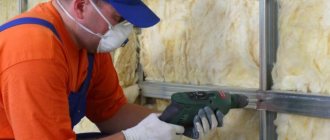
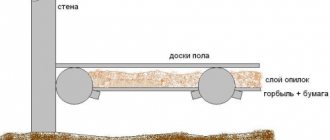
One of the most important stages in the construction of any building is thermal insulation, so the choice of material is very important. It should provide comfort in the home, be safe and energy efficient. The process of insulating walls with penoplex is simple, so you can do it yourself.
How to insulate a facade, popular technologies
To insulate a house, you can use the “wet facade” technology. It bears this name because during the work process liquid construction compounds are used that require drying.
How insulation is performed:
- Cleaning and surface preparation.
- Applying an adhesive layer (maximum 3 cm).
- Installation of thermal insulation.
- Applying a second adhesive layer.
- Installation of reinforcing mesh.
- Applying plaster.
- Padding.
- Painting.
Another popular technology is the ventilated facade. Its peculiarity is that work is carried out much faster than with previous technology. This is due to the fact that installation does not involve the use of so-called “wet” compounds, between the application of which a certain time must pass. When choosing a ventilated facade, you can begin subsequent installation stages immediately after completing the previous one.
For fastening, not glue is used, but disc-shaped dowels and anchors. This technology is durable and has good resistance to external influences. You can choose any materials for exterior finishing.
Required materials
To insulate the outside of a house with penoplex, you need to select the necessary consumables. In this case, the work will go smoothly. For insulation you need:
- Penoplex boards. Their number is calculated depending on the area of the base, as well as adding a 10% margin for cutting.
- Primer liquid. It improves the adhesion of sheets to the base. The type of substance depends on the material used to make the walls: for brick surfaces , plastered surfaces made of gas silicate blocks, a deep penetration primer (300 ml/sq.m.) is suitable, and for concrete surfaces, Concrete Contact containing quartz sand (400 ml/sq.m.).
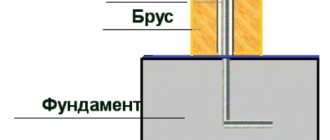
- To insulate external walls with penoplex, a starting profile is required. It is needed for proper fastening of the first row of slabs. The element is installed around the perimeter of the entire building. Included with it are spacer washers that allow you to correct minor unevenness in the base. The number of profiles is calculated depending on the length of the walls, and fasteners - 1-2 per joint. To fasten the supporting elements, dowels are used, the distance between which is 30 cm.
- To insulate walls with extruded polystyrene foam, you need special glue. The average material consumption at the first stage is 5 kg/sq.m. An additional layer will be required to secure the layer of reinforcing mesh. In general, it will take up to 10 kg/sq.m. material.
- Dowels are “fungi”. They can be hammered or screwed. It is better to choose products with a thermal head or a plastic expansion nail. For each square meter of area you will need 6 elements.
- Reinforcing mesh. It is better to purchase fiberglass-based material. For finishing you will need up to 1.1 sq.m/sq.m.
For the decorative plaster layer, materials with different textures are used, so the consumption is calculated after external insulation.
Installation features
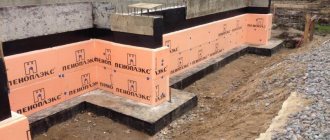
In this article we will tell you how to insulate a house made of aerated concrete on your own. Penoplex insulation 50 mm thick will help eliminate cold bridges, prevent the appearance of dampness and mold in the room, create a comfortable microclimate and save on heating costs in the winter.
1
2
3
1 – Penoplex boards are fastened using Penoplex Fastfix adhesive foam. It is specially designed for such work. In addition, it has low expansion.
2 – You will also need umbrellas or strong ones. Everyone calls them differently. You can see what they look like in the photo below.
3 – Mechanical fixation of the insulation is carried out using black self-tapping screws 120.
Why is external insulation better?
It is necessary to take care of a good layer of walls at the design stage of the building. By insulating a house from the inside, the dew point moves inward. This causes fogging of the walls, high humidity and the occurrence of mold, which means the loss of their thermal insulation properties due to the wetting of the insulation.
Return to content
Preparatory work
Installation work begins with preparation:
- Inspect the entire house, check for unevenness and protruding elements. Remove all excess using a spatula and a hammer, so that later during the work it does not cause unnecessary trouble.
- Wash the walls of the house using a hose or Karcher. This will help remove dust and dirt from the surface.
- If the walls of the house are made of reinforced concrete, then treat them on the surface with a primer. Plaster is applied to the brickwork to level the surface as much as possible and eliminate air gaps that may form when laying insulation. Penoplex slabs can only be mounted on a flat and durable surface. This will guarantee the durability of such insulation. For example, if the wall was previously plastered and painted on top, then you should get rid of the paint and check the plaster layer everywhere for evenness.
- Prime the plaster after drying. This allows you to strengthen its surface and improve adhesion with the adhesive used to fix the insulation to the wall. Thanks to this, the plaster will not crumble as the load from the applied materials increases.
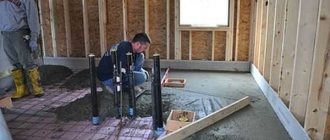
- Draw a line using a laser level, since thermal insulation of the walls will not insulate the foundation. This will happen separately, together with the blind area. Back off 10 cm to cover the seam later.
- Use a coated thread to mark the starting line. Before insulating the wall, you should install embedded parts and fasteners, with the help of which the drainage system, external lamps, antenna and other accessories placed on the facade of the building will be fixed in the future. If the fastener passes through the insulation and is located within its thickness, then it is worth treating it with a protective compound. For example, any paint for exterior use, but not oil-based, is suitable.
- Along the coated line below, where the installation of insulation will begin, mount the starting profile. It must be made of stainless steel. It is fixed to brickwork or a concrete wall using self-tapping screws and dowels. First, their locations are marked, holes are drilled according to the markings, where fasteners are then inserted. The starting profile will be a reliable support for the first row of insulation boards.
It allows you to align them horizontally. Plus, this is additional protection for the lower part of the thermal insulation from moisture, mechanical damage and rodent pests. The starting profile clamps are fixed at a distance of 30-50 cm from each other. At the point of contact with the wall, the elements must fit tightly together. If a gap has formed, it should be eliminated using spacers. A gap of 3 mm is left horizontally between the individual profiles and a special fastening is installed.
It is important to know!
The level of placement of the lower part of the insulation is set 20-30 cm higher than the floors inside the house. This allows you to improve the thermal protection of rooms and avoid dampness. It should also be ensured that the width of the stainless steel profile is equal to the thickness of the foam board.
Characteristics
- has a small weight,
- standard overall dimensions,
- quickly installed,
- environmentally friendly,
- has high resistance to mechanical stress,
- service life more than 50 years.
To fasten the sheets, you can use foam adhesive, mortar or special-purpose plastic dowels. It will be very convenient to lay thermal insulation with locking grooves that do not create seams.
Proper wall insulation with Penoplex and the technology for carrying out the work will help determine the types of materials, taking into account their compatibility, quality and price. Since installation work using expanded polystyrene is most often carried out outside, the moment of selecting everything necessary is very important for the long service of the entire insulating layer.
Installation of insulation using “wet technology”
Step by step steps:
- Installation of penoplex outside the house should begin from its corners. But in the locations of door or window openings, they start from them, first filling the opening around the perimeter. Of course, some of the insulation boards will have to be cut to give the desired shape. But this is not difficult to do with a hacksaw or even a regular saw.
- Lightly moisten the area on the wall for better adhesion. Along the marked line, proceed with the installation of heat-insulating boards, fixing them with adhesive foam. Gluing will take no more than 3 minutes. There are types of adhesives that can only be applied to a dry surface, this is indicated on the packaging. In this case, you need to wait until the wall surface is completely dry.
The adhesives are mixed according to the instructions on the pack. If a dry mixture is used, then it is diluted with water and stirred for 5 minutes, then set aside for another 10 minutes and thoroughly stirred again until a homogeneous consistency is obtained. You can use this glue for 2 hours, after which the composition loses the necessary characteristics. The glue is applied along the perimeter of the slabs in a strip of 10 cm. The thickness of the adhesive layer should not exceed 2.5 cm. The area of the foam sheet is filled with glue by 40%.
- Perform mechanical fixation with 5 fasteners. It is advisable to do this 2-3 days after gluing the slabs. This will ensure a tight fit of the slab and will not disturb the plane. The second row of insulation is placed offset by half the slab. So the seams will not match vertically. This not only improves thermal insulation parameters, but also increases the strength of the wall finish.
- Apply a second layer of glue - more than 0.2 cm thick. It will fix the reinforcing mesh. It is necessary to improve the adhesion of the plaster to the surface of the insulation. Additionally, the mesh is secured using staples with a stapler or small self-tapping screws. The strips of reinforcing mesh have dimensions of 30x100 cm. They begin to be fixed from corners and slopes. Adjacent strips are laid overlapping, 10 cm wide. On the sides, the mesh is fixed with metal corners, which are attached to self-tapping screws.
- Perform plastering. It is important that the reinforcing mesh is completely covered with plaster and does not protrude from it anywhere. After hardening, the top plaster is primed and painted in the desired color.
- Close all walls in the same way.
Work can also be carried out during light rain. This is only to your advantage, because... The adhesive foam will be moistened naturally, which will ensure better adhesion. Penoplex itself is not afraid of moisture, as it has zero water absorption. At the same time, it is characterized by low thermal conductivity and high strength; during work, you can safely rest a ladder on it. The insulation has a long service life, is environmentally friendly and easy to install.
It is important to know!
Insulation scraps can also be used, but it is better when they are large solid slabs. Very often, cuttings are placed in places where there are fastenings on the façade for the drainage system, external lamps or CCTV cameras. But keep in mind that insulation boards less than 20 cm wide cannot be laid at the corners of walls. This will reduce the level of thermal insulation and can lead to the formation of “cold bridges”.
Preparing the wall surface
Before installing the insulation, prepare the materials and wall surface. For reliable fixation, choose an adhesive composition. It's better to take foam glue.
Surface preparation
You will also need:
- Adhesive composition for plastering.
- Set of corners.
- Decorative plaster.
- Primer with adhesive properties.
- Facade paint.
- Deep penetration primer.
When the materials are ready, start working on the walls:
- Remove decorative and functional elements from the surface that will interfere with the finishing: antennas, visors and other parts.
- Inspect surfaces for defects. If you find them, eliminate them. These include brittle or peeling plaster.
- Wipe the facade with a damp cloth or get rid of dust in another way.
- Cover the walls with a deep penetration primer. Use a brush or paint roller.
The primer should be applied in an even, thin layer. When it dries, reapply.
Marking the zero line and setting the starting profile
Installation of the starting profile requires care. It is needed for:
- The correct direction of the initial row of slabs.
- Performs a supporting function.
- Protects the lower part of the slab from various influences (loads, damage due to animals and insects, moisture). In this area, the slabs are not protected by plaster.
The width of the profile should be equal to the thickness of the sheets. You should not use a wider or narrower profile.
To prevent excessive dampness in the rooms, it is required that the insulation be attached 20-30 centimeters below the ground floor floor. This place is vulnerable because the cold penetrates through it.
Marking must be carried out with maximum accuracy. Even minimal errors will lead to a cascading increase in the size of the error. And on the upper tiers of penoplex sheets, cracks will form that will interfere with the performance of the thermal insulation function.
The starting profile is attached with dowels. The distance between fasteners is 30-50 cm. However, if the insulating layer is thick, a minimum step must be ensured. The length of the dowel is taken depending on the walls:
- Concrete walls or solid brick - 40 millimeters.
- Hollow brick - from 60 mm.
- Gas silicate blocks – 100 mm.
In the areas of contact, it is necessary to ensure good fastening, but without deformation of the metal. For minimal gaps, it is advisable to install shim washers.
Adjacent profiles are installed end-to-end or with a small gap. Overlapping is prohibited. To combine them into a single network, you need special fasteners, sold in hardware stores. You need to choose elements with a width of 40 or 60 millimeters. If the width of the heat insulator is large, use several inserts.
Corners are attached at the corners. If you can’t find them, you can cut part of the profile at an angle of 45 degrees, then join. A corner connecting element is attached at the connection point.
When installing wide sheets of penoplex, temporary supports are attached, which are mounted to install the first row of sheets. This is necessary to prevent sagging.
Adhesive for penoplex
Preparation and cutting of foam boards
Before starting work, it is necessary to measure and adjust the insulation sheets. There are no problems with this on straight sections of walls. However, there are difficulties at corners and near windows.
During installation, the slabs are installed one by one, like bricks. The joints should not match. Retreat at least 20 centimeters on each row.
In the corner areas where the slabs will be joined, place them in the form of a toothed lock. For this purpose, they are installed alternately. Part of the slab extends outward to a width slightly greater than the thickness of the sheet. After finishing the work, the penoplex is trimmed. The width of the fragment in contact with the corner must exceed 20 cm.
It is most difficult to install slabs around windows and doors. They need to be installed so that the seams are not located along the continuation line of the opening. If you use this method for new buildings, cracks will appear as they shrink. To avoid this, L-shaped sheets are required. The width of each part must exceed 200 mm.
When cutting sheets, provide an allowance inward for joining with the slope insulation. When there is an expansion joint or joint between plates, position the sheets so that the joint does not coincide with the problem area.
The slabs are cut with a hacksaw or cutter. If you need to adjust them while working, use a sharp knife. Before installation, sand them to improve their fastening properties.
Preparation of adhesive composition and installation of insulation boards
After preparation and fitting, prepare the glue. Mix the adhesive powder with water, stir until a homogeneous consistency is obtained. You need to stir for 5 minutes, then leave for a few minutes and repeat stirring.
Penoplex installation
The adhesive composition will not lose its properties at normal temperatures (about 20 degrees) for two hours. Its consumption is high, so it will not have time to harden. However, it is not advisable to cook excessive quantities. If the composition begins to harden, we do not recommend using it.
Apply glue to the slabs with a spatula, following the recommendations:
- Stripes no narrower than 10 cm are applied along the perimeter.
- There are small slides in the center.
- The thickness of the adhesive is no more than 25mm.
- When installing the slab on a corner, do not apply glue to the protruding part.
- If the wall is smooth, you can apply glue with a spatula over the entire area. The thickness should not exceed 10 mm.
Technology of wall insulation with penoplex:
- The first row of slabs is attached to the profile. The edge of the sheet must be attached to the limiting board of the profile. If there is a gap, increase the amount of glue.
- Press all sheets tightly to the surface of a brick or wooden wall. Afterwards you can align it in both planes with a clamp.
- Remove any protruding glue. It is prohibited to leave them between the slabs. This will lead to the appearance of blowouts.
- When attaching the next slab, align the joining slats. If they had to be cut off during cutting, you need to achieve a minimum gap.
- All insulation sheets must be installed in the same plane. The correctness of their fastening is checked using a rule with a plumb line or a laser level. Defects can be corrected while the glue is still wet by tapping it with a polyurethane float.
After finishing fixing the slabs, you need to wait at least 72 hours until they are completely dry. Then you can secure the slabs with mushroom dowels. They are placed in the center and corners of the sheet. The dowel head should secure adjacent sheets.
This method ensures less dowel consumption and reliable fastening.
- A drill of the required diameter and length is attached to the drill. The perforation depth limiter is adjusted. The working length of the drill is equal to the dimensions of the dowel, to which 15 millimeters are added.
- In places with markings, carefully drill holes through the foam and sheets and insert the dowel spacer, press until the cap comes into contact with the insulation.
- Screw in the core or drive it in with a hammer. To prevent rusting, the holes are covered with a cap. If it is missing, it is fixed with polyurethane foam.
If there are gaps or holes between the slabs, it is worth sealing them with scraps of material. Perform final sealing with polyurethane foam. There is a composition of the same name, which is adapted for fastening foam boards.
Reinforcing network
If plastering is not planned, materials are installed for temporary protection from precipitation and ultraviolet radiation. It is better to plaster the surface immediately.
Creation of a reinforced protective layer
The finished layer of penoplex must be plastered after installation. This is necessary for maximum fixation. The best material is fiberglass mesh with a density of 140 to 160 grams per meter.
For installation, you can use the adhesive composition used for installing the heat insulation sheets. It has a high grip relative to penoplex. Dilute the composition in the same ratios.
Fastening the mesh begins with difficult areas - corners, slopes. For them, strips of 30x100 cm are cut, which are folded along the entire length to obtain an L-shape. You can buy corners.
For fastening, apply an adhesive solution up to 2 mm thick and 10 cm wide to both surfaces. Then the corner is installed and leveled. The plates are pressed with a spatula onto the glue.
After securing the corners, you can proceed to installing the strips on flat parts of the surface. To do this, cut into even sections, no more than 100 cm in length. Then they are attached to the surface in one of the following ways:
- The network is attached to the top point with a solution, then an adhesive is added with a spatula. Presses down to get under the net. The thickness of the composition must be at least 2mm.
- An alternative method is to pre-apply the solution, spreading it with a notched trowel with a small comb. Afterwards, the mesh is attached to the wall and embedded with a wide spatula.
Plastering
Work begins from the corners. Adjacent strips are laid overlapping, with a width of at least 100 mm.
After the solution has set, rub the surfaces. Using a grater with sandpaper. There is no need to press hard.
After preparation, you can apply a leveling layer of the adhesive composition that was used previously. The next layer is applied with force. Use a rule or a wide spatula and gradually add the solution. It is necessary to ensure a layer thickness of at least 4 mm. If the facade is to be painted, increase the thickness of the solution to 5mm. In the area of the base it should be more than 7mm.
After the composition has set, a final grout is needed. This must be done before it completely hardens. Otherwise you won't get a smooth surface.
Decorative finishing
After plastering - decorative finishing. The work is carried out according to the following scheme:
- Treatment of the facade with a primer.
- Application of decorative plaster. The layer should be thin and uniform.
- Pre-grouting when the plaster layer begins to harden. To do this, use a plaster grinder.
- Painting the walls after the plaster layer has dried. Produced with a paint roller. When dry, reapply paint.
Installation of insulation using “ventilated facade” technology
The ventilated facade is a lattice structure, which is lined with slab or panel materials. The peculiarity of this finish is the presence of a gap between the finish and the wall. It is necessary for air circulation and free removal of moisture from the wall surface.
The insulation of a ventilated facade with penoplex differs slightly in technology and is carried out in several successive stages:
- Preparing the walls. If necessary, putty for leveling. Cracks and chips are repaired. The top is treated with a primer.
- Drawing vertical lines under straight hangers. Marking the horizontal position of the profile.
- Installation of stainless steel profiles. This structure will serve to accommodate the facing material. It is important that the distance between the frame and the wall is 5-7 cm greater than the thickness of the insulation boards. This space will become a ventilated gap.
- Penoplex boards are laid on a layer of glue. Additionally, they are fixed to the wall with disc-shaped dowels - 5 pieces each. for 1 plate. When installing in penoplex, slots are made for fastening the profile. They will need to be sealed with foam sealant after laying the slabs.
- A layer of waterproofing is laid on top of the insulation. Its role is played by a windproof membrane made of multilayer insulating materials. It is attached to the insulation using a stapler and staples. At the joints of the canvas, an overlap of 10-15 cm is made.
- The frame of the profile system is assembled and the facing material is installed on it. These can be decorative wood panels, aluminum or steel cassettes, porcelain stoneware.
Curtain facade
Insulation of the walls of a house can be done in the form of a curtain wall. First you need to prepare the base. All areas with crumbling finishing material are cleaned. The destroyed brickwork is being restored. Since the panels can be installed correctly only after marking, maximum attention is paid to this process. The distance between the brackets is taken into account: 40-60 cm horizontally and 80-140 cm vertically.
Frame installation and wall insulation
Before attaching the penoplex to the wall, you need to mount the sheathing. It is fixed with screws on the base. However, it is worth remembering that if the masonry was carried out with hollow bricks, then holes for fasteners should not be drilled using a hammer drill. After installation, the brackets need to be aligned so that they are in the same plane.
Next, you can insulate the base, but do not forget about waterproofing. Penoplex boards are attached with glue and additionally secured with dowels. They need to be laid from bottom to top in two layers with bandaging of the seams. A waterproofing film is attached over the material.
Finishing
Decorative panels imitating wood, porcelain stoneware, and brick are used as finishing materials. Natural stone is often used for cladding.
How to determine the thickness of insulation
To calculate the thickness of the thermal insulation material, you can use special online calculators.
In this case it will be necessary to take into account:
- thickness of external walls;
- the degree of their thermal resistance;
- climatic features in the region;
- seasonal temperature;
- thermal conductivity of insulation.
It is important to know!
The resulting value will only be an approximate value. For an accurate calculation, it is recommended to contact specialists.
Dimensions and weight, quantity calculation
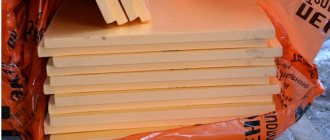
Penoflex thermal insulation boards can be of different thicknesses, so the packaging can have different sizes and contain a different number of sheets. It is also necessary to take into account that the dimensions of the slabs are indicated without taking into account the tenons/locks.
| Name and thickness | Dimensions (L/W) | Amount in a package | Insulation area per package | Packaging volume |
| Comfort 20 mm | 585*1185 mm | 18 pcs | 12.48 m2 | 0.273 m3 |
| Comfort 30 mm | 585*1185 mm | 12 pcs | 8.32 m2 | 0.2704 m3 |
| Comfort 40 mm | 585*1185 mm | 9 pcs | 6.24 m2 | 0.2493 m3 |
| Comfort 50 mm | 585*1185 mm | 7 pcs | 7.69 m2 | 0.2429 m3 |
| Comfort 100 mm | 585*1185 mm | 4 things | 2.77 m2 | 0.2772 m3 |
| Foundation 50 mm | 585*1185 mm | 7 pcs | 7.69 m2 | 0.2429 m3 |
| Foundation 100 mm | 585*1185 mm | 4 things | 2.77 m2 | 0.2772 m3 |
| Pitched roof 100 mm | 585*1185 mm | 4 things | 2.77 m2 | 0.2772 m3 |
| Wall 50 mm | 585*1185 mm | 8 pcs | 5.55 m2 | 0.2776 m3 |
There are two methods for calculating the number of packages: using the volume or area of the package:
- You know the insulated area, find the area of the insulation of the required thickness in the package and divide the insulated area by this value. For example, you need to insulate 15 squares; you will use slabs 40 mm thick. The insulation area in the package is 6.24 m². We count: 15/6.24 = 2.4 packs.
- To calculate by volume, multiply the insulated area by the thickness to obtain the required volume. Next, by analogy with the example above, we divide the found figure by the volume of one package. We get the number of packages of insulation. Let's calculate for the same case: 15 m² * 0.04 m = 0.6 m³. According to the table, one package of this material has a volume of 0.2493 m³. we find the number of packages: 0.6/0.2493 = 2.4 packages.
Penoplex for blind areas around the house and insulation of the basement is an excellent choice
If the number of packages is not whole (most likely this will be the case), some surplus will be created. If the surplus turns out to be large (as in the example - more than half of the slabs turn out to be unnecessary) and you have nowhere to use it, check to see if the seller sells incomplete packages. In this case, the calculation will be a little more complicated. You should estimate how many slabs you need in addition to the whole packages. For this:
- Find the area covered by entire packages. For example, this is: 2 packs * 6.24 m² = 12.48 m².
- Since we need to insulate 15 squares, we subtract the found one from this figure: 15 m² - 12.48 m² = 2.52 m². This is the area for which additional slabs should be purchased.
- The area of one Penoflex thermal insulation board is 0.6932 m². If we divide the remainder by this figure, we get the required number of additional insulation sheets: 2.52 m² / 0.6932 m² = 3.63 pcs. It turns out that we will need 4 slabs in addition to the two packages.
In a package, depending on the thickness, from 4 to 18 pieces
With such an accurate calculation, it is better to take a small supply - one or two slabs. In case there was a mistake somewhere in measurements or calculations, somewhere the edges became wrinkled and other unforeseen cases.
Recommendations for insulating walls made of various materials
Rules for insulating concrete walls:
- before proceeding with the installation of thermal insulation, you need to treat the surface with antiseptic compounds;
- You cannot lay insulation in a specific area, this must be done over the entire area of the building;
- concrete is not resistant to moisture, so the installation of a waterproofing membrane is necessary.
Rules for insulating a wooden house:
It is important to know!
The most important rule for thermal insulation of a building made of any material is compliance with the stages and installation technology. The work is quite difficult, so it is better to entrust this task to professionals.
As it became clear, there are many types of insulation for facades. Penoplex is considered one of the most modern and effective. It has impressive performance characteristics and a long service life. However, it is important to consider that this can only be achieved if the installation work is carried out in accordance with all rules, regulations and requirements.
How to choose penoplex?
Before insulating with penoplex, you should choose the right material. The following characteristics are taken into account:
- density and thickness of the product (to insulate a wooden house from the outside with penoplex, sheets with an index of PBS-15 are required, for a concrete house - PBS-25);
- weight and dimensions of sheets;
- coefficient of moisture absorption, thermal conductivity, compressive strength;
- climate zone;
- cost of the material ( prices depend on the manufacturing company, technical parameters ).
The manufacturer is also an important criterion for choosing penoplex. It is better to give preference to those companies that have earned positive user reviews and a good reputation.
Pros and cons of penoplex
Penoplex is high-quality foamed polystyrene. Manufactured using extrusion technology. The material was developed more than 50 years ago in an American laboratory. Penoplex is sold in a special packaging film. This is necessary to protect it from ultraviolet rays, since it is not resistant to them. Thanks to this, the insulation can be stored outdoors. However, if possible, it should be additionally protected from the sun to reduce the risk of sun exposure. Under the influence of rays, the integrity of the top layer of the heat insulator can be damaged.
The advantages include:
- Low thermal conductivity. This makes it possible to insulate the façade walls with penoplex foam with a minimum layer thickness. In this case, the thermal insulation will be high.
- Good resistance to moisture. Thanks to this, the insulation does not deteriorate under the influence of precipitation and condensation.
- High strength. Insulation of the facade with penoplex under plaster and any other cladding is not subject to mechanical damage.
- Long service life. If the thermal insulation layer is installed correctly, the operational period will be at least 50 years. To do this, it is better to entrust the insulation of the facade to specialists, and not to do it yourself in the absence of experience.
- Environmental Safety. The insulation is absolutely safe for human health, so it can also be used for internal insulation, including in educational and medical institutions.
- Resistance to chemical environments . Low probability of mold and mildew.
- High speed and ease of installation work.
- Non-flammability.
The disadvantages include:
- If a fire occurs, the material does not ignite, but melts;
- Rodents love to spoil Penoplex;
- When exposed to ultraviolet rays, it loses its performance characteristics, therefore, during installation in sunny weather, additional protection of the walls is required;
- High price.
The advantages of thermal insulation material are much greater. They cover all the shortcomings. For example, the high cost of insulating a façade with Penoplex will pay off due to its long service life.
What is important to know about Penoplex
To choose the right insulation for walls, you need to consider the properties, advantages and disadvantages of the materials offered on the market. Penoplex is extruded polystyrene foam with high density and strength. During production, the initial granular raw material is melted and mixed with gasifiers. Next, the foamed mass is pressed through the nozzles of the extruder and hardens, turning into a long white tape of a given thickness.
After this, the material is cut into standard size pieces. As a result of a chemical reaction, air bubbles isolated from each other are formed inside the sheets. The material is used to insulate floors, walls, and ceilings. It has the following advantages:
- low thermal conductivity coefficient;
- resistance to moisture (its absorption is only 0.5% of the total volume);
- high level of mechanical strength (the product does not deform over time);
- simplicity of installation work and low cost;
- the ability to provide good insulating properties with minimal material thickness;
- fire resistance;
- long service life;
- no need to use expensive or bulky installation equipment;
- resistance to rotting, development of fungal pathologies and mold.
There are no restrictions for insulating the outside of a house with penoplex. It is even allowed to be installed in rooms characterized by high humidity. However, the product has disadvantages: it does not burn, but melts, emitting toxic smoke.
The slabs do not allow steam to pass through, so the insulation is suitable for finishing a brick house, and not a wooden one (from the inside) or a frame one. Moreover, it can be installed both under plaster and under siding.
Varieties of Penoplex for insulation
There are several types of penoplex for insulating facades. They differ in flammability class and strength. Each type is intended for thermal insulation of various objects.
Main line:
- Penoplex “Facade”
Designed for thermal insulation of internal and external enclosing structures, that is, walls, partitions and facade systems. It is a slab with a milled surface. Thanks to this characteristic, insulating the facade of a house with Penoplex under plaster has better adhesion with glue and cladding, which reduces the time required for the work. - “Base”
It is considered a universal material. Used for thermal insulation of floors, walls, roofs that will experience high loads. Penoplex "Osnova" is used in industrial and civil construction. - “Wall”
is an analogue of Penoplex “Facade”. However, this variety does not have a milled surface. Used to insulate external and internal enclosing structures (walls, partitions, facade systems). - “Comfort”
is the most popular thermal insulation material in private housing construction. It is used for insulation of country houses and city apartments. The material is used for walls, extensions, loggias, balconies.
It is important to know!
There are also other types of insulation, but they are not intended for facades: Penoplex “Foundation”, “Roof”, “45” (for road construction), “Pitched Roof”, “Geo”.
Characteristics, advantages and disadvantages of the material
Penoplex has become increasingly used in building cladding. Mainly due to production technology and a number of properties. This is a budget, synthetic material with high thermal insulation characteristics. Installation requires less effort than when installing glass wool or other bulky materials.
Material sorting
Available in standard sizes. Sheet length is 120 cm, width 60. In this case, the thickness varies depending on the properties of the sheet and the manufacturer. It can be up to 10 centimeters.
Penoplex has the following characteristics:
- Heat conductivity according to GOST 0.03 W/m*S.
- Moisture permeability is not higher than 0.008 mg/m*hour.
- Absorbs sounds up to 41dB.
- Density 28-45 kilograms/cubic meter.
- The maximum pressure level between the plates is up to 0.18 MPa.
- The characteristics of the coating are maintained at temperatures from -100 to +55 degrees Celsius.
Advantages of the material:
- Penoplex has the best thermal insulation characteristics among analogues.
- High degree of protection against condensation due to its unusual structure.
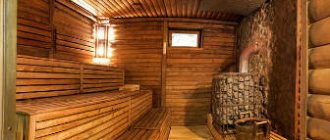
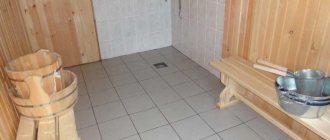
- Good level of moisture protection. This makes it possible to use the material for baths and saunas.
- High mechanical strength. Withstands significant compressive and tensile loads.
- Sound insulates well.
- During production it is treated with solutions that protect against ignition.
- Due to its light weight, you can mount it on the wall alone.
- Protected against the formation of fungal colonies.
- The service life reaches 50 years while maintaining the characteristics.
Disadvantages include:
- At high temperatures, foam sheets begin to melt, releasing toxic smoke.
- The coating cannot be left in the sun - its properties are lost.
- When treated with solvents it is destroyed.
- There are several classes of penoplex, which differ in price.
- Low vapor permeability, which prevents its use for insulating frame structures.
Penoplex for insulation
Expert advice
Trimming standard size insulation boards results in the need to remove the connecting ends. Because of this, gaps and cracks may appear at the joints. In the future, they will become “cold bridges”, increasing the level of heat loss from the wall. To avoid this, such joints are “blown in” with a foam type sealant. It resembles polyurethane foam, but at the same time has even higher performance characteristics - it is not afraid of moisture, temperature changes, exposure to sunlight or freezing. It is important that it does not expand in air.
When fixing penoplex with an adhesive composition, only 1 fastening in the form of a disc-shaped dowel can be used for each of the plates. But this approach is usually chosen only when insulating one-story buildings with concrete walls. They are less susceptible to wind loads. To ensure reliable fixation of the insulation board, the fastening must go into the concrete wall by at least 40-50 mm. This number must be added to the thickness of the selected foam when purchasing fasteners.
If the facade of the house, after insulation with penoplex, is planned to be covered with siding, then a sheathing made of metal or wood should be mounted on top of the insulation. It is attached to the penoplex itself with long screws or dowels. Of course, the insulation board must be fixed not only with adhesive, but also with fasteners with a disc head. This will reduce the risk of the thermal insulation collapsing when installing the sheathing and avoid tearing off the facing material during strong gusts of wind. There remains a ventilated gap of 2-3 cm wide between the siding and the penoplex. But there is no need to use a vapor barrier with such cladding.
Which insulation method to choose
When building housing, especially in the northern regions, it is necessary to insulate the walls. There are two ways: external and internal. Each has its own advantages.
More often, houses are insulated from the outside. Advantages:
- An additional layer of thermal insulation protects the wall from environmental factors. In this case, the base is not subject to erosion due to wind or erosion by precipitation.
- Living space is preserved. This is important for small buildings. When covering all the walls, a large area is taken away.
- No steam on the walls. Residential buildings generate large amounts of condensate. Penetrating through the outer layers of finishing, it lingers on the heat insulator and spoils it.
- When the walls are insulated from the outside, heat is better retained inside the room.
During work, it is necessary to choose a time so that there are no showers or frosts. This is the only drawback of the method.
If you choose internal insulation, the area will be reduced. There are other characteristics and features that need to be taken into account:
- There is a high probability of condensation forming indoors. Therefore, you will have to additionally install a vapor barrier layer and leave a gap for liquid movement.
- The surface of the walls from the outside is exposed to environmental factors that cause its deterioration.
Therefore, the optimal method of insulation is to install a heat insulator outside. However, there are situations where this is not possible. For example, if the house is made of carved timber or has complex decor, which is undesirable to hide under sheet material. The only way out is insulation with penoplex from the inside.
Insulation pie
When is insulation of wooden houses required?
Wood is a building material that retains heat with good thermal conductivity. If the construction technology of a log house is violated, living in it becomes less comfortable.
There are several reasons for heat loss in a wooden house:
- insufficient thickness of lumber;
- incorrect choice of method for angular connection of parts;
- insufficient sealing of windows and discrepancy between the number of cameras and the climatic conditions in the region;
- gaps between the crowns that appeared as a result of shrinkage of the log house;
- blowing due to old caulk.
A few words about extruded polystyrene foam
Before we begin the technology of external insulation of a house, let’s consider what penoplex is. I’ll say right away that it is more correct to call this material extruded polystyrene foam, since “Penoplex” is the name of the manufacturing company of this insulation.
Extruded polystyrene foam is made from ordinary polystyrene foam (foam plastic). As a result of special heat treatment, it acquires higher properties, and along with them, properties that affect the installation technology and the area of application of the material.
These properties primarily include:
- low level of moisture absorption;
- smooth structure.
Penoplex has a smooth structure
On the one hand, this allows the material to be used in unfavorable operating conditions; in particular, it can be used for façade insulation. But, on the other hand, penoplex has poor adhesion. Therefore, it is not even a façade material, much less intended for “wet” finishing.
The most common mistake made by beginners is that when insulating a facade, they work with penoplex in the same way as with ordinary polystyrene foam. Some construction resources “help” with this, for which would-be specialists write articles. The result of this approach is clearly visible in the photo below.
The photo shows the result of improper reinforcement of penoplex
However, this does not mean that insulating the facade using the “wet” method using penoplex will have to be abandoned. The technology that I will discuss below will allow you to create a reliable and durable finish on top of this insulation.
Beginners probably have a question: why use penoplex if it can be replaced with polystyrene foam, which is cheaper and has good adhesion?
The fact is that extruded polystyrene foam has several important advantages over polystyrene foam:
- has higher strength, and accordingly, the façade finish is more durable;
- is a vapor-permeable material;
- thermal conductivity is lower than that of foam.
Therefore, it makes sense to use penoplex for “wet” finishing of the facade. As for the “dry” insulation, which is used for a suspended facade, this procedure practically does not contain any special features.
Below I will tell you in detail how to insulate external walls with penoplex using both methods.
An example of finishing a house using the “wet facade” technology
How to comply in practice
To properly insulate a wooden house from the outside, you need to take into account several nuances.
If a frame house is to be thermally insulated, it is important that the wood is well dried in special chambers, otherwise damp wood can lead to the formation of mold.
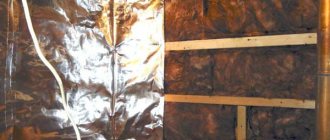
Let's see if there is ventilation in the timber structure. Air does not pass through foamed polystyrene boards because penoplex has low vapor permeability. Water vapor tends to escape through the joints between the slabs, which are covered with polyurethane foam. Vapors pass through it, accumulating condensate in these areas. Every day the amount of accumulated moisture increases. Insulated walls become covered with fungus.
To prevent the formation of condensation in a wooden house, you need to ensure good ventilation. Fanned walls and insulation will remove excess moisture. Optimal ventilation can be ensured by creating a ventilation gap between the wooden wall and the thermal insulation. But in this case, creating a gap between the wall and extruded polystyrene foam is prohibited, because wood is a flammable material, and in the vicinity of extruded polystyrene foam the risk of fire increases.
If you eliminate the gap between the penoplex and the wall and tightly glue the insulation to it, then after a while black mold will form under the thermal insulation, a damp smell will appear, and the wooden house may begin to collapse. In addition, it is impossible to ensure a tight fit of the material to the logs due to the structural features of the crowns.