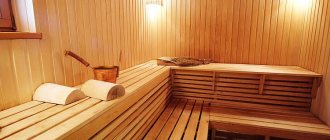
Steaming in a bathhouse is an original Russian tradition. But in order for the steam room to be truly cozy, and to spend time in it pleasant and comfortable, it is necessary not only to build it correctly, but also to protect it from heat leakage, moisture, wind, and cold air. Traditionally, the bathhouse was insulated with caulk, but nowadays this outdated method of insulation is used less and less. Today, many people prefer modern technologies for sealing wooden houses using special sealants. However, a bathhouse is a room with a special microclimate, and not every product can be used in extreme temperatures. In this review we will talk about how to choose a sealant for a bathhouse and how to apply it.
What is the best way to seal the cracks between logs: caulk or sealant (installation secrets)
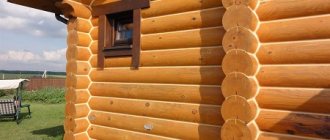
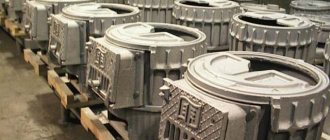
After the construction of log houses, it is necessary to seal the gaps between the logs.
Previously, they used moss, then tow, flax wool and jute. You need to be able to work with moss and know how to do everything correctly. Not everyone has knowledge of the old masters. Therefore, jute fabric, tow, linen batting and more modern insulation - acrylic-based polymer sealant - are more often used.
Today we will compare sealant and caulk. Which is better, more durable and more effective?
Rules of application
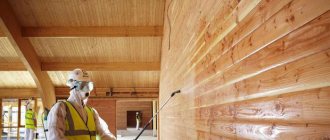
Modern building materials are easy to use and can be handled without any experience. The work is carried out in the warm season, when there is no precipitation.
- To seal the joints of logs in wooden log houses, the surface is first cleaned of dirt.
- Next, you need to look at the condition of the wood. If the material has been treated with impregnations or dirt has become embedded in the top layer, it can be removed using any abrasive method.
- The logs are treated with a fungicidal solution to prevent rotting.
- Slots with a diameter of more than 0.5 cm are paved with polystyrene foam. It will protect against moisture getting inside the crack.
- If the mixture is in a tube, then it is filled into the mounting gun. The compositions in large packages are drawn into a gun, like a syringe, and squeezed out in an even layer onto joints or cracks.
- Then the seam is leveled with an elongated thin spatula.
- While the sealant has not set, remove excess with a clean cloth.
- Leave to dry completely for 2-3 days.
Caulk
This is the first thing that comes to mind for sealing seams between logs. If we compare jute and linen, the first is better, but also more expensive. There are also mixed materials.
Moss is considered the best material. Wood under moss does not rot and mold does not form. This is very good material. But there are some difficulties: it is difficult to find in the quantity needed. You need to know how to caulk and prepare moss.
After the structure shrinks, caulk is made from the log. The insulation gets stuck in the cracks. Several years pass and the question arises again of caulking the cracks between the logs, and then again and again. This is a big minus.
You need to start caulking from the bottom crown along the perimeter on both sides (outside and inside). This must be done evenly.
The caulk must be driven in so that it forms a roller. The quality of the caulk is determined by the density of the roller.
Traditional methods of sealing cracks
There are many “old-fashioned” methods of solving this issue that have been proven over the years.
In some cases, they are more effective than the use of modern means. Using the cord . Using a cord selected according to the width of the hole, you can seal cracks not only in the floor, but also on the walls. The cord will close the gap and eliminate the unpleasant creaking of the boards.
To carry out repairs, you will need to prepare a cord, rope or twine, putty, wood glue or PVA, and sawdust from any material. Work process:
- Cover the cord completely with glue.
- Make a mixture from sawdust, putty and glue.
- Deepen the cord into the gap so that there is from two to four millimeters from the floor surface to it.
- Fill the distance from the rope to the surface with the prepared mixture. The putty composition shrinks when it dries, so the gap is filled with the mixture with a small margin on top.
Why do many people now choose sealant?
The sealant also solves a number of problems, just like caulking: it removes air from the walls, retains heat in the room, and increases the service life of the house.
Sealant, unlike caulking, is passed (applied) only once
on
one side
of the house (outside or inside). Caulking is done immediately after construction, then after partial shrinkage and complete shrinkage of the house.
The sealant adheres tightly, leaves no gaps and forms a vapor-proof film. It can shrink and stretch without deformation.
Some will say that caulk is cheaper. But it needs to be done many times and requires decorative finishing.
Source
Preventing cracks: tips and tricks
Most often, the problem of cracks in a log house log is solved by sealing it with sealant. However, this is already a radical decision, although it is more correct to take measures to prevent the immediate appearance of cracks in the wood.
The first step is to create the right conditions for drying lumber.
- The owner must remember the following point: the number and size of cracks directly depends on the drying time of the wood. Therefore, it is recommended to carry out this operation for as long as possible.
- Another important point, which can also affect the appearance of cracks in the structure of the log, is the creation of such conditions for the wood so that it does not lose its natural ability to breathe.
The tree needs to be provided with a constant flow of fresh air . This can only be done if an optimal temperature regime is created and the material is protected from direct sunlight.
By creating such conditions for the tree, you can be sure that moisture will evaporate from all layers of wood evenly, and this will significantly reduce the likelihood of cracks and other unpleasant defects in the structure of the log.
What happens if you don't repair cracks in logs?
The logs of the log house, covered with a web of cracks, as well as deep crevices, look extremely unattractive, which is why the aesthetics of the structure suffer. But besides this, cracks are a source of many different problems that bring the moment of the first repair closer.
Taking this into account, it is necessary to be very attentive to the condition of the logs and take action at the first appearance of cracks. The main negative point that manifests itself if there are cracks in the logs is a significant decrease in the strength characteristics of the building.
This happens because at the stage of developing the building project, strength limits were laid into it, taking into account the homogeneity and integrity of the material. The appearance of cracks in the logs of a log house can significantly reduce the service life of the material , and because of this defect, destruction of the entire supporting structure can begin.
How to seal gaps between logs - consider traditional materials
When it comes to finishing the seams between beams or logs, literature alone will not be enough, since a dozen books will provide the same number of caulking options for your consideration. Of course, deliberately false information rarely appears on the pages of reference books, but it still happens, and identifying it among other data is quite difficult.
The most reliable advice on how to seal cracks between logs will only be given by an experienced craftsman, or at least a person who has actually tried what he is talking about. And, interestingly, many agree that moss is one of the most effective materials for caulking. Often on the outskirts of swamps you can see a whole carpet of sphagnum, which, while still wet, easily packs into the joints between the crowns.
Only the kind of caulk that can be called high-quality is one in which a sharp awl fits into the gap between the logs no less hard than into the wood.
A more common and equally environmentally friendly way to seal cracks is to fill them with tow, coated with plaster or cement mortar, or simply compact this consumable material, which is accessible to everyone, without any additives. You can use hemp or jute fiber instead. The difference between hemp and tow is insignificant - the first is a derivative of flax, less often hemp, the second is obtained only from hemp.
Construction layout
To properly perform insulation, it is necessary to take into account factors such as the location and layout of the bathhouse . If all this is taken into account at the bathhouse design stage, then it will be possible to avoid unnecessary costs when performing thermal insulation of the steam room. Thus, when choosing a bathhouse layout option, you need to take into account the following:
- When choosing the size of the steam room, you need to take into account how many people will be indoors at the same time, as well as how many rooms you plan to make. Will it be just a dressing room, a locker room and a steam room, or will you decide to add others. Most often, an area of 4-6 m2 is selected for the dressing room, and 6 m2 for the steam room.
- When drawing up a bathhouse design, it is necessary to take into account possible heat losses and take measures to minimize them. This means that the locker room should be located as close to the entrance as possible. Then it will help to better protect the steam room from drafts and cold air entering it.
- When preparing to insulate the steam room, the design should include an entrance from the washing room or dressing room to the steam room not in the traditional version, but in the form of a vestibule.
- Attention should also be paid to the doorway, which should not be too wide, but at the same time should have a high threshold.
- It is best to make the steam room square, and build a stove in the corner, and it should be as close to the door as possible.
Modern putty for logs
In addition to natural materials for sealing seams between the crowns of a log house (some of which you don’t even need to buy, just go to the forest or swamp), modern industry can offer a lot of synthetic ones. There is no need to talk about environmental friendliness here, but reliability is definitely observed, which is, in fact, what is required from such putties.
Some “experts” advise using silicone sealant. but such a method of sealing joints will only aggravate the situation, since wood tends to absorb moisture, and if it evaporates worse somewhere, rot will almost certainly form there.
Consequences of wood delamination
Small cracks are not capable of causing serious damage to the finished building. But deep defects and damage can cause uneven shrinkage of wood and deformation of the entire structure of the log house.
When eliminating defects, you should not ignore the smallest grooves and cracks, which, under the influence of high humidity, can become a breeding ground for mold, fungal formations and rot.
All this can lead to the destruction of the log house itself and a decrease in its performance characteristics.
Stages of floor installation in a bathhouse
Taking into account the microclimate that is created in the bathhouse, the main requirements for the composition for sealing joints and cracks in floors are:
Also, the sealant must have good adhesion to the materials from which the subfloor and floor covering are made. It needs to be suitable for interior work and not emit toxic substances, especially when heated. Sealing wood structures requires a sealant with high elasticity that can adapt to the thermal expansion of the wood. Acrylic, silicone and polyurethane compounds meet these requirements:
The bathhouse is usually located on the ground floor; a concrete screed is poured under the flooring. It and the layers of the floor “pie” above must be protected from groundwater. For these purposes, a cushion of compacted sand and crushed stone is poured under the screed; the crushed stone is impregnated with bitumen on top or covered in several layers with rolled (sheet) waterproofing - roofing felt, high-density film.
If the floors in the bathhouse are insulated, the insulation must be protected from the penetration of groundwater from below and moisture leaks from above. Even before installing the floor, you need to think about the drainage system. Usually the floors are given a slight slope towards one of the walls or towards the center and a drain hole is made in this place, installing a ladder through which the water will flow into a pipe (gutter) and be discharged into the sewer, septic tank, filter well.
Here is one of the schemes for installing a non-leakage floor in a bathhouse:
We suggest you familiarize yourself with How to sheathe the ceiling in a bathhouse inside. Sometimes wooden floors are laid in a bathhouse. This option is more suitable for rooms with a normal level of humidity, where water does not pour onto the floor - a dressing room, a rest room. Wooden floors must be ventilated, so they are laid on joists or sheathing on top of the joists. A ventilation gap is left between the top layer of waterproofing and the wooden covering.
Wooden floors in a bathhouse with insulation
In a wooden bathhouse, it is important to protect the walls from contact with water. To do this, you can make a ventilated box around the perimeter of the floor from timber treated with antiseptics and gypsum fiber sheet. Bars of small cross-section (for example, 20x40 mm) and about 20 cm high are screwed vertically with self-tapping screws to the walls above the floor at a distance of 30-40 cm from each other; the upper ends must first be cut down at a slight angle.
GVL strips in two layers are attached parallel to the walls to the front vertical surface of the bars. The upper edge of the strips should be approximately 2 cm below the end of the beam. Wooden planks of such a width as to cover the gypsum plasterboard strips are laid on the ends cut at an angle and secured with self-tapping screws. The result is an inclined surface - a dropper.
Professional sealing services for wooden houses
offers its services for insulating houses made of timber and logs located in Moscow, the Moscow region and surrounding areas.
We are official dealers of manufacturers producing premium sealants Remmers, Ramsauer, Oliva and others. Thanks to this, our customers can order sealing with branded products on favorable terms.
In our company, the main emphasis is on the quality of the services provided. We carry out triple quality control of the work performed. Masters undergo regular training and advanced training.
To contact us, go to the “Contacts” page, where you will find our contact details and the form for submitting an application.
Calculate the cost of painting and insulating your home right now
Select types of work:
Select materials:
How is caulking and laying between logs done?
Before caulking the seams between the logs, think about what you will have under the caulk. The fact is that it is irrational and uneconomical to completely fill the cracks with sealants, since they can turn out to be quite deep, and in a log house there are usually at least 40 such seams.
Having hammered the seams as tightly as possible, we begin to cover the caulk with sealant. To begin, place masking tape on both sides of the crack so as not to stain the entire log with putty. If, when laying logs or beams, you used a felt pad between the logs (some people recommend moss as such a layer, it is better not to use glass wool), fill the cracks with a breathable material, such as tow.
Is it possible to minimize the risk of splits?
The only condition that guarantees minimal cracking is prolonged drying of the logs under natural conditions.
Long-term drying of wood:
- Increases the strength of the log.
- Significantly extends its service life.
When drying logs naturally, it is important to ensure their uniform drying, that is, the same drying rate for both the outer and inner layers of the log house.
This can be achieved by creating certain conditions for complete drying. This is a cool and completely dry place in which the logs are allowed to dry out for at least 2 years.
From the appearance of the cracks we can deduce how long the wood has been drying:
- 1.5-2 years: crack size up to 2-2.5 mm.
- 1-1.5 years: the splits are already expanding to a width of 7-12 mm.
- Several months: the cracks become larger and occupy a distance of 12-25 mm.
To minimize the risk of faults, a compensation (unloading) cut is sometimes formed on raw logs. This measure relieves the growing stress on the wood fibers and ensures they dry out faster.
Article on the topic: Is it possible to leave a house made of aerated concrete for the winter without heating?
The cut is carried out according to special standards:
- it is performed along the log;
- has the appearance of a neat, even groove;
- has a thickness of 7-10 mm;
- it is made with a depth of no more than 1/4 of the diameter of the log itself.
Sealing the inter-crown seams of a bathhouse log
“The ceiling is icy, the door is creaky, Behind the rough wall there is prickly darkness. As soon as you step over the threshold, there is frost everywhere,
And from the windows the park is blue and blue."
Here are the most common aspects of using such sealing:
Sealant for the seams of the bathhouse frame
1. On the leeward side, the walls of the timber are constantly exposed to air pressure, which is directed inside the log house of the bathhouse. The pressure difference creates conditions for cold air to penetrate into the space between the beams. If the beam profile is chosen with a large number of ridges, then the fit of the parts is so high that there is little chance of cold air getting inside the frame. In some types of walls made of rounded or profiled timber with two ridges, cold air has a greater chance of getting into the warm steam room.
2. During slanting rains and side winds, water literally pours down the outer wall. When there are gusts of wind, such streams may seep into the bathhouse. Such cases are especially common for timber whose ridge height is small and the shape of the lock is not provided with special drains. We talked about this in the article Looking the timber in the mouth.
3. When building from raw timber, the timber almost always cracks and becomes curvature along the longitudinal axis. This leads to the formation of additional cracks and cracks not provided for in our dream of a wooden frame. The size of the cracks is sometimes so impressive that even birds cannot resist the temptation to tear the insulation out of the cracks and steal it to build their nest.
Wind, water and feathered builders will gradually make your log house drafty and cold. This is where we turn to a sealant for help, which will not only block the sparrows’ access to tow and jute, but will also prevent water from getting into the space between the crowns of the frame.
Despite the fact that the site is dedicated to the technology of building a bathhouse with your own hands, for now we will skip the research on “how to make a sealant with your own hands.” It's quite difficult. Of course, there is a way to make the sealant yourself, but the first frosts and sun will reduce your efforts to zero. It is difficult to produce synthetic materials at home!
Preventive measures
Method #1. Long natural drying
The best prevention is long-term natural drying of the logs before placing them in the log house. The more uniformly the logs dry across the entire thickness of the fibers, the less likely it is for cracks to appear. The drying rate in the inner and outer layers should be approximately the same. Then moisture from the inner layers will move to the outer ones, and they, in turn, will evaporate it into the environment.
This balance can be maintained if the drying period is at least two years. Dry the logs in a shady, dry and cool place. As a result, wood moisture content should decrease to 18-20%.
For comparison: when drying logs for one year, the width of the resulting cracks is no more than 6-10 mm, over two years - no more than 1-2 mm. If the logs have been dried for less than a year, the width of the cracks may exceed 10-20 mm.
Method #2. Compensation cut
A cut in the upper or lower part of the log (timber) helps reduce stress in the wood fibers. This type of cut is called compensation or unloading. It is performed along the axis of the log, often on the upper surface. Some craftsmen make cuts along the entire surface, while others do not cut the groove to the ends.
In a log house, the cut is covered with a lying log on top, so moisture does not get into it. When dried, the cut expands. But, at the same time, the number of natural cracks formed is reduced, their depth and width are reduced.
The cut is an even groove 7-10 mm thick, 1/3-1/4 deep from the diameter of the log. The cut can be made using a chainsaw, a router, or a rounding machine.
Method #3. Sealing the ends of logs
The ends of the logs (cutting areas) dry several times faster than the rest of the outer surface. Therefore, during intensive drying, the ends become cracked first. To prevent this process, you need to close the moisture exit through the ends. That is, cover them with sealant. Then the ends will stop quickly evaporating moisture. It will go into the outer layers of the log and from there it will evaporate, but evenly.
Article on the topic: How to make a closet for a garage
To cover the ends, you can use drying oil, oil paint, oil varnish, and wax solutions. Previously, the ends were coated with lime to seal.
The need to protect the ends of logs is discussed in the following video:
First, let's look at the pros and cons of the log-in-foot technology
Pros:
- A simpler process (than other methods) of cutting grooves;
- The ability to use timber along the entire length (that’s why they say “log house without residues”).
Minuses:
- The corners of a log house always require additional insulation;
- The structure is considered not as stable as, for example, when cutting into a bowl.
However, it is distinguished by a more harmonious shape, due to the absence of the ends of the logs protruding at the corners. For this reason, it is called a “clean corner”.
“It is desirable that the logs for construction be of the same caliber and the thicker the better - there will be fewer connecting grooves. And besides, a paw with a small cross-section freezes faster.”
How to properly insulate the space around a pipe?
Wooden ceilings are highly flammable, so the pipe should be placed between the beams, preferably in the middle. It’s a good idea to familiarize yourself with fire safety standards when starting to install a chimney. The distance from the pipe to the tree must be at least 380mm.
To ensure that the chimney opening is not too large, an element such as a ceiling assembly is used, which creates an air gap between the heat-insulating material and the iron of the pipe.
Chimney opening
Next, a heat-reflecting screen is installed, this is a stainless steel sheet, in the inner part of which there is a layer of fire-resistant insulation, stone basalt wool. The whole thing looks like a box around a pipe. The box is made from non-flammable materials, heat-resistant magnesite plates.
After installing the box, the space around the chimney is filled with basalt wool. Then a sandwich pipe is installed, the part of the chimney that goes out onto the roof.
Important! Use a sandwich pipe equipped with a spark arrester. This design is somewhat more expensive, but it guarantees a wooden bathhouse from fire.
Correct installation of the chimney