In one of our coastal cities, famous for its public baths, there is an urban legend. Its essence is as follows. At one time, wealthy citizens of the city began to have a general fashion for furniture made of bog oak. Since the city was a port and there were many wealthy citizens, it is natural that the needs were high and, oddly enough, they were fully satisfied by businessmen from the furniture production sector. The trick was revealed a few years later, because of some banal little thing, and the whole point was that the source raw material for sets and panels made of bog oak was a banal ladder for a bath, along which, in conditions of high temperature and humidity, not actively trampled one hundred visitors to the said public baths. Bathhouse directors profitably sold consumables, furniture makers received cheap raw materials to imitate bog oak, and the nouveau riche, in turn, received a tasty slap in the face. The site's editors are skeptical about this legend in terms of reliability for a number of quite objective reasons. However, many indigenous residents of the port city firmly believe in it, and at every opportunity, they willingly tell visitors about it. So, a seemingly simple thing, but became a hero of folklore. In our story today we will dwell on it from a purely pragmatic point of view, without any embellishment.
Features of bath drains
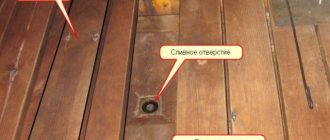
The drain is an element of the waste system that ensures the drainage of water into the sewer canal. In the bathhouse it is installed in the floor of the steam room and washing room. The water flow along the inclined floor covering rushes to the drain hole, where it enters through the drain into the sewer outlet. The design of this element consists of a body, a siphon, a water seal, an outlet pipe and a decorative grille.
If a drain ladder is installed, then for a bath it performs the following functions:
Of no small importance is the decorating function. The overlay grille not only covers the drain hole, but also harmoniously fits it into the interior.
The drains are divided into several types and according to the method of connecting the sewer supply, such options are distinguished.
Devices are also divided according to the method of gate formation. A drain with a wet seal or a water seal protects against odors from the sewer and is secured with a layer of water. All gases penetrating from the system dissolve in water, which provides a reliable barrier. The main limitation of use is the drying out of the water seal when the bath is left idle for a long time. It can be installed provided that the bath procedure is carried out at least once a week. A dry drain provides an air gap and opens the hole only at the moment when draining is needed.
The dry type of water seal for a bath is manufactured in various versions
Varieties
Characteristics
In addition to these two main varieties, universal devices are gaining popularity. They contain a water seal. But an air gap is also provided when the water layer dries.
Conclusion
We hope that our brief instructions will help you choose high-quality drains for your bathhouse without extra costs or outside help. These simple designs have both a practical meaning, preventing accidents and allowing water to flow freely into the sauna drain, and an aesthetic one - the wood fits perfectly into the interior.
You can also make furniture for a bathhouse that matches the style of the ladders on the floor
In addition, wood is an environmentally friendly material that does not contain chemical compounds harmful to the human body. And some types of wood, when exposed to temperature, release beneficial substances into the air, making the atmosphere in the bathhouse even more favorable. The video in this article will help you understand this topic more clearly.
Did you like the article? Subscribe to our Yandex.Zen channel
How to choose a ladder
When choosing this device for bath rooms, the following basic characteristics should be taken into account.
The devices are made of metal or plastic, and combined designs can also be used. Metal drains are the most durable, but taking into account bath conditions, stainless steel, aluminum or copper alloys are suitable. They are much more expensive than plastic drains, which explains the popularity of the latter. Combined devices have a metal body, and the siphon and overhead grille can be made of plastic and wood.
Wooden grates fit well into the bath interior, but taking into account the resistance to rotting, you should choose larch or oak.
Application of purchased gratings
When you need a ready-made grate for the floor of a bathhouse, you can buy it on the market, in specialized and hardware stores, or online. It is important to correctly determine the required size and shape of the site. Nowadays, the choice of such products is very wide - from cheap simple gratings to decorative products made of mahogany. It all depends on the imagination and financial capabilities of the owner.
On a note! In addition to wooden structures, plastic bath grates have become quite popular.
Such finished products should not be used in the steam room, but they are quite suitable for the washing compartment and dressing room. Platforms made of polyvinyl chloride and acrylonitrile butadiene styrene are widely used. The latter option has increased resistance to aggressive environments and temperature changes, and at the same time has high mechanical abrasion resistance.
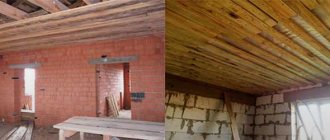
A grate on the floor of a bathhouse sometimes solves the problem of insulation and increases the convenience of the bathing procedure. This method has been used in Russian baths and saunas for a long time, and in our time we should not forget about it. A simple device you can easily make with your own hands.
Source
Features of installation of a dry ladder
Installing a drain in a bathhouse using a dry shutter should be based on the following principles.
To ensure high-quality and reliable drainage, it is important to correctly lay the sewer drain pipe under the floor. In the area of the drain hole, it must be installed at a depth sufficient to install the drain. Installation of a dry drain is carried out after laying the outlet pipe and pouring the concrete screed.
Guide to action.
You can make a drain with a dry water seal yourself. A plastic ball is used as a locking element. Its diameter is selected so that the ball tightly covers the drain hole. In this way, a float-type device is manufactured. The flow of water will lift the ball, but after it drains it will return to its place. To create pressure, a column height of about 4–6 cm is sufficient.
It is better to make a decorative overhead grille from wood. A wooden plate 10–15 mm thick of the required size is prepared. Numerous holes are drilled in it or slot-like slits are made.
If, during winter use in such a homemade device, the ball freezes to the body, then it is enough to first pour a little hot water.
Do-it-yourself drainage system in a bathhouse
Issues related to the construction of a bathhouse are very relevant, as country houses are gaining more and more popularity. One of the important problems when constructing a room with a steam room and a washing room is the arrangement of water drainage. After all, it is the main element necessary for the functioning of the bathhouse. Let's look at how to properly make drain systems yourself so that the floor does not rot.
Subtleties of installing a water drain
If we consider a water seal, then for a bathhouse with frequent use it can be considered an attractive option that eliminates all odors from the sewer system. In such a drain, it is important that there is always water in the special cavity of the body, which creates a water seal. Installation work for installing a water drain is not fundamentally different from installing a dry “brother”. A nest is prepared in the underground above the drain hole, in which the device body is installed. The difference lies in the formation of the water seal.
There are 2 main types of such elements.
When making a water ladder with your own hands, the knee type is most often used. In this case, a piece of metal or plastic pipe with a diameter of about 32-50 mm and a length of 40–60 cm is taken. The pipe is bent in the shape of a U, and a branch is bent at the top to connect to the sewer branch. The second end maintains the vertical direction. The ladder funnel is inserted into it.
An important condition for reliable operation of the device is sealing the joints. In a vertical connection, it is enough for the upper pipe to fit inside the lower pipe, and for reliability, you can install a rubber seal. With horizontal joints, it is important to ensure the tightness of the joint. Metal elements are joined by welding or using a threaded connection using a coupling.
Plastic parts are hot joined. To do this, a coupling made of the same material is installed, and the plastic is held together by heating with a hair dryer or a blowtorch. When installing water seals, it is important to provide for the possibility of clearing the stagnant zone from debris and silt. This is especially true for bottle-type water seals. In such structures, adequate access must be provided at the bottom.
The drain in the steam room and washing department of the bathhouse is considered an important element of the wastewater system. It helps to drain water from the flooring and protect the premises from sewer odors. Such devices can be purchased ready-made or made with your own hands. It is important to choose the right design so that water can be freely discharged into the waste system, but without disturbing the design of the bathhouse.
Cancel reply
By clicking on the “Submit” button, you consent to the processing of your personal data.
Source
Step-by-step instructions for making a bath drain design
We proceed directly to installing the drainage system.
- The drainage system is installed before pouring the concrete wash floor. The first step is to dig a trench with a shovel for the drain pipe from the sewer pit to the bathhouse. This is done in such a way that a slope of 15 degrees is obtained. That is, the depth of the channel is taken to be equal to the diameter of the pipe (100 mm), plus another twenty centimeters offhand.
The depth of the trench should be approximately 50–60 cm, and the width depends on the size of the selected pipes
If a plastic barrel is selected, then the task is to cut a round hole in it with a strong knife and then insert the pipe with tension
When laying pipes, you should wear cloth gloves to avoid damaging your hands.
An additional small outlet for the sink can be attached to the nice pipe
If the sewer needs to be continued, then the branch with the ladder is made separately
Many bathhouses additionally add a special layer of waterproofing.
The walls of the ladder must be firmly fused with the concrete. Otherwise, water will seep under the flooring, which will subsequently lead to increased humidity, unpleasant odors and even rot.
Drying of the coating takes up to three days.
Video on the topic: how to properly drain a bathhouse
Types of drains
The drains for draining water are cast according to the type of installation. There are three types:
A point drain in the floor is most often done. For small showers without a tray - it is the best choice
The linear water drain differs in the shape of the receiving chamber; the device itself and installation are similar
The wall drain for draining water has a different design
Most often, to make a floor with a drain, point drains are used, much less often - linear ones. The installation of wall drains is generally quite a rare occurrence, since installation is possible only at the stage of major repairs, not only of the floor, but also of the walls. In addition, such devices are much more expensive.
Valve types
In addition to different design solutions, the water drain to the floor (point or linear) has different types of valves. A seal is a device that prevents sewer odors from entering a room.
The simplest seal is a water seal. In these devices, there is a bend in the outlet pipe in which water remains. It blocks odors. The disadvantage of such a system is the possibility of drying out. This happens if the water has not been drained for a long time. Drying out can also be caused by incorrect installation (the slope is chosen incorrectly) or the presence of floor heating - a warm floor in the bathroom “dries out” the water in the water seal.
Dry gates for ladders are more reliable in this regard. There are several types:
Operating principle of a dry seal in a drain
Operating principle of a dry shutter
Dry drains are made mainly of plastic, gratings are made of stainless steel or also plastic. There are models with a built-in check valve. It prevents water from rising when the drainage pit overflows. When installing a floor with a drain in an unheated bathhouse, look for models that can be used in cold weather (there are some).
Advantages and disadvantages of ladders made of different types of wood
As you know, there are no trifles in a bathhouse, so every detail should be given the closest attention. For example, if during construction you have perfectly insulated the floors in all rooms, installed a heating system and covered the surface with ceramic tiles, you should take care of the comfort of movement.
After all, as you know, wet ceramics are very slippery, which can lead to falls and injuries. To avoid this, bath ladders are used. But their scope of application is not limited to this; they can also be used as the main floor covering, but more on that below.
In the photo - a section of the bathhouse ladder
How to raise the bathroom floor to install a drain
The smallest floor-mounted drain ladder has a height of 6-7 cm. At the same time, in order for water to flow normally into it, it is necessary to ensure a slope towards the drain hole of at least 1 cm per meter. This means that when making a floor with a drain, the height of the floor towards the walls is increased. The zero point in this case is the upper part of the installed ladder. How accurately the floor rises depends on the size of the shower stall or the entire bathtub, if you plan to collect water from the entire area of the bathroom.
Floor drain layout diagram
There are several ways to raise your bathroom or shower floor. When choosing a method, it is necessary to take into account the load-bearing capacity of the floor, otherwise you can cause damage to the entire structure.
Screed of different types
The most obvious way to make a floor drain slope in the floor is to pour a screed. But the option is not always the best. Firstly, an ordinary cement-sand mixture has a lot of weight, and secondly, it “matures” for a long time. But there are several good options.
Guides for pouring screed have been prepared
The most common way to create a floor with a drain is using a screed. It’s just that the screed can be different, especially since the thickness of the “pie” is usually significant - rarely less than 12 cm - which makes it possible to make it a combination. This allows you to provide the required reliability, but reduce weight. Most often, the floor with a drain is insulated. But the maximum thickness of the insulation and screed is 10 cm, which is clearly not enough to install most drains. The remaining centimeters are “gained” by laying a rough screed, but it makes sense to make it from lightweight concrete to reduce the load on the floor.
On the logs
In order not to overload the floors, you can make a podium in the shower or bathtub on joists. The option is controversial, since high humidity and wood do not go well together, but sometimes this is the only option. When choosing such a floor drain device, you must use well-dried wood. Before use, it is treated with protective compounds (according to the instructions, but at least twice). It is advisable to choose from those impregnations that are intended for outdoor use or for direct contact with the ground - they have a higher degree of protection. After the composition has dried, you can begin to work.
Approximate layout of the lag "envelope"
You can make the floor straight, and set the slope with the thickness of the glue
The advantages of these methods are minimal weight, the disadvantages are the complexity of execution, since attention to detail and high quality waterproofing are required.
As you can see, a floor with a drain in a bathtub or shower can be done in different ways. Choose the option that best suits your conditions.
Drainage device in the bathhouse washing room
There are two main schemes for drainage communications in a washing room.
- If the floor is wooden. In this case, during paving, special gaps of approximately 5 mm are left between the boards. Water through these cracks enters a small reservoir made under the floor, from which it goes through a drain pipe into the general sewer system.
The most budget-friendly and easiest to install drainage system, however, it should be borne in mind that such a floor will not have thermal insulation
Drainage in a concrete floor is more difficult to install, but it will have thermal insulation
Moreover, in both options, a drain pipe is always installed under the floor (for example, after a drain), which goes at an angle into the general sewer line or into a separate well for a bathhouse.
Most often, modern country houses have septic tanks - underground reservoirs in which waste products accumulate, flowing through a common pipe from the entire household - from the toilet, shower, kitchen, bathhouse, and so on. Once every few months, a filled septic tank is emptied using a pumping cesspool machine.
The presence of a septic tank minimizes the level of contamination of groundwater and soil with substances that are found in excess in sewer water
If there is no septic tank on the site, there is only one way out - to dig a hole for a bathhouse. But it must be located at a distance of at least three meters from the building. The design of the sink drain does not depend on whether a common septic tank or a local pit is used. In any case, a sewer pipe must lead to one of these objects from the bathhouse.
Criterias of choice
In addition to choosing the design of the shutter, it is advisable to select the size of the mesh so that it is convenient to lay the tiles on the floor: it is desirable that the size of the drain be a multiple of the size of the tile (including mosaics). Pay attention to the material of the case. For a shower stall in an apartment or house, plastic is quite suitable. These are the most affordable options. Floor drains made of polypropylene are more expensive, and stainless steel is even more expensive.
There are even corner models
It is also worth choosing the height of the ladder. The minimum value is about 6-7 cm, the maximum is up to 20 cm. Among the technical characteristics, this equipment only has a maximum throughput - how many liters it can dispense per minute. Select depending on the maximum pressure that your shower can produce: the throughput of the drain ladder should not be less than the maximum amount of water dispensed. Both parameters are measured in liters per minute (L/min), so there shouldn't be any problems.
Variety of design solutions
Today on sale you can find many dry ladders that have their own unique configuration. There are three main types of drains, depending on the shape:
Corner drains are mounted in a corner (hence the name) and are almost invisible. Rectangular and round fixtures can be installed in any part of the bathroom. Plastic, steel and combined models are very popular in the plumbing market.
Gratings for drains differ in the pattern of slots, perforations, etc. The range of gratings is incredibly wide. There are also products that have LED backlighting. A backlit drain can create a unique atmosphere in the bathroom. However, the cost of such a device is higher.
Depending on the design, the drain is installed in the center of the floor or in any corner, and the grate can play a decorative role, complementing the interior
There are also quite a lot of budget options, so choosing the right option for a specific case will not be difficult. It is worth remembering that the appearance of the device is secondary. The main thing you need to pay attention to when choosing such a device is the technical characteristics. This will allow you to purchase an effective product that will last for many years.
Floor with drain: work order
Although the designs of drains are different, all floor-mounted models are installed according to the same principle - the sequence of work is the same.
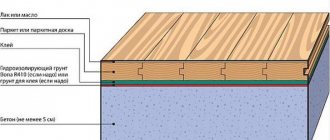
It is much more pleasant to stand on a warm floor in the shower, which is why a floor with a drain is most often made with a layer of thermal insulation. The best thermal insulation material for this is high-density extruded polystyrene foam. It does not absorb water, does not rot, has excellent thermal insulation characteristics, and can withstand loads normally (it will withstand the weight of the screed and tiles without problems).
You can make a floor with a drain in the shower with your own hands
It is more convenient to work with a level (laser level) that has a plane builder function. It will make the work much easier.
Preparatory work
The first step is to remove a branch from the sewer riser where the water will flow. The sewer pipe is laid with the required slope (2 cm by 1 meter), the socket is placed at the intended location of the drain connection. After the sewer outlet is installed, take a drain and make preliminary markings - you need to mark the height of the screed on the walls of the shower stall:
The axis of the drain should be slightly higher than the axis of the sewer pipe
Mark the line for laying the screed on the walls
Now you can measure the height to which you will need to raise the floor in the shower stall. It largely depends on the parameters of the ladder (its height). Based on the obtained figure, it will be necessary to plan the layers of screed and their thickness.
Determining the thickness of screed layers
Usually it is assumed that polystyrene foam 5 cm thick is placed in the screed. The minimum thickness of the screed is 3 cm (more is possible, less is not). This is in the center near the drain; towards the edges it becomes thicker (the required slope is created). From the existing screed height line, we put the resulting figure down (add the thickness of the polystyrene foam and the screed). It will be necessary to bring the rough screed to this level.
From the existing height of the screed we set down the thickness of the insulation and DSP
To reduce the load, the rough screed is made of lightweight concrete. It can be foam concrete or expanded clay concrete. Wet work can be minimized. To do this, you can lay foam blocks at the missing height and fasten them with reinforcing mesh. You can pour a 3 cm layer of DSP on top.
When installing such a base, a damper tape is needed along the walls. Since in the presence of polystyrene foam or any other insulation, the floor may sag a little, it must be made incoherent with the walls. This is why you need a damper tape. It is placed around the perimeter of the base. In height it should be 1-2 cm above all layers.
You can use a special damper tape, or thin foam plastic (1 cm thick or less). Even corrugated cardboard will do. The remaining tape is then cut flush with the screed. She did her job - we got a floating slab.
The poured screed must stand for at least a week - the concrete must gain at least 50% strength. After this, you can continue working.
Waterproofing
To prevent the drain floor from leaking, the shower stall needs good waterproofing. It is better to make it multi-layered. One of the layers can be done at this stage.
Coating waterproofing is usually used. This could be bitumen mastic or special waterproofing for swimming pools. It is applied with a brush in several layers, extending onto the walls at least 30 cm. These mastics form an elastic, waterproof film on the surface without seams or joints. This type of waterproofing is highly reliable.
Particular attention should be paid to the processing of corners. They can even be glued with a strip of rolled waterproofing (such as Gidroizol, etc.). Apply the first layer of coating waterproofing to the walls, then glue the joint between the wall and the floor with roll waterproofing (set on the same compound), and apply another layer on top.
Multi-layer waterproofing is more reliable
For those who like to do everything with a margin of safety, the first layer of waterproofing can be laid even under the first corrective screed. All rules remain the same as described above.
Instead of coating waterproofing, you can use roll waterproofing. But you will still have to lay it on bitumen mastic, lubricating it well and pressing the seams. The approach to the walls is approximately the same - about 30 cm. If the width of one roll is not enough, the panels are laid with an overlap of 15 cm, they are well coated with mastic.
Choosing a place to install a drain ladder
To ensure that the tiles on the floor of the shower stall look at least normal, it is better to position the drain grate symmetrically relative to the tiles. Therefore, first, dry, lay out the tiles on the floor (taking into account the seams). When laying out, remember to step back a little from the walls - by the thickness of the tiles and glue.
It is not at all necessary to make the drain in the center - it can easily be moved to any wall. In this case, the far wall from the entrance was chosen to reduce the possibility of water spilling out of the booth
Next, we choose the position of the ladder so that everything looks good and, at the same time, it is necessary to make a minimum of trimmings. Not only do they take up time, they also spoil the view.
Installation of drain and insulation
The joints of polystyrene foam are glued with tape (so that moisture does not leak out of the concrete). If there are large gaps, they can be tightly packed with scraps and then sealed.
Using a pit
If the drainage flows weakly through the ground, then it is better to build a pit. In it, the liquid will reach a certain level, and then be discharged outside the site. The material for the pit should not allow water to pass through. And all pipes are installed with some slope.
To prevent the appearance of unpleasant odors in the bathhouse, the drain is equipped with a water seal. For this
- at a height of 9-12 centimeters from the bottom of the pit, a hole is made to insert the drainage pipe;
- a plate is installed on three sides of the pipe, but it is not secured from below;
- There should be five to six centimeters between the plate and the bottom (this is where the water seal will form).
Effluent can also be discharged into the general sewer system, into a cesspool or septic tank (especially if there is a toilet in the bathhouse).
In areas with poorly permeable soil, it would be more appropriate to have a sewerage system with a pit for collecting and subsequently disposing of wastewater. All drained water is collected in this pit, made of waterproof materials, and then transported beyond the boundaries of the site through an inclined pipe.
When installing a pit, it is necessary to provide a water seal that will limit the penetration of unpleasant odors into the bathhouse. For this:
- the entrance to the drainage pipe pit should be arranged at a height of 10-12 cm above its bottom;
- install the plate under the pipe without securing it from below;
- leave a distance of 5-6 cm from the bottom of the pit to the plate (this distance is enough to form a water seal).
Durable polyethylene pipes used for transporting wastewater are well suited if a sewage system is needed in the bathhouse. In this case, if necessary, it is possible to connect to the bathroom system, subject to its minimal use.
Pit use diagram
What is a water seal
They come in two types:
U-shaped (knee) water seal
From the figure it is absolutely clear that this simple device, similar to a hookah, unlike it, does not allow air to pass through, creating a water plug .
And what happens in a hookah is called a breakdown of the water seal. The diameter of the pipe and the method of connection can only affect the performance of such a device; the main thing that is required of it is tightness , and its lowest point must be at least 50 mm below the drain pipe.
Any materials at hand will be suitable for the water seal, but we must not forget that in the case where access to it is closed, reliability and the ability to clean it are of decisive importance.
The second picture shows how water, having evaporated from the plug (and this will definitely happen in 40-50 days), opens up the possibility for air to penetrate from the sewer.
So you need to either periodically fill it with water, or use a different type of water seal, or seal it hermetically during a long absence.
Bottle water seal
From this figure it is clear that another design solution did not change the function of this device - to create a water plug. Another name for this thing is siphon.
Part 3: waterproofing, polystyrene foam, polyurethane foam
After applying the primer, the next step was to apply Mastergood Liquid Waterproofing. I made a separate video about this material, dryly and purely technically about its properties, uploaded it to my additional channel, if you are interested in this waterproofing, see below.
In general, a professional plumber friend advised me on Knauf waterproofing and waterproofing tape, but it wasn’t on sale in my city, but later, in the next series, Knauf will also be available, I had to order it, subscribe if interested. In the meantime, MasterGood waterproofing, I coat the surface with it for the first time, I try to apply it thicker in the corners, whether it helped me, look further, you will see for yourself. Then I missed it a second time, with a second layer. In the meantime, I bought extruded polystyrene foam, more precisely polystyrene foam produced by TechnoNIKOL. I start cutting out the required pieces of EPS according to the pattern. The blade of the knife turned out to be a little short, I had to take a longer one. Still, 100 mm, 10 centimeters thick pieces. I had to cut out a piano lid like this, it was also a creative job. Now the remaining sealant came in handy; I used it to glue the polystyrene foam to the floor. I filled all the voids with polystyrene foam with gaps for foaming. I bought this foam called Profile. I also made a separate video about it, dryly and purely technically about its properties, see below.
According to what is said on the bottle, there should be enough foam for 40 liters of space. I doubt I have 40 liters in my cracks. What do you think, write in the comments, is there 40 liters in the cracks? Now you will see for yourself whether the cylinder is enough. Using a laser level, I mark the line of the future edge of the concrete slab. In order to save money, I buy a small can of foam; I also made a separate video about it, dryly and purely technically about its properties, see below. Here I will only give brief conclusions, which I think will be useful to many.
Natural filtration
Technologically, the system is quite complex. It is used when the volume of wastewater is large enough, but not more than 250 liters, or when it contains solid elements. The drainage system consists of a container of any shape and a system of pipes extending from it over the entire area.
Requirements for the container: waterproof; the volume should be three times the water consumption per day. Periodically, the septic tank must be cleared of sediment. A sewer truck is used for this, so there must be access to the tank.
What tools will you need?
The set of tools that will be required for the work depends on the installation method and the selected materials:
- A mandatory tool is a level. It is necessary to control the slope of the floor plane. You can use a regular building level or a high-precision laser device.
- To apply the markings you will need a pencil and a tape measure.
- You will need to purchase the ladder itself and plastic pipes of the appropriate diameter in advance (usually 50 mm).
- If you are going to install a podium, you will need blocks for the sides, a metal profile, and gypsum board sheets.
- You will definitely need waterproofing material. It can be rolled or in the form of mastic.
- If you are going to fill the screed, you will need a dry construction mixture, a container for preparing the solution, a mixer attachment, usually a spatula, and a grater.
- For insulation of screeds, extruded polystyrene foam is purchased. You will also need a damper tape, which is installed around the perimeter of the room before pouring the screed. To fix it to the wall, use masking tape.
- To install the front covering you will need: ceramic floor tiles, glue, PVC crosses, grout, tile cutting devices.
- Silicone waterproof sealant.
ceramic tiles for bathroom
Tools for work The set of tools required for work depends on the installation method
What is a water seal
They come in two types:
U-shaped (knee) water seal
From the figure it is absolutely clear that this simple device, similar to a hookah, unlike it, does not allow air to pass through, creating a water plug .
And what happens in a hookah is called a breakdown of the water seal. The diameter of the pipe and the method of connection can only affect the performance of such a device; the main thing that is required of it is tightness , and its lowest point must be at least 50 mm below the drain pipe.
Any materials at hand will be suitable for the water seal, but we must not forget that in the case where access to it is closed, reliability and the ability to clean it are of decisive importance.
The second picture shows how water, having evaporated from the plug (and this will definitely happen in 40-50 days), opens up the possibility for air to penetrate from the sewer.
So you need to either periodically fill it with water, or use a different type of water seal, or seal it hermetically during a long absence.
Bottle water seal
From this figure it is clear that another design solution did not change the function of this device - to create a water plug.
Another name for this thing is siphon. It is also clear that the pipe connection must be airtight. Such a water seal is also a settling tank.
The lower part of a regular bottle siphon for washing can be unscrewed for cleaning, and if a homemade valve of this type is used, for example, in the floor, then the upper part should be collapsible.