For a Russian person, a bathhouse is not a luxury, but a vital necessity. Even historians are convinced that the love for a bath broom and good heat is literally in our blood, and even in the poorest villages next to rickety dilapidated huts, new steam rooms were regularly built every five years (the old ones burned down). And Peter I, during his trip to France, could not stand being without his family for even two days, urgently ordering the construction of a Russian bathhouse right on the banks of a foreign river, which shocked the natives quite a bit. But what to do if building today is so expensive, and public steam rooms are not to everyone’s liking? And if relaxing in a steam room is not just useful procedures, but also valuable communication with friends, barbecue and the opportunity to breathe fresh air? Then we will learn the cunning tricks of modern Russian masters who manage to build their steam rooms literally for vacation pay.
So, let's look at the most successful bathhouse construction projects and their implementation, where the main task was to save as much as possible, but at the same time not lose the comfort of bath procedures. After all, as they say, the most budget-friendly bathhouse is the vestibule of a summer commuter train.
What can and cannot be saved on when building a bathhouse?
Agree, no savings are worth the loss of health, property or life. But the saddest situations occur when the issue of cheapness is approached thoughtlessly: such baths first slowly poison their owners by releasing hazardous substances, and then either burn or quickly deteriorate. But this does not mean that it is better to give up and give all your money to the construction team - it is better to simply refuse dangerous use during construction from the very beginning:
- Uncertified materials and fakes, for which unscrupulous sellers charge much less. And at the same time they convince the buyer that “there is no difference with expensive material, there is simply no markup for the brand, my brother/in-law/son-in-law has had a bathhouse with this for half a century, and nothing.”
- Materials that are strictly not intended for the construction and finishing of baths. So, if you can’t insulate the walls in a sauna with polystyrene foam, then it’s impossible, and this is not the whim of the manufacturer. Again, a neighbor who insulated in this way at his own risk and is now bragging is not an example.
- Unsuitable components for conducting electricity in the bathhouse (wires, sockets), unprotected lamps or cheap Chinese products.
- Homemade stoves and water heaters that no one has tested for fire safety.
- Combustible materials and those that do not indicate that they can be used in conditions of high air humidity and heat.
If you are building a bathhouse with your own hands and are forced to save as much as possible on materials, carefully calculate each step, consult with specialists and do not leave anything unattended “it seems to work.” And finally, if you have a limited budget, it’s better to save on cubic meters of steam room, but not on its finishing materials. This is the advice.
Let's take a little look at affordable insulation materials. So, basalt wool is made from stone (basalt). Its main advantage is that the fibers inside the insulation are not connected chemically, but by another technology, and therefore, even when placed behind the foil in the steam room, hazardous substances will not be released. This insulation is non-flammable and insulates the firebox well. For a bath - the best option. If you want to save money, then put one layer of basalt wool and a couple of layers of another, cheaper material on the ceiling.
Penofol - porous propylene with polyethylene film and foil coating - is also used as an economical option. You can purchase it in roll form and attach it directly to a bare wall. This material is a good heat bridge between the wall itself and the insulation.
You can find out about other insulation options here:
Here are the recommendations of experts on what else exactly you can save on when building a bathhouse and during its maintenance:
- Buy a stove without a remote firebox - this way it will take much less firewood to heat the steam room, and such a unit is inexpensive.
- Be sure to install a water tank on the chimney pipe
- Make a cheap, removable foundation for the bathhouse: it is much cheaper and easier to carry out repair work later and replace it with another one.
- Pay maximum attention to the insulation of the bathhouse - the less you “heat the street”, the more economical the heating itself will be.
- Place packaging film with bubbles on the window in the rest room in winter - this will retain heat by at least 50%.
- Instead of a regular shower or shower stall, install a traditional Russian tub. And it’s healthier, by the way. And it is not at all necessary to pour only ice water into it.
- When purchasing lining, take short-sized bars - they are cheaper and look no worse.
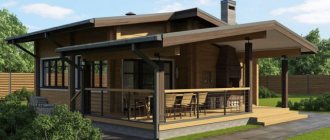
- Build a low roof for the bathhouse, no more than a width-to-height ratio of 1:3. Such a design will require much less materials, and the chimney will also not need to be made high.
Choosing the best place for a bathhouse
Thanks to communicating with people who have built more than one bathhouse in their lives, and also continue to do this business now, we have learned many interesting facts, which we share with you. So, initially we will talk about where it is best to build a bathhouse on a summer cottage:
- You should not build a bathhouse next to a pond, in close proximity to water, as the building may be flooded by floods;
- An excellent option is an extension to a residential building or any other building - saving materials and energy savings;
- It is most correct to build a bathhouse in the backyard, where there are no drafts, in the silence of the trees;
- Be sure to think about waterproofing, vapor barrier and ventilation at the initial stages of construction, because a bathhouse tends to create unpleasant odors if it is built incorrectly or is not provided with proper care;
- Do not start construction near a road or field - there is no need for dust in interior damp areas;
- The south side is the most suitable for construction;
- Think about fire safety, since the risk of unpleasant situations here is quite high;
- If possible, start construction away from the neighboring territory. This way you will not observe envious or judgmental glances on yourself, and provoke scandals due to noisy recreation or the aromas of the bathhouse;
- Carry out construction in a place remote from the well or well, at least 15-20 m.
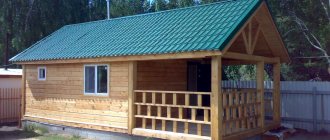
Project #1 - compact bathhouse at a minimum cost
So, step by step process:
- Step 1 - foundation. We will make the foundation columnar. To do this, you will need to get a 2-meter auger. As a casing pipe, take ordinary cheap sewer pipes of 110 mm. Insert the reinforcement from two connected rods.
The article will tell you more about how to make a columnar foundation with your own hands.
- Step 2 - strapping. Place 500 mm long pins under the harness. Assemble the 150x150 frame and prepare the frame posts with a height of 2200 mm. Treat the frame with Neomid 440 or any other suitable for the same purposes.
- Step 3 - walls. You can modify the walls directly on the frame and simply raise them. We sheath the DSP. To do this, we pre-drill the plates and then fasten them with self-tapping screws with a semicircular head.
- Step 4 - roof. The roof is covered with eight-wave slate. We're saving money!
- Step 5 - insulation. Now we put in any inexpensive insulation that is suitable for a bathhouse. In this project - Linerock Light.
- Step 6 - oven. We install an inexpensive stove, or a homemade one. But under any one, we must additionally lay out a brick corner.
- Step 7 - finishing. We fasten the lining, skirting boards, casings.
So your compact and inexpensive steam room is ready.
If the walls, due to savings, are not too strong, then the smaller the bathhouse in volume, the better - so its structural properties will be higher.
Stages of constructing a summer steam room
A frame sauna, created with your own hands at the dacha, does not require special skills. It is enough to carefully follow the step-by-step construction sequence:
- Draw a drawing that can clearly show the details of the future project.
- Decide on a site for construction.
- Clear the place.
- Make a foundation for installing the frame.
- Construction of the frame.
- External cladding.
- Installation of a thermal insulation layer.
- Summing up communications.
- Interior decoration.
- Installation of equipment and furniture.
Construction of the foundation
After completing the preparation of the project, it is necessary to decide on the location for the construction of the building. The surface of the site is cleared of stones and debris, vegetation is removed and the surface of the earth is leveled.
Since a do-it-yourself sauna made from scrap materials at the dacha does not have much weight, it does not require a powerful foundation. You can limit yourself to a support-column base. An asbestos-cement pipe is suitable for making supports. The pipes are buried 1.5 meters, a piece of reinforcement is inserted inside each and concreted. The number of supports and the length of the step between them depends on the type of soil and the expected load on the future foundation. The area between the pipes is filled with solution.
Next, you need to wait until the foundation dries completely. Then they begin to install the grillage under the frame. Metal or wooden beams are suitable for its manufacture.
Project #2 - wood concrete is used
And here is a good example of building a budget bathhouse from wood concrete - the price is not much more expensive than frame technology. So, the outer walls of the steam room will be 20 cm thick, and inside there will be a brick partition from the stove.
Here's what the construction process looks like:
- Step 1. We dig a drainage hole with dimensions of 1.2 x 1.8 x 1.4 m. We fill up the OPGS with stones on both sides, make formwork, and fill it.
- Step 2. We dig a foundation 30 cm wide and up to 50 cm deep. We fill it with sand and tamp it.
- Step 3. We put up the formwork, reinforce two rods at the top and bottom. We place vertical rods every meter. We pour the foundation.
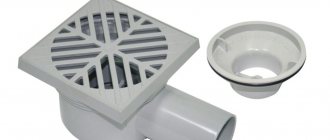
- Step 4. We lay EPS, mesh in the washing and steam room and fill the floors. In the washing room we additionally organize drainage.
Detailed information about the plum can be found here:
- Step 5. Lay the blocks, check the evenness of the walls with a level.
- Step 6. We make the roof using 50x100 boards. The optimal distance between the rafters is 55-80 cm. Cover.
- Step 7. Cook the oven or buy a budget ready-made one. The ventilation scheme is suitable as follows: outside air goes to the gap between the stove and the brick wall, where it heats up.
- Step 8. Install the shower tank in the attic.
- Step 9. Finish the walls from the inside. If possible, use Izospan FB - a material special for baths, plus heat-resistant tape. Izolon is good for ceilings, as it can withstand temperatures up to 150°C.
This is such a budget-friendly and quite successful bathhouse.
When choosing wood concrete, pay attention: according to its density, it can be thermal insulating and structural. The first has a density of 400-500 kg/m, the second - 500-850 kg/m. This material is used for the construction of self-supporting walls and has good heat and sound insulation.
Installation of the floor of a frame-panel bathhouse in the country
The floor in the bathhouse is double:
- The lower floor consists of two parts with 2% slopes directed towards each other. This design is designed to drain water from the bathhouse. The material used is 20 mm thick boards covered with roofing felt. It is attached to the base using a stapler. The logs are installed on the tires. A gap of 5 cm is left between the parts of the floor. To avoid sticking of the roofing material, 3 metal tubes are placed in the gap. The floor gap serves as a kind of receiving tray for water, which, when it gets from the floor onto a layer of crushed stone, breaks into drops and enters the ground.
- The top floor is the main one. It is made from 50 mm boards treated with an antiseptic. Floor slope - 1%. The logs are installed in 1 m increments, and the boards are attached to them with screws, the heads of which must be recessed.
It is recommended to leave small gaps in the floor. This will facilitate better drying of the boards and provide fresh air for burning wood in the heater. When using a bathhouse, a special grate is placed on its floor.
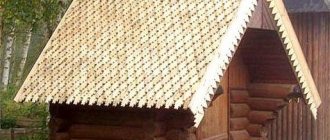
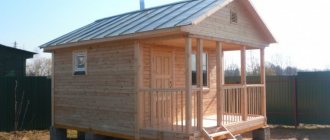
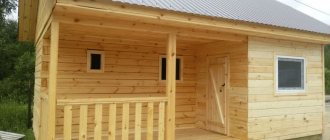
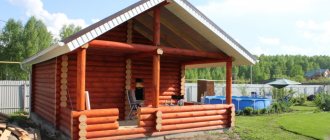
Project #3 - miniature bathhouse made of timber in the national style
And if you can’t imagine a Russian steam room made of another material, like timber, you can build this relatively budget option.
- Step 1. We level the area for the foundation from the screenings, knock together the “formwork” and leave only an opening for draining water from the washing room.
- Step 2. Lay out the EPS and knit the reinforcement cage. We fill it with concrete, make a water ramp and the foundation is ready.
- Step 3. Lay the frame. Under the first crown we place a board treated with an antiseptic, which we cover with roofing felt on three sides. You can put moss on the board itself - it has antiseptic properties, and therefore the crown of the bath will last even longer.
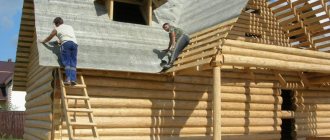
- Step 4. We build the walls and leave it like that for several months for shrinkage.
- Step 5. Attach the rafters and cover the roof. We make a pipe passage through the ceiling - it can be easily made from a metal angle and a stainless steel sheet.
- Step 6. We make a frame partition between the steam room and the dressing room, insulate it with mineral wool and cover it with clapboard on both sides.
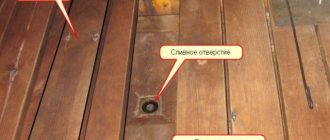
- Step 7. Lay out the floor in front of the stove with porcelain tiles. We leave a special hole in the floor for fresh ventilation.
- Step 8. We lead the pipe from the stove through the roof. We make the passage from Master-flash rubber, which is resistant to temperature. The joint with the roofing is sealed with MS polymer.
- Step 9. We attach the shelves in the steam room and conduct electricity.
Remember: the first step to huge savings when building your own sauna is to build it yourself!
Features of a frame-panel bathhouse at the dacha
Compared to other types of bathhouse buildings, the panel structure has a number of advantages:
- Relatively low labor intensity and high installation speed;
- Economical construction;
- Fast heating of rooms;
- No long-term shrinkage of the structure due to its low weight;
- Wide range of choice of materials for exterior and interior finishing.
Its disadvantages include the lack of solidity of the structure due to the specifics of its assembly, the need for enhanced thermal insulation of the bathhouse structures and the relatively short life of its operation.
Project #4 - steam room on a light frame made from improvised materials
The beams for the bathhouse frame can even be made from collected firewood, if desired. The main thing is to choose one without defects and knots, and be sure to treat it with an antiseptic.
So, let’s build a budget sauna from improvised means:
- Step 1. We make beams for the frame, process and dry.
- Step 2. We build a pile-rubble foundation: we dig up a meter of soil with a drill, put thick pine stakes there and make a backfill of concrete and stones on top. Next, fill the pillars to the top.
- Step 4. Assembling the frame.
- Step 5. We dig a hole for the drain, insert a barrel with broken bricks and crushed stone inside, and put a drain there. This is a non-insulated summer option, but for winter you can lay insulation or a heating cable.
- Step 6. We insulate the floor and ceiling, put a film on top of the insulation. We use Finnish foil paper for saunas on the walls and ceiling.
- Step 7. Put on the oven. Take it with a register, because... you need to heat the water for washing - so as not to purchase a boiler separately. So, the Vulcan stove - it’s inexpensive and heats well.
Such a bathhouse lasts a surprisingly long time, the steam makes you happy, and spending time in it is a pleasure. And you can always find disadvantages.
Do-it-yourself sauna: all stages (video)
Each stage of building a bathhouse at the dacha is complex in its own way. Naturally, you can re-read many interesting articles, watch lessons, or contact specialists directly for minimal help. But here you must understand that only personal desire will allow you to start and complete the project. If it’s just an idea that seems simple and feasible to you in a couple of days, it’s better not to take on the process. Save your energy, time and money, draw up an accurate and correct project, and only then start working.
Mini-baths: cheap and cheerful
But if you don’t have the funds to build a steam room at all, you shouldn’t despair - today there are many options for building a steam room literally out of nothing. Let's take a closer look.
Barrel sauna
This is the most ordinary wooden barrel, only of a more substantial size. Part of it is covered by a wooden lattice screen, behind which the stove is hidden. There is a small bench in front of the screen. Even three people can steam in such a bathhouse at the same time. But this option is only for summer: they rolled it out onto the site, placed it horizontally, threw firewood into the stove and you can pour water on the stones. But as a low-budget option, it’s nothing at all.
Camping sauna
Such a bathhouse is mainly taken on camping trips, but if there is no other alternative, it can also be used on the site. Such a steam room will be inexpensive, because it is an ordinary tent in which a stove or an electric steam generator is placed. This is no longer the same soft Russian bathhouse, but as a temporary phenomenon it also has a right to exist.
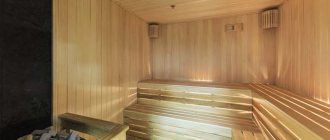
Built-in mini-sauna
A fashion has also appeared to make bath-saunas right in a city apartment, in the bathroom. So, we move the washing machine to the kitchen, and in its place we build something similar to a cabinet. This is a small structure, about 1.5 m high, made of a frame and covered with clapboard. Inside there is one shelf for a seat and a built-in steam generator. The person sits down, closes the door, and turns on the device. But his head remains outside for safety's sake. Using special aromatic oils and other SPA elements is quite a good way to improve your health. We can say that this is the smallest and cheapest bathhouse in the world.
What to build a bathhouse from
At the moment, there are many options from which it is worth choosing. But if you pay attention to the latest rapid construction technologies, you won’t be able to save money here. Of course, a frame bathhouse can be built in just a few days, but it will also cost a pretty penny. Therefore, it is worth looking for an option that is more acceptable, for many of us in general, from used materials, for example, brick or cinder block. And why not, because such a building will easily last for several decades...
In fact, now you can build from anything, as long as the requirements and budget are met, and the characteristics of the future building are combined with your opinion about the new bathhouse.
Construction of a ceiling and roof for a frame-panel bathhouse
The passage of the chimney through the ceiling can be done in this way.
A square hole is cut in a heat-resistant panel or metal sheet into which a metal box for the stove pipe is secured. The height of the box must be greater than the height of the ceiling. When installing the pipe, the passage space is filled with basalt fiber. The chimney passage arranged in this way is safe from a fire point of view, since there is no contact between the chimney and the wooden roof structure. Along the remaining surface of the ceiling, foil insulation is fixed to the floor beams, on top of which a wooden cladding made of clapboard is installed. The upper space between the ceiling beams is filled with insulation, covered with a waterproofing membrane and covered with 20 mm boards fastened with nails to the ceiling joists.
The installation of the roof of a frame-panel bathhouse is practically no different from the installation of a similar structure of a residential building. It includes: assembly of the mauerlat and rafter system, installation of sheathing and laying of roofing material. Considering that our foundation is not massive, the roof of the bathhouse should not be heavy. Therefore, instead of tiles for covering, you can choose roofing iron or rolled materials.
Determining the construction site
The location for a bathhouse on the site can be determined taking into account the general layout of the topography of the site, the presence of other structures on it, sanitary and fire safety requirements. It is most advisable to place it near a lake or river; a swimming pool or artificial pond may also be suitable.
When choosing a location, design and size, it is necessary to take into account the bathhouse and the possibility of blocking or combining with other structures. For example, you can combine the wall where the bathroom is located in the house. This will help save money on sewer installation.
Or, for example, this can be done as an extension of the kitchen, then there will be a common stove, sewerage, quick access to the bathhouse without going outside. The method will be especially relevant for those who have a summer kitchen on their property.