The comfort of staying in a bath apartment depends not only on the design of the heater or ventilation; in conditions of excess water, the successful design of a bath drain is no less important than skillfully selected cladding or flooring in a steam room or washing department. The drainage system and sewage system of a wooden bathhouse are in many ways similar to human lifestyle and health. While the water drains down the drain without any problems, its operation is not noticed. As the drainage system becomes clogged or fails, the entire steam room process, the entire room of the wooden bathhouse, turns into a fetid sump.
Models of drainage systems for wooden baths
To be precise, the safety of the floors in the steam room and washing department depends on the correct choice of the design of the bath drain. In addition to the joists and floorboards of the rough floor padding, the corners and some of the wall insulation begin to dampen.
You can stop using the drain altogether. For example, in small log cabins with a steam room for a couple of people, the washing floor is laid with a slight five-degree slope. A layer of film is laid on top of it just to protect the thermal insulation and rough padding boards. Wooden bath ladders are installed on top of the film. The drain is installed along the edge of the wall, usually it is a standard gutter through which water goes into the sewer pipe and into the ditch.
What to choose for a drainage system
Often, owners of wooden baths install a classic elbow with a bellows - a water seal. The floor is covered with a waterproofing film, and a wooden ladder or grid of several sections is laid on top. This is both simpler and cheaper, but not always convenient. For a winter bath, such a drainage system can only be used if the steam room is used regularly and the wooden floors are thoroughly insulated.
Otherwise, the plastic water seal will either be torn apart by frozen water, or the room of the wooden bathhouse will be forever saturated with odors and gases from the drainage pit.
The choice of a drain drain system is determined by several important conditions:
- Low height of the drain structure. For a wooden bathhouse, this is not critical, since the height between the subfloor and the drain floor is often 15-20 cm. But it is the compactness of the ladder that allows you to hide the entire drain system under the wooden floor without any problems and thoroughly insulate it;
- Easy maintenance of the drain system. Periodically you have to clean the sump, remove and rinse debris from the water seal. All this can be done from the bathhouse without dismantling the wooden floors;
- Ability to operate the ladder in a dry or almost dry condition. Even after a month's absence and not using the bathhouse, the drain gate system will properly isolate the space of the sewer pipes from the steam room or shower room.
For your information!
There are also designs of sewer drains for baths with a built-in lock that can mechanically cut off the sewer from the washing room. You just need to press the lock button with your foot to close the cavity. Such designs are used mainly in shower rooms. For a wooden steam room or washing a bathhouse, such ladders are not very convenient. You can, of course, make a hatch on top of the grate and open it every time after completing the bath procedures and latch the valve, but this is wrong. Moisture and drops of water will condense on the drain surface of the subfloor for a long time, therefore, if you close the valve in a wooden steam room, then after half an hour or an hour a puddle of condensate will form on the floor.
In conditions of irregular use of the bathhouse, the ladder, as a system, remains the most preferable from all points of view.
Advantages and disadvantages of ladders made of different types of wood
As you know, there are no trifles in a bathhouse, so every detail should be given the closest attention. For example, if during construction you have perfectly insulated the floors in all rooms, installed a heating system and covered the surface with ceramic tiles, you should take care of the comfort of movement.
After all, as you know, wet ceramics are very slippery, which can lead to falls and injuries. To avoid this, bath ladders are used. But their scope of application is not limited to this; they can also be used as the main floor covering, but more on that below.
In the photo - a section of the bathhouse ladder
Options for drain drain systems
As a rule, experts recommend three types of drains for use in bathhouse conditions:
- Classic ring drain path;
- Linear drain with grating;
- Dry or float drain with mechanical bellows blocking.
The principle of operation of all devices is approximately the same; differences may be in the method of blocking the flow area and the design of the ladder itself. This is convenient; you can always choose one or even two different devices that are best suited for the specific configuration of the steam room or washing compartment of the bathhouse.
Ring and linear version of the drain ladder
This type of drainage device is used for small spaces; it is convenient to equip, for example, a shower stall. The cylindrical body and the annular slot for receiving water cope well with the load in conditions where the water flow approaches the drain from all sides in a relatively small area.
The installation of a ring-type drain is much simpler than linear or combined designs. A ring drain is recommended for rooms with a small amount of water to be removed.
The structure, 70-90 mm high, is designed in the form of two coaxial annular cavities installed in one housing. The gap between the walls is filled with water with a column height of 50-55 mm, which is quite enough to reliably block the inlet section of the sewer pipe.
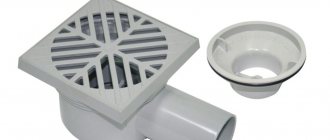
The classic linear drain is a long receiving chute with a barred window. Structurally, the linear drain differs from the standard ring design only in the shape of the water intake and the rectangular body of the water seal.
Main stages of installation
To install a dry siphon yourself, you should carefully study the steps of its installation. If certain conditions are met and everything is done correctly, then the installation of this structure will not cause problems. The most common problem after installing a water seal yourself is leaks. If you don’t have confidence in your own abilities, you should seek help from a specialist who can carry out this task easily and efficiently.
Installation of this device is quite easy. Here are the main steps:
Dry sewer siphons are fairly reliable structures and do not require frequent checks and are quite resistant to blockages. To select and install this device, you must follow the recommendations and rules given in this article. You need to choose this device carefully and carefully, and in this case the result will not be long in coming; the device will work reliably for many years.
Any device has its advantages and disadvantages. Let's look at the main advantages of a dry shutter:
Such valves, unlike water valves, can be installed horizontally
Adapted versions of the sauna drain
The so-called dry type drain looks more attractive. In such a drain there is a minimum amount of water in the water seal. For comparison, the height of the water column in a dry case is 30-35 mm, while in the classic version it is 50-55 mm. This is more than enough for a wooden bath.
Dry water seals are produced in two types - float and pendulum.
In the first case, the exit to the sewer drain pipe is blocked by a heavy float. The weight of the ring element is large enough that, in the absence of water in the bellows, it reliably sinks to the bottom and blocks the exit to the drain line. In this position, the drain system can close the bath drain pipe for an unlimited time, and with the first liters of water filling the bellows, the drain will go into working condition.
The design of the ladder with valves of the pendulum system is shown in the diagram. The bellows blades or flaps are in a vertical, closed position. When the system is filled with water, the valve opens under pressure and releases some of the water.
Advice! Before installing the drain system, it is imperative to check the condition of the drain slope under load.
Typically, the drain plane is tilted and planned so that the water flows to the point where the receiving window is installed. If the floors “play” slightly, the slope under the load from the weight of people in the room may change.
Therefore, before installing a drain in the floor of the bathhouse, they do a small check:
- Place an insulating film on the floor;
- Install wooden ladder gratings;
- Pour a small amount of water onto the waterproofing of the bath.
Moving along wooden ladders, they monitor the place on the floor where spilled water mainly flows and collects. This will help determine the optimal location for installing the drain system.
Variety of design solutions
Today on sale you can find many dry ladders that have their own unique configuration. There are three main types of drains, depending on the shape:
Corner drains are mounted in a corner (hence the name) and are almost invisible. Rectangular and round fixtures can be installed in any part of the bathroom. Plastic, steel and combined models are very popular in the plumbing market.
Gratings for drains differ in the pattern of slots, perforations, etc. The range of gratings is incredibly wide. There are also products that have LED backlighting. A backlit drain can create a unique atmosphere in the bathroom. However, the cost of such a device is higher.
Depending on the design, the drain is installed in the center of the floor or in any corner, and the grate can play a decorative role, complementing the interior
There are also quite a lot of budget options, so choosing the right option for a specific case will not be difficult. It is worth remembering that the appearance of the device is secondary. The main thing you need to pay attention to when choosing such a device is the technical characteristics. This will allow you to purchase an effective product that will last for many years.
Installing a drain ladder in a bathhouse
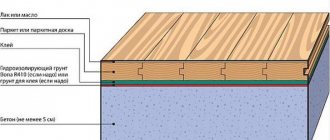
After the thermal insulation has been laid, it is time to install the drain floor. You can do it in two ways. In the first case, it is formed directly on foam boards laid on the subfloor. The surface of the insulation is simply sealed with a waterproofing membrane, and at a selected point a hole is cut in the foam and membrane for installing the casing and the drain system of the drain.
In this embodiment, washing floors are made in the form of wooden gratings, supported on bars nailed to the level of the baseboard of the bathhouse walls.
The second option for installing the drain involves covering the surface of the insulation with an intermediate floor, which simultaneously serves as the basis for the drainage system and PVC waterproofing. In this case, the floors are a little thicker, but the entire drain system of sewer pipes is sealed into the insulation of the bathhouse floors.
Of course, in both cases, drain gratings will be required to house the steam room and washing compartment. Before making ladders into the bathhouse, it is necessary to mark the number and location of support bars on the drain floor, so that the dimensions of one wooden grate do not exceed 70x150 cm.
Conclusion
We hope that our brief instructions will help you choose high-quality drains for your bathhouse without extra costs or outside help. These simple designs have both a practical meaning, preventing accidents and allowing water to flow freely into the sauna drain, and an aesthetic one - the wood fits perfectly into the interior.
You can also make furniture for a bathhouse that matches the style of the ladders on the floor
In addition, wood is an environmentally friendly material that does not contain chemical compounds harmful to the human body. And some types of wood, when exposed to temperature, release beneficial substances into the air, making the atmosphere in the bathhouse even more favorable. The video in this article will help you understand this topic more clearly.
Source
Preparing to install the ladder
After the condition of the wooden floor has been checked and the optimal location for installing the drain has been found, the layout of the sewer pipes must be checked.
Due to the very low height of the water column, the drain in a bathhouse turns out to be very sensitive to the angle of inclination of the sewer drain pipe. So much so that many craftsmen try to check the performance of the drain system even before installing the insulation and floorboards.
To do this, a box of slats is knocked down on the assembled logs, into which the ladder body is installed. Sewer pipes are connected to the outlet flange.
By pouring a small amount of water, you can very easily find the optimal location of the drainage system pipes in the bathhouse subfloor. The location of the communications is fixed, the outlet of the sewer pipe is left assembled on the joists, and the drain itself is dismantled and returned to it after laying the floorboards.
Installation of a dry siphon
In order to install a dry siphon yourself, you need to study the steps of its installation. If you follow certain rules and are very careful, installing this structure will not cause difficulties. The most common problem after installing a water seal yourself is leaks. If you are not confident in your own abilities, it is recommended to call a specialist who will carry out a high-quality installation of the device.
Installation of such a device is very simple. Let's consider the main stages:
Dry siphons for sewerage are very reliable devices, do not require frequent checks and are resistant to blockages. To select and install such a device, you must adhere to the rules and tips outlined in this article. You need to approach the choice of such a device with the utmost seriousness, and then the result will pleasantly surprise you - you will receive a reliable and durable device that will last for many years.
Installation of a drain drain
The drain installation process begins with marking the hole on the floor. This is quite simple to do if you know exactly the location of the axis of the sewer pipe located in the underground. Usually the point - the center of the circle is marked when laying the drain floor in the bathhouse.
Using a jigsaw, a hole equal to the outer diameter of the body is cut according to the markings. The ladder should fit into the cutout with a small gap.
Next, using a chisel and a light hammer, or maybe a mallet, cut out a square for the mounting flange of the ladder. If the floorboards are thin, then it is better to do the work using a hand router, and only trim the corners with your hands.
Next, a waterproofing membrane is laid on the floor of the bathhouse; the size of the canvas should be chosen with a small margin, so that there is an overlap of 30-35 mm on the walls of the bathhouse.
Before laying the ladder, the canvas will need to be tensioned and secured with aluminum thresholds. Next, at the installation site, a hole with a diameter of 15 mm smaller than the cylindrical body of the ladder is cut out in the PVC film. The edges of the film are cut with straight cuts, treated with sealant and glued to the walls of the seat.
All that remains is to insert the outlet pipe into the sewer connecting flange, treat the edges of the drain system with sealant and install the housing in place.
