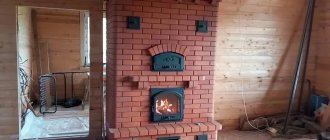
Brick stoves equipped with a hob are universal - they allow you to heat the house, as well as heat water and cook food. The designs of stoves vary, from the simplest and most compact, which you can assemble with your own hands, to complex multifunctional ones, the laying of which is best left to an experienced stove maker. For those who are interested in how to fold a stove with a stove for the home, how to properly fold a stove with your own hands, an article will help, which contains a diagram of the stove and drawings with orders.
Features of laying a brick oven with your own hands
What nuances do you need to know before starting to lay the stove?
The foundation for the stove must be strong and solid. But at the same time, in no case should it be connected to the main foundation for the house
The fact is that the house shrinks over time, which is reflected in the foundation, so it is very important to separate these two elements. With seasonal soil movements and general shrinkage of the house, the design of the stove may suffer. The foundation should exceed the dimensions of the stove by 15-20 cm on each side. It can be made of ordinary concrete, cement mortar or made of concrete blocks. To lay the furnace, you need to purchase 2 types of bricks: regular solid bricks made of ceramics and fireclay (fireproof), from which the firebox, smoke ducts and all heated elements will be built.
The cost of such material is much higher than the price of ordinary red brick, so it is usually used only on those surfaces that will have direct contact with fire. All other elements are laid from red solid brick, using a mortar based on red oven clay. The composition of such a solution must include heat-resistant cement. But between the ceramic masonry and fireclay bricks it is necessary to maintain a gap of 5 mm. As the fireclay brick heats up, it will expand. Therefore, to ensure that the furnace structure does not undergo deformation during operation, it is necessary to take this gap into account. All purchased elements for the stove (grid, door, hob, oven, etc.) are installed in accordance with the general layout and purpose of the stove
It can be made of ordinary concrete, cement mortar or made of concrete blocks. To lay the furnace, you need to purchase 2 types of bricks: regular solid bricks made of ceramics and fireclay (fireproof), from which the firebox, smoke ducts and all heated elements will be built. The cost of such material is much higher than the price of ordinary red brick, so it is usually used only on those surfaces that will have direct contact with fire. All other elements are laid from red solid brick, using a mortar based on red oven clay. The composition of such a solution must include heat-resistant cement. But between the ceramic masonry and fireclay bricks it is necessary to maintain a gap of 5 mm. As the fireclay brick heats up, it will expand. Therefore, to ensure that the furnace structure does not undergo deformation during operation, it is necessary to take this gap into account. All purchased elements for the stove (grid, door, hob, oven, etc.) are installed in accordance with the general layout and purpose of the stove.
Grate
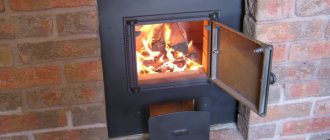
When inserting the door of the combustion chamber or ash pan, it is necessary to tie it with annealed steel wire. In this case, one end of the wire is inserted into a specially designed hole, and the second is twisted into a bundle and laid between the bricks, tightly clamped with mortar. When installing a cast-iron firebox or cast-iron stove, it is necessary to lay an asbestos cord between the brick and the metal element to compensate for the different temperature expansion of the materials. The chimney for the stove can be made of red ceramic brick, or you can use a ceramic block chimney, which is purchased ready-made. Cladding is the final stage of building a brick oven. To give a beautiful aesthetic appearance, the stove can be lined with red ceramic bricks, clinker bricks (like wild stone), and decorative tiles. This coating gives the stove a unique, authentic look and also protects it from the negative effects of the environment.
Materials needed for laying the stove.
- Red solid ceramic brick (M-150.)
M 150
- Fireclay (fireproof) brick.
- Masonry mortar (sand, red oven clay).
- Foundation material (cement, graphite, sand).
- Ruberoid.
- Asbestos cord, galvanized wire.
- Boards for creating formwork.
- Reinforcing mesh.
- Grate.
- Cooking surface (stove).
- Ash pan and ash pan (blower) door.
- Fire door.
- Chimney view.
- Chimney duct damper.
Tools needed for laying the stove:
- Building level.
- Shovel
- Construction marker.
- Measuring tape (roulette).
- Construction plumb.
- Goniometer.
The construction process of the Swedish
The process of constructing a Swedish stove. For the construction of the furnace, the following calculations are taken: for the stove - 71 by 41 centimeters; for the firebox (height, width, depth) 30 by 35 and 45 centimeters; for oven 30 by 35 and 50 centimeters. These dimensions may vary depending on the oven version. The metal walls for the oven must be at least 4 millimeters. The distance from the edge of the grate to the oven should be about one brick. There should be a gap of a quarter brick from the back of the oven to the firebox. The oven is made of dense cast metal.
Orders of the Shvedka stove
When the oven approaches the firebox, the walls are additionally protected with vermiculite. The door must be cast iron. It is attached to the masonry, which guarantees reliable fixation.
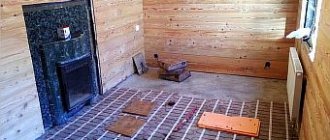
Before laying the brick stove, thermal insulation of the floor is done. Insulation can be made from basalt cardboard. The insulation is laid so that at the end a 1.5 centimeter layer is formed. The middle layer is made from a foil sheet. The foot of the oven (the first 2 rows) is laid out with widened centimeter seams, this creates a protrusion. The brick is moistened before laying. The next two rows form an ash pan and three doors are installed for cleaning the oven. The doors are mounted with a gap. An asbestos cord is inserted into the gaps.
| ORP Shvedka (Swedish stove) No. 3 |
With a two-layer stove made of red and fireclay bricks, a distance of 6 millimeters is made between them. The internal lining of the furnace is lined with fireclay bricks. The grate bars are inserted. And the oven is inserted into the same row. From the sixth to the ninth the combustion chamber is formed. The door is inserted. The tenth row covers the oven.
Next, the slab is laid and smoke channels are made. When laying the slab, quarters are cut out of the bricks. From the twelfth to the sixteenth, the cooking chamber and smoke exhaust channels are laid out. The next two are laid with trimmed bricks. From the twenty-first to the twenty-eighth there is a chimney. In the twenty-seventh, a valve is inserted with a basalt cord gasket in the gap. From the twenty-ninth row there is an extension for the cornice of 5 centimeters. The channels (except the pipe) are closed.
The next row is made even wider by 5 centimeters. Then the size is reduced to the original size. The pipe is laid out in 5 bricks. In front of the ceiling, 3 rows of pipes are fluffed up. The thickness of the pipe is one and a half bricks. An iron smoke cap is placed on top of the pipe. The pipe running outside the house is lined with cement mortar.
Assembling a heating and cooking stove with your own hands: procedure
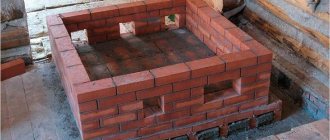
Work begins with the construction of the foundation. For it, you should prepare a hole less than half a meter deep. On soft soils, the bottom should be compacted and leveled. For a heating and cooking stove made of brick, the foundation should be made a little larger than the structure itself, the gap should be at least 5 cm.
A backfill of brick chips or crushed stone is used as the base of the foundation; it is compacted and filled with liquid mortar.
You can use brick for the foundation, but in order to save money, it is better to do it as follows:
- on the front side, lay out bricks with rows bandaged;
- From the inside, the foundation is filled with liquid mortar, where stones are placed;
- Each stone layer should be filled with mortar.
At the top, the foundation should be 150 mm below floor level.
The stove should be placed on a perfectly flat surface, so the foundation should be checked with a level and, if necessary, added cement mortar. When the surface has become perfectly flat, you can lay out the bricks themselves. Ensure the evenness of the masonry, fill any cracks with mortar if necessary.
After this, two layers of roofing felt should be laid as waterproofing; it should be laid dry. More bricks are laid on top in a row using cement mortar. Next, you can place the oven itself on a mixture of clay and sand.
Please note that the solution should not stick or spread. If the consistency is unsuccessful, then you need to add one or another component to the mixture
Otherwise, when drying, cracks may appear on the surface.
Installation of furnace casting for heating and cooking structures
As mentioned earlier, heating and cooking structures consist of some cast iron elements: ash pan, firebox, oven, damper and cooking stove, which must be installed correctly.
When laying rows of bricks, leave a gap for casting that exceeds the size of the structure by 5 mm. It is able to compensate for the thermal expansion of cast iron. The protrusions on the door must be tied with thick wire placed in rows between the bricks.
You can also install furnace casting using another method, using a stainless steel corner. They should be laid in brick cuts. Then the door frames must be lined with asbestos or other high-temperature insulating material. The most basic material is asbestos cord, which is wrapped around the door frame. They should also cover the entire perimeter of the structure when installing it.
We lay out the classic “Swedish”
The dimensions of this stove are 102 x 88.5 cm in plan, height - 2.03 m, heating power - 3.2 kW. Accordingly, the heating area is up to 40 m² of a country house, insulated according to the climate in the area of residence.
Oven heater can be used for baking and heating the kitchen
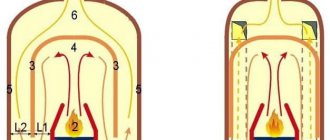
Comment. In the presented model there is no channel for the summer passage of gases, so it is more convenient to use the stove for cooking in winter. The heater device is shown in section in the picture below.
To fold a traditional “Swede” yourself, purchase the following materials:
- solid ceramic brick of standard sizes 250 x 120 x 65 mm – 553 pcs.;
- fireclay brick SHA-8, operating temperature – up to 1300 °C, size 230 x 114 x 65 mm – 33 pcs.;
- grate 30 x 20 cm;
- oven 45 x 25 x 29 cm;
- doors: firebox 21 x 25 cm, blower 14 x 25 cm, inspection 14 x 14 cm (3 pcs.);
- hob panel 2 burners made of cast iron 410 x 710 mm;
- valves: smoke 25 x 13 cm, exhaust 13 x 13 cm;
- equal-flange steel angle 45 x 45 mm total length 6.5 m;
- steel strip with a cross section of 50 x 5 mm and a length of 2 m;
- metal sheet 2 mm thick – 1 m².
Walls in contact with flames and hot gases are lined with fireproof materials.
According to fire safety requirements, a sheet of roofing steel 70 x 50 cm is laid on the floors on the side of the firebox. Building materials for the chimney and foundation are not included in the list.
When the stove is ready, it is laid out according to the presented order:
- Rows 1, 2 are solid, on the third the outlines of the ash pan, the secondary chamber for the oven and the vertical shafts are laid out. We attach 3 cleaning doors and one ash door.
- The fourth tier is a continuation of the masonry according to the drawing, the fifth overlaps the installed doors. We begin to form the bottom of the firebox from fireclay bricks and install the grates, having previously made a depression in the stones with a grinder.
- Row 6 – lay out the walls of the combustion chamber, mount the oven and loading door. Between the firebox and the oven compartment we make a partition ¼ thick of fireclay stone. We build the 7th horizon according to the scheme, on the eighth we block the lower gas duct, the ninth tier covers the door of the main chamber.
- After the tenth row, a hob and a metal corner are installed on the front side. On the 11th, the walls of the niche begin to form; horizons 12–16 continue. Then we lay the support corners and the brick floor - row No. 17. On the left we leave an exhaust opening above a niche the size of half a brick.
- On the 18th tier we attach the second end corner and begin laying the walls of the drying chamber (rows 19-26). After the 22nd horizon, we cover the stove with a sheet of 34 x 19 cm, on the 26th row we place the next corners of the ceiling, and on top we place a metal plate measuring 905 x 800 mm.
- Tiers 27-29 are solid, leaving one chimney opening. Rows 30-31 - we form the beginning of a pipe with an internal channel 250 x 140 mm.
Further masonry is carried out using cement mortar, in compliance with fire safety rules. That is, in the wooden ceiling there is a stove groove with a thickness of one and a half bricks (38 cm), on the roof there is a setback of 130 mm, as is done in the diagram.
For the procedure for laying a Swedish classic stove, watch the video:
Note. Here and below, materials from the website “Heating Stoves and Fireplaces” by the Belarusian master Nikolai Zolotarev are used.
Heating and cooking stoves for home and garden
If a private house does not have a supply to the central heating network, installing a conventional brick stove is an excellent option. Although, in fact, a modern stove is not entirely ordinary. Nowadays, the only acceptable option is a long-burning stove, which you can make with your own hands, either in a simple version from an ordinary barrel, or in a more complex and aesthetically pleasing one - from stove bricks.
The advantage of this stove is that its efficiency is almost 100%, which even a Russian stove cannot boast of. In addition, these stoves can be of different designs, the most modernized of which is a brick stove, equipped with an oven and a stove for cooking. Cooking at home over an open fire instead of gas is a pleasure few can afford.
Type of fuel
Stoves in country houses can be heated in two different ways.
- Solid fuel;
- Universal.
Solid fuels include coal and firewood. They are superior to electric and gas.
Heating with gas or solid fuel can be considered universal. In this case, when one fuel runs out, you can switch to another. From gas to wood or coal and vice versa.
Materials for laying the furnace
Materials you will need:
- ordinary red brick M150 - 1085 pieces;
- fireclay or silicate bricks for arranging the firebox - 150 pieces;
- clay - about 200 kilograms;
- sand - approximately 100 buckets;
- 2 mm steel wire - 25 meters;
- metal corner measuring 50x50 and 4040 millimeters;
- roofing felt sheet 1x3 meters;
- metal sheet GK-4 millimeters, size 1.5x1.5 meters;
- insulating material for wall finishing;
- asbestos 5 mm cord - 10 meters.
The following building materials are needed for the foundation:
- boards for formwork;
- sand;
- cement;
- crushed stone;
- fittings
It is necessary to purchase the following cast iron products:
- valves - 3 pieces;
- hob with two burners;
- grate – 1 piece;
- cleaning doors – 5 pieces;
- ash door – 1 piece;
- fire door – 1 piece.
A little theory
This section of our article is necessary due to the fact that even a professional builder who has never encountered the laying of a furnace may not understand some specific terms and names of structural elements and details. If we talk in general about self-taught home craftsmen, then they definitely need such an “educational education”, otherwise it will be unclear what they are talking about. Let's start with the device of the furnace.
Furnace structure
First, let's look at the terms and elements of the furnace design, since in order to understand the description of the order, you definitely need to know them. Let us list the parts of the furnace and indicate their purpose. The picture below will allow you to see everything clearly.
Heating stove made of bricks
- The foundation serves as the basis for the structure.
- The walls enclose the remaining elements; their outer surface serves to transfer heat to the air in the room. Also, the wall material accumulates thermal energy in order to release it not immediately while the fire is burning, but gradually, maintaining a comfortable microclimate in the room.
- A firebox or firebox, in which fuel burns, hot flue gases are formed, and part of the heat is transferred by radiation to the walls of the furnace. The lower part is called the hearth, the upper part is called the vault.
The main part of the stove is the firebox
The grate, the grate on the hearth, through it air is supplied to the combustion zone and the ash spills into the ash pan.
Grate
- An ash pit or ash pit, a chamber under the firebox for supplying air to the grate and for collecting ash.
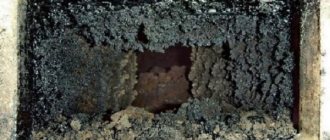
- Cleaning - a hatch opening into the smoke channel allows you to remove the soot accumulated in it without disassembling the furnace structure.
- Smoke channels (smoke circulation, in common parlance, passages) - hot gases circulate through them, and energy is transferred by heat transfer to the walls of the furnace.
- Chimney - serves to release gases that have given up most of their heat into the atmosphere.
- The roof is the upper surface of the furnace.
- The hot-air chamber is a cavity in the furnace volume that is not connected with the channels and the firebox.
- Smoke damper is a plate (gate) that blocks the smoke channel, almost always adjustable, i.e. you can partially block the flow of gases.
- Firebox and ash doors.
Convenient door for the blower with a flap for air passage
Shants are beams made of various materials used instead of a foundation. If the stove hangs on them, then its lower surface can also give off heat.
Construction stages
Foundation for a two-story oven
The first thing the work begins with is marking to lay the foundation
It is important to remember that the dimensions of the foundations in any case must be larger than the foundation itself. To set up the structure you will need the following:
- plywood for formwork construction;
- sand and cement;
- fittings;
- crushed stone;
- waterproofing sheet (preferably made of roofing felt).
Stages of work:
- Prepare a place for the foundation, cut out part of the floor boards if necessary.
- Make sure that the future structure will not rest against the load-bearing beams of the ceiling, otherwise you will have to change the layout of the top.
- A pit is dug taking into account the work plan.
- Crushed stone and sand are poured into the bottom and the composition is compacted.
- The formwork frame is constructed so that the concrete does not leak out of the walls.
- Reinforcing mesh is installed. The fittings for a two-story stove are made stronger than for a conventional one.
- A concrete solution is poured and left to dry for several days.
Masonry scheme
Once the foundation is ready, you can begin laying the foundation. The ordering is carried out strictly according to the scheme and includes the following steps:
- The order of laying the first row on the waterproofing sheet is noted.
- The solution for work is mixed.
Next, the rows are built:
| Row No. | Execution of work |
| 1 | Laying out without using a clay mixture to understand the further course of action |
| 2 | Mounting a blower using wire |
| 3 | Formation of the combustion chamber |
| 4 | Laying asbestos strips along the side openings of the fire chamber for further installation of the grate |
| 5 | Installation of a combustion door, similar to the blower door |
| 7—10 | Standard installation scheme |
| 11 | Mounting the hob, installing metal corners |
| 12—16 | Formation of the cooking chamber |
| 17—19 | Laying out continuous brick rows of lines, forming a place for the chimney |
| 20—22 | Installing corners, fixing doors for the cleaning chamber |
| 23—24 | Raising the sides of the drying chamber |
| 25—30 | The filling proceeds without changes, the valves are formed |
| 31—38 | Forming channels for smoke exhaust, expanding the masonry and leading to the ceiling |
The following stages concern construction on the second floor:
- From the 1st to the 26th row, the standard work scheme is used.
- The 27th stage ends with the formation of the valve. And up to 31 everything goes according to plan.
- Rows 31 and 32 are considered to be the beginning of the chimney pipe.
Possible difficulties and problems
When building stove walls, inexperienced craftsmen do not use a frame made of wooden beams and a plumb line, which leads to the walls deviating from the vertical.
If during the construction process a distortion of the walls is discovered, the masonry should be dismantled and repositioned.
After finishing the work and natural drying, the mini-oven begins to be heated with small portions of firewood.
In this case, the stove walls become covered with cracks due to the fact that shrinkage processes are taking place in the heating structure. To eliminate cracks, dilute the solution and cover the seams.
a07ff0f2bc47417ca4e38dc4d992141a.jpe
Improper sealing of the door fasteners can cause the door to move. To avoid skewing the door, do not leave it open until the fasteners are completely sealed into the seams. If displacement is discovered during construction, the rows are dismantled and the fasteners are sealed again.
Oven features
It is very simple to build heating and cooking stoves with your own hands. They are represented by numerous modifications. Each of them performs two main tasks at once:
- Heats the room
- Serves for preparing nourishing and tasty food
Depending on the size of the house, the stove may have different dimensions. The same can be said about the arrangement of the structure: wall-mounted, corner, island or built-in.
The operating principle of such a seemingly complex design is quite simple:
- Gases are formed in the combustion chamber in the form of smoke, which are in direct contact with the hob and give off their heat
- Heat is also transferred to the oven located on the side
- Steam from the cooking room and smoke are removed through vertical channels into the chimney pipe, giving off heat to the room
Smoke and heating channels can be divided among themselves. In the summer, this will make it possible to heat only the hob and oven.
Introductory video review of a working stove
https://youtube.com/watch?v=yhh0BIsh_cI
A barbecue oven is also ideal for cooking in a summer cottage; see the instructions for laying it yourself
A few basic rules for increasing furnace efficiency
To increase the efficiency of burning one armful of wood, it is necessary to calculate in advance the optimal proportions of the ratio of the size of the firebox, the number of smoke circulations and the cross-section of the chimney. Only in this case can increased heat transfer and prolonged combustion be achieved.
- In the “Swedish”, as in other systems of village stoves, a smoke circulation system is used for heating. This internal arrangement forces the walls of the stove to heat up to the maximum, which in turn heats the room of the hut. The design of the “Swedish” allows you to cook food in the summer, since by turning off the smoke circulation system with a damper, the heat will go out directly through the chimney. The walls of the oven will not heat up.
Attention: the efficiency of the summer version of burning wood in a stove is 50%, in winter this figure is 80%.
- The most optimal and universal dimensions for a Swedish heating and cooking stove are the following parameters: 1020x880x2170 mm. Today they are the standard, but everyone can, at their own discretion, choose other sizes that are most suitable for the selected room.
- During laying, it is imperative to take into account the height of the chimney; the longer the pipe, the better the draft. Do not forget to tightly close the valve that blocks the exit of smoke to the outside after the coals burn out. This way the stove will hold the body longer.
Country heating stoves, masonry highlights
Country stove
- The masonry of a rustic stove must be strictly vertical. The maximum deviation of the main part is no more than 1 cm. Irregularities on the outer part of the stove do not exceed depths and convexities of 5 mm.
- The laying of internal smoke exhaust channels is made smooth, even, without voids or excess mortar. Each individually laid row must be checked by rule and level and correspond to the horizon level. The thickness of the seams when building from brick is equal to the standard of 5 mm, from fireclay - 3 mm.
- It has been proven that the thinner the seams, the stronger the stove will be. In addition, thin seams are less susceptible to cracking and crumbling. During masonry, be sure to use half-brick dressing of the seams; in some places, quarter-tying is allowed, but not in the corners.
- Kiln channels are constructed using one section; narrowing should not be allowed during laying, this will greatly affect the traction factor. The ratio of the length and size of the smoke circuits must be such as to ensure normal movement of smoke using the draft formed in the chimney.
Arranging a small heating and cooking stove
For a small Swedish stove you will need 570 bricks of grade M150 and higher, clay-sand mortar, a cast iron stove with 2 burners, doors for the ash and firebox, 3 cleanouts, 2 valves, 170 cm of metal corner, 65 cm of steel strip (for covering over the cooking recess), a sheet of flat slate 10 mm thick, a sheet of roofing metal for the firebox.
Swedish heating and cooking stove (click to enlarge picture)
Among the features of this stove: the right burner heats up weaker, the left burner heats up more. You can fry on it. This feature is due to the position of the oven, which serves as a barrier to gases emanating from the firebox. They burn well over the firebox, heating the hob located on top. After which they “roll” through the oven and, not so hot, are sent into the smoke ducts.
Swedish heating and cooking stove (click to enlarge picture)
Swedish heating and cooking stove (click to enlarge picture)
Swedish heating and cooking stove (click to enlarge picture)
Heating and cooking stove-Swedish (click to enlarge the picture)Heating and cooking stove-Swedish (click to enlarge the picture)
You can heat the stove with wood and coal, but in the summer it is better to use briquettes or a large fraction of coal: the wood will burn out too quickly and you will have to add it often.
Of course, you can’t install such a stove in the garden, but there’s nothing to heat there either. To install in the garden you need a completely different, small cooking stove.
Popular mistakes
It is better to wet the bricks before laying.
Inexperienced craftsmen put dry bricks into the masonry, but it is better to wet the material. It holds better and adheres more firmly to the solution. This results in more accurate and even masonry joints. Use a wide bucket of water, where the elements are placed for 2 - 5 minutes before installation.
Narrowing the smoke channel in relation to the standard size reduces draft, and damp wood will not burn. When installing the fire chamber door, they often do not leave a 0.5 cm gap around the perimeter to compensate for expansion. After installation, the gap is filled with asbestos cord or sand mortar.
Iron partitions are placed inside the furnace, but it is better to use bricks placed on edge. This is explained by the different expansion of ceramics and metal.
The oven cavity cannot be placed close to the firebox; it is better to place it above the heating chamber through the decks. This will heat the bottom evenly, and the baked goods will be baked equally on all sides.
Interior of a village house with a stove
The method of designing the stove structure depends on the chosen design trend. Finishing materials will determine its appearance.
Tile
If you want to create a luxurious atmosphere in a rustic kitchen, the stove can be refined using tiles - special ceramic or clay heat-resistant tiles created specifically for finishing stoves. The unique shape of the tiles makes them easy to install, and the unique pattern will allow you to create a delightful design, unlike others. In the 19th century in Rus', tiled stoves were in fashion among the upper strata of society and were considered an indicator of prosperity and luxury.
Ceramic tiles heat up quickly and retain heat for a long time
A more affordable option for designing a stove structure is to use tiles. It can be of any shape, rectangular, square or imitate various natural fibers.
Tiles will help create a unique stove design
Design of a stove in a private house, decorated with tiles
When choosing tiles, you need to choose fire-resistant samples that can easily withstand high temperatures and have a dense structure. Thanks to these properties, they will last a long time and will not require cosmetic repairs.
Very often, tiling is carried out only in the part where the fire is ignited and maintained.
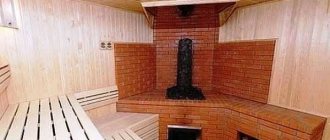
Stone
Upgrading the surface of a Russian stove with stone allows you to get a unique rustic interior with an antique accent. This option is quite labor-intensive and requires significant financial investments. But by spending time and money, you will get a unique design that will delight more than one generation of your family.
A stone stove will become the main highlight in the house
Plaster
When designing the kitchen of a private house in rustic, Provence, country or Russian styles, plastering with clay mortar is an excellent way to finish the stove. After it hardens, heat-resistant paint is applied to the surface. With its help, the stove can be decorated with an original ornament, ideas for which are suggested in the following photos.
Decorative plaster gives a Russian stove a special charm. It will help you recreate any pattern you like on its surface. The following selection of photos will convince you of this and inspire you to create an extraordinary design.
The rustic style almost never completely went out of style. Even having their own huge dacha, stuffed with ultra-modern equipment and perfect, economical heating devices, people strive to build something on their site in the old style - a small gazebo or sauna. But many, having acquired a country house, want to completely transform it, turning it into something like an old Russian hut with a real stove.
Schemes of brick mini-ovens
Small ovens occupy a small area; the dimensions of their bases range from 50 to 70 centimeters in width and up to 65–100 cm in length. The height of the heating structure is from 1.5 to 2.3 meters. A cooking floor, an oven, and a water heating tank are built into the oven. Stove makers have also developed devices intended only for heating a home.
Small heating structure
This is the simplest heating structure. We will analyze the model in the following sizes:
- base width - 51 cm;
- base length (depth) - 89 cm;
- height - 238 cm.
The mini-stove is installed in the middle of the kitchen or against the wall. The optimal heating area is 20-35 meters. Interior partitions are erected around the stove, which allows heating both the kitchen and the adjacent room.
Inside the device are:
- combustion chamber;
- blower;
- smoke channels leading into the chimney.
The combustion door of the mini-stove (cast iron or glass) is selected depending on the aesthetic preferences of the home owners. A door made of heat-resistant glass, through which you can see how the wood is burning, gives the structure a resemblance to a fireplace. Two smoke valves are installed in the middle and upper parts of the furnace. There is one door for cleaning the channels. To build this model of the device you will need:
- 260 pieces of ceramic bricks;
- 130 pieces of fireclay bricks;
- grate (40x23 cm);
- combustion (30x20 cm) and blower (20x14 cm) doors;
- 2 doors for cleaning holes (20x40 cm);
- metal pre-furnace sheet (50x70 cm);
- two sheets of roofing material measuring 60x100 mm;
- sand and clay (or ready-made clay-sand mixture for masonry), clay-fireclay mixture.
Reference. Masonry mortar increases the volume of the device by the thickness of the joints.
The base and top of the mini-oven are laid with ceramic bricks on a clay-sand mortar. The firebox is made of fireclay bricks on a clay-fireclay mixture.
Three and a half bricks fit on the long side of the base, and 2 standard bricks 25 cm long on the short side. The masonry consists of 35 rows in height.
Small heating and cooking stove
This is a mini-oven model for heating and cooking - a convenient and very compact structure. The optimal area for a heated room at sub-zero temperatures is 20-25 square meters.
The device has the following dimensions:
- base length (depth) - 64 cm;
- base width - 51 cm;
- height - 215 cm.
The structure is being erected in the kitchen. The device includes:
- blower;
- combustion chamber;
- smoke channels leading into the chimney;
- cooking floor;
- niche for the oven.
The cast iron cooking floor has a hole that is closed with a disk and a circle. Solid flooring is also available for sale. In the niche for the oven chamber there is a metal oven or a hot water tank with a tap. If the niche is left free, it is used for drying things. To build a stove you will need:
- 222 pieces of ceramic bricks;
- grate (40x25 cm);
- firebox door (20x20 cm);
- door for the blower (14x14 cm);
- cooking floor (35x38 cm);
- metal oven or hot water tank;
- iron pre-furnace sheet (50x70 cm);
- two doors for cleaning holes (20x14 cm);
- two valves;
- a piece of flat slate;
- steel corner;
- clay, sand or ready-made clay-sand mixture for masonry.
Preparatory work
Before you start building a Russian stove, you should make sure that everything you need is available.
Selecting a location
A lot depends on the choice of place to build a furnace. It is necessary to maintain a gap of 30-40 cm to walls made of flammable material or provide them with protective cladding with asbestos. Gaps will also be required for access to the outer walls of the stove for the purpose of inspection and repair.
A heavy unit weighing several tons requires a solid foundation (foundation) protected from ground moisture. A place is provided in advance where the chimney will pass through the ceiling and roof. There should be no ridge or rafters here.
Masonry tools
Basic working tools for a stove maker:
- a narrow trowel (trowel) for laying mortar and cleaning excess from seams;
- a hammer-pick to give a solid brick the required shape;
- building level and plumb line.
To mix the solution you need a shovel and a container.
Stove maker's tool
Now cutting bricks into wedges, removing corners and grinding the cladding is done with a hand-held power tool (grinder) with diamond wheels. This greatly simplifies the work of the master.
Necessary materials
Basic materials for constructing a reliable fireplace: brick and refractory mortar
Their quality is given close attention. You will also need: cast iron for doors, dampers, latches, grates and a hob
Brick selection
The correct selection of bricks for the job is a key factor in the efficiency of thermal output and the long service life of the future fireplace. Therefore, it makes sense to purchase red clay bricks of the M150-M200 brand only of the first grade. Hollow material is unsuitable for stove masonry.
Bricks with obvious signs of defects are also not suitable for such work:
- non-compliance with the standard (230x125x65 mm), to which all standard orders are oriented;
- with traces of burns, warping, shape and surface defects;
- with shells after the release of gases;
- having cracks and burrs from cutting.
Special grades of premium quality bricks, called hearth bricks, are sold individually and are ideal for laying stoves.
Foundation
The base of a heavy furnace is placed on a concrete foundation, which is cast over a compacted crushed stone bed in a hole up to half a meter deep. Horizontal waterproofing from groundwater is made of 2 layers of roofing felt on bitumen mastic.
Masonry mortar
The requirements for a solution suitable for furnace work are seriously different from the usual ones.
The material is required:
- resistance to high temperatures;
- coefficient of thermal expansion as close as possible to that of masonry bricks.
Refractory mixture for laying stoves
Since the quality of the clay plays a leading role here, it is better to buy a ready-made dry mixture at a hardware store.
Checking the quality of clay
The suitability of clay for stove masonry can be checked using a folk method. From the solution, make a spherical lump the size of a child's fist and slowly squeeze it between two planks. If the clay is of high quality, the lump will crack only after being compressed to half its size. Skinny, unusable clay does not deform at all, and material of average condition will burst after being compressed by about a third.
Advantages and disadvantages
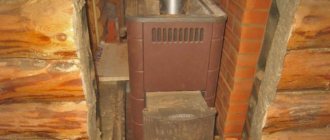
A metal stove is a good source of heat.
You can do it yourself if you have some experience, drawings, tools and consumables. However, before making a thematic design, you need to weigh all the pros and cons.
Among the advantages of a metal furnace are:
- Simplicity of design, allowing it to be made by hand;
- Possibility of carrying and transportation;
- Convenient operation;
- Compactness;
- Strength and wear resistance.
By the way, different power tools are used to work with metal:
- Electric drill;
- Bulgarian;
- Welding inverter.
If you don’t have a cutting power tool, you can limit yourself to a hand tool – a hacksaw, a chisel, a hammer. Some craftsmen, instead of welding, connect metal fragments with fasteners - bolts.
The good news is that any potbelly stove, even a do-it-yourself metal sauna stove, does not require foundation preparation. You just need to install the chimney and provide a path to it.
Being indoors all the time, the stove structure can be susceptible to chemical reactions, perhaps due to the combustion of solid or liquid fuel.
But this does not prevent it from serving for decades. Deformations are also excluded if the metal walls have a thickness of at least 8 mm.
When choosing a suitable design for heating, you need to understand that cast iron does not tolerate shock loads. Therefore, it is better not to drop its stoves during transportation. This, perhaps, is a disadvantage of a certain group of units.
There is also a common disadvantage - fire danger. To reduce the latter to a minimum, it is recommended to install stoves closer to the wall, and their operation must be monitored.
DIY stove installation kit
Start by preparing all the necessary masonry equipment.
- brick. Buy simple and fire-resistant masonry material. To accurately determine the required amount of brick, first prepare the order of the future furnace;
- clay. Based on it, you will prepare a mortar for laying the stove;
- metal doors and other fittings;
- sheet metal;
- corners;
- mesh or reinforcement bars to strengthen the structure;
- tires;
- lime;
- container for preparing the solution;
- metal sieve with cells 1-2 mm;
- plumb line;
- building level;
- hammer;
- Master OK;
- shovel;
- cast iron stove with burners.
Preparing the necessary tools
During laying, you need to control the verticality of the walls and the horizontality of the rows. To do this, use a building level, a plumb line, and a carpenter's square.
Other tools:
- trowel, pickaxe;
- tape measure, pencil;
- drill with whisk;
- grinder with cutting wheel for stone.
For even masonry, use a device called ordering. This is a wooden or steel strip on which the installation locations of each brick are marked with marks or notches.
A cord is used, which is pulled after installing the corner elements; it outlines the top of the stones of each row.
Dimensions and drawings of the Swedish stove
After the foundation, they proceed to work on the base of the future furnace, laying out its first and second rows. To provide a kind of protrusion-pedestal, they are laid out exclusively with expanded seams, within 13 mm.
There is no need to make them too wide either. When laying a Swedish stove, experts advise rinsing each brick in clean water for several seconds. This simple manipulation will increase adhesion by getting rid of dust on the surface of the material.
masonry stove Swedish order
The fact is that in practice, masonry, which is made of dusty and dry bricks, may not be strong enough under conditions of significant thermal stress.
In the case of a Swedish stove, a strong heat dissipation through the oven is assumed against the backdrop of efficient use of fuel. Therefore, for its laying, only high-quality fireclay bricks are used, as well as high-quality marl mortar.
Usually it is from fireclay that it is recommended to lay out the Swedish stove with your own hands from the third row and right up to the one that will follow the stove. But in some cases, in order to save money, it is taken only for the internal lining of the firebox, which will require no more than a hundred bricks.
The main advantages of the Swedish
What is most attractive about the design of the Swedish stove is the efficiency of fuel combustion.
Thanks to a successful technical design, coal, firewood, reeds or small wood burns in the firebox, forming a large mass of thermal energy.
Unlike a traditional Russian stove, which takes a lot of time before it starts giving off heat, a Swedish stove heats up very quickly. Thanks to this, within 10-15 minutes after laying and lighting firewood, the room is filled with warmth.
Swedish: advantages
At the same time, it not only quickly warms up the room, but also retains heat. To do this, after the firewood has died down, it is necessary to close the valve tightly. Otherwise, all the heat that has accumulated in the oven will quickly come out.
Like the popular Dutch oven, the Swede is very compact and does not take up much space in the house, which is indispensable in small country houses where the location of a large Russian stove simply does not make sense.
In addition, the cooking hob and oven provide additional comfort and increase the functionality of the oven.
Advantages of a Swedish woman:
- compact dimensions;
- functionality (hob, oven, water heating, etc.);
- fuel efficiency;
- the ability to warm two rooms at the same time.
But, speaking about the advantages of the Swede, it would be unfair not to notice some of her shortcomings.
The design of the Swedish stove is very demanding in terms of the choice of material. If ordinary fireclay brick is suitable for creating a Russian stove, then you need to stock up on very high-quality materials, otherwise the efficiency of the heating apparatus will be greatly reduced.
In addition, the design of such a furnace is quite complex and requires certain knowledge and a very subtle, scrupulous approach. After installation and launch, it will be very difficult to eliminate your mistakes.
Firebox, shield and chimney
The main differences from a solid fuel stove are a more powerful firebox and the absence of a pass (smoke tooth) in the firebox. The tooth traps hot gases under the hob, which in a summer stove allows you to reduce fuel consumption for cooking. In the rough it is not needed, because excess heat will be used for heating.
A rough stove should have a more powerful firebox because the shield provides additional resistance to the flow of flue gases. A chimney with increased draft will not help here: the gases in the shield will immediately expand and cool. Their thermal energy will turn into mechanical energy, which will successfully fly out into the chimney. Figuratively speaking, a firebox with a chimney in a stove with a shield operates on the push-pull principle, and “push” here is a firebox of greater power. This explains the special requirements for the firebox and stove fittings, see below.
Depending on the purpose of rough heating shields, they are made of different types. Diagrams of heating panels for furnaces are shown in Fig. below; The fuel part is shown conditionally everywhere.
Schemes of heating panels for stoves
- Sequential stroke with short vertical channels. The least material-intensive and easiest to build. The resistance to gas flow is greatest. The compactness and thermal efficiency of the stove are average. The most commonly used scheme;
- Sequential stroke with horizontal channels. The dimensions and weight of the oven are the same as before. case, but building a shield with horizontal channels is much more difficult. Gas flow resistance approx. 1.5 times less. As a result, the thermal efficiency of the furnace is higher. It is possible to install a bed, i.e. the upper channel does not heat up much;
- Sequential stroke with long vertical channels. Thermal efficiency is the same as that of a shield with horizontal channels, the technological complexity is the same as that of a shield with short vertical channels. It occupies the smallest area, but requires a lot of materials and a good foundation (see below) due to the high specific pressure on the support. The best option for a home heating stove for 2-3 rooms, see below;
- Parallel move. Highest thermal efficiency, lowest weight per unit of thermal power. The occupied area and technological complexity are the greatest. Can be used with a reduced power firebox. Optimal for adding to an existing slab without altering it.
Note: there are also series-parallel or chessboard shields. The most complex, but also the lightest, have the least resistance to the flow of gases. The only possible option for roughing in a house with a heated attic, see below.
Brick edges and parts
Faces and parts of a brick
The end of a brick is called a butt, the wide flat side is called a bed, and the side surface is called a spoon. The ribs of the product are called the usenka. Masonry is carried out by placing the product on a bed, which is considered a working surface. In the only option, the elements are placed on spoons if the wall is built with ¼ brick.
Parts of stones other than full bricks are intended for making corners and turning walls and have conventional names:
- three-four (nine);
- four (quad);
- half.
The brick is divided into pieces with a pick, hitting the spoon rather than the bed, while the stone is held leaning on its edge. A small volume of incomplete factory-produced elements is ordered from the supplier.
Do-it-yourself heating and cooking stove - nothing complicated
For centuries, people have been using heating and cooking stoves for their homes, which they make with their own hands. Owners of private households and country houses often install such structures, providing themselves with comfortable living on cold days: thanks to their functionality, they are still relevant today.
Even when the house has a gas or electric heating system, it makes no sense to use it on cool spring or autumn days - after all, you can heat a brick heating stove and thereby heat the living quarters. The work should be approached with all responsibility, since a heating and cooking stove with your own hands is built to last for decades.
It is almost impossible to correct poor-quality masonry. If an error is discovered, the structure will have to be dismantled down to the incorrectly laid row of bricks, and when the mortar has already hardened, this is not easy. Heating stoves with a hob can be made for both a one-story house and a two-story building (read: “Heating stove for two floors”). They differ only in the number of rows of bricks in order. The article describes the creation of a heating and cooking stove, shown in the photo, for a two-story building.
Tips for choosing building materials
The construction process is not complicated. The Swedish stove is a simple design that requires strict adherence to the drawings and order. You need to mix the solution correctly and have minimal knowledge of how to do it.
Required tools:
- Master OK;
- rubber mallet;
- level;
- rail;
- roulette;
- hydraulics;
- pencil;
- shoulder blade;
- bucket.
When making the solution, take a small metal strainer. It must have a cell for sifting sand and clay. Ordinary clay is not suitable because it is not heat-resistant. For the construction of such a heating device, exclusively fireclay clay is chosen.
The solution must be soaked for several nights in a trough. Continue this process until the lumps disappear and excess water appears on the surface. After draining, the remaining mixture should have a thick texture. This can be checked using a trowel. A small amount of solution is applied to a dry vertical surface. If it does not drain, but hardens, then it can be used.
Advice from experts in choosing clay: the mixture should not have any foreign odor. Any aroma is a sign of organic impurities that will evaporate during combustion. This will lead to a decrease in the strength of the masonry. Choose your clay carefully.
List of materials that will be needed during construction:
- red solid brick;
- fireclay brick;
- fireclay clay;
- door for the combustion chamber and ash chamber;
- grate (ideally cast iron);
- iron angles and sheets;
- asbestos gasket in the form of a cord;
- asbestos sheet.
Must be of high quality, without manufacturing defects. You can weld the doors yourself.
Preliminary steps before assembling the oven
One of the main points in preparation is determining where the stove will be installed. After all, it should heat the entire room evenly. If the device is being built in a finished house, the chimney outlet must be taken into account. During the installation of the pipe, it is important not to damage the rigidity of the frame.
Preparatory work is best done in summer or autumn. It will take at least 30 days to dry the foundation. But experts recommend keeping it for up to six months. Holes in the ceilings are made before laying. The roof is assembled last.
Determining the place where the Swede will be located.
The main function of the device is heating. Therefore, it is optimal to build the stove in the center of the room. The house must have a very good and strong foundation that is firmly established. The structure weighs approximately 3 tons. It is important that the foundation of the house can support its weight. In a residential building, it is usually installed near the interior partitions near the exit door.
Pouring the foundation: recommendations + video
The lifespan of this device, its performance and heat dissipation depend on the foundation.
The depth is determined taking into account the region and groundwater. It is important to calculate the depth of frost resistance in winter. If the top is installed above this level, horizontal extensions will appear. It is recommended to choose a depth of 0.8-1 m.
Linear values are determined by the dimensions of the furnace. The foundation is poured approximately 15 cm wider from these indicators. These are the main standards in the structure.
In the space between the ground and concrete it is necessary to create a gap from sand. Height - 20 cm. In the future, it will perform the function of separating water that comes from the ground.
After the sand cushion, you can use crushed stone, crumbs of brick or other materials. Craftsmen give preference to natural stone because it is highly durable.
The reinforcement is installed closer to the bottom layer. It is needed to strengthen and evenly distribute temperature effects. The metal mesh is placed horizontally.
The top surface must be flat. Use a wide spatula to help. After drying, apply roofing felt in several layers. It is used for waterproofing.
A hole is made in the floor, which must have the correct design. This is necessary for convenient laying. Then they install the flooring under the body of the structure and make skirting boards.
The advantage of a Swedish stove with a hob and oven is a strong flow of heat. Before masonry is carried out, the thermal insulation material is laid out. There should be several layers of it. A good material is basalt cardboard. It is inexpensive, has sufficient thickness - 5mm. An option is fireclay brick, used to build a furnace. The material is more expensive and has low thermal conductivity. It doesn't warm up the foundation.
Video that will be useful:
Creating a waterproofing layer
The picture below shows how to apply roofing felt layers. Craftsmen also choose materials for sheathing, for example, sheathing with foil on all sides. Waterproofing is a certain part of the stove design. For waterproofing, use a dense, stable material. An economical option is a substrate. It comes in different thicknesses.
Preparation for work
For laying a stove with a stove, different types of brick are used. Usually they take red solid one for external masonry and fireclay - to make the internal lining of the firebox, as well as the smoke well.
The foundation is poured with concrete mortar. To prepare it you will need cement of at least M400, preferably M500. The sand can be river or from a quarry, but it must first be sifted to prevent the ingress of impurities. Clean water should also be used. For the solution, you should also take granite crushed stone about 30 mm.
The foundation is backfilled using rubble granite, a suitable fraction is approximately 300 mm. In addition, you will need to prepare a solution of red clay and sand.
Instead of clay, you can purchase clay powder; the instructions for using it are indicated on the package. All components must be of good quality; the integrity and service life of the future stove depends on this. To seal the joints, you need to prepare a high-temperature sealant.
The work is carried out using ordinary construction tools.
You may need:
- containers for mixing the solution;
- Master OK;
- Bulgarian;
- plumb line;
- level;
- roulette;
- rule;
- mallet;
- furnace hammer;
- other devices for processing and laying bricks.
To make a high-quality solution, it is better to use a hammer drill or drill with the appropriate characteristics, as well as an attachment designed for these purposes. A shovel and a sieve will come in handy.
Varieties
It is important to understand what types of Swedish stoves there are, since the layout and location in the house will depend on this. The following models are popular:
- with a fireplace, when the stove for cooking is turned towards the kitchen, and the fireplace is directed towards the living room;
- Swedish stove with stove and oven - used for heating the entire room;
- with a couch for a comfortable rest while simultaneously heating the house.
Regardless of the chosen type of structure, it is necessary to correctly determine the pipe cross-section parameter. To do this you need to know:
- dimensions of the combustion chamber by multiplying the length of the firebox by its width and height;
- specific calorific value of fuel - tabular data is used.
When calculating heat transfer, the calorific value in specific units is multiplied by the volumetric characteristics of the firebox. The resulting value is multiplied by:
- Efficiency – 40%;
- combustion level – 80%;
- fuel load level – 63%.
Masonry mortar
A high-quality and correctly prepared mixture is a guarantee of reliable service for the future solid fuel stove. Earlier in the article it was discussed that it is customary to use sand and clay as materials for mortar. The components must be mixed to the desired consistency.
The kneading method is not particularly complicated. The clay is soaked in water and then ground through a sieve to achieve uniformity. Sand is added to this composition in the required quantity. To ensure that the stove heats the room effectively, only high-quality materials are used. If you do not follow this and do not follow the cooking technology, you can get low heat transfer and a number of other problems. In particular, the stove may be extremely short-lived and collapse after some time.
After preparing the mortar, we proceed to masonry work. At this stage we will need to arrange the oven.
Finally about drying and kindling
The final stage of construction is drying the furnace body and pre-heating. In this regard, the “Swedish” requires a careful approach:
- You cannot immediately light firewood in the firebox.
- First, the masonry must dry for 2 weeks. If the weather is cold and damp, use an electric fan heater.
- For 14 days, regularly heat the stove with small portions of dry firewood (3-4 kg per day). Use wood species that produce little soot - aspen, acacia, poplar.
Advice. During the first kindling, open the cleaning doors and insert crumpled newspapers into the openings. The paper will first become saturated with moisture, then begin to dry. When the newspaper stops getting damp, the drying process can be considered complete.
Make the first working fireboxes with a small amount of firewood, gradually increasing the load. Don’t forget to open the winter shutters so that the Swede warms up evenly.
Building a foundation for a furnace: universal instructions
Regardless of the stove model, it needs a reliable and durable base. This foundation is suitable for both the Swede and the two-bell model.
The sequence of arranging the support is as follows.
First step
We dig a pit about half a meter deep.
Foundation pit
Second step
We compact the bottom of the hole and fill it with a 15-20 cm layer of sand. Pour water over the sand and compact it thoroughly.
Third step
We install the formwork.
Fourth step
We lay the reinforcement frame.
Fifth step
We prepare a solution from part cement, five parts crushed stone, three parts sifted river sand and water. Fill approximately half of the free horizontal space of the pit with this solution. Let the fill dry.
Sixth step
We prepare a solution from part cement and three parts sand. Fill the remaining space of the pit with the mixture. Carefully level the upper part of the fill using a rule.
Poured foundation for laying a brick stove
Seventh step
3-4 weeks after pouring, cover the frozen foundation with a layer of roofing material.
Foundation waterproofing
The working process of a Russian stove
Despite serious competition and a solid history, the design is still in demand among country property owners. Based on how the Russian stove is structured from the inside, it will be possible to focus on the dimensions from the outside and accordingly plan a place for it and lay the foundation.
Before you put together a Russian stove, you need to understand its operating principle - the design is a periodic heating device, that is, when burning wood, it accumulates heat, then releases it for almost a day. The structure can warm or languish like this for almost a day, which makes it possible to cook baked milk in it, steam porridges and soups, without controlling the process.
Before making a Russian stove, you should build a separate foundation that is not connected to the tape, since the structure is usually heavy
This is especially important when the house “dances” on heaving soil during freezing and thawing. In this case, the stove will move along its own amplitude along with its foundation, without destroying the finish or affecting the walls and openings
Cross-section of a Russian stove during heating and simmeringSource 2proraba.com
Work principles:
- the entire structure stands on a brick or concrete slab;
- firewood for kindling is stored in the stove, where it dries very well and, when ignited, lights up instantly;
- the top of the sub-peck is made with a hemispherical arch, like a trough;
- sand, clay, broken brick - any heat-intensive material is poured onto it, and the front part of the firebox (cooking chamber) is laid on top of it under the stoves; it is placed without clay mortar.
If you ignore the topping, then you can forget about real hearth bread and pies. By the way, they are baked on cabbage leaves.
Next comes an injection with an overtube and a highlight in the form of a tapering nozzle. On the sides of the fold near the walls there are ash pits - recesses for smoldering coals (for the next kindling) and ash. Sometimes they are raked into a fringe - a part of a cast iron or stone slab (pole) protruding from the face (brow) of the stove.
To reduce costs and cleanliness in the room, there is no need to make an ash pan and ash pan. Previously, they were raked into a nook of the mouth, then the coals of birch, maple, elm, oak and aspen retained their heat for only a day.
Cooking in a cast iron pot over coalsSource yandex.net
Most likely, this is where the belief came from that the Russian stove is quite picky when it comes to fuel. But this is not so - it works on any solid fuel, including:
- brushwood;
- dung;
- dead wood;
- sawdust
- straw;
- peat briquettes.
Thanks to this configuration, the combustion chamber acts as an economizer, where the following happens: the smoke circulation heats the air, which enters the firebox without removing oxygen from it and without interfering with combustion - mixing of heat flows should not occur. In essence, a combustion chamber is an energy recuperator (heat exchanger).
Before building a Russian stove, you should check the dimensions in advance - this is important so that the structure does not smoke, does not cool down quickly and does not use a lot of firewood. For the same purpose, perfectly smooth haila vaults are made.
Moreover, they cannot be plastered, so the bricks are chipped from the inside and polished until glossy - then there will be no swirls in the slit.
Smoke from the stove goes into the chimneySource stroyfora.ru
Stove with stove - multifunctional structure
The stove is so useful, convenient and ergonomic that building a structure without it simply loses its meaning. Perhaps this is why all modern modifications of Russian stoves have cast iron stoves - with one, two or even three burners.
In fact, models with a stove do not contradict one of the main features of a Russian stove - they have two fireboxes. It is the small firebox that is responsible for heating the stove. Moreover, in simple stoves it has a separate chimney, connected at the top to the chimney of the furnace.
One of the popular options for placing the stove is right in front of the mouth of the furnace. Heating is carried out independently of the large firebox, through the lower heating
For more complex designs, there is the possibility of “summer” and “winter” fireboxes: in the first case, the small furnace (furnace) operates autonomously, and in the second, with its help, the walls and the large furnace are heated.
There is a third option for locating the flooding - in the main structure, but on the side or on the opposite side. This solution is not always acceptable - for example, if the stove needs to be located in a corner. In this case, it is more convenient if both fireboxes are on one side and located one above the other.
A successful engineering solution in which a small stove with a cast-iron stove is placed separately, but has a common wall with the main structure. Disadvantage - takes up more space
The advantages of the design with a hob are obvious:
- autonomous heating with a lower degree of heat transfer;
- fast heating process of cast iron and walls;
- cooking all kinds of dishes on the stove;
- the ability to heat or store food warm;
- economical fuel consumption - firewood;
- easy maintenance - cleaning the ash pan.
On the stove, when it is no longer hot, but has cooled down a little, you can dry household items. For the same purpose, stoves are used - small recesses in the walls of the stove, as well as a brick perimeter around the cast-iron surface.
For summer residents, the model with flooding is much more convenient, as it is used more often. A large firebox is usually used either in early spring or late autumn, when the cold season sets in and the entire stove needs to be heated.
What metal to use
Before the manufacture of the furnace, it is imperative to inspect the metal for defects - corrosion, cracks, bulges. If they exist, they must be processed by grinding, welding, and stamping.
The reliability and strength of the stove is given by the material from which it is assembled. Suitable metals for the thematic problem include:
- Ordinary steel;
- Heat-resistant steel;
- Cast iron.
If the stove is made from a ready-made container, then sometimes a can or fire extinguisher acts as the latter. The most durable material is steel. But this indicator (strength) also depends on thickness. If it is 10-18 mm, then the stove will last a long time.
If you have a large amount of cast iron, you will have to make a heavy stove with walls 6-25 mm thick. Despite their enormous weight, the corresponding structures heat up quickly and retain heat for a long time. In other words, cast iron stoves have good efficiency.
A little about metal in masonry
Metal is generally undesirable in furnaces - its coefficient of thermal expansion does not coincide with the CTE of brick. In a furnace, of course, it is impossible to do without metal.
Therefore, it is important to follow a few simple rules that will help avoid unnecessary cracks in the masonry.
Cleaning hatches and blower doors are simply installed on a masonry mortar - clay-sand. Naturally, wire is inserted into the holes of the frames and its ends are run into the masonry between the rows.
The fire doors get very hot. Therefore, you cannot insert them tightly - they will tear the masonry or crack themselves. To prevent this from happening, a cord made of asbestos, basalt or kaolin, soaked in a clay solution, is wound around the perimeter of the frame - it will play the role of a thermal compensator and seal the connection.
The oven is installed in the same way. But such winding is required only in the door area. The oven drawer itself is not wrapped. Although it would be good to apply a layer of about 5-10 mm of masonry mortar on top of the cabinet - it will slightly even out the heating and protect it from direct exposure to heat. Of course, such a composition cannot be applied to the side walls - it will fly off during the first fire.
The grate is always placed freely in the firebox so that the gap is at least 5 mm on each side.
The cooking floor (more often referred to simply as a slab) is placed on a thin layer of mortar. To which you can add soaked asbestos or kaolin. Finnish-made slabs are installed a little differently - their flooring and frame are made as separate elements. Therefore, they are simply lined with kaolin wool.
On top of the masonry, along the upper outer corner of the slab, a frame is laid from a steel corner - earthenware. It serves to protect the masonry from destruction - it still happens that the corner is touched by pots or other utensils.
If you make a chamber to a stove with a shield above the cooking floor (add side walls and some kind of ceiling), then you will end up with a design better known as a Swede - a very popular kitchen stove among professionals and DIYers.