To install a metal stove, the main type of which is cast iron, you need to prepare in advance, literally even at the stage of designing the bathhouse. Because the stove is in close connection with the ventilation system of the bathhouse, the space around it is regulated by fire safety standards, depending on its size and weight (as well as the weight of everything included, including the chimney, tanks, water, etc.), forgive me for pun, fundamentality of the foundation. Let's consider all the phases of preparation sequentially.
Installing a metal stove in a bathhouse: choosing a location
Where exactly in the steam room do you see the future stove (see here about choosing a stove for a steam room)?
Will it be located in a corner or just against one of the walls? Where will the firebox go - into the steam room or into an adjacent room (dressing room, for example)? What will be the distance between the stove and the shelves, the opposite wall, and the adjacent wall? How far from the beam will the chimney be? All these questions need to be answered. And since some of the answers are dictated by fire safety standards, we will turn to them.
First, let's figure out
the distance to the wall . If it is made of flammable material, then the optimal distance would be half a meter from the stove . But who has that much space in their steam room? The only way to reduce the gap between them is to either line the wall with non-combustible material, or replace a piece of wooden wall with a brick one .
The latter is most often done in cases where the firebox is located in an adjacent room. Considering that the combustion tunnel is usually between 20 and 30 cm, the stove cannot be much further from the wall. Combustion tunnels have different lengths. They go through the wall. Subtract the wall thickness. The remaining distance is the maximum how far the stove can stand from the wall. The half-meter rule also applies to the gaps between combustible walls and the side walls of the stove. With the same allowance for non-combustible cladding or brick cutting. Yes, this applies to all flammable items, including shelves.
Regarding the firebox: an external firebox is preferable for two reasons: more oxygen will remain in the steam room, and some of the heat will go to the dressing room.
But there is an important point: IMPORTANT! Wherever the firebox is located, there must be a free space in front of it of at least one and a half meters, and on the floor in front of it a firebox must be placed, protecting at least half a meter of the floor surface from accidental sparks and fallen coals.
Regarding the beams: the distance between them should initially not be too small. For example, it could be 90 cm . In this case, it is better to put the chimney in the middle, surrounding it with a cutting box.
Cutting boxes
Advice! Do not forget about the location of the beams when choosing a place for the stove so that you do not have to bend the chimney.
And regarding ventilation: the inlet must be brought out next to the ash pit so that oxygen-saturated street air enters the firebox. But ventilation is installed during construction and redoing it is very troublesome , so once again: think ahead. We advise you to research bath ventilation materials.
Basalt cardboard characteristics
The main difference of this material is its high thermal insulation and sound insulation. It is non-flammable, fire-resistant and fireproof. At the same time, basalt cardboard has extremely low hygroscopicity, in other words, it is not able to absorb moisture from the air. The temperature of use of this material is +500 degrees, while for a short period it can withstand up to +700 degrees. Another reason why cardboard should be used in a bathhouse is that it has excellent vapor permeability. It has increased resistance to microorganisms and rodents, does not crumble, does not rot, and is resistant to vibrations and thermal-oxidative aging. The approximate service life of this material is 50 years.
At the same time, basalt cardboard is very easy to cut; this can be done even with a simple knife. The sheets bend well and can take any shape, which allows for excellent thermal insulation of the bath room. Parts made of such material can be fixed using special glue
When cutting, it is necessary to take into account the shrinkage of the cardboard, which can occur from exposure to elevated temperatures. In case of high humidity, the sheet may bend, but after drying it will return to its previous shape. In total, it can withstand more than two thousand cooling and heating cycles
In total, it can withstand more than two thousand cooling and heating cycles.
Installing an iron stove: choosing a base
Nobody just puts a metal stove on the bath floor. And here's why: the thing is heavy, and therefore it would simply begin to sag on the floor over time . And it would do it unevenly. And when the stove is not level, it can crack . Therefore, either a brick foundation is made for it , or even a separate foundation with verified level horizontal lines to prevent destruction of the furnace.
To decide whether you need a lightweight or a full-fledged base, you must first calculate the mass of the stove with everything due to it. You will learn how to do this from our article - you don’t want to repeat yourself, but everything is described in detail there.
Separation of a section of ceramic coating along with the solution from the base
The most likely cause of such destruction is an incorrectly selected primer mixture or no priming at all before laying the tiles. A common mistake when preparing the base is priming with concentrated latex, which forms a thin rubbery film on the surface that prevents adhesion to cement-based tile adhesives.
The separation of the laid tiles along with the mortar from the base can be caused by deformation of the base
The preserved finish is inspected and tapped to identify voids that are fraught with additional destruction of the cladding. If the area of the collapsed finish and existing voids in total exceeds 20% of the total area of the base, then the wall or floor cladding will have to be re-done in full, taking into account the mistakes made, since after partial repairs the destruction of the old tiles will most likely continue.
Preparing the floor before installation in a wooden bath
When the total weight of the furnace is less than 7 centners , the need for a foundation disappears, but a kind of “pedestal” of brick is still erected. It's good when this happens during construction. You can again calculate the position so that the base lies between the lower beams under the floor . But it happens that you have to redo the old base for a new stove in an old bathhouse. Then you can't do without opening the floors and checking their strength . We advise you to read the relevant paragraphs of this article, where you will find tips on strengthening beams and joists, and tables for calculating their “endurance”.
Fire safety rules
If you plan to use an iron stove in a steam room, for fire safety purposes you must strictly follow the installation rules
:
- The firebox doors should open towards the door, and the heater door, on the contrary, should open towards the corner of the room.
- The penetration through the ceiling must be a structure with a heat-insulating layer and a metal screen on the ceiling. Its format should be 1/3 larger than the projection of the stove body.
- If an electric furnace is selected, proper installation involves the installation of grounding, as well as coordination of the implemented project with the fire inspectorate.
- The bathhouse is equipped with fire extinguishing equipment. They must be at hand and in good condition.
- Regardless of which stove installation scheme is chosen, it is required to comply with standards regarding the distance from the stove to structures.
Lining the firebox with bricks in a bathhouse is good protection against fire
Distance from the stove to the walls of the bathhouse
It is important to know how to correctly install the stove in a bathhouse in relation to walls and other structures. Remember:
- there must be a gap of at least 0.5 m between the metal or brick lining of the stove and the wall (a similar distance is maintained with respect to any other flammable structures);
- walls and structures made of flammable materials located in the immediate vicinity of the stove must be covered with a screen made of fire-resistant materials.
Stove installation diagram - recommended distances
Installing the stove unit on a wooden floor
If the choice fell on a small metal stove (the weight together with stones, brick casing, fuel and water tank does not exceed 700 kg), it can be installed without constructing a foundation, directly on a wooden floor. Since it is recommended to select a stove unit at the bathhouse design stage, in the place where it will be installed, it is necessary to provide for laying the logs with a smaller pitch - this will increase the strength of the base.
Installing a metal stove in a bathhouse directly on the floor, according to SNiP, requires installing a screen that will protect the wood from ignition
. The weight of the screen is also taken into account when calculating the total load on the floors.
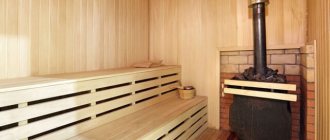
Metal stove on a wooden floor in a bathhouse
Screen arrangement:
A rectangle corresponding to the dimensions of the stove is drawn on the floor at the installation site. 50 cm is added to it on the side of the fire door, 10 cm on the other three sides. If the stove is mounted with the fire door outside the room, a place for the portal is marked on the wall with the expectation that 25–50 cm should be left around the stove body on each side sides around the perimeter. If necessary, part of the partition or wall is dismantled in accordance with the markings. A rectangle is cut out of a fireproof heat-resistant plate according to the size of the figure drawn on the floor (with added centimeters). The prepared element is attached to the floor using self-tapping screws. Fireclay or solid red bricks are soaked in water, after which a platform is mounted from them in one layer on top of the fixed slab
It is important to use a heat-resistant mortar for laying stoves and check the horizontal level of the site. Ceramic or porcelain tiles can be laid on top of the brick for an aesthetic appearance. The base in front of the fire door in the room is covered with a steel sheet, and if the firebox goes outside, the corresponding area is concreted. 24–48 hours after the foundation has been laid out, the stove can be installed.
Wall decoration near the stove
Baths are built from different materials, but most often wood is used to construct wall structures. The building can be frame or be a log house made of logs or timber.
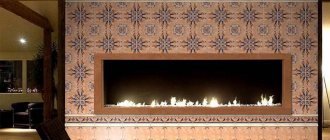
The walls near the stove can be finished with tiles or natural stone
When arranging a screen on the walls, basalt cardboard or a heat-resistant plate, which is attached to self-tapping screws, is used as thermal insulation. The protective layer can be laid out from solid red or fireclay bricks (half-brick masonry). The use of ceramic or porcelain tiles is also practiced. The cladding will not only protect the walls from overheating, but will also add attractiveness to the interior of the steam room.
The simplest option for protecting a wall is to install a steel sheet with a thickness of at least 3 mm on top of the thermal insulator.
Preparing the walls
Above, we determined what the distance to the flammable wall should be, and there we came to the conclusion that it is much more practical to decorate them with refractory materials, so as not to waste steam room space . Now it's time to talk about how this is done.
Budget-friendly, but not the best option, a sheet of galvanized sheet nailed to the wall
So, we have three and a half options:
- We attach the refractory sheet to the wall;
- plastering the wall;
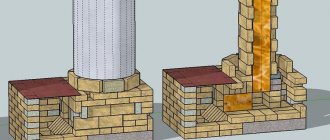
- we make a brick casing for the stove;
- replacing part of a wooden wall with brick.
Let's explain why 3.5 - often they hang the refractory on the wall and build the casing. Moreover, the latter is installed not only for the purpose of fire safety, but also simply for safety, as well as for heat redistribution. You will learn more about why it is needed and how to make it in this article.
As for refractory, you can use mineralite - these are sheets of cement with fillers, reinforced with fibers. Excellent fire resistance. You just need to attach it correctly.
If the stove is standing almost flush against the wall , then you will need two layers of minerite with an air gap between them, which you will create using 3-centimeter ceramic bushings. The first layer is directly adjacent to the wooden wall, then there are bushings and a second layer of mineralite.
If the distance is larger , you can limit yourself to one layer , but it should not touch the wall - the same bushings are used to attach it to the tree.
Note! In a new log bathhouse, the refractory cannot be rigidly attached . Due to shrinkage, which lasts for years, rigid fastening can cause the refractory material to rupture. Therefore, make grooves for the fastening to slide . Over time, the shrinkage will be completed, then secure it tightly).
You can put, for example, heat-resistant tiles (it is placed on heat-resistant mastic) or come up with another decorative design. As an option - mirror stainless steel . Its sheets perfectly reflect heat, but at the same time heat up themselves. Therefore, stainless steel is attached to a layer of any refractory - mineral wool, ceramic fiber, superisol, etc.
In principle, you can plaster a flammable wall ( a layer of at least 2.5 cm ) or use fire-resistant plasterboard.
Those who decide to bring the firebox into the dressing room either immediately put up a brick wall, or then cut out part of the log house or timber. In the brickwork, space is left for a combustion tunnel with a reserve , where a heat insulator, for example, mineral wool, is then clogged. Thermal insulator is also used in places of contact between brickwork and a wooden wall . If you don’t want to replace the entire wall, make a portal - at least a meter long.
Structure of the structure
So, if you are using straight brickwork, then the simplest option for installing a heating stove is to install a metal independent frame with a ash pit and a chimney (more precisely, an exit to it).
All this remains to be covered with red heat-resistant brick (preferably hardened, which has already been heated to several thousand °C). The installation structure can be either flat or with a coil (that is, a curly bend along the chimney, which allows you to leave more heat in the room than with a direct blowing system).
Brick oven diagram.
Similar systems can also be used when a stove is installed in a bathhouse. In this case, the structure is installed in the opening between the rooms, where the most ordinary wood (meaning a log house) is used as a partition. Here the arrangement of the stove is complicated by the fact that it is necessary to insulate the wooden base from heat and heat. Here again you can use ceramic slabs and the most common heat-resistant bricks. The distance from the base itself (rough) and the slab should be at least 15 cm of air space. Only in this case can we say that safety precautions are fully observed.
It is worth noting that after installing the stove, the adjacent wall is under no circumstances covered with a layer of decorative plaster or similar building material. The best option is to cover it with dark-colored tiles or create an air gap inside. But the latter option will reduce the performance of the heating structure, so it is better not to focus on it.
Ceiling preparation and chimney installation
Many fires have started in the area of the ceiling where the chimney runs. There are many mistakes associated with arranging the passage of a chimney through ceilings. The cause of the fire may be:
- pipe overheating;
- cracks in the pipe through which sparks escape;
- errors in the distances between the pipe and the combustible ceiling.
Not the most competent way to pass the ceiling for a bathhouse
If you did not design the position of the stove in advance, there may be a beam above it. In this case , you will have to cut out part of the beam and fasten it with jumpers to adjacent beams. The empty space above the center of the pipe passage should be about 90 cm in diameter.
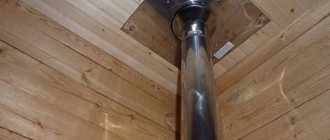
The ceilings are cut out square to install a cutting box , which is a tin box closed at the bottom and top with stainless steel sheets in which a hole is made for the pipe (see photo above).
The chimney is mounted from the pipe coming out of the stove. If the monopipe is larger in diameter, you will have to put an adapter . But in any case , the first pipe running through the steam room will be a monopipe. A gate is mounted on it , then it continues again, but before reaching the ceiling (this is important!), a “start” is put on it - an adapter from a mono to a sandwich pipe that will go through the ceilings. Pipe connections must not penetrate into ceilings.
It is worth noting here that sandwiches, of course, are the most common, but this is a dangerous type of chimney - so what if the gap between the two pipes is clogged with thermal insulation? This will in no way prevent the inner pipe from burning out if the owner is often in a hurry to heat the bathhouse. And the properties of the insulation, when condensation forms in it, will not be the same as stated - it will transmit heat perfectly, overheating the outer pipe.
An alternative to sandwich pipes is ceramic or brick-lined chimneys , but both are heavier and more expensive. Therefore, the majority prefers to risk the entire bathhouse.
OK. This means that through a hole in the stainless steel the sandwich pipe enters the cutting box.
There is still space around it that can be filled:
- expanded clay;
- mineral wool;
- sand.
Attention! The height of the box must be several centimeters greater than the thickness of the ceiling
The outside of the box can be wrapped with basalt cardboard so that it does not touch the wood.
Next, the pipe is brought out through the roof, through a hole of a larger diameter than the pipe. On the outside, the area nearby is coated with sealant, a master flush , secured to the roof with self-tapping screws at intervals of up to 5 cm, and the connection between the flush and the pipe is also sealed. All that remains is to install an umbrella or deflector.
master flush
Do not forget! It is necessary to constantly check the vertical position of the chimney with a plumb line, and also secure it for greater stability using a clamp with a bracket to the wall or other stable structural elements.
Installation features
When installing a chimney, there are several nuances that must be taken into account during the work:
- the first horizontal link should have a slight slope from the stove, which will protect the device from condensation;
- There are two ways to remove the smoke exhaust duct through the wall: raise part of the pipe to the ceiling and at this level bring it outside, or place the exit point of the duct to the street at the level of the stove inlet pipe. The second method is more preferable, which involves the use of a smaller number of shaped parts (only one rotary elbow);
- the entire chimney structure must be assembled from pipes identical in technical characteristics;
- in the area of passage through the wall, the pipe must be solid, without joints;
- the joints of sections and shaped elements should be coated with heat-resistant sealant before assembling the system, and after installation they should be additionally secured using special wide clamps;
- A protective umbrella must be installed on top of the pipe.
Preparing the oven
Before you work on the chimney, the stove should already be in its intended place. But first, it should be heated in the yard for the first time. is necessary to do this , because during the first fire the industrial heat-resistant paint usually sets and partially burns out. It “smoke” a little when fired and smells. This is normal, this is how it should be.
By the way, new stones in the yard - sometimes they give off a stench that stings the throat and eyes. It is better to experience this in the fresh air, and not in the steam room.
Assemble the stove according to the instructions, install it on a flat and solid base, place some piece of at least a ventilation pipe on the chimney pipe ( at least 2 meters long) and heat it thoroughly once. At the same time, find out if there are any design defects, if it smokes, in general, get to know each other.
On a note! Heat for the first time with normal wood, not garbage, and most importantly, wait for natural cooling after the wood has completely burned out. In this case, the paint polymerizes correctly.
Kamenki
Heaters with a separate steam room create an ideal microclimate for visitors. Therefore, maximum attention is paid to the construction of the heater.
She must be:
- productive;
- safe;
- compact.
The rules for arranging a heater imply the mandatory presence of:
- metal bases;
- guides for cutting the steam flow.
Bath stones are usually laid on a waterproof base.
Heater stoves are a type of permanent firebox. Unlike other types of stoves, stone filling accumulates heat better, as it acts as a kind of evaporator. Liquid is poured onto the surface of the stones, which, under the influence of heat, turns into bath steam.
Moreover, if a waterproof stove is installed above the firebox, steam can be obtained during the burning of wood and it will not be extinguished by water. If the heater is located in a simple frame, steam can only be obtained after complete combustion of the fuel.
The temperature of the stones in the first placement option can reach up to 600 degrees, and in the second placement option up to 300-350 degrees. It is believed that with optimal placement of stones, soft steam should not cause burns or make breathing difficult.
Installation of a hanging tank and heat exchanger
In the absence of hot water supply at the dacha, autonomous water heating becomes relevant. A boiler is not needed in a bathhouse; the stove can easily cope with the needs of washing and heating.
You can read about what options there are in the articles: about stoves with a tank and about stoves with a heat exchanger.
You can install a remote tank connected to the heat exchanger in the furnace as follows:
- Choose a place so that the tank hangs above the stove. The specific height is related to the angle of inclination of the pipes.
- Do not mount the tank directly to the wall. Make a sheathing from slats and attach it to it.
- In addition to the top fastening, you can screw brackets from below.
- The tank has three or four pipes. Two of them will connect it to the heat exchanger. Another one is needed to supply hot water to the washing or heating system.
- The latter can be replaced with a hole and serves to fill the tank with cold water. If there is one, then you need to install a non-return safety valve on it.
- The tank is connected to the heat exchanger using corrugated steel or copper pipes, which are connected using fittings.
- A tap must be provided on one of the pipes to completely drain the water.
- The heat exchanger is placed inside or outside the furnace (depending on the design), its fittings are connected by fittings to the tank pipes.
- If the heat exchanger is of the samovar type, it is placed on the monopipe of the chimney and secured with sealant and clamps.
Sometimes bathhouse owners, without further ado, make everything simpler and, oddly enough, this also works. See how a stove with a heat exchanger in one bath is made:
On a note! If it is not possible to install pipes at the desired angle, you can consider the option of forced pressure in the system.
Burning algorithm:
- Place the oven on a horizontal, non-combustible base.
- Fill the heat exchanger with water.
- Install a temporary chimney about 2 m high.
- Using dry crumpled paper and small logs, light a small fire in the oven. It is not necessary to close the door completely. Do not use anything other than wood for fuel.
- Continue heating for an hour, adding firewood all the time.
- Wait until everything burns out; you can’t extinguish anything.
Important! Any mechanical impact on the metal furnace during heating is prohibited, since at this time the coating of the walls completely hardens.
Literacy is the main thing in the process of installing a stove in a wooden bathhouse. The selection of a heating device, its correct location, and installation of the structure must be carried out by competent specialists. Plus, at every stage of installation and operation of the stove, fire safety rules must be observed. The health and lives of many people depend on this.
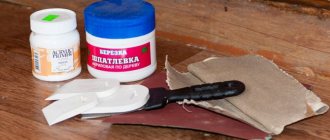
Additionally: wood treatment with impregnations
Fire regulations require that wood be treated with special impregnations that reduce its flammability. However, we know very well that impregnation in a bathhouse is not particularly desirable, because at a high temperature inside the steam room, all the chemicals begin to be released into the air and poison a person. That's not why we go to the bathhouse.
And yet, not all rooms experience such a temperature load as a steam room, so it would be reasonable to treat at least them with fire retardants, as well as the attic, especially since a considerable proportion of fires occur due to sparks flying from the chimney (here Also install a spark arrester or a deflector with it).
IMPORTANT! You won’t be able to soak wood once and forget about it. Impregnation is resumed after checking: if a sliver catches the flame from a match, then it’s time to renew. The average frequency is once every two years.
The composition should be applied in two or three layers at least 6 hours to dry between stages . Yes, and pay attention to the presence of pigments to indicate impregnation if you do not want the wood to become, for example, a bright pink color. (That is, the color is not from chemicals, it is added specifically to distinguish treated wood from untreated wood.)
***
So, now that you have an idea of how to install a stove correctly, it’s time to put your acquired knowledge into practice. Write comments, we are interested in your opinion about what you read.
If you have not yet decided on the type of stove you need, then you should familiarize yourself with the characteristics and models of different types: gas, wood, electric. The variety of types of designs, sizes and prices provides the widest selection of stoves for baths and saunas. And which one is better, everyone has the opportunity to decide for themselves.
Correct laying of the stove
Where do you start laying a stove in a brick wall with your own hands? As mentioned above - from the formation of a recess for the chimney, the stove itself and the vent. If the chimney has not yet been formed, it is done first. The best option is to form it from heat-resistant brick at the maximum height, that is, without transitions. It is also desirable that the upper part of the chimney is located at a height of approximately 4.5 m or higher. If it is lower, it will often blow into the oven when there is a strong wind outside. Because of this, the smoke will go back into the ash pit and into the house, and not out.
If the stove is mounted in an opening between a wooden wall, then part of the building structure will simply have to be removed. The wall is supported by a spacer. By the way, if the installation of the stove trim will be carried out in one go, then it is allowed not to make thick inter-pitched seams. You can do without them by simply increasing the density of the solution (adding more concrete) and reducing the distance of the masonry along the seam (instead of the usual 10 mm, make 5 or less).
Scheme of laying furnace rows.
If you look at the shape of the oven from above in cross-section, it turns out that it consists of 4 compartments. This is the best option. You can reduce it to 3:
- blower;
- the combustion chamber;
- chimney (coil).
The fourth chamber in question is where soot accumulates. This part can be completely abandoned only if the stove is installed in a bathhouse. There, anyway, cleaning the chimney must be done 1-2 times a year, since due to the accumulation of moisture, the outflow of smoke is reduced, and sometimes the air duct becomes clogged. In this case, the stove accumulates all the soot in the chimney. It is recommended to make a removable door in the elbow (transition at a right angle) - this is where all the debris and other remnants of solid fuel combustion products will accumulate.
When laying the stove, it is advisable to make the distance from the blower to the combustion chamber as large as possible. In this case, it is better to make the transition between these chambers as narrow as possible - this increases the speed of movement of air masses.
It is impossible to build such a structure only from brick, so experts recommend installing special nozzles made of metal.
Fortunately, they are relatively cheap. There are several advantages to this design. Firstly, the air flow speed increases, and secondly, the consumption of solid fuel and the efficiency of the heating structure decreases. Roughly speaking, this increases efficiency.