Here you will learn:
- Calculation of chimney parameters
- Types and designs of steel chimneys
- Advantages of a steel chimney pipe
- Advantages and disadvantages of sandwich chimneys
- Installation recommendations
- Installation of a sandwich system for smoke removal
- Maintenance of the assembled system
The installation of heating devices is subject to the requirements set out in the regulatory documentation.
Installation of devices is regulated by the provisions of SNiP 2.04.05–91 and DBN V.2.5-20-2001. Also, before drawing up a project, it is advisable to study materials on heating systems (SNiP 41-01-2003), on heat generation devices (NPB 252–98), on technical conditions for the operation of heating devices (GOST 9817–95), on the rules and regulations for the operation of smoke ducts (VDPO).
The design of the chimney and installation features must fully comply with the requirements specified in SNiP, otherwise you will not receive a construction inspection certificate, which is issued after commissioning
Some of the requirements are addressed specifically to the installation of chimneys. The design of the structure can be anything, but the material must be non-flammable.
The materials used for the construction of chimneys can be:
- steel;
- ceramics;
- brick.
Without exception, all structures are prefabricated, and the installation itself is fragmentary, since the chimney passes through several rooms (for example, a room and an attic).
In order for a structure to meet fire safety requirements, its parameters must be correctly calculated, and all component parts must be sized accordingly. When installing factory equipment, you must follow all the recommendations set out in the instructions, including the assembly procedure and methods for installing parts.
A brick pipe is a classic option for a solid fuel system, in which the flue gas temperature reaches 500-700º. Laying it is a labor-intensive process, but if you follow the rules, it can be done with your own hands
A chimney with characteristics as close as possible to a brick pipe can be made from modules of a ceramic chimney system
The construction of a metal chimney from ready-made pipes is simpler and faster than all types of chimneys currently used. However, in solid fuel systems they try not to use this option, because metal pipes burn out quickly and require frequent replacement
One of the modernized variations of a metal pipe is the sandwich chimney. Due to its special design, its service life is increased and its technical performance is improved. Brick pipe of a solid fuel system.
The documentation contains certain provisions that also need to be taken into account, for example:
- the length of the chimney can be any, but not less than 5 m (the height of the ventilation ducts is not less);
- the cross-section of the pipe must correspond to or exceed the inlet hole in the generator;
- each heat generator requires a separate chimney;
- the speed of flowing air inside the pipe is from 15 m/s to 20 m/s;
- the thickness of the pipes is determined by the material of manufacture (the norm for steel is at least 0.5 mm);
- for regular inspection and cleaning activities, chimneys are equipped with pockets (niches) 0.25 m deep;
- the maximum number of chimney turns is 3;
- the radius of curvature must exceed the diameter of the channel;
- the height of the pipe above the roof is regulated by the roof structure: on a flat one – 0.5 m; 0.5 higher than the roof if it is located at a distance of 1.5 m (or less) from the ridge; equal to or greater than the ridge axis if located at a distance of 1.5-3 m.
The order of construction of the structure has been established - always from the bottom up, that is, from the heat generator (boiler, furnace) through the floors to the roof. In prefabricated structures, each subsequent pipe part is inserted into the previous one.
The operating temperature of sealants used to fix parts must be at least 1000º. The connections are equipped with clamps on the outside; fastening material should not get inside the chimney.
Support brackets are provided for fastening the tee, and in order to avoid sagging of the channel, clamps must be fixed to the wall every 2 m to support the pipe
The regulatory documentation defines the places where chimneys are allowed to be installed. The wall material must be non-flammable, but if this condition is not met (for example, in a building with wooden walls), then during installation, for protection purposes, cap or crown pipes should be used.
Calculation of chimney parameters
The basis for calculating the height and diameter of the chimney is the power indicator.
The performance of a boiler or furnace is directly affected by the height of the chimney. For household appliances it is 5 m. This characteristic is provided for by the SNiP requirements for stoves in residential buildings. The measurement is taken from the device's grate to the hood. At a lower altitude, the natural draft in the stove will not ensure efficient combustion of fuel; it will smoke and not produce the optimal amount of heat. However, the ability to increase height is limited. Experiencing the natural resistance of the pipe walls, the air will slow down if the channel is too long, which will also lead to a decrease in draft.
Rules for selecting chimney length
For a private house, calculating the height of the chimney is based on certain rules:
- The pipe must be at least 5 m.
- The excess of the chimney end above a conventionally flat roof is at least 50 cm.
- For a pitched roof, a pipe whose axis is located no further than 1.5 m from the ridge, and if there are superstructures, then from their highest point, the excess is 0.5 m.
- When the distance to the ridge is 1.5–3.0 m, the end of the pipe should be no lower than the level of the ridge.
- When installing a chimney at a distance of more than 3 m from the ridge, in particular for outdoor installation, the angle between the horizon level and the conventional straight line between the ridge and the end of the pipe must be at least 10 degrees.
The height of the pipe depends on its location
When choosing a location for the chimney outlet through the roof, it should be taken into account that it should not be located near roof windows and other similar devices in order to avoid creating fire hazards.
Calculation of the chimney cross-section
The procedure given below for determining the size of the channel is valid for a circular cross-section. It is the optimal form, since the flue gases do not move in a monolithic straight stream, but the flow swirls and they move in a spiral. In rectangular channels, vortices are formed at the corners, inhibiting the movement of gases. To calculate the cross-sectional value, the obtained result should be multiplied by 1.5.
You will need the following initial data:
- Furnace power, that is, the amount of heat generated by the device per unit time when fully loaded.
- The temperature of the flue gases at the outlet of the furnace is usually taken to be within 150–200 degrees.
- The speed of gas movement through the channel (is 2 m/sec).
- Chimney height.
- The value of natural draft (4 MPa per 1 m of smoke channel).
The dependence of the cross-sectional area of the chimney on the volume of fuel burned is obvious.
Smoke doesn't move in a straight line
To perform the calculation, you need to use the converted formula for the area of a circle: D2 = 4 x S * Pi, where D is the diameter of the smoke channel, S is the cross-sectional area, Pi is the number pi equal to 3.14.
To calculate the cross-sectional area, you need to determine the gas volume at the point where they exit from the stove into the chimney. This value is calculated depending on the volume of fuel burned and is determined from the ratio Vgas = B x Vtop x (1 + t / 273)/ 3600, where Vgas is the volume of gases, B is the amount of fuel burned, Vtop is a tabular coefficient that can be found in GOST 2127, t - temperature of gases at the outlet of the furnace, usually a value within 150–200 degrees is accepted.
The cross-sectional area is determined by the ratio of the volume of passing gases to the speed of its movement, that is, by the formula S = Vgas/W. In the final version, the desired value is determined by the relation D2 = Vgasx4/PihW.
Having made the necessary calculations, you will get the result - the diameter of the chimney should be 17 cm. This ratio is valid for a stove in which 10 kg of fuel burns per hour with a humidity of 25%.
The calculation is made for cases where non-standard heating units are used. If the power of the device is known, it is enough to use the chimney parameters recommended by experts:
- for devices with power up to 3.5 kW - 140 x 140 mm;
- at 3.5–5.0 kW - 140 x 200 mm;
- with a power of 5.0–70 kV - 200 x 270 mm.
For chimneys with a round cross-section, its area should not be less than the calculated size of a rectangular one.
How to secure the joint between a chimney and a wooden ceiling?
And now we will touch on the most important point, knowledge of which will help you avoid a completely unexpected fire.
So, the higher the temperature of the flue gases, the more the sandwich pipe heats up, and all the structural elements around it are subject to temperature effects. Therefore, it is extremely important to ensure that the passage elements are reliably protected. And don't think that everything is so simple.
For example, an ordinary tree without special protection becomes charred at a temperature of 200 degrees. And dried wood can even catch fire at a temperature of 270 degrees Celsius! If you expose wooden joists to temperatures of 170 degrees for more than a day, they can also catch fire. Unfortunately, it is this point, which many do not know, that often causes fires, even if a high-quality sandwich pipe is installed.
Therefore, it is advisable to carry out the ceiling with good insulation of sufficient thickness so that the heat from the pipe to the wall and wooden elements is practically absent. In addition, the more the wooden floor itself accumulates heat from the sandwich, the worse the wood will perceive this heat each time. Of course, in an hour or two, the usual insulation in a polyurethane foam unit does not have time to warm up to a critical temperature, but the problem is that, in the language of stove makers, after heating, heat accumulates in the wood and insulating materials and gradually changes their chemical composition.
For example, with prolonged and constant cumulative heating, wood can ignite at a temperature of 130 degrees! But on the outside of the sandwich it often reaches up to 200 degrees (from 75 to 200, as laboratory tests have shown). So such a sad thing happens, when the stove or fireplace was successfully lit for many years, everything was wonderful, and then one day the owners fired it just 2 hours longer and hotter than usual (to warm up on a particularly cold winter evening or to heat the steam room for guests) , and the temperature in the sandwich exceeded the critical temperature, and the same temperature of 130 degrees Celsius reached the floor wood that had already dried over the years.
You also need to be careful if mineral wool is used as the thermal insulation material for polyurethane foam. Over time, from exposure to high temperatures, it also changes its properties and even becomes more thermally conductive! This does not mean that the wool will one day risk catching fire, but the outer contour of the chimney in this place will already be much hotter than you originally expected. But this is a factor that was not initially taken into account!
That is why experienced stove makers advise not to make the ceiling insulation too dense (the denser it is, the more heat it accumulates). Moreover, the natural possibility of blowing air through the pipe is vital:
They also often make a dangerous mistake by poorly calculating the distance between the rafters for the passage of the pipe, which does not correspond to the norm. Please also note that an empty ceiling assembly, in which no insulation has been installed at all, is also not the best option.
Also keep in mind that the material that envelops the inner arc of the chimney tends to settle slightly over time. As a result, the junction of the two walls is sometimes unprotected. And, if this joint burns out (and it is especially dangerous if it is also located inside the ceiling), then the fire that arises in such voids will be almost impossible to extinguish. Therefore, once every year or two, all passage units of the sandwich chimney should be carefully inspected.
Here's how to properly organize the passage of a sandwich chimney through the ceiling in its simplest form:
If you install a water tank on the chimney, then the entire installation should look like this:
Please note how the sandwich pipe should be passed through the ceiling:
And finally, if it is not possible to place a stove or fireplace directly under the sandwich pipe outlet, you will need a special tee:
Types and designs of steel chimneys
Chimneys are made from the following types of steel:
- Alloyed (with and without enamel coating).
- Mirror stainless steel.
- Galvanized.
Steel chimneys come in 2 models:
- Single-walled (single-pipe). Simple rigid or flexible corrugated pipes and shaped elements for them with a thickness of one wall (0.5 - 1.5 mm) can withstand heating up to 1100⁰C. Mainly used as liners in brick chimney shafts. They can also act as an independent structural element, but in this case it will be necessary to carry out additional work on their thermal insulation and insulation.
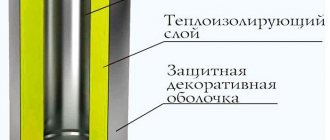
- Double-walled (two-pipe). So-called sandwich or coaxial chimneys consist of two pipes of different diameters and, as a rule, different levels of heat resistance, inserted into one another.
The space between them is filled with fire-resistant insulating material (most often basalt mineral wool), which performs several functions:
- Insulation of the pipeline when it is placed outdoors.
- Prevents condensation.
- Ensuring a normal level of traction.
They are distinguished by a longer period of operation, as well as originality and aesthetics, which eliminates the need to cover them with a decorative casing.
Chimneys also differ according to the type of structural solution:
- The location of the chimney circuit is inside or outside the room. Placing a chimney in a house is a more labor-intensive process, which involves laying it through the ceilings and exiting through the roof. In many ways, this concept is justified by the high heat saving coefficient and the ability to arrange the simplest and most efficient straight, strictly vertical configuration. However, this method is the most fire hazardous; in addition, the pipe eats up useful space in the rooms through which it passes.
Exiting the pipe to the street through a hole in the wall of the house and attaching it to the facade using brackets significantly reduces the fire hazard index. However, in this case, additional work will be required to insulate the circuit, and in areas with severe frosts, it becomes necessary to construct an external brick shaft as a complementary insulating casing.
- According to the angle of inclination of the contour into: upright (strictly vertical), inclined and containing horizontal sections. The first option is considered the most effective. Slopes and horizontal planes impair traction in the circuit, so their installation must be carried out in strict accordance with building regulations.
- The shape of chimneys can be round, oval, square and rectangular. The best is considered to be a round cross-section, which has excellent aerodynamic characteristics. Square and rectangular formats help reduce the speed of movement of the air mass inside the contour due to the formation of turbulence in the corners. In addition, it is in the corners that more soot is deposited.
Elements of modular systems
To draw up an installation diagram, purchase components and subsequent assembly, you need to understand what parts are used in a double-circuit chimney. We list the main elements, accompanied by photographs:
- straight sections of sandwich pipes 25, 50, 100 cm long;
- tees at 45, 90°;
- elbows 90, 45, 30 and 15 degrees;
- transitions from a single-wall pipe to a double-wall pipe - “start sandwich”;
- rotary gates (flaps);
- condensate collectors and various heads;
- ceiling passage units (abbreviated PPU);
- support platforms, brackets;
- fastenings – crimp clamps for guy wires;
- pitched roof sealing elements called master flash or “kryza”;
- end caps, skirts.
Note. Here is a partial list of chimney parts. There are direct channels with inspection and condensate drainage, floor stands, inspection hatches, and crosspieces.
Double-layer pipes are connected to other fragments using the socket-profile joining method. In a more accessible language, the connection is called “tenon-groove” or “male-male”, as you like. When manufacturing each shaped part (except for the end parts), a tenon is provided on one side and a groove on the other.
Scheme of installing a chimney along the outer wall of a country house
As an example, we suggest considering the assembly diagram of a wall-mounted sandwich chimney starting from the boiler:
- We connect a single-wall pipe to the output of the heat generator through a coupling, then mount the starting adapter onto the sandwich.
- We connect to the transition a straight section of a double-circuit pipe facing the street. There it is inserted into the tee.
- Below the tee we place an inspection section, then a support platform and a condensate collector. The structure is placed on a wall bracket.
- We rise from the tee in straight sections, fasten it to the wall every 2 meters with sliding brackets, and compress the joints of the elements with clamps.
- At the end of the chimney we install a cone without an umbrella (for a gas boiler), a simple cap or a deflector.
Comment. If a horizontal chimney duct crosses a wooden wall, you need to cut a square opening and install the PPU in accordance with fire safety requirements.
When you need to get around the roof overhang, we use 2 bends at 30 or 45 degrees. We secure the end of the chimney with guy ropes so that it does not sway in the wind, as was done above in the photo. Watch the video for professional installation of a sandwich pipe for a steel furnace:
Advantages of a steel chimney pipe
Chimney pipes are made of metal, ceramics and brick. Metal pipes are currently in greatest demand. Of all the varieties of this material, it is recommended to choose steel. Steel pipes for chimneys are coated with special solutions that make the material resistant to all adverse effects of the internal environment of the chimney.
When choosing a pipe, it is necessary to take into account the parameters of the heating devices and the fuel used. The material from which the pipes are made must withstand higher temperatures than the fuel can create.
When using some types of heating devices, chemically active substances are found among the under-oxidized combustion products. They can damage a chimney that is not sufficiently resistant to chemicals. Some unburned particles can ignite, creating sparks. Therefore, the material from which the pipe is made must be fireproof.
This is interesting! When choosing a pipe, you need to pay attention to the melting point of the material from which it is made. The melting point of steel exceeds 1000 0C - the highest possible indicator encountered when operating heating appliances powered by coal.
The advantages of steel pipes are:
- Easy to install. Steel pipes do not require the installation of a special foundation; they do not require complex engineering solutions or special installation tools. You can install them yourself without prior preparation. Due to the plasticity of the material, complex technical structures can be created.
- Light weight. They are easy to transport, you can lift and move them yourself without a team of workers, which also simplifies installation.
- High temperature resistance. Steel products are suitable for appliances operating on any fuel. They do not melt at maximum temperature loads.
- Chemical inertness. Steel does not interact with chemical reagents that can form as under-oxidized combustion products. These substances are not capable of destroying it.
- Corrosion resistance. This advantage applies to pipes that have a special coating and stainless steel. The material itself quickly corrodes. It is worth considering that in addition to the internal environment, the chimney pipe is affected by external unfavorable factors, for example, precipitation. Preference should be given to coated pipes.
- Smooth inner walls. Combustion products settle on the rough surface, turning into soot, which gradually reduces the clearance. This reduces the draft in the chimney. Steel is completely smooth, the risk of soot settling on their surface is minimal.
We recommend reading: Why heating pipes in an apartment make noise or hum, and how to fix it
Advantages and disadvantages of sandwich chimneys
In industrial conditions, stainless steel products are used for the inner layer of the sandwich, and zinc-coated steel pipes are used for the outer layer. In this case, the inner contour is covered with thermal insulation and placed inside the outer cylinder. As a result, such a structure functions quite efficiently and efficiently.
Please note that industrial sandwich pipes are sold in lengths up to 1 m.
Installing a chimney made from sandwich products does not take much time and effort - all the work can be completed in a day. Below we present a number of advantages and disadvantages of such pipes.
Among the advantages of such structures are:
- multitasking - such pipes can be used in buildings made of any materials;
- occupy a minimum of space;
- ease of transportation;
- Even a beginner in construction can install sandwich pipes, as it is very simple and quick;
- laconic and pleasant appearance;
- fire safety - this is one of the best options for chimneys in this regard;
- the existing roof truss system does not create any obstacles to the installation of a sandwich pipe;
- due to the presence of several layers, much less soot accumulates in such a pipe and almost no condensation forms, so cleaning it is required much less frequently;
- The sandwich pipe is capable of fully protecting residents from the influence of toxic combustion products.
But such designs have very few disadvantages, although they still exist:
- the price of a sandwich pipe is quite significant;
- The optimal service life of such products is only about 15 years.
If you want to make a sandwich pipe with your own hands, then such a chimney will cost you much less than, say, one made of brick. This will result in a completely reliable chimney, and there should be no difficulties with installation and assembly.
Operating principle of the telescopic bracket
Some bracket legs are adjustable in length.
The purpose of this fastener is to firmly secure the pipe to the wall of the building. The telescopic wall bracket will prevent displacement from the horizontal and vertical directions. Depending on the type of chimney and the method of fastening, it is possible to adjust the length from 40 to 60 centimeters. Using this holder, you don’t have to worry about rough walls, which prevent you from accurately fixing the chimney in a vertical position. If the wall is straight, it is possible to use a regular wall holder.
It is not recommended to install the telescopic bracket to its full length, otherwise it may be too weak.
You can make the brackets yourself, but it is better to buy them. This will be correct from a technical point of view.
Installation recommendations
To carry out the work, you will have to purchase pipes whose length is 1 meter. The chimney in a house is made up of main parts. You will also need a tee for pipe inspection. It is important to buy a tee for collecting condensate, which is used to clean joints. If the pipe has turns equal to 45 degrees, then you will need corners that are made of the same material. Make sure you have a compensator; it takes on the load from the expansion of the chimney elements during cooling and heating. The system must be installed on the roof; for this, an adjoining unit is useful. In order to prevent the entry of rain, leaves, snow and dust, the system should be equipped with a cap.
Installation of a sandwich system for smoke removal
Before installing the structure, you must carefully read the technical documentation and safety regulations.
It is imperative to take all measures to prevent fire during operation of the chimney.
Before purchasing, it is necessary to calculate all materials, taking into account the specific layout of the house
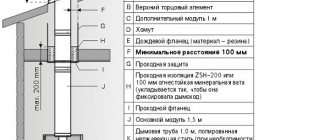
Sandwich chimney installation diagram
To make it easier to imagine how to carry out the installation correctly, here is a diagram.
Figure - Installation diagram
Thus, if you take into account all the requirements and rules when calculating the location of the sandwich chimney, its height and length, then the installation will be carried out correctly.
Step 1 - assembly of chimney pipe elements
Installation of the structure always starts from the bottom up. Sandwich chimneys must not be connected directly to a heating device.
A sandwich chimney element is never connected to the heating device - a single-wall pipe or adapter is installed first
First, install a special adapter or a single-wall steel pipe half a meter long.
If it is planned to lead the pipe directly into the wall, then install a horizontal outlet with a slight slope of 2°.
The adapter is designed to connect different sections of the chimney system - single-wall and sandwich pipes
The section of uninsulated pipe can be short or long if greater heat transfer is expected. Walls and structures located near it must be protected with a screen or casing.
They install it “smoke-wise”, that is, they put it on top of the heating device pipe and additionally protect the joint with a heat-resistant sealant.
Assembly “by condensation” prevents drops of moisture from penetrating into the insulation system, which significantly reduces its insulating properties
The chimney sandwich element can be connected to the heating device through an adapter - a double-circuit pipe, the lower part of which is installed “for smoke”, and the upper part “for condensate”.
All subsequent pipes will be installed “on condensate”, which will prevent its seepage and protect against damage to the thermal insulation layer.
All joints are secured with couplings. A clamp is installed near each joint to secure the system to the wall.
To prevent lateral movement of the structure, wall brackets are used every two meters, and support brackets are used for tees. The system is attached to the wall using consoles or support platforms every five meters.
Step 2 - passing ceilings and walls
Even the fact that sandwich chimneys have an insulating layer does not mean that their surface cannot heat up quite strongly. Therefore, it is prohibited to place them without additional insulation near flammable materials (wood, plastic, etc.).
The joints of sandwich pipes for chimneys during their installation and operation should not coincide with the passage in the ceiling or wall.
The free space between the ceiling and the pipe is filled with non-flammable and non-flammable basalt wool
The diameter of the hole in the wall or ceiling is cut 250 mm larger than the diameter of the outer pipe.
Make it round or rectangular. Heat-resistant material is placed in the free space, which is hidden with decorative plates.
The passage unit is heat-resistant, it prevents deformation of the chimney when the building structure moves - shrinkage, moisture and temperature deformation
To pass through the ceiling and, especially, through flammable materials, a special passage unit is also used. An air gap is left between the outer contour and the inner surface of the assembly.
When passing through a ceiling or wall made of a slightly flammable material, you can use an unloading platform instead of a passage unit. It will act as an additional support.
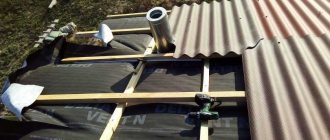
Step 3 - passing the system through the roof
When the chimney pipe is brought out through the roof, its tightness is broken. To strengthen the pipe, isolate it from flammable elements of the roof and eliminate the possibility of leaks in the roofing, special devices are used: conical roofs, silicone seals.
These parts have standardized slope angles; they are selected taking into account the roof parameters.
Silicone sealant - master flash greatly simplifies the work and helps create reliable protection against leaks
When placing the pipe, it is calculated so that the distance to flammable materials is at least 37 cm. To protect against water getting under the roof, an apron is installed on top of the roof. Its edges go under the roofing.
Regulatory requirements
The rules for installing chimney pipes are mainly established by two regulatory documents: SP 61.13330.2012, which covers the thermal protection of pipelines, and SP 7.13130.2013, dedicated to climate systems.
According to these standards:
- between the inner surface of the pipe and combustible materials there must be at least 500 mm if the chimney is not protected, and at least 380 mm if there is a protective coating (in the SP, reinforced plaster 25 mm thick is given as an example of such a coating);
- the minimum distance to insulated surfaces from the inner wall of the chimney is 250 mm;
- the pipe should be as vertical as possible to ensure good traction;
- the minimum cross-section of chimneys for a fireplace is 8 cm2 per 1 kW of the rated power of the heating device;
- The maximum flue gas temperature for stainless chimneys is 400 °C.
To meet these requirements and correctly install the chimney, the pipe is passed through the walls and ceilings using a special design - a pass-through glass. And where the pipe passes through the roof, a box is made of fire-resistant materials.
Maintenance of the assembled system
During operation, soot growths may appear on the walls of the sandwich chimney, reducing its cross-sectional area, which can lead to smoke in the room and a fire. Therefore, it is necessary to clean the duct at least twice during the heating season. It is convenient to carry out cleaning through the inspection hatch in the plug; if there is none, you can open the plug completely for these purposes by unfastening the clamp.
The condensate collector also requires regular inspection to ensure timely discharge of accumulated liquid. If the condensate drain is connected to the sewer system, then the condition of the connecting tube must also be examined: clean it if it is clogged and replace it if it fails. To clear a clogged drip line, you can use a thin, strong wire.
Stages of installing a chimney from thermal pipes
After concluding the contract, developing the project and its approval by the customer, the construction company will install a chimney in the wall or roof in stages:
- An adapter is put on the stove pipe. It is lubricated with a sealant that can withstand temperatures of at least 1000 degrees. For reliability, the transition element is secured with a metal clamp.
- A length of single-wall pipe is installed to prevent the sandwich from overheating, which turns to stone when exposed to high temperatures. This leads to failure of the chimney.
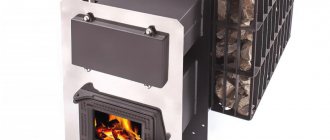
- A heater or metal container for heating water is mounted on a single-wall pipe piece.
Metal tank for heating water in a bathhouse above the stoveSource pechimax.ru
- If a chimney is installed through a wall in a wooden house, bathhouse or other building, a chimney section no more than 1000 mm long is created with a 3-degree slope towards the street.
- A hole is prepared in the wall for the chimney outlet. Its diameter is always larger than the cross-section of the sandwich pipe. If the wall is made of combustible material, then the gap between the smoke exhaust duct and the supporting structure is at least 200 mm. Often a square hole measuring 400*400 mm is created.
- The walls of the opening are covered with basalt cardboard.
- A factory-made chimney passage through the wall is installed.
Pass-through block in the form of a boxSource masterweld.ru
- A sandwich pipe is inserted into the passage block.
- The empty space of the part for penetration is filled with mineral wool.
- The pipe passage through the wall is covered with a decorative rosette or metal plate.
- Visible cracks are filled with sealant.
- A bracket with a support plate is fixed to the outer surface of the wall at the chimney outlet. Manufacturers often produce this unit together with an inspection element.
- The chimney is fastened along the wall in a vertical direction. Sandwich pipes are connected to each other “through smoke” and “through condensate.” In the first case, the products are put on the narrowed ends with a socket, and in the second, the joints are made the other way around.
Methods for connecting pipes “for smoke” and “for condensate” Source obustroeno.com
The following video material will help you understand the principles of creating “smoke” and “condensate” connections:
The installation process is completed by installing the cone of the required height and the selected head. If the last section is long, a clamp with eyes is attached to it. This product allows you to fix the final section of the chimney using guy wires that are attached to fixed, durable parts of the roof.
Special clamp for guy wiresSource yandex.net