Hello, dear guest!
Sit back and forget about your pressing problems for a moment. The topic of today’s article is one of the favorite vacation spots of Russian people. A place where people have long washed themselves, treated illnesses, met with friends, and simply hid for a while from life’s hardships.
Have you already guessed what I mean? Right! Today we will talk about the Russian bathhouse. About a classic bathhouse, but made in modern solutions, comfortable and safe. We will take a detailed look at the tank on a bath pipe, find out why it is needed, in which cases this option for heating water is optimal, and find out the dangers of choosing the wrong bath containers.
Why do you need a tank on a pipe?
Strong hot steam, invigorating tart aroma of wood, birch and juniper brooms, the special spirit of a Russian bath... Not a single sauna with scalding air can replace real light steam! Even in our time, a bathhouse is a favorite place to relax for a person tired of the everyday hustle and bustle. And no entertainment and shopping centers will replace it.
And now I’ll add a little horror to the beautiful picture.
Imagine - you have decided to build or renovate a bathhouse. And so, the walls are covered with new lining, fresh brooms are waiting for hot steam, and the simplest thing remains - to buy a tank for the sauna stove. It would seem, what could be simpler?
Modern stores are overflowing with bath accessories and there are a great variety of containers for heating water. Most are tanks for sauna stoves of various shapes, shiny, smooth to the touch, with high-quality and beautiful welds. It would seem, what else is needed?
Now let's take a closer look at the material of manufacture.
In 80% of cases it is stainless steel with the incomprehensible name AISI430. And few people know that the stainless steel in this AISI is only a shiny surface and a little chrome. And a sheet of such material burns out under the influence of direct fire in 3-4 months. It’s no wonder that the manufacturer’s warranty for such tanks is no more than 3 months. Moreover, the sheet thickness is rarely more than one and a half millimeters.
And this is where the fun begins. Imagine, you bought a tank for 10, 15, or even 30 thousand rubles and happily installed it on the stove in the bathhouse. And six months later a hole burned in the bottom. Scary?
So I'm scared.
But there is a great way to avoid all such troubles, even using products made from Chinese stainless steel. And one of them is installing a water tank directly on the sauna pipe.
Review of furnaces with heat exchanger
There are built-in models of heat exchangers. Below we will look at the popular ones.
Sauna stove with boiler
Let's start with how justified such a decision is from an economic point of view. Installation of this device increases the efficiency of the equipment used. With it, exhaust gases not only fly away uselessly into the atmosphere, but also simultaneously heats water, which can then be used for bathing or other household needs. Therefore, it repeatedly justifies the fact of its installation in the long term.
Vesuvius Skif 16 VChT
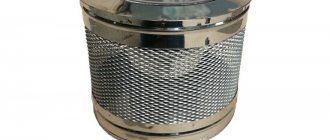
Powerful and fast, with a right- or left-side location of the water heater, equipped with a mesh. It boasts a steel firebox with thick walls (8 mm), thanks to which it is not afraid of even constant exposure to high temperatures.
Tornado 20M2
Productive, heavy (125 kg). Equipped with a cast iron door, built-in heat exchanger and a spacious side casing designed for 240 kg of stones. Must be installed on a reinforced foundation. But the efficiency is impressive.
Harvia 20SL Boiler
A heater from a Finnish manufacturer, weighing 75 kg, with 40 kg of stones. Modern, with a recuperator in the form of a tank, with a remote structure and a built-in condenser, designed for a steam room with an area of up to 20 m3. It has stable legs and a stainless frame, has smooth shapes and an attractive design.
The principle of operation of a tank on a pipe
The first Russian baths were heated “black”; smoke filled the room, leaving traces of soot and soot on the walls. This technology has long been a thing of the past; modern stoves are equipped with chimneys.
Vapors and gases leaving the stove through the chimney heat it up greatly. And this temperature can be used to heat water.
To do this, a tank is installed on the pipe. It encircles the pipe and the water in it is heated by hot gases. This solves two problems at once - heating water and thermal insulation of pipes.
This is interesting: This system works on the principle of a samovar, which is why the tank on the pipe is called a samovar.
Pros and cons of this design
The main advantages of installing a sauna tank on a pipe:
- The reservoir can be placed along the entire length of the pipe, which allows you to obtain a large volume of hot water. At the same time, increasing the volume of the container will not affect the heating time;
- The temperature of the gases in the pipe is high (up to 500 degrees), so heating is carried out quickly and evenly;
- Installing the tank is easy to do with your own hands;
- Hot smoke is not just discharged into the street, but heats the water, so the efficiency of the stove increases;
- The service life of the chimney increases;
- The water maintains its temperature for a long time while the pipe cools;
- No additional heating elements are required;
- The samovar tank can be installed not in the steam room itself, but at the attic level. In this case, hoses are connected to the heat exchanger to input cold water and output hot water.
Design disadvantages:
- Large tanks are difficult to install due to weight. If it is necessary to install a large container, it is necessary to use a fastening system, and the load should not fall on the stove, but on the walls or foundation;
- The water temperature cannot be controlled;
- The liquid boils away faster;
- The design is not suitable for every chimney. For example, if the pipe in the bathhouse is brick or asbestos, you will have to choose another option;
- If the heat exchanger is located high, it is difficult to fill it with water.
Important! In the cold season, the liquid from the tank must be drained, otherwise the entire system will freeze.
Basic concepts of heating water in a bath
The problem of hot water supply is solved in several ways. However, in essence, there are two main ones: from a sauna stove, and from an independent source.
Water supply from sauna stove
It involves the use of thermal energy from a sauna stove not only to heat the internal space and generate steam, but also to produce hot water for the needs of the washing department. What's good about her? Firstly, the water supply system is simplified. There are no additional sources of thermal energy generation. Secondly, such a solution is more economically profitable. Fuel is used as efficiently as possible. Finally, this solution is the most compact, which is especially important for small baths.
Independent water supply
This way eliminates the key drawback of the previous concept, when - “The stove does not burn - there is no hot water.” Sometimes circumstances develop in such a way that hot water is needed even before the sauna stove reaches operating mode. For example, in a kitchen unit when cooking and washing dishes, for preparing medicinal decoctions and infusions, when steaming brooms and the like. This issue is resolved, in most cases, through electricity.
An electric kettle or electric stove can provide a small amount of water; larger volumes are provided by the introduction of electric boiler-type water heaters into bath life. More exotic methods are extremely rare, through the use of solar vacuum tubes, heat pumps and other things. If the bathhouse is located in the middle of nowhere, where there is no electricity and you are not an adherent of complex innovative methods, then using such a good old and time-tested item as a water tank for a bathhouse is just right.
Types of factory tanks and average prices
Factory tanks have different configurations. Main parameters:
- Type of material;
- Design;
The most common materials are galvanized, steel, stainless steel, less common are products made of cast iron.
The most popular factory shape is a rectangle and a cylinder with a circular cross-section.
Average cost of a rectangular tank with a volume of 50 liters:
- Steel - 1000 rubles;
- Galvanizing - 1500-2000 rubles;
- Stainless steel - from 3000 rubles.
How to choose?
To begin with, you need to decide where the tank will be located - directly above the pipe, or it will be a remote structure located in the attic.
Installing a container in the attic is convenient, but not always possible - it all depends on the design of the roof and the possibility of supplying and discharging water.
Calculating the volume
The required volume of liquid is calculated from the norm of 15-20 liters per person plus 10-15 liters in reserve. For example, if a family of 2 people periodically washes in a bathhouse, then a tank of 50 liters will be enough. A family of 4 people will need a capacity of 80-100 liters.
Type of material
Pros and cons of steel, cast iron, stainless steel:
- Cast iron
Cast iron containers are heavy, they are inconvenient to install, the water in them heats up slowly, but remains hot for a long time;
- Galvanized iron
Containers made from it last longer than steel ones, but over time they rust and burn out;
- Steel
Due to their high thermal conductivity, steel tanks heat up quickly and cool down just as quickly. The main advantage is the price, the main disadvantage is the low service life;
- Stainless steel
They combine all the advantages of iron products with high corrosion resistance.
Enameled products are found in stores. They are more durable than uncoated steel tanks, but are susceptible to chips, in place of which pockets of corrosion form.
Features of installation and connection step by step
It is not difficult to install a water tank with your own hands.
Let's look at each stage separately:
- If the stove is already installed, remove the section of pipe extending from the stove into the ceiling;
- We weld a piece of pipe 8-10cm long to the outlet of the furnace.
- If the pipe built into the tank does not match the diameter of the chimney, an adapter is mounted on the installed section of the pipe;
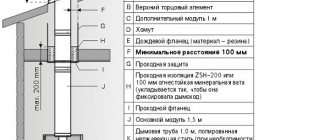
- We install the tank. The distance between the top cover and the ceiling should be 20-25cm;
- If necessary, an adapter is also installed in the upper part;
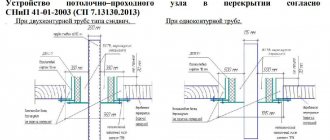
Important! Pipe connections are made using crimp clamps, but the joints should be additionally treated with a special sealant. Otherwise, if gases penetrate through cracks in pipe joints and there is insufficient ventilation, a person may suffocate.
A few important operating rules:
- The bathhouse is not only a recreation area, but also a place of increased danger, especially for children. Therefore, if possible, it is better to install the tank on the pipe as high as possible, optimally in the attic. You need to pour boiling water extremely carefully.
- The system should be filled with water until it is flooded; heat without water will destroy the welds.
- Do not leave water in cold weather. If the water in the system freezes, deformation is inevitable.
Video description
Heat exchanger in the oven.
Let's move on to a more complex task - you will need to cut two holes of 100 mm in diameter in both disks with a core cutter for the chimney exhaust pipe. In order for the holes to be exactly in the center, you must already have the crosses outlined above. For the most accurate alignment, first drill the holes with a thin (2-3 mm) drill and only then use a diamond-coated core bit. The difficulty in this case is that metal 1.5-2.0 mm thick will sag if it is drilled with a crown in weight, so you will need some kind of dense and at the same time non-solid base.
Sand is best suited for this purpose, the surface of which must be made smooth so that the workpiece fits tightly there, and for convenience it can be collected in a cardboard or wooden box. In addition to a dense base for drilling sheet steel, you need the immobility of the workpiece, since you will not be able to clamp the disk on a sand cushion, then rest the circle against the corner of the box, and hold it on the opposite side with your fingers, but better with pliers. If you want, you can reverse the order of actions - first drill a round hole for the chimney, and then use a grinder to cut out a disk for the cylinder cover. If you rest the quadrangular workpiece against the corner of the box, it will be much more convenient to hold it while drilling.
On one of the disks, in order not to install a blast valve, use a stepped drill to drill a hole of the required diameter for a plug that will open and close freely. The plug can be made from a piece of stainless tube, welding a cap on top, or from a piece of polypropylene pipe Ø 20 mm, soldering a plug at one end. The second option will be even more convenient than the first, since the PPR plug can be opened and closed with bare hands even when the water is boiling. Under strong pressure, if steam does not break through at the point of blockage, the stopper will simply be pushed out of the container - this is very convenient and several times cheaper than a blast valve.
If you clean the edges well, you can get a good seam Source stroychik.ru
Now you need to weld a cylinder from a sheet of 1256x800 mm. If you work without an assistant, it will be very difficult, but you will need a vice to fix the edges of the rectangle. Now clamp a corner of the sheet in a vice so that a few centimeters of the rectangle are above the clamping jaws, and the rest hangs down to the floor. If you have an assistant, have him roll the cylinder edge to edge and hold it, and let you or someone else grab the seam at three points (edges and middle). Now all that remains is to weld the joint well so that no water leaks out. Keep in mind that if you do not have enough experience in welding, you will not be able to make such a seam yourself - it is better to invite a professional welder.
A samovar-type container is installed directly on the chimney of the sauna stove on its fittings Source profpipe.ru
After you remove the scale from the cylinder, you can work on the fittings for cold and hot water. In this case, you should proceed in exactly this order: first the fittings, and then the lids and pipe, so that chips and splashes of molten metal do not remain inside the container. In the upper and lower parts of the tank, using a stepped drill, make two holes for cold and hot water for a threaded fitting, just first think about their location so that it is convenient for connection. Adapter fittings for connecting PPR-20 must be made of stainless or galvanized steel, as already mentioned in the “Materials and Tools” list.
Now you need to carefully weld both covers, but first check that a piece of pipe fits through them for insertion. The fact is that for this pipe, the Ø 100 mm may not be the outer size, but the inner one, and then you will have to bore the holes in the covers with a file. This is a long time, but you can’t think of anything better; however, you can also perform this operation using a hole saw, but for this, both disks must be clamped in a vice. Exactly both at once to speed up the process, and all you have to do when boring a hole is to try on its permeability using a pipe. When you have welded the lids, insert the hundredth pipe into the holes and carefully weld them too. That's it, the heat exchanger is ready for installation and operation.
To supply cold water and remove hot water from the heat exchanger, it is best to use PPR-20 PN-20 Source stroidea.ru