Electrician in the house
Encyclopedia about electricity from A to Z
Masters catalog
Find the best master or company in your city
LED lighting in the steam room
LED lighting in the sauna is unacceptable. You have probably heard such words on many thematic forums, and articles on this site also contain a similar statement. But it is not so.
LEDs can be used as lighting for a steam room or sauna, but subject to a number of restrictions. We will talk about them in our article. And at the same time, we’ll discuss the specifics of the steam room lighting network as a whole.
- Why can't LEDs be used in a bathhouse?
- How to make lighting for a steam room? Steam room lighting requirements
- Steam room lighting options
Methods for connecting electrical wiring to points
In order to correctly install all the light sources in the bathhouse, you need to know how to conduct electrical wiring to each of them.
There are two ways:
- Open;
- Hidden.
It is better to install electrical wiring inside the bathhouse using an open method, since it is safer and more convenient. In this case, the wiring lines are quite easy to view, and there are no difficulties during the replacement or repair process.
It is better to conduct hidden electrical wiring to lamps only in the steam room.
You should also follow some rules when wiring to lamps:
Two of these conductors are connected to phase and neutral, and the third is connected to the panel or fittings; All sockets in the bathhouse must be provided with an individual differential switch; The use of artificially connected wires in the steam room is not allowed, only solid wiring; The wires from each of the elements are connected only on the panel; The shield should be installed as far as possible from the steam room.
Main conclusions
Incandescent lamps, LED elements and optical fibers are used as lighting sources in sauna lamps in the steam room. When choosing them, you need to take into account such characteristics as:
- Moisture and thermal protection.
- Reliability of electrical insulation.
- Power and brightness settings.
- Health safety.
- Decorative features.
It is optimal to install lamps in a corner or on the ceiling, so that no one can accidentally touch them and so that their location is as far as possible from the heat source (stove). Light bulbs that cannot withstand overheating above sixty degrees cannot be installed in the steam room. During the installation of lighting devices, wiring, and switches in the bathhouse, electrical and fire safety rules must be strictly observed.
Decoration options
A lamp in a bathhouse is not just a source of light, it is also an important decorative element. Due to the specific conditions in the steam room, not all materials can be used for decoration (as in ordinary rooms). Many of them will simply go bad. Therefore, the following are used as the basis for interior components located in close proximity to the lamps:
- Glass and ceramics. Thickened glass shades withstand both heat and steam well, and therefore they are often installed directly in the steam room. They can have a wide variety of colors and shapes. The main condition for their use is tightness. Ceramic products also have good resistance to the extreme conditions developed in a steam room. This could be the base of the chandelier, lampshades and other details. As an option, a lamp is made in the shape of an antique kerosene lamp with forged black metal elements.
- Lamps for baths, saunas and steam rooms in a modern style are made on the basis of heat-resistant plastic, duralumin alloy, plastic and stainless steel.
- Natural materials - stone, wood, minerals. The natural base has a natural structure, which softens the harshness of the lighting and the flickering of the lamp. In addition, some components, for example, Himalayan salt, release ionizing substances when heated, disinfecting the air. As a rule, they are all used as solid slabs or lampshades.
Advantage of LED strips
The great difficulty in building a bathhouse is that it requires the use of special devices that can withstand harsh operating conditions. If the equipment is incorrectly selected, the lighting will have to be changed frequently, as the lamps will quickly fail. But don't forget about safety. In the best case, the lamp will simply go out; in the worst case, it may burst, and this can lead to injury from small glass fragments, as well as an electric shock to a person. This is a very important point that must be taken into account when arranging rooms where high humidity is planned. Poor quality or incorrectly selected equipment can cause personal injury or even death.
With an LED strip in the bathhouse, you don’t have to worry about people who are relaxing peacefully getting an electric shock. Such lighting fixtures can withstand any level of humidity. Even if they start pouring water on the tape, nothing will happen to it. Considering the high level of moisture resistance of the strip with LED elements, such a device is even recommended for creating pool lighting. But in order to use the lighting device underwater, you need to purchase a device with special markings indicating a high level of water resistance.
LED lighting can be placed in the shelves of the bath
LED strip can be placed behind shelves
The big advantage of LED strip is that it is not only moisture-resistant, but also heat-resistant, so the lighting will withstand very high temperatures. Moreover, heat-resistant tapes last a very long time with minimal energy consumption.
Thanks to such equipment, you can create a unique interior in any bathhouse. This will make your vacation more comfortable, and the time spent in the bathhouse will be remembered for a long time.
Using an LED strip, you can diversify the interior of the steam room and create interesting effects, for example, by placing it behind wooden wall panels
It should be noted! With low power consumption, diode strips in the bathhouse produce quite a lot of light.
But it’s still better to use the recommendations of professionals for installing heat-resistant equipment so that there is sufficient lighting in each room.
The most popular sauna lamps
Country property owners highlight several products that meet safety requirements and are durable and heat resistant.
| Manufacturer, model | Protection level | Peculiarities | Maximum room temperature, °C | Cost, rub |
| Harvia, SAS21060 | IP44 | Sealed housing | 125 | 845 |
| Harvia, SAS21106 (with guard) | IP44 | The steel shade provides better protection and diffuses light | 125 | 3 700 |
| Linder (ceramic) | IP54 | Connects to a 220 V network, but it is possible to use a step-down transformer | 125 | 650 |
| TDM Electric, NPB400 | IP54 | Matte lampshade | 125 | 500 |
| Eletekh, TERMA 3 | IP65 | Increased protection | 125 | 700 |
| Uniel, ULWO04 | IP65 | Stylish look, increased protection | 125 | 900 |
Installation requirements for a sauna
There is an excellent video on the Internet showing viewers the process of making a lamp from Chinese LEDs on their own. We think that craftsmen will find it useful:
Everything else concerns the direct installation of lamps that use LED elements in the most problematic room for semiconductors - the steam room.
Experts say that the closer to the floor you place the LEDs in the steam room, the better it will be for them. But this inevitably means the need for basic lighting, which will be located higher and disperse the darkness
By the way, if you want to learn more about which lamps are more suitable for a Russian bath, which ones are more suitable for a sauna, just follow the links. In addition, we have useful material dedicated entirely to bath lamps (with instructions for making them yourself). Another material will tell you about the types of bath lampshades and share tips on how to make them yourself.
If you use an LED strip to illuminate shelves and under them, then its moisture protection class (the last digit in the code) must be at least 7: IP*7 or IP*8. If a regular lamp is placed under the shelf, then its protection class must also be appropriate, because water will fall on it. (The store will tell you that they are all sealed, but the manufacturer usually indicates the protection class, and often this is IP54).
When installing, do not forget how important heat removal is for the normal operation of LED elements - this can be not only a metal radiator with high thermal conductivity, but also ventilation! It's true - some craftsmen create entire cooling systems for LEDs. But now is the time to think - maybe, after all, install an RCD and incandescent light bulbs?
Lighting with halogen lamps
Halogen light bulbs for baths are very popular because they can even be used in a steam room.
Halogen lamps are not afraid of high temperatures. They have built-in reflectors, and the power of such lamps does not exceed 20-35 W.
Halogen lamps are not afraid of high temperatures, because their own temperature can reach up to 400 degrees.
The undoubted advantages of this type of lighting include constructive protection from water drops or careless touches.
Also, halogen lamps use safe voltage, which is very important in a bathhouse. Information
Despite the popularity of halogen lamps, it is very difficult to find colored shades for them.
Information. Despite the popularity of halogen lamps, it is very difficult to find colored shades for them.
Varieties
LED lamps for saunas and baths differ according to the following parameters:
- by voltage;
- by color;
- according to the configuration of LEDs (lamps or strips).
With voltage , everything is simple - either these are lamps that can be placed in a standard socket and connected to a 220 volt network, or these are lamps for the already mentioned 9, 12, 24, 36 volts, which require a transformer or driver, or these are tapes that you need a driver designed for their power and other parameters.
By color: LEDs can produce different colors depending on the substance used as a semiconductor, as well as depending on the color of the lens. There are monochrome color ones, and there are color-changing RGB (there are three types of color diodes). White light is produced by a combination of a blue LED element and a yellow phosphor. It's funny that if these were paints, the color would be green. White color varies in temperature - from 2,700 to 10,000 kelvins.
And we’ll tell you a little more about ribbons and lamps.
Ribbon
Someone thought of mounting a lot of diodes in a row on a long and narrow circuit board . This created a new type of lighting, which today is called LED strip lighting . Flexible tape is sold in reels, usually 5 meters.
The main purpose is to illuminate interiors and exteriors. Since we are talking about LED strip for baths and saunas, here it is used to illuminate shelves in the steam room and to illuminate swimming pools.
Waterproofing tapes are divided into the same degrees of dust and moisture protection, which apply to a wide variety of equipment. On sale you can find tapes with protection classes IP65 and IP68 . In the first case, to protect the tape, it is filled with epoxy resin on top. In the second, a flexible and transparent PVC hose is put on the tape.
There are two modifications - when silicone is poured inside the “hose” for greater tightness , and when there is just air there. The most waterproof version is the one with PVC silicone poured inside. It can be used to completely immerse the tape in water, for example, to illuminate the bottom of a pool. It is also suitable for the steam room.
To make it clear what the set of letters and numbers on the tapes means, let’s decipher one of them.
SMD3528 120Led IP65 850Lm/m – SMD is a technology for creating tape; on sale you can find either those created using SMD or DIP technologies. 3528 is the crystal size (here 3.5 by 2.8 mm). 120LED – number of diodes per meter (here 120). Next comes the already recognized class of protection against dust and moisture, and behind it is the luminosity in lumens per meter.
It was already mentioned above that to power the tape you need either a transformer or a driver. Connecting a transformer was discussed in an article on the theory of bathhouse electrics, as well as in an article on connecting a bathhouse yourself.
In addition to power, you can also connect a controller that will control blinking and/or color. The controller may come with a remote control.
To select the correct power of a step-down transformer or power supply, you should calculate the total power of the installed LED strips and add to them a power reserve of 20% (remember that a larger reserve is harmful).
Lamps
Many people have probably already installed such lamps at home, so they know that according to the shape of the base, there are those that are screwed into a standard E27 socket , suitable for incandescent lamps and powered by a 220 volt network, and there are those with other bases, designed for spotlights and designed for mains voltage 12, 24 or 36 volts.
With lamps it’s a little easier than with strips, because for those that operate on 220 volts you don’t need to do any calculations at all, and for lamps with low voltage it’s enough to calculate the total power and select (not forgetting the 20% reserve) a suitable transformer .
On sale you can find lamps of different shapes and sizes, different power and luminosity, different warmth of white light, and most importantly - from different manufacturers.
Of course, we will advise well-known manufacturers , but not because someone pays us for advertising, but for the simple reason that cheap LED lamps from unknown companies rarely correspond to the declared characteristics , and their cheapness is due to the lack of important parts, including radiators for heat removal.
If you want to save money, order LEDs from China and assemble a lamp with the required characteristics yourself. At least you will be sure of the filling.
A few more recommendations.
- Cold light in a bathhouse will not be pleasant, so take warm yellow light - up to 3000 Kelvin.
- To check how strongly pulsates , use your smartphone's camera. This can be done when checking in a store - just point the camera at the glowing lamp, and if flickering is noticeable on the screen, refuse to purchase this model.
- Color rendering index is probably not very important for lighting a steam room, but if you decide to install such lamps in the relaxation room, then focus on 80 CRI.
- Another important characteristic is the voltage range that this model can handle. It is better to take those with a wider range.
By the way, there is a hybrid of tape and lamp. Since we are talking about a circuit board, you are free to choose its configuration and the location of the LED elements on it. If such a board is placed inside a lamp, in which instead of a base there is simply a smooth base, and covered with a lampshade on top, then we will get an LED lamp . Of course, you will need to select resistors (they take away excess voltage if the power source provides it). The rest is the same as for lamps and tapes.
Where to place and what marking?
Having chosen the optimal type of lighting fixture for his bath, the owner should not calm down, since he still faces many unresolved problems. One of the priorities is where to install the lamps.
In the steam room
Here the owner must remember the rules prohibiting the installation of lamps in certain places. This is the area next to the stove. Even if you purchased a heat-resistant lamp, it is unlikely that it can withstand the flow of hot air coming from the hot walls for long.
All other zones are considered relatively safe, so here you can completely focus on personal preferences. It would not be a mistake to install lamps on a shelf. But you need to choose a place very carefully so that the lamps do not injure people.
A suitable place to install the lamp may be the corner of the steam room. This is a safe place in every sense: they definitely won’t interfere here. For a horizontal lamp, you can choose the place where the walls and ceiling connect. You can also consider more original lighting ideas: for example, if you manage to get a corner decorative screen, you can install it in the corner, first gluing an LED strip to a heat-resistant, non-flammable base.
For Finnish saunas, where dry air predominates, it is recommended to choose lamps with a ceramic base. All other options should not even be considered, since they are short-lived. If you are the proud owner of a Russian bathhouse, then you should know that the temperature in the steam room is kept at 50-75 °C. Therefore, you can choose any heat-resistant material for it. But do not forget about high humidity - the material you choose must have a moisture-resistant base. Copes best with moisture:
- stainless steel;
- aluminum;
- heat-resistant plastics.
But when choosing, be sure to take into account the operating temperature, which should be at least 100 °C.
In the washing room
They want the temperature in the sink to be kept at the usual level, but high humidity and splashing water can create a problem. Contact with electricity may cause a fire. In this room it is best to install lighting fixtures with a protection class appropriate for a bathroom. When choosing, be sure to consider how high the risk of water getting on the lampshade is.
In each room, we can conditionally distinguish three zones in which lighting devices of a certain protection class can be installed:
- First zone. An area near a water source, such as a shower stall. Given the high humidity, there is the highest probability of water entering in large quantities and from any direction. For this zone, it is recommended to choose 20 W lamps with a protection class of at least 5 (IP 45, 46, 47, 55, 56, etc.).
- Second zone. A part of the room located at a distance of 60 cm from a water source - a bathtub, a swimming pool, etc. The likelihood of drops of moisture getting into this area is much lower, so you can limit yourself to installing devices with protection class 4 and higher.
- Third zone. It is characterized by a fairly low level of humidity, which allows the installation of lighting devices with moisture protection class 1 and higher.
In the rest room
A room in which the humidity level remains consistently high. Taking this into account, it is necessary to choose lamps that have at least a minimum moisture protection class of 1 and higher.
LED lighting for baths
Those who know that the main enemy of LEDs is high temperature probably doubt whether LED lighting can be installed in a bathhouse? Today I will prove that installing it in a steam room is not only possible, but also desirable.
The content of the article:
- Types of bath lighting
- Advantages of LED lighting for a bath
- Installing LED lighting in a bathhouse
- Installation of LED strip in a bathhouse
- Fiber optic bath lighting
- LED lights for baths
- How to make an LED bath lamp with your own hands
- Video about bath lighting
- LED lighting catalogs
Types of bath lighting
Conventionally, bath lighting fixtures can be divided into 2 types:
- classic lamps based on an incandescent lamp;
- halogen light sources;
- LED lighting fixtures.
In the latter case, LED fiber optic lamps or LED strips can be used to illuminate the bath. The first are a thread of optically transparent material, usually glass or plastic, inside of which there are fibers that transmit light.
Fiber Optic Cable Design
Fiber optics today have the highest degree of protection among all lighting devices. It is absolutely resistant to moisture and can withstand temperatures up to 200 °C. Externally, optical fiber looks like a cable or bundle. Thanks to its flexibility, fiber optics are quite easy to install, and the high level of protection guarantees a long service life.
Steam room illuminated by LED strip
In addition to fiber optics, the bathhouse can be illuminated using LED strips, as well as special LED lamps. In this case, their level of protection (IP) should not be lower than IP67, that is, the lamp must be reliably protected from the penetration of dust and moisture. Simple LED illuminators, like LED pear lamps, cannot be installed in a bathhouse, as they will quickly fail. Such lamps can operate adequately in the temperature range from -30 °C to +40 °C. Since sauna temperatures can easily reach 120°C, I recommend using fiber optic lights or heat-resistant LED strip coated with two-component silicone.
Heat-resistant LED strip
This tape is reliably protected from moisture and high temperature. The world leader in the production of heat-resistant LED strips is Finnish, which produces various products for baths and saunas.
Advantages of LED bath lighting
As in the case of using LED devices for home lighting, the advantages of installing LED bath lighting are obvious:
- With their help, you can create interesting lighting effects and unusual design solutions that you cannot create using other lighting devices;
- To illuminate the sauna, you can use both single-color and multi-color (RGB) LED strips;
- The ability to withstand high temperatures makes it possible to install LED lamps made of fiber optics anywhere in the bathhouse or sauna;
- LED devices made from fiber optics are impervious to moisture, so they can even be installed in a swimming pool;
- LED lamps consume minimal current and can last up to 10 years;
- They are absolutely safe for human health, as they do not flicker and operate at low voltage.
Installing LED lighting in a bathhouse
Since incorrect installation of LED lighting in a bathhouse can cost the lives of its visitors, I recommend following the following rules during installation:
- Wiring in a wooden steam room should be laid exclusively in internal open lines; I would even recommend not using electric lines in the steam room, but installing lighting through adjacent rooms;
- when installing cables and wiring, you need to carefully select the cross-section of the wire so that it matches the lighting fixtures that you plan to install in the sauna;
- in wooden bathhouses and in places with high humidity, the wires should not have solders or connections, as there is a high risk of a short circuit;
- Light switches and LED strips should not be placed near a sauna stove (stove), since the possibility of their spontaneous combustion cannot be ruled out;
- When installing electricity in the bathhouse, you should be careful and install emergency light switches;
- The sauna must have grounding, which will help avoid most emergency situations.
Installation of LED strip in a bathhouse
I already said above that a special moisture- and heat-resistant LED strip is used to illuminate a bathhouse or sauna. It costs several times more than a regular LED strip, which can only be used to illuminate a dressing room or a rest room.
Steam room lighting with LED strip
The main advantages of LED strip in a bath:
- LED strip for a bath has a high level of protection from moisture, as well as from exposure to high temperatures, so there is no need to install any additional protective equipment on top of it, which usually affects brightness;
- The tape will consume up to 6 times less energy than a conventional lamp, which is very beneficial if your sauna is used for commercial purposes;
- Most LED strips operate on a low voltage - 12 V, which is absolutely safe for human health;
- Tapes with a high degree of protection can work even in water, which makes it possible to use them to illuminate a swimming pool and shower room.
LED strip installation
To install an LED strip in a bathhouse, you need to have several things with you:
- A power cable that will allow you to connect the tape to the electrical network;
- Several connectors that will help connect two or more pieces of tape;
- Several plugs that are installed on the edges of the tape sections opposite the power supply;
- A power supply whose power must be sufficient for the correct operation of your LED strip;
- RGB controller for controlling color tape (if this is exactly what you are planning to install in your sauna).
Connection procedure
LED strip connection diagram
The entire procedure for connecting the LED strip occurs in several stages:
- Let's find out the total power of the LED strip in order to select the appropriate power supply. The power supply must have some power reserve - usually 10-20%. It should be installed outside the steam room, like a switch;
- We connect the tape to the RGB controller, each wire according to its designation - B, G, R, V+;
- We clean and degrease the surface to which we will attach the LED strip;
- We remove the protective film and glue the tape where we need it. Places directly close to the heater should be avoided. If it is necessary to cut a piece of tape, this must be done strictly in the place marked by the manufacturer (usually there is a picture of scissors);
- We connect the tape to the power supply, observing the polarity.
Remember! If you need to connect a tape more than 5 meters long, that is, more than one reel, it is best to use two power supplies: one for a 5-meter section of tape, the second for a second section, the length of which should also not exceed 5 m. If you need connect a small section to the LED strip - up to 1 m in length, you can use an RGB amplifier that will maintain the brightness of the backlight.
See how you can diversify your bath design using LED lighting
LED pool lighting
LED pool lighting
If a swimming pool is installed in the bathhouse, its design can also be beautifully decorated using LED lighting. In this case, you can use both LED spotlights and sealed LED strip. Here are some recommendations regarding the organization of LED lighting in the pool:
- lamps that are underwater should be placed opposite each other;
- above the pool you can install both ceiling lighting to create a reflection effect, and ordinary wall LED lamps, which will look much more impressive;
- It is best to install the backlight underwater behind protective glass or plastic; Although the moisture-resistant LED strip can work underwater, it would be a good idea to take care of additional safety.
Price for LED strip for a bath
| No. | Product name | Price in rubles |
| 1. | Harvia LED strip for sauna, length 5 meters | 7 335,00 |
| 2. | LED strip LED IP68 12 V (Warm white) 5 meters | 3 200,00 |
| 3. | LED strip LED IP68 12 V (Cold white) 5 meters | 3 200,00 |
Fiber optic bath lighting
Because fiber optics can withstand high temperatures and is also waterproof, it is ideal for bathhouse lighting.
Installation of fiber optics in the sauna occurs in the following order:
- Installation of a light projector in the waiting room, which runs on a halogen lamp and passes light through a filter, thus cutting off infrared and ultraviolet light;
- Connecting optical led conductors that operate on the principle of multiple reflection of light;
- Supplying optical LED conductors to a steam room or shower room;
- Fastening (if necessary) crystalline nozzles;
- We fix the optical fiber in predetermined places.
When fixing the optical fiber in the bath, you should monitor its bending radius. The diameter of the arc here should not be more than 10 times the diameter of the thread. If the thread has a diameter of 0.6 mm, then the bend should not exceed 8 mm, otherwise it will lead to loss of light.
Remember that for a sauna it is best to use fiber optics enclosed in a glass shell, as the PVC shell may not withstand high temperatures.
Fiber optic starry sky
“Starry sky” made of fiber optics
Using fiber optics, you can stylistically diversify the interior design of a bathhouse or swimming pool by arranging backlighting in the form of a starry sky, as shown in the figure above.
Since installation of this design is only possible on a suspended ceiling, it will not be possible to install it in a steam room. However, it will look very beautiful in the relaxation room and above the pool, bringing an atmosphere of special comfort and relaxation to these places.
Creating a “starry sky” occurs in several simple steps:
- Marking the ceiling for installing metal profiles under plasterboard;
- Installation of a light controller;
- Using a drill, we make small holes with a diameter of 1.5-2 mm in sheets of plasterboard. Just 1 m? there should be about 80 holes;
- We glue the fiber optics into the holes made, and a different number of fiber optic threads should be inserted into each hole to create a natural effect: some “stars” will twinkle brightly, others dimmer;
- After this, we fix the sheets of drywall on the metal frame, leaving a small hatch for access to the controller;
- Upon completion of all procedures, our ceiling can be painted with acrylic paint.
Price for fiber optic systems for baths
| No. | Product name | Price in rubles |
| 1. | Sauna lighting set Cariitti VPL10-E161 | 11 670,00 |
| 2. | Set for lighting ceilings in sauna Premier SE 92 | 14 110,00 |
| 3. | Fiber optic sauna lamp Cariitti Kihla, stainless steel | 6 000,00 |
LED lights for baths
In addition to LED strip and fiber optics, ready-made LED lamps can be used to illuminate a bathhouse, as an analogue of conventional bathhouse lights with an incandescent filament. The sealed design of LED bath lights allows them to withstand high temperatures and the negative effects of a humid environment.
Brief instructions for installing LED lamps in a bathhouse:
- Marking the installation locations of lamps and electrical wires;
- Power supply using a three-wire wire enclosed in a protective corrugation. If you are installing recessed lamps, the wires should be placed slightly away from the lamps so that they do not overheat or melt during operation. The wires are secured behind the frame and battens using special clips. If you plan to install overhead lamps, then to connect them use single cables extending from the junction box;
Installation of LED lamps in the sauna
- Checking the functionality of the electrical wiring using a socket with a piece of wire and a regular light bulb;
- Drilling holes in the walls of the bathhouse for mortise lamps or fixing mounting plates of overhead lighting fixtures;
- The installation of mortise lamps begins with cutting a loop of wire, after which the resulting ends are connected to the socket using twists, inserting them into the terminal block under the screws, and wrapping them with insulating tape;
- If you plan to install lamps with a power of up to 12 W, a step-down transformer is connected to the first lighting fixture in the circuit. It is placed inside the frame for a recessed lamp, which in case of a breakdown will allow for quick removal of the transformer and its repair without damaging the walls of the sauna;
- At the final stage, the performance of the lamp is checked. If everything is in order, it should shine with a bright light.
LED lamp in the bath
Some tips for conducting electricity in a bathhouse:
- When installing closed wiring in a bathhouse, the installation of electrical points should begin along with laying the cable;
- The power outlet should be located at a height of 25-30 cm from the floor and at a distance of at least 50 cm from electrical appliances;
- If, after installing the socket box, further repair work is carried out in the room, there is no need to attach the socket block to it, and the hole should be covered with crumpled newspaper to prevent debris from accumulating there;
- Each socket can be connected to a separate line of the power box or panel. They can also be connected via a cable. With this type of connection, the power wires of each subsequent socket are connected to the contacts of the previous one;
- The switches should be installed so that when turning on the light, you press on their upper part, and not on the lower;
- With open wiring, placed in a plastic cable channel or without it, it is much easier to install lamps and sockets, but for safety reasons and preserving the aesthetic appeal of the building, it is still better to hide the wiring behind the walls of the bathhouse;
- To install a distribution box with a diameter of up to 10 cm, a recess is made in the concrete wall of the bathhouse using a diamond crown; if the diameter of the box exceeds 10 cm, several recesses are made using a crown in close proximity to each other, after which the hole is trimmed with a chisel;
- The protected electrical cables should extend 1-3 cm into the junction box.
Price for LED bath lights
| No. | Product name | Price in rubles |
| 1. | Lamp Cariitti fiber optic Lighthouse LH-100 | 3 800,00 |
| 2. | Cariitti LED lamp CR05 Led (gold, clear lens) | 3 000,00 |
| 3. | Cariitti LED lamp CR05 Led (chrome, matte lens) | 3 100,00 |
How to make an LED bath lamp with your own hands
To make a lamp from LEDs for a bath or sauna, we will need the following items:
- wood;
- plywood;
- PET film (resistant to temperatures of at least 120 °C);
- glass 4 mm thick;
- getinax;
- superglue and assembly adhesive;
- aluminum tape;
- LEDs with lighting angle 120° (80 pcs.).
The procedure for creating an LED lamp for a bathhouse begins with cutting out mock-ups of the main parts from fiberboard. Next, according to the template for the frame of the future lamp, vertical slats with rounded edges are cut out of wood:
- 4 pieces measuring 750x45x15 cm;
- 1 piece measuring 550 -50 -20 cm - as a groove for glass;
- 4 pieces measuring 750 x 35 x 15 cm;
- 8 pieces measuring 750x40x15 cm.
This is what you should get:
Manufacturing of LED lamp:
- The main parts are connected to each other using slats and coated with assembly glue, the fastening points are tightened with self-tapping screws 70 mm long;
- To install glass, special strips are attached to the structure, then we cut out the glass to the required size and wrap it with PET film;
- Next, the slats are sawn, coated with assembly glue and connected using self-tapping screws;
- On two slats measuring 750? 45×15 cm points are marked where holes are then drilled for installing glass, after which vertical slats are fastened with screws from the outside;
- Now, using a computer, you can draw and print a 3×3 cm table. It is glued to a sheet of getinax and the places where the lines intersect are drilled. The diameter of each hole must be 5 mm so that the light diode can fit in it. Using a larger drill, cone-shaped recesses are made to provide directional light flow. After these procedures, the paper is washed off the part with warm water;
- On the reverse side, use superglue to glue light diodes (80 pcs.). LEDs are soldered together in groups of 4. In total we will get 20 luminous points of 4 diodes each. The lamp will operate on 12 Volts. We will use aluminum tape as a reflector;
- Now you can install the power supply , which must be placed outside the steam room. A power cable is connected from the power supply to the lamp. Our lighting device should consume only 3 W per hour, which will help save on electricity;
- At the final stage, slats are attached to the wooden frame of the lamp using self-tapping screws, which should not be visible from the front side. The panel with LEDs is wrapped with PET film and attached to the base. The result is a beautiful LED bath lamp, which is shown in the picture above.
Video about bath lighting
LED lighting catalogs
HALA – guide to the world
LUXA SPHINX LED lighting
Lampyris LED lighting production
TRIDONIC – ballasts and lighting control systems
HadnLight – Catalog of LED products for interior lighting
- How to choose the right lighting for your home
- Russian bath
- Hanging lamp
- Advantages of laminated veneer lumber
- Frame houses
- What you need to decorate your kitchen
Requirements, permitting documentation
At the everyday level, everyone understands that the lighting system in a steam room, and specifically the wiring diagram and conditions, switches and sockets must meet two conditions:
- Maintain operability in conditions of elevated temperatures, prolonged contact with hot wet steam or water condensate;
- Based on the operating voltage and design of the electrical fittings, lighting in a steam bath must be guaranteed to be safe for human health even in conditions of insulation damage.
You can add to the list requirements for fireproof wiring in the lighting system, but such measures are usually considered unnecessary. The electrical power consumption, even when using modern LED lamps in a steam bath, rarely exceeds several tens of watts. This is enough for lighting, but even a Chinese wire will not be enough to cause a fire.
Do not combine the lighting wiring of the steam room with the power cable for the heating element in the bathhouse, otherwise a short circuit will not be avoided
Important! If you make a steam room in the form of an extension of a bathhouse to a residential building, then the change in the house-building plan will have to be officially registered, otherwise it will all be self-construction. It would be right, after arranging the lighting in the steam room with your own hands, to contact a company licensed to perform electrical installation work to draw up a certificate of compliance of electrical fittings, wiring and lamps with current standards.
This document will help you obtain permission from Gorenergo officials to register and operate the bathhouse
It would be right, after arranging the lighting in the steam room with your own hands, to contact a company that has a license to perform electrical installation work to draw up a certificate of compliance of electrical fittings, wiring and lamps with current standards. This document will help you obtain permission from Gorenergo officials to register and operate the bathhouse.
In any case, permits, inspection reports and certificates for wiring, lamps and control devices will become insurance in the event of controversial situations.
Regulatory documents
Usually, when planning lighting in a steam bath, two documents are referred to:
- Rules for the technical operation of consumer electrical installations, chapter 2.12 “Electrical lighting”;
- Departmental construction standards VSN 59 – 88, clause 2.28.
A steam bath is recognized as a room with special operating conditions, high humidity and high air temperature. Accordingly, a 12V step-down transformer and low-voltage light sources should be used for lighting equipment in the steam room of the bathhouse.
Approximate layout of lamps in the steam room and the rest of the bathhouse
Installation and Installation
You can install a lamp in a bathhouse in several stages:
- Route the power cable and secure it to the outside of the bathhouse in full compliance with the rules for electrical installation work.
- Make markings for the future location of lamps inside the steam room and other rooms of the bathhouse and wiring entry points.
- Connect the wiring in accordance with the markings, be sure to use moisture- and heat-protective corrugation to protect the conductors inside the steam room.
- Install lamp bases, connect contacts, mount lamps, put on and secure shades.
- Conduct a test.
Important! The distribution box, as well as switches and voltage reduction units, if they are used, cannot be installed inside the steam room, since when the sauna is used and the air is saturated with steam, condensation may form on the contacts and a short circuit may occur!
How to correctly position light sources in a steam room
Before installing luminaires with one type of lighting lamp or another, you must carefully study the instructions and all manufacturer’s instructions.
It is very important to choose the right place for the light source
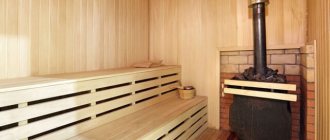
In the steam room, where the temperature and humidity levels are especially high, only heat-resistant lighting fixtures can be installed. In this case, the lamps should be placed away from the stove. This is a must.
It is better to place lighting in the steam room away from the stove
The optimal location of the light source in the steam room is in the corner of the room and/or under the ceiling. In this case, you need to take into account the dimensions of the room and the size of the ceiling. The ceiling lamp should be located above human height. The corner lamp is installed so as to exclude the possibility of accidental contacts.
You can attach an LED strip along the wall under the ceiling. Under it you definitely need a base made of non-flammable heat-resistant material.
The LED strip can be placed under the shelves, but so that they do not interfere with visitors
The base for the LED strip and/or any other lighting device located in a Russian bathhouse must be made from a material such as:
- stainless steel;
- aluminum;
- heat-resistant plastic;
- ceramics (only for dry rooms).
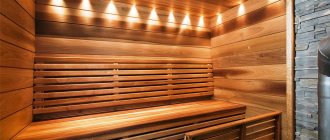
To illuminate the steam room, it is better to use warm shades of lighting
Which ones you can’t put
Not all types of lamps can be selected and used in lamps for baths and steam rooms. The restriction applies primarily to lighting devices that actively generate heat. These are primarily energy-saving, fluorescent and halogen light bulbs. They are not able to withstand heating above 60 degrees, while in a steam room the air can heat up above 100 degrees. However, such light sources can be installed in adjacent rooms - locker room, rest room, shower room.
LED strips can also generate a lot of heat. However, they are often installed in steam rooms. The main thing during installation is to choose the right location and base. They need to be mounted as far as possible from the heat emitter (stove) on a box that conducts heat well, for example, made of duralumin alloy.
Options for lamps for the steam room
There are several types of lamps that can be installed in a steam room. Each of them has advantages and disadvantages, so the purchase should be based on the characteristics of a particular bath and personal wishes.
Bathroom lighting option
Halogen lighting fixtures
Bath lamps of this class have a power of 20-35 W. They are absolutely safe and are not afraid of either too high temperatures or extreme humidity. Even direct contact with splashes will not cause dangerous consequences.
This category of lamps is characterized by the most natural light spectrum.
In the model range you can find halogen lamps with shades of different colors.
Fluorescent lamps
They are good because they allow you to adjust the brightness of the emitted light. They tolerate high temperatures well.
You should only choose those equipped with an electromagnetic choke.
Fluorescent lamps cannot be used for unheated visits in winter, as they do not tolerate freezing temperatures.
Fiber optic lights
Lamps for saunas and baths of this type will appeal to those who care not only about functionality, but also about the unusual appearance of the room. They are classified as the safest lamps, as they operate uninterruptedly at temperatures of about +300 degrees. And the moisture resistance is so good that they can be placed at the bottom of the pool.
Their peculiarity is the need for proper connection. To achieve colorful visual effects, you will need to additionally purchase attachments, lenses and filters. Accordingly, the cost of such lighting cannot be called budgetary.
LEDs
The main advantage of LED lamps is a wide range of color solutions. With their help you can create a truly fantastic atmosphere.
Their weakness is high temperature, which requires installing such lamps in the bathhouse as low as possible to the floor. Most often they are placed under or behind shelves.
Sauna lamp
Incandescent lamps
Steam room lamps with incandescent lamps are not the best choice. But there is no categorical ban on their use. It must be remembered that the power of such a light bulb should not exceed 60 W. And the lampshade covering it must have hermetically sealed protection.
Types and features
Not all types of lamps existing today are suitable as a lamp for a steam room. Only those lighting devices that strictly comply with the operating conditions - high atmospheric humidity and temperature - can be installed in this part of the bathhouse. These are primarily conventional incandescent light bulbs, LEDs and optical fiber.
Each of them has its own characteristics:
- Incandescent lamps. They are characterized by maximum cheapness and practicality. With their help, simple natural lighting is achieved. However, in order for it to work for a long time and not lead to a fire, it is necessary to limit its power to 60 W. With all the advantages, however, they have a main drawback - they quickly burn out. If water gets in, the flask may explode. Therefore, the installation of a protective, sealed lamp will be required.
- LEDs. They can have various modifications - spotlights, strips, E 27 lamps, spotlights, lanterns. The main advantages are complete fire safety, good luminous flux, long service life, inertness to external conditions, and environmental safety. In addition, ice elements used in baths and steam rooms, as a rule, have a waterproof body (marked P65). Their disadvantage is the possibility of rapid deterioration when located close to a heat source. In addition, if the led strip is powered from a household network (220 V), it will require mandatory grounding and good electrical insulation.
- Optical fibers. The most suitable option for a steam room. Conductive parts can be located outdoors, and the material itself is not afraid of water (up to immersion) and can withstand heating up to 200 degrees. Such lamps provide ample opportunities for decorating a bathhouse. Their only drawback is their fairly high price.
Advice! Decorative grilles-lampshades will help protect the lamp on the wall in the steam room from excess water splashes, accidental mechanical damage, as well as visitors from the unpleasant effects of direct damage to vision.
Decorating with lattice
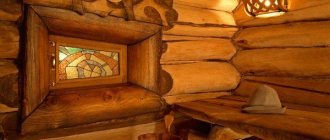
Most bathhouses located on personal plots, as well as saunas inside country houses, are decorated with wood - most often with lining made from various types of wood. In this case, you want to complement the interior with natural elements in order to maintain the integrity of the picture. Therefore, decorating lamps with wooden grilles has not only practical, but also aesthetic significance.
From a practical point of view, the grille protects the space from splinters if the lamp is damaged. The appearance complements the peaceful and cozy atmosphere. Light breaking through individual cells loses its annoying brightness and diffuses softly and widely, creating interesting shadows and reflections.
The material for the decorative element can be a wide variety of wood. If you like a mono interior, then the base can be made of the same type of wood as the lining of the remaining surfaces of the bathhouse. Most often, linden is chosen for these purposes. Linden wood has a pleasant light shade, is very durable, emits a pleasant smell and has healing properties.
But if you are a fan of aromatherapy, you should pay attention to products made from conifers (larch or cedar). They are not suitable for walls and ceilings, since when heated they release resins, and a small grill will release a specific aroma, which has a beneficial effect on the nervous system
The product will serve you for many years.
When planning the design, you should pay attention to some features:
- It is necessary to take into account the shape and type of the lighting fixture itself. It should be generously placed under the grille and securely fastened.
- The installation location significantly influences the design of the protection. If the lamp is located on the wall, then the shape of the grille can be any: rectangular, semicircular, figured. If you install lighting in the corners, then the protection can be triangular or have another convenient number of edges.
- The lengths of the slats are selected according to the parameters of the lamps.
- If the product has sharp corners, roughness and unevenness, they must be sanded and smoothed. These manipulations not only have a decorative component, but also increase operational safety - they reduce the risk of injury or getting a splinter.
- Fasteners must be hidden. In this case, you can also use metal products to fasten the elements. If the heads of the hardware are on the outer surface of the grill, there is a risk that vacationers could get burned on them during the washing process.
- The shape of the slats depends mainly on your preferences. Rectangular elements are used for simple and strict products. They can be arranged in parallel rows. Products with various curves are suitable for shaped, intricate grilles. But it will be more difficult for a novice master to work with them. Although as a result you will get a unique design element.
In order to realize the most daring decorative ideas, you can build a diffusing screen. It performs the same functions as the grille, but there are many more design possibilities.
Not only wood can serve as a material for making a product. Bark, natural fabrics, ceramic products, plastic, and types of glass cope excellently with protective functions. The most short-lived type of coating will be cardboard or paper.
In any case, the base for the screen must fulfill a number of requirements:
- be strong enough to withstand mechanical stress;
- do not heat above tolerable temperatures;
- be fireproof and not emit toxic substances during combustion.
The selected material of a certain shape or with holes and patterns printed on it is attached to the base. It all depends on your imagination: the starry sky, masks, animal figures, a month or the sun - all this will delight you for a long time.
Original and fashionable lighting is done in such a way that shelves can act as a screen. Hidden behind them are LED strips that emit vertically directed light. An unusual shine will make the interior unique.
Where to start
Electrical wiring for bathhouse lighting consists of several systems: an input panel with safety fittings, electrical cables and protective covers, wiring boxes (Berman boxes), switches, sockets and lighting fixtures. This is a classic “budget” set. For exclusive baths, this list can be significantly expanded due to the installation of electronic equipment for controlling decorative lighting, additional motion sensors, etc.
Connection diagram for electrical appliances
According to the accepted classification, baths are divided into four safety zones:
- restrictive zone 0. The zone concerns the internal shower tray and steam room shelves;
- restriction zone 1. Located ≥ 60 centimeters from various types of water sprinklers;
- restrictive zone 2. Limited by a horizontal plane at a distance of 2 m above the floor;
- restrictive zone 3. Horizontal and vertical restrictive conventional planes are located at a distance of 2.25 m.
Zone sizes
Depending on the zone in which you plan to install electrical appliances, the degree of their protection is selected. Electrical equipment must have a degree of protection from IPX7 (in zone 0) to IPX1 (in zone 3). The degree of protection of electrical devices is indicated on the housing or in the instructions for use.
IP protection rating for electrical appliances
The brand of cables must be selected taking into account the maximum peak power and operating temperature conditions.
Cable core thickness for copper wires
But this is not all the problems with unscrupulous companies. To make insulation, they use low-quality plastics, in most cases after recycling. There is no confidence in their reliability. The reliability of insulation largely depends on the ambient temperature; each brand of cable has its own permissible limits. In addition, the higher the temperature of the cable, the higher the resistance of the conductor. In turn, the higher the resistance of the wire, the more it heats up. And this results in a vicious circle, which can cause a cable burnout or fire.
Power copper cable VVG
Methods for laying wires in a bathhouse
Conclusion. The desire to save on cheap cables leads to very real losses and unjustified risks, do not mess with them. It is much more profitable to immediately purchase expensive cables from well-known foreign or domestic brands. Familiarize yourself with the tables characterizing the technical parameters of cables of domestic and foreign production.
Insulation resistance values
We will tell you how to check the insulation below. Often it is impossible to do the verification yourself; you will have to turn to specialized companies for help. At the same time, he can draw up a certificate of compliance of the wiring with existing government regulations. They will also check the quality of the connection of the electrical wiring contacts.
Table for selecting cables by cross-section
This table applies only to products from reputable manufacturers. For everyone else, increase the cable cross-section by at least 25%.
Recommended cables for indoor use
Do not use these cables outdoors; they are susceptible to harsh ultraviolet radiation and sudden temperature changes.
Recommended cables for outdoor use
These are often universal cables and are also suitable for indoor installation. But the rather high price makes their use indoors economically unprofitable; there are much cheaper options.
Domestic cable marking
This table will help you understand each letter and number indicated on the label. Now it will be much easier to choose brands exactly according to your needs. It should be noted that copper cables are not a cheap pleasure; with special knowledge you can save quite impressive amounts.
Safety regulations
Lamps for saunas and baths will illuminate a room where the temperature reaches 100-120°C. Therefore, they must have sufficient heat resistance.
High humidity is another source of potential danger when operating lighting fixtures. Therefore, a lamp for a steam room in a bathhouse or washroom must be waterproof. Additional protection will be provided by sealed lampshades that are resistant to moisture and high temperatures.
It is better to install lighting sources under the ceiling or in the corners of the room
In this case, it will be possible to avoid accidental contacts and/or mechanical damage to lighting devices due to negligence. When choosing lampshades, the main condition is tightness. To give additional aesthetic properties to a simple lamp, you can use openwork wooden overlays in the form of gratings or carved screens
Installation of internal wiring
The installation of internal wiring is carried out taking into account the safety requirements determined by the provisions of GOST:
- To arrange lighting in the bathhouse, you can use only solid wires.
- The cables are placed in special moisture- and fire-resistant boxes.
- The electrical panel is installed as close as possible to the supply cable. An important factor is that the shield is equipped with additional overload protection.
- Wires are laid strictly along vertical or horizontal straight lines. Placing wiring in corner joints of rooms, opposite doors, and most importantly, in a steam room is prohibited.
- The angle of bends, if necessary, is clearly 90 degrees.
- Cable wiring to switches and sockets is carried out only from below. This approach reduces the likelihood of moisture penetration.
- The height of sockets is at least 0.5 meters from the floor, switches - 1.5 meters. In both options, the devices must be placed no closer than 60 cm from the shower doors. Installation of sockets and switches in the steam room is prohibited.
- The minimum acceptable moisture resistance class for devices is IP-44 for switches and IP-54 for sockets.
- Distribution boxes must be installed in plain sight.
Design and characteristics of LEDs
Before moving on to the practice of using them in baths and saunas, let's find out what we are dealing with.
An LED is a semiconductor element in which passing current causes the material to glow.
IMPORTANT! The main characteristic of current for semiconductors is current, not voltage. This means that fluctuations in this value are most significant for the operation of such elements. Like any diode, it passes current in the forward direction and blocks it in the reverse direction
Important characteristics of the LED are:
Like any diode, it passes current in the forward direction and blocks it in the reverse direction. Important characteristics of the LED are:
- direct current, that is, the amount of current that provides the nameplate luminosity;
- maximum forward current - peaks that last a very short time and do not lead to diode failure;
- maximum reverse voltage - the value, when applied, the LED will also not fail;
- maximum dissipation power - the amount of heat that the case dissipates without collapsing.
- Volt-ampere characteristic - a graph of the relationship between voltage and current, helps in selecting resistance.
These and other characteristics can be found in the datasheet (technical description). It’s worth dealing with them if you want to avoid burning out the diodes by correctly selecting the characteristics of a step-down transformer or power supply (driver) for them. But if you do not assemble the device yourself, but use purchased lamps or strips, then there should be no problems.
However, you should also distinguish between current and voltage sources - the former, when connecting a consumer, keep the current strength stable, varying the voltage drop, and the latter maintain a certain voltage, varying the current strength.
ATTENTION! LEDs require a constant current source with stable characteristics, because exceeding the current by even 20% will significantly shorten the life of the diodes.
On sale you can find linear and switching power supplies. Linear ones are suitable for the least powerful LEDs or strips of them. It is better to give preference to a pulse driver that has galvanic isolation.
ADVICE! It's better not to buy cheap Chinese drivers. Their low cost will not pay for the rapid failure of the LEDs they power. After all, for long-term operation, you need protection from fluctuations in the network, protection from overheating, protection from radio interference and output pulsations, and a cheap driver cannot provide all this.
How to cut, seal and fasten
Now let's take a closer look at the points regarding how to work with such LED backlighting.
Firstly, how to cut it correctly. After all, it is in matte silicone protection. Secondly, what can be used to hermetically seal the second cut end.
Indeed, the cover completely covers the entire tape, which is why the factory cut points are not visible. Let us remind you that they are indicated by special icons.
You'll have to experiment here. Measure the length of the backlight you need and use a utility knife to make an incision half the thickness of the “tube.”
The depth of the cut should be sufficient to see the outside of the substrate. Pull the silicone apart and look inside.
If you didn’t guess correctly and don’t see the cut mark, then move to the right or left and make another cut.
And repeat this until the treasured icon appears.
When you reach it, it is in this place that you cut off the thermal tape.
After this, this end with cuts must be sealed with silicone sealant and closed with a special plug.
It is recommended to pour a little sealant into the plug itself.
After drying, its excess can be easily cut off with a stationery knife.
What sealant should I use? Vinegar based is best.
It does not cause corrosion of copper traces on the substrate.
If you do not have factory silicone plugs or have run out, take an ordinary heat-shrink tube and place it on the end of the tape.
After that, pour silicone sealant inside again and seat the tube.
It is better to do this with a hairdryer, since fire changes the color of the heat shrink and it can become smoky.
This LED strip is attached to any surface using soft silicone brackets.
If you couldn’t find them on sale, use “liquid nails” type glue.
You can also use metal clips. Plastic ones are not always appropriate here. The main thing is to choose them correctly according to the diameter of the silicone case.
The nuances of installing a light fixture in a bathhouse
To install lighting in the steam room of a bathhouse, you must:
- Experience in connecting lighting fixtures in baths and saunas.
- Purchase waterproof lamps that can function at high temperatures and high humidity. Buy lamps marked IP44, which means protection against splashes and drops. IP65 illuminators are protected from water jets and dust.
- So that the lighting device can withstand temperature differences from +20 to +130 degrees.
- The housing of the illuminator must be reliably sealed with rubber or silicone.
Sealed lamp Source ru-svet.ru
- Make sure that the light fits into the interior of the steam room - create decorative screens and lampshades.
- The wiring must be closed - this should be taken care of during the construction of the bathhouse.
Buy lamps and lamps from reputable stores. When purchasing, be sure to check the lighting fixtures. Do not buy products at a discount, as there is a high probability of acquiring a defect. Choose a quality product, since saving on light in a steam room is inappropriate - you spend a limited amount of time in the bathhouse, and this is unlikely to lead to a significant increase in costs. By saving once, you risk costing yourself a pretty penny in the future when your cheap lamps begin to fail.
Main disadvantage
If we talk about the disadvantages of using an LED strip in the middle of a bath or sauna, the main one is premature failure at very high air temperatures.
Given this property, it is not recommended to use most types of LED strips in the steam room. A much better option would be to use fiber optics.
Helpful advice: if you really want to equip your sauna steam room with LED strip, then you should use heat-resistant strip. Manufacturers cover it with two-component heat-resistant silicone, which protects each element from temperature.
Manufacturers
As always, when choosing any equipment, the question arises about the manufacturer: whose products are better to buy. Finnish companies Tylo and Harvia have long been leaders in the segment of lamps for baths and saunas. They produce heat-resistant lamps. They are worth buying for the steam room. Although their price tag is decent, they are distinguished by high quality and reliability, and have been tested more than once or twice in numerous baths and saunas.
In other rooms you can get by with more budget products. Linder lamps have more affordable prices, but their quality is lower. They are usually recommended to be installed not in a steam room, but in a dressing room, shower or locker room.
In general, there are many German, Czech and even Russian companies that make such equipment. Look for those that suit you in terms of characteristics, not the manufacturers.
Tips for using diode strips for a bath
When installed correctly, the LED strip in sauna rooms does not require additional care throughout its entire service life. However, in order to significantly extend it, it is necessary to choose the right place for its installation:
- The ice strip must correspond to the temperature and humidity conditions of the room.
- The lamp and its base must prevent accidental contact by people.
- The LED strip should be positioned in such a way as to exclude maximum exposure to the environment. For example, it cannot be installed next to the boiler, or on the ceiling in the steam room.
The most popular sauna lamps
Country property owners highlight several products that meet safety requirements and are durable and heat resistant.
| Manufacturer, model | Protection level | Peculiarities | Maximum room temperature, °C | Cost, rub |
| Harvia, SAS21060 | IP44 | Sealed housing | 125 | 845 |
| Harvia, SAS21106 (with guard) | IP44 | The steel shade provides better protection and diffuses light | 125 | 3 700 |
| Linder (ceramic) | IP54 | Connects to a 220 V network, but it is possible to use a step-down transformer | 125 | 650 |
| TDM Electric, NPB400 | IP54 | Matte lampshade | 125 | 500 |
| Eletekh, TERMA 3 | IP65 | Increased protection | 125 | 700 |
| Uniel, ULWO04 | IP65 | Stylish look, increased protection | 125 | 900 |
Heat-resistant lamps for baths
Since the temperature in the steam room is often more than one hundred degrees, this means that the lamps in the bathhouse should easily tolerate it. That is, they must be made of heat-resistant materials: glass, metal and heat-resistant plastic. In my practice, there have been cases where people bought cheap Chinese lamps and put them in the steam room.
After a good hot bath, they simply flowed down the walls, and everything had to be replaced with a new one of better quality. It's good that these cases did not end in a short circuit. The consequences could have been more dire.
So, the steam room should have special heat-resistant lamps for the bath
This is the first point you need to pay attention to. The lamp should easily withstand temperatures above 120 degrees
Pay attention to the socket inside the lamp. It should be ceramic; carbolite is less suitable in this case.
DIY making
Making a wooden lamp with your own hands
Making a lamp for a steam room with your own hands is difficult. To do this, you need to understand electronics and know where to find consumables. However, a homemade lighting device can be dangerous to use.
You can make your own lampshade for lighting. It will improve the appearance of the devices and protect visitors from flying fragments if the lamp explodes. Lampshades are made of metal, wood, salt, stone, plastic, glass, ceramics.
Materials and tools
To make a decorative lampshade you need to prepare:
- bars, slats;
- grinding machine;
- wood hacksaw, jigsaw or miter saw;
- screwdriver, screws or hammer with nails;
- tape measure, pencil.
To fasten individual parts, you can use wooden dowels. It is impossible to get burned on them, since the material has low thermal conductivity.
Preparation
Before you begin assembling the lampshade, the wooden blanks need to be prepared. To do this you need to perform several steps:
- Mark the bars with slats.
- Trim the pieces of wood with a miter saw, jigsaw or wood hacksaw.
- Clean the surfaces and ends with a grinding machine.
All wooden surfaces must be coated with a special antiseptic to protect them from the destructive effects of moisture.
It is important to choose a composition that will not release harmful substances when heated strongly.
Manufacturing
The process of making a homemade lampshade is simple:
- Draw the finished lattice on a piece of paper to better visualize the finished product.
- Connect individual wooden elements. Possible types of fasteners are finishing nails, self-tapping screws, and dowels.
Decoration
Many bathhouse attendants are sure that it is unacceptable to use various paints and varnishes to cover wooden surfaces in the steam room.
Their opinion is based on the fact that coloring compounds emit harmful substances when heated strongly, but wooden surfaces without protection will quickly darken and lose their attractiveness.
To protect wood from darkening, the formation of fungus, mold, and moisture damage, you can use special impregnations. If there are concerns about the use of drying oil, it is recommended to use paraffin oil for the steam room.
In addition to special impregnations, you can use varnishes and coloring compounds
It is important that the packaging contains an inscription stating that the paint composition is suitable for steam rooms