Having your own bathhouse is the dream of many. What could be more pleasant than enjoying steam treatments and then drinking aromatic tea? After such a procedure, all stress and fatigue disappear, the person feels rested and renewed.
To build a bathhouse, you can turn to specialists or do the construction yourself.
The construction process cannot be called simple; you need to follow a certain construction order, comply with technical standards and fire safety requirements. Where does any construction start? Of course, with drawing up a detailed design of the future structure.
Features of the construction of a 6 by 3 bathhouse
You can build a bathhouse with your own hands.
Unlimited access to information will help you combine opportunities with wishes, as well as show your creativity. The greatest interest may be aroused by a simple and proven 3x6 bathhouse project. Before you get down to business, think about what the layout of the bathhouse will be and where on the site it is most convenient to place such a structure.
Subtleties of the preparatory stage of construction
There are several rules for placing a building that will facilitate the operation of the bathhouse in the future.
Bathhouse layout
The bathhouse can be installed separately or combined with another structure: make it part of the house, connect it with a summer kitchen or workshop. But experience shows that such a neighborhood can lead to dampness and an unpleasant odor. Proper planning of sewerage, ventilation and waterproofing systems will help avoid such a situation.
When building a bathhouse, it is necessary to lay the foundation to the depth of soil freezing. Depending on the soil moisture, you can make a simplified version of the base. But, as practice shows, a 6x3 bathhouse is built on a strong foundation of stone, brick or concrete. After about 2-3 months, as soon as the base has dried and settled, you can begin construction.
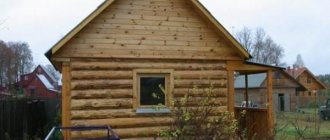
The building is constructed from environmentally friendly materials that “breathe” and retain and release heat well. Wood is rightfully considered one of the best. Sometimes 3x6 baths are built from natural stone and brick, which are durable and more fireproof.
Advice from the master!
In terms of construction, the entrance is usually located on the south side: in winter there are not such large snowdrifts and in spring the snow melts much faster. A 6x3 bathhouse is built at a distance of 5 m from other buildings and is located no closer than 15-20 m from reservoirs, slopes, on a flat surface. Use the ready-made 6x3 bath plan.
The lifespan of a 3 by 6 bathhouse depends on proper logging and drying of wood. Wood should be harvested from December to early March. The felled trees should lie down for several months, only after that can you begin to make logs and beams for building a bathhouse.
To preserve this building material, you must adhere to several rules.
- The log is cleared of bark. To prevent it from cracking at the edges, a strip of bark 15 cm wide is left at its ends.
- To prevent spoilage, logs are stored in stacks. In this case, the distance between the logs should be 5 cm, between the rows of the stack - 10 cm, between the ground and the first stack - 20 cm.
- The logs should be covered with some kind of roofing material, such as slate, so that they are not exposed to precipitation. There should be at least 5 cm between the slate and the logs.
- Protect logs from direct sunlight. Place the material in a well-ventilated place.
Filling the bathhouse with a good mood
A 6 x 3 sauna will help improve health, cleanse the body, and bring spiritual peace. You can arrange your temple of purity according to your personal preferences and include in the bathhouse design the size of the steam room, options for placing shelves, their shape, and width.
Consider how the steam room of a 6x3 bath will be heated: a stove, electrical appliances or pipes with hot water or gas. The best option, undoubtedly, is a heater stove, which is located in the corner of the steam room.
Bath layout options
The bathhouse must have a shower room. Here you can install a shower for three people and hang a wooden bucket into which cold water will be poured. You can equip the shower with a small table or shelf to put personal hygiene products there. Make sure you have hooks for towels.
Advice from the master!
If funds allow, you can install a 6x3 shower stall in the bathhouse. It is advisable to equip the relaxation room with a table, armchairs and other necessary bath interior items.
Advantages and disadvantages
The undeniable advantages of building frame baths are:
Ease of construction; cheap design (low cost of materials); simplification of foundation work in comparison with other options; low thermal conductivity; the ability to make communication channels inside the walls and not spoil the appearance;
elimination of shrinkage; no need for complex construction equipment; environmental safety (rare for country budget buildings); the ability to complete all work without the involvement of specialists; elimination of wet work - construction can be done in winter and even where there is no stable water supply; a wide variety of finishing options.
11 photos
But after carefully studying the reviews of owners and developers, you can immediately detect certain shortcomings. Each of them can be eliminated with timely measures, only because you need to properly understand the possible problems. Frame baths in their pure form cool quickly, and therefore an ugly fungus appears inside after a short time. To cope with this difficulty, you need to use only the highest quality insulation.
You can extend the service life of a panel bath if you impregnate all used timber and boards with special antiseptics. After 18-24 months, the shrinkage of the frame is sometimes 80-100 mm. As a result, the external and internal decoration is deformed. This risk can be reduced if you use lumber that has been kiln-dried.
4
Installing an attic roof
As an example, let's look at how to build an attic roof, since it allows you to get an almost full second floor with a minimal increase in financial costs. If you are interested in building a gable or hip roof, check out other articles on our portal.
For the attic roof you will need the following materials:
timber 100x150 mm for racks; boards 150x50 mm for rafters; boards 150x20 mm; slats; super-diffuse membrane; roofing material.
The work begins with the installation of the supporting structure. For each truss, two racks are installed, which are connected at the top by beams. Those. Under each truss there is a U-shaped supporting structure.
When installing the supporting structure, it is necessary to correctly determine the position of the racks. Since the rack with the lower rafter and mauerlat (floor beam) forms a rectangle, the distance from the wall to the rack depends on the height of the attic and the angle of inclination of the lower rafter. Knowing the angle of inclination of the rafters and the height of the rack (determines the height of the attic room), you can calculate at what distance from the edge the rack is installed using the Pythagorean theorem, i.e. you need to find out the length of the smaller leg.
Frame for the roof of the bathhouse
Secure the posts to the frame and floor beams with self-tapping screws and angles. Additionally, reinforce them with braces. Then connect both posts with beams. Using this principle, install U-shaped parts on all floor beams. Connect all the resulting load-bearing elements at the edges with purlins, as shown in the diagram above.
Now you can install the lower rafters. They are cut from below and attached to the harness, and from above - to the purlin, in which the grooves are pre-cut. Next, you need to secure the racks in the center of the jumpers of the U-shaped parts. The height of the racks determines the angle of inclination of the upper rafters. Connect all the posts with a ridge girder.
To complete the attic frame, install the upper rafters, which rest on the lower and ridge purlins. First, cut the grooves for the rafters in the purlins. Immediately waterproof the roof - secure the super-diffuse membrane to the rafters with a stapler. Place a special self-adhesive tape over the staples to ensure a tight connection. Please note that the membrane sheets should overlap each other by 20–25 centimeters.
Be sure to secure the slats on top of the rafters, which will serve as a counter-lattice. Then attach 150x20 mm boards perpendicular to the slats. As for the sheathing pitch, follow the recommendations of the manufacturer of the roofing material you purchased for the bathhouse.
The roofing covering is mounted on top of the sheathing according to the standard scheme - sheets of material must overlap each other lengthwise and crosswise. Screws or nails are located at the crest of the wave.
Preparation for construction
Before purchasing materials and building a foundation, you need to think carefully about the design of a 3x6 m bathhouse and prepare a drawing. It’s not difficult to sketch out the rooms that will be located in a space of 6 by 3 meters.
The main thing is to decide what is preferable, and which room should be given more space and which should have less. For one, a spacious steam room is important and does not need a relaxation room at all; for another, on the contrary, a place where guests can gather for tea is enough, and a compact steam room will suffice. And the third one will decide to replace the rest room with a veranda.
Once the project has been determined, you need to think about finishing materials - inside and outside. The best option is to build a wooden bathhouse. If the building will be constructed from concrete blocks or bricks, cladding is required. Whether it will be made from natural materials or imitating natural ones depends on the funds that are planned to be spent on arranging the bathhouse.
Bathhouse: layout and division of the total area into functional zones
If earlier baths consisted of only one room, then modern versions of these structures include several rooms. These may include a washing room, a dressing room, a recreation area, a swimming pool, a billiard room, etc. So that in the future the owner does not have to resort to rebuilding and adjusting the building, even at the design stage it is necessary to make all important notes in the drawings of the bathhouse. The following points deserve special attention:
For convenience, modern baths include several functional areas
- interior layout;
- water supply system;
- electrical wiring;
- sewerage and drainage system.
Development of a bathhouse plan taking into account the conditions of the summer cottage
To create ideal conditions for relaxing in a bathhouse, you need to take into account some nuances that will allow you to avoid troubles during the operation of the room. It is desirable that the construction area be located on soils with low groundwater levels. Before starting to develop a project, you must immediately exclude all areas that do not meet this condition.
If there is a well on the territory, then the distance between it and the bathhouse should not be less than 5 m. The minimum gap between the steam room and the residential building is 8 m. The farther the compost pit and toilet are located from the bathhouse, the better. Experts advise making the entrance from the south. In winter, fewer snowdrifts form here, so there is no possibility of blocking access to the door. It is better if the windows face west, which will allow sufficient sunlight to enter the room.
If there is a pond at your summer cottage, by building a bathhouse 15-20 m from it, you can use it instead of a swimming pool. In addition, the presence of a river or lake near the structure will provide a water supply system.
Bathhouse project measuring 7.74 by 6.24 meters
For small areas (3-6 acres), 3 by 3 bathhouse projects are suitable; photos of such buildings are available in abundance on the websites of construction companies. Even in such compact buildings, the main room remains the steam room. The maximum possible amount of space should be allocated for the organization of this room - about 8 m². This is enough to install 2-3 sunbeds (shelves) and a stove.
Other rooms can be included in the layout of a bathhouse of 3x4 m or more (optional). The structure can be used for its intended purpose even in the absence of a billiard room or bathroom. A bathhouse cannot exist without a steam room. For this reason, the division of the internal space into functional zones primarily depends on the size of the project.
It is recommended to build baths at a distance of at least 8 m from a residential building
If you want additional amenities, you can include a small shower room or washing room in the design of a 3 by 4 m bathhouse. After the steam room, you can wash off the dirt and freshen up here. Typical projects are characterized by the presence of a relaxation room, which will be used during breaks between steam sessions. To organize it you will need 4.5 m².
Other rooms, for example, a locker room or vestibule, would also be useful. They are compact enough to fit into a 5 by 5 timber bathhouse project along with the main rooms.
Design of a bathhouse measuring 6x6 m with a second attic floor
Foundation for a frame bath
Since the future frame bath will not have significant weight, a columnar foundation can be used for it. An alternative to it is a screw one. It will take little time to manufacture it, but the most important and expensive cycle in construction will be completed. If the site has some kind of soil or you are a supporter of the classics, then you can pour a strip foundation. They are both great for a framing project.
Please note that the grillage at the screw foundation (what it is, I described here) and the width of the strip should be 10 centimeters wider than the wall. This is done in order to lay floor beams on it from the inside. This will save you from the question of how to make floors in a frame bath, although in other types of baths the principle is the same.
Don't forget to make a good waterproofing of the foundation. For these purposes, you can use a simple roofing material laid in 2-3 layers. Or you can use bitumen mastics. Prepare the drainage pit and the entire sewerage and water supply system at once. We've decided on the foundation, let's move on.
Successful projects
Project options with a total area of 6x3 m are few in number. Moreover, this requires more careful thinking.
This room is designed for four people. This area is enough to accommodate each other comfortably and not interfere with each other. But this is the ideal option. If necessary, the company can be larger.
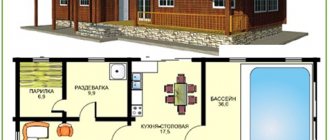
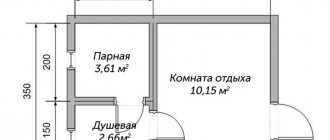
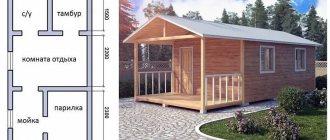
Project 1. In a small dressing room on the left side there is a door from which you can enter the rest room. And from the rest room you can go into the washing room, and then into the steam room. The relaxation room and steam room are the same size. The premises allow you to place everything you need. There is enough dedicated space for a washing room. The dressing room is also well located.
With a small space, your imagination can’t run wild, but it’s quite possible to create a comfortable, cozy and attractive bathhouse outside and inside. You just need to determine for yourself which rooms should be larger or smaller in size, and which ones you can do without.
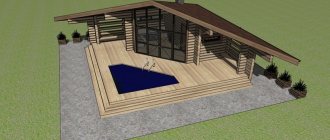
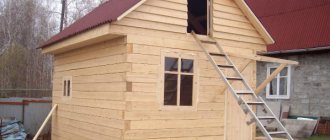
An option that allows you to increase the space of the bathhouse, but at the same time remain on the same plot of land, is to complete the attic floor. It will provide additional opportunities, and its construction will not be so troublesome.
But on the ground floor there is more space. You can make a more spacious steam room, find a place for a utility room, and install a shower in the washing room. Then the room under the roof will be completely dedicated to relaxation. It can accommodate a table for tea drinking, a cozy sofa, and even a corner for cooking.
A good addition that will make your vacation even more comfortable could be a TV, stereo system, or karaoke system. If necessary, the second floor can become a room for guests who decide to stay for a few days. If you distribute the space wisely, then there will be room for a cozy sofa or folding sofa, which can be separated with a screen from the tea drinking area.
A design is possible when the proposed space has both a room under the roof and a veranda. It will not be difficult to think through a scheme for such a design. One of three projects is taken as a basis; the second floor implies an open plan.
Internal and external cladding of a frame bath
It is best to sheathe frame walls on the outside with OSB boards (over waterproofing), and on the inside with moisture-resistant plywood. They are simply screwed onto the frame with self-tapping screws. Then the OSB can be painted or varnished (on the outside). By the way, you can cover the ceiling with OSB panels and also insulate it with Rockwool mineral wool boards. Another option: take an edged board and cover the outside of the walls with an ordinary board. Then you decorate it with vinyl siding or any decorative panels.
The inside of the wall can be sheathed like this: take dry wooden blocks 20 by 30 mm
and carefully, without damaging the vapor barrier, screw it horizontally onto the walls. The distance between them is approximately 50-60 cm
You can immediately pass the wires by placing them in a corrugated pipe. But for this you need to already know the exact wiring diagram. Then you carefully install the lining and don’t worry about where and how to hide the wire.
I will end here. I did not touch on the topic of roof, floor, windows and doors. Everything is normal here. Now you have a rough idea of how to build a frame bathhouse. Although I know for myself that when you start construction, a million questions immediately arise that you need to solve on your own.
An anecdote on the topic: Husband: Tomorrow I want to go fishing with the guys, and then go to Petka’s bathhouse, drink beer and relax. But don’t worry, there will be only boys, no women. So, shall I go? Wife: Of course, go, no one is holding you by the horns.
I hope the information was a little useful. If yes, then recommend it to your friends. If you don’t want to miss new articles, subscribe to the blog news. Good luck and fast construction to you! Bye!
Wisdom Quote: Anyone who wants to succeed must be able to tolerate failure.
Why should we build a bathhouse? It would be from something
In the article about the layout of a 6x4 bathhouse, we dwelt in detail on buildings made of logs, timber, and modern materials. Once again we will talk about materials that can or should be used in construction and those whose use is unlikely to bring pleasure from the steam room.
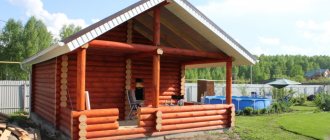
Wooden sauna
Natural wood is a valuable, environmentally friendly material and loved by everyone. No aroma lamp can convey the aroma that wood creates. There is beauty, practicality, and aromatherapy here. After all, if you choose the right type of wood, the bathhouse will last for decades.
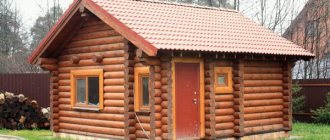
An example of Russian architecture with a modern twist
We will share recommendations on which tree you can take and which you shouldn’t.
- Aspen will do. And its wood is very fragrant.
- Linden. Like linden honey, broom, the tree also has healing properties.
- Oak and beech are durable trees with dense wood. And it is precisely because of this inflexibility that they are not suitable. Increased moisture will “lead” the walls.
- Pine, spruce, larch and other trees with needles instead of leaves are not suitable.
Wooden sauna 6×6
Option for a two-story bathhouse with a terrace
You can find advice that coniferous trees are suitable for walls. They say they are cheaper and stronger. But only if the layout of the 6x6 bathhouse includes a steam room with its own walls. Agree, under the influence of steam, a pine beam or log will begin to “cry” resin tears. Is this necessary?
By the way, about the type of wood material. What is preferable - timber or logs?
- The log initially needs to be dried for about 6 months. Are you ready to wait?
- However, log baths look original, in the spirit of ancient Russian traditions.
- But bathhouses made of timber are economically profitable and are built much faster.
Saunas made of timber require less material and less time, and this material costs much less than logs. If a log is primarily processed wood, then timber is lumber. It is dried properly and cut into pieces of 6 m each.
Bathhouse made of timber - modern and beautiful
Layout of the 1st floor of a two-story bathhouse
Stone hut
Baths made of brick, lined with stone, and foam blocks are also not without attractiveness. In addition, they are characterized by increased strength.
Yes, I want the steam room itself and the relaxation room to smell like natural wood. Then wooden lining and wooden panels will help you.
If you need a bathhouse urgently, you can buy a ready-made frame structure. The outside is faced with stone or brick, and the inside is trimmed with wood. But in this case, you shouldn’t even think about building a second floor - the walls won’t hold up.
Did you see? Pass by
What materials for building a bathhouse should not even be considered?
- Synthetic materials for walls are not suitable.
- Plastic panels should not be used.
- Raw wood. Even if you cut the logs yourself, they need to dry naturally for a year or two.
- Wood walls cannot be varnished or painted. You can’t use drying oil either, no matter how much the store clerk assures you. This is a petroleum product. This means that the only natural thing there is a jar – that is, nothing. And its contents will harm your health.
- Any materials that contain synthetic ingredients.
Do not hesitate to ask for quality certificates for the products you purchase.
Advantages of a turnkey order
A specialized construction organization undertakes the entire complex of work, freeing the future owner from the need to worry about a thousand little things. Experienced company employees:
- They will draw up design documentation in accordance with SNiP and fire safety standards, and calculate an estimate that will not be exceeded during the work.
- They will help you save money wisely by selecting high-quality building materials (many companies cooperate directly with suppliers, which has a positive effect on budget reduction).
- They will carry out turnkey work according to a fixed estimate, with quality control and in strict accordance with the project (standard or individual).
- They will provide a guarantee for the work performed.
Visualization of the layout of a bathhouse made of timber Source dom-deshevle.com
Material for construction
You need to decide what you will build the bathhouse from, because it should be comfortable, durable, and have a pleasant appearance. Most often, timber, brick and various blocks are used. Each of these materials has its own advantages and disadvantages.
It can be very cozy in a building made of logs or beams. A pleasant aroma emanates from the walls, they allow air and steam to pass through, and retain heat. Heating costs in such cases are low. The disadvantages include forced maintenance of the building, without which it will lose its attractiveness under the influence of the external environment.
A brick sauna will cost more than a timber sauna, but it will be more durable and can last up to 150 years. Such buildings have good thermal insulation properties, look great and do not require special care. However, brick buildings are more heat-intensive than wood and have lower vapor conductivity. This means that it will take longer to heat such a bath, and you will also need a good ventilation system.
Foam blocks are a lightweight porous material; they can be formed in large blocks, so objects are built very quickly.
Sometimes cinder blocks are used for construction. They have good thermal insulation, weigh little, and are easy to work with.
Bottom line
Original decor of the walls of the bathhouse complex on the site
Building a bathhouse is not a big problem and the price for this building is quite affordable, since today on the building materials market you can easily purchase ready-made projects to order. But before buying, you should plan the premises and know exactly where and what will be located even before the building is erected.
The video in this article will help you study this topic in more detail and learn a lot of new and interesting things for yourself.
Did you like the article? Subscribe to our Yandex.Zen channel
Choosing material for walls
First, let's look at the pros and cons of the profiled timber mentioned above, which is usually made from coniferous trees (pine, spruce, larch or cedar), but there are also options from linden, aspen or larch. Among the advantages:
- Environmentally friendly (the preparation of such raw materials does not require all kinds of chemical additives, for example, glue, which become toxic when heated).
- Cost-effective (due to lower thermal conductivity, the walls for the bathhouse need less thickness).
- Reducing the cost of interior and exterior finishing.
- Minimum construction time.
However, based on reviews from the owners of such baths, it should be noted that there are significant disadvantages of using this material:
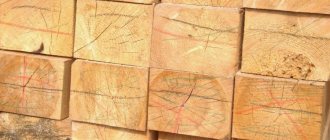
- Price (you can save money on finishing, but the main material will be expensive). Let's compare: A cube of profiled timber measuring 100x150x6000 mm will cost 8,200 rubles.
- A cube of edged timber with the same parameters – 4,900 rubles.
- Cracking. When drying, pine beams become deformed and become covered with cracks. However, due to the low price in Russia, timber from this wood is most often used.
- Walls can “cry.” Using coniferous wood when building a bathhouse, the owner runs the risk that high temperatures will negatively affect the quality of the partitions. Therefore, for a steam room it is better to use linden, aspen or larch, which tolerate high temperatures well. A pine needle beam is suitable for the second tier.
In addition to profiled timber, other wood options are possible:
- The solid timber has a square cross-section and a smooth surface.
- Glued laminated timber, resistant to high temperatures.
- A rounded log is considered the most beautiful option and does not require professional skills to use.
Steam room
It is believed that linden is most suitable here due to its low thermal conductivity. It will not heat up excessively even at temperatures above 700°C. Cedar is also recommended. The advantage of this material is its greater density, and its degree of drying is much less than that of pine. In addition, the high resin content in the fibers prevents the appearance of fungus. The price of wood, however, is quite high.
Washing compartment and internal partitions
It is quite obvious that the construction of these structures requires materials that are highly resistant to moisture. Such properties are inherent in aspen and larch. When water hits wood, it hardens, and over time the wood only becomes stronger. The material is expensive.
In addition to natural raw materials, foam blocks are used in the construction of baths. Among the advantages of this material are high fire safety, excellent sound insulation, short construction time and environmental friendliness.
But there is also a rather serious drawback in the structure of such material. It is because of their porosity that such blocks absorb much more moisture, resulting in a deterioration in their strength. Winter has the worst effect on foam blocks. Therefore, whether or not to choose this material, the bathhouse owner must decide for himself based on all the pros and cons.
Peculiarities
The optimal dimensions of such structures are usually 6x6 meters. In such an area you can easily place the most necessary things. A bathhouse area of 6x6 meters can be called the ideal format for a bathhouse. Such parameters allow you to arrange all the necessary premises, supply the necessary furniture, as well as heating equipment. This size of the room provides adequate rest for 8-10 people at the same time.
The bathhouse includes the following premises:
- steam room;
- shower room;
- bathroom;
- dressing room;
- restroom.
The most commonly used material is wood, timber or logs.
This is interesting: Gazebo design - design ideas
Necessary premises
Mandatory premises, whether it is a small bathhouse or a large one, are a steam room and a dressing room. The main thing is to equip the space in the steam room so that there is a sufficient number of shelves. In a small room they should be placed in the form of a staircase. The room should be decorated with wood. The stove is placed in a corner so that you can move freely, but at the same time easy access to the stove must be provided. If it is located too close to a wooden wall, you need to install a protective screen in that place or use brickwork.
Lighting must be designed to be comfortable and safe; lamps must be made of fireproof glass or protected by additional structures. There is no point in filling an already small space with additional items.
The washing room can be made small. The main thing is that there is room for a container of water and free movement of at least two people in the space. To save square meters, you can connect a washing room with a steam room, although experts who know a lot about the bath business do not recommend doing this.
A change room will serve to store necessary things, firewood, coal, bath accessories. Firewood can be in a special box. In some cases, firewood or coal is supplied to the stove directly from the door located in the living room.
There is a waiting room in any bathhouse. And in a compact room it can serve as both a locker room and a rest room at the same time. It should have a wardrobe or convenient hangers. Here you can place a small table with stools, where it’s nice to sit after a bath and drink aromatic tea with fragrant herbs.
Premises that you can find a place for, or you can do without them - a recreation room or a small veranda that replaces it. Separate spaces for these purposes are convenient, since there you can gather in a small family circle or with guests after bath procedures and talk over a cup of tea.
Construction of a ceiling and roof for a frame-panel bathhouse
The passage of the chimney through the ceiling can be done in this way. A square hole is cut in a heat-resistant panel or metal sheet into which a metal box for the stove pipe is secured. The height of the box must be greater than the height of the ceiling. When installing the pipe, the passage space is filled with basalt fiber. The chimney passage arranged in this way is safe from a fire point of view, since there is no contact between the chimney and the wooden roof structure. Along the remaining surface of the ceiling, foil insulation is fixed to the floor beams, on top of which a wooden cladding made of clapboard is installed. The upper space between the ceiling beams is filled with insulation, covered with a waterproofing membrane and covered with 20 mm boards fastened with nails to the ceiling joists.
The installation of the roof of a frame-panel bathhouse is practically no different from the installation of a similar structure of a residential building. It includes: assembly of the mauerlat and rafter system, installation of sheathing and laying of roofing material. Considering that our foundation is not massive, the roof of the bathhouse should not be heavy. Therefore, instead of tiles for covering, you can choose roofing iron or rolled materials.
Interior decoration
Despite the many trends in the design of modern baths, the most popular is still the traditional decoration in the Russian style with ordinary benches in the steam room and traditional bath utensils.
In the classic version, the Russian bath has three main zones:
- dressing room or dressing room;
- washing compartment;
- steam room
In this case, the washing room and steam room can be combined, and the dressing room is divided into a relaxation room and a separate locker room.
By choosing an antique design for decoration, you can bring wooden utensils (ladles, tubs, tubs) into the interior of your bathhouse, purchase bath furniture with carvings or forging elements, decorate the walls and ceiling with bundles of brooms and aromatic herbs. Textile accessories can include weaving and embroidery.
For those who want to use modern finishing materials, such as ceramic tiles or chrome faucets, in the design of a Russian bath, you should remember that all elements must be in harmony with the overall design line
Remember that it is extremely important to choose the best combination of simplicity and modern design elements to introduce a casual touch of bad taste into the interior
Lighting is also important: it should be warm and subdued, emphasizing the intimacy and tranquility of the atmosphere - first of all, this rule applies to lighting in the steam room. To diffuse bright light, you can use special filters
Roof
An excellent solution for a bathhouse would be to install a pitched roof. Its equipment is somewhat cheaper and also simpler than a gable one. In the photo below you can see that the rafter system has three support points.
The rafter legs are located in increments of 60 cm from each other and are fixed to the upper elements of the wall. To achieve the required roof slope, it is necessary to calculate in advance the height of all walls so that an angle is formed between them. The roof slope angle for a bathhouse is determined individually for each project. Much depends on the meteorological conditions in a particular area, as well as the type of flooring chosen. If it is metal tiles, then the minimum slope should be 16 degrees.
In the photo above you can see that the front wall had to be raised a little. To increase its strength, jibs were installed on the sides. Roof overhangs are made at the front and back so that water flows down unhindered. Waterproofing, control sheathing and sheathing under the roof deck and the roof deck itself are attached to the rafters. A video about the construction of such a bath can be seen below.
Layout
Let's look at the list of main rooms inside a bathhouse with an area of 3x6 square meters. m with attic:
- of course, the most important place is the steam room itself;
- washing;
- dressing room;
- restroom;
- terrace;
- attic.
Options for placement of premises may be different, depending on the preferences of the owner. When planning, you must not forget about their optimal area:
- For a steam room for several people, an area of six square meters is quite enough.
- The washing room must have a shower and a small window 500x500 mm.
- The area of the dressing room should be calculated based on the fact that it will be necessary to place a small amount of firewood there, as well as fold clothes.
- You can allocate about ten square meters for a relaxation room to comfortably place a table, bench or sofa in it. Of course, don't forget about TV. It is better to place the entrance to the rest room from the dressing room so as not to increase the humidity in it. The window here can be made larger - 1200x1000 mm.
- In order to prevent heat from escaping from a heated bath, it is recommended to make entrance doors smaller than others (150-180 cm high and 60-70 cm wide).
- The staircase to climb to the second tier should be located in the entrance area.
- The owner of the bathhouse decorates the attic depending on his tastes and preferences.