Not every land owner can boast of a large enough area of their property. Most of them have to place all the necessary buildings on a small piece of land - a gazebo, a house, utility rooms and leave some space for a garden.
But what is a house without a bathhouse? Is it possible to imagine a country house without a favorite place for relaxation? Of course not.
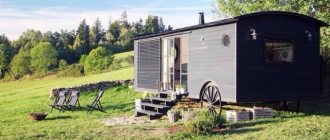
In the photo there is an area with a bathhouse
But what to do in the case when the area of the site does not allow you to build a full-fledged bathhouse? Bathhouse projects made from 3 by 6 timber will come to your aid with this. Thanks to them, you can easily install on your site, even if it is narrow, a structure for bathing procedures and physical relaxation.
Layout of such a building
Of course, a bathhouse with dimensions of 3 by 6 cannot be called too spacious, but nevertheless, all rooms can be equipped in it. In such a structure there will be enough space to accommodate the necessary equipment and accessories that you cannot do without.
For a truly hospitable owner to feel proud of his building, and for it to be able to provide a comfortable stay for a small group of friends, you must choose the right project.
Below we will give you several examples of 3 by 6 bathhouse projects, from which you can choose the best option for yourself. By the way, if the land area allows you, then you can consider the design of a 6x8 bathhouse made of timber. Examples of these projects can be found on our website.
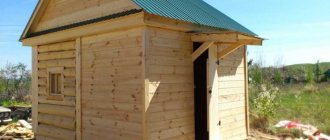
How to build a bathhouse from 6 by 3 timber
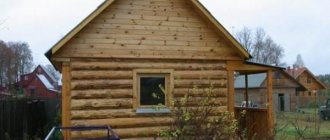
A 6 x 3 timber sauna is a classic version of a steam room on your own country plot. The bathhouse of this design is small and compact. This option is suitable for a family holiday or for a fun time with friends.
A sauna made of timber is durable and retains heat well; on a small terrace you can set up a relaxation area with a barbecue grill.
Characteristics of bath material
A bathhouse can be built from various materials, but timber is the most preferable option. This is due to the following factors:
- Ease of installation.
- No shrinkage.
- Ability to retain heat.
- Unlike a log house, timber elements are laid on the foundation without preliminary assembly.
- Affordable price of the building.
There are 4 main types of bars:
Comparative table of characteristics of laminated veneer lumber and regular timber.
- non-profiled with a rectangular or square section;
- profiled solid;
- glued;
- LVL timber.
For the construction of a home sauna, the most acceptable is considered to be a profiled beam of a solid structure, which has precise dimensions and appropriate processing. This material ensures a tight fit between the wood, which facilitates installation and eliminates additional processing of the walls. The shrinkage of a building made from such material does not exceed 5%.
It is better to make the first crowns of the bathhouse from hardwood timber. This type of wood rots less in conditions of high humidity.
Starting from the 3rd crown, the log house can be built from coniferous wood: spruce or pine. The natural resins contained in this material help retain heat indoors.
The timber material is made in different sections: from 120 x 120 mm to 200 x 200 mm. But the most appropriate for building a house is considered to be timber with dimensions of 150 x 150 mm in longitudinal section. For internal partitions, timber 150 x 100 mm will be sufficient.
Before starting construction, the wood must be treated with antiseptic agents to prevent rotting and the appearance of insects. If there are no special antiseptic liquids, then motor oil can be an excellent alternative.
Project of a 6x3 bathhouse made of timber
Figure 1. Layout of a 6x3 timber bath.
The layout of a 6 by 3 bathhouse is approximately as shown in Figure 1. The usable area of such a structure is 16.8 sq.m. The 6 x 3 bath includes:
- rest room - dressing room;
- shower room with shower and toilet;
- steam room with shelves;
- hallway;
- stove-heater.
Almost half of the room is occupied by a relaxation room, in which there is a table, a TV and benches where they drink tea, and a changing room to leave clothes.
The steam room is designed for 4 people, it should be quite spacious. The height and length of the room should allow each visitor to freely steam and relax. A stove-stove is placed in the steam room, which will generate steam.
The entrance to the bathhouse is decorated with a porch with a canopy. This will protect the building from precipitation.
A tourniquet must be laid between the crowns of the log house, which will prevent the appearance of cold bridges. The height of the first floor of the bathhouse is 2.25 m. The roof is made of rafters, which are represented by 50 x 100 mm timber, and the sheathing is made of 20 mm unedged boards.
Strip foundation for a bathhouse made of timber.
Roofing material is selected based on the customer’s personal preferences and the scale of material capabilities. Ondulin is best suited.
The floors in the bathhouse are laid according to technology: subfloor, steam-waterproofing and insulation. The surface of the finished floor is made of tongue-and-groove floor boards.
The steam room is finished with clapboard, which has a foil lining.
Why do many people prefer a bathhouse with dimensions that have already become classic? Advantages of a 6 x 3 timber bath:
- a small sauna can be placed on your country property;
- a cozy room will bring a lot of joy to all family members at any time of the year;
- a bathhouse made of profiled timber retains heat for a long time and at the same time creates good ventilation;
- When heated, coniferous wood will delight visitors with the pleasant aromas of healing resins;
- neat appearance;
- simple and quick installation of beams.
Construction of foundation and walls
Before starting construction of a bathhouse, you need to mark the site. The construction area will be 6 x 3 m, which should be cleared. At this stage, it is necessary to provide for the location of the drainage pit. Next we move on to the foundation.
Of all the known types of foundation for a bathhouse, it is better to choose a strip foundation. This option is simple and quite suitable for such a light structure as a home sauna.
Making a foundation for a 6 x 3 bathhouse consists of the following steps:
- Digging a trench according to the marking of the site. The depth of the trench depends on the freezing of the soil. In average climatic conditions, this parameter is 1.2 m. The width of the trench should be 30-40 cm.
- A sand cushion 10 cm thick is poured into the bottom of the pit and compacted.
- Laying the reinforcement frame, rods with a diameter of 10 mm.
- Formwork installation.
- Pouring with concrete mixture.
Construction of sauna walls from timber.
The foundation should rise 15-20 cm above the ground. If wooden walls start immediately from the ground, then there is a high probability of rapid rotting of the material.
After a week of pouring concrete, the walls begin to be erected. But first, a layer of waterproofing must be laid on the concrete surface. For this, 2 layers of roofing material or treating the foundation with mastic are suitable.
Next, wooden slats 15 mm thick are laid on the waterproofing along the perimeter, and the space between them is filled with polyurethane foam. This is necessary so that the first crown can be conveniently attached to the foundation, as well as for additional waterproofing.
So, from the 150 x 150 beams, they begin laying the first crown. Before installation, the beams must be checked again for dimensional accuracy and treated with antiseptic impregnation. The evenness of the entire structure depends on the quality of laying the first crown.
The first crown is attached to mortgages. But many experts do not recommend using fastenings, but leave the structures in a free state, in anticipation of future shrinkage.
The remaining rows of the log house are laid on the first crown. Jute insulation is laid between the crowns of the bathhouse. It provides good thermal insulation, prevents the formation of cold bridges, and also prevents the formation of mold. Tow or flax are used as insulation.
The crowns are secured to each other with dowels. These fastenings allow you to preserve the structure of the house without twisting and drying out the beams. These hardware are 6 x 200 nails. The nails are driven in increments of 1 m to a depth of 25-30 cm.
Final work in the construction of a bathhouse
Installation of a wooden floor in a bathhouse.
The door frame is installed on the floor using a plumb line and a level. If this element is skewed, the doors will be very difficult to open.
A gap of up to 80 mm should be left between the door frame and the wall to allow wood to shrink. Once all dimensions are checked, the door block is secured and the cracks are filled with polyurethane foam.
For a 6 x 3 bathhouse, there must be several small windows. Window openings are installed in the same way as in the previous case.
All joints between the boxes and the timber are filled with insulation - tow. But this is done after the frame shrinks.
The roof for a 6 x 3 bath has the following algorithm:
- Beams are laid along the upper crown.
- Rafters are mounted on them in increments of 1 m.
- The rafters are covered with lathing for fastening the roofing material. For soft tiles, plywood is used.
It should be noted that within 1 year a wooden bathhouse shrinks naturally, so it is not worth finishing it with facing materials during this period.
It is better to line the dressing room with boards or lining made of coniferous wood, and the steam room should be finished with deciduous wood.
It is best to line the interior of the bathhouse with linden boards. This material has a beautiful golden color, and when heated, this wood emits a honey aroma. Linden boards are very easy to install: they do not split or deform due to temperature changes. Linden vapors are especially useful for people with a diseased liver or a cold.
The most popular option for finishing a bathhouse is lining. It has a beautiful appearance, is easy to install, and is also inexpensive. To arrange the lining, it is necessary to build a frame and make lathing. Gaps should be left between the walls and the lining, since wood expands when heated. Taking this factor into account, the use of lining reduces the usable area of the room.
A timber bathhouse is an environmentally friendly and warm building designed for family holidays outside the city.
Veranda installation
Installation of the extension should be done after the foundation is completely ready, as well as the height of the walls and the type of roof have been determined, since it will be easier to attach a gazebo to a bathhouse with a pitched roof from the side. The easiest option for creating a veranda is to make it out of wood. Therefore, for walls, a structure in the form of a frame made of logs or timber measuring 100x150 mm or 100x100 mm is most often used.
To make a veranda you need to make a grillage (a wooden frame for the top of the foundation). It should be mounted on top of the waterproofing of the base. Most often, the grillage has a thickness of 55 mm and a width of up to 160 mm. For a strong connection, anchor bolts are used, which are inserted into the concrete.
After this, vertical beams are installed. With their help, the foundation for the roof and walls will be made. To do this, the beams are attached to the grillage using metal corners or a notch. In order for the structure to be as stable as possible, it is necessary to fix the racks on each side.
An example of attaching vertical posts to the base of a verandaSource remontnik.ru
Vertical beams should be installed so that windows and doors can be made in predetermined locations. On top of the beams, which will be the basis for the roof, vertical pillars are attached in the same way as the bottom. After installation, it is recommended to insulate the walls with mineral or basalt wool if the room is closed.
External and internal finishing can be done using lining, decorative panels or ordinary boards. Also, the veranda is most often made using glass. There are 2 main types of glazing: partial and full.
Options for bathhouse designs measuring 6 by 3 m
A bathhouse - at the dacha or in a private house - is a source of pride for any owner. This is a wonderful opportunity not only to get your body in order and improve your health, but also to have a good rest after a working day and recharge your batteries before new working days.
Many people prefer to do the construction themselves, select materials, create an interior, and work out a diagram of where everything will be located. If the space allocated for a bathhouse is not too large in area, you can consider options for bathhouse designs measuring 6 by 3 m.
Preparation for construction
Before purchasing materials and building a foundation, you need to think carefully about the design of a 3x6 m bathhouse and prepare a drawing. It’s not difficult to sketch out the rooms that will be located in a space of 6 by 3 meters.
The main thing is to decide what is preferable, and which room should be given more space and which should have less. For one, a spacious steam room is important and does not need a relaxation room at all; for another, on the contrary, a place where guests can gather for tea is enough, and a compact steam room will suffice. And the third one will decide to replace the rest room with a veranda.
Once the project has been determined, you need to think about finishing materials - inside and outside. The best option is to build a wooden bathhouse. If the building will be erected from concrete blocks or bricks, cladding is required . Whether it will be made from natural materials or imitating natural ones depends on the funds that are planned to be spent on arranging the bathhouse.
The main thing is that everything is done efficiently, in compliance with technology and safety regulations.
Necessary premises
Mandatory premises, whether it is a small bathhouse or a large one, are a steam room and a dressing room. The main thing is to equip the space in the steam room so that there is a sufficient number of shelves. In a small room they should be placed in the form of a staircase . The room should be decorated with wood. The stove is placed in a corner so that you can move freely, but at the same time easy access to the stove must be provided. If it is located too close to a wooden wall, you need to install a protective screen in that place or use brickwork.
Lighting must be designed to be comfortable and safe; lamps must be made of fireproof glass or protected by additional structures. There is no point in filling an already small space with additional items.
The washing room can be made small. The main thing is that there is room for a container of water and free movement of at least two people in the space. To save square meters, you can connect a washing room with a steam room, although experts who know a lot about the bath business do not recommend doing this .
A change room will serve to store necessary things, firewood, coal, bath accessories. Firewood can be in a special box. In some cases, firewood or coal is supplied to the stove directly from the door located in the living room.
There is a waiting room in any bathhouse. And in a compact room it can serve as both a locker room and a rest room at the same time. It should have a wardrobe or convenient hangers. Here you can place a small table with stools, where it’s nice to sit after a bath and drink aromatic tea with fragrant herbs.
To save space, you can provide cabinets or shelves for towels, gels, shampoos, oils. Here, on a separate shelf or in a nightstand, you can place tea leaves, herbs, dishes, and a kettle.
Construction stages
Preparing the area where the extension will be located: all garden debris is removed, bulges and holes are leveled. Installation of strip foundation. (It is this type of foundation that is mainly used on such structures because it is easy to manufacture, does not require the use of special equipment, has a long service life, and the cost of construction is inexpensive.) The frame racks are embedded in concrete - a steel or aluminum profile. When choosing a steel frame, it must first be primed and painted. With an aluminum frame, these actions are not required. A wooden frame can also be used.
Cover the prepared frame with polycarbonate sheets. It is recommended to secure it using screws with rubber washers. You can cut polycarbonate using an electric jigsaw or a saw with fine teeth (either a hand saw or a circular saw will do). Install a roof for the extension, the possible types of which were described above (in the form of an arch or sloping). If windows are needed, ready-made metal-plastic ones are usually used.
The extension is ready for use, but to increase its service life and attractive appearance, it is important to know the basic rules for caring for this material:
- Branches of nearby trees can scratch the material, so if there are trees or shrubs near the building, it is better to trim them or tie them up.
- When soiled, the material should be washed with soapy water using a soft cloth (or rags). It is better to avoid products containing alkali, solvents and acids - the material may become cloudy, which will negatively affect its appearance.
- The material does not require additional painting.
We hope that our detailed recommendations, as well as visual photos, will help you build a reliable and durable extension!
If you are thinking of updating the lighting in your room, then pay attention to polycarbonate diffusers, these are very strong and durable products
Russian bathhouse 6x3 meters. Layout
In terms of the composition of the premises, a 6x3 meter bathhouse resembles a layout with dimensions of 6 by 6 meters. It is not difficult to calculate that its area is smaller, but the functionality is the same. In addition, the order of the rooms in it is more rational - the rest room (1) is on the left, the steam room (3) is on the right, and the washing compartment (2) is in the middle. The toilet and shower are separated by a common wall. It is not difficult
to install sewerage and water supply in the bathhouse The proximity of the washing compartment to the steam room will ensure ease of maintenance of the latter. The steam room is spacious enough for 4 people to steam in it at the same time. The length of the shelf allows one visitor to lie down comfortably and enjoy a steam bath . For ease of maintenance of the stove-heater (6), its firebox is located in the hallway (4). You can also store the necessary supply of firewood there. It would also be nice to make a dressing room in it for outerwear and shoes.
The porch and entrance to the bathhouse are covered with a canopy, which, without a doubt, is another positive factor in favor of this plan - it will protect from precipitation all year round.
The rest room can easily accommodate a table, chairs, and a lounger. If desired, you can install a TV. And then, for sure, every visit to the bathhouse will turn into a real vacation.
Basic data for the layout of a Russian bathhouse 6x3 meters
- The building area based on the foundation is 23.30 sq. m. m.
- Building area – 21.76 sq. m.
- Usable area: Total – 16.82 sq. m.
- Without hallway – 15.11 sq.m. m.
- Log, diameter – 200 mm.
Legend:
1 – Rest room (dressing room); 2 – washing compartment; 3 – steam room; 4 – hallway; 5 – stove-heater; 6 – toilet; 7 – shower cabin; 8 – shelves for hovering.
This layout of a 6x3 Russian bathhouse made of logs will be a godsend for many summer residents who want to build their own bathhouse. I did not set out to tell in this short article about its full project, but presented only its layout so that you could evaluate it and make the right choice before starting construction.
Here you can see examples of all layouts
or select in this widget:
- For 2-3 people
- For 2 people
- For 4-5 people
- For 6-8 people
- Compact 3x4 version
- Bathhouse 3x4. Option 2
- Plan 3x5 meters
- Russian bathhouse 4×4
- 5x4 sauna option
- Log house Russian bath 6×3
- Bathhouse layout 6x4
- Bathhouse 6x4. Option 2
- Bathhouse 5x6 meters made of logs
- Layout 6x6 meters
- Bathhouse 6x6 with terrace
- Bathhouse plan 6x8 meters
- Bathhouse with swimming pool 6×8.5
- Bathhouse with attic 4×6 m
- Bathhouse with attic 6×8 m
Video description
This video shows an example of building a veranda with planks
In the first case, the walls are made 1/3 of the main material (wood, brick or stone), and the rest is occupied by the window. With full glazing, panoramic windows are used, which occupy the entire height and area of the wall. Most often they are equipped with opening areas, for example, vents or glass doors to create natural ventilation.
The roof of the veranda usually depends on the shape of the extension and the bathhouse, as well as the material from which the steam room covering is made. If the extension is located under the roof of the sauna, then a common roof should be made. In this case, it is necessary to make a transition between the terrace and the bathhouse so that water does not get into the gap, as well as a separate drainage system for the extension. If the veranda is located perpendicular to the main building, then it is recommended to make a separate roof.
An example of a split roof for a terrace attached to a bathhouseSource remontik.org
Bathhouse layout 3x6m - two options
Layout of a 3x6 bathhouse with sequentially located rooms
An acquaintance decided to build a 3x6m bathhouse with a single frame, with internal walls made of logs: a six-wall structure. He asks about the layout options for a 3x6m bathhouse.
Naturally, the first and main layout option suggests itself: a sequential arrangement of rooms from the entrance: relaxation room, washing room, steam room.
We have previously considered 3x6 bathhouse projects with the following layout:
- porch (entrance to the bathhouse) from the very edge of the log house under a separate canopy
- the porch is almost in the middle of the log house under the canopy
- porch in the middle of the log house with a veranda under the same roof as the bathhouse
This layout is most optimal if you are not going to build an attic and will only use the first floor.
With this arrangement, there is one small inconvenience: the loading (combustion) chamber of the sauna stove opens into the washing room. This means that a certain amount of dry firewood should lie near it. And the washing room is designed so that you do not limit yourself in the process of washing and dousing with water. There is only one way out: move the washing stove and shower into different corners.
In addition, the location of the combustion stove opposite the front door is the most correct solution: the minimum distance, without crossing the entire room. In this case, you can bring logs to heat the stove from the rest room.
You can, of course, put the stove in the steam room along with the furnace room. But, nevertheless, it is more comfortable for steamers to heat from a washing room compared to a steam room. And it will be warmer in the washing room.
The second layout option is suitable for those who want to equip additional living space in the attic space for themselves or guests.
By reducing the area of the steam room and washing room, you can increase the area of the rest room, in which you can place a staircase to the second floor.
6x3 bathhouse layout with a large relaxation room
Or for those who do not need a large steam room, but want a larger relaxation room, which can be equipped with a small kitchen and a dining table for guests.
Again, let me remind you that if in the first option it is not so important what logs you order when cutting a log house:
- according to external dimensions
- according to internal dimensions
- along the axes
With consecutive rooms, reducing the internal size of the rooms due to the thickness of the logs will not play such a big role; or rather, it will not be noticeable that the inside is not 3 m, but 2.8 m, if you did not discuss this nuance when ordering.
In the second option, this point is very important, because, usually, by default, loggers use a 3m log and then inside you will have a log house width of 2.8 or 2.5m.
Taking into account the adjacent location of the steam room and washing room, which are also separated by a log interior wall, these rooms will turn out to be quite small.
Pay attention to this point and when ordering, discuss that you need the internal width of the log house to be 3 m. They will offer you the option of chopping into the paw and will use a log of slightly longer length.
Also, do not discount the option of using the attic space in the bathhouse as an attic:
- the attic floor will always be warm, because there are warm rooms below and not cold ground
- by insulating the roof on cool days it will be warm enough (you can also heat the sauna stove) to live there until late autumn
- Due to the same insulation, there will be no “steam room” on hot days. It’s hot and it’s hot everywhere when it’s 30 degrees outside. But you can make two windows at the ends and create a draft...
The layout of the 3x6 m bathhouse allows you to have three main rooms for bathing procedures and comfortable relaxation.
Do-it-yourself extension to a frame bathhouse
Before we move on to considering the components of self-construction of an extension, let me remind you that the frame is not a very strong thing.
How to attach to a frame so that it does not collapse
If we already have a frame bathhouse, then a do-it-yourself extension to the bathhouse should take into account the fragility of the original structure.
Therefore, we propose a radical remedy: do not use an existing structure at all as a support for the one under construction. In other words, build a completely autonomous extension, but very close, literally 2-5 centimeters from the existing bathhouse.
The cracks can be foamed, covered with sheathing, the junction of the roof and the wall (for example) can be connected with a galvanized apron. In general, imitate the unity of two autonomous buildings.
What is the advantage of this method? Both structures can be raised and lowered independently of each other seasonally, without creating stress in the rigid connections (which there are none).
And in general, attaching something to a frame is not an easy task, because you need to hit the racks exactly - other than them there is nothing to hold the mount. Of course, very light things, such as a shelf for shampoo, can be supported by cladding, but we are talking about an extension.
IMPORTANT! It is worth remembering that in a durable frame bath there are only upper and lower frames and corner posts made of timber (or double boards).
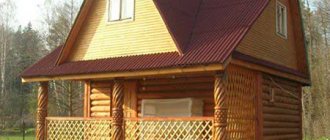
Project of a 6 by 3 bathhouse with a terrace photo
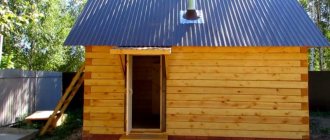
We finished the bathhouse in Zeleny Bor. The project is made of a 6 by 3 log frame with 2 partitions. The log house has three separate zones: a steam room, a washing room and a relaxation room. Also, a frame terrace is attached to the log house along its entire length. Which is extremely convenient! A separate desire of the client was to increase the roof ridge. So that in the future the attic can be used as an additional room in the country house.
The time of year they built in gold was autumn. It was so lucky that Indian summer arrived. It was very comfortable and pleasant to build. Construction was completed on the 14th day after arrival. Now the client has his own cozy relaxation corner in his country house!
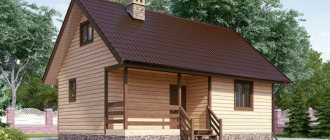
Bathhouse 3x6 # Warm Dressing Room and Terrace
Size of the log house: 6×3 m Dressing room: 2×6 m Stove: yes Canopy: — Electrics: — Painting: —
When the main points are determined, you can begin the construction itself.
- Pouring the foundation.
Step one. The perimeter of the future bathhouse is determined in advance; special pegs are driven into the ground along its edges, within which it is necessary to dig a ditch 60 centimeters deep and 40 centimeters wide.
Step two. The ditch is filled with sand to one third of the depth. The sand is poured from above with water and thoroughly compacted.
Step three. After compacting the first layer, finely chopped red brick or gravel is poured over it.
Step four. A layer of broken brick or gravel is covered with a layer of sand, which should be level with the ground level.
Step five. Formwork is assembled from reinforcement. The entire structure is poured with concrete and insulated on top with a thin layer of roofing felt.
Important! Before building a frame bath, at least a week should pass so that the foundation has the opportunity to properly settle
- Construction of walls.
Step one. Lumber prepared for a frame bath must be thoroughly dried before starting work. It is not recommended to use birch wood for construction, as it quickly rots. The best option would be linden, aspen or larch
The wood of these species is able to maintain its shape for a long time and has thermal insulation properties, which is very important for a bathhouse.
Step two. After all construction work is completed, the inside of the boards should be coated with an antiseptic solution, and the outside with furniture varnish, in two layers. This procedure must be done around the entire perimeter of the room, avoiding only the steam room and the washing compartment.
Step three. The bottom trim, made of a reliable beam with a cross-section of 10x10 centimeters, must be fixed firmly enough, after which the beams should be properly fastened at the corners with nails. It is recommended to place the racks on metal pins so that during the construction of the walls they cannot change their location and knock down the structure.
Step four. Corner posts must be embedded in concrete.
Advice: The pillars - the basis of the walls of the future bathhouse - should be placed directly under load-bearing walls, corners, stoves - that is, in those places where the load is greatest.
Step five. Along the perimeter of the walls, intermediate racks are installed, made of the same timber as the main structure.
Step six. To make the floor waterproof, it should be laid out with timber made of any wood, with a cross-section of 15x15 centimeters.
- Let's move on to building the roof.
Step one. It is necessary to take 8 special ceiling beams, sawn to the angle of the rafters. To begin with, you should set up only the outer rafters, and only after that fix a couple more pieces in the center of the future roof. The remaining rafters are connected to the main structure, first on one side of the roof, then on the other (through the ridge).
Step two. After the rafters, vertical posts are installed, and if necessary, an exit to the attic is also made.
Step three. On the rafters located at the edges, beams are cut out, to which the front boards are nailed, after which the battens are attached on top.
- It is necessary to insulate the walls.
The most common material for this purpose is roll insulation about 50 millimeters thick. In some cases, mineral wool or ready-made mats are used. The insulation is laid between vertical wooden posts, after which slats are nailed to them. For thermal insulation of the room, it is recommended to use polyethylene or glassine.
Advice: it is not recommended to use roofing felt for wall insulation, since under the influence of high temperatures it begins to emit an unpleasant odor.
For floor insulation, it is better to choose expanded clay or other types of backfill, and for the ceiling - polystyrene foam. If the insulation is selected correctly, heat will be lost several times less. Thanks to this, the cost of heating the bath will also be reduced.
After the walls and roof are built, you can begin installing windows and doors in the openings previously left for them. Upon completion of this work, it will be possible to enter the finish line.