Should I have a sauna at home or not? The discussion of this issue by the FORUMHOUSE editors grew into a heated argument, we began to look into it and, of course, went to look at the opinions on our forum. Most of our forum members believe that a bathhouse in the house is a whim for which you will have to pay too much.
A responsible homeowner would never do this, according to our expert users, and we share their arguments with you.
Preparatory work before installing a built-in bath
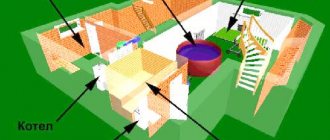
First you need to decide on the design of a built-in bathhouse in the house. It is better to place it on the ground floor or in the basement. Calculate the dimensions taking into account 2.5-3 m3 per person. In addition, it is more convenient to set up a steam room near the bathroom. In this case, it will be possible not to bother with the equipment of an additional washing room.
You can immediately start connecting to the sewer system and design a ventilation duct. Before installing an electric heater, you should take into account the power of the wiring in the house in advance and, if necessary, equip a three-phase network.
When the premises are selected, we purchase the necessary materials. To equip a bathhouse in a residential building, we will need insulation (mineral wool or cork board), expanded clay, roofing felt, aluminum foil, metal hose, corrugated pipe, lining, tiles.
If all materials have been purchased, we proceed directly to the construction process. The first step is to address the issue of power supply to the devices.
Documents for construction permission
The first thing you need to know: the planned extension of a bathhouse to a house is considered a reconstruction of a residential building . And permission is obtained specifically for the reconstruction of a permanent structure (a residential building is a permanent structure).
However, a free-standing bathhouse is also considered a permanent structure, and permission must also be obtained for it. (Although not always, there is some kind of loophole that allows you not to take a construction permit , but then still register the already built bathhouse - in order to install electricity, water, gas there.)
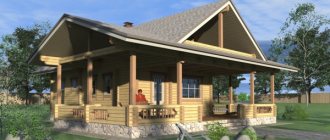
House with sauna and terrace. Photo ProSIP
To obtain permission to reconstruct a residential building, you must go to the regional BTI . Take the following documents with you:
- a document confirming your ownership of the site (or a long-term lease agreement with the right to build);
- an application for reconstruction written by the owner of the site or an authorized representative (+ power of attorney for this person);
- general site plan;
- a renovation project that includes existing and planned buildings.
The package of documents will be reviewed within 10 days , and as a result, permission will either be given or denied. If permission is received, it is valid for 10 years. If it’s a failure, try a new project, taking into account the complaints.
What should you consider first? When a project is submitted, they will look at what building materials you indicated there . Therefore, you need to know the fire safety requirements (more about them below) and draw up a project so that it complies with all of them.
Now about registration. It is produced by municipal authorities. A completed construction is registered. This is done to secure ownership of it.
List of documents for registration:
- passport of the owner of the site;
- land ownership document;
- application for registration of a building, which contains the actual address of the land plot;
- design documentation for construction - with all building materials, dimensions, equipment and other details;
- a list of communications to which the building is connected, along with engineering diagrams.
IMPORTANT! Check with the BTI whether the reconstructed residential building with an extension will need to be registered, because it already has registration before the reconstruction. The above exactly applies to a free-standing bathhouse.
The design of a bathhouse attached to a house can be done independently or ordered from a design organization.
Extension to the bathhouse at home
No matter how funny it may sound, this option is also possible. For example, if we are talking about a guest house.
So, what standards apply if the owner of the site decides to add an extension to the house to the bathhouse? The bathhouse is a permanent structure , therefore a large-scale extension that makes it a residential building must also receive permission from the BTI.
Electrification of a built-in bathhouse
When choosing an electric heater, consider the power required for high-quality heating of the steam room.
It is better to choose models specially adapted for baths with the terminal box located on the rear panel. In this case, the device will be protected from moisture. For an electric heater, as for a conventional stone stove, it is necessary to equip an additional foundation. We carry out the work on electrifying a built-in bathhouse with our own hands in the following sequence: we install a separate machine on the distribution panel, lay the cable in a special corrugated pipe and install a separate socket for the stove.
At this stage, you need to prepare the cable for wiring in the room to the locations of the lamps. For these purposes, it is better to use wires with heat-resistant insulation and a moisture resistance level of IP54. The switch should be placed in the dressing room.
Terrace attached to the house: patio near the bathhouse
We spoke quite thoroughly about the terrace attached to the house in this article.
But now we are talking about an option when the extension forms a courtyard, which is called a “patio”. For some reason, it has become fashionable to call an open veranda with an earthen floor this very word, although the patio there is only an earthen floor, everything else is like an ordinary open veranda.
If the distance between the house and the bathhouse is small (we hope the standards are met) , then the terrace attached to the house can become a patio near the bathhouse, that is, you can move to it to relax after bathing procedures.
The difference between a terrace and a veranda is not very big; here is another link to an article about a veranda attached to an existing bathhouse, and another to an article that describes projects with extensions built into them.
Ventilation technology for a built-in bath
To protect the wood in the steam room from mold, rotting and swelling, it is necessary to provide high-quality ventilation.
In the process we adhere to the following algorithm:
- We make a ventilation hole. It is better to make the ventilation inlet channel in the floor behind the stove. This will ensure instant heating of cold air and its circulation throughout the steam room.
- We equip the ventilation outlet from above in a diagonal position with respect to the input.
- We lay a ventilation duct from one channel to another.
- We install ventilation valves to regulate air flow.
- We install a fire damper to prevent hot air from entering residential premises in the event of a fire. It will close when the fire extinguishing system is turned on.
With properly equipped ventilation, the steam room will warm up even better and faster. If the ventilation system is not equipped correctly, the air will heat up only near the stove itself.
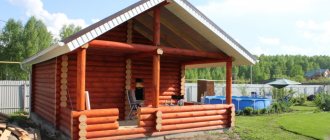
Location of the building
There is a regulation according to which a residential building and outbuildings are located on the site in compliance with building codes, fire safety rules and landscape features. The bathhouse should be located at a distance from the house and neighboring buildings of at least 5 - 8 meters, away from the road. There must be a fence or hedge between it and the neighbor's property.
And although according to the regulations it is proposed to fence off the bathhouse from neighboring buildings, in reality no one does this now - it is no longer fashionable to block off areas with all sorts of fences. If the building is located near a natural or artificial reservoir, the distance between them must be at least 20 meters. Sanitary safety standards must be strictly observed - wastewater from the bathhouse should not enter the reservoir and pollute it.
A convenient position for building a bathhouse is an elevation. In this case, the water flows itself to a certain place and there is no need for a complex sewer drainage system. If you plan to combine a bathhouse with a residential building or other buildings, experts recommend the Finnish type. Such a bath provides less moisture and dries faster due to high temperatures, which reduces the chance of fungus appearing.
The trench or container for waste bath water should be located no closer than 1 meter from the neighboring area. The place for waste water should be covered with sand, crushed stone or gravel. The choice of location for a bathhouse is also influenced by the height of the groundwater - a foundation in a swampy place will cost much more, and if this factor is neglected, sooner or later the structure will “float”.
Methods for installing sewerage systems in a built-in bathhouse
Before installing the floor in the steam room, you need to install a sewer system.
If possible, it is easier, of course, to cut the pipe into the general sewer system. Otherwise, you will have to equip the drain yourself in this order:
- We dig a drain hole at a distance of 0.5 meters from the building with a depth of 1.5 meters.
- We dig a trench to the bathhouse.
- We make a recess for drainage in the steam room.
- Fill the holes with a gravel-sand mixture.
- We install the pipes at an angle to the drainage pit.
- Coat the joints of the drain pipes with cement mortar.
Please note that it is not advisable to install a drain right next to the steam room. Constant humidity can lead to dampness and mold.
What you need to know about the foundation
Until you built the house, the soil underneath had the same properties, but the violation of its integrity, the pouring of the foundation, the load of the built house - all this changed them.
The zone within which a change in soil properties occurred does not exceed a couple of meters from the boundary of the building .
Stabilization of the soil after a house is placed on it lasts from 3 to 5 years. During this time, you should not place anything next to it, especially on a connected foundation.
Once it is established, you can build. But it is advisable that the project be carried out by specialists who can calculate how much weight the future extension will be, how much, on the one hand, it will sink the soil, and on the other hand, resist the forces of frost heaving, which tend to push the foundation out of the ground.
Of course, a lot depends on the soil itself . Some people are lucky and have sandy soil with coarse sand and gravel. And others have heaving clay, for example. Therefore, you need to know the geology of the site.
And the foundation for the extension of the bathhouse is selected according to the depth, design and material in accordance with the type of soil, the depth of groundwater, as well as the depth of soil freezing in winter. See the section on types of foundations.
ATTENTION! It is better if the groundwater is at least half a meter below the base of the foundation. If higher, then think about drainage.
This means that bathhouses are usually placed on a shallow strip foundation, but it is unlikely to be suitable for an extension to a house.
Firstly, because it is very desirable to build such a bathhouse from non-flammable material, and it weighs a lot , even if it is aerated concrete.
Secondly, because a shallow foundation is laid
above the freezing depth of the soil , and therefore, the forces of frost heaving will act more actively on it if the soil is heaving.
And it is better not to consider options for connecting the bathhouse to the house through the foundation or just the roof. Everything is fine when the foundation is laid at the same time and for both buildings at once. Therefore, it is recommended to pour the foundation immediately, taking into account all subsequent additions, if they are planned, and to implement them as funds and other opportunities become available.
If the foundations are laid at different times, and even more so at different depths, then their vibrations in the ground will not coincide in any way. It follows from this that it is best not to make a connected foundation of the house and extension.
But what's wrong with a single roof? If two foundations rise to different heights, but at the same time have a common roof, stresses will arise in the roof, which will lead to the destruction of the most stressed structural parts .
It is easier to add a bathhouse to an old house. It’s also easy to get to a house with a wide, warm blind area. In both cases, changes in the soil around the house will not have the same effect on the foundation of the bathhouse.
ADVICE! Of course, we have simplified a lot here, but the best thing you can do for yourself is to talk to specialists. So the project will be competent, the BTI will accept it, and there will be no need to expect destruction over time.
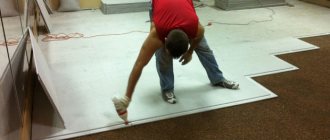
Finishing the floor in a built-in bathhouse
In the steam room of a private house, you can install a tiled floor, choosing tiles that are resistant to temperature influences of up to 120 degrees.
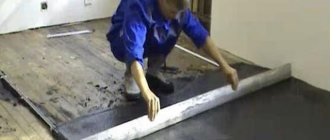
We finish the floor in the following sequence:
- We fill a layer of expanded clay around the perimeter of the future floor.
- Pour the concrete at a slope towards the drain hole.
- We lay a waterproofing film. You can also use roofing felt.
- We make a cement-sand screed. It is important to observe the slope towards the drain. At this stage, in the area where the furnace is installed, we lay out a base of refractory bricks.
- We install tiles.
When arranging the floor in this way, it is advisable to choose a covering with a rough surface or install a wooden ladder on top of the flooring so as not to accidentally slip.
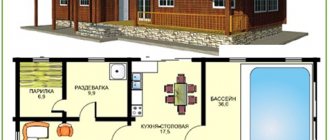
Projects of one-story houses with a sauna
The most popular are building projects with one floor and a steam room, since they can quickly be used to build a country cottage. They are convenient for spending weekends with family and friends or living permanently. The design of such buildings is mainly based on natural shades.
The advantage of such houses with one floor is considered to be that they require a small area. A competent project successfully accommodates a sufficient number of rooms and a sauna. A home steam room can be located right next to the living room or terrace, so that when you leave it you can plunge into the pool.
No less popular is the layout of a Finnish building with a steam room. This building is structurally voluminous, and therefore perfectly accommodates additional home extensions, which include a bathhouse.
Covering the walls and ceiling of a built-in steam room
The most suitable option for wall decoration is considered to be hardwood (linden, aspen, abashi).
Coniferous wood is not used due to its high content of resin substances. When performing finishing work, we adhere to the following instructions:
- We fix glassine or bitumen paper to the walls and ceiling with overlapping wooden slats. This process is only necessary for brick premises. In other cases, you can do without it.
- We mount the frame on the ceiling and walls with beams with a cross section of 4*6 cm or 5 cm2.
- We carry out cable routing to the location of future lamps.
- We install dry pipes around the perimeter under the ceiling. This device is needed to provide fire extinguishing.
- We lay insulation between the bars. It is necessary to ensure that the heat insulator fits tightly to the walls.
- We fix a layer of aluminum foil on top with the mirror side inward. It will provide quick warm-up and long-term heat retention in the steam room. This will significantly save fuel costs.
- We seal the joints with metallized tape.
- Carefully, so as not to damage the foil, attach the crate in a strictly horizontal position. To do this, we use beams with a cross section of 3*4 cm and install them in increments of 0.4 m.
- We mount transverse frames from bars with a cross-section of 3*6 cm. Shelves will be attached to them in the future.
- We cover the walls and ceiling with clapboard.
The suspended ceiling initially needs to be covered with clapboard and then insulation must be laid on top. In this case, it is better to use glass wool and take an assistant. It is quite difficult to complete this process on your own.
Dimensions
If the size of the plot or the financial side do not allow for the installation of a large structure, a small 4x4 bathhouse in a two-story design will perfectly perform all the functions of a spacious bathhouse complex. Of course, it is impossible to find a place for a swimming pool in it, but it is quite possible to place a plunge pool or a Japanese ofuro barrel on the attached terrace.
In another option, this place can be occupied by a barbecue area or allocated space for a solarium. Inside, you can make a separate steam room and sink with a shower, and raise the relaxation room to the second floor, and it will successfully serve as a bedroom. A small 5x3 sauna is compact and quite roomy for a small family.
If you have cramped dacha plots or characteristic relief features, you can install a long bathhouse with a small diameter, for example, 6x4. A spacious version of a two-story 5x5 bathhouse becomes a place where a large group can gather. The large format of the building allows you to create a full-fledged bath complex.
Large rooms have ample opportunities; a spacious recreation room is conveniently located there; the presence of a kitchen allows you to cook indoors and not depend on weather conditions. The steam room and sink sections have a spacious area and allow you to carry out bath procedures comfortably. Sizes 6x6 and 8x8 are no less popular, since the level of comfort with such freedom of space has no complaints.
Features of installing benches in a built-in bathhouse
The benches should be secured to a pre-prepared frame under the lining. To make them, it is advisable to use carefully sanded hardwood boards 3-4 cm thick. Please note that all fasteners must be galvanized and driven deep into the base so as not to get burned on them at high temperatures. Lubricate the built-in shelves with special oil before use.
Useful video
Here is an example of the fact that it is still possible to attach a frame bathhouse to a house - we had no doubt about the technical reality of this, but the video says nothing about the resolution. This extension looks like this:
And here is another video that shows some techniques that can increase the fire safety of a bathhouse attached to a house. See if something from another person's experience will be useful.
The following video was recorded by a professional builder with a decent amount of work experience and the mental activity associated with it. That's why it's valuable. See if you also tend to think carefully about your decisions before getting down to business.
*** When writing this article, we encountered gaps in knowledge about the legal part of construction. Like most land owners, we believed that garages, bathhouses, sheds and verandas were the owner’s personal business. It turned out that the state thinks differently. It’s very interesting how many of our readers knew about permits and registration of buildings, sign up below if it’s not difficult!
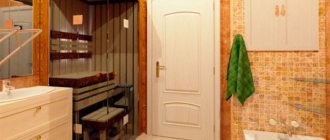
Installation of a door in a built-in bathhouse
As for the front door, it must meet certain requirements: have a jamb, hinges and insulation, be small in width and height, and open only outward. In addition, it must be made of dense door leaf and a high threshold must be installed under it to reduce heat loss and obstruct the flow of cold air. It is advisable to choose a door from sanded tongue-and-groove boards.
Which steam room is better based on health requirements?
The choice between a bathhouse and a sauna should first of all be dictated by the state of health of the owner of the house and all members of his family. It is advisable to undergo examination by doctors before using one of the types of steam baths. This is especially true for people with diseases:
- Of cardio-vascular system;
- Gastrointestinal tract;
- Lungs and respiratory tract;
- Skin;
- Kidney and liver;
- Muscles and joints.
The most important differences between a bath and a sauna for health are temperature and humidity. The latter figure is lower in the sauna, where the atmosphere is very dry (about 30%). But the temperature in a Finnish steam room can reach 120 °C. For people with diseases of the cardiovascular system, a bathhouse would be more preferable. The temperature is lower (about 70 °C) and the humidity is higher (90-100%). For men and women with kidney and gastrointestinal diseases, a sauna is suitable, as it warms up the body better. We must not forget that in a Finnish steam room a person always relaxes and is in complete peace, and in a Russian bath he washes.
Electric oven for built-in steam room
The heater must have a power of 1 kW per 1 m3 of steam room. We install the electric furnace in the following sequence:
- We cover the wooden surface around the future stove with asbestos cardboard.
- We install the heater on a pre-prepared base with a height of about 15-20 cm.
- We provide 20-25 cm of free space around it.
- We wash the stones and put them in a special container.
For electric heaters, you should use stones of the correct shape; products with potholes will crack faster. Optimal options: porphyrite, jadeite, soapstone, steatite or diabase. Other materials will begin to crack when heated/cooled.
Materials
The basis of the bathhouse is the walls; they determine the reliability of the building, the quality of thermal insulation and, to a large extent, the comfort inside.
Most often, bathhouse walls are built from:
- bricks;
- foam concrete, aerated concrete;
- wood concrete;
- tree.
Brick walls are very difficult to lay. They have high thermal conductivity, so increased thermal insulation will be required. A foundation must be laid under brick walls.
Wood concrete is a mixture of cement with organic fillers, mainly crushed wood. Its properties are similar to foam concrete; it is also produced in the form of blocks. You can make it yourself right on the construction site; the technology is very simple. There is only one main drawback - low resistance to moisture.
Foam concrete and aerated concrete blocks have much higher thermal insulation qualities, moreover, they are much lighter and do not require a massive foundation underneath.
The size of a standard wall foam block is 20x30x60 cm, and it alone is equal to 13 sand-lime bricks. It’s not difficult to build walls from foam blocks yourself.
Wood is most often used to build baths in our country. There are enough wood species suitable for this; experienced builders prefer larch, pine, and cedar.
To raise the log house of a bathhouse, the following materials are suitable:
- logs (solid or rounded);
- sawn timber with a rectangular cross-section;
- profiled timber;
- glued profiled timber.
You can use either wet or dried material. The first one is better suited for a log house. The more moisture in the material, the more the log house will shrink. Glued laminated timber practically does not require shrinkage. A log house takes longer and shrinks more than others. There is no need to mention that wood is the most environmentally friendly material, so it is best suited for the construction of a bathhouse.
Instructions for arranging a mobile built-in bathhouse
If it is not possible to allocate an entire room for a steam room, then you can equip a separate structure in any room.
For this you will need mineral wool, boards (edged and tongue-and-groove), waterproofing film, wooden lining, mineral wool, aluminum foil. First, decide on the location of the structure. It is most convenient to place it in the corner of the room. Before arrangement, it is necessary to consider the dimensions of the structure. The height of such a bath should not exceed two meters. It would also be a good idea to make a ventilation duct and install a sewer drain in advance.
We carry out the work in the following sequence:
- We supply electricity to the location of the booth. To do this, we use a cable with heat-resistant insulation. If heating is planned with an electric heater, then we additionally install a separate automatic machine on the distribution panel.
- We install the floor around the perimeter of the future structure. To do this, we first fill the logs about 5 cm high with a “rough” flooring from edged boards.
- Lay a waterproofing layer.
- We install a “finish” floor from a tongue and groove board at a slope towards the drain hole.
- We install bars strictly vertically along the perimeter of the steam room and perform the strapping at five levels, located at the same distance.
- We cover the base with a vapor barrier layer from the outside and cover the walls to which the structure is adjacent with it. If they are uneven, then you must first secure plywood sheets to them.
- We cover the outside of the frame with wooden clapboard. For external cladding, you can use coniferous wood. We leave room for the door.
- We lay a 5-centimeter layer of insulation on the inside.
- We fix aluminum foil on top, with the reflective surface facing inward. We seal the joints with metallized tape.
- We fill the top of the counter-batten with beams, 3-4 cm thick, so that there is an air corridor between the sheathing and the vapor barrier. The work must be carried out carefully so as not to damage the integrity of the foil.
- We line the inside of the steam room with clapboard.
- We will install a door to the room. It must open outwards.
- We place the lamps in sealed heat-resistant shades.
- We cover the location of the stove with a galvanized metal sheet.
- We install an electric heater.
- We install shelves and benches. We treat the wood with a special oil.
- At the last stage, we place the stones in a special bowl.
Please note that after the first fire, low-quality stones may crack.
They will need to be replaced. How to build a built-in bathhouse - watch the video: Equipping a built-in bathhouse in a private house is a troublesome and time-consuming process that requires careful attention to detail. However, by adhering to the above instructions, you will be able to correctly choose the location of the bathhouse in the house, materials for construction and build a high-quality, safe steam room.
How much money does it take to build a bathhouse? Do-it-yourself sauna - savings, pros, cons
Owners of suburban areas often consider self-construction an option to save money. There is no need to hire a team, or even contact a construction company, whose services are not cheap - from drawing up a building project to final finishing. The owner-developer only loses personal time, and money will be required to purchase materials.
This option looks attractive, but you should think carefully about it, because not everyone will be able to:
- make the calculations correctly, it’s not for nothing that companies use design documentation to build even a miniature bathhouse;
- It’s purely physically necessary to lay out the foundation, assemble the walls, install the rafters and roofing work, and then there’s also the finishing touches ahead along with the installation of the stove, windows and doors;
- choose materials yourself without falling for the bait of unscrupulous suppliers and sellers at construction bases.
To do the job you will need a tool that is unlikely to be lying around in someone’s closet. But if these difficulties do not scare you, be patient and move forward!
Building a 3x4 sauna with your own hands from timber is not as difficult as it seems, if you carefully think through everything and provide for it. If you doubt your ability to calculate correctly, purchase a ready-made standard project or order an individual one. The documentation will indicate the required dimensions and values. There is also the option of purchasing a ready-made house kit - this will reduce the number of expensive tools for the work and simplify assembly.
Among the advantages of self-construction are savings and full compliance with the result. The owner will carefully monitor compliance with the rules and requirements, while unscrupulous assemblers “from the outside” may “mess up” in an effort to simplify their work, or even purchase substandard materials and pocket the saved difference. The downside is that the developer does not have the extensive experience that professional carpenters have, so construction will be delayed.
Saving
The cost of timber or a finished house kit depends on various factors. This includes the type of wood, the degree of humidity, and the pricing policy of the manufacturer. Let's consider a cheap and common option - pine with natural humidity, average price on the market, cross-section - 150x150 (so that there is appropriate heat in the steam room even in winter).
The cost of a house kit is calculated in rubles per cubic meter. Under the conditions described above, the lower level is 9-12 thousand rubles/m. cube A bathhouse with dimensions of 3x4 meters will require about 5 cubic meters of timber (without internal partitions), the exact amount depends on the cross-section of the lumber. The total cost of the finished house kit will be 55-65 thousand rubles. But don’t be fooled, these are just walls. The foundation, roof, rafter system, and interior decoration still remain.
If you plan to do all these stages of construction yourself, there will be savings. But is it worth it? Preparing the foundation is not an easy task. Even a columnar foundation will require an investment of time and effort. The cost of installing the base is one third of the final cost of the bath. Roof – another 15% of the price of the finished building.
When the frame of the log house is ready, you will need to invest in finishing, interior and floor partitions, as well as doors and windows. Let’s not forget about the stove, because it also costs money. Total: the cost of construction will be 130-170 thousand rubles. Construction companies will charge more - from 200 thousand, the cost of work by coven workers will seem lower - from 150 thousand, but in this case additional operations will be required, the cost of which will be announced to you during the process. Private teams carry out such a scheme - they inform the potential client of a low price for construction, after which, already in the process of work, they talk about the need for additional thermal insulation, inserting casing boxes, and installing swarms. In this case, the customer has nowhere to go and continues to pay. It is not uncommon for such a cheap construction of a bathhouse or house to actually cost more than in large, reputable companies.
Based on the area of the plot and the capabilities of the owner
After receiving doctors’ recommendations, you should consider in detail the design of your future steam room. When selecting drawings, it is necessary to take into account the possibility of modifying them and applying them to your own conditions and wishes. It must be remembered that a large bathhouse on a small plot will take up a lot of space, will disturb the household, and a large one will not always look beautiful.
Based on your own sense of beauty, it is better to choose a project that will not create obstacles on the household’s territory, will look discreet and will be in harmony with the surrounding buildings.