Log house in a bowl
Hello, curious amateur builders!
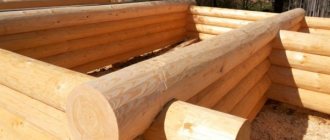
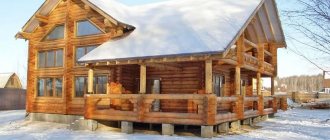
Today there are several types of manual felling of houses and baths. These are “log-house in a bowl” and “log-house in a paw”. The construction of a bathhouse into a bowl is a truly Russian creation. A long time ago, our ancestors built houses and baths this way. Remembering the films of past years and our unforgettable artists, one immediately imagines chopped-up, truly Russian houses. Some architectural examples still stand today, being more than 100 years old. We can say that this construction method has been tested for centuries.
Now quite a few construction companies offer log houses using this technology. I will say right away that it will be difficult for a person who does not have knowledge and practice in this area of carpentry to make a log house into a bowl with their own hands. Almost impossible. But real masters, using their centuries-old secrets, do their work practically without a single nail. Why is this particular cutting method so popular among the population? Let's try to delve into this process.
How to cut a log house into a bowl? Below we will try to answer this thematic question?
When building from solid logs, several cutting methods are used. They depend on the purpose of the structure being built. When constructing houses for permanent residence and baths, carpenters use cutting into a bowl or into a paw. Experienced experts recommend that when constructing a permanent structure, use the cutting method, in which the excavation is made in such a way that the bowl rests on the log, and not vice versa - the log into the bowl. This kind of felling is also called “in the okhlop” or “Siberian”. Whereas, the reverse excavation is “into the oblo” or “Russian” cutting. The Siberian cutting method better protects the log house from moisture penetration. Its use, compared to Russian cutting, requires a smaller number of technological operations. When making log houses using Siberian technology, logs are released outwards up to 60 cm, obtaining a warm corner.
Wood selection
Preference is given to coniferous species. Most often, pine is used, which is distinguished by a smooth trunk of uniform thickness along almost the entire length, a minimum number of knots, and resistance to decay. The best wood is considered to be from the northern zones, cut down in winter. In winter, the movement of sap in the tree is minimal, which leads to less cracking of winter preparations when dried. The blanks must have the same overall dimensions, the recommended diameter is ≥ 22 cm. The larger the better, this will reduce the number of node connections and increase the thermal performance inside the building.
The material is sanded and trimmed from the inside to the thickness of the upper section. To ensure the stability of the log house against weather conditions, the blanks must be oriented along the annual rings. The part with thin rings is located outward, and the part with thicker rings is located inward. The prepared workpieces are dried in a ventilated stack, providing shelter from precipitation. Minimum drying time ≥ 6 months.
Tools required for making a log house
The process of making a log house involves carrying out work on marking the logs and the felling itself. Without special tools, it is impossible to perform quality work.
Therefore, after consulting with professionals, purchase:
- carpenter's axe;
- chainsaw (or an electric saw);
- chisel;
carpenter's line (you can make it yourself).
Briefly about the main thing
The log house is most often made from pine or other coniferous wood.
The main advantage of a wooden log house is thermal insulation and environmental friendliness.
When choosing a log manufacturing technology, it is recommended to take into account the level of knowledge and skill. If it is not high enough, then it is better to contact specialists.
It is necessary to use high-quality thermal insulation and means to combat fungus and insects. This will extend the life of the building.
All logs for a log house must be treated with a fire retardant to avoid fire in the structure.
Ratings 0
How to mark logs for cutting into a bowl?
To prepare for cutting out bowls, they use a special tool - a carpenter's line, which is similar to a compass, only of a rigid design.
The span between the extreme points of the line is set in accordance with the diameter of the logs used and is equal to half of the lower or upper log.
The marking process consists of marking the contours of future cutting. When marking, follow several rules:
- install the logs the way they will be laid when assembling the log house (cross to cross);
- place the pointed ends of the bar on the parts to be connected;
- draw lines for the wood notch on both logs at the same time.
Types of logs used
Don’t think that the technology is a one-size-fits-all solution with no possibility of making adjustments. The greatest space for individual choice involves precisely the variety of the main material - logs. Or rather, the methods of preparing the wood. It must be said that Canadian technology requires considerable investment in building materials, so there will be an opportunity to save money.
However, you should start with the optimal solution for those who do not want to skimp on quality. In this case, you should prefer a scraped log. This material preserves the natural shape of the surface, which also increases the aesthetic advantages of the log house. The drawing of crowns in such a design is carried out with minimal tolerances, duplicating the complex shape of the elements. The option of planed logs is no less attractive.
All external flaws and defects of the log are smoothed out, due to which the drawing process is simplified. This is a durable and high-quality processed log, which is inferior to the scraped one only in aesthetic advantages. If you plan to cut log houses in Canada with minimal investment, then it is worth using a planed log, the drawing of which is carried out in one approach. However, the tolerances of “bowls” with grooves in this case increase, which may require caulking.
How to efficiently and quickly cut down?
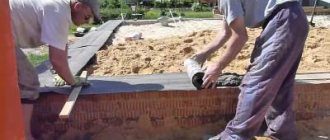
The term “cutting” has been preserved historically, although modern craftsmen, when building houses from logs, more often use a chainsaw instead of an ax. Highly professional carpenters also perform the lines for the notches with a saw. After marking the cutting areas, cut down or saw out the bowl in such a way that when assembling the log house, the log will lie down, embedded exactly halfway into the adjacent bottom row.
To ensure a tight fit of the crowns to each other, lengthen the selected bowl by choosing a longitudinal oval with a groove. Select the size of the additional notch depending on the local weather. The colder the winter, the wider it should be. To ensure a tight fit, equalize the depth and volume of the wood cut for the oval.
Check the correctness and accuracy of the work performed by test laying the logs. The precisely processed surface of the upper log should fit tightly onto the lower log with its entire plane. The laid part should not have any gaps or cracks. If they form, mark again and adjust the cutting until the logs fit snugly.
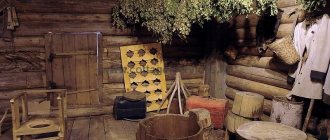
Photo: a lot of interesting things on this topic can be gleaned from old books written with the participation of experienced carpentry masters.
To seal the connections, use an additional cutting element - a tenon. If you are cutting a warm building, take into account the location of the annual rings, since the looser southern parts of the rings should be inside the log house. To maintain the level of the rows in the horizontal direction, do not miss an important point. In log houses, the butt of the log is alternated with its narrower part. To align the crowns, cut down alternately - first in the wide part of the log, then in the narrow one.
Creating a "saddle"
The base of the “bowl” is the “saddle” into which the logs are placed. It should also be noted that each joint must initially have a special tenon. Outwardly, it may seem that the classic tongue-and-groove installation technique is being implemented, but this is not entirely true, since the joint is made by bringing together rounded planes - that is, through “saddles”.
If you do the Canadian felling of log houses with your own hands, then you can make calculations using a simplified scheme. For example, in determining the depth of the “saddle” you should focus on the radius of the log, which will subsequently be laid in this niche. This creates an organic masonry with a tight connection of logs. In this case, it is necessary to retreat from the edge at least 25 cm, and the marking of the “saddle” itself should be done with a sharp nail or a chemical pencil, since ordinary pens and markers can easily be erased.
Final Tips
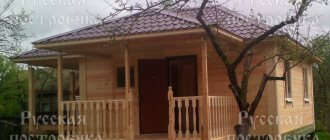
Having mastered the craft of a carpenter, you will save significantly on construction. Start learning the basics by making a log gazebo for the garden. Then, build a small bathhouse on your site. The experience gained will allow you to master the construction of a house. A technologically precisely manufactured log house will be warm and will give the building durability and reliability and provide exceptional environmental friendliness, especially if you use cedar lining for internal cladding.
On other pages of our website you can see a lot of interesting things about log houses and log baths.
Video description
In this video you will see how to caulk a log house with tow:
- Jute . An environmentally friendly type of insulation that retains heat well, but has a short service life (3 years) due to the fact that it strongly absorbs moisture.
Old jute is difficult to get out of the cracks, so it is rarely used. There are also differences between types of jute. For example, tow is too hard and has low density. Because of this, it is necessary to caulk the log house in several stages to achieve the desired density.
Flax-jute contains 50% flax fibers, so it requires additional treatment to prevent insects and rot. Jute felt consists of 10% flax fibers, but has high flexibility and good density. It also requires additional insect repellent treatment.
- Lnovatin . Due to heavy treatment with insect repellent chemicals, it is not environmentally friendly. It has a service life of 3 years and is attached to the structure using a construction stapler.
Felt made of jute Source drevtorg.rf
See also: Catalog of house projects made from hand-cut logs and timber
- Synthetic compounds . They cost more than other materials, but are easier to use.
Such substances are used in combination with natural material (cord). To do this, the thread is placed in the gap and filled with sealant, which is leveled with a small spatula.
The disadvantage of this method of sealing log cracks is that when exposed to sunlight, the sealant will dry out and begin to crumble. To do this, the place of putty must be covered with planks.
Also, synthetic compounds harden and can expand and contract with temperature changes, which can lead to cracks in the wood. To avoid this, it is necessary to use elastic compounds.
The right combination of sealing materials helps avoid the formation of damage and fungus, and also increases the thermal insulation of walls. This is necessary when constructing buildings in cold regions or when assembling a bathhouse, since in such rooms rapid cooling of the air can be critical.
Synthetic sealant for log houses Source td-artemov.ru
Butt connection
For beginners, the easiest option is to connect profiled timber using the butt method. The ends of the beams are cut evenly and fixed at the corners using steel brackets or plates with spikes.
However, this method of joining timber cannot be called very durable and airtight. Therefore, it is better to use it for non-residential outbuildings.
Butt connection of beams
To strengthen corners assembled end-to-end, dowels are often used - vertical rods made of hard wood (oak, birch, hornbeam).
Joining timber on a straight flat key (dowel)
A common corner joint method is the dovetail. It differs from the root tenon in its trapezoidal shape, which makes the contact area of the beams denser and more rigid.
Stage 9. Roof
Construction of a roof on males with layered raftersRafter system
As soon as the tree shrinks, you can begin building the roof. If you do this earlier, the roof will simply collapse.
Step 1. Place wooden beams on the wall framing (we have already talked about this).
Step 2. Fix the beams and attach the rafter legs to them in 1 m increments. In the ridge part, cut the rafters at the appropriate angle for the connection.
Step 3. Nail a solid board deck to the rafters (if you plan to use rolled roofing material) or make a sheathing (if you use slate, tiles, etc.).
Step 4. Install the roofing according to the instructions for the specific material.
Step 5. Cover the ridge with galvanized sheet steel to protect it from aggressive environmental influences.
Step 6. Cover the roof gables with siding or clapboard.
How to sew up a pediment
After this, proceed to further planned work - pouring a concrete screed or building a wooden floor (in the second case, the logs are cut into the logs of the second crown and fixed), install insulation, carry out interior finishing and arrangement of the steam room according to your project.
An example of a log house with a shingle roof. An example of a log house with a shingle roof. Eaves lining. Roof overhangs lining.
Nuances of work
To cut down a log house and make it resistant to bad weather, the logs are oriented with thin annual rings towards the street, and with thick rings - inside the future house.
To facilitate this process, the building can be built in parts. The crossbars (as these parts are called) are usually tied on the ground, aligned upward to the size of human height. Then each of them is disassembled and reinstalled on the base frame.
The optimal choice for a foundation for a wooden frame would be a pile option. It is lightweight and quite easy to install.
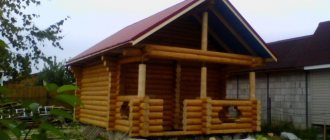
In the absence of the necessary experience, it is recommended to start the production of log cabins with the construction of something small and not very significant, for example, a garden gazebo or a small bathhouse. This will give you experience and develop the skills necessary to build a full-fledged house.
Having gradually learned the intricacies of construction, the master will be able to create something not only suitable for habitation, but also causing enthusiastic responses with its exquisite appearance.
Marking
Standard parameters for marking corner joints using the “paw” method can be found in GOST 30974-02.
The work methodology consists of the following stages:
- Using a tape measure, you need to find the center at both ends.
- Using a plumb line at the end of a smaller diameter, 2 straight vertical lines are drawn relative to the marked center. In the same way, 2 horizontal lines are drawn.
- The humps are trimmed and sawed off on all sides, leaving a distance of 10-15 mm to the marking. Then the ends of the workpiece are trimmed to the parameters specified in GOST. The result should be a prism with a square cross-section.
- Next, the vertical planes are divided into eight parts, and horizontal lines are drawn through them.
- Let's start trimming the logs.