Published: 03/17/2013 Heading: Materials and technologies, Repair
Adjustable floor - subfloor in the form of joists or plywood flooring
As a rule, flooring in residential premises is laid on a concrete screed and joists. A relatively new option is the construction of a subfloor in the form of logs or plywood flooring , the height of which can be adjusted using special rack blocks. This solution received a completely understandable name - adjustable floor .
The technology of adjustable floors involves the use of wooden logs or slabs (18 mm moisture-resistant plywood sheets), which are supported by stand-up bolts screwed into them, usually made of high-strength plastic. Turning the bolts around an axis changes the height of the joists or sheets, which allows you to accurately level the subfloor. After leveling the structure, the bolt is rigidly fixed to the base with a dowel-nail. In this case, the base can be either concrete (monolithic, hollow, with a screed) or wooden (beam). Sheets of moisture-resistant plywood are usually laid on top of the joists and any type of floor covering is fixed on them - solid boards, parquet, parquet boards, laminate, linoleum, carpet, etc. In order to save money, massive boards are sometimes mounted directly on the joists.
Why choose adjustable feet
Floors with adjustable joists have many advantages over other technologies, among them the following should be highlighted:
- light weight;
- the possibility of carrying out floor insulation work;
- speed of work;
- no need for the master to have special skills;
- the possibility of forming a multi-level floor;
- Possibility of laying flooring without installing underlay.
The adjustable support for the joists does not have an impressive weight, so it can be installed even on a rough surface with low load-bearing capacity. Any covering can be laid on such floors, and an additional feature of the technology is the ability to create free space between the subfloor and the finishing surface. Communications can be placed inside. Such work is carried out quite quickly; even a person who does not have special knowledge in construction can do it. Dirty work is excluded.
Areas of application
Thanks to the wide base of the racks and the uniform distribution of loads, the elements can be installed on any stabilized surface.
Manufacturers produce various modifications and series of adjustable floor supports, which significantly expands the scope of application of the elements. Since polypropylene posts are not afraid of high and low temperatures, moisture, and can withstand loads of up to 1000 kg per support, the products are suitable not only for laying joist systems indoors, but also for constructing structures outdoors .
Options for using adjustable supports outdoors:
- for arranging existing and green roofs;
- balconies;
- garden terraces, areas around swimming pools, ponds;
- design of terrace extensions, summer cafes, gazebos.
Which supports to choose
If you decide to build a subfloor using a jacking system, then the technology will involve the use of special threaded supports. They can be classified into metal and plastic. The latest type of adjustable joist supports are usually made of galvanized steel, so they do not corrode.
Such devices can withstand impressive loads, so they are used when renovating premises not only for residential purposes. The only drawback of such supports is that they contribute to the destruction of the concrete base. Over time, the pins dig into the material, which leads to the formation of cracks.
Plastic adjustable supports for joists differ from metal ones in that they are not as durable. However, the material is not exposed to moisture. If you install rack-bolts with small pitches, the floor will be able to withstand a load of 300 kg per square meter. Plastic supports will not create a load on the concrete floors, and therefore will not contribute to their destruction.
Flaws
The disadvantages of flooring with joists include the risk that the floor will creak; in an aggressive, humid environment, wood is not so durable. The issue of squeaking is practically reduced to zero when choosing high-quality, dried logs and the correct fasteners. Many people are confused by the possibility of laying tiles on such floors - this problem can be solved, the joists are installed in sufficient quantities to eliminate significant deflections in the canvas, and gypsum fiber is laid over the canvas. Gypsum fiber serves as a damper; even with large fluctuations in the size of the canvas due to changes in humidity, gypsum fiber is quite stable and does not provoke the tile to snap.
The material of the canvas laid on the joists is quite diverse: from the most budget chipboard to two-layer plywood. Planed boards, lining and OSB - you see, a very wide choice for flooring with joists.
Types of designs
Before you install an adjustable joist support, you should become familiar with the main types of structures. Floors can be made using one of two technologies. The first involves the use of dense chipboards, which change position using special structures and devices. They are installed according to the principle of a multi-layer cake.
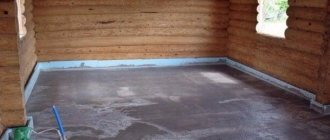
At the first stage, threaded anchor devices are firmly fixed to the base material. By rotating them you can change the position of the subfloor. Anchor floors will take on part of the load and ensure a strong connection between the system and the floor. Anchor devices can also be attached to floor beams with self-tapping screws; this is the second technology. Fixation can be carried out to concrete slabs that have a cavity inside. Fixation can be carried out to the surface of the concrete screed. When dowels are used for fastening, it can be fixed to a monolithic concrete floor.
Preparation rules
If you decide to install adjustable supports for joists with your own hands, then you need to select the type of adjustable structure and determine the height at which the rough flooring will be fixed. You need to focus on the floor level; its thickness should be subtracted when calculating.
When arranging the floor, the room is measured and a plan is drawn. If you have a drawing on hand, you will be able to calculate the amount of material and hardware for fastening. This will allow you to determine the arrangement of cut and solid elements. In any case, a ventilation gap should be left around the perimeter of the room, the width of which will be 1 cm. The same should be between the stakes and adjacent slabs.
Before installing adjustable supports for the floor joists, it is necessary to determine the distance between the holes, which will depend on the installation of the finished floor covering. For an ideal dry screed under linoleum or floor tiles, approximately 30 cm should be maintained between the axes of the holes. Between the central points of screw devices, the maximum distance is 50 cm. This is true when leveling is carried out with slabs. But for logs this parameter is 45 cm.
If a design with adjustable joists involves laying plank floorboards at the next stage, then there is no need to nail plywood to the joists. The board is immediately attached to the beam; this should not be forgotten when you think about what the level of the subfloor should be.
Algorithm for creating a floor on slabs
The second type of flooring is done on slabs. It is chosen if the height of the floor should not exceed 3 centimeters. It is difficult to hide communications in such a space between the base of the floor and the covering, but it is quite possible to place cables from the telephone or the Internet here.
The process of installing this type of floor is somewhat reminiscent of installing an adjustable floor on joists.
Algorithm for creating a floor on slabs
Materials and tools
Before installing an adjustable floor on slabs, you need to prepare the following tools and materials: sheets of plywood or other material, bushings, stand-up bolts, drill, self-tapping screws, hammer, water or laser level.
| Type of plywood | Description |
| Plywood FC | moisture-resistant appearance; urea resin is used for gluing veneer sheets. This plywood is intended for indoor use. |
| FKM plywood | has increased water resistance and is made on the basis of melamine resins. This type of plywood is unique, since environmentally friendly melamine resins are used for its production. Due to its environmental characteristics, plywood is used in furniture production and for interior finishing work. |
| Plywood FSF | Veneer sheets are glued together using phenolic resin. This type of plywood also has increased water resistance. It is not recommended for interior decoration, as phenolic resins are harmful to health. Typically used for exterior finishing work |
| Laminated plywood | It is based on FSF plywood, which is covered on both sides with a special film. Laminated plywood is used for the manufacture of formwork. This type can be used repeatedly |
| Bakelized plywood | Bakelite resin is used to glue veneer sheets together. This type of plywood is used in aggressive climates, sea water, aggressive environments, and sometimes for monolithic work. |
| Marine plywood | similar to bakelized, but less durable. Made from foreign wood species |
| Plywood Flexible | foreign version. A distinctive feature is the ability to bend well in the transverse and longitudinal directions |
Video - Which plywood is better
Preparatory stage of work
- Just like when installing an adjustable floor on joists, installing a floor on slabs requires certain preparation of the working surface of the floor. Be sure to remove excess debris and correctly distribute communications that you plan to hide under the floor. Remember that the maximum lift height will be about 3 centimeters.
- Carefully place the sheets around the perimeter of the room. The distance between the sheets should be 2-3 centimeters on each side of the sheet.
- Mark the points for drilling holes. With a sheet size of 1.5 by 1.5 meters, 9 holes will be enough. One hole should be located in the middle (center of the sheet), four holes can be at the corners of the sheet and four more should be located in the central part of each side of the sheet. This arrangement of holes will ensure reliable fastening of the sheet.
Instructions for installing an adjustable floor on slabs
Installation of sheets
Fastening plywood
- After we have marked the holes, we begin drilling. We take a drill with a special attachment with an extended tip.
- We insert stand-up bolts into the drilled holes. We attach the bushings to the underside of the bolts using small self-tapping screws.
- Once the bolts are inserted and secured into each hole on the sheet, we turn the sheet over and place it on the subfloor.
- We drill holes in the concrete base through the post bolts and insert dowel nails into these holes.
- Hammer the nails exactly halfway.
Installation process
Adjustment
- After preparing and installing the sheets, we proceed to their alignment and adjustment. To make adjustments, we use a special key, as well as a water or laser level.
- After carefully adjusting the height of the sheets, we carefully cut off the extra centimeters of the post bolts.
- Using a hammer, drive the dowel nails all the way to the base of the floor.
Instructions for installing an adjustable floor on slabs
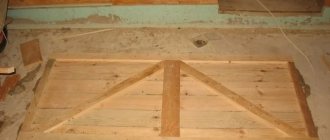
DIY adjustable floors
First and second layers of plywood flooring
First and second layers of plywood flooring
Final stage
- If necessary, we place thermal insulation or sound insulation of the floor on top of the sheets.
- After installing the sheets, we also lay out laminite, tiles, parquet, linoleum or any other selected floor covering.
Installing an Adjustable Leg with Leveling Plywood
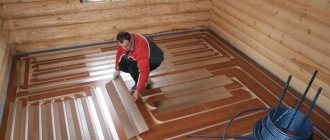
If you are installing an adjustable support for joists, then at the first stage you should drill holes in the plywood used as flooring. The distance between them should depend on the expected load on the coating. On the reverse side, threaded bushings are inserted into the holes, then the stand-up bolts are screwed into them.
The element is installed on the ceiling, and then the structure is attached to the surface. The base is leveled by rotating around an axis. The remaining bolts that will be visible above the surface should be cut off and another layer of flooring installed. The seams of the first layer should not coincide with the seams of the second, which will prevent a violation of integrity.
Usage
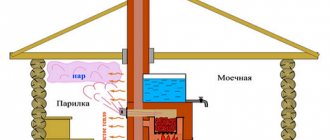
This method of leveling floors is, first of all, convenient to use where there are a lot of communications and it is necessary to remove them into the underground space
For example, in server rooms and at transformer stations, and also, if necessary, to hide all pipes and other communications in the house. The adjustable leveling design allows you to quickly achieve a level floor and can be successfully used in both new and old buildings. Unlike a concrete screed, the load on the floor in this case is minimal, which is especially important in old buildings. This floor design is ideal for installing multi-level floors. Today, adjustable floors are successfully used both in the residential sector and in public buildings for various purposes
They are used in television studios, control rooms, classrooms and classrooms, conference rooms, gyms, sports facilities, various warehouses and production facilities.
Today, adjustable floors are successfully used both in the residential sector and in public buildings for various purposes. They are used in television studios, control rooms, training rooms and auditoriums, conference rooms, gyms, sports facilities, various warehouses and production facilities.
Second option for installing an adjustable support
This technique involves the installation of adjustable joists, which will be located on the rough surface. The logs will be lowered and raised by rotating bolt posts. At the first stage, anchor bolts are screwed into the logs. To do this, holes should be drilled in them.
The logs are installed on the rough surface. The distance between them should be determined by the characteristics of the future floor. Through each anchor it is necessary to drill holes in the concrete or wooden beam, and at the next stage a self-tapping screw or dowel-nail is installed there. Now you can perform alignment using a level. The protruding parts of the bolts are cut off, and then you can begin laying the rough mass.
DIY adjusting anchor
If you decide to install metal adjustable supports for the logs, then you can make the anchor yourself. All elements should be purchased at a building materials store. For the control device you should prepare:
- hairpins;
- drive-in anchor;
- nut;
- metal plate;
- washers.
The plate is fixed to the stud with a bolt and nut. The latter will be used to make adjustments in the future. Another nut and bolt are needed to secure the beam from above. In order to install the nut, a groove should be made in the joist so that the element does not interfere when the flooring is laid.
Conclusion
The process of installing an adjustable floor itself, as you understand, is not particularly difficult; all the work may be familiar to many. Your biggest concern should be the quality of the building materials used in this process. You should not save on this, as you will have to invest in repairs in the future.
In the video presented in this article you will find additional information on this topic.” width=”640″ height=”360″ frameborder=”0″ allowfullscreen=”allowfullscreen”>
Adjustable support with studs and corners
If you do not want to purchase ready-made devices, then you can install floors with studs. The price of the structure will be lower, and the characteristics of the floor will not be inferior to that assembled using ready-made structures. If you use corners in your work, they must be firmly attached to the base. This method is suitable for cases where the use of hairpins is not possible. The lags are fastened using this technology in the case where the subfloor has a weak base. The size of the corner will depend on what level you want to raise the surface to.
Additional recommendations for constructing a system with adjustable joists
If you install adjustable supports under the joists, it is important to mark the points at which holes will be drilled in the beam for the plastic bushings. To drill the first hole, you should retreat 10 cm from the edge. The distance that remains minus from both ends must be divided into equal segments. It is necessary to leave a distance between the side plane of the first joist, the ends and the walls.
The pitch between the lags should be the same. Row logs are positioned so that the edge of each sheet of plywood rests on the timber. A centimeter gap should be left between the plates. When installing adjustable supports for the logs, holes for the supports should be formed at the designated points on the beam, which are then screwed in with screws. Only the outer bolts are installed flush with the plane; it is with the help of them that the adjustment will be carried out.
How to cover logs
Materials can be varied, from rough to finishing. For subsequent finishing, you can lay a regular edged board - this option is more suitable for a private home. Sheet materials are suitable for both private and apartment buildings. It can be plywood, chipboard, OSB. All these materials are considered rough, with subsequent installation of linoleum, laminate and parquet boards. With additional gypsum fiber flooring, tiles are laid.
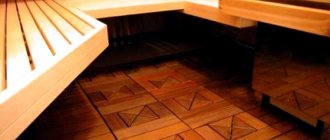
The finishing coating includes floorboards and lining. Their further finishing consists of sanding and painting (although it is often useful to do this before installation).
As a sheet material, I would like to mention plywood - it is strong, durable and tolerates moisture well. Due to the different orientations of the veneer layers, plywood is less susceptible to variations in size. There is, however, one unpleasant drawback: in most cases, the thickness of the sheets may differ slightly by 1-2 mm, and the difference may be present at different ends of the same sheet. Because of this difference, for linoleum flooring, for example, you will have to putty the seams. However, despite this, plywood is considered the best material for adjustable floors - 10 mm plywood in two layers is the most durable solution. Plywood no thinner than 18 mm is placed in one layer.