Floor screed is an intermediate layer between the base and the finished floor.
Screeding is a very important step in the rough renovation process. The quality of the final floor covering depends on the quality of the screed, namely its evenness, absence of differences, and strength characteristics. In order for the screed to be strong and not crack, it is very important to correctly and accurately calculate the thickness. In this article we will tell you what the minimum thickness should be for semi-dry and regular screeds, as well as what layer the screed should be laid over electric and water heated floors.
Semi-dry floor screed and its features
The basis of the semi-dry screed solution is a classic cement-sand mixture. To reduce the proportions of water in the mixture, when mixing the solution, a special polymer composition, fiber fiber, is added to it. Adding this composition allows you to reduce the proportion of water and make the screed semi-dry.
The solution for semi-dry screed must be mixed mechanically. Fiber fiber is added at the last stage of mixing, according to the instructions received when purchasing it.
The best solution for semi-dry screed is obtained by mechanically mixing the solution in special installations. After mixing, the solution is supplied through a pipeline to the desired floor of work.
Surface preparation
- Carefully inspect the floor: tap with a hammer to find loose areas of cement, remove them using a hammer drill, and fill the resulting voids with cement mixture. Expand and restore cracks, knock down noticeable bulges.
- The interface lines between the floor and walls must be treated with cement mortar, even if there are no cracks in these places.
- After this, remove stains of oil paint and grease from the base and vacuum it thoroughly.
Floor construction with semi-dry screed
- A semi-dry screed is made on concrete bases or an earthen floor with appropriate preparation (a cushion of sand, crushed stone and a rough concrete layer).
- A layer of polyethylene or other rolled waterproofing material is laid on the rough subfloor.
- A damper strip is laid along the perimeter of the room to the height of the screed. It separates the screed from the walls of the room and “transfers” it to the class of floating screeds.
- In apartment rooms, semi-dry screed does not require expansion joints. It is enough to make transitional seams between rooms in the doorways.
general information
In the process of making semi-dry screeds, dry ready-made mixtures have become more often used, which make the work easier and more convenient. A mesh made of steel material or fiberglass is selected as a reinforcing substance. To reduce the load on the floor and improve the strength characteristics, purchase fiberglass.
The concrete mixture dries much faster due to the small amount of water. The average period is 5-6 days. These figures are approximately 5 times faster than pouring a “wet” screed.
The semi-dry version of the subfloor installation can be done both on concrete floor slabs and on a wooden base. The room where the installation is carried out, as well as the subsequent floor covering, will not play a role. The main thing is that the technology is followed at all stages.
It is worth noting that the thickness of the semi-dry screed is determined very carefully. The height of the finished cake is influenced by certain factors.
Semi-dry screed device
- The screed solution is supplied through a pipeline to the apartment and scattered over the area of the room;
- Next, the solution is compacted (usually with feet);
- For semi-dry screed, there is no need to install profile beacons. The level of the screed is measured, and beacons of the screed itself are made according to the level;
- The compacted solution, or rather not a solution, but a mixture, begins to be leveled using the rule. As a rule, you need to apply constant pressure and, as it were, press the solution.
To level the mixture of semi-dry screeds, special tamping slats are produced and made by hand. For compacting industrial floors, there are special leveling units.
The need to determine the minimum
The minimum thickness of a semi-dry screed should be determined in the case where there are installed communications or a heated floor system. By making a very large layer of subfloor, the distance from the floor to the ceiling is reduced. This is especially noticeable in low rooms.
Above the heated floor level, the minimum thickness should be 35 mm. This level is established immediately after the completion of all its elements. A thick floor increases the cost of heating the room, since the screed itself is saturated with heat for a long time, not to mention another obstacle - the floor covering.
The large thickness of the floor puts pressure on the ceiling. It appears most often on balconies. And the drying time will immediately increase. The material tends to expand over time. This can subsequently cause pressure on the walls if the layer is too massive.
If the mixture does not include any additional reinforcing substances, then its minimum thickness should be 40-50 mm. You can tell a lot about thickness by looking at the packaging for the mixture. Recommended parameters are always displayed there. Manufacturers always worry about the bottom line.
According to SNiP, when laying a semi-dry screed immediately on the floor slab, it must be at least 20 mm thick. If there is an additional layer of waterproofing - 40 mm.
Price of semi-dry screed
Typically, the price of a semi-dry screed with material is 20 USD. per meter The maximum height is usually 16 floors. Productivity is 180-200 meters per working day.
Floor Installation Instructions
- Instructions for installing semi-dry floor screed with fiberglass (fiber)
- Instructions for applying polymer self-leveling floor
- Instructions for laying laminate flooring
- How to prepare the base for a screed
- How to make a cement-sand screed correctly
- How to make a screed
- How to install cement-polymer floors
- Installation of electric heating on a wooden floor
- DIY bath floors
- About the site
- Marking the screed level: three ways to mark the floor level
- Screed care
- Installation of wet and semi-dry cement-sand screed
- Mixing the screed mortar
- Beacons for screed: types of beacons for screed
- Damper connection for screed
- Types of floor screed for apartments and houses
- Checking the floor for clearance
- Preparing the floor for cement-sand screed
Allowable maximum
The maximum thickness of a semi-dry screed depends on the need to hide communications and unevenness of the subfloor. Sometimes, with large differences and unevenness of the base, the thickness of the screed layer can reach up to 150 mm.
If it is necessary to make a screed of greater thickness, use expanded clay flooring, which will help reduce the specific weight of the screed and save costs on the material.
If there is a heating system inside the screed, the thickness of the screed directly depends on the diameter of the pipes.
The thicker the layer of semi-dry screed, the higher the loads the floor in the room can withstand during operation.
Materials and tools
The third surprise awaited me when I studied the need for materials and tools. Almost every article about semi-dry screed talks about a concrete mixer and a trowel. I naively believed that teams that do the work manually rent these machines. Imagine my surprise when, upon arriving at the site, I saw:
- several bags of M500 cement;
- a pile of sand;
- large sieve;
- several packs of fiberglass;
- plastic film;
- a stack of metal reinforcing mesh;
- a screwdriver with an incomprehensible hook;
- underlay for laminate;
- construction gun with hot glue;
- twisting copper wire;
- laser level;
- rule;
- roulette;
- construction pencil;
- bucket;
- plastic cup;
- two plaster floats;
- shovel;
- several metal pipes about 3 meters long;
- metal hook about 1.5 m long;
- construction knife;
- two pairs of concrete shoes.
These are concrete shoes.
No concrete mixers or trowels.
The presence of some tools and devices was surprising. I could not understand their role in the technological process. Even while changing into work clothes, I bombarded the builders with questions. I received detailed answers.
Cement. To get a solid base, it must be in a semi-dry mixture of the M500 brand. As a last resort, M400, but with a shelf life of no more than 2 months. No M300 brands. I knew why the foreman focused on the shelf life - every 6 months of being in the warehouse, the grade of Portland cement drops by 100 units. Was M500, sat for six months, became M400.
Sand. You need quarry sand - only it has a fineness modulus of up to 2.5 units. A little clarification is needed here: according to GOST, such sand must first be sifted through a sieve with a hole diameter of 25 mm, and then 14 mm. Everything that did not pass through the last sieve must be used. There should be no clay in the sand, or rather, no more than 3% of fine clay inclusions are allowed; accidentally introduced plant debris is completely excluded. The humidity is natural, which means any.
For information: the teams, as if by agreement, sifted the sand only once, through a fine sieve. Large pebbles rolled off the mound of cement as it was mixed. They were constantly being removed. It’s faster, but it doesn’t affect the quality of the work.
Fiber fiber. The reinforcing mesh does not prevent the appearance of cracks on the surface, but rather prevents their growth. Therefore, polypropylene fiber is introduced into the solution, which ensures the integrity of the surface.
Screwdriver. The hook inserted into the cartridge allows you to quickly twist the copper wire when tying the reinforcing mesh. This is the first time I have encountered this, although I was assured that this method has been used for quite a long time.
Pipes. Used as beacons. Only they do not deform when driven into an already laid solution.
Shovel. There are several types of shovels. There must be a scoop (popularly known as a shufel, hence the name “shufel”).
Substrate - used instead of damper tape. I cut it into strips and attached it to the wall. It's much cheaper that way.
Hook. SNiP recommends laying the reinforcing mesh on the screed layer and covering it with a second layer on top. The team works differently - they place a mesh on the base of the floor, pour a bucket of mortar onto it and use a hook to lift it up a little so that it is inside the screed, in its lower part. Simple and fast. A beautiful solution to a technological problem.
Hot-melt adhesive - glue the cut backing to the wall.
Glass - pour water into the solution, or rather onto a hill of sand and cement.
Copper wire - needed to bind the metal mesh.
Plastic film - the solution is first prepared on it, and then the screed is covered with it.
The purpose of the remaining tools is self-explanatory.
Calculation of material requirements
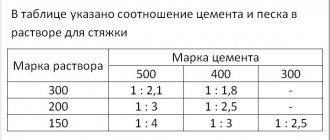
The required amount of materials is calculated using the following algorithm: the thickness of the screed is multiplied by the area of the room in square meters. This gives the volume of fill in m3. Next, look at the table, which shows the amount of cement per 1 m3 of mortar grades M150 and M200 and multiply by volume. We divide the results obtained by the weight of the material in the package and determine the number of bags of cement and sand after rounding up.
Table 1. Consumption of cement and sand per 1 m3 of solution.
| Cement brand | Material consumption per 1 m3 of solution | |||
| Solution grade M150 | Solution brand M200 | |||
| Cement, kg | Sand, kg | Cement, kg | Sand, kg | |
| M400 | Z90 | 1310 | 490 | 1350 |
| M500 | 370 | 1350 | 410 | 1400 |
Care after installation
For after installation care you need:
- remove the beacons and seal the cracks with mortar;
- Smooth the floor surface with a trowel after preliminary drying.
Next, it is recommended to cover the floor with film and wet the concrete with a spray bottle (0.5 l/m2) for the first 2-3 days. This is necessary so that the hydration process has time to go through (the cement has crystallized), since if the water dries out too early, the screed will become more fragile.
In rooms with an area of more than 25 m2, on the second day it is recommended to make an expansion joint, the width of which will be 3 mm and the depth will be 1/3 of the thickness of the concrete layer. This cut needs to be made in the middle of the screed.
More information here.
What affects the layer thickness
The thickness of the concrete screed is determined taking into account several factors. If they are not taken into account, the foundation will not be reliable and durable:
- The condition of the floor slabs, due to the presence of a large number of flaws and deviations in level, it is necessary to make a thicker coating, otherwise the floor material will not be laid evenly;
- The type of material used, the quality of the material may require an increase in thickness to obtain the desired functional parameters from the surface, and vice versa;
- Laying insulating materials, if it is necessary to additionally install other layers, the thickness will increase.
An excessively thin layer may collapse over time due to external factors. But creating too dense a coating can have negative consequences. The distance from the floor to the ceiling base will decrease, or too much load will be placed on the base.
What affects the thickness of the screed
The main criterion for the design height of the screed is its purpose. This design is necessary in the following cases:
- creating slopes for draining liquids in bathroom stalls and bathhouse washrooms;
Beacons for creating a slope with concrete.
Floor slabs cannot be laid perfectly evenly.
Raising the floor level on the balcony.
Communications running along the floor are masked with a layer of concrete.
It is quite natural that to solve such dissimilar problems, the default minimum thickness of the screed cannot be the same.
Recommendations SP 29.13330
According to building regulations, the thickness of the floor screed must be as follows:
- 20 mm is the minimum for sand concrete, ensuring operation without destruction of the layer;
- 40 mm - if acoustic and heat-insulating materials are used in the screed cake, the height is measured from their surface, in fact it reaches 140 - 190 mm (if counted together with materials);
- Dt + 45 mm - the concrete layer above the heated floor contours laid inside it must correspond to this value.
Screed with heated floor.
Important! The specified values are valid only for concrete screeds made from CFRP.
Not only the height of the screed is standardized, but also the strength grade of the mixtures used:
- B12.5 – for monolithic concrete structures;
- B15 – for sand concrete;
- 20 MPa - since dry mixtures do not have an indicator of brand strength, the permissible strength limit of the hardened mortar is used for them.
When using concrete, self-leveling floors and other ready-made packaged mixtures, it is necessary to take into account the following nuances:
- the design rigidity/hardness is given to them by filler (sand, crushed stone, polymer additives);
- therefore, the screed layer should be 1.5 times larger than the fraction of this filler.
Important! For the convenience of the developer, manufacturers indicate the necessary information on the packaging of their products. If concrete is mixed on site from imported crushed stone and sand, or delivered by mixer, the developer must additionally control this characteristic.
In contrast to the permissible minimum leveling layer, the maximum thickness of the screed is limited by the design solutions of specific projects:
- level of finishing flooring in individual rooms;
- the number of insulating materials inside the screed and the thickness of each of them;
- availability of communications, underfloor heating circuits;
- economic efficiency to save construction/finishing budget;
There are no strict restrictions here, however, it should be noted that at a height of 10 cm or more, floor screeds automatically become reinforced concrete slabs. They must be reinforced with wire or reinforcing mesh:
- in the lower level - to absorb operational loads, distribute them evenly and transfer them to the lower structures (soil, floor slab, footing);
Reinforcement of the leveling layer.
Important! The basic principle for floor structures is that the bottom layer should be stronger than the top. That is, the screed must be laid on solid foundations and ensure absolute immobility of the floor covering on top of it.
Therefore, the floor slab is first visually inspected, cracks are sealed, loose areas are removed or strengthened with special compounds.
Screed materials and technologies
The height of the structure is influenced by the material from which it is made. Even when using a cement-sand mixture of DSP for mixing sand concrete, the proportions of the components may change. This applies mainly to the water-cement ratio (W/C):
- reaches 0.75 in ready-mixed concrete;
- does not exceed 0.45 units in mixtures for semi-dry cement screed.
A mixture with a minimum VC ratio for semi-dry technology.
Therefore, the following thickness values for structures manufactured using these technologies are accepted:
- 3 cm minimum for wet screed;
- 4 cm for semi-dry screed.
Important! These design characteristics are valid only in the absence of insulating layers and engineering systems that need to be laid inside it. When using a heated floor, sound-absorbing material, the thickness automatically increases.
Self-leveling flooring is a universal material; it is used both for rough screeds and for finishing floor coverings. It costs much more than DSP, so it is usually used in combination with DSP:
- sand concrete is used to level out significant irregularities of 3 cm or more, achieve the design level of the structure, cover engineering systems, reinforcing mesh and acoustic materials;
- a 5-10 mm layer of self-leveling floor is poured on top, which has self-leveling properties;
Combined leveling with different materials.
This allows you to quickly complete large volumes of work without carefully leveling the not very plastic sand concrete. Then it is ideal to level the floor plane with expensive material with minimal expense.
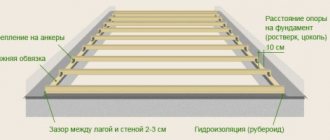
These are structures consisting of a frame and sheet material: plasterboard, plywood, OSB. Here the minimum indicator is 4-5 cm. The thickness of the floor is formed not only by the cross-section of the frame elements, but also by the thickness of the sheets.
The convenience of this option is not only due to the absence of wet processes:
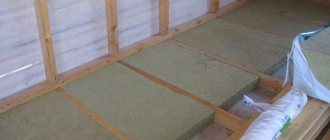
- Insulation or water heating pipes can be laid between the frame elements;
- such a floor has a high rate of maintainability, this applies to both the design and communication systems;
- the insulation can always be replaced with a more efficient one, for example, expanded clay on polystyrene foam boards;
- the load on the base floor is minimized;
- low price of materials and work;
- speed of construction processes, no need to wait for the cement mortar or bulk mixture to dry;
- the result is the smoothest possible surface.
There is another option for dry technology, which is offered by. This is an insulated floor, covered with paired plasterboard slabs, under which expanded clay gravel is poured. Knauf recommends making expanded clay bedding 1.5 cm. The maximum value is 4 cm. This does not take into account plasterboard boards.
Advantages and disadvantages
About two years ago, I already prepared a material where I considered the strengths and weaknesses of semi-dry technology (you can see it here). Practice has made its own adjustments: something had to be removed, something had to be added.
The advantages include:
- strength. A number of experts claim that it is higher than that of concrete due to the absence of cavities (voids) that remain after the evaporation of excess, unbound water. This point of view is refuted by the density of the material: it is higher in concrete. And at school they taught that the higher the density, the stronger the material. You can easily check: stand on a thick layer of foam rubber and 2-3 mm metal. What is deformed? That's it. Therefore, such statements can be explained by advertising of semi-dry technology. However, a little less strength is enough for residential premises. The exception is a fireplace (not all types) and a stove;
- durability. Experts talk about an operational life of 50 years or more. It has not yet been possible to test it in practice - the technology found application in the mid-90s of the last century (not even 30 years ago);
- a smooth surface after the solution has set - obtained after grouting by machine or manually;
- the ability to walk directly on the screed. You can walk, but only in special shoes: concrete shoes;
- there is no risk of spilling water on neighbors below. It simply isn't here;
- The installation process does not leave any dirt. After the completion of the work, literally in 10 minutes the auxiliary premises were restored to their original condition;
- high speed of work completion - the three of us, although what kind of assistant am I, in a room with an area of just over 24 m2, the work was completed in about 6 hours;
- installation can be done on any floor surface: be it concrete, rough wooden floor or soil. My doubts about the soil (as it subsides, concrete collapses) were dispelled by the foreman. Concrete is brittle, which is why it cracks under low bending loads, while cement stone has much higher bending strength. Tested in practice. I understood this in my own way: a thicker, yet reinforced screed is naturally more stable. Analogy with reinforced concrete floors;
- There is no shrinkage or cracking of the surface. I agree about shrinkage, there is practically no shrinkage (at least I haven’t seen it) if the solution is well trampled (compacted), but cracks appear in the absence of fiber reinforcement. The mesh doesn't help either. By the way, she has completely different tasks;
- compatibility with “warm floors” - all operational characteristics allow this;
- You can hide communications in the leveling layer. No problem;
- repairs can be continued after 72 hours - ceramic tiles and porcelain tiles can be installed with glue without any questions; other types of flooring will have to wait. In some cases, laminate, up to a month.
disadvantages , but they are contradictory:
- Experts unanimously say that without knowledge, experience and the presence of small-scale mechanization, laying a semi-dry screed with your own hands is extremely difficult, or rather, impossible. I wrote about this too. I repent. From personal experience I was convinced that, if desired, everything lends itself to skillful hands and a bright head;
- Another expert statement: the slightest errors in the amount of water in any direction negatively affect the strength of the solution. But what do we mean by the slightest mistake? In one team, 17 liters of water were poured onto a bag of cement, in another - 20. The result was the same. In passing, I note that with the mechanized method of preparing the solution, 15 liters of water are taken per 25 kg of cement;
- continuity of the technological process. This applies only to mechanized pouring - you need to have time to distribute the supplied solution throughout the room within an hour, tamp it down and rub it in at the same time. When working manually, you can smoke, but only between batches;
- strict requirements for sand - it must be of a certain fraction (therefore river sand is not suitable) without clay and stones.
Characteristics
Semi-dry screed has the following characteristics :
- the strength of the mixture when using concrete grade M150-250 is from 150 to 250 kg/cm2;
- drying shrinkage – 0.2 mm/m;
- the minimum layer thickness is 30-40 mm, and the maximum is not recommended to be more than 5-6 cm;
- Concrete drying for foot traffic takes 12-24 hours, and complete drying takes 3-4 weeks.
When using fiberglass to reinforce the solution, the maximum permissible layer of concrete is 80 mm, and the minimum is 1 cm, but as the thickness increases or decreases, the likelihood of deformation of the floors from excessive load increases.
Too much or too little concrete can cause the screed to crack.

