Wood is the traditional, main material for flooring, despite its inherent disadvantages. Its structure is based on organic substances: this makes wood less resistant to destructive factors compared to other types of building materials. In addition to oxidation, and both metals and concrete are susceptible to this process, wood fibers are threatened by biological organisms, sunlight, water, and fire. To extend the service life of structures, builders make certain efforts aimed at improving the operating conditions of wooden parts or giving them new properties.
Types of structures made of natural wood
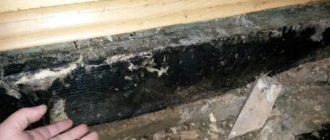
Since any type of tree is a material that can easily rot, the question remains relevant: “How to treat floor joists?”
As mentioned above, moisture does not get under the flooring from the external environment, but it is present there. This means that condensation is accumulating under the floor surface. The reason for this phenomenon lies in the difference in air temperatures between the room and the basement below it. However, the difference between them can be significant.
All this means that treating wooden joists is really necessary. In addition to rotting, wood is a favorable breeding ground for various insects that can completely destroy the wooden floors of a building. This should not be allowed. Pests need to be destroyed.
There is no perfect solution for how to treat underfloor joists. The choice largely depends on the type of wood that was used to install the floor structure. The water environment can affect each wood species differently. The fact is that the microclimate in the floors of each of the constructed houses has its own characteristics, and they depend on many parameters.
Where houses are built, the climatic conditions, as well as the soil and air humidity, differ. Solving the problem of how to impregnate the logs should be approached responsibly.
Factors determining the suitability of timber
When choosing timber for joists, an important aspect is the moisture content of the wood
. To be completely sure of the quality of the floor, it is advisable to know in advance the history of the origin of the wood from which it is planned to make the beams. The tree must undergo the first antimicrobial treatment at the stage of primary sawing. Moreover, the duration of its implementation is strictly limited: 12 hours after cutting.
The second important point is drying. According to standards established since 1925, all timber must undergo a mandatory period of closed warehouse storage. Coniferous wood is aged for at least a year, oak - more than two years. In this case, the humidity indicator is important: for pine and spruce it should be 15–18%.
If, to place a steam room in a bathhouse, you make logs from raw wood and lay them on a damp foundation, they will collapse in a year or two. The preservative coating will turn the timber into a closed incubator for mold growth. It follows that you need to coat a material that is guaranteed to have undergone preliminary preparation and drying.
DIY floor made of wooden material
Making a wooden floor has its own technology:
- Wood preparation.
- Arrangement of sheathing.
- Laying insulation.
Second or third grade wood can be used as subfloor beams. Those sides of the beams on which the flooring will be laid should be leveled.
You can install logs in two ways: on the floor or on the base.
According to the first method, it is necessary to lay the logs of the lower trim and make grooves in them in those places where the logs of the upper trim will be laid. The depth of the grooves is equal to the width of the upper beams.
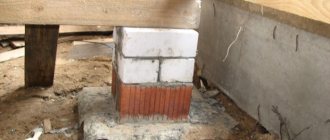
The harness must be securely installed. To do this, make brick columns that will serve as support for the logs.
The installation of the posts is carried out at the initial stage of the subfloor. This design is also called a “column foundation”. The technology is like this:
- Along the line of the ceilings, holes are dug at the same distance from each other. Pit size: 20x20x40 mm.
- Layers of gravel and sand are poured onto the bottom, compacting well. Then lay the reinforcing mesh.
- The holes are filled with sand-cement mortar. Cement, sand and water are taken respectively in the following proportions: 1: 3: 0.5.
- Roofing felt is laid on the hardened concrete.
- Brick columns are built.
The distance between the logs depends on the thickness of the wood material: the thinner the timber, the closer the logs are located. The laid beams must be secured to each other.
Installing a log “at the base” involves removing the top layer of soil and filling the surface with small crushed stone. Overlapping logs are laid on the resulting base, as in the previous version.
A waterproofing film is laid on the lower base, and a layer of insulation is laid on top.
At this stage it is necessary to decide on the finishing coat. If it is sheet material of chipboard, then before laying it it is recommended to make a sheathing of transverse bars, which are secured to supports.
Sheets of flooring are laid on the sheathing so that their joints are located in the center of the lintels.
Treatment of floor structures from rotting
Without taking measures to prevent rotting of any structures made of wooden elements, including floors, any structure will require major repairs as soon as possible. The domestic market offers a wide selection of effective means to treat logs against rotting.
According to both specialists and home craftsmen, a product called “Senezh” has proven itself best, but, unfortunately, it cannot be called universal
When purchasing it, you should pay attention that an individual composition has been developed for each tree species. The cost of the product depends on it
This antiseptic contains approximately 10 different drugs. In addition, the way they are used is also different.
It was for lags that the drug “Senezh Ognebio” was created, which:
- perfectly protects wood;
- applies effortlessly;
- has an affordable price;
- able to prevent fire in a wooden house;
- is an excellent biological protection of bars.
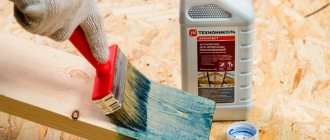
This product, shown in the photo, can be used to treat all areas of wooden joists without exception. "Senezh Ognebio" is also used for impregnation of log structures.
Once applied to wooden elements, the preparation protects against fire for a period of up to 3 years. When a professional antiseptic is used for floor joists, this period increases to 5 years. If we talk about bioprotection, the period of effective action is about two decades.
In addition to this, one of the most effective antiseptics on the domestic market, there are other high-quality preparations on sale that protect wood from rot.
Some experts recommend using hot transformer oil for processing logs, because it:
- It can penetrate deep enough, sometimes up to several centimeters, into wood.
- Embalms the material, changing its original properties.
Sometimes home craftsmen use used motor oil to protect logs from rotting processes, although professionals strongly do not recommend using it for such purposes. The fact is that this product smells unpleasant after application and it will be uncomfortable to stay in the room for a long time.
Services of professional craftsmen
Antiseptic treatment of the internal walls of wooden buildings is an important and responsible job that requires care and precision. Therefore, it is best to entrust it to professionals.
offers its services for interior processing of a wooden house. The work is performed by qualified specialists with extensive experience. We use safe and certified products, which we select individually, taking into account the characteristics and condition of a particular object.
You can send your application or contact us by phone; you will find our contact information in the “Contacts” section.
Calculate the cost of painting and insulating your home right now
Select types of work:
Select materials:
Best answers
NV-StroyTerminal:
Pirilax-Lux For external and internal work, risk areas. For harsh conditions (swampy areas, southern subtropical regions, Far North). Has two-level antiseptic protection. Destroys mold and wood-staining fungi, algae and prevents their reappearance. Protects against wood-boring beetles and termites.
Anna Grushevskaya:
for prophylaxis, antiseptics, but already damaged areas should be replaced, the grinder cannot be removed
3:
lime
Dimon Rumyantsev:
Senezh antiseptic
Alexander Senin:
how scary it is... but since it’s antiseptics. There are a lot of them right now. from everything. And if you want it to last forever. then treat it with bitumen. will last forever. I saw a house 160 years old. the logs were like new. The sleepers are also being processed. They lie on the street for just as long.
Alex:
superarch /materialy/lnyanoe-maslo-dlya-drevesinyi
Compositions for chemical protection of wooden elements
Impregnations penetrate 15–35 mm into the fibers
The main way to prevent rot from forming is to use chemical coatings on the floor joists. All SNiP protective fluids are divided into several groups:
- surface applied antiseptics;
- impregnating compositions;
- film-forming substances.
According to SNiP, materials for surface antibacterial protection can be:
- water soluble;
- organic;
- oil
The first group includes salts (fluorides), borates (washable antiseptics), as well as compounds containing chromium, copper, arsenic, which are called difficult to wash out. The second group includes alkyd, urethane and acrylic compounds. The third set of antiseptics includes resin-containing substances based on coal, anthracene and other similar compounds. This also includes vegetable oils of linseed, hemp and gum, as well as rosin and tar.
Glazing materials are intended for surface application - to a depth of 1–3 mm. Impregnations penetrate 15–35 mm into the fibers. Water-washable compounds are suitable for protecting parts that are not exposed to atmospheric precipitation and are not subject to intensive washing: in a bath they can be used to cover, for example, logs.
Antiseptics are classified according to their functional use:
- transport;
- preservatives;
- whitening;
- fire protection (flame retardants).
In accordance with the requirements of the standards
Protective impregnation for wood from the company Tikurilla
Traditional compositions are solutions of borax, potassium dichromate, silicate glue, vinegar. Today there are compositions that have high antibacterial properties and are safe for others. These compositions, made according to the recommended recipe in accordance with GOST requirements, are intended to perform various functions. In most cases, they allow you to protect house parts from damage by living organisms, flames and active chemicals.
To protect the load-bearing beams of the floor in the bathhouse, you can use certain brands of industrial impregnations. Among them are Finnish, Tikkurila, Bioks, Biosept and many others. Indications for use in each case are indicated on the packaging (in the user manual). Compositions designed to protect logs in a bathhouse are distinguished by the fact that they ensure minimal shrinkage of wood and maximally close the pores at the ends of posts and boards. These compositions do not necessarily have to protect the material from sunlight, temperature changes and emphasize the texture of the fibers.
The mixture is applied coldly, the treatment is repeated several times - from two to five. After impregnation, the wood is preserved with alkyd or other polymer paints.
Answers from experts
Sergey Kolchenko:
It will last for 20 years without treatment, but if you soak it in hot drying oil. then with a 100 year guarantee.
Free wind:
Creosote lasts 100 years
Tester:
Sleepers are impregnated with creosote
Eugene:
pine sleepers creosote. oak will last for more than 20 years without treatment
Victor Adamenya:
if they are made from larch, they won’t rot even without treatment
Nikolay Oleynik:
Creosote still needs to be found. You can soak the timber with used transmission oil or nigrol.
Mike Noldman:
A tree is not forever. Except oak.
Vladimir:
TRANSFORMER OIL! It’s clean, doesn’t smell and will last 100 years!
Avotara:
To ensure that the logs last for a long time, they are placed on stones (bricks). This is how the ancient Russians built huts. To lay them on the ground - burn them (the method is also more than 1000 years old) - soak them in tar or cresote (a very strong smell). Also an ancient method, ships were impregnated with tar; sleepers were impregnated with cresote (a product of tar).
Olga:
If you maintain a distance from the ground to the logs of at least 40 cm, and also maintain ventilation in the foundation of the barn, then untreated logs will last 20 years, and easily! If you want to somehow extend the service life of the logs, then you can use modern compounds, only treat the wood not with a brush, but build a bathtub from the boards, the length of the future joists, line the inside of this bathtub with film and, after pouring an antiseptic solution into it, immerse the future floor joists in its entirety. Thus, the processing will be of high quality, but the impregnation consumption will also increase. Good luck!!!
Valery Sergeev:
If you take larch timber for the joists, and even saturate it, it will last, let alone 20, at least 50 years. kronwood / Due to its high resistance to chemical solutions, rain, ground moisture and other natural “aggression”, larch is ideal for outdoor construction.
Anatoly Frolov:
There is no need to treat floor joists if there is no high humidity. (but it shouldn’t be) It’s useful to soak the lower crowns with an antiseptic, but it’s even more useful to lay waterproofing between the foundation and the log house. If it is not there, the tree will constantly draw moisture from the concrete. A little trick - the log house should stand exactly on the outer edge of the foundation so that when it rains, puddles do not form, which will then be absorbed into the log house. There are a lot of antiseptic impregnations in shops now, but if you prepare it yourself, it’s like a thread based on copper sulfate. The beetle doesn't eat it and the fungus doesn't like it. If the log house has already been assembled, then you can soak it in the summer (it’s still not much use). The most vulnerable part of the log is the one that was baled with an ax, and therefore you cannot reach it. Yes! ! no coatings such as bitumen mining, etc. d. this will close the pores of the tree, and to avoid a long explanation, remember what happens to a fresh loaf in a plastic bag
blacksmith:
the answer is off topic, have you built a new house? There are a lot of questions on the topic of how to build your own house, sorry, I just want to build my own, I don’t know who to turn to, I’ve looked through a lot of literature, and so... general concepts, maybe you can help with general advice, as already taught?
-ooo-:
Throw bitumen into the diesel fuel. Heat it up (preferably not over an open fire). Very reliable and durable.
SAN:
I don’t agree with Vasily S. only about working out. The practice of observing wooden structures treated with mining shows the reliable preservation of the wood in the future (5 years, then the procedure must be repeated). And antiseptics have a longer shelf life, provided that they are not washed off with water, since the compositions are easily soluble..
Subfloor for laminate
This type of subfloor requires a more demanding attitude to the quality of the coating. If floors are made between floors, then insulation can be omitted. Warm air from the premises on the first floor does not escape to the street, but heats the second floor. Due to this, the microclimate parameters of the rooms on the second floor are improved. Insulation is done only on attic floors.
Wooden floor on joists
The subfloor serves as the base for laminate flooring and must meet three requirements.
Hardness. The thickness of the boards and the distance between the beams are selected in such a way that deformation of the planes is completely eliminated under the maximum possible loads. Humidity. The relative humidity of lumber should not exceed 20%. Before laying, the boards must be dried in a heated room for several days. During this time, they will acquire natural moisture and will not change linear dimensions. Evenness. The deviation in plane height cannot exceed two millimeters per two meters of length. Otherwise, the laminate floor will begin to make very unpleasant sounds while walking, appearing due to the friction of the elements in the connecting locks. It is impossible to eliminate these sounds. You will have to completely dismantle the flooring, level the subfloor and only then lay the laminate again
The work takes a long time and is expensive, it is better to immediately pay attention to the quality. For subfloors, you should use only lumber passed through a double-sided planer.
The final adjustment of the subfloor to the laminate can be done with a parquet machine or a hand plane. The choice of tool depends on the total area of coverage.
Installation of OSB subfloor on joists
The evenness of the base should be checked with a long level or rule, apply tools in different places of the subfloor and pay attention to the gaps. If deviations are detected, the plane should be leveled with one of the tools
If the difference in height of the subfloor does not exceed a millimeter, then the unpleasant creaking may disappear on its own after a few months of operation. During this time, the elements of the locking connection will partially rub in, and the abutting parts will reduce their thickness. Those that are not used in are slightly deformed, due to which the density of the locking joint decreases. These changes will not affect the quality and durability of laminate floors.
Laying plywood under laminate on a wooden floor
When fixing the subfloor under the laminate, you need to slightly recess the heads of the nails or screws into the boards. The fact is that it is even theoretically impossible to achieve a perfectly even fit of the boards to the beams. Over time, in places where the boards sag, the nails may come out slightly from the beams, causing the head to rise above the plane of the boards. This is very undesirable for laminate floors. They are laid on a special bedding and have hermetically sealed waterproofing. Hardware caps with sharp edges damage the membrane layer, the tightness of the waterproofing is broken. Moisture that gets between the laminate and the subfloor through the holes causes fungi and rot to appear on the wood. It is impossible to see the problem in a timely manner; it is discovered after the lumber has lost its original properties. As a result, elimination requires complex special measures; sometimes it is necessary to change the supporting structures.
Coverage by joists
On a note! Wooden beams should be able to move a little, never fix them in a stationary state. Today there are special metal stops on sale that allow the ends to move along the length.
OSB boards
And one last thing. The best option for laying subfloors under laminate coatings are waterproof OSB boards or plywood. The sheets are large in size, which minimizes the number of joints and makes it much easier to smooth out sudden changes in height. The slabs must be laid with damper gaps approximately 2–3 mm wide, which will compensate for the thermal expansion of the material. Otherwise, swelling of the laminate floor is likely; eliminating it will require the complete dismantling of both the finishing coating and the leveling base.
Products: necessity or evil?
By the way, recently underground spaces are increasingly being built without ventilation. Thus, the masters call this “a Russian tradition - first driving humid air underground, and then actively expelling it from there.” Therefore, today, more and more often, the foundation and floor are simply well insulated - and that’s all. This way the floor will never rot. What does this design solve?
Let's take a closer look at this point. For example, in the spring the air outside is much warmer than underground, and besides, it is also humid (the snow is melting). And this warm and moisture-saturated air penetrates through the vents under your floor and immediately settles in the form of condensation on the cold boards. And they spend a lot of time in this dampness - until the summer. Is it any wonder that wooden floors completely rot within a few years? And through the same vents, rodents sneak into the house in hordes in the fall. That is why today other design solutions are actively used, and ventilation is carried out in a slightly different way - through the house itself.
Such an underground is called closed air-conditioned, i.e. mechanically ventilated. The fact of the matter is that if the temperature of the underground and the room does not differ much, then condensation on the floorboards will not occur. On the other hand, if your underground is and will be ventilated with vents, the movement of air from it through the floor must then be completely blocked.
These are the solutions to this problem - everything is actually very simple.
Subfloor
Base for finishing coating with insulation
- The simplest arrangement of a subfloor in a wooden house is logs or sheathing, onto which boards are sewn so that it is possible to lay the front covering (carpet, linoleum, parquet, laminate). The task of such a base is to create an even horizontal plane and uniformly distribute the load for the finishing coating, that is, in other words, to create an even and rigid horizontal plane.
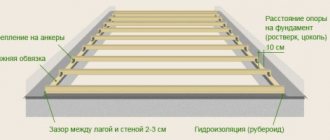
- For wooden buildings, the classic option is a subfloor on wooden beams, which are also called joists or crossbars and are installed on a rigid and durable base, which can be a concrete screed, building frame (crown beam), or beacons made of stone, brick or concrete installed directly on the ground. In cases where the area of the room is large enough, an unedged board 40-50 mm thick is laid across the joists - the result is a sheathing for boards or OSB (oriented strand board).
- The device also depends on how to cover the rough wooden floor, for example, if you cover it with oriented strand board, then lathing (crossbars and boards) will be quite enough. But you can also cover the joists with floorboards in order to install a second level of beams on them and, laying mineral wool or foam insulation between them, lay a finishing coating on top.
Between the joists
But, perhaps, the most common and convenient installation of a subfloor in a wooden house is its installation between the joists, when the boards are laid on thin crossbars (head beams) fixed to the beams, as shown in the top image. But such a device implies a sufficient degree of waterproofing from the ground, otherwise fungus and mold will very quickly begin to form on the wood, which is close to the ground, not to mention the dampness that will be transmitted into the room.
Briefly about the main thing
When choosing how to cover the boards in a bathhouse on the floor from rotting and moisture, it is better to give preference to industrial compounds that are sold in hardware and country stores. This will reduce the risk of damage to the tree and harm to human health. Properly organized ventilation and water drainage will eliminate the need to deal with rot. Products that are effective against rot, protect against mold, fungi and microbes, and may have additional fire protection.
Ratings 0
General Tips
Beams are supporting elements for the construction of a floor or ceiling; they must withstand maximum design loads and have a safety margin. Depending on the purpose and operating conditions of the premises, the thickness of the beams and the distance between them are selected. The materials can be used beams with dimensions of 50×50 mm or more or boards with parameters from 50×150 mm. On lumber with smooth surfaces, the subfloor can be attached from the bottom, side or top; on round beams - only from the bottom or top.
Characteristics of wood used for floor joists
Table. What elements does a classic subfloor consist of?
| Item name | Purpose and description |
| Beams or joists | The main load-bearing element absorbs all static and dynamic forces. In each individual case, individual calculations are made based on linear parameters and distance steps. They can rest on columns, foundation strip, floor slab, facade walls or load-bearing interior partitions. |
| Skull bars | Size - approximately 20x30 mm, fixed to the side surfaces of the beams, used for laying subfloor boards. |
| Hydro- or vapor barrier | The waterproofing is laid on the subfloor, which serves as the foundation for the finishing floor. Vapor barrier is used to protect insulation from increased relative humidity; it is used on the first floors or ceilings. |
Depending on the specific placement and purpose of the subfloors, the listed elements may be added or excluded. We'll look at a few of the most commonly used types of subfloors.
Floor beams
How to prepare joists for a subfloor
The logs are made from wooden beams.
Before installation, the logs must be treated with impregnation.
It is important to protect wooden logs from insects and rot before work. Various impregnations are used for this purpose.
Modern antiseptics, as a rule, do not have a pronounced odor. Various substances are used as antiseptics for impregnating lags - these are VVK-3, ammonium, sodium silicofluoride and others. All of them are diluted with water in the proportion specified by the manufacturer.
The composition must be applied to the joists in 2-3 layers to ensure high-quality treatment. First, it is recommended to treat damaged areas of the joists - ends and cuts. The relative humidity in the room where the treatment will be carried out must be at least 80%. It is recommended to apply the antiseptic with a brush; you can use a roller or spray. First, use a brush to cover the surface of all elements, after which you need to set them aside for 3-5 hours. Then a second layer of impregnation is applied, which must also dry. Such preparations are chemical products, so the use of protective equipment in the form of gloves and face masks is required. After drying and covering the floor, they will be completely safe and will not affect your health in any way, but you must be careful when working with them.
The beams for the joists must be well sanded.
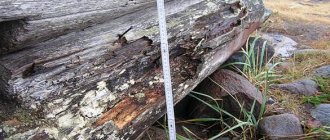
The boards themselves must be carefully inspected for their integrity and fungal damage. You cannot take logs that have chips, knots, or signs of damage.
In addition to protection from mold, it is also necessary to protect the logs from insects. For this purpose, sodium fluoride and sodium fluoride are used. All joists must be treated before installation so that they have a smooth and even surface. If it is possible to lay the flooring with grooves, then before installation they must be made with a milling cutter.
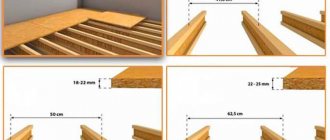
Floor boards are taken in the following sizes:
- thickness - 28-36 mm;
- width for the front part of the board - 138 mm, 118 mm, 98 mm, 78 mm, 68 mm;
- beam width - 55 mm, 45 mm, 35 mm, 28 mm.
Scheme of laying lags.
To ensure excellent ventilation of the floor, a 2 mm recess is required. This will avoid many troubles, including damp boards and flooring.
The laying of the lags itself is carried out in this way:
- it is necessary to mark the upper level of the logs around the perimeter of the walls;
- start attaching the joists. For leveling, pieces of plywood and special fastening systems are used;
- the height of the log is adjusted, horizontality is checked;
- if necessary, a layer of insulation is laid between the joists;
- The floor is finished with boards or plywood panels.
Quality control
An experienced specialist will be able to determine the quality of the work done “by eye”. But if there is not enough skill or knowledge, then to assess the completed floor screed it is necessary to conduct a visual inspection. The surface of the screed should not only be perfectly smooth, but also have an even color. Use a general rule to identify possible gaps. It is advisable to use a tool 1.5-2 meters long. If during the inspection no gaps larger than 4 mm were identified, then the work was done efficiently.
Checking the quality of the floor screedThe hardness of the coating is another important criterion for assessing the quality of the screed. Using a hammer, strike tangently. If the screed turns out to be strong, then even after a number of blows there will be no noticeable marks left on its surface. Otherwise, for example, when using low-quality cement, even after several blows with a hammer the surface will begin to crumble. Ready-made semi-dry floor screed
Subfloor on the attic floor
It has several options; for example, we will consider the most complex of them. It is better to file the ceiling before installing the subfloor, but this condition is not necessary. When working with mineral wool insulation, it is recommended to use a respirator or mask to protect the respiratory system, and wear rubberized gloves on your hands.
Installation of wooden interfloor slabs
Since there is no ceiling covering, nail a vapor barrier membrane underneath. Attach it securely; at first it will support the weight of the insulation.
Important! When performing further work in the attic, make special passages for walking and place long boards in these places. To increase safety, it is recommended to temporarily fix them
The boards will somewhat complicate the process of laying insulation, but they will minimize the risks of unpleasant situations.
For safer movement, you can build a small ladder from boards
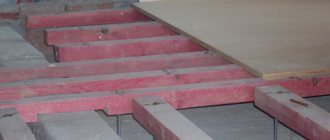
Step 1: Begin laying insulation into the space between the attic floor joists
We have already mentioned that when calculating the distance between beams, you need to take into account the standard width of materials for thermal insulation. Lay as tightly as possible; if there are two layers, their joints should be offset
Laying insulation
The process of laying insulation
Another photo of the process
Important! When laying rolled mineral wool, do not allow sharp bends - in these places the thickness of the insulation is significantly reduced and a cold bridge is formed. And one more piece of advice
Do not press down the cotton too much or artificially reduce its thickness. Unlike the pressed one, the rolled one cannot withstand any loads.
Step 2: Lay down a wind and vapor barrier membrane. Rolled mineral wool is easily blown through by drafts, and heat is removed along with the intake of fresh air. The membranes are fixed to the beams with a stapler. Professional builders do not recommend stretching the membranes too much; it is advisable that they lie loosely on top of the insulation. In case of leaks, water will not get onto the insulation through the holes made by the stapler staples.
When working, use a protective mask
Gloves will also be required
Laying moisture and wind protection
The membrane must lie freely
Step 3. Secure the membrane to the beams with thin slats. Lay subfloor boards on the slats. They can be screwed on with self-tapping screws or nailed.
Laying slats on joists
The boards are screwed to the joists through slats
Installation of OSB
Features of log operation
Wooden structural elements during operation are not directly exposed to all kinds of natural factors, such as precipitation and wind. As a rule, there is no direct contact between the logs and the natural environment.
Sometimes dampness can damage them only if they are laid on a damp foundation. But when installing logs, property owners strive to prevent the beams from coming into contact with the external environment. In this case we are talking about the device of vapor and waterproofing.
Since wood is highly susceptible to rotting processes and mold fungi can intensively multiply on it, it must be protected from adverse external factors.
Even with slight non-compliance with the technology for installing wooden beams, the wood begins to rot. It is for this reason that floor joists need to be treated with various special compounds that can protect structural elements from unfavorable processes. This procedure is considered mandatory and should not be forgotten when arranging a wooden floor.
Floor board scraping
This type of treatment is used when installing boards or during floor restoration. To cycle the floor yourself, you need to follow the following sequence of actions:
- Clean the floor and remove the layer of protective coating (remove mastic with white spirit, varnish or paint with sandpaper or a sanding machine).
- Press down any protruding nail heads (if any) with a hammer.
- Seal large gaps between the boards with slats of the same thickness, smearing them with wood glue. After the glue has completely dried, use a plane to level the surface.
- Fill small gaps with wood putty or sealant, then sand with sandpaper.
- Starting at a corner and moving diagonally, using a sanding machine and coarse sandpaper, sand the floor in several passes.
- Sand the floor in several stages, perpendicular to the previous one, and at each stage reduce the grit of the sandpaper. The final step is done parallel to the floor boards and with fine-grit sandpaper.
- Thoroughly clean the finished floor and seal it with varnish.
Advice! Make a sanding overlap with the previous track and periodically replace the sandpaper.
According to folk recipe
The treatment is applied hot: the mixture is heated in a water bath, then rubbed into the prepared surface using a brush or brush.
One of the popular compositions used to preserve logs is machine mining. There are many recipes that are based on a combination of oily waste, diesel fuel and various salts. However, craftsmen claim that coating with oil alone is extremely reliable: with its help you can stop the process of rotting on already damaged beams.
The method has become widespread due to the large supply of used oil. The effectiveness of the method is beyond doubt: there are many active substances in the process that can neutralize the development of any biological process. For this reason, it is not recommended to apply the treatment to the entire surface of the lag - the chemical activity is high. This material should not be used to protect parts in a bathhouse. It is considered relatively safe to coat small areas of the most affected part of the timber - the ends and notches: it is in these places that the most accessible path is located along which microorganisms penetrate deep into the fibers.
The treatment is applied hot: the mixture is heated in a water bath, then rubbed into the prepared surface using a brush or brush. It is not necessary to polish the timber before processing; the molten emulsion penetrates deeper if the surface remains unplaned.