You can make a wooden floor in a country house or country house with your own hands by studying several technological nuances. Brick columns for joists are necessary for correct and level flooring. In order for the device to last a long time, it is important to isolate the wood from dampness, various types of fungi and pests. For this purpose, antiseptics and waterproofing materials are used. A floorboard sanded and covered with colorless varnish will give the floor a natural uniqueness and beauty.
What it is?
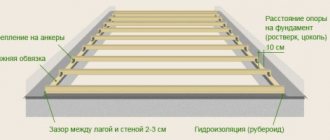
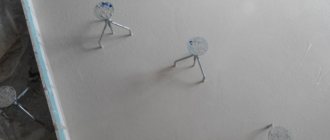
Pillars for brick logs are a masonry structure with a cross-section of one brick. They are erected on a prepared concrete pad, reinforced with reinforcement with a diameter of 5-8 mm. They ensure that floors do not sag during prolonged use and under significant weight loads. For ease of fastening the logs when laying, a bracket with a thread in the upper part should be mounted in the center of the structure, to the base of which a metal plate 3-5 cm thick and 15x15 cm in size should be welded. It is important that the brackets are centered and aligned to zero horizontally. Covering them with bricks on 4 sides will provide support for the joists.
Construction on a concrete base
Concrete flooring is a complex and expensive structure, but its strength and long service life make concrete the most popular base for a wooden floor. When laying logs on concrete, you will not need cabinets for the logs, but they will have to be isolated from each other, otherwise this will lead to the formation of moisture, which will lead to damage to the wood.
Isolation is performed in several ways:
Algorithm for building on a concrete screed:
Installing joists using corners is one of the most common solutions. Despite the fact that this method somewhat reduces the strength of the floor, builders recommend laying logs on a concrete screed in this way, because it has a lot of advantages:
If you decide to lay logs directly on concrete using waterproofing materials, then they should be secured with anchors or also with fastening angles.
Laying logs on brick columns in a wooden house
Although wood and structures made from it do not have such a long service life, the vast majority of consumers still vote in favor of this material because of its many advantages: environmental friendliness, low weight, reliability and low price.
Wood is used to create joists, which play a huge role in the construction of the floor. The service life of the flooring in a wooden house depends on their correct installation. In this article we will talk about how to lay floor joists with your own hands, so that they will serve faithfully for decades.
Recommendations from experts
Laying a wooden floor along joists on beams is easier than on the ground. But in any case, the step between the overlaps is taken into account. If it does not exceed 80 cm, you can immediately install the finishing coating. But such a wooden floor design is rarely installed. More often than not, the flooring “pie” is installed in the following sequence:
- fastening the logs with screws, with the obligatory check of the level and compliance with the correct step;
- laying the subfloor;
- waterproofing;
- thermal insulation;
Wooden floors are installed differently on a concrete base. In this case, a certain technology is followed to lay the floor along the joists.
- The concrete screed should be cleared of debris and primed.
- The necessary tools are prepared (hammer, plane, hacksaw, construction level).
- With an overlap of 15-20 cm on the walls, waterproofing is laid, which is used as roofing felt or thick polyethylene film. The joints must be connected with electrical tape. At this stage, you can install a floating floor.
- After determining the step, the logs are laid. If the base has significant differences in height, you should resort to pads made of boards, chipboard, plywood, fiberboard or pegs. The tree must be treated with protective agents.
Holes are drilled at the bases of the beams into which dowels or anchor bolt spacers are placed. The latter will provide a stronger connection. At a distance of 60-80 cm from each other, self-tapping screws or bolts are screwed into the holes (2-3 for each lag). Before fully tightening the fasteners, you need to double-check the evenness of the installation. The construction of the subfloor remains the same as in other cases.
Having completed all these steps, you can lay waterproofing, insulation and vapor barrier. The final stage is installation of the finished floor. Following all these simple instructions, anyone without special training can install a wooden floor on joists with their own hands.
Attaching joists to brick columns. Support columns for joists
Since the plan was to have a plank floor on joists, the next step was naturally the posts for the joists.
It’s worth noting here that brick columns are somehow no longer in fashion. For example, at the stage of getting to know the shabashniks, we were twice offered to make these pillars concrete. The price for each such product ranged from six to seven dollars. They would be placed directly on compacted soil.
This option is cheaper than the brick one. In our case, each pillar required 14 bricks, and with the price of each solid ceramic brick being 50 cents, it would have cost the same 7 bucks. In my calculation, the concrete version does not take into account the material (cement and sand), but the brick version does not take into account the work (I did it myself).
Articles on the topic
Beating plaster from brick surfaces using machines and manually, instructions, advice from masons
Dew point in a brick house - why it is calculated, instructions, advice from masons
How to paint the outside of a brick house - types of paint, instructions, advice from masons
How to make a roof on a brick house - varieties, strengthening, instructions, advice from masons
Brick foundation for a wooden house - types, instructions, advice from masons
Brick cornice - how the masonry is made, varieties, instructions, advice from masons
Insulation of a brick facade - thermal insulation, thermal panels, instructions, advice from masons
Insulation of a brick house from the outside - mineral wool, polystyrene foam, expanded polystyrene, instructions, advice from masons
Reviews ()
What logs to use
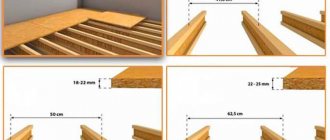
You need to choose the size and number of bars based on the load and thickness of the floor boards. The cross-section of the logs and their thickness depend on the span length - the distance between two supports. The greater the distance between the supports, the more powerful the beam required. There are no such requirements for logs installed on a concrete base. Here, most often, the dimensions are selected based on the dimensions of the insulation, and the thickness of the board that will be laid on the floor.
The pitch for the logs (the distance between two adjacent bars) is selected from 30 cm to 100 cm. It depends on the thickness of the floor board. The correspondence is shown in the table. A step of 50 cm is considered optimal for baths. The thickness of the board is 25-30 mm.
Table of the dependence of the thickness of the floorboard on the installation pitch of the logs
There are also some recommendations on the width of the floorboard - do not take it too wide for the bath - as the humidity increases, it will warp more, which can even create difficulties when moving. Medium width is the best choice for baths.
It is advisable to lay the logs in one piece, without joints. But if necessary, they can be spliced. To do this, either cut a tongue and groove into half a tree, or connect them end-to-end, securing them on at least two sides with pieces of boards at least 1 meter long.
Relevance of installing cabinets
Plank flooring is still considered one of the popular floor finishing options. According to the technology, the prepared boards are attached to a supporting lathing made of logs. This is a rectangular beam made of solid wood. This design allows you to create a ventilation gap so that the decorative coating can breathe freely and not become damp.
In fact, in a residential area, subject to technological requirements, this approach is sufficient to eliminate creaking and deformation of the plank sheet. However, over time, the load on the finish may change, which affects the overall condition of the floor. To ensure that the stationary position of the timber sheathing remains unchanged, support posts are additionally installed under it. They also allow you to create the most accurate base for the joists and not have to deal with continuous leveling of the subfloor.
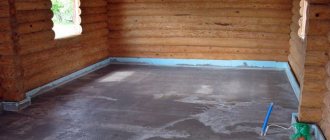
Leveling the concrete base Source sense-life.com
There are often houses where cabinets were not originally installed. As a rule, the reason is that construction is carried out in winter. In this case, an additional installation option is possible. But the event will be labor-intensive, since the entire structure will have to be completely disassembled.
Installation of floors on wooden joists on concrete
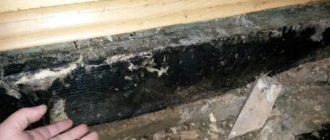
Such floors are considered more complex, labor-intensive and expensive; all wooden structures must be reliably protected from direct contact with concrete. Otherwise, the structures will quickly become unusable and will have to be replaced prematurely. There is a chemical way to protect lags from rotting processes using various impregnations. They are quite effective and actually prevent the process of wood deterioration. But unfortunately, impregnated wooden structures can no longer be considered environmentally friendly, and it is for this indicator that most developers install natural wooden floors.
If the logs are laid over the entire area on concrete, then waterproofing is required between them.
Waterproofing is laid between the floor joists and the concrete base
But they can also be secured using metal squares, which allows you to create a gap between the base and the joist. It must be borne in mind that in this case the load-bearing characteristics of the floor are somewhat reduced.
Attaching joists to the floor with corners
Fasteners for joists
- Make an exact marking of the position of the joists on the concrete screed, mark the line with a rope with blue.
- Using a drill and a Pobedit drill, drill holes for the angles; the distance between them is selected depending on the size of the lag.
Fixing corners - Align the two opposite ends of the lags according to the marks and level, attach them to the squares. Check the position with a level.
- Fix the remaining angles to the joists under the level.
In the photo there are fixed logs
This fixation method has its advantages. Firstly, direct contact of wooden structures with concrete ones is completely excluded. Secondly, logs can also be installed on a black screed. Using corners, you can eliminate irregularities of several centimeters; there is no need to make a finishing screed. This saves a lot of time and money.
Adjustable supports for floor joists
Boards or sheet materials are laid on top of the logs
The second method of laying on a concrete screed is to lay the logs directly on it; a material based on modified bitumen is used for insulation.
Location rules
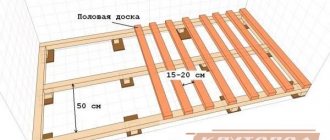
The first and last lags from the wall should be at a distance of no more than 20 cm. If, while observing the calculated step, the outermost lags are located further, their number is increased and the step is reduced.
They are placed either along the wall in which the door is located, or perpendicular to it. If one wall is much longer than the other, then it is along this long wall that the logs are placed. If the room is square or similar in shape, then the location of the window may influence the choice: floorboards look best if they are located along the flow of light. That is, in this case, the logs are placed along the wall in which there is a window.
Soil requirements
Before giving preference to the construction technology of the design in question, familiarize yourself with the key soil requirements given in the following table.
Table. Soil requirements for constructing a reliable concrete floor
| Evaluation criterion | Explanations |
| Substrate moisture | The soil on top of which the flooring is planned must be dry. |
| Groundwater level | The depth of passage of these should be at least 4-5 m. |
| Soil mobility | It is strictly prohibited to build the structure in question on top of moving soil. |
Additionally, requirements are imposed directly on the building itself. It is important that the house is used for permanent residence or at least heated during the cold season. Otherwise, the ground will freeze, causing the concrete structure to deform.
Scheme of floors on the ground for a private house, garage, utility room
Installation of columns under logs
After the soil is compacted and leveled, they begin to install columns under the logs. But first you need to mark the installation locations of the supporting pillars. In practice, cords are used for this, which determine the location of the lags. At the intersection of these cords, places are designated for the foundation for the columns, which are laid out from ceramic bricks or concrete blocks. The cords are then removed, and the locations of the posts are fixed with wooden pegs driven into the ground.
Next, at the locations of the pegs, holes are dug for the foundation for the posts. The depth of the holes depends on the density of the soil and the depth of groundwater. If the soil is sandy or rocky, a depth of 25–30 cm will be sufficient, however, and if the soil is clayey, then the depth of the foundation should be 40–50 cm, since crushed stone will have to be poured into the bottom, which must be thoroughly compacted.
Pouring concrete for the foundation must be taken very seriously, observing the required proportions of concrete, sand and water. You should not skimp on cement, but prepare the mixture in the following proportions: one part cement + three parts sand + three parts fine crushed stone (10–15 mm). Before pouring the solution, it is recommended to lay plastic film at the bottom of the hole so that the “milk” does not go into the ground. And one more thing: below the level of the middle of the pit it would be more rational to attach a metal mesh made of wire Ø 4–5 mm, which will act as reinforcement for the concrete.
After the concrete has hardened, the surface under the brickwork of the columns must be protected with waterproofing made of roofing felt or other material with an allowance of 10–15 cm on each side. Then you can begin laying brick columns, which, for reliability, it is advisable to lay from two rows of bricks. The height of the brick columns must be calculated so that the top bricks are perpendicular to the laid logs.
Accommodation
If the thickness of the board is at least 50 mm, in this version the transverse beams are placed at a distance of 1 meter from each other. However, in private house construction, 40 mm boards are more often used; in this version, the transverse beams are installed in increments of 70 cm. Many people ask the question of how to do it so that the structure is reliable and the loads are accurately distributed? The main thing here is to maintain the exact distance between the wood blocks. The first board is placed no further than 25-35 cm from the wall surface.
Making a heated floor in a wooden house: designs
It would be nice to have a heated floor in a wooden house. This is possible, and with various types of heating. Floor heating can be water or electric. It’s easier with an electric one - it can be placed on plywood, gypsum fiber board, fiber board and other materials. The design of the floor in this case will not change too much. You just need to take care of high-quality insulation. Warming the ground or cold underground is not a good idea.
Floor in a wooden house on the ground with water heating from heating
With water heating it is somewhat more complicated. Usually the pipes are hidden in a screed, so the optimal design would be a concrete floor on the ground. Heated floor pipes are added to the final screed - the one with reinforcement. They are tied to a reinforcing mesh, and then the whole thing is poured with concrete.
This is how you can make a warm floor from heating without concrete and screed
There is an option for water heated floors on joists without screed. The so-called polystyrene or wooden structure. A rough flooring is laid on top of the insulation. A board or sheet material cut into strips (most often GVL, DSP) is mounted on top of it at intervals. Heat-distributing metal plates (usually aluminum) are placed in the gaps. Heated floor pipes are placed in the grooves of these plates. The top is covered with another layer of sheet material. In this case, the criterion is heat tolerance, high heat transfer.
The disadvantage of this method of installing heated floors is low efficiency. Although the plates distribute heat more evenly, they are covered with sheet material. And on top there is floor covering. In order for the floor to be noticeably warm, you have to circulate a fairly hot coolant. But wood and materials made from it do not like high temperatures too much. So this option is done only when the beams and floor joists cannot withstand the weight of the screed. If their load-bearing capacity (and the foundation) is sufficient to allow a 5 cm thick screed to be poured (this is the minimum layer), a heated floor is made along the joists, but in a concrete screed.
The floor in a wooden house is heated by heating along logs
In this case, both the logs and the subfloor laid on them must be powerful, durable, protected from rot, and impregnated with moisture-resistant compounds. They will bear a significant load from the reinforced concrete slab, and even pipes filled with water. In general, strength comes first.
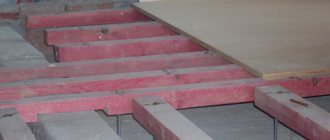
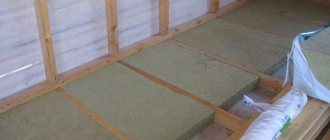
Floor insulation
Warming is also a very important stage. Below, on one and the other side of the wooden logs, support bars 50 × 50 or 30 × 50 mm are nailed.
Next, a roll is laid on the block, which is an unedged low-grade board; its thickness should be 25 mm. Before laying, such boards are treated with a special antiseptic composition to protect the floor from rodents and insects. Self-tapping screws are used to attach the knurling to the bars.
Insulation
Next, a waterproofing membrane with a throughput capacity of no more than 800 g/m is laid on the created bead. It will protect the heat insulator from exposure to moisture. Afterwards, a heat insulator is mounted on the laid waterproofing layer. Considering that today there is a large assortment of insulating materials on the market, there will be no problems with the choice, but you should understand that not every one of them can be used to insulate a wooden floor.
Here it is recommended to choose mineral wool with a density of 35 to 55 kg/m². When laying, a gap of 2-4 cm is left between the boards and the heat insulator for ventilation.
How to lay joists on the ground. What to lay on the joists
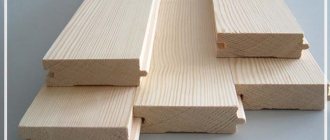
If the task is to make a wooden floor in the house, there are no questions. A tongue-and-groove board is placed on the joists so that the covering has no gaps and the fasteners can be installed flush-mounted. You can make finishing flooring from edged boards, but a higher grade is needed. Usually they try to choose with a minimum number of knots, but this is not for everybody. Some people, on the contrary, like the presence of wood features. The knots just shouldn’t be dry, cracked and black. Then this is really a “highlight”, and not defective material.
The joists are installed, you can make rough flooring
List of materials for flooring
If you plan to make the floor in a wooden house from laminate or linoleum, you don’t have to put a board. Sheet material for the floor can be as follows:
- Plywood. High strength, wear resistance. There is a waterproof one. Disadvantages: glue is used in production, so it is considered not environmentally friendly. The second disadvantage is the high price.
- OSB. Durable, always with increased water resistance. The price is lower than that of plywood, the strength is at the same level. The disadvantage is phenolic resins, which can evaporate formaldehyde.
- GVL (gypsum fiber sheet). Natural, non-toxic, but does not hold its shape - it will bend if placed directly on the joists. Therefore, it can only be laid as a second layer on a flat base.
Table of characteristics of various sheet materials
- LSU. Glass magnesite sheet. Almost the same composition as gypsum fiber sheets, only in a fiberglass shell. Durable, holds its shape well, but the price is above average.
- DSP. Cement particle boards. They have virtually no drawbacks except one: heavy weight. The fasteners hold well, you can lay tiles on them (cement and cement make excellent friends) and any other coatings, but with a primer.
- GKL. Plasterboard sheets. This material is also used as flooring for joists, but of all those listed above it is the most fragile.
Professional advice on choosing lags
Coniferous wood should be used for logs.
Larch logs
If possible, materials should be impregnated with antiseptics. These are very effective means for protecting wood not only from fungi, but also from many pests.
Antiseptic for wood
Antiseptic
Always select joists with a safety margin, especially in cases where the installation method involves bending loads. It must be remembered that correcting mistakes made during the construction of flooring always costs much more than carrying out the work with high-quality materials and in compliance with recommended technologies.
Logs from boards
Choose your joist boards carefully. They must be absolutely healthy without signs of rot. The presence of through cracks and rotten knots is completely prohibited. If there are large healthy through knots, then you need to install the joists in such a way that there is a stop under them.
When attaching the logs, do not allow the possibility of wobbling.
Fix the joists firmly
Most loose joists cause very unpleasant squeaks in the flooring while walking. To eliminate such phenomena, you will have to remove floor coverings; this is time-consuming and expensive; it is not always possible to keep the dismantled materials in a condition suitable for reuse.
How do they do it?
One of the stages of work is pouring the foundation for the columns.
- Dig small pits for concrete pads with an area of 40x40 cm and a depth of 30 cm in place of the control pegs driven into the underground.
- Lay sand as a substrate in a layer of 10-12 cm and compact it thoroughly.
- Install the prepared formwork from boards.
- Tie the cut reinforcement using steel wire and make a lattice with a cell of 10 cm. Place it in a pit with a clearance from the bottom of 10-15 cm.
- Prepare a concrete solution from cement, sand and small crushed stone in proportions 1:2:3 and pour the foundations for the columns. After complete hardening, remove the formwork and add soil and compact it tightly around the bases.
- Install the brackets and cover them with bricks, while observing the dressing standards, starting from the second row. The fastening rod must be securely fixed. To do this, when laying each row, the openings are completely filled with mortar.
- The outer supports adjacent to the foundation must be laid out taking into account the openings where the logs will go. Brackets are not included in these structures.
- Check the quality of work using a level longitudinally and transversely. It is important that the brackets are positioned in line for each joist.
- Having brought the masonry to the required level, leave it for 4-5 days to completely harden.
Return to contents
Calculation of materials and preparation
Work on the construction of supports for laying logs begins with the preparation of the underground:
- Using a tape measure, determine the location of future brick pedestals and drive in control pegs.
- If the length of the floorboards exceeds 4 meters, a reinforced concrete base is made.
- Reinforcement with a diameter of 5-8 mm is cut into segments along the length of the concrete base. The underground soil is thoroughly compacted. Mounting brackets are prepared in advance.
- Floor joists 10x15 or 15x15 cm are impregnated with an antiseptic and dried.
- A mesh of twine with a cell of 1.5 * 1.5 meters is made level and at an angle of 90 degrees for visual control of the height of the supports being erected, and it is fixed to the upper edge of the foundation.
- Materials are calculated depending on the number and height of the racks. As a rule, 1 row of support consists of 4 bricks, and the pitch of the supports for the logs is 1.5-2 meters. The bricks are counted individually, and then the volume of cement and sand required for masonry is determined based on a 1:2 ratio.
- To improve the waterproofing of joists and floors, expanded clay of a fraction of 1.5-2 cm is used. Its quantity is determined based on the layer height of 10-12 cm per underground area.
What should be the brick columns for the logs?
Wooden floor joists are laid on brick supports. These support pillars create an underground floor between the soil and the finishing flooring, protecting the future floor from moisture and dampness. The free space in the basement can be effectively used for wiring electricity and communications.
The height of brick columns for logs should not exceed 3 rows of masonry. The supports are constructed in plan from two bricks, obtaining a section size of 25×25 cm after masonry. Cement-sand mortar is used as a binder in proportions from 1:2 to 1:5. All bulk components of the solution are sifted through a fine-mesh sieve until mixed. This guarantees a strong cement mortar and, as a result, durable supports for the logs.
In addition to durability and strength, support pillars are required to be horizontal. The supporting surfaces of the pillars must be located at the same level. The deviation from the horizon should not exceed ±1 cm. The evenness of the future floor will depend on compliance with this requirement.
Making a columnar brick foundation yourself
Laying out row after row, a beginner can make subtle mistakes that will degenerate into serious deviations at the top level. Here's what you need to pay attention to:. Not everyone is able to lay out a row in a perfect square with exactly the same dimensions.
As a result, the top rows of the column may be 20 - 30 mm larger than the bottom ones. There is also a chance of getting a diamond instead of a square, so the resulting post will be quite crooked. The solution is to use a carefully calibrated template made from blocks.
We lay it on a brick row and immediately see all the flaws. Ideally, the corners of each subsequent row should be located strictly above the corners of the previous one. If you allow even minor deviations in this regard, with each row the masonry may fall to one side or acquire a helical curvature. The verticality of the corners must be controlled by a plumb line. To simplify this process, after laying out the 2nd row, you can fix steel corners on the corners of the post, aligning them plumb to a strictly vertical position.
Self-tapping screws should be used as fasteners, screwed into the seam between the 1st and 2nd rows. After this, all that remains is to place the bricks in the corners, without worrying about the evenness of the structure. When constructing fences, preference is given to either brick or concrete pillars. The frequency of laying the mesh is between each row of bricks. To obtain a perfectly level foundation, it is necessary to use a level - each laid row of bricks is checked.
It is not advisable for the deviation to exceed 2 degrees. This may affect the reliability of the foundation and, accordingly, the safety of the house. Brickwork continues until a suitable foundation height is reached - the pillars should rise centimeters above the edges of the pit.
Which brick should I take?
To lay out support pillars above ground level, red bricks, also called ceramic, are used. Choose a solid construction type, which has increased strength and durability. The density of solid brick reaches 1900 kg/m³, while hollow brick is only 1500 kg/m³. This material is not afraid of dampness and is indispensable for loaded structures. The strength of the brick is acceptable M 100. Preference is given to the single type with parameters 25x12x6.5 cm.
So, choose bricks for the lag:
- ceramic;
- full-bodied;
- strength M100;
- single.
General information about installation
So, if you are wondering how to attach cross beams to brick pillars, then you have seriously thought about creating a reliable and durable floor. But with this installation method, you will need to turn to a foundation device, and most importantly, it must be done in such a way that it can easily support each installed brick support. You can pour the foundation for installation separately or make it in the form of a narrow strip. The height of the support can be determined using the height at which the timber will be placed.
Pillars
To find out the consumption of materials for the installation of columns under the transverse beams, it is necessary to make a calculation and then develop a plan that will indicate the layout of the subfloor, what materials will be needed and their quantity. This will need to include the following materials: timber, good cement and bricks.
Masonry
To masonry
The cross beams in the column were made with high quality, it is recommended to follow the following rule: where the load in the room is small, a greater distance can be maintained between the timber bars. If thin material is used for laying, then it is recommended to place the cross beams at a close distance from each other.
This suggests the following conclusion: the smaller the distance between the wood blocks, the higher the structural strength parameters.
However, such a solution leads to excessive consumption of materials, and therefore an increase in financial costs. But the final result will be good, and the laid floor will last a long time.