- How thick are the blocks needed to build a bathhouse?
- Laying the foundation and organizing drainage
Due to the fact that, compared to other materials, cellular concrete is characterized by increased water absorption, there is ongoing debate on the Internet about the appropriateness of such a choice for private construction. Users ask questions not only about residential buildings - many are interested in whether such an object as a bathhouse made of aerated concrete has the right to exist. Let's look into this issue thoroughly.
Why were gas silicate blocks chosen?
When I just started construction, many neighbors in the dacha community asked me a question about why I chose gas silicate blocks. Somehow everyone got used to either wood or brick. And my arguments are:
- Quick installation. Gas silicate blocks are larger in size than bricks, so the construction of walls from them is much faster.
- High thermal insulation. Gas silicate belongs to cellular concrete, that is, it has many air cells inside. They play the role of heat insulators. Therefore, a bathhouse made of gas silicate blocks, in comparison with a brick one, warms up faster and retains heat longer. In terms of thermal insulation qualities, gas silicate is not inferior to wood.
- Fire resistance. Gas silicate blocks do not burn, unlike wooden structures.
- Impossibility of rotting.
- Low cost compared to brick, timber or logs.
In addition, I have good bricklaying skills, so I decided that I could handle gas silicate blocks.
I'll start in order.
Is it possible to build a bathhouse from aerated concrete?
Doubts about the advisability of using aerated concrete in the construction of baths arise due to the requirements of rules 15.13330, which “in plain English” state that the use of cellular concrete blocks for the construction of walls of buildings with wet operating conditions is not allowed. But, knowing about the excellent physical properties of aerated concrete, which are as close as possible to the characteristics of wood, many experts, including aerated concrete manufacturers, do not agree with this.
- Why, then, is wood not banned - after all, its water absorption is even higher? In addition, it is fire hazardous, exposed to biological effects, and greatly changes linear dimensions when swelling and drying. It has only one advantage over aerated concrete - a pleasant aroma and aesthetic appearance. That’s why the board exists, to give similar qualities to walls made of other materials.
- Bans have never bothered our compatriots, and many regulatory documents that have not been revised for decades simply lag behind technological progress. Any sane person understands that if a material cannot be wetted, then it must be made so that it cannot absorb moisture.
- Today there are many opportunities to achieve this. For example: line the walls from the inside of a bathhouse with expanded polystyrene, and cover them on top with foamed foil polyethylene such as Tepofol, Penofol, Isolon. Even with hermetically sealed joints and panels, some tiny part of the steam will still get into the walls, but if you give it the opportunity to freely escape from the outside, no problems with moistening the walls will arise.
- Therefore, it is better to finish the façade of the bathhouse with materials mounted on the wall, or use vapor-permeable plaster. In cold regions, insulation can also be used outside, but it should only be mineral wool, as it allows vapors to pass through well. The main condition that will not allow it to be moistened by condensation moisture will be the presence of a ventilated gap between the insulation and finishing material - or the same plaster with a high coefficient of vapor permeability.
Expert opinion Vitaly Kudryashov builder, aspiring author
Ask a Question
Important: Polymer insulation materials practically do not allow steam to pass through, so they can only be glued to aerated concrete from the inside. If you glue the same foam plastic on the outside, it will seal the pores of the aerated concrete, preventing steam from escaping and forcing it to condense in the thickness of the wall.
The conditions for normal operation of aerated concrete walls are quite simple, and if they are met, the operation of a bathhouse built from this material will be as comfortable as when using wooden beams.
Pros and cons of building a bathhouse from aerated concrete
Since the main competitor of aerated concrete in the construction of bathhouses is wood, we will focus on it in comparison. In general, all the advantages and disadvantages of an aerated concrete bath can be characterized as follows:
| pros | Minuses |
| Despite the fact that the physical properties of aerated concrete are very close to wood, the cost of a bathhouse built from it is half or even three times lower. | It takes at least six months to reduce the initial humidity of 25-30% to the standard 5-6%. Therefore, it is not recommended to start exterior finishing immediately . |
| Processing aerated concrete mechanically: sawing, planing, cutting, drilling is as easy as wood. | In order for the bathhouse to be well ventilated, it is necessary to arrange supply and exhaust ventilation. And it is better if it is forced, because the window opening is a heat loss zone. |
| Autoclaved aerated blocks practically do not shrink. Therefore, after construction there is no need to spend a lot of time waiting before starting interior decoration. | Increased costs for internal waterproofing, since it is important to prevent the aerated concrete masonry from getting wet. |
| The material is environmentally friendly and has a very low natural background radiation. | The need to construct a rigid monolithic foundation, while a wooden bathhouse can also be placed on metal piles. |
| Aerated concrete is resistant to chemical and biological influences. | The construction of the box is inexpensive, but considerable costs will be incurred for moisture protection and finishing. |
| Due to the enlarged dimensions, the speed of work is much higher than in the case of brick or timber. | When purchasing substandard blocks, the consumption of masonry mixture increases , and first-class products are more expensive. |
All building materials have disadvantages. Here they are fully compensated by their advantages. Many experts believe that an aerated concrete bath is even better than a wooden one, and we tend to agree with this.
Construction of building walls
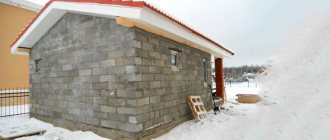
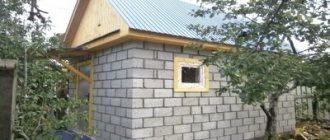
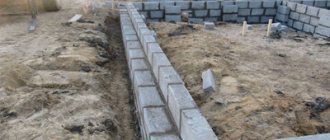
The blocks were laid on a ready-made strip foundation, protected by two layers of roofing felt waterproofing. Blocks with dimensions of 200x300x600 mm were used. I laid them on edge, that is, the thickness of the walls turned out to be 200 mm.
The construction of gas silicate walls will be carried out on a strip foundation
For masonry, cement mortar was used, mixed in a 3:1 ratio (ratio of sand to cement).
The work was carried out according to the following plan.
Stage #1 - laying the first row of blocks on the foundation
I started laying from the angle that (according to the laser level) was the highest. I applied the solution (about 5 mm) onto the roofing material with a trowel, and pressed the block on top. For better fastening, I tapped the blocks with the handle of a trowel.
The first row is the most important; the remaining rows of blocks will be aligned with it. Therefore, the accuracy of laying the blocks of the first row must be constantly monitored by the building level in 3 directions.
If it was necessary to cut blocks, I used a grinder with diamond discs for concrete. By the way, I once saw workers from a construction crew cutting blocks with a chainsaw. It worked out very quickly. So, whichever of these tools you have, use it.
The first rows of gas silicate blocks
Stage #2 - erection of walls
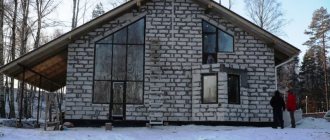
Subsequent rows of blocks were laid with an offset of 15 cm. That is, the seams of the overlying blocks were shifted by 15 cm in relation to the underlying ones. Gradually the walls were built to a height of 2.25 m.
The walls of the bathhouse are made of gas silicate blocks and lined to the ceiling
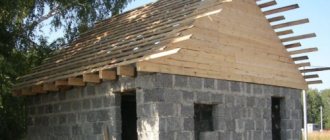
Stage #3 - construction of gables
The gables were built according to the same principle as the walls, to a height of 1.9 m at the ridge. Except there was more hassle with cutting the blocks!
The gables of the bathhouse were also lined with gas silicate
Let's calculate the project
The construction of any object is preceded by design, which will help determine the dimensions of the building as a whole and each room separately, the height of the walls and roof, their configuration, materials and their quantity.
- Even if there is no professional project, there should be at least sketches that will show not only the external contour with reference to the existing buildings on the site, but also the internal layout, the location of window and door openings, as well as the stove, for which a separate foundation.
- In addition, you should consider where and how electricity and water will be supplied to the bathhouse, and how the sewage system will be arranged. All this will help to calculate as accurately as possible the amount of necessary materials and equipment, and determine their total cost.
- In order not to guess which foundation is better and which wall thickness will be optimal, the easiest way is to use the data from one of the ready-made projects found on specialized sites. And even if it’s not even a budget small bathhouse, but a guest house with a bedroom in the attic, the basic parameters can be taken as a basis.
- Having opened one of these projects for a bathhouse made of aerated concrete blocks, we see that the thickness of the walls, which is usually oriented towards the middle zone of the country, is 300 or 400 mm. The foundation is often offered in the form of a monolithic slab - and this is the most convenient solution.
- Firstly, there is no need to pour a separate foundation for the stove, and secondly, it is easier to immediately provide slopes for draining water in the necessary rooms. If the foundation has a different structure, the floors will have to be structured according to the frame, or additionally poured onto the ground.
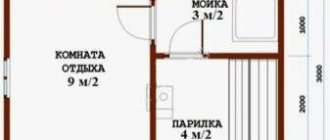
In the simplest version, a bathhouse is built measuring 3 * 4 m, and it consists of three rooms: a dressing room (a small room for changing clothes and relaxing), a washing compartment and a steam room. The entrance to the bathhouse is through the dressing room, from which a door leads to the washing room and steam room. There will be only two windows in such a bathhouse - in the room and the sink.
How thick are the blocks needed to build a bathhouse?
Let's return to the issue of wall thickness. The bathhouse is not a residential building and is heated only periodically, so precise calculations on the thermal efficiency of the walls need not be made. They usually focus on this: if the region is southern, and the one-story bathhouse is small in size, a masonry thickness of 30 cm will be quite enough. If insulation is provided on the outside, then the walls can be made 250 or even 200 mm thick, compensating for the difference due to the thickness of the insulation.
Expert opinion Vitaly Kudryashov builder, aspiring author
Ask a Question
Note: As an option, you can line them on the outside with brick without any thermal insulation - just do not forget to maintain a ventilation gap between the walls and provide vents in the brickwork. Usually, for this purpose, the vertical seams in the second row are left unfilled with mortar.
In central Russia, blocks with a width of 375 or 400 mm are used for laying aerated concrete walls; in cold regions it is better to take 500 mm, with mandatory insulation of the facade. By the way, the same gas block can be used as insulation, only with a lower density of 200 kg/m³. Many manufacturers offer such blocks today, and they are the most durable of all existing insulation materials.
Internal partitions with such small spans can be made with a minimum thickness of 50-75 mm. The same blocks can also be used to fill the reinforcing belt on which the floor beams and roof rafters will rest. To do this, the blocks are mounted parallel along the outer and inner edges of the wall, forming a tray. Reinforcement is placed in it and ordinary concrete is poured, the result is a monolithic reinforced beam, the thermal resistance of which is increased due to the aerated concrete shell.
How to calculate the number of gas blocks per bathhouse
So, you have decided on the thickness of the walls and partitions, now you need to calculate the aerated concrete blocks for the bathhouse. Let’s say a block of 600*300*200 mm is needed for external walls, and 600*75*200 mm for partitions. They have the same height and length, but the thickness is different, so you have to count them separately.
- First of all, you need to determine the exact length of the enclosing structures. With a bathhouse size of 3*4 meters, the perimeter of the external walls is 14 m. If the height of the walls is 2.5 m, the area of the walls is 35 m².
- Now from here you need to subtract the area of all openings - the front door and two windows. Let’s say the size of the window in the dressing room is 0.92 * 0.50 m, in the sink 0.45 * 0.45 m. The door is 2.0 * 0.8 m. Having calculated their areas and summed up the results, we get 2.26 m², which and minus the total quadrature. 35-2.26=32.74 m².
- All that remains is to multiply this figure by the wall thickness in meters, and we get the cubic capacity of the external walls: 32.74*0.3=9.822 m³. We add a 5% reserve for waste, and we get 10.374 m³ of gas blocks.
- The number of partition blocks is calculated in the same way, only you need to multiply the area of the partitions not by 0.3, but by 0.075 m.
If you use the same blocks for an armored belt, divide the perimeter of the walls by the length of the block (0.6 m), and calculate the number of blocks in pieces. By multiplying the pieces by the cubic capacity of one block, you get the cubic capacity of all the blocks needed to construct an armored belt. But you may decide to buy ready-made trays for this purpose - the so-called U-blocks, and they are sold individually.
The consumption of cement adhesive for the installation of blocks will depend on the thickness of the seams. Usually it is determined by the manufacturer and approximately a 25 kg bag is enough for a cubic meter of masonry. Taking into account the 5% reserve, for our cubic capacity of 11 m² we will need to buy 13 bags of glue. If you use foam adhesive, which is more economical, with a block width of 300 mm (only 2 strips are applied), 5-6 bottles may be enough.
If you build a bathhouse from substandard blocks (category 2 or 3), it will be impossible to install it on foam glue, and the consumption of cement glue will be too high and it will be expensive. In this case, the masonry is carried out using ordinary sand-cement mortar. However, through such seams the bathhouse will lose heat faster, so the walls must be insulated from the outside.
How to choose a sauna stove portal made of aerated concrete
A portal is a U-shaped frame around a hole in the wall into which the stove is installed. It consists of two columns with a crossbar, which most often are simply an imitation. The portal can be metal, ceramic, gypsum, stone. If the walls of the bathhouse are built from flammable material (wood), in the place where the fuel channel is installed, it is replaced with non-flammable material (brick). In this case, our walls are aerated concrete, and this material is non-flammable. There is no need to replace an aerated block with a brick, since they have the same fire resistance limit.
The stove itself can be brick or metal. Many people prefer to install an electric heater, which eliminates the need to build a chimney and stock up on firewood. In any case, the stove should provide a temperature in the steam room of +45 degrees, heat the stones to form steam, and not fill the room with carbon monoxide and smoke.
If the stove is still brick, and the foundation of your bathhouse is not slab, but, for example, strip, the installation of the stove will begin with pouring the foundation. In general terms, the whole process looks like this:
- In the place where the stove will be located, dig a hole 50 cm deep. The dimensions of the sides are 20 cm larger than the contours of the stove.
- The bottom of the pit is leveled with sand and compacted with crushed stone, the total thickness of the cushion is about 15 cm.
- M100 concrete is prepared from M500 cement. To 1 part of binder add 5.8 parts of sand and 1 part of crushed stone. Water is approximately 50% of the total mass of the mixture.
- Polyethylene or roofing felt is laid at the bottom of the pit, a portion of concrete is poured, a steel or composite mesh is placed, and the monolith is brought out flush with the floor. After 3-5 days, when the concrete has hardened well, you can continue working.
- Waterproofing material is laid under the masonry. Having laid out the first row with bricks, a blower door is installed on it, sealed with wire and asbestos cord.
- When all the rows along the height of the door are removed and the opening is blocked, the grate bars are mounted, the firebox and water tank are installed.
On average, the height of the stove is 9 rows of bricks, after which a metal ceiling is installed on the walls, on which stones are poured. These could be rocks such as jadeite, diabase or soapstone, but in Russian baths from time immemorial they used pebbles or river rubble of medium size.
Installation of a “pie” of insulation in a steam room
I would like to see the interior surfaces of the bathhouse finished in wood. For almost nothing, I managed to buy a machine for cutting aspen boards 20 mm thick and 125 mm wide. I used it for finishing, having previously smoothed the surfaces with a plane and sander. It turned out to be a good lining!
Despite the good thermal insulation qualities of gas silicate, additional insulation will never hurt. Especially in a steam room, where there are temperature changes and high humidity. Without insulation, streams of condensate will flow through the gas silicate. This is not very good for blocks, but generally disastrous for lining. First it will twist, then it will rot.
Therefore, I decided to equip the steam room with the traditional insulation “pie”: insulation - vapor barrier - lining.
The plan was carried out according to the following scheme.
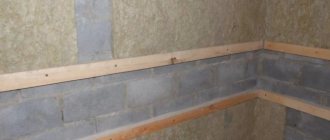
Stage #1 - stuffing slats on the walls and laying insulation
Paroc mineral wool must be laid over gas silicate, inserting mats between the padded slats.
I attached 50x50 mm slats to the walls vertically using wood screws. It turned out that they are easily screwed into gas silicate and are firmly held in it. A 50 mm thick insulation was laid between the slats. I tried to lay it tightly, squeezing the cotton a little before installing it in the slatted “window”. It is important here to avoid any cracks, otherwise cold bridges will negate all thermal insulation.
Laying insulation between slats packed on the wall
Stage #2 - installation of a vapor barrier layer
For vapor barrier, two materials were used - Metaspan film and foil. First, I shot Metaspan onto the slats with an overlap of about 15-20 cm. Then - foil, with the same overlap. The joints of both layers were taped with foil tape. Such a vapor barrier will not only prevent moisture and steam from accessing the Paroc insulation, but will also serve as a kind of continuation of the insulating layer. The foil vapor barrier Metaspan + aluminum foil will serve as a reflective mirror for thermal infrared rays coming from the steam room. The rays will be sent back, and accordingly the quality of thermal insulation will increase.
Fastening the Metaspan foil vapor barrier on top of the insulation
Stage #3 - making lathing for clapboard cladding
To ensure that condensate flows freely over the foil and is not absorbed into the lining, a ventilation gap was made. To do this, the sheathing had to be “pushed away” from the foil using small, 2cm thick bars nailed in advance.
Bar between foil and sheathing
Thus, first I nailed the bars through the foil (to the slats), and then horizontally fixed the sheathing of boards onto them.
The horizontal lathing for fastening the lining is made of boards
Stage #4 - paneling
The clapboard sheathing on the sheathing was done vertically using small nails.
Internal wall cladding with paired aspen lining
At first I thought that I wouldn’t treat the lining in the steam room with anything. But then I decided to play it safe against all kinds of rot and covered the boards with one layer of oil from Tikkurilla “Supi Saunasuoja”. The oil is colorless, but forms a matte film on the wood.
At this point, the design of the walls of the steam room was completed.
How to properly build a bathhouse from aerated concrete blocks with your own hands
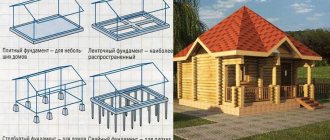
The main and most difficult stage in the construction of a bathhouse is the installation of the foundation and floor, since they are most often interconnected. The main task that needs to be solved is organizing the drainage of water into a sewer pipe or concrete container, which is located in the thickness or internal contour of the foundation. It all depends on the design of the latter.
Laying the foundation and organizing drainage
Here's how all this is organized depending on the type of foundation:
| Foundation design | Organization of drainage |
| Monolithic slab | The slab itself is made superficially, in the form of a monolithic bowl, the walls of which form a base. A slab thickness of 250 mm is quite enough for a small bathhouse. The thickness of the walls of the base depends on the thickness of the masonry, to which you need to add 10 cm. A plinth height of 45 cm is usually enough so that a slope can be created inside the bowl by pouring screed with variable thickness . The slope goes from the walls to the center of the room, in the floor of which there is a drain funnel connected to a sewer pipe. The pipe is laid in the foundation at the stage of formwork formation and reinforcement installation. It is important that it also has a slope, allowing water to flow into the sewer by gravity. A wooden ladder is installed above the funnel, through the cracks of which water flows. |
| Ribbon | When the foundation is strip, the floor is laid on the ground, and under it there can be a drainage pit with concreted walls. The tape under aerated concrete walls should always be buried below the UPG mark - this way it is less susceptible to seasonal movements. The depth of the hole should significantly exceed the depth of the tape so that water does not wash away the foundation if the bottom is simply filled with sand and crushed stone. Alternatively, the bottom of the pit can be concreted. In this case, an overflow must be organized, from which the water will flow into a drainage well located near the bathhouse. The slope towards the drain hole is formed here when pouring the floor slab . A wooden ladder with slits is also installed on top of it, through which water flows when washing. |
| Pillars or piles with grillage | In areas with uneven terrain, high groundwater levels or weak soil structure, the bathhouse may need to be placed on piles. In order for such a foundation to be rigid - and this is very important for aerated concrete - you should not use screw piles, it is better to make bored ones. The grillage must also be reinforced concrete. Essentially, this is the same tape, only raised above the ground. Due to their isolation from the ground, concrete floors have nothing to rest on, so a frame structure has to be built. To do this, additional supports are erected from bricks between the walls of the grillage and logs are thrown through them. The subfloor is made of sheet material, resting its edges on the skull beam, and the space between the joists is filled with insulation. The best material for this purpose is polystyrene chips, which are light in weight, do not become moistened, do not rot, and do not self-compact. Next come the layers of the floor “pie”: 2 layers of fiberglass board, self-leveling waterproofing, and a mesh-reinforced concrete screed, due to which a slope is formed towards the center of the steam room floor. Since the grillage, and accordingly the floors of the bathhouse, are above the ground, the drain pipe is “packed” in heat-insulating shells to avoid freezing . In cold regions, a heating electric cable is laid along with it. |
Concrete floors can be made parallel to the foundation; frame floors are usually assembled after the walls have been erected and covered with a roof.
So, we are building a bathhouse from aerated concrete with our own hands - the next chapter will present a step-by-step construction demonstration.
Preparation of materials and tools for masonry
In addition to general construction tools such as a level, plumb line, tape measure or square, when working with aerated concrete, you may need several special ones.
- The most convenient of them is the carriage, which allows you to dose the glue as accurately as possible and make seams of uniform thickness. There are several design options for this tool, consisting of a static base and a moving bucket or blade, due to which the glue is distributed. In any case, the width of the tool is selected in accordance with the thickness of the wall.
- In addition to the carriage, you can use a toothed ladle or spatula to apply glue, but the latter option is more convenient when masonry is carried out using ordinary mortar. All this may not be needed at all if you decide to install gas blocks with polyurethane foam glue. Since it is packaged in 750-950 ml tubes, you only need a mounting gun for application.
Expert opinion Vitaly Kudryashov builder, aspiring authorAsk a Question
Note: The choice of masonry material always remains with the customer; we would only like to note that when working with foam adhesive, only category 1 gas block should be used with a minimum of deviations from the geometric parameters.
- When masonry is made from aerated concrete blocks, a grater or plane must be used. This tool is needed to level the side surface of the cut blocks that usually end each row, and to eliminate differences between two adjacent blocks if they arise due to a mismatch in their heights. This is a very important point, since if there are differences in the masonry, stresses arise, and as a result, cracks.
- A wall chaser may be needed only when the horizontal reinforcement of the rows is done with rod reinforcement. However, if a small bathhouse with an area of only 12 m² is being built, only the most loaded areas can be reinforced: in the first row, as well as under the lintel and window sill. To make the task easier, it is easier to use basalt or fiberglass mesh for this purpose rather than rods.
- Sawing blocks can be done with hand tools. Externally, hacksaws for aerated concrete do not differ from those designed for working on wood - the difference is only in the shape of the teeth and their coating. After all, metal tends to wear out, and to prevent this from happening, the cutting part of the blade is coated with Teflon, or pobedite soldering is provided on the teeth. Hacksaws designed for cutting cellular concrete blocks also have a larger blade thickness.
To correct the position of masonry elements, a rubber mallet is used. There is also a device for carrying blocks on site, it costs about 1300 rubles. But if you use blocks with grip pockets provided at the ends, you can do without such a tool.
Wall masonry
Laying out the walls begins after the foundation has already acquired the design strength, and it begins with leveling and waterproofing the horizontal surface of the base. If the base is fairly level, a strip of roofing material is immediately glued onto it using bitumen mastic. If there are significant unevennesses, first the surface is leveled with a solution of cement and sand, and, without waiting for it to set, roll waterproofing is laid.
- The first row of blocks is already mounted on top of it, but again, on the central station. Cement, and even more so polyurethane glue can only be used for laying subsequent rows. Laying should begin from the corner with the highest mark. Level-aligned blocks are installed on it, as well as on one of the opposite corners, which will act as beacons.
- A cord is pulled between them (it is called a mooring), which will serve as a guide to the horizontality of the row. The height of the rows can be controlled using row slats, but no one uses them on small objects.
- The process of gluing the block depends on what kind of masonry material is used. If the adhesive is cement, then it is applied with a toothed ladle to a thickness of 2-3 mm, along the horizontal and vertical mounting surface. If foam glue is used, it is applied with two or three rollers (on partitions generally in one strip).
- At the end of the row, or at the border with the opening, there will always be an additional block that you have to cut out yourself. Starting the laying of the next row from the same place, but from the whole block, we obtain the chain ligation necessary for laying.
- Between the first and second rows, reinforcement is required along the entire length of the wall. In addition to the steel or composite rods and fiberglass mesh that we have already mentioned, you can use steel masonry mesh or galvanized perforated strip for this purpose.
- Since the windows in the bathhouse are small, they can not be structured during the laying process, but can be cut out after the wall has been erected. However, the place where it will be located must be marked in advance so that the row preceding the opening can be immediately reinforced in the area of the future window sill.
- It also makes no sense to make lintels in small openings, so it is not the places where they are supposed to be supported that are reinforced, but a row of blocks above the window. So that the mason can see where it will be located, a board of the appropriate length is mounted on the vertical surface of the masonry along the line of the opening. Vertical lines are marked with a marker. Cutting the opening with a hacksaw is inconvenient; you will need a chain saw.
- After the wall has been raised to the desired height, it is necessary to pour a reinforced monolithic belt. If the roof gables are also made of aerated concrete, the reinforcement beam should also cover their contour.
We have already mentioned that both partition blocks and tray (U-shaped) blocks can be used as permanent formwork. If the pouring is carried out using removable formwork, the unprotected reinforced concrete beam will become a bridge of cold. In this case, it is necessary to carry out external insulation of the bathhouse.
Roof
Most often, small baths are built with gable roofs. We will keep them in mind when talking about the structure of the rafters. As the finishing material, we will take the most popular metal tiles today.
The easiest way to calculate roofing material is to use an online calculator. There you need to enter:
- type of roofing material;
- width and length of the base;
- roof height;
- length of overhangs.
Click the “calculate” button and get a calculation of the rafters and sheathing (pitch and cross-section of materials). For a roof on a 3*4 m bathhouse, with overhangs of 50 cm and a height of 30 cm, the calculator gave the following result:
- rafters made of timber 40*150, length 385 cm, pitch 60 cm, total quantity 16 pieces;
- vapor-permeable membrane with an overlap of 10% - 3 rolls;
- lathing for metal tiles from boards 25*150 mm, in increments of 35 cm - a total of 18 rows;
- The roof angle was 63.43 degrees, which is quite suitable for this material.
If the gables are made of aerated concrete, then they will form the height and angle of inclination of the slopes. But more often the end part of the bathhouse roof is simply covered with a board. In this case, long slats are installed along the centers of the end walls of the building, supported on the ground, on which the height of the roof ridge is marked. Then, a horizontal beam is mounted on the edge of the wall and, adjacent to it, two inclined rafters that form a triangle. The vertex of the triangle will be at the point marked on the staff.
Similarly, the base of the pediment is formed with an arc of the side, after which the vertices of both triangles are connected by a ridge. Next, ordinary rafters are installed at even intervals, securing one end to the ridge and the other to the rafter beam. For rigidity, the rafters under the ridge are connected with short ties.
Next, they begin to structure the base for the metal tiles. Since the roof will be cold (the insulation of the bathhouse is carried out over the ceiling), a roofing membrane is mounted on top of the rafters. It is fixed with a counter lath, and then the lathing itself is filled in the transverse direction. As a result, the size of the ventilated gap will be 50 mm.
Washing tiles
There should not be any significant temperature changes in the washing room, so I decided to do without special waterproofing. Just cover the gas silicate with tiles and that’s it.
I bought high-strength ceramic tiles with a thickness of 8 mm. I laid it on frost-resistant, moisture-resistant glue. The glue was spread on the wall in a layer of about 10 mm, and the tile was pressed against it. All rows were controlled horizontally and vertically by the building level.
Laying tiles on gas silicate blocks
Foundation
Various types of foundations can be used as the foundation of a future bathhouse:
Tape, repeating the perimeter of the building. The foundation is formed into a wooden formwork with a reinforcement frame by pouring it with concrete mortar. The finished foundation of the bathhouse is immersed 0.5 m in the ground and is located on a compacted sand and gravel backfill.
Columnar, representing concrete supports installed at the corner points of the building and in areas where walls adjoin
Pay attention to the horizontal surfaces of the supporting elements, which should be located at the same level. Concrete is poured into pits with pre-installed reinforcement.
Cladding the rest room and attic
For the cladding I used the same aspen paneling as in the steam room. I just sewed it onto the slats horizontally. I did not use any vapor or thermal insulation.
First of all, I attached vertical slats (made of boards) to the gas silicate walls. I nailed the clapboard to them with nails.
Vertical slats are mounted on gas silicate blocks using wood screws
The walls of the rest room were covered with aspen paneling horizontally
Upon completion of the work, I covered the lining with antiseptic impregnation “Drevnokhron oak” (Polifarb) in 2 layers. The second layer was applied after the first had dried, that is, the next day.
Installation of roof truss system
The next stage is the arrangement of the rafter system for the gable roof. The work package includes the following:
- Installation of the base, rafter and transom for the finished structure. For the rafter system, an edged board is used (dimensions 100 × 40 mm).
- Installation of triangles for gables.
- Installation of wooden sheathing from beams with a step width from 60 to 100 cm.
- Arrangement of the attic floor base in compliance with technological gaps for ventilation.
- Gable trim.
- Installation of waterproofing material on wooden sheathing.
- Laying roofing material.
Results of the work
The cladding I completed does not indicate the presence of gas silicate walls. Entering the bathhouse, it seems that you are in a wooden log house. And what aromas come from the aspen lining when the steam room is heated!
This is what the wall by the front door in the recreation room looks like!
In general, gas silicate blocks are an excellent material for building a bathhouse. Besides, it's inexpensive. The construction of a gas silicate bath, compared to a wooden log house, will cost much less.
Ivan K.
Beautiful examples
Many consumers are skeptical about block baths, explaining this by their unsightly design. In fact, such buildings can be made very stylish and attractive not only inside, but also outside.
For example, a small building with a triangular roof and steps leading to a dressing room can be finished with light-colored siding panels. The lower part of the building should be lined with decorative brown bricks around the perimeter. In such a bathhouse, blue or purple tiles will stand out effectively.
At the entrance to the building, place brick columns and install a red tile roof on top, which would cover the entire structure as a whole (along with the terrace). Green plants and flowers should be planted around. As a result, you will get a very impressive bathhouse.
A bathhouse made of blocks can be made laconic, but no less attractive, by playing on the contrast of the walls and roof. For example, the external finishing of block ceilings should be done with snow-white or beige plaster/paint, and brown coverings should be chosen for the roof. Install high plastic windows and doors in such a structure. This will make the bathhouse more stylish and modern.
Requirements for structures
When building a bathhouse, a number of requirements must be taken into account:
The building must be located at least 1 m from the fence and 8 m from the residential building. A sewer drain for water and a ventilation system (forced or natural) must be installed inside. The material used for the construction and decorative finishing of the bath should not emit harmful substances when heated. The cladding must withstand changing environmental conditions, be resistant to temperature changes, and frequent exposure to moisture. Surfaces around furnace equipment must be covered with non-flammable materials
It is important to equip a high-quality chimney so that smoke does not enter the bath rooms. For a sauna in a house made of aerated concrete, the requirements change
For a sauna in a house made of aerated concrete, the requirements change.
Ventilation
When building baths from any material, the main task is to ensure good drying of all rooms after the bath. Then there will be no problems with fungi and mold.
When building a bathhouse from gas silicate blocks with your own hands, do not forget to leave ventilation holes at the top and bottom of the wall in each room. They can probably be cut out later, but why complicate your life. To prevent suction from them while vaping, they are closed with doors. And they don’t go into the room - they end up under the insulation. Their task is to remove all steam from under the casing after visiting the steam room.
One of the options for external insulation of walls made of foam blocks with subsequent finishing