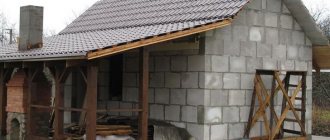
Insulating a bathhouse is a difficult task. however, if it is built from gas silicate blocks, the insulation procedure becomes even more complex, requiring consideration of the properties and performance qualities of the material.
A bathhouse is a room that, by definition, requires high-quality insulation. If its walls are made of such a specific building material as aerated concrete (or gas silicate), insulating the walls or other planes becomes a more difficult task. It is necessary to ensure normal operation of the porous material, protect it from contact with moisture, and eliminate the possibility of condensation formation. These issues can only be resolved in a comprehensive manner; to miss even one of them means to create conditions for the gradual destruction of walls and deterioration of the microclimate. Before insulating a bathhouse made of aerated blocks, it is necessary to carefully study the characteristics of the material, operating conditions, and the processes taking place within the walls. The issue is serious, therefore, it is necessary to consider it in more detail.
Specifics of aerated concrete
Aerated concrete is a building material from the cellular concrete family. It was created about 100 years ago with the goal of obtaining a light and warm material for the construction of economical housing. The creators of aerated concrete managed to fulfill their task. They managed to obtain a material with low thermal conductivity and low weight, which allows saving on the foundation and heating of the house. These advantages appeared due to the porous structure. The mass of aerated concrete is replete with small (2-4 mm) air-gas cavities, which give the material all its working qualities, both positive and negative. The material is soft and friable and does not withstand compression and tension loads. In addition, aerated concrete is hygroscopic and easily absorbs moisture. This property is typical for all types of concrete, but gas silicate not only absorbs, but accumulates moisture inside air bubbles.
This is a dangerous property, since in winter the water freezes, expands and ruptures the material from the inside, like an explosion stretched over several months or years. This is the most undesirable scenario for the development of events, but less dangerous options are little better - wet gas silicate is not able to retain heat, it becomes heavier and begins to overload the supporting structures.
Because of these qualities, aerated concrete must be protected from contact with moisture by all available methods. The outside of the material is finished with plaster, cladding and cladding are installed. The inside is plastered and painted, and covered with wallpaper. The specifics of these works differ little from the general rules that require the possibility of drying the material. To do this, it is necessary that the permeability of the finishing layers inside is minimal, and outside - maximum. This is the only option that ensures normal removal of moisture from the walls. Otherwise, water will begin to accumulate inside the pores of aerated concrete and create conditions for the destruction of the building.
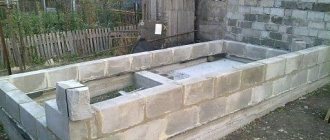
Technology of building a house from expanded clay concrete
If you are building an expanded clay concrete house, follow the recommended technology and you will succeed.
Foundation
Professionals say that a strip foundation is most suitable for building a house made of expanded clay concrete blocks (by the way, just like a monolithic house). The technology for its arrangement is simple, so you can easily make the foundation needed for your house from expanded clay concrete blocks yourself. We carry out the following work:
- we dig a trench under the foundation (the width exceeds the width of the wall by 10-15 cm, and the depth is 50 cm);
- Place a sand cushion on the bottom (height – 15 cm);
- moisten the sand generously with water and tamp;
- pour a layer of crushed stone (15 cm high);
- compact the crushed stone;
- we arrange a waterproofing layer (for example, roofing felt);
- we install the formwork, which must be waterproofed;
- We make a reinforcing frame inside the formwork;
- pour concrete;
- after 5 days we remove the formwork, waterproof the upper and side surfaces of the foundation with mastic and roofing felt;
- fill the cavities between the foundation and the trench with sand;
- we take a break for 1-3 months so that the foundation settles;
- We are starting to lay the walls.
We lay expanded clay concrete wall blocks
The masonry algorithm looks like this:
- We lay roofing material on the foundation in 2-3 layers (coat each layer with mastic);
- place 2 blocks on the solution from each corner;
- along the entire perimeter we stretch a cord between the corner blocks, along which we align the laying of expanded clay concrete products of the first row;
- we check the masonry with a level, adjust the position of each block using a rubber mallet;
- we take a break for 1 day so that the row of masonry settles;
- We build subsequent rows in a checkerboard pattern, starting from the corner (we lay no more than 3-4 rows per day);
- Before laying the floors between the floors and the roof truss system, we install reinforcing belts.
Options for laying standard blocks depending on the desired thickness:
Comparison of baths made of aerated concrete and other materials
The main requirement for a bathhouse material should be the ability to retain thermal energy. A traditional Russian bathhouse is built from wood - timber or logs. There are also brick baths, which are considered less preferable due to the high thermal conductivity of the material and the high fuel consumption for heating the premises. Recently, there has been a fashion for baths made of aerated concrete, which has a successful set of working qualities:
- low thermal conductivity allows you to save and accumulate thermal energy;
- Gas silicate is lightweight and easy to work with. The construction of the bathhouse is quick and does not require the use of lifting equipment;
- unlike wood, aerated concrete does not rot (although contact with water is no less destructive for it);
- The cost of a bathhouse made of aerated concrete is low and allows you to save significant amounts.
It is not advisable to compare aerated concrete with brick or other piece elements - all dense building materials have high thermal conductivity and are uneconomical in terms of heating. Therefore, the main competitor for gas silicate is wood. It has a lot of advantages:
- is an excellent heat insulator and does not require insulation;
- has a considerable service life - there are baths that are 100 years old or more;
- the frost resistance of wood is practically unlimited, which fundamentally distinguishes it from other materials;
- environmentally friendly material, has a pleasant smell, creates a comfortable and attractive microclimate in the room;
- wood is a traditional material for building a bathhouse and is psychologically more preferable than other options.
However, wood has many disadvantages:
- tendency to rot;
- ability to burn;
- logs or beams are heavy, it is difficult to build from them without lifting devices.
In a number of indicators, aerated concrete and wood are almost identical. For example, density (500 kg/m3 for wood and D500 gas blocks), thermal conductivity (both have an indicator of 0.14 W/m·C), almost the same water absorption. At the same time, wood does not allow water vapor to pass through, and aerated concrete is able to “breathe,” which allows you to remove excess water vapor and protect the interior from the appearance of fungus and mold.
The only indicator by which wood is many times superior to aerated concrete is its ability to withstand pressure (439 kgf/cm2 versus 50 kgf/m2). However, the bathhouse is a low, most often one-story building. The weight of the walls cannot create excess pressure that is dangerous for the lower elements. Therefore, in terms of technical and physical indicators, aerated concrete and wood are approximately equal. The choice of material is made based on personal preferences and capabilities. Many owners of bathhouses made of aerated silicate blocks explain their decision simply - lifting one block weighing 25-30 kg is much easier than lifting a heavy log to a height of 2-3 m. Working with aerated concrete is easier and faster, and also cheaper. These considerations largely determine the choice of wall material. There is one more reason - the shrinkage of a wooden bathhouse takes much longer and occurs more intensively than the shrinkage of walls made of aerated blocks. The ability to quickly complete the finishing process and get a finished bathhouse attracts users and forces them to choose a cheaper and more practical material - aerated concrete.
Thickness of bathhouse walls made of aerated concrete
A bathhouse is a small building used only periodically. Before using the bathhouse, it is well heated, creating a comfortable microclimate. The rest of the time, the temperature inside the premises does not matter, since people practically do not go there. This allows the use of relatively small-sized gas blocks. As a rule, the thickness is calculated based on the mechanical parameters of the building - strength and load-bearing capacity. In this regard, the choice depends on the size of the bathhouse, the height and composition of the interior, the type of roof and other indicators. For an ordinary medium-sized bathhouse, it is considered sufficient to use gas blocks measuring 600 × 200 × 300 mm installed on an edge (the resulting wall thickness is 200 mm). This is an option convenient for construction - laying blocks is done faster.
If a large enough bathhouse is being built in the form of a guest house with a rest room, the thickness of the walls will have to be increased. Here the dimensions depend not only on the area of the building, but also on the climatic characteristics of the region. For the southern regions, a wall thickness of 250 mm is sufficient, for the middle zone - 300 mm, and for the conditions of the Urals and Siberia, walls with a minimum thickness of 350 mm will be needed.
Insulation of aerated concrete baths
Aerated concrete is a material that can accumulate thermal energy. Low grades (D250-D400) are considered unsuitable for serious construction, only for use as thermal insulation. At the same time, the construction of a bathhouse allows the use of low-density gas blocks with minimal thermal conductivity. The low height of the bathhouse does not allow the maximum load on aerated blocks to be exceeded, which is used by developers to build walls with increased heat-saving capabilities.
However, insulating a bathhouse is not considered an excess and is done almost everywhere. As a rule, this is done to reduce the thickness of the walls. The small size of the building, relatively light roof and walls do not create significant loads on the foundation. You can significantly save on the base and the total amount of building materials, and transfer some of the heat-saving functions to thermal insulation.
To properly organize the insulation of aerated concrete baths, it is necessary to consider the conditions in which the external walls are located. A bathhouse is a damp room where water is heated and a large amount of water vapor is released. In addition, an atmosphere supersaturated with water vapor is deliberately created in the steam room - this is normal operating mode. Therefore, it is necessary to protect gas silicate walls from contact with moisture from the inside and ensure free removal of moisture from the outside. This condition fully complies with the requirements of SNiP on the composition of the wall cake, but in the situation with the bathhouse there are some nuances.
Unlike residential premises, where there are almost always people and the heating system is constantly running, the bathhouse is used only periodically and experiences significant temperature changes. Air humidity changes dramatically, which creates the opportunity for condensation and freezing of moisture in the thickness of the walls. This is only relevant for the autumn-winter season, but in most regions of Russia it lasts up to 9 months. Therefore, before insulating a bathhouse made of aerated concrete, it is necessary to analyze all aspects of its operation, consider the composition of the wall pie and choose the optimal method of installing insulation. It is important to understand that there are no absolutely correct decisions in this matter; there is always a certain combination of conditions and circumstances. If you cannot choose an insulation option, it is recommended to contact specialists or use the most popular solutions.
Installation of a “pie” of insulation from the inside
In addition to the very need to insulate the bathhouse from the inside (including with your own hands), it is important to make the right insulation “pie”.
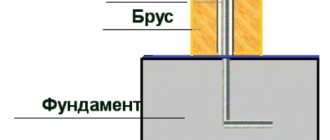
For lathing, you can use wooden blocks or a metal profile. We recommend treating the former with an antiseptic to increase service life, and choosing metal profiles from the galvanized category (not subject to rust).
It is best to use dowels as fasteners: they will make it easier to work with blocks, which have a stronger structure than wood, and will provide a tighter connection. Although, in order to save money, it is permissible to use wood screws.
A ventilation gap is left between the finishing materials and the layer of vapor and water protection so that condensation can flow down without affecting the insulation.
Insulation of walls in a bathhouse made of foam blocks (the diagram is suitable for all block walls of bathhouses)
External insulation, dew point
When considering the removal of steam from porous walls, it is necessary to understand the physical essence of the processes occurring. If moisture in a gaseous state is absorbed into aerated concrete from the inside, then liquid water evaporates from the outside. This occurs due to a decrease in the temperature of the outer layers of the wall. There is a concept - dew point. This is a conditional plane inside the walls in which the transition of steam into a liquid state occurs. It is called a point, since the very appearance of the term is associated with graphic images of walls in section, where the transition area is displayed as a point.
Water vapor, absorbed from the inside, spreads throughout the entire volume and reaches a region of low temperature, at which condensation occurs and liquid forms. This is a common occurrence, but for external walls it does not bode well. Removing liquid moisture is more difficult and takes more time. At the same time, steam flows from inside as usual. Water begins to accumulate, the wall becomes wet and ceases to perform heat-insulating functions. In winter, another area appears - the zero point. In it, water turns into a solid state, that is, it freezes. An insurmountable barrier arises, the removal of moisture from the walls stops, creating conditions for the destruction of the wall material.
If there is no external insulation, dew and zero points appear inside the walls. However, if a layer of thermal insulation is installed outside, both planes move outward. When installing a sufficiently thick layer of insulation, both areas are outside the aerated concrete, the material retains its working qualities.
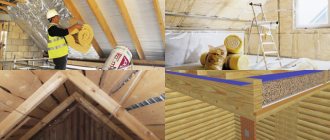
Material for external insulation
It is important that the thermal insulation is permeable to water vapor and does not interfere with the drying of the outer surface of the walls. For this purpose, mineral wool is used; it is the only fairly effective and inexpensive vapor-permeable insulator. There are a lot of videos online that demonstrate external insulation using polystyrene foam or penoplex. This is the wrong approach since both materials are impervious to moisture. They trap steam inside the walls and contribute to their getting wet, which sooner or later will lead to dire consequences (destruction of materials). At the same time, it is necessary to take into account that visual monitoring of the condition of gas silicate blocks will be impossible - they are covered on both sides with several layers of thermal insulation and finishing. Therefore, it is possible to detect the results of an incorrect choice of thermal insulation only in the final stage, when the walls require major repairs.
If an impenetrable heat insulator has already been installed on the outside, there is no need to rush to dismantle it. the problem can be solved in another way - by installing a reliable cutoff of the walls from moisture from the inside, as well as organizing high-quality ventilation of the interior. Here you will need the help of specialists who can calculate the standard air exchange and select equipment with the ability to heat the supply flow.
Internal insulation
In addition to external insulation, it is necessary to ensure thermal insulation of gas silicate blocks from the inside in the bathhouse. In this case, the material is comprehensively protected from contact with moisture and hot air is cut off from the walls. This eliminates the formation of condensation and reduces heat loss, reducing fuel consumption when heating rooms. The need to warm up the walls made of aerated blocks disappears, limiting itself only to the convection increase in air temperature in the rooms.
In addition, installing thermal insulation from the inside reduces the amount of steam absorbed into the wall. In this regard, internal thermal insulation functions as a vapor barrier, cutting off humid internal air from gas blocks.
It must be taken into account that internal insulation reduces the functionality of aerated concrete walls. They are cut off from contact with hot air and are switched off from the thermal circuit of the bath. From the moment the insulation is installed, the walls simply cannot perform heat-saving functions, remaining only a mechanical fence, protection from wind or bad weather. This is a negative factor when it comes to residential buildings. However, for a bathhouse this option is quite convenient - you can use the cheapest material and not build thick walls. The main task is to ensure mechanical strength and load-bearing capacity.
At the same time, the internal insulation of a bathhouse made of gas silicate blocks cannot guarantee protection of the walls from contact with water vapor. Small holes always remain, steam penetrates through the sockets for fasteners, areas of passage of pipes, wires, and structural elements. Therefore, you should not forget about the need to properly organize the drying of walls.
Materials for internal insulation
It is necessary to choose the right insulation materials for walls, floors and ceilings. Mineral wool, which is effective for external insulation, will not work here, since it will have to be placed in a sealed vapor barrier cocoon. Any rupture of the film will create conditions for the insulation to become wet and stop functioning.
The best option is to use polyethylene foam with a foil layer to reflect IR rays. This material is good for installation on walls and ceilings. There are a lot of brands on sale - Izolon, Penofol, Alufom, Teplofol, etc. All these materials are rolled polyethylene foam of different thicknesses. They are absolutely impervious to moisture, effectively retain thermal energy, are easy to install and are not too thick. This is an important point, since installing a thick layer of insulation on aerated concrete walls significantly reduces the internal space, which is not very large. Considering the sheathing, which also takes up a certain volume, the ability to reduce the thickness of the insulating material seems very useful. For comparison, a 4 mm layer of penofol is equivalent to a 40 mm layer of polystyrene foam or penoplex.
Step-by-step instruction
In order to understand how to insulate a cinder block bathhouse from the inside, you need to carefully read the theoretical materials on this topic and disassemble everything step by step, starting with insulating floors and ending with ceilings.
As mentioned earlier, the process of insulating a block bathhouse made of various materials (cinder block, foam block, aerated concrete, expanded clay concrete) is practically the same.
That is why we will consider in more detail the process of insulating a bathhouse made of blocks using the example of an expanded clay concrete structure.
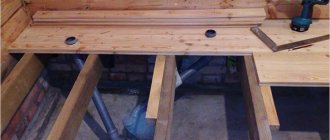
Floors: how to do it right
Insulation of a bathhouse made of blocks should begin with thermal insulation of the floors.
- First of all, a layer of slag, glass wool or expanded clay is poured onto the soil base. In order to keep the heat in the room much longer, it is necessary to ensure the thickness of this layer is at least 35 cm;
- A reinforced expanded clay concrete screed is mounted on top of the insulating layer;
- After the reinforced screed is ready, ceramic tiles or floorboards are laid on top of it.
To carry out insulation work on concrete floors, you must:
- First of all, waterproofing is installed on the concrete sub-base. To do this, you can use rolled waterproofing or coating;
- Foam plastic, mineral wool or expanded clay are laid on top of the waterproofing. The thickness of the layer must be determined based on the heat-insulating properties of the selected material;
- Plastic supports must be installed on top of the insulation to provide a ventilation gap;
- A reinforced mesh is laid on plastic supports, on top of which a concrete screed is poured;
- Next, you can lay ceramic tiles on top of the concrete screed, or use them as a base for wooden floors.
To install the insulating layer of wooden floors, the following sequence should be followed:
- The first step is to install the subfloor. To do this, cranial bars are packed along the lower edge of the beams;
- Cut cheap boards are placed on top of them;
- Next, the subfloor is covered with a waterproofing layer, which must be vapor-tight. The waterproofing film is laid along the entire perimeter and covers the walls by 15-20 cm. A construction stapler is used for fastening, and the joints are taped with double-sided tape;
- Next, an insulation layer is laid, and a waterproofing film is again laid on top of it. You can also use roofing felt as waterproofing;
- The final stage is laying the finished floor and installing skirting boards.
Walls
Due to their porous structure, expanded clay blocks retain heat perfectly, and an additional insulating cake will help avoid the accumulation of moisture in the structure of the bath structure.
You should also remember that the insulation of a cinder block bathhouse from the inside is significantly different from the outside and its significance is more significant.
It is important to take the insulation process as responsibly as possible.
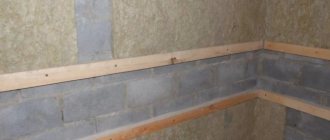
Before you begin insulating a bathhouse made of expanded clay concrete blocks, you should carefully prepare the walls. During the preparation process, they are cleaned of dirt, dust and paint residues, and also plastered to a smooth surface.
After the walls are prepared, you can proceed directly to the insulation process:
- A wooden sheathing is installed using pre-installed waterproofing. Timber is quite suitable for this, since it is easy to install and relatively inexpensive. The thickness of the timber must be at least 50 mm. It is worth noting that the distance between the vertical components of the sheathing should be 3 cm less than the width of the insulation boards, since only under such conditions will the insulation be able to adhere independently to the sheathing;
- Basalt slabs are inserted into the empty cells of the equipped sheathing;
- After the insulation boards are installed in place, a vapor barrier layer is laid on top of them. A foil-coated membrane based on kraft paper is suitable for this. It is necessary to lay a vapor barrier with a reflective layer inside the steam room. The vapor barrier fabric is overlapped by 10-20 cm, and the joints should be carefully taped. The membrane is attached to the sheathing using a construction stapler;
- In order to properly arrange the outer wall cladding, providing a ventilation gap that will allow condensation to be removed from the foil-coated surface of the vapor barrier, it is necessary to install a counter-lattice. It is attached on top of the vapor barrier film in the direction transverse to the beam;
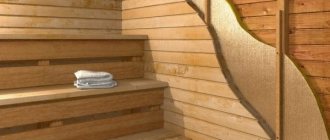
- The final stage is the process of external wall cladding. For the walls of a steam room, it is recommended to use wood of natural origin, which contains an acceptable amount of resins. It is recommended to install wood boards horizontally, as this will simplify the dismantling of the lower layers, which deteriorate when exposed to moisture.
This is explained by the fact that foamed polypropylene can withstand temperatures up to 150 degrees.
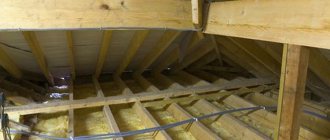
Ceiling structures in block
The insulation of a bathhouse made of foam blocks and its ceilings is of utmost importance, as is the insulation of the ceilings of an expanded clay concrete bathhouse. This can be explained by the fact that it operates in extreme conditions under the influence of low, on the one hand, and high, on the other, temperatures.
In order to retain heat inside the bath room, there are two ways to insulate the ceiling:
- Closed;
- Open.
For baths that do not have a floor in the attic, an open insulation method is used.
To do this, a thick layer (at least 25 cm) of loose heat insulation is poured over the ceiling structure, covered with a waterproofing film.
Bathhouse premises and requirements for their insulation
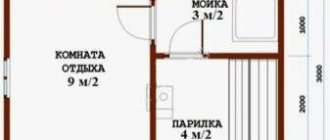
As a rule, a bathhouse consists of the following premises:
- dressing room (acts as a vestibule for cutting off cold air and a locker room);
- washing compartment;
- steam room
Some baths also have relaxation rooms with a pool or plunge pool for cooling after the steam room. However, this is not typical for small private baths, where they are limited to functional rooms.
The main and most important room of the bathhouse is the steam room. It should be insulated as much as possible, since this is where the highest temperatures are created. The next level of thermal insulation is considered to be the washing compartment, where it is necessary to ensure comfortable temperature conditions. The most moderate requirements are placed on the dressing room - in traditional Russian baths it is not insulated at all, although in winter the heat from the stove may not be enough. If we consider a bathhouse made of aerated concrete, insulating the dressing room becomes a necessity - humid internal air hitting the cold walls will cause abundant condensation, which is unacceptable. Therefore, internal insulation of a bathhouse made of gas silicate blocks should be carried out in all rooms, regardless of purpose and size.
It is necessary to insulate not only aerated concrete walls, but also floors and ceilings. This is done at different times - for example, insulation of the floors of a bathhouse should be done during the construction process, with the laying of thermal insulation material on the subfloor, under the screed and floor covering. Bathhouse ceilings are insulated after laying (or laying) the ceiling; this procedure can be performed during finishing work.
Features of different materials for insulation
Bathhouse premises are divided into types depending on the internal microclimate. The washing room, steam room and combustion chamber have high humidity and temperature, and the rest room and dressing room have normal conditions.
The following insulation is used for bathhouse premises:
- jute felt;
- mineral wool;
- expanded clay;
- Styrofoam.
The materials are intended for different rooms, because... differ in properties and characteristics. When choosing, the hydrophobicity of the insulation and the ability to release harmful substances when heated are important.
Jute felt
Jute felt
The production uses natural fiber from the plant of the same name. Natural resins protect the threads from rotting; the material is durable, environmentally friendly, and has a uniform density throughout the mass. Polyester fibers are used for bonding, which impart elasticity.
Mineral wool
Mineral wool
For production, rocks, glass, and blast furnace waste are used, which are melted in high-temperature chambers and form fibers.
There are different types of mineral wool:
- glass wool;
- stone wool;
- slag.
Glass wool absorbs moisture less than the other two types, but is also used in bath rooms in combination with steam protection. Mineral wool reacts steadfastly to the action of chemicals and, in the event of a fire, forms a barrier to the spread of flame. Getting wet reduces the heat-shielding properties.
Expanded clay
Expanded clay
Porous insulation is made from clay shale as a result of firing. Subsequent processing results in material with different bulk densities. Expanded clay can weigh from 150 to 850 kg/m3.
Environmentally friendly insulation is divided depending on shape and size:
- crushed stone;
- gravel;
- sand.
The first two varieties have a large, medium and small fraction. Sand and small-sized elements are not used to insulate a cinder block bathhouse from the inside, because... Due to the high density in the mass, it conducts internal energy faster. Large and medium granules are used, which require the construction of a special frame into which the material is poured.
Styrofoam
The material belongs to the group of foamed polymers. Gas occupies a large volume in the mass, so the structure contains isolated balls glued together during the production process. Thermal insulating properties are due to the low conductivity of the internal elements.
Internal insulation with tight installation of the insulator to the wall
Internal insulation of a bathhouse made of gas silicate blocks is carried out in different ways. The most common option is to install thermal insulation material close to the wall. This method saves internal space, simplifies and speeds up work.
As a rule, the material is installed directly on a wall made of aerated concrete. They use adhesive compositions (adhesive for laying aerated concrete or tile adhesive is suitable), as well as mechanical fastening with dowels and screws. The first option is more labor-intensive, but effective and reliable. The absence of a gap between the wall and the insulator prevents moisture from entering from the air, condensation and wetting of the aerated concrete. Fastening with screws is less dense and can cause moisture to enter the gas blocks. In practice, they usually combine both options - stick the insulator on the wall and fix it with screws so as not to delay the work.
If an impermeable material is used, a vapor barrier can be dispensed with. Sheets of foam plastic (penoplex) or strips of foamed polyethylene are installed tightly to each other, the cracks are filled with polyurethane foam and taped with aluminum tape. However, it is necessary to remember the numerous points of passage of pipes, wires, brackets and other structural elements. Each area must be carefully sealed using foam or silicone plumbing sealant.
Thermal insulation methods
Mineral wool, expanded clay, foil polyethylene foam
- Most often, mineral wool (walls, ceilings) is used to insulate a bathhouse made of gas silicate blocks, foam concrete or brick for internal thermal insulation, covering it with foil or foil-coated polyethylene foam. But for the floor it is cheaper to use expanded clay, if, of course, the building is built on a strip foundation (for columnar and pile foundations with a high grillage, this will be an extra load). Also, bulk material can be used for external insulation of the ceiling of a bathhouse, that is, it can be filled in the attic, if one is provided for in the project.
Extruded polystyrene foam of different thicknesses (10/220/30/40/50/60/70/80/90/100 mm)
- For exterior work, polystyrene foam or extruded polystyrene foam is used - they are very similar in structure, but differ significantly in density. So, if for foam plastic this figure is 15 kg/cm 3 and 25 kg/cm 3, then for penoplex it is much higher than 35 kg/cm 3 and 45 kg/cm 3, respectively. By the way, the frame bath is also insulated from the outside, while the insulation of the steam room of a log bath is usually done only from the inside, although there are exceptions.
Comparative chart of heat resistance of materials by their thickness
- Of course, you understand that the thermal conductivity of materials, just like their price, can differ significantly from each other. But this does not mean at all that you need to buy exclusively expensive products; it’s just that in each case you can use this or that material with maximum efficiency, even if its quality is slightly lower. For example, if you don’t need to save distance, then why don’t you use 30 or 40 mm foam instead of 20 mm foam when you line the bathhouse with siding?!
Advice. If you use mineral wool to insulate the ceiling and/or walls, then choose only stone (basalt) or glass. The fact is that slag wool (from blast furnace slag melts) contains particles of iron ore, which will rust and the material will soon become unusable.
Floor insulation
Floor insulation scheme
Pay attention to the floor insulation diagram in the bathhouse and let's look at the numbers, which materials and in what order you will need for this. Instead of a concrete slab (number 6), we will have soil on which the remaining layers will lie, and the number five indicates an expanded clay-sand cushion. Next comes the waterproofing (4), but in our case it is better to place it on the ground, creating a cut-off, and pour the screed (3) along the beacons directly onto the pillow.
There you also see ceramic tiles (2) and a wall (1), along the perimeter of which an edge strip is installed. It is interesting that when insulating a log bathhouse is done, it is not necessary, since wood itself is a good thermal insulator, but for a strip foundation such a measure is necessary so that the cold from it is not transferred to the screed, which will significantly reduce the effect of installing the insulation.
Laying out the soil for pouring the screed
But this is all schematic, but in reality, insulating a bathhouse made of foam blocks or bricks begins with planning and compacting the soil on the floor. Then lay cut-off waterproofing directly on the soil with a fold over the walls at the height of the screed and pour a sand cushion of at least 20 mm thick onto it.
Please note that we recommend this order, although many advise doing it the other way around (first sand, then cutting off) - in this case, the sand will remain dry and will increase the thermal insulation power of the floor.
Lighthouses on expanded clay
Expanded clay is poured onto a sand cushion, and the thickness will depend not only on the average soil temperature, but also on the fraction. So, expanded clay can be less than 5 mm, which is considered as expanded clay sand, as well as 5-10 mm - small, 10-20 mm - medium and 20-40 mm - large fraction. Such a pillow can be reinforced, as shown in the photo above, but you can also do without it - after all, the load on the floor in the bathhouse is small.
The lighthouse profiles are mounted directly on the expanded clay, and the next day the screed is poured. Just don’t forget to leave a waterproofing film and edge tape near the wall to prevent the transfer of cold from the foundation to the floor surface. By the way, the tape can be made from foil polyethylene foam.
Walls and ceiling
Scheme for insulating brick baths
The picture at the top shows how a bathhouse is insulated from expanded clay concrete blocks, foam and gas blocks, bricks and even logs. But this is a general scheme and there are some nuances here, which mainly depend on the material and method of manufacturing the frame for wooden lining.
Imagine that such a sheathing is made from a wooden beam, which is fixed directly to the wall, without consoles, that is, there are no gaps between them.
Full thermal insulation of the wall
In such cases, insulation materials (mineral wool, polystyrene foam, extruded polystyrene foam) are placed tightly directly between the bars, but a waterproofing or vapor-permeable film should be installed underneath. Then, from above, all this, together with the sheathing, is covered with a layer of foil or thin (2-5 mm) foil-clad polyethylene foam, which serves as a reflector. After all, the wooden lining is sewn on.
Advice. To fix foil materials, it is best to use not a stapler, but thin slats such as glazing beads, in order to penetrate the insulation as little as possible.
Mineral wool is threaded through the console
The sheathing can also be mounted on consoles, for example, these will be CD profiles for fastening drywall, which are installed on U-shaped metal hangers. If you lay the insulation in the same way as before, you will be left with uncovered strips through which heat will escape.
Therefore, the insulation of a bathhouse made of cinder block or brick with such a sheathing must be done under the profile, simply by pinning the insulator on the console, and then installing the frame.
For installing thermal insulation on the ceiling, the instructions remain the same as for the wall (in both cases), only sometimes additional fixation of the material is required so that it does not fall. In the case of profiles pressed against the ceiling, when mineral wool is laid between them, you can pass a nylon thread in the form of a mesh with a large cell, fixing it with small nails.
But in the case of foam plastic, you can simply attach it in several places on the sides to the wooden profiles with self-tapping screws.
Internal insulation with ventilated gap
One of the most effective ways of internal insulation of a bathhouse is to create a ventilated gap between walls made of gas silicate blocks and thermal insulation. This method is often used for external insulation of residential buildings, but it is practically not used from the inside. The reason for this is the inconvenience of hanging furniture or household appliances, a significant reduction in internal space, and insects, rodents, and birds can settle in the gap.
However, for a bathhouse made of aerated blocks, this option seems to be the most successful. It is extremely difficult to provide guaranteed protection against the penetration of moist air into the wall; sooner or later cracks will open, cracks or holes will form. Therefore, it is more correct to ensure the possibility of drying the walls using a ventilated space between the insulation and the wall material.
In this case, walls made of aerated concrete are practically excluded from the thermal contour of the building, remaining only a mechanical fence. However, the heat-saving ability of the insulation will be quite sufficient, especially since traditional cladding made of wooden boards (lining) will play the role of an additional heat insulator. But it will be possible to dry the wall both from the inside, by evaporating moisture into the ventilated gap, and from the outside, in the usual way.
From a design point of view, you need a frame that carries thermal insulation and sheathing. It is separated from the wall by 4-5 cm (the usual size of a ventilated gap). Air exchange is carried out through vents - slotted holes located in the lower and upper parts of the wall (usually, covers for them are made outside the walls so as not to violate the tightness of the lining of the internal surfaces of the bathhouse). The vents open only after using the bath; they are closed during heating and bath procedures.
There is a lot of controversy surrounding this method. Opponents argue that cold walls will become surfaces on which condensation will actively accumulate. The material will get wet and begin to deteriorate. However, this statement is refuted by operating practice - in winter, steam immediately settles on the surface of the wall and forms a layer of frost. After finishing using the bathhouse, it gradually evaporates. Since the time of using the bathhouse is relatively short, this frost does not have time to form a blockage in the ventilated space. In addition, the technique does not reject the need to seal the space behind the frame and form a complete cutoff of internal air from the ventilated cavity. The essence of the technique is not the constant removal of steam, but the ability to eliminate the accumulation of moisture in the wall material.
Method of insulating an expanded clay concrete house from the outside
Expanded clay concrete walls can be insulated with foam plastic using the wet facade method.
Let's consider two options for insulating expanded clay concrete walls from the outside. The first is the installation of thermal insulation with the preliminary construction of a wooden frame. This method is called a ventilated facade. The second is the installation of insulation boards under the plaster. The method is called wet facade.
Insulation of a wall made of expanded clay concrete blocks using the ventilated facade method allows you to reduce the heating of the room in the summer. Thus, the house will have a comfortable temperature all year round. The essence of the method is to leave a ventilated gap between the thermal insulation and the exterior finish, in which air always circulates from bottom to top. It simultaneously cools the façade finishing in summer and carries away steam that escapes from the room through the walls and thermal insulation.
Installation work is carried out in accordance with the following rules:
- there should be no air pockets between the insulation and the wall;
- thermal insulation in slabs or rolls is placed between the sheathing;
- glue is used for fastening to the wall;
- a wind barrier or diffusion membrane is laid on top of the thermal insulation (a vapor barrier cannot be used);
- the counter-lattice is filled with bars with a cross-section of 15 mm or more.
You can attach any finish to the counter-lattice, for example, vinyl siding or blockhouse. There should be gaps at the bottom and top of the finish so that air can penetrate under it. Creating conditions for convection is an important aspect when constructing a ventilated façade.
Thermal insulation boards are attached directly to the wall using universal construction adhesive. During installation, the principle of brickwork must be observed, that is, the seams of adjacent levels should not coincide. The slabs are additionally secured with plastic mushroom dowels, 4-5 pieces per slab. Immediately on top of the insulation, the first layer of plaster is applied, which is reinforced with fiberglass mesh before drying, the ends are closed with corners.
After the first layer of plaster has dried, you can apply the second, finishing layer. It can be made smooth or with indentations, the so-called bark beetle. Finally the finish is primed and painted. In addition to following the technology, you need to calculate the thickness of the insulation for walls made of expanded clay concrete blocks. To do this, the easiest way is to use an online calculator on one of the resources of heat-insulating material manufacturers.
Steam room insulation
The steam room is the hottest and most humid room in the bathhouse. Here it is necessary not only to insulate the walls from contact with hot air, but also to cut them off from the absorption of steam. As a rule, thermal insulation of a steam room is implemented in the form of a continuous insulating box along the planes of the walls and ceiling. The insulation is installed in a continuous layer over all surfaces, filling the cracks with foam. The best option is to install polyethylene foam with the foil side facing the inside of the room. This will reflect the infrared rays back into the steam room and retain thermal energy.
Horizontal planks are installed on top of the thermal insulation material on the wall and wooden sheathing is mounted. It is also an element of insulation, since wood has low thermal conductivity. In addition, the cladding creates an additional barrier to water vapor (wood is impermeable to moisture, although it tends to absorb it). Not only the walls are sheathed, but also the ceiling. Here it is necessary to carry out the electrical wiring in advance, sealing the points where the cable passes through the heat-insulating material. As a rule, lamps are placed on walls or ceilings. In addition, you need to take care of the laying of air ducts (if forced ventilation is used). This is an important point, since it is impossible to carry out ventilation after installing thermal insulation and sheathing on the walls - the external arrangement of the pipes looks sloppy. In addition, the air ducts become very hot and become dangerous for users.
The floor is insulated during the construction process, since it is necessary to lay the floor covering (tiles) with a slope to drain the water. Therefore, insulation of the floor in the steam room is carried out according to the usual scheme for all rooms of the bathhouse. Sometimes it is made of wood, so as not to use a platform, but to walk directly on the boardwalk. This option is convenient and practical, but it becomes more difficult to dry such a floor - the underside of the boards gives off moisture worse, which can cause rotting.
Thermal insulation with expanded clay for wooden floors
Despite the fact that recently durable concrete floors are increasingly being installed, wooden floors remain relevant in bathhouses. They have a number of positive qualities:
- high level of environmental friendliness;
- good thermal insulation effect;
- When using the necessary protective equipment, their service life is quite long.
Before starting the process of insulating wooden floors in a bathhouse building, you will need to disassemble the flooring from the boards and thoroughly dry them naturally. The duration of their further operation will largely depend on the quality of drying. The insulation technology will look like this:
- removal of wooden flooring;
- laying skull beams;
- installation of vapor barrier material;
- securing rough boards;
- filling between the beams with an expanded clay layer;
- laying a layer to insulate from moisture;
- installation of floorboards.
Insulation of the remaining rooms of the bathhouse
The washing compartment and rest room also need insulation, since the total air humidity in the bathhouse is quickly balanced due to the free movement of air throughout all rooms. The purpose and specific use of the rest room and washroom differ from the steam room and allow the issue to be resolved in simpler ways. However, experienced users recommend not trying to save money or speed up the progress of work - you can end up with uncomfortable rooms with multiple cold bridges. In addition, from a technological point of view, it is easier to perform the same type of work in all rooms than to use different insulation methods in each department. Moreover, the process of installing insulators on walls and ceilings depends little on the type of material and requires approximately the same time and effort. Therefore, it is better not to diversify technologies and carry out insulation according to a single scheme.
Cladding the rest room and attic
For the cladding I used the same aspen paneling as in the steam room. I just sewed it onto the slats horizontally. I did not use any vapor or thermal insulation.
First of all, I attached vertical slats (made of boards) to the gas silicate walls. I nailed the clapboard to them with nails.
Vertical slats are mounted on gas silicate blocks using wood screws
The walls of the rest room were covered with aspen paneling horizontally
Upon completion of the work, I covered the lining with antiseptic impregnation “Drevnokhron oak” (Polifarb) in 2 layers. The second layer was applied after the first had dried, that is, the next day.
Internal or external insulation?
Many users often have a question: what type of bath insulation to choose, from the inside or the outside. The question is not idle, since the bathhouse is different from residential premises, it is used periodically and is not heated constantly. Installation of thermal insulation material from the inside in this case is mandatory. Is it also necessary to insulate the outside if the walls are still excluded from the thermal contour of the building?
Various sources claim that the best option would be to simultaneously insulate the walls from the inside and outside. This option will provide maximum heat saving efficiency and will save fuel for heating the bath. However, experienced bathhouse owners claim that this method is only good for large buildings with recreation rooms, swimming pools and other departments. They have a large wall area with high heat loss. For a small bathhouse, it is quite enough to properly insulate the walls from the inside, and on the outside you can simply install sheathing with a ventilated gap. Thermal insulation in this case is excessive; there is nothing to protect the cold walls from. Therefore, you need to be guided by the size of the bath and the mode of its use.
Briefly about the main thing
Baths built from expanded clay concrete blocks or using frame technology are considered the optimal solution in terms of price/quality ratio. In order for the building to reliably serve its owners, it is necessary to minimize heat loss, and to do this, select the most suitable materials.
Both wall structures have good thermal insulation properties. However, KBB walls have different characteristics from frame walls, so their insulation is carried out in different ways. The greatest differences are in the floor pie, which is due to the peculiarities of the organization of the foundation.
Ratings 0