Home |Construction |Gas silicate bath
Date: April 24, 2017
Comments: 0
Many owners of private houses and summer cottages dream of building their own bathhouse. It’s nice, after a hard day of work or work on a personal plot, to take water treatments and enjoy a steam bath in your own bathhouse. People perceive a private bathhouse as a room built from a wooden frame. However, it is not necessary to use logs, the acquisition of which requires increased costs, and the construction of a building requires professional skills. After all, there is a proven alternative solution - a do-it-yourself bathhouse made from gas silicate blocks. Its construction is quite possible without hiring hired workers.
Constructing it yourself is not very difficult. This is a budget idea that can quickly be implemented on your own. The reasonable price of gas silicate and the ability to quickly carry out construction attract private property owners with limited income.
The stages of construction of your own gas silicate bathhouse can be easily mastered. Compliance with the technological sequence of operations and the use of high-quality materials will allow you to build a warm room in which it is comfortable to take water procedures. So, let's look at how to build a gas silicate bathhouse with your own hands. Let us first dwell on the properties of the material and evaluate its characteristics.
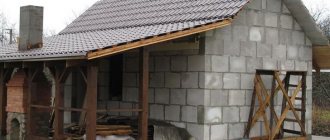
With the right approach, you can build a bathhouse from gas silicate blocks with your own hands, especially since the material is lightweight and you can handle the work without additional help
Material composition
Among the building materials suitable for building a bathhouse, blocks made from gas silicate stand out. The material is a type of cellular concrete, hardening in special containers - autoclaves. Gas silicate is made based on a mixture including:
- Portland cement
- Quartz sand.
- Aluminum powder.
- Lime.
- Water.
The quality of gas silicate is determined by the peculiarities of manufacturing products in production conditions, where manufactured products are controlled by laboratory methods.
Opinions of block bathhouse owners
If you follow all the rules during the construction of a bathhouse, then no nuances or unforeseen issues should arise. The main thing is to purchase high-quality material so that it is not damaged during delivery. Below we will look at a few reviews of what owners think about their block saunas.
“We have been using our bathhouse, which we built ourselves, for more than a year. Its dimensions are 3x3 m, and, to be honest, we really like it. We also made the stove ourselves, while adhering to all fire safety regulations. We placed it horizontally. The interior of the bathhouse was decorated with wooden clapboards, and the exterior was lined with brick.
“Our bathhouse is made of a polystyrene block, its dimensions are 5x4.5 m. We have been using it for about two years. Until now we used a wood-burning stove, but now we decided to replace it with a Tunguska stove. The inside of the bathhouse was insulated with foil and lined with aspen clapboard. The outside was simply plastered and painted. The result is impeccable functioning of the bathhouse and only positive emotions. The sauna warms up in a couple of hours and holds the heat just fine.”
“I want to share what kind of bathhouse I built for myself. It is already almost 8 years old, and this despite the fact that it was built from foam concrete blocks. Their thickness is 10 cm. Foil film was used as insulation, and the sheathing was done with linden clapboard. In winter, we heat it once a week, and this is at -30 oC. The brick stove reaches the required temperature in the bathhouse in an hour and a half. You can steam as much as you like.
There are no foreign odors felt at all inside the bathhouse; the outside was simply whitewashed. We spent a long time choosing which foam blocks were best for a bathhouse until we found the right option. The construction of the walls was as fast as possible, with a minimum of effort. The blocks are easy to process; a simple hacksaw will do for cutting, and for drilling you only need a simple drill. It took only two days to build the walls, despite the fact that only one person helped me - a medium-sized bathhouse.”
Finally
To summarize, we can say with confidence that a bathhouse made of blocks is a completely worthy option. If you have a limited budget or time, such a bathhouse is really worth building.
Advantages of gas silicate
Let us dwell in detail on the features of gas silicate, which ensure the possibility of its use as a building material for the construction of a bathhouse.
Even at the planning stage, the finishing of the bathhouse is thought out, since it will have to be done on both sides, and a lot of money will be required
Main advantages:
- affordable, compared to wooden logs and traditional bricks, price, reducing the cost of building a bathhouse;
- ease of masonry associated with clear geometry and increased dimensions of lightweight products;
- resistance to mold, mildew, impossibility of reducing strength characteristics as a result of rotting of environmentally friendly building materials;
- resistance, unlike wood, to the effects of open fire, increased temperature, which is achieved indoors as a result of heating;
- increased strength characteristics, resistance to the effects of multiple cycles of freezing with subsequent thawing, makes it possible to ensure the stability and long service life of the bathhouse being built, which is occasionally subjected to sudden temperature changes when the room is heated;
- increased level of sound insulation, making it difficult for extraneous noise to penetrate into the room;
- the insignificant mass of the blocks allows for quick laying and the formation of a lightweight foundation;
- increased thermal insulation characteristics associated with the cellular structure of the porous composite. The air cavities located inside the concrete mass are a heat insulator, allowing the walls to better retain heat inside the room and warm up faster.
Gas silicate blocks are produced from a mixture of materials: lime, gypsum, cement and aluminum powder
Project
As with the construction of any other building, the design of a bathhouse must be approached scrupulously and responsibly. The first step is to draw up a plan for your project. The convenience of the block design is that they are suitable even for the smallest - two- or three-room bathhouse.
So, before we start construction, let’s look at the most common and successful drawings of standard sizes.
- To place a small structure with maximum convenience, you need to do everything right. In this case, both external and internal layout are very important. The minimum area of a steam room is considered to be a house measuring 4x3 m. Here you can make a project for a small two-room house, where a steam room complete with a washing room is quite conveniently located, and the relaxation room can also be used as a small corner for storing bath accessories. This project is highly functional despite its small dimensions. A 3x4 m bathhouse can be built even on a small plot of land or attached to a summer house.
- The next popular size of block baths is slightly larger - 3 by 5 meters. There are also only two rooms here. As in the first option, the steam room is adjacent to the sink without a partition and occupies an area of 9 m². The hallway is only 6 square meters. At the same time, the bathhouse is equipped with everything necessary: a shower with a drain, a stove with a tank for hot water and shelves, usually two-tiered.
- Another project for a bathhouse with an area of 3x5 m. Here you can already make three rooms, despite the small space. Let's look at how this was achieved. There is a comfortable dressing room - a relaxation room. Now 9 m² are allocated for it. The steam room and sink have dimensions of 4 and 2 square meters, respectively.
- An example of a square bathhouse 4 by 4 meters allows you to place everything in its place and absolutely geometrically evenly. The same three rooms as in the third option. Only the steam room and sink this time have the same area of 4 m², and the dressing room with the guest area is located on 8 squares. Modern craftsmen manage to make a 4x4 m block bathhouse even with an attic. But this should be taken care of at the stage of laying the foundation for the appropriate height of the building.
- Large baths are a pleasure to create. For example, a comfortable size is 5x4 m. Here you can already walk up to an open or closed terrace, and also more calmly plan an attic floor with a sleeping area placed on it.
- 6x4 m is the best option for a bathhouse on a large area. This design looks great as a separate room. The main thing is that all the main communications are connected to it and work as smoothly as possible. Let's consider a project that can easily accommodate a company of 6 people at the same time. The bathhouse is also equipped with an outdoor terrace. All rooms are isolated. Washing room and steam room - 4 square meters each. Guest area + dressing room – 8 m², and terrace – 8 square meters. In the warm season, you can sit almost in the lap of nature after active steaming.
For bathhouses made from large-area blocks, original and spacious designs are provided. For example, a square building with an area of 6 by 6 meters can be considered a full-fledged house for active recreation. A 10x4 m bathhouse can be easily arranged in such a way as to accommodate more tiers of shelves.
List of works
The general set of measures, according to which a bathhouse is built from gas silicate blocks with your own hands, includes the following stages of work:
- preparatory stage, which involves performing calculations, preparing the necessary materials and tools, determining the required type of foundation, as well as preparing the site;
- construction of a foundation, the correct manufacture of which ensures the stability of the bathhouse being built;
- construction of walls that are the load-bearing part of the structure being built, as well as the installation of a roof;
- insulation of the room, implementation of waterproofing measures that ensure a comfortable temperature regime in the room and reliable protection of gas silicate from moisture.
We will separately consider the main stages of the events.
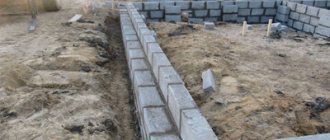
To install a strip foundation, it is necessary to mark and dig a trench to a depth below freezing of the soil
Aerated block bath projects
The most important stage in the construction of a bathhouse from an aerated block is the creation of a project that would exactly meet expectations and requirements and ensure maximum comfort in operation.
What must be taken into account in the project:
- The total area of the building, ceiling height, the presence and location of main and additional rooms, their size (footage), location of doors and windows.
- Location, entry/exit points of all communications (water, sewerage, electricity).
- Preliminary location of the boiler, plumbing, smoke/ventilation ducts.
- Locations of all elements in each room.
After the project has been created, you can use it to calculate the volume of materials and draw up an estimate. A bathhouse made from an aerated block can be made in a variety of options - from a small building with a minimum of premises to a two-story mansion, which acts more as a leisure center.
Small sauna up to 20 m²
Small baths are ideal in areas where it is not possible to place a very large building. The project necessarily includes all the necessary premises - a steam room, a washing room (shower room), an entrance hall (it can also be a rest room). The steam room is usually made small, so the sauna quickly heats up to the optimal temperature, which significantly saves fuel.
The shower room may include a cubicle or bathtub, and the rest room can accommodate a compact sofa, a small dressing room, a coffee table, etc. At the same time, such a bathhouse can accommodate up to 5 people. If only one or two people take a steam bath, then the rooms may be even smaller.
This is the simplest version of an aerated concrete bathhouse, which involves small financial investments, quick and simple construction, and minimal maintenance and operating costs. Ideal for small families, provided that you do not plan to steam in a large group. The optimal option is 3 by 4, 4 by 4, 4 by 5, 4 by 6 meters.
Over 30 m²
The design of such a bathhouse requires a large area, since in addition to standard rooms, many additional ones can be provided here - a terrace, a billiard room, a leisure area, etc. In addition, there is no need to skimp on the size of the premises - the bathhouse is designed for 8-10 people to be in it at the same time, so there should be enough space.
Usually the steam room is made of medium size (based on the number of people who will be here at the same time), the washing room (aka shower room) is equipped with a plunge pool and a compact jacuzzi. A small pool can be installed, a large comfort zone can be designed, the arrangement of which is carried out in accordance with the preferences and wishes of the owner.
Project of a two-story bathhouse over 90 m²
This is the most expensive and luxurious version of the bathhouse project. A two-story bathhouse requires large rooms where a group can comfortably accommodate
Much attention is paid to the arrangement of entertainment and recreation areas. The building may have a full second floor or an attic; large terraces are often added
On the ground floor there is always a bathhouse itself with a shower, steam room, locker room, and toilet. The terrace may have its own canopy or a common roof. The enclosing partitions of the terrace are built from gas blocks, with a wooden or metal frame.
On the second floor they design a recreation area - there can be everything the owners want: most often there is a billiard room, hookah room, table tennis, gym, play area, bedroom, etc. It is advisable to design another bathroom so as not to go down to the first floor.
The layout of the heating and plumbing equipment for a bathhouse can be designed in different ways, it all depends on the layout of the bathhouse, the features and purpose of the premises, the installed equipment, etc.
Design
Before construction begins, a project should be developed that will regulate the design features and dimensions of the future bathhouse. When designing, pay special attention to the following points:
- Connecting the necessary communications that provide a high degree of functionality and comfortable operating conditions.
- The configuration of the building and the type of finishing that harmoniously fits into the exterior of the site.
- The dimensions of the building, taking into account the number of people simultaneously taking water procedures. For a family holiday, a small bathhouse measuring 4.5 x 5.5 meters is sufficient.
- The height of the room is 2–2.2 m, allowing you to place 3 shelves in the steam room, comfortably move around and take a shower.
- Breakdown of the general contour into separate rooms, allowing you to arrange rest rooms, a steam room, and a shower.
- The type of foundation that ensures the stability of the bathhouse being built and takes into account the characteristics of the soil.
A bathhouse made from gas silicate blocks can be built quickly with your own hands if you approach the development of the project responsibly and think through all the details.
You need to plan a gas silicate bathhouse just like any other.
Projects
Currently, the bathhouse is a multifunctional space that is used not only for washing, but also for complete relaxation.
Based on these goals, modern projects of block baths are being developed. In addition to the main premises (steam room, wash room), this building may contain a cozy relaxation room, a small terrace, an attic or a swimming pool. The size of the latter largely depends on the dimensions of the structure itself. The most common are attractive bathhouse designs that include a relaxation room.
Most often, the relaxation zone is larger in area than the rest of the premises. This is because in the rest room it is necessary to place a table, armchairs or chairs and other necessary pieces of furniture that need enough free space.
The most common types of projects include the following options.
When building a block bathhouse with a rest room, be sure to take into account that the building must have a vestibule or a small dressing room separating the internal and external parts of the structure. Thanks to such additions, cold and frosty air will not penetrate into the room during the winter season.
Most often, this decision is made if there are no other residential spaces on the land plot. Also, similar structures are often used when designing a plot in a dacha. The attic is a great place to spend the night after being in the recreation area.
When developing a bathhouse project with dimensions of 3 by 5 m, it is necessary to organize several isolated rooms. Without them, the resulting design will be incomplete.
The first room a person enters may be a dressing room. It should be such that you can leave clothes in it. In the interior of such a bath it is necessary to place a small closet in which there is free space for storing all things. Many owners install an additional box in such baths, in which they separately store fuel (wood or coal).
Even in projects of very small baths it is necessary to provide this room. In a 3x5 m building, you can put a small table and a few chairs in the relaxation room.
Immediately behind the rest room you should organize a sink or shower. These spaces are necessary so that sauna users can cool down after steaming their bodies. These rooms should have a simple and uncomplicated interior design. They can accommodate several small benches, a shower and a clean container filled with water. Currently, many owners choose one shower stall to furnish such spaces, abandoning the classic sink.
The main room of the bathhouse is the steam room. Here you need to place a stove, as well as comfortable wooden benches. All listed rooms must be located in any bathhouse. In addition, the building with dimensions of 3x5 m also allows for the installation of a small terrace or attic.
Immediately after the dressing room, you can organize a small relaxation room and place a compact table in it, as well as a couple of chairs. You can get by with a not too large sofa and place a coffee table in front of it. This area should be separated from the rest of the space by a partition, and behind it a spacious steam room should be arranged. It can be divided by another partition and equipped with a washing space in the resulting small corner. In such conditions, a narrow shower stall will look best.
A partition should be placed behind it to close the three remaining zones - shower, steam room and toilet (if you want to install it in a bathhouse).
All bathhouse projects are similar to each other. Any building should have a washing room, steam room and rest room. Additionally, the building can be equipped with a spacious attic or a neat terrace. Some owners even combine such structures with a garage. In this case, it is recommended to contact specialists who can competently draw up correct drawings of such buildings.
What is needed for the job?
To do the work yourself, prepare the following materials and tools:
- ingredients for preparing concrete mortar (cement, crushed stone, sand, water) necessary for the foundation;
- gas silicate blocks, the number of which is determined at the design stage;
- concrete mixer necessary for preparing the solution;
- shovels and buckets used in the construction process;
- reinforcing bars to strengthen the concrete base;
- pegs and cord for marking the site.
After marking the site, removing vegetation, planning the surface, proceed to further work.
Construction of a bathhouse from gas silicate blocks
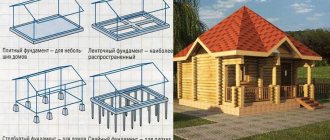
After determining the construction site and clearing the site, you need to select a bathhouse design and calculate an estimate. The next step is choosing a foundation, and here there are two economical and reliable options - a columnar one, made with a concrete strip bandage, or a shallow strip foundation. Options are selected depending on the type of soil.
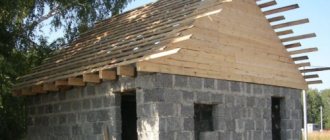
Gable roof
A columnar foundation can be made without a strip ligament, but this depends on the type of soil, as well as the depth of the wells for the pillars. For each well, you need to pour a sand cushion in a layer of 10-15 cm and compact it with moisture. The sand should be poured on top with a layer of concrete 10-15 cm thick. To create a concrete strip, formwork is installed between the pillars above the ground, the space between the pillars is reinforced and filled with concrete.
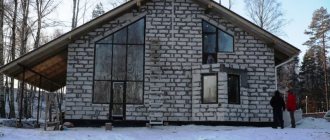
Typical bathhouse design
The strip foundation is arranged as follows:
- Along the perimeter of the bathhouse and for internal load-bearing walls, you need to dig a ditch with a depth determined by the type of soil;
- The bottom of the trench is covered with a sand cushion, the same as for a columnar base;
- Formwork is assembled from any available materials - wood, slate, corrugated sheets, tin, chipboard or plywood.
- The formwork is reinforced with a frame made of rods Ø 10-14 mm;
- The concrete that is poured into the formwork can be ordered from the manufacturer, or you can prepare your own solution based on the proportions 1:3:3 (cement - crushed stone - sand);
- The surface of the base is leveled to minimize glue consumption. The main advantages of a strip foundation are the ability to build a bathhouse on any soil.
Strip foundation reinforcement
Foundation
Various types of foundations can be used as the foundation of a future bathhouse:
- Tape, repeating the perimeter of the building.
The foundation is formed into a wooden formwork with a reinforcement frame by pouring it with concrete mortar. The finished foundation of the bathhouse is immersed 0.5 m in the ground and is located on a compacted sand and gravel backfill. The monolithic foundation is poured with a single reinforced structure - Columnar, representing concrete supports installed at the corner points of the building and in the areas where walls adjoin. Pay attention to the horizontal surfaces of the supporting elements, which should be located at the same level. Concrete is poured into pits with pre-installed reinforcement.
Any foundation must be waterproofed with bitumen or two-layer roofing felt, since gas silicate blocks require enhanced waterproofing.
How to build?
Building a bathhouse from blocks with your own hands is much easier than doing the same process from wood.
First, you need to familiarize yourself with some detailed step-by-step recommendations:
- First: the construction of any building always begins with a project. If everything is ready here, you can immediately move on to the second step.
- Second: even such a light building as a bathhouse made of blocks must be placed on a foundation. The choice of a particular type of foundation for your building is made based on the quality of the soil underneath it.
A strip foundation is the most suitable basis for a block bathhouse on almost any soil. To make a smooth and durable strip base, you need to make the correct markings. Excavate a trench of the required width and depth along the perimeter of the future building and partitions inside it. Next, the formwork is installed. A layer of sand no more than 15 cm is compacted at the bottom of the trenches.
We lay a reinforced base (mesh, rods, etc.) on the sand. Having prepared the solution, pour it into the formwork, filling all the voids. After 7 days, the support can be removed. We continue to let the foundation stand, periodically wetting it with water to avoid cracking. You can lay blocks on top of the base only after a month.
- Third: block masonry. Waterproofing is done on top of the dried and cured foundation. Despite the fact that the blocks are laid using special glue, it is recommended to fasten the first two rows together using standard cement mortar. Laying begins from the corners of the structure. In this case, each corner block should protrude 0.5 cm beyond the foundation. It is advisable to check each row with a level. Do not forget to lay reinforcement every 3-4 rows. And also in openings. This will make the structure stronger.
- Fourth: when the walls are rebuilt, you can begin to design the floor screed.
You can see the approximate structure of the insulation layers of aerated concrete slabs in the bathhouse in the photo.
Construction works
A gas silicate bathhouse can be built quite quickly with your own hands. Use silicate blocks measuring 20x30x60 cm. Installing them “on edge” allows you to ensure a room wall thickness of 20 cm. For masonry you can use:
- self-prepared sand-cement mortar, the content of cement and sand in which is 1:3;
- a ready-made commercial mixture applied in a thin layer, reducing the thickness of cold bridges.
The blocks are laid in a checkerboard pattern, constantly checking with a level the evenness of the masonry
Stages of work:
- Installation of the bottom row of gas silicate blocks on the foundation surface. Lay the first row starting from the corner, applying the solution to the surface, pressing the blocks tightly.
- Execution of wall laying. Control the horizontality of the rows using a level, shift the seams between the blocks by 15 cm. At intervals of three rows, reinforce with steel rods with a diameter of 8 mm installed in pre-drilled holes in the blocks. Fix the reinforcement with an adhesive mixture. When forming window and door openings, use U-shaped blocks, placing them on the beams.
- Construction of gables, the height of which corresponds to the configuration of the future roof.
The roof structure can be varied to suit the requirements of the project.
Washing tiles
There should not be any significant temperature changes in the washing room, so I decided to do without special waterproofing. Just cover the gas silicate with tiles and that’s it.
I bought high-strength ceramic tiles with a thickness of 8 mm. I laid it on frost-resistant, moisture-resistant glue. The glue was spread on the wall in a layer of about 10 mm, and the tile was pressed against it. All rows were controlled horizontally and vertically by the building level.
Laying tiles on gas silicate blocks
Insulation and waterproofing
A bathhouse made of gas silicate blocks requires waterproofing protection and insulation. Sequence of work:
- fill slats measuring 5x5 cm to the walls inside the room and place insulation between them;
- attach a vapor barrier film and aluminum foil to the slats;
- nail the strips that form the basis for fastening the sheathing;
- secure the “lining”.
Tile the shower room, the color depends on the tastes of the owner. The finishing of a gas silicate bathhouse on the outside is carried out in accordance with the requirements of the project, which includes waterproofing. Having completed construction and waterproofing measures, proceed to equipping the bathhouse with the necessary plumbing equipment and interior items.
Do-it-yourself bathhouse made from gas silicate blocks
The smaller the size of the walls, the easier it is to install a gas silicate box, the smaller and lighter the foundation for the building is required. In some cases, it is possible to make a foundation for a bathhouse from gas silicate blocks, such as Minsk. Due to the high density and closed structure of the bubbles, the material practically does not absorb liquid water, and thanks to the excellent thermal insulation of gas silicate, the bathhouse building is well protected from freezing of the base and partially from soil heaving.
Stages of construction work
The first step when building a bathhouse is to make a full-fledged cushion under the foundation, remove turf and clay to a depth of at least 50 cm, and remove all layers of soil in which moisture can accumulate.
Most bathhouse projects made from gas silicate blocks, photos, require a solid foundation.
It is best if it is a concrete slab laid on a sand and gravel bed and EPS insulation. Walls made of gas silicate, even in a one-story version, require support, so a rigid concrete foundation will be the best solution to the problem.
The second step is to lay out the plinth and waterproofing of the walls. The starting and last rows of aerated concrete blocks are always reinforced with a concrete belt with a reinforcement frame. The roof and floor must be insulated, most often with fill-in insulation.
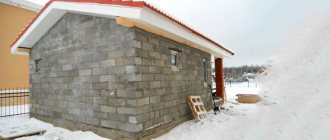
Immediately after installing all the elements of the roof and roof, you need to complete the external finishing of the walls, before rain and dampness destroy the bathhouse frame.
Important! To avoid the blocks getting wet, the building is covered with a protective film.
As soon as the roof and ceilings of the bathhouse are assembled, you can close the walls; it makes no sense to start finishing earlier, since the walls have not taken their size under the weight of the rafters and beams.
Exterior decoration
The walls of the bath box must be protected and insulated at the same time
It is important that the outer surface of the gas silicate blocks “breathes”, that is, water vapor and air are able to freely penetrate through the thickness and escape into the surrounding space
Therefore, correct and reliable finishing of the outer surface of the walls of the bathhouse is carried out as follows:
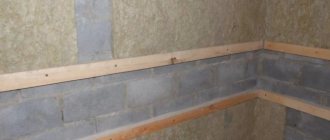
- Initially, timber and roll insulation are sewn onto the walls, usually mineral fiber mats;
- The second step in insulation is to install a vapor barrier membrane;
- The next step is to sew a lining made of PVC, aspen or galvanized steel onto the sheathing.
In this case, the bathhouse turns out to be warm, the walls do not get wet and always remain dry, even if the steam room is heated several times a day.
Interior decoration of a bathhouse made of gas silicate blocks
It is best to start finishing work indoors with a steam room. First of all, vertical sheathing slats are sewn onto the walls. You can use aspen or pine with a section of 50x50 mm. The material can be fixed to a gas silicate wall using ordinary self-tapping screws. The steam room must be insulated with mineral wool and foamed polyethylene with a foil surface. A vapor barrier like Metaspan must be sewn on top of the mineral insulation.
Horizontal rows of aspen lath are placed on top of the warm cake, on top of which the lining of the steam room is laid.
The washing compartment of the bathhouse is covered with tiles without any options. The gas silicate is first primed with liquid waterproofing, otherwise in winter moisture from the ceiling can flow into the wall and tear off the lining.
The rest room of the bathhouse is most often simply sheathed with clapboard along the laid sheathing strips. If there is no supply and exhaust ventilation in the room, then a vapor barrier film will need to be laid under the tree, and gratings will need to be installed in the ceiling part of the walls.
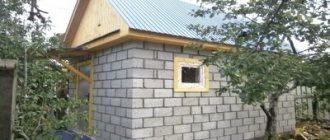
For summer bath options, the lining can be sewn directly onto the walls from gas silicate blocks.
Requirements for structures
When building a bathhouse, a number of requirements must be taken into account:
The building must be located at least 1 m from the fence and 8 m from the residential building. A sewer drain for water and a ventilation system (forced or natural) must be installed inside. The material used for the construction and decorative finishing of the bath should not emit harmful substances when heated. The cladding must withstand changing environmental conditions, be resistant to temperature changes, and frequent exposure to moisture. Surfaces around furnace equipment must be covered with non-flammable materials
It is important to equip a high-quality chimney so that smoke does not enter the bath rooms. For a sauna in a house made of aerated concrete, the requirements change
For a sauna in a house made of aerated concrete, the requirements change.