Owners of dachas and country houses cannot imagine a vacation without bath procedures. Having completed the construction of the house, the owners begin to equip the bathhouse. The bathhouse was traditionally built in the form of a log house, but the increased price of wood forces us to look for alternative options. Use a proven solution - a block sauna! It is not difficult to build it yourself from inexpensive, harmless, lightweight and easy-to-lay material. Let's consider the properties, characteristics of block products, and the technology of construction from them.
How to build a bathhouse from foam blocks with your own hands
Features of aerated concrete blocks
Aerated concrete is cement and quartz sand with the addition of ash, slag, lime, and gypsum.
Using gas generation technology using aluminum paste or powder, a building material with properties that combine the advantages of brick and wood was created. Due to the many pores that are formed due to hydrogen released during the reaction of aluminum with alkali or lime, aerated concrete obtains a structure that is 3 times lighter than brick.
The value of the thermal conductivity coefficient for a gas block is 0.1-0.15 W/m∙K. For comparison, for concrete with crushed stone it is 1.7 W/m∙K, and for brick – 0.3-0.7 W/m∙K.
Aerated concrete blocks are divided depending on the main binder:
- Ash - more than 50% ash.
- Slag - more than half of the composition is slag with alkali, lime or gypsum.
- Cement - up to 50% of the mass is Portland cement.
- Limestone, in which half the mass is lime, the rest is slag, gypsum, cement, sand.
In addition, there is autoclave (synthetic) hardening aerated concrete, which is made in saturated steam at elevated pressure. And non-autoclave (hydration) hardening at pressure equal to atmospheric.
The material also differs in its silica component:
- From secondary products of various industries. This can be waste from ore beneficiation, ash from thermal power plants, waste from ferroalloy production, or ash from hydraulic removal.
- From natural sands. Most often quartz.
The softer D400 has increased thermal inertia and is better suited for sauna construction.
Advantages and disadvantages
The advantages of aerated concrete blocks include:
- Construction will be inexpensive. Even compared to foam concrete, due to its more even geometry, the consumption of the plaster mixture will be less. The price difference with ceramic bricks will be 30-40%. When laying a block, high qualifications are not required, so there is an opportunity to save on masons.
- The building material is environmentally friendly and safe. Aluminum oxide, into which metallic aluminum is converted as a result of chemical reactions, is harmless, and its background radiation is minimal.
- It is not difficult to build from blocks - it drills and cuts well, and has a small mass. It compares favorably with brick in the speed of installation. If you follow construction technology, the walls will be smooth, with a minimum of gaps. A thin layer of glue is enough to connect blocks with a clear geometry.
- Even a novice master can build structures of complex shapes - kinks, arches - from blocks.
- The mineral components that make up aerated concrete do not burn.
Disadvantages inherent in aerated concrete:
- The warmer the building material, the less durable it is. Heat capacity is achieved due to the porosity of the structure. To build a multi-story building, it is necessary to use stronger blocks to enhance the load-bearing capacity of the structure.
- In the northern and central regions, a wall thickness of at least 45 cm d400 is recommended. Which entails additional costs.
- People who have used aerated concrete in buildings note that its main disadvantage is cracks. 20% of the material cracks, even if all technologies are followed. Therefore, a prerequisite is a strong monolithic foundation that can reduce deformation loads.
- Plastering the external surface is a must. The porous structure absorbs moisture well. A reliable connection of the finishing coating with the facade walls requires a reinforcing mesh or fiberglass canvas. This leads to additional costs. For good waterproofing of plaster, it is better to use expensive ones, for example, silicone.
- The wall surface requires a deep penetration double primer.
- In order to hang a shelf or a heavy water heater on the wall, you have to make special fastening devices.
Log house and roof
For a log house you need elastic, damp moss, “cuckoo flax”, sphagnum - about 25 bags, if it is a 6x4 m log house veranda. The strands are taken no more than 30 cm. All cracks are sealed.
Waterproofing is done with roofing felt, with moss laid on top of the logs, up to 3 cm thick. The tree should not be felt under the moss. Moss is not needed on the veranda; uniformity is not so necessary here. After this, the production of rafters from 50x150 mm boards begins. The rafters are covered with a vapor barrier and a counter-lattice made of 20x50 mm slats.
You can make a sheathing under the metal tiles, then less rainwater will fall on the tree. Elevators are installed for the veranda to reduce shrinkage under the supporting pillars.
Pediments are made from tongue-and-groove boards and hammered with the point up. Before sewing, a galvanized casting is installed. All irregularities are treated with mastic, sanded, impregnated and glazed.
Then on the top of the pediment they make doors and a window for ventilation, with a radiator grille and plastic corrugation. Electricity is supplied through a corrugated cable and a metal cable with a 4 mm braid.
We are building a bathhouse - phased construction
The step-by-step construction of a bathhouse from foam blocks with your own hands involves a whole series of construction and installation works that you have to perform in a certain sequence. Let's try to look at each stage in more detail.
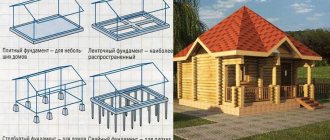
Foundation
Perhaps the most important stage in the construction of a bathhouse made of foam blocks is to pour a reliable and durable foundation:
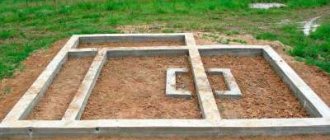
- Initially, it is necessary to dig a shallow pit for a strip foundation - 60 cm deep and 30 cm wide;
Trench for the future foundation of the bathhouse
- Next, you need to take pins or pegs and drive them around the perimeter of the entire pit. Then, using a laser level or level, mark a horizontal plane, which is subsequently marked with a rope;
Pull the rope according to the level
- The next stage is knitting the reinforced frame, the thickness of the reinforcement in which must be at least 12 mm;
- Now that the frame is ready, you can safely begin constructing the formwork, which is assembled from boards or panels with a thickness of at least 25 mm (this thickness is optimal for work with a small foundation);
Formwork reinforced with supports + reinforcement + mortar
- When everything is ready, you can start pouring concrete (grade 200 concrete is recommended). For such purposes, it is better to have a concrete mixer or order an automixer with the required amount of ready-made concrete solution.
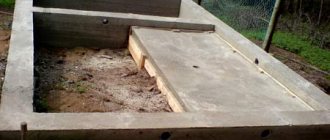
As a result, you should have a foundation approximately 70-75 cm high, which will be quite enough to implement the foam block bathhouse project (see photo below).
Ready foundation with finished base and drain
Now you can safely begin installing the sewer system and a 10 cm wastewater receiver.
Walls
Before you start building walls from foam blocks with your own hands, you will need to waterproof the foundation. This process does not involve any serious measures - it is enough to melt the bitumen and, after diluting it with diesel fuel (waste oil), coat the concrete base.
The construction of the first rows is the most difficult work in the process of wall construction
In general, to build a bathhouse with your own hands, in most cases, foam blocks with a density of D700 and grade M25 are used. The most optimal size of one “brick” is 10x30x60 cm.
So, let's begin. A two-story bathhouse made of foam blocks begins to be built from the highest corner of the foundation, which can be easily calculated using a building level. This is where the construction begins.
The foam blocks themselves should be laid on their edges, and the interblock seams should be made as thin as possible - this will significantly reduce heat loss. Even though the foam block is one of the “warmest” materials, heat loss can still occur due to the so-called cold bridges.
A bathhouse and foam blocks are the optimal solution for a budget-conscious owner. The most important thing when building walls is to fold the first row correctly and evenly. The blocks are fastened to each other using ordinary cement mortar.
The work of a mason requires certain knowledge and skills
After you finish laying out the first row, do not forget to trim the resulting surface and level the row using a level. It is the first row that can influence all your future work - it will be easy and fast only if the surface is perfectly flat and without drops.
The first row is the most important
What is noteworthy is that only the first row is laid out and fastened with mortar; the second and subsequent rows are built using special glue.
Window and door openings can be made from the same foam blocks, leveling the edges with well-sifted cement mortar.
Finishing
Interior decoration is another step towards creating the perfect steam room
Even if a 6x6 bathhouse is built from an expensive foam concrete block, it is still necessary to take the entire range of measures to protect the walls from moisture. In general, the entire process involves treating the finished walls of the bathhouse with special water-repellent solutions and compounds.
In addition to treatment with compounds, the construction of a bathhouse from foam blocks involves external cladding (purely for aesthetic purposes). Builders recommend using modern ventilated facades as finishing, which cope well with excess moisture, evaporating it into the atmosphere.
Advantages and disadvantages
Building a bathhouse from blocks with your own hands has a number of advantages:
- shrinkage of the new structure will be minimal, which distinguishes this building material from wood; it will be possible to take a steam bath almost immediately after the completion of construction and finishing work; construction occurs in record time; all work can be carried out independently, but it would be preferable to ask another person for help person; a bathhouse made of blocks will cost 2 times less than a similar-sized structure made of wood; blocks are completely inert in their chemical composition and do not emit gases; the building material is resistant to fire and does not rot.
Cement blocks have their own disadvantages, which are as follows:
- they absorb water, so walls made from them need to be well insulated from moisture; condensation collects in walls made of this material, which is eliminated with the help of reliable vapor barrier materials; compared to brick, blocks are relatively short-lived, and with wood they are less environmentally friendly; very light, due to which the cost of constructing the foundation will be higher.
Walls
The following materials are used for the construction of walls:
- Wooden beam.
- Logs.
- Boards.
- Brick.
- Blocks from various building mixtures (cinder block, aerated concrete, wood concrete, and so on).
Since the construction of a bathhouse from logs or bricks is already quite widely described on the Internet, let's consider the option of building a frame bathhouse from timber 15x15 and 5x10 centimeters and boards with a section of 2x15 centimeters:
- Make the bottom trim; to do this, take bars with a cross-section of 15x15 cm and install them on the foundation, connecting them together with special metal plates and corners. There is another way to connect bars, by cutting out tenons and grooves at their ends and then fastening them with screws or nails. When making the strapping, do not forget to place waterproofing under the bars.
- Install vertical posts from 5x10 cm timber. The distance between the posts is usually 50-60 centimeters. First of all, determine the position of the window and door openings and install the racks framing them.
- While working, secure the already installed racks with temporary strips so that they do not warp.
- Make the top trim, securing it to the ends of the vertical posts.
- When making the final fastening of the top trim, carefully monitor the position of the vertical posts, checking their evenness with a level.
- Be sure to strengthen all corner joints with diagonal posts, this will help prevent the frame from warping.
- Make the ceiling sheathing.
- After making the frame, make the external cladding of the walls of the bathhouse with a board with a section of 2x15 centimeters. If you do not want gaps to appear between the boards, then make the sheathing - “overlap”, laying the bottom edge of the board on a nailed board. In appearance, this method resembles finishing walls with siding.
- Having sheathed the bathhouse from the outside, proceed to installing the insulation. Sheets of foam or mineral wool are installed along the vertical posts of the frame.
- On top of the insulation, it is necessary to install a layer of vapor barrier, which is attached to the vertical posts using thin slats.
- After installing the vapor barrier, line the interior of the bathhouse with clapboard or slats.
- Insulate the ceiling by laying vapor barrier sheets on the inner lining, then insulation. Sheathe the ceiling from the outside with sheets of plywood.
Please note that the manufacture and insulation of the ceiling can also be done after the roof has been installed.
Construction of a building
Anyone who knows the basics of using hand and power tools and has a general understanding of construction can build a bathhouse from cinder blocks on their own.
Making masonry mortar
Mixing the mortar for laying cinder blocks:
- In one container mix 3 parts sand, 1 part cement. Mix the ingredients thoroughly.
- Slowly adding water, stir the solution until the required consistency is obtained.
To increase the plasticity of the finished solution, you need to add special plasticizers to it, which are sold in construction stores.
Foundation and floor
The construction of a massive building begins with the construction of a foundation:
- Make markings on the site, indicate the location of the building.
- Cut off the soil layer to a depth of 10 cm. Remove it outside the future building.
- Further work depends on the chosen type of foundation.
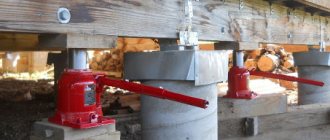
Pile foundation:
- Mark the locations of the holes. The distance between them is 1.5 meters.
- Dig holes to a depth of 90–110 cm. Place a 30 cm thick layer of sand and crushed stone on their bottom.
- Make formwork that should be 50 degrees above ground level. It is easier to make it from stainless steel sheets.
- Place reinforcement bars inside the formwork for reinforcement.
- Mix cement mortar with fine crushed stone and pour to the top of the formwork.
To strengthen the pile foundation, it is necessary to make a concrete grillage connecting all the posts.
Strip foundation:
- Mark the location of the trenches. Dig them to a depth of 40 cm.
- Put together the formwork panels and secure them along all the trenches on both sides. The height of the formwork is 40 cm.
- Tie together reinforcing frames from reinforcement and place them inside the formwork.
- Fill the trenches with cement mortar.
Wait until the foundation hardens.
Walls
The process of laying monolithic blocks:
- Before laying cinder blocks, cover the foundation with a layer of waterproofing. You can use roofing material for this.
- Lay out the corners. To do this, you need to connect two stones of the first row and cover them with blocks of the second row. Check the evenness of the corners with a building level.
- Place the first row. When it is finished, repeat laying the corners for another row, check their level, and move the thread higher.
This is how the walls are built to the very top. The mortar that protrudes between the individual bricks must be removed with a trowel.
Windows and doors
When laying walls, you need to pay attention to doors and windows. In their place you need to leave free space
In this case, individual cinder blocks are cut to the required sizes to leave space for a window or door.
The top of the window or door is arranged differently. You need to place two long metal corners on the side walls, inside of which there will be a closing row of bricks on top of the window or doorway.
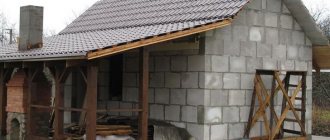
Ceilings and roof
Features of the construction of ceilings and roofs:
- Ceilings can be wooden or with concrete floors. The second option is relevant if the bathhouse has a second floor. If there is none, you can make a wooden ceiling. To do this, you need to secure the beams - the distance between them should be 60 cm. Stuff the rough ceiling.
- To build a roof, it is necessary to prepare wooden rafters, which are installed at the required angle at the ends of the beams. After this, the sheathing is placed on top of the rafters.
Next, all that remains is to make a vapor barrier, select a roofing material, and secure it to the rafters.
Communications
Communications in the bathhouse must be carried out at the stages of construction of walls and floors. If this is not done in advance, problems may arise later.
It is important to think about the location of the drain and assemble it from plastic pipes. Cinder block walls can be drilled with a hammer drill if it is necessary to pass wires or a gas pipe through them
Materials
For the foundation I got hold of bricks from old buildings. It is very durable, they don’t make it like this anymore. The purchase cost about 5,000 rubles. for 1,000 pieces.
- Gas silicate blocks for walls measuring 600x300x200 mm cost 18,300 rubles per 7.2 m3.
- For partitions and gables, I took blocks 600x300x100 mm for the amount of 4,000 rubles. for 1.4 m3. Delivery to the dacha was carried out by guys from the nearest construction market.
- For masonry I used about 1 ton of dry masonry mixture, for which I paid 5,400 rubles.
- I bought wooden beams 100x100x6000 mm for the joists, ceiling slabs and rafter system at a sawmill, of which there are about twenty in my area. Used 18 bars worth 620 rubles.
- There I also took 0.5 m3 of boards for the floor and 0.2 m3 of sheathing for the rafter system. All lumber, including lining, cost about 45,000 rubles.
- The roof was covered with soft Euro slate “Ondulin”: 27 sheets were used. Taking into account additional elements and fasteners, I spent 12,500 rubles.
- After the apartment was renovated, window frames and room doors remained. From them I made windows, the front door and the entrance to the steam room.
- I covered the old doors with clapboard and impregnated them with the decorative and protective composition Aquatex. They look no worse than new!
- The heart of the bathhouse is the Vesuvius stove. I selected it with reserve for a steam room with a volume of up to 14 m3. I chose one with a glass door for better visibility.
- The kit included a 100 liter samovar-type tank made of stainless steel, a chimney and stones - 100 kg. I purchased it through an online store with an installment plan of 2 months. The purchase cost 34,000 rubles.
- I installed a 100 liter polyethylene container for cold water in the attic.
- There is also a second 60 liter tank with electric heating for showering after work. The filling of the tanks was mounted through a pipeline from an underground pump.
- All wiring was done with polypropylene pipes Ø20 mm. Additionally, I spent about 6,000 rubles.
Approximately 4,000 rubles were the costs for the blind area, plaster and paint for the facade of the bathhouse.
In total, all materials cost about 153 thousand rubles.
Flooring
At the beginning of laying the walls, it is necessary to leave pockets for installing floor joists if the project plans to have a wooden covering. Provided that a concrete floor will be poured, this is not necessary. The logs, before being installed in the pockets, are treated with fire retardants and waterproofing impregnation. Additional fastening is made with metal corners. During further construction, a rough coating is laid on the logs to make it more convenient to carry out the remaining work. Upon completion of finishing, the floor is constructed according to the technology chosen for these purposes.
Interior decoration
The bathhouse was built in a summer version, so insulation of the walls was not provided. Foil film with basalt fiber insulation is laid only in the ceiling part of the steam room.
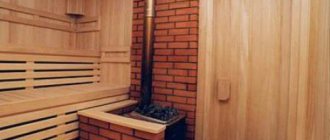
Restroom
The interior decoration of the steam room was made of aspen, and the remaining surfaces, in order to save money, were sheathed with pine clapboard over timber sheathing.
She also made shelves and benches from aspen; this tree is less susceptible to rotting.
All wooden coverings were impregnated twice with a hydrophobic composition for baths and saunas.
The wall adjacent to the steam room was tiled to look like stone and covered with acrylic varnish. It turned out nice.
Instead of a door to the washing compartment, I hung a stylish curtain.
Entrance to the car wash
I used four old car tires as a well for draining water. The well was disguised with a flowerpot.
The façade was finished with textured bark beetle plaster and acrylic paint.
I made a concrete blind area around the bathhouse and laid out a path of tiles.
The base was decorated with waste artificial stone and treated with a hydrophobic compound. The area was landscaped with lawn grass.
Exterior facade decoration
How to do it well
You need to carefully select the material for construction, paying attention to the following points:
- Manufacturer. Well-known companies care about their reputation. They have all the necessary certificates confirming the high performance properties of their products. Research aimed at quality control is regularly carried out;
- Price. If the price is lower than that of competitors, then this fact should raise suspicions about the quality of the building material. Typically, a discount is provided due to either proximity of production, or bulk order quantity, or low grade of material;
- Warehouse conditions. The blocks should be stored in a dry place where moisture cannot penetrate;
- Package. Must not be damaged.
Information. The unsuitability of building materials can also be detected through a simple inspection. The way they look can tell a lot about their quality.
When inspecting the blocks, you can glean the necessary information from the following signs.
- On the inner surface. It can be studied by breaking the block into parts. The building material from the inside must be the same as the outside. The pores should not be connected, otherwise the blocks will absorb moisture;
- Pore size. The larger they are, the lower the strength of the building material;
- Color. Since cement is the predominant component of the blocks, their surface should be painted a monotonous gray shade. Too light building material was produced in violation of standards, since it does not contain enough cement;
- Form. If, when you put two blocks together, gaps are found between them, then when building a bathhouse you will need too much mixture or glue;
- Weight. This indicator should also remain within normal limits.
To test a block for strength, you need to try to break off part of its edge by pressing with your hand. If a piece falls off, this indicates poor quality of the material.
Information. Another way to test the block is to pierce it by hand with a large nail. If the nail enters without strong pressure, then it is not recommended to use this building material for a bathhouse.
How to build: stages
The construction of a bathhouse from block material begins with the correct installation of the foundation.
As a rule, a shallow strip foundation is laid. After this work is completed, you need to wait two days until the cement completely hardens.
The walls are erected using waterproofing material laid on the foundation.
Using a level, the highest corner of the building is found, from which further construction of walls from blocks is carried out.
This building material has excellent thermal insulation properties, however, heat can leak from the bathhouse through joint materials that do not have such qualities - the so-called cold bridges.
Laying the first row is considered the most important stage in building a block bathhouse.
They are fastened to each other using a simple solution of cement and sand.
The laying of the row is completed by carefully leveling the surface and compensating for all changes in the height of the base of the building, as well as all kinds of irregularities.
Accuracy in the execution of work at this stage ensures the success of the entire subsequent construction process. The blocks must be installed using a mallet with a rubber tip.
The second row and those following it are laid using special glue. It is usually sold dry. This glue is dissolved in water during construction work.
Making glue takes no more than 10 minutes. The adhesive mixture should be applied in a layer, the thickness of which should not exceed 0.5 cm. The consumption of this building material is made in minimal quantities.
Mix the glue with water in a small container using a drill. A nozzle in the form of a whisk is installed on it. Thanks to the use of this glue, there are practically no joints. The surface of the walls of a bathhouse made of block material does not have “cold bridges” when using this technology. Professional builders recommend laying blocks in 3 rows. Between them you need to place a reinforcing layer, which represents consists of a steel mesh with small cells. This measure is due to the need to additionally strengthen the facility under construction. Before building a bathhouse from blocks, it would be correct to think in advance where the windows and doors will be located. In this matter, you can be guided by your own considerations.
To cover such openings in block walls, you need to fill the formwork with concrete. It is also permissible to use industrially manufactured typesetting parts. Upon completion of the construction of the walls of the bathhouse, it is recommended to take a break. After 4 days you can begin installing the roof.
Preparatory work
The first step when building a bathhouse from aerated concrete is to draw up a plan for the future construction and a list of planned works - this will speed up the process significantly
But before this, it is important to prepare, namely, purchase the necessary tools and learn how to choose the right quality raw materials, because as they say, “the miser pays twice”
Carefully select tools according to the characteristics of the material.
Required tools and materials:
- Wall chaser. It is used to create special channels in which reinforcement is placed to strengthen the structure;
- Electric drill. Helps drill holes for various needs;
- Electric cutter. Used for processing grooves when laying the same fittings or electrical wiring;
- Hacksaw. Needed for cutting blocks when they have uneven geometry;
- Rubber hammer;
- Level. The evenness of the blocks is checked;
- Carriages and buckets for adhesive solution. Used for applying adhesive solution to horizontal and vertical surfaces of gas blocks;
- Grater. It is used to smooth out walls before applying plaster;
- Other marking tools;
- Cement;
- Sand;
- Construction adhesive;
Geometric shape is very important when choosing aerated blocks
When choosing aerated concrete blocks, pay attention to:
- Color. If the color is uniform, this indicates a higher quality of the blocks;
- Size. All purchased blocks should ideally be the same size, unless you plan to create some unusual design;
- Form. Each block must be symmetrical, have smooth and even edges;
*The cheaper the price, the lower quality the blocks will be.
- State. Naturally, the material should not have any cracks, chips or other deformations;
- Storage method. According to the rules of transportation and operation, gas silicate blocks must be hermetically packed in polyethylene.
Insulation and vapor barrier
External insulation is performed only for a heated bath. At the dacha this is not financially feasible. The block building is insulated using a special technology. Use mineral wool and polystyrene foam of a certain thickness. The first is sold in rolls or in the form of mats, and the second - in sheets. Decorative cladding is made on top of the insulation.
Vapor barrier is not waterproofing. Each type has its own purpose. A budget vapor barrier can cope with the task, while using waterproofing for other purposes reduces all the work to zero.
The procedure for internal insulation:
- Cover the walls with waterproofing film.
- Make a wooden sheathing.
- Lay a vapor barrier (foil) and insulation.
- Organize finishing work.
Choosing a size and layout
An important preparatory stage is the selection of a suitable bathhouse design. On specialized forums and construction portals you can find a huge number of projects developed and already tested by someone.
If the size of the garden plot is small, then a bathhouse project in the form of a block extension to a garage or utility building may be a good option.
Bathhouses with an attic, built using this building material, are also of interest. After studying standard designs and recommendations from specialists, you can begin designing the future structure. Even when building a house, the owners of the site will learn everything about how groundwater flows. This information will also be useful when searching for a suitable place for a bathhouse. During the design process, the following factors must be taken into account: Correct location of the bathhouse on a personal plot; Coordination of building dimensions and internal layout; Creation of a project.
Engineering ways to eliminate deficiencies
If we take into account the fact that blocks made on the basis of foam concrete have significantly more “pluses” than “minuses”, then it is simply impossible to refuse the use of such materials. As a result, builders have to look for solutions to eliminate all the shortcomings of the building material.
First of all, the problem with the fragility of building blocks can be solved by strengthening the foundation. For the construction of buildings made of foam blocks, a special slab base is often used, but it is also possible to use a strip foundation (profiles “T”, “G” and “L”, which do not shrink).
As for the increased hygroscopicity and the negative impact of moisture on foam concrete, these disadvantages of the material can be eliminated by additional finishing of surfaces and their insulation.
Thanks to such simple and affordable processes, it is possible to increase the reliability and durability of any structure almost significantly, and eliminate premature wear and destruction.
Which blocks to choose for bath walls
Accelerating the pace of construction has always been a common goal for the customer and the contractor. Building bricks do not always contribute to solving such a problem. High thermal conductivity, small sizes and complex masonry dressings reduce the pace of construction.
The solution to the problem was the creation of enlarged building stones. They are characterized by low thermal conductivity, large size and weight, allowing the blocks to be moved manually. Monolithic products are used for laying the basement parts of a building; the blocks are hollow and with various additives are used for the construction of walls.
A bathhouse made of blocks with a front exterior finish will serve for a long time
Plan for building a gas silicate bathhouse
Gas silicate is cellular concrete cured in an autoclave. Each block consists of aluminum powder, water, cement, gypsum, lime, and in some cases additives, at the discretion of the manufacturer.
The material is fireproof, frost-resistant, is not afraid of mechanical damage, putrefactive processes, and is quickly and easily installed, as it is light in weight. Has good sound insulation.
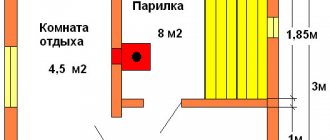
A gas silicate bathhouse can be built quite quickly and efficiently with your own hands and without specific skills. The project diagram, as shown below, can be considered universal. Additions at the discretion of the owners.
The appearance of a bathhouse made of gas silicate blocks will look like this, photo below.
But, of course, there is also wood concrete - a fairly inexpensive and practical material. Projects for such structures are not much different from those listed above, but the cheapness and strength of the blocks make it indispensable in budget bathhouse construction.
If you put in the effort and create the project correctly, everything looks just perfect.
Arbolite blocks retain heat well, warm up quickly, and are not susceptible to rotting. Durable and safe for human health. Their degree of fragility is much lower than that of expanded clay concrete, and their sound insulation is many times higher.
When decorating walls both inside and outside, more attention should be paid to waterproofing. In general, building a bathhouse from blocks of any consistency is much more profitable in material terms: the box parts themselves will not cost so much, you can develop the project yourself, you don’t need to involve a specialized team of workers and special equipment, and it will take much less time to build the building
In general, building a bathhouse from blocks of any consistency is much more profitable in material terms: the box parts themselves will not cost so much, you can develop the project yourself, you do not need to involve a specialized team of workers and special equipment, and it will take much less time to build the building.
Advantages of buildings made of blocks
Despite the fact that many professionals consider cellular materials, that is, blocks, not the best option for building a steam room, many craftsmen opt for such buildings. And there is an explanation for this, because you can quickly lay a solid foundation for a bathhouse with your own hands from blocks. It will not take much time and will not require significant financial investments.
A significant advantage of such options is that a bathhouse made of expanded clay concrete blocks with your own hands does not shrink, and it can be used almost immediately after finishing work. If the bathhouse is built from wood, then before starting interior and exterior decoration, you must wait at least 1 year . During this time, the logs will stand and the building will be completely ready for use. With a bathhouse made of blocks, everything is much simpler, since there can be no shrinkage.
As for moisture resistance, this is a sore point for block buildings. Nevertheless, everything can be solved with the help of modern materials. For example, if you take a hydrophobic primer, you can safely even build a bathhouse from gas silicate blocks with your own hands.
Many experts believe that the blocks are not able to withstand heavy loads, so multi-storey buildings cannot be built from them. However, if the project provides for a one-story bathhouse, you just need to take care of a high-quality foundation, and you can build a building without fear that the blocks will not withstand the load.
Bake
A good stove eliminates the issue of fuel and helps maintain the temperature for almost three days, which completely dries out the bathhouse. And the hot water will boil in a separate remote tank, and not in the steam room.
For example, you can choose a stove with an attached heat exchanger. This design is suitable for covering with bricks, which will serve as a screen. The stove is heated outside in advance to burn through the paint and eliminate the smell in the bathhouse.
For traction they install a meter-long pipe, this is enough, but there may be a little soot. Since the stove foundation is connected to the bathhouse foundation, reinforcement is done when pouring.
The masonry is made with cement to protect the waterproofing, double roofing material is laid, and brick is placed on it. The stove is raised from the foundation 20 cm above the floor. The sand is moistened and compacted to prevent settling.
Take a brick and a stove mixture, dry the mixture and add water. The top rows are sealed with mortar. Immediately install convection doors so that they properly draw air from the dressing room into the steam room.
It is important to carefully bring the stove into the room (a couple of people will be required) and install it in the exact place. A T-shaped branch is placed on top to mount the pipe, which will also stand on the foundation.
Next, hang a heat exchanger from corners, bends, couplings, attach it to the furnace, wrapping the threads with flax soaked in sealant. The masonry is made up to the top of the firebox, a corner is placed with an overlap on the bricks and a gap of 2 cm is left. The front version is almost ready, the contact of the masonry with the stove should be minimal.
Then we cover the entire exchanger with bricks and install pipes to the tank. The holes are covered with steel disks. In the washing room the masonry is done up to the ceiling. They finish the façade work and make a fireplace mantel to redirect hot air.
The last step is to make connections from the pipes to the tank. Prepare the roof for inserting the pipe, drill the ceiling with a margin of 1 cm, lay the pipe and do the masonry at the top. Clean the pipe and coat it with protective varnish three times. Cover the space around the pipe with insulating material.
Now you know how to properly build a bathhouse with your own hands. Calculate all the options, check the availability of materials in the store, make the bathhouse of your dreams for modest money. Also look at DIY bath options and photo projects - they will inspire you to work.
Equipment and tools
To build a bathhouse with your own hands from foam blocks, you need equipment and tools.
Bayonet shovel.
Rubber hammer.
Hacksaw.
Master OK.
Tools:
- shovels – bayonet, scoop and mortar;
- hammer-pick;
- rubber mallet or mallet;
- plumb line;
- building level;
- rule;
- jointing;
- trowel or trowel;
- mooring cord;
- spatulas;
- notched spatula;
- hacksaw;
- roulette;
- hammer.
Hammer.
Concrete mixer.
Equipment:
- concrete mixer;
- container for diluting glue, cement and water;
- drill with whisk attachment;
- perforator;
- screwdriver;
- wall chaser;
- deep vibrator for removing air from the solution;
- stapler;
- ladder.
The project has been drawn, building materials and tools have been prepared, we move on to building a bathhouse.
Building dimensions
What size bathhouse is best to choose for construction? Let's start with the height of the ceilings. To make it comfortable to move around in the room, even if your family members are of average height, you should not make the walls lower than 2.1 m. After all, it is necessary to take into account that the shelves in the steam room are made at a level of 1 m from the floor. A person should sit on it without bending over. Plus, you need to leave free space under the ceiling for the sweep of the broom. You should not make the ceiling higher - it will take longer to heat the room.
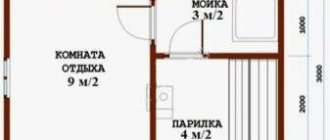
Now let's talk about the length and width of the building. As a rule, a bathhouse consists of 3 rooms: a dressing room, where you can undress and relax after the bath, the steam room itself, and a sink. According to the standard, the ratio of such premises is 2:1.5:1. That is, the dressing room is made a little larger.
Steam room dimensions
The size of the sink should be sufficient for at least a couple of people to sit comfortably on benches with basins. There is 1 sq.m. per person. m of free space. It is necessary to leave free space for containers with water. If desired, a shower room or a small pool can be made.
The dimensions of the steam room are minimal. If several people will visit the bathhouse at the same time, then each of them must be allocated 1.5 m2.
The width of the steam room depends on the size of the shelf. Some people like to steam while sitting. In this case, it is enough to build a bench 40-45 cm long. For those who like to lie in the steam room, its length is 95 cm. You can use the space rationally if you build shelves in the letter “L”. In this case, even small benches can accommodate two people. You can make a couple of shelves on opposite walls. For free passage between them, you must leave 80 cm.
The dimensions of the steam room itself depend not only on the size of the shelf, but also on the type of oven. It is also necessary to take into account the recommended distance from it to combustible structures (wall cladding). This is done for fire safety purposes.
You should also focus on the length of the logs. As a rule, it is 6 m.
Landscaping your site with your own hands – (130+ Photos of ideas & Videos) + Reviews
What happened in the end
Upon completion of construction, I can draw the following conclusions:
- ready-made country bath with an internal size of 3x4 meters;
- steam room with a volume of 6 cubic meters. meters can easily accommodate four people in the “warm up” mode, but it’s more comfortable to steam with two people;
- a spacious full-height attic allows you to dry brooms and store materials;
- bathhouse readiness time - 1.5-2 hours;
- the entire construction took 2 months;
- instead of wooden ladders in the washing compartment, I used a more practical mat made of PVC tiles;
- the wish came true, the budget was slightly exceeded.
I invite you to share your opinion about my project: What, in your opinion, could be done better? Which solutions did you like and which ones could you refuse?
Types of blocks, their qualities and characteristics
Aerated concrete is concrete with a cellular structure. It is made from cement with the addition of quartz sand and foaming agents. The finished mixture is distributed into molds and water is added. During the reaction, the mass foams, filling the mold.
To make the material stronger, the finished blocks are treated with steam in autoclaves. As a result of exposure to high pressure, quartz sand changes its structure, becoming stronger. In other words, foam block is a lightweight artificial stone with great strength.
Which blocks are better for building a bathhouse when constructing load-bearing walls and partitions? Of course, this is autoclaved aerated concrete (read: “How to build a bathhouse from aerated concrete with your own hands - step-by-step instructions”). For insulation, you can also use non-autoclave, since it is cheaper, but its strength is not as high.
Aerated concrete blocks are found in different densities:
- 0.3-0.5 t/m3 – used for thermal insulation;
- 0.5-1.2 t/m3 – suitable for building walls.
For the construction of small buildings, aerated concrete grade D500 with a density of 0.5 t/m3 is suitable. It can also be used for box lining and partitions, and the price is not as high as high-density brands. When building a bathhouse from a foam block or aerated block, in order to save them, they are laid on edge, and the wall will be about 200 mm thick (for more details: “Which project of a foam block bathhouse to choose - from planning to construction”). This will be enough, because the block retains heat well, and the walls themselves will still be insulated.
Aerated concrete is notable for the fact that it has a small mass, it is easy to process (a hacksaw is suitable for cutting, and you can make a hole with a simple drill), it is not flammable, and over time it only becomes stronger. Among the disadvantages, we can note the high hygroscopicity (applies to low-quality material) and considerable cost.
A type of aerated concrete – gas silicate – is distinguished by its binder additive. For aerated concrete it is cement - up to 60%, and for aerated silicate it is lime - 24% and 62% quartz sand. In addition, gas silicate is produced only in autoclaves. Materials vary in color and degree of hygroscopicity.
Gas silicate is white in color, it is capable of strongly absorbing moisture, which makes it susceptible to destruction. Aerated concrete, on the contrary, allows moisture to pass through, maintaining a normal level of humidity in the room. That is, when choosing between these two materials, aerated concrete will definitely be the best choice.
Foam concrete is one of the types of cellular concrete. For its production, a composition of cement, sand and water is used, to which foam is added from a foam generator. The manufacturing technology of foam blocks is quite simple, making the production process possible privately.
This, in turn, creates a number of dangers for the end consumer, since there is a high chance of buying poor quality material at an inappropriate price. Over time, such material will certainly begin to deteriorate and collapse.
The positive side of foam concrete can be considered its lower cost compared to aerated concrete and higher levels of hygrostability.
Sawdust can serve as a filler in the production of building blocks, and such material is called sawdust concrete. It is easy to cut and drill, and its thermal conductivity is twice that of brick. In addition, sawdust concrete is an environmentally friendly and non-flammable material, and it has a small mass.
Among the disadvantages is that the material is afraid of moisture, but this is partially eliminated by pre-treating the sawdust with moisture-repellent mixtures or by moisture-proofing the walls.
Expanded clay concrete is another type of building blocks, which, by and large, replaced the cinder block. In this case, expanded clay (burnt and foamed clay) acts as a filler. Expanded clay concrete is absolutely harmless, maximally hygroscopic and has high thermal insulation properties.
Blocks made of such material have a relatively small mass. A bathhouse made from it turns out to be more practical than one made from foam concrete or aerated concrete, since expanded clay concrete requires less thermal insulation materials and it is easier to install fasteners. It is also practiced to insulate a bathhouse from expanded clay concrete blocks from the inside, which is very effective.
The thermal insulation qualities of expanded clay concrete are determined by the fractions of the filling composition - the larger they are, the higher these qualities are, but the density decreases. In the process of building a bathhouse from such a material, insulation is best done from the inside.
Preparation for construction
Based on all the indicators and our purchasing power, we chose aerated concrete blocks for the bathhouse, which have a thermal conductivity coefficient even lower than linden, with dimensions of 600x200x300 mm.
Size and design selection
We decided to build a small, inexpensive bathhouse for one family of three or four people. The height of the bath is usually determined by your capabilities, but traditionally the height from floor to ceiling should be 220 or 230 centimeters. Let's take the dimensions of the bathhouse as 5.5x5 meters. Let's draw an approximate drawing. You can visualize it on your computer.
Three-dimensional drawing of a future bathhouse in 3DMax
Selecting a location
If the area is small, then you don’t have much choice. But if it is big, then there is a chance to use all its advantages. A simple and cheap foundation can be limited to good solid soil and deep groundwater. Their close occurrence can be recognized even visually: where the midge curls in a column on the site, it is damp. According to SNiPs, a bathhouse should not be located close to a well (a bathhouse is considered a source of pollution), a house (to avoid fire), a toilet and a compost pit (to avoid washing away their contents). The nearest tree from the bathhouse should be at least 15 meters.
Drawing of choosing a location for a bathhouse, taking into account all the buildings and trees on the site and the neighbor’s fence
Coordination of the design of the future bathhouse with administrative authorities
Without approval of the project before the start of construction, an already built bathhouse can be demolished due to any complaints from neighbors, and you will lose the labor and money invested. The project should include the following items:
- A plan (floor plan, even if you have one floor), created according to all drawing rules with specifications, sections and explication.
- Approximate estimate for materials.
- Planned type of foundation with drawing.
- Consent of the closest neighbors for construction.
An example of a bathhouse design sheet for approval
Calculation of the number of blocks for construction
It is difficult to accurately calculate the amount of material for a block bath with such rough guidance as we can give in one single article. We can only give an approximate picture. You can find calculators online to calculate the number of blocks. We'll use any. Doors and windows will be taken as the arithmetic average size. We will lay the walls in half a block with glue. Taking into account the accepted project, dimensions, weight and density of the blocks, we fill out the table.
Table for calculating the number of blocks and glue
We get the result.
Calculation result
Do-it-yourself bathhouse made of foam blocks: conclusions?
Indeed, it is quite possible to build a bathhouse from foam blocks with your own hands, if you have certain skills and equipment.
An important role is played by the purchase of high-quality materials for construction - blocks from a trusted manufacturer. Remember that your own safety is not something you should skimp on.
After all, a bathhouse made of foam blocks is superior to brick and concrete bathhouses in terms of environmental friendliness, and is slightly inferior to wooden ones: timber or logs. Features of insulation of wooden, block or brick baths may influence the choice of the final solution. Frame baths have a wide range of advantages, in favor of which clients often make their choice.
What to build from
At the stage of preparation for construction work, it is necessary to calculate the number of blocks that will be required. On sale you can find 600×300×200 mm blocks used for the construction of load-bearing walls, and 600×300×100 mm blocks used for the construction of partitions inside the building.
The bathhouse will last a long time if you carefully consider the choice of material for its construction.
You should select a suitable grade of concrete in terms of density and maximum permissible load per square decimeter.
When building a bathhouse from blocks with your own hands, you need to take into account the time that has passed since the production of the building material.
The blocks finally harden on the 28th day from the date of their manufacture. It is not advisable to use blocks in construction before this date.