Photo from the site: vseopolax.ru Every Russian person who acquires a personal plot or builds a private house, sooner or later thinks about building a bathhouse. Our wise ancestors also found out that regularly steaming is very good for health, and this is confirmed by modern medicine. However, before building any structure, it is necessary to study the technology so that it will last for many years, and the installation of floors plays a significant role in this. Thanks to the correct choice of the type and type of floor, as well as competently made drainage, which is extremely important, you can significantly increase the service life of the building and prevent premature need for repairs. So how to make a floor in a bathhouse with a drain correctly, what needs to be taken into account for this and how to think through and calculate everything correctly? This is exactly what we will talk about in our article.
Features of floor design taking into account the soil
When the soil under the bathhouse building is loose or sandy, the flooring can be laid directly on the base, which in this case will be the ground. In this case, in the steam room there is no need to make a drain for a large volume of water. It is necessary to build drainage for the washing room.
Of course, you want to move around in a bathhouse on a warm floor surface, so you should provide maximum protection from the cold coming from the base. Then the air in the heated steam room will cool down for a long time, and maintaining the required temperature will become easier. This problem becomes especially relevant in the cold season, when the soil freezes and begins to take away a large amount of thermal energy.
Pouring the floor in a bathhouse on the ground consists of a number of mandatory measures:
- A drainage hole or well is installed to collect and drain wastewater.
- A cushion is created on the ground for the primary screed.
- Pour the initial layer of coating.
- Insulation and waterproofing are installed.
- Install the top concrete screed.
- Apply a tightening layer.
- Finishing of the floor surface is carried out.
Septic tank installation
Expert opinion: Afanasyev E.V.
Chief editor of the Stroyday.ru project. Engineer.
Read my detailed article about the installation and installation of a septic tank.
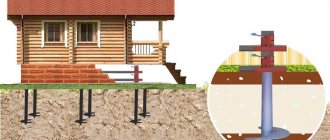
The water is discharged through the pipe either into the ground through a drainage area in the underground, or into a septic tank. It can be made from old tires or concrete rings. To prevent the pipe from freezing in winter, it must be insulated. A septic tank made of concrete rings is a simple budget design. The rings are installed on a soil cushion; the bottom is not concreted so that the water goes into the ground.
Construction of a septic tank made of concrete rings
The optimal option for a drainage device in a bathhouse is chosen based on the structural features, type of foundation and method of further drainage of water.
Drainage system
Moisture will collect in the steam room during procedures, albeit in small quantities. For this reason, a waste water receiver is installed on any type of soil. As a rule, it is an area covered with a special grid in the corner of the room or a shallow pit, the walls of which are made of concrete or coated with clay. The slope of the floor in the bathhouse is brought to this point.
Water can be drained from the receiver in several ways. Most often, a hole is made in the base, from which a pipe is led into a drainage pit or centralized sewer system. To prevent cold air or foreign odors from entering the room, a shutter is installed at the end of the pipe.
Often a closing hole is created at the top of the drainage ditch. It will provide additional ventilation to the room and remove moisture from it.
The lowest point of the floor structure is the bottom of the drainage pit. In some cases, it is not possible to remove the liquid outside the building - for example, when the bathhouse is located in the basement. Then, instead of a drainage ditch, a recess is installed with a container from which water is drawn after completing the bath procedures.
Types of structures
In practice, several types of floor designs with drains are used, each of which has advantages and disadvantages, as well as technological features:
Classic with outlet pipe laid in the screed
As a rule, such a structure is installed before the floors are poured on the ground. Builders select in advance the elevation of the water intake grid, from which they lay the utility network to the main highway. All subsequent elements of the subfloor pie are arranged intermittently, so as to bypass the sewer pipe.
The water intake grid, depending on the customer’s wishes, can be point or slotted, with surface trays arranged around the perimeter of the wet room, or along one of its walls. The system operates on the principle of surface drainage, the trays are laid with a slope, and at the lowest point they are equipped with a pipe for draining wastewater into the sewer.
Advantages:
- efficient water removal;
- the ability to clean the network mechanically or hydrodynamically;
- protection of linear communication from fracture and bending.
Flaws:
- labor intensity of work;
- reduction in the strength of the screed due to a violation of the integrity of the structure;
- the appearance of thermal inhomogeneity due to the impossibility of installing insulation along the entire plane of the future floor.
in tray
Before starting work on installing a screed, a monolithic or prefabricated reinforced concrete tray is created in the ground or in the body of the foundation slab, in which one or more pipes are laid. The tray can be straight, since the sewer slope is formed inside it.
Advantages:
- This method of laying allows you to arrange several pipes in the tray at once - for sewerage and water supply;
- utility networks are reliably protected from mechanical damage;
- there is a possibility of their inspection and maintenance.
Flaws:
- high cost of trays;
- increased labor intensity;
- in the presence of a foundation slab - violation of the structure, interference with the compacted base;
- risk of flooding of the tray during the flood period.
With a pit
Another popular solution is to install an overflow pit under the water intake grate. As a rule, the structure is made in a prefabricated version, or from monolithic reinforced concrete, however, ready-made structures made of high-strength plastic or stainless steel are sold on the market.
Advantages:
- the ability to install several connections into one pit at once;
- equipping the tank with a submersible nose;
- preventing flooding during snow melting;
- reliable cleaning of the utility network - heavy particles settle to the bottom of the pit.
Flaws:
- problems with arranging the screed - the pit must be insulated and sealed around the entire perimeter, and an inspection hatch must be installed;
- When clogged, it requires maintenance, which is carried out only from the bathhouse.
Open drain at the bottom of the wall
It is installed in the corner of the room, water moves along the slope and is removed through an adjacent wall, usually a façade. A water inlet pipe is installed on the outside, discharging water into the sewer.
Advantages:
- simple and cheap solution;
- the utility network is serviced when clogged from the outside;
- high maintainability.
Disadvantages - risk of freezing in winter, an extra element on the facade of the building.
As a rule, when constructing permanent buildings for arranging a bathhouse, the owners resort to arranging a classic internal drain in a floor screed or in a tray.
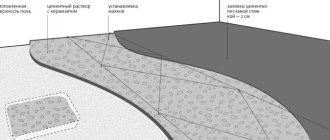
Cushion under the first layer of screed
Before pouring the floor in the bathhouse with your own hands, lay a special pillow to reduce heat loss. Before this, a pit 50-60 centimeters deep is dug in the ground.
A 30-40 cm layer of construction waste, consisting of fragments of bricks, stones, gravel and other things, is poured onto its bottom. The main thing is that the waste does not contain pieces of wood or other biological components that may begin to rot in the future. After backfilling is completed, the layer of debris is compacted.
The recess along the perimeter of the room is coated with clay and a 15-centimeter shock-absorbing layer of sand and small crushed stone is poured. This layer will absorb moisture that appears as a result of condensation caused by temperature changes. Then the resulting pillow is leveled, its surface is well compacted and the solution is poured.
Water drainage methods
Diagram of a filtration system for draining a bath.
The design features of the base and methods of arranging the hydraulic apparatus directly depend on what types of materials the floor will be constructed from. As a rule, wood, cement screed or combinations of materials are used to finish the base. For any type of construction, a system for draining water masses from the bathhouse is prepared in advance.
The design of the drain mechanism can be different and depends on many factors:
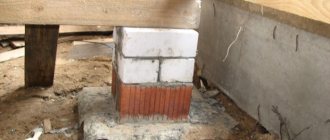
- For a bathhouse for three to four people, it is advisable to make a cesspool under the foundation of the structure. The walls of such a pit are edged with brick and covered with sand. As the tank fills with water, the liquid is pumped out of it using a cleaning machine;
- If you are building a bathhouse for a large number of people with your own hands, it is better to make a drain pipe connected to the central sewer system or a separate well;
- To purify wastewater from dirt, it is advisable to install an underground filtration system. It is equipped with a special sump, distribution well and waste pipe;
- A simpler option for water purification would be to install a filter well. Filter material (crushed stone, brick fragments, expanded clay) is poured under the bathhouse. In the process of irrigation with water, the mineral bed is covered with silt, which purifies the wastewater before entering the ground.
Primary screed
In order to provide additional thermal insulation, it is advisable to make the solution for the first layer of screed based on perlite. This material shown in the photo is an excellent insulator and therefore the floor covering will be warm and pleasant to the touch.
Since perlite is light and consists of small fractions, work with it should be carried out in a place well protected from drafts.
The solution is made with it in several stages:
- Pour 2 buckets of perlite into a concrete mixer and add 1 bucket of water.
- The mixture is thoroughly mixed, and its volume is significantly reduced.
- After the mass is made homogeneous, cement is added to it, which is poured gradually. The mixture continues to be stirred.
- When the mass becomes uniform in color and consistency, pour 1 bucket of perlite into it and pour in several liters of water.
- The mixture should ultimately be free-flowing.
- For perlite to react with cement and water, you need to wait some time - about 10-15 minutes with the concrete mixer turned off.
- Then they continue to knead until the mass is plastic.
If you don’t want to use a bathhouse during the cold season, you can do it simpler and use a mixture of 3 parts sand, 1 part M400 cement and 0.1 parts lime. These components are mixed by adding water until the color is uniform and the solution has the consistency of thick sour cream.
The finished mass is laid out on the subfloor and leveled. You don't have to use guide beacons at this stage. But at the same time, it is imperative to ensure that the floor in the bathhouse is poured correctly with a slope in the direction of the location of the drainage hole.
The primary screed needs to be given time to dry. The solution, which includes perlite, dries in about 5-7 days. This will take about 2 weeks for the concrete mixture. To prevent the screed from cracking, it should be moistened several times during the day, and in hot weather it should also be covered with plastic wrap. The surface should not be allowed to dry out.
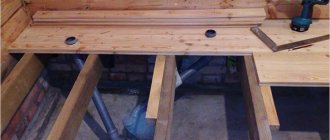
Stage one. Organization of water drainage
These works can be considered preparatory work, but without them you cannot start pouring the floor. We chose the most difficult option - the bathhouse was placed on a strip foundation.
Step 1. Draw up a sewer plan taking into account the placement of the steam room, locker room and other premises. At the same time, carefully consider the installation location of the water receiver, if one is planned to be installed. The receiver can be made from an ordinary metal or plastic barrel with a volume of approximately 100–200 liters; holes should be cut on the sides and bottom of the container using a grinder.
DIY septic tank from barrels
Step 2. Dig trenches according to the diagram. Observe the slope; the difference in height per linear meter should be approximately 1–2 cm. There is no need to use special instruments; the slope can be checked by eye or using an ordinary level.
Trench
Step 3. Level the bottom and lay plastic pipes. There is no need to add sand, the depth of the trenches is insignificant, and the sewerage system will not experience much pressure. If we take the drainage level in the steam room as zero, then the maximum depth of the trench at the exit from a 6 m wide bathhouse will be approximately 25–30 cm. There is no need to be afraid that the water will freeze in the winter. First of all, it's warm. Secondly, the slope ensures complete drainage, the pipes are always empty, and there is nothing to freeze.
Pipe slope control by level
How to use a bubble level to control the slope of pipes?
- Place the device on a flat surface, take a ruler and place it on a level at a distance of 50 cm from the beginning.
- Raise the device until the clearance between it and the plane is equal to a centimeter.
- Visually remember the position of the bubble on the scale or make a mark with a marker. In the future, when checking the slope of the pipes, use the mark you made.
Step 4: Assemble the drain inlet and attach it to the pipe. To facilitate the assembly process, you can use soap, soapy water or sunflower oil. Wet rubber seals with these liquids. It is strictly forbidden to use automobile oil for these purposes - the rubber in the seals is ordinary, automobile oil will ruin it and will have to be completely changed.
Assembled elements of internal sewerage
Seals should be moistened with oil or soapy water.
If necessary, make holes in the foundation strip
Sewage installation
The pipe is laid on a bed of crushed stone to create a slope
Step 5. Check the functionality and serviceability of the drain. To do this, fill a liter jar with water and place an empty container of the same volume at the outlet of the sewer pipe. Pour water into the receiver and see how much comes out of the sewer. If the volume is much less than the filled volume, this means that the pipe is laid with differences in height, water is retained in uneven areas.
Everything is normal - fill the trench, carefully compact it every 10 cm of soil height. For compaction, you can use any convenient means at hand.
Manual tamping
It is advisable to slightly moisten the soil before compacting. Keep in mind that subsidence under a layer of concrete can cause major problems. After installing the drain, further construction work can continue.
Insulation and waterproofing of the coating
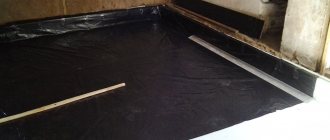
The foundation around the perimeter of the bathhouse is coated with bitumen to prevent moisture from penetrating into the room. A waterproofing material such as roofing material is placed on the surface of the primary screed, the joints of which are treated with bitumen.
You can also use a thick polyethylene film for insulation. The joints are glued in several layers with wide construction tape or special tape.
The next layer is laid with thermal insulation material. Experts recommend using felt - it not only retains heat well, but also creates the required degree of adhesion for the next layer of screed. You can also use mineral wool as insulation.
Concrete floor with joists
In addition to the described option, a concrete floor can be laid along the joists, in which case an underground ventilated space is obtained.
Wooden beams with a cross-section of 10x20 cm are used as logs, the laying step should be about 50 cm, wooden beams with a cross-section of 5x15 cm are attached to the bottom of the logs and boards 20-30 mm thick are mounted on them, which serve as a subfloor.
If the bathhouse is large, then it is better to install supports under the logs so that they do not sag over time.
Waterproofing material is laid on the finished subfloor with an overlap of at least 10 cm, and all seams must be sealed.
Experts prefer to use polyethylene film as waterproofing, since it is more plastic compared to roofing felt, so it is more convenient and easier to work with.
The next step is laying the thermal insulation; after its installation, it is again covered with a layer of waterproofing material, on which a reinforcing mesh is installed.
If you are planning to make a warm floor, now you can start installing pipes or laying cables. After installing the system, check its functionality.
pour a layer of screed,
To ventilate the underground space, vents must be left in the above-ground part of the foundation through which air will penetrate, so the subfloor and joists will not rot.
Before installing all wooden elements: logs, boards, they must be treated with antiseptics in order to prevent the development of the rotting process.
At the last stage of arranging such a floor, the finishing floor covering is installed; porcelain stoneware or tiles are usually laid on the heated floor; they must have an anti-slip coating.
If you do not install a heated floor, then walking on the tiles will be uncomfortable, in which case you need to make a flooring from wooden blocks or lay down polymer mats. If there is a wooden flooring, it is recommended to periodically remove it from the bathhouse for ventilation.
To prevent the walls from getting damp in the bathhouse, when installing the floor, you need to calculate its height, taking into account all the layers, so that it is higher than the top edge of the base and then there will be no problems.
Arrangement of the top layer of screed
In order for the flooring design to be of high quality, you need to know how to properly fill the floor in a bathhouse:
- The thickness of the top layer should be small - approximately 5-6 centimeters. The coating is made reinforced.
- Guide beacons are installed, maintaining a slight slope in the direction of the drainage zone.
- The screed is poured over a pre-laid steel or aluminum mesh.
- For filling, a cement-sand mixture is used.
- Wait for 10 days until the solution is partially dry, moistening the surface of the screed daily.
Possible difficulties and errors
When arranging a drain in the concrete floor of a wet bathhouse, beginners may encounter a number of difficulties that will lead to negative consequences.
To prevent this from happening, experts recommend taking into account some important nuances :
Violation of the slope when pouring concrete floors - the pipe must be fixed with crimp clamps or fixed supports made of cement-sand mortar, so as not to bend at the socket.- Incorrect calculation of the slope, which prevents the normal flow of water - when designing a sewer drain, a slope of no less than 3% should be taken, despite regulatory tolerances, since over time the pipe will become overgrown with a layer of mold, soap and lime deposits, which will cause difficulties in drainage.
- Pipe leakage after installing the screed - in order to avoid depressurization of the assembled system, each socket should be additionally treated with polymer plumbing glue or sealant.
- Mechanical damage to the pipe by metal mesh or crushed concrete - after laying a PVC pipe, it is necessary to protect it with a layer of drainage material.
- Subsidence of the concrete floor where the pipe is laid. It is required to ensure that the position of the pipe is at least 100-120 mm below the top of the screed, and the concrete structure must be reinforced with a metal mesh with a rod diameter of at least 4 mm.
The only condition for its normal operation is the need for periodic maintenance of the utility network , cleaning the nominal diameter of the pipe using a hydrodynamic method without the use of chemicals.
Subject to compliance with regulatory requirements, technological map, and also in the case of using high-quality materials, the drain in the bathhouse floor will be used for decades, without the need for repairs.
Applying a tightening layer
At this stage, it is necessary to make the surface perfectly flat and smooth, so apply a small layer of cement-based mortar and smooth it. Since the top layer of the screed has not completely hardened, adhesion will be good, which means that the coating will not be in danger of cracking.
After completing the arrangement of the tightening layer, the floor surface is allowed to dry completely, while continuing to wet the concrete and, if necessary, covering it with film.
Finishing
The result of the work done is a smooth coating. All that remains is to sand its surface with a grinding machine. After this it will be pleasant to move on the floor. You can also give it a beautiful appearance (read: “How and with what to treat the floor in a bathhouse - choosing the right impregnation”).
Modern finishing materials usually cover the floor with ceramic tiles. If you choose glass products, then the floor covering will be very durable, resistant to abrasion and temperature changes. The retail chain offers consumers special collections of tiles for bathhouses. Therefore, you can choose a finishing option to suit every taste.
Increasingly, instead of ceramics, a self-leveling floor in the bathhouse has begun to be used, which you can make yourself.
Often, owners of bath buildings use wooden boards to move across the floor, which are not only good for the feet, but also create a special atmosphere in the steam room due to certain types of wood.
Installation of floor skirting boards
Moldings for finishing a bath
The profile of the skirting boards does not matter, choose which one you like best. Skirting boards are nailed with nails 30÷40 millimeters long, the specific values depend on its thickness and width.
The shape of the plinth and the cutter for its manufacture
Prices for different types of skirting boards
plinth
Step 1. Take measurements of the steam room around the perimeter. Skirting boards have a standard length of two meters, and most paired ones are wider and longer. This means that the moldings will have to be joined. If in ordinary rooms uneven joints can be sealed with wood putty or colored sealant, then in a bathhouse this method of eliminating errors cannot be used; the putty will quickly fall off. Try to make the joints of the skirting boards in inconspicuous places: behind the stove, near containers with water, under a shelf, etc. Of course, be very careful when cutting the skirting boards; the tool must be sharp and in good working order.
Wooden plinth and heat-treated abasha strip
Step 2. Check the corners of the bath, they should all be exactly 90°. File the end of the baseboard at a 45° angle. For even cutting, use a factory-made miter box or make the device yourself.
How to cut a floor plinth
We recommend cutting with a hacksaw - the cut area is much smoother. Always apply the left plinth to the miter box on the left, and the right one on the right, to the side away from you. Otherwise, instead of an external corner, you will get an internal one and vice versa. If you rarely work with a chair, we advise you to write on its sides where to install the left and right ceiling and floor plinths on the outer and inner corners.
The photo shows the joining of skirting boards in the inner corner of the room
Video - How to join skirting boards
It is somewhat more difficult to cut the baseboard if the angle of the steam room is different from straight. If you do not have enough experience, we advise you to try cutting any slats for the first time. Install them in the right place so that they rest against the walls. Use a pencil to mark where the slats intersect.
Example of plinth markings
From these marks, draw straight lines to the corners, make a cut along the lines. Check what you got. Everything is correct - excellent, repeat the same operations with the baseboard. A large gap has appeared in the gley - think about where you made the mistake, repeat all the operations again, taking into account the error. This does not take much time and will save expensive material.
Accurate joining of skirting boards is very important
Step 3. Start nailing the baseboard from the corner of the bathhouse, step back 2-3 centimeters from the cut point, nail the nails at an angle at a distance of 30-40 centimeters.
Step 4. Using the same method, nail the baseboard on all sides of the steam room. Check their position and, if necessary, remove burrs or lint with sandpaper. If there is a noticeable difference in height at the joints, then first remove them with a sharp chisel, and then correct them with sandpaper.
Installation of wooden plinth in a bathhouse
That's all. In Russian baths, as a rule, the floors are not varnished or painted, but if you really want to, apply a topcoat. Just keep in mind that no matter how durable coatings you use, they will still peel off - the operating conditions are too harsh.
Now let's look at how to make pouring floors in bathhouses on a strip foundation.
Ventilated basement floor
In the case where the bathhouse is planned to be used throughout the year or the climate in the region is harsh, the floor in the building must be made with a ventilated space underneath. Such a floor covering will require additional cash costs, but as a result, the surface on which you will be moving will receive reliable thermal protection.
In this case, the technology will differ from work on creating a structure “on the ground”. The main difference is the absence of a drainage hole. Instead, there will be a point for collecting water, and a drain going beyond the foundation of the building. In addition, a pillow will not be required, since it will be replaced by a ventilated basement space.
Preparatory work for creating a primary screed consists of the following activities:
- ground leveling;
- installation of logs at a height of 20-25 centimeters;
- plank flooring;
- treating wooden elements with an antiseptic;
- laying film to provide waterproofing.
At the same time, the ground level both outside and inside the building must be the same. To ensure ventilation of the basement space, lugs are created in the foundation through which air will circulate and thereby remove moisture. As a result, the logs will last a long time.
The remaining stages of arranging the floor structure are similar to the processes described above.
Non-leakage floors
Layout of a leak-proof floor with a slope
Laying wooden floors with a slope is required only if a leak-proof base is installed. How to lay floorboards at a certain angle to the drain?
- The rough coating is cleaned of dirt and a drainage system is installed;
- Then the concrete screed is supposed to be poured, which is done using the technology described below;
- After the screed hardens, the tongue and groove board is laid;
- The finished floorboards are positioned at a slight angle to the drainage system due to the previously formed screed slope.
Unlike pure concrete, wooden floors can be installed in a sink, steam room or shower, as they are not prone to dust formation.
Pouring technology for inexperienced builders
You should not be afraid of carrying out work on arranging a screed if you do not have experience and skills in how to pour floors in a bathhouse under the drain. In reality, this process cannot be called complicated.
Segments of aluminum profiles can serve as guide beacons. It is not mounted strictly horizontally, but with a slight slope towards the place where moisture is collected. A distance of about 100 centimeters is left between the beacons. To fix the landmarks, you can use small piles of cement mortar, which must dry.
Then they start pouring the screed. Work begins to be done from the farthest corner. The prepared solution is laid out on a rough base and distributed between the guides using a trowel. To make the process move faster, it is advisable to fill the floor with an assistant who will ensure a continuous supply of the mixture.
For the final leveling of the floor surface, a long rule is used. They guide it along the guides and smooth out the solution. If necessary, the mixture is added and spread with a trowel.
After a few days, the concrete layer will acquire the necessary strength, but the screed will be completely ready in no less than 2 weeks. The concrete surface should be moistened at least 2 times a day. The presence of light spots on the surface of the screed means that moisture is not enough and after wetting with water it needs to be covered with a film. To speed up the process, plasticizers must be added to the solution.
Preparatory work
If you have an old concrete base, you first need to decide whether to remove it or not. If you only plan to repair a concrete floor screed, the old base does not have large cracks and fits tightly to the base, you can treat the surface with a primer and begin installing beacons or guides.
If the old base crumbles, has swelling and other obvious defects, it must be removed (to do this, use a hammer drill, jackhammer or chisel with a hammer). After finishing the work, the surface is cleaned (using a construction vacuum cleaner or a regular broom), treated with a primer and allowed to dry. The base is ready.
Preparing a Wooden Floor
Concrete screed on a wooden floor has its own nuances: it is necessary to carefully repair all existing defects (replace rotten boards or at least turn them over, seal the joints with epoxy putty, and if necessary, with polyurethane foam, treat the joints with sealant on top), cover the wooden floor with a primer with moisture protection or moisture-resistant paint, lay a layer of waterproofing and only then proceed with the installation of beacons.
The use of a bonded screed is unacceptable here: the wood deforms during temperature changes, which will lead to the destruction of the screed laid directly on the floor boards.
Setting the zero level
The main stage of the preparatory work is determining the zero level of the floor screed. If you have a laser level, no difficulties are foreseen - just turn it on, install it and use the beam to make marks on the walls.
Marking walls using a water level
The second method is much more labor-intensive. This will require a water level or level. Mark a point on one of the walls at an arbitrary height. For example, 150 cm from the floor. Using a water level, mark the other walls (at least 2 marks on each). Then, using a painting cord (the cord and powder paint for it can be bought at a hardware store), connect all the dots. We got a line at the same level relative to the horizon (not the floor).
How to work with a water level, see this video
Now, by measuring the height from the floor to the line at several points, find the minimum thickness of the screed, which will make it possible to eliminate all unevenness. Usually the measurements will be different. If you take the largest and smallest value and subtract them, you will get the same desired value. Please note that the minimum thickness of the concrete floor screed is 7 mm . With a smaller thickness, cracks will soon appear and the concrete will begin to crumble.
Having found the required thickness of the screed, subtract it from the height of the drawn line. For example, the screed should be 4.5 cm. Subtract 4.5 cm from 150 cm, we get 145.5 cm. We measure this distance from the drawn line and draw another line, which will serve as a guide when laying beacons and leveling the screed. This line is called the zero level. Beacons or guides are then aligned along it.
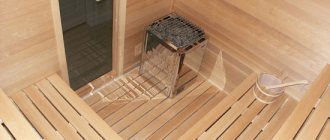
Warm floor system in the bathhouse
When you want to create the most comfortable conditions, you need to study information on how to fill a heated floor in a bathhouse (for more details: “What is the best heated floor in bathhouses - arrangement options”). To equip it, when laying the final screed, a heating system for the floor surface is installed inside it. The pipes through which the heated coolant moves are laid on top of the reinforcing mesh. This design can provide quick heating of bath rooms.
Why is tilt necessary?
If the degree of inclination is too small, not all the water accumulating on the surface will enter the drainage system.
Tilt of the base towards the drain allows you to quickly remove water from the washing room or steam room in the bathhouse. A rather complex design performs several tasks:
- Prevents fluid accumulation;
- Prevents damage to floor materials;
- Provides quick drying of floors;
- Significantly reduces the chances of developing fungus and mold.
The design of a rough foundation with a slope must be carried out taking into account many technological nuances. If the degree of inclination is too small, not all the water accumulating on the surface will enter the drainage system. If you make the floor slope too large, this will affect the material component of the issue, since it will lead to unnecessary expenses.