Suburban areas with ideal hydrogeological conditions are extremely rare. Mostly they come with natural flaws, which can and should be dealt with. So, to combat groundwater and flood water, wall foundation drainage is constructed. For it to work effectively, you need to know the specifics of the device. Do you agree?
We suggest that you familiarize yourself with the practice-tested rules for constructing wall drainage. Reliable information will be useful to owners who want to make their own water drainage system. The article will also be useful for those who order work from a specialized company in order to control their quality.
We have detailed the step-by-step technology for constructing a system that drains the soil near the base of the house. The article provides recommendations for the operation of drainage. Photo and video applications will provide effective assistance in analyzing a difficult topic.
Preparation for the construction of a PF for a private house
The design rules for slab foundations are regulated by SP 50-101-2004.
The developer needs to analyze the hydrogeological features of the site, add up the design loads and calculate the foundation parameters using the formulas described in the regulatory documentation. As a rule, the thickness of the slab varies from 20 to 40 cm depending on the bearing capacity of the soil and design loads. For concrete screed, concrete grades M250–M350 are used, and the greater the weight of the house and the more complex the geological conditions, the stronger the solution should be.
In modern construction, the use of geotextiles is actively practiced as a basis for the bottom of a pit, which simultaneously performs a number of useful functions:
- prevents silting;
- does not allow soil and bulk non-metallic materials to mix;
- is a kind of barrier to groundwater;
- helps the foundation to evenly distribute the load on the soil base.
The formula for calculating a monolithic foundation slab is presented in this article, and the design features are presented in this article. How to calculate the thickness of a slab base can be found here, and information about suitable grades of concrete can be found here.
Water infusion of dandelion flowers
This is an excellent cosmetic product. It gets rid of freckles and age spots. I use the infusion as a regular face lotion. I wipe cleansed skin with it morning and evening. It refreshes and tones the skin, relieves puffiness.
I pour a glass of boiling water over a large handful of fresh or dried dandelion inflorescences. I insist for 1-2 hours (preferably in a thermos). I cool and strain.
Main works
If you have assessed the situation on your site and realized that there is nowhere to go without intervention, then before you start draining the foundation with your own hands, you should stipulate some more rules.
- Firstly, all work must take place in the summer - for obvious reasons.
- Secondly, you should understand that the process will be labor-intensive and long from 2 to 3 months.
- Thirdly, care must be taken to protect the drainage system from moisture entering it if the weather turns bad. For example, arrange a canopy made of polyethylene or boards.
- Fourthly, if you have weak soil, you need to take care in advance to strengthen it with retaining structures.
- Fifthly, it would be a good idea to dig up the foundation and inspect its depth and shape.
- Sixthly, in the land registry you will need to find out the location of underground sources and groundwater.
- Seventh, observe where the most moisture accumulates on your foundation.
And finally, prepare in advance a diagram of pipes, wells, etc., stock up on everything necessary for drainage.
Before you directly approach the wall drainage, you should perform some preparatory work on waterproofing.
- First, as mentioned earlier, you need to dig out the foundation. In this case, it is necessary to clean the foundation slabs from soil and old waterproofing.
- Give the foundation time to dry.
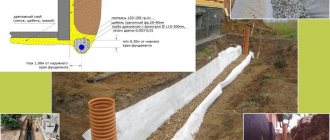
So, let's get started. First, let's dig trenches for laying our system, while stepping back 1 meter to the side from the foundation. Let's estimate the width of the trench - it should be 20 cm greater than the diameter of the pipe.
When laying pipes, do not forget that the drainage should pass half a meter below the supporting structure.
We place wide strips of geotextile fabric on the sand so that its ends protrude beyond the boundaries of the trench. Next, we fill in large crushed stone around the foundation - it conducts water well.
Only after all this do we lay the pipes, making sure that they slope toward the lowest point of the system. We connect the pipes using fittings, wrap them with electrical tape just in case and fill them with 10 cm of crushed stone. Then we sew the ends of the geotextile together with threads.
We install the collector at a distance of at least 5 m from the house. It should be located between the levels of the pipe and groundwater. About a meter lower from the pipes. We also cover the pit for the collector with geotextile fabric and only after that we install the well itself. To prevent the well from bevelling in the bottom of the container, you need to drill several holes and secure it firmly. After that, we fill it with gravel and then with earth.
By the way, the trenches should be filled in so that a small mound is formed, because if this is not done, the soil will sag and will have to be filled again.
For example, let’s imagine that your water intake tank is higher than the level of the pipes, then, among other things, you will have to install a drainage pump. It will forcefully distill water masses.
We invite you to familiarize yourself with: Do-it-yourself sauna stove made of brick
If the depth of the pipes is higher than the freezing depth of the soil, it is necessary to install a heating system using a heating cable. This will protect your drainage system from freezing during the winter.
Thus, if you want to do the foundation drainage with your own hands, it is not the easiest, but quite doable task.
Based on their functional purpose and installation method, there are several main types of drainage around the foundation of a house:
- surface drainage - acts as a storm drain around the house, closely connected with the roof drainage system;
- wall foundation drainage;
- foundation ring drainage;
- reservoir drainage.
Photo from the site during drainage installation.
Ring drainage is often used in the construction of private houses in areas with high groundwater levels. It consists of perforated drainage pipes laid along the perimeter of the house foundation and inspection wells.
Such a drainage system can be around any foundation - slab, strip, columnar. This system ends with a common drainage well into which all waste water is discharged. Water is drained from it by a sewer pipe towards the street or ravine.
The difference between wall and ring drainage is the distance of its installation from the surface of the foundation. For ring drainage this is an average of three meters, and wall drainage is installed at a distance of about one meter.
Reservoir drainage is performed under the entire area of the building and can be used with slab and strip foundations. It is often used in the construction of baths.
Organization of waterproofing for different types of foundation
Arrangements for protecting a constructed building from moisture vary depending on the type of foundation. The most common types are slab, pile, column, strip and monolithic foundations.
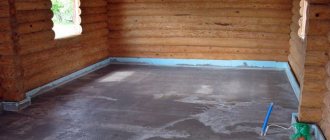
Plates
Here it is best to wrap the foundation with rolled roofing felt. When any irregularities are detected.
They must be removed using a leveling screed.
Then a water-repellent material and insulation are placed on the concrete slabs and the surface is leveled again.
Pile and column types
It is not easy to waterproof concrete piles and pillars. It is provided by adding water-repellent additives to concrete. Wooden structures are treated with special liquids that prevent rotting and moisture absorption.
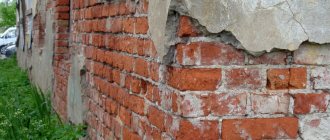
Strip and monolithic foundations
Most often, monolithic structures are insulated with hot bitumen mastic
To properly waterproof these types of foundations, the following several methods are used. They are varied and quite effective.
- Treat the foundation with a special mastic, only the surface must be dry and smooth. This method is not entirely reliable, so to strengthen the composition it is necessary to cover it with insulation or build a brick wall.
- Just as in the first case, you need to carry out all the manipulations using hot bitumen mastic, and stick roofing material on top in 2 layers with an overlap of about 15 cm.
- Using a special sprayer, a water-repellent composition is applied to the dry foundation. It is advisable to use geotextiles on top, then the waterproofing will last a long time.
- Another reliable and high-quality method is penetrating waterproofing. It contains quartz sand, cement and special additives. This mass has penetrating properties.
Work on the installation of effective drainage
As already mentioned, it is a comprehensive solution to the issue that will bring the greatest effect, so a whole series of work should be performed.
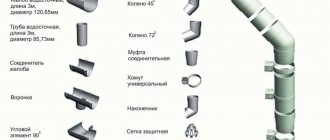
In addition to groundwater, water coming from roof drains is a big problem. We recommend that, along with laying drainage pipes, install a storm sewer and drain sediment through special water intake funnels in the blind area.
In this case, drainage around the house will be most effective.
Drainage wells, into which both groundwater and atmospheric water will flow, are easiest to make from concrete. When constructing, do not forget about the reinforcement of the walls of the well and high-quality waterproofing. The collected wastewater is either pumped out or redirected to the sewerage system.
In most cases, this method can solve the problem of high groundwater levels, but once again, conditions vary, so to develop an effective system, it is best to contact a specialist. But the installation can be done with your own hands.
We suggest you familiarize yourself with: Trowel for bricklaying
A common type of drainage system for the foundation of a house is ring drainage. It is better to carry it out in parallel with the construction of the foundation of the house. Let us consider step by step the entire process of installing such a system. Waterproofing must be done before drainage can be carried out. All work can be divided into the following stages:
- preparing a trench around the house to the depth of the foundation, its width can be any, but not less than 50 cm, while the bottom is made with a slope of approximately 2 cm per meter;
- backfilling the underlying cushion with sand 150 - 200 mm thick;
- installation of inspection and drainage wells in the corners of the building; holes must first be made in their walls;
- laying geotextiles up to two meters wide at the bottom of the trench;
- installing a layer of medium-fraction crushed stone at the bottom of the trench on top of geotextiles, this layer should be up to 20 cm thick;
- laying perforated pipes with a slope;
- filling the pipes with crushed stone in a layer of approximately 30 - 40 cm;
- wrapping pipes covered with crushed stone, geotextiles with an overlap;
- backfilling the trench with soil to the level of the blind area.
Foundation drainage can be done with your own hands without the involvement of specialists. The considered option relates to the installation of deep drainage to combat groundwater. Using the same technology, surface drainage can be made, acting as a storm drain, collecting and draining rainwater from the roof and from the local area.
To correctly design a slope, it is best to use a laser or optical level, setting a slope of 2 cm per linear meter. The mark of the trench can be easily determined by knowing the depth of the drainage pipe - it is approximately equal to the depth of the foundation. In this case, the trench is deepened 300 mm lower - for the installation of a sand cushion and crushed stone backfill.
Wall drainage.
The next stage is filling the pipes with a layer of crushed stone and wrapping this “pie” with geotextile so that the fabric overlaps. All that remains is to backfill - it can be done with sand or soil previously removed from the trench.
How to organize water drainage on the site
This task is complex; it includes systems that complement each other:
- drainage system;
- surface drainage system;
- drainage system.
Using the first two systems, rain and melt water can be drained away. These types of groundwater are seasonal and pose a significant problem for houses with a basement. In addition, they can instantly fill a cesspool during floods.
If there is a roofing system, rainwater quickly accumulates and is drained to the catchment area. If there is no drainage, then very soon the rains will simply break the steps, blind area and all the paths near the building. The remaining melt and storm water is eliminated using surface drainage.
If the basement is flooded with water, and at the same time the cesspool needs to be pumped out weekly, then deep drainage will have to be performed.
House foundation drainage
If the groundwater level is high, the foundation must be protected not only by careful waterproofing, but also by a well-designed drainage system. Only the combination of these measures will allow the structure to be maintained in its design condition without destruction.
Which system to choose
The foundation drainage of a house can have a different structure depending on the type of soil, the amount of groundwater and the depth of the structure.
Wall foundation drainage
Such a system is necessary when laying a deep foundation with a high groundwater level. It is often installed to prevent flooding even at normal groundwater levels to protect against intense precipitation.
The wall drainage system can consist of 2 parts:
- Foundation wall protection;
- Interlayer drainage, arranged under the foundation cushion, is necessary for voluminous and saturated groundwater layers.
The device for protecting the outer wall of a load-bearing structure is carried out on all soils except sandy ones - they themselves conduct liquid well into the lower layers of soil.
The wall system includes a complex of waterproofing walls and laying drainage pipes with inspection wells. Excess liquid is collected in the pipeline and removed at the disposal site into a sewer, reservoir, site for reuse, etc.
Ring drainage
The method of installation is similar to the wall one, but differs in location: the ring system drains the entire perimeter, incl. areas adjacent to the house. It is placed at a distance of 1.5...3.0 meters from the foundation, which is convenient when laying it after the construction of the building.
Ring drainage is optimally chosen for shallow foundations without a basement.
Interlayer drainage
It is often arranged as an independent protection of the foundation from saturated aquifers that the structure reaches. Interlayer drainage additionally prevents the walls from getting wet by capillary moisture. Its arrangement is possible only at the stage of preparing the foundation for the foundation.
The system is used mainly for slab foundations. It involves compacting the soil with large sand and gravel using drainage pipes located under the foundation.
To clearly determine which type of drainage is suitable for a particular home, use the table:
Any system is necessarily accompanied by waterproofing of the external surfaces of the foundation and the arrangement of a blind area with a slope along the entire perimeter of the building - it partially drains the water coming from above.
Calculation of system and materials
Proper foundation drainage begins with calculations of the drainage system and materials.
- The depth of the pipe in the trench should be 0.3...0.5 meters greater (deeper) than the foundation cushion. This reserve is sufficient to remove excess soil fluid from the supporting structure.
- The slope of the pipeline must be at least 2 cm per 1 pm of drainage for the natural removal of water from structures to their destinations.
To organize drainage on the perimeter, you need to find the highest and lowest points.
- A water collection well is located high;
- A receiving well is installed in the low one, from which it is discharged into a collector well for further transportation.
To calculate the amount of materials, follow several rules:
- Draw a diagram of the house indicating the sides. Draw on the plan the proposed drainage water line, taking into account the distance from the wall (up to 0.5 m for a wall outlet, 1.5...3.0 m for a ring outlet).
- For every meter, add 2 cm to the slope. If the length of the plot is 10 meters, we get 20 cm of slope from the top to the bottom point.
- Mark the position of the inspection wells. They should be located in the corners of the house or at every second turn, but at a distance in a straight line no more than 40 m from each other.
- Based on the data obtained, calculate the required number of pipes and wells.
- Provide couplings for turns, and separate special components for pipe connections.
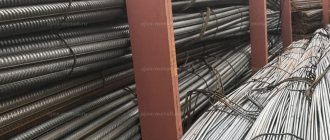
Pipe selection
The efficiency of the entire system depends on the quality of the selected materials. Pipes made of ceramics and asbestos cement are currently practically not used due to their low efficiency; preference is given to PVC and HDPE pipes. For drainage, use products with perforations and filters:
It is optimal to use pipes with stiffeners to maintain the shape of water pipelines even under intense soil loads.
The variety of pipes and filters in stores will confuse any uninformed buyer. How not to make a mistake when choosing? – rely on the type of soil.
Valuable tips and tricks
If you follow the rules listed below, there will be much fewer problems with the functioning of the drainage system.
- Drainage pipes are installed along the lower border of the foundation base. The permissible step up/down is from 0.3 m to 0.5 m. If you lower the drains lower, groundwater and rainwater will systematically wash away the soil from under the foundation, which can lead to subsidence of the building.
- If it is not possible to protect the foundation with a geomembrane, you will have to build a clay castle.
- The level of accumulation of drainage water (drain zone) must be below the level of the finished floor in the basement or cellar.
- Backfilling with river sand is more effective than backfilling with “native” soil.
Considering the dynamic movement of groundwater, be sure to secure geotextiles when installing the pipeline. It should cover the filter “roll” tightly, without gaps.
A properly equipped drainage system lasts 20-30 years, so after installation is complete, you can begin choosing a method for landscaping the local area. One of the popular options is a flower garden
To more effectively remove excess moisture, along with wall drainage, a drainage system and a storm drain are installed - underground or external.
Deep drainage
Deep drainage can be general or local. The first option involves draining water from the entire area of the site, the second option - from individual buildings on the site, including houses, roads and basements.
The local drainage system can be of the following types:
Wall drainage. With the help of such a system, water is drained from basements built on clay and loamy soil. Very often, such a system is used for preventive purposes. The structure consists of drains with filtering properties located no lower than the foundation of the building. The distance between the pipes and the wall is selected depending on the width of the foundation of the main building. If the base of the foundation is located at great depth, then the drainage system is installed on the surface. It is necessary to understand that the soil under the drains may sag.
Ring drainage. The main application of such systems is to drain water from the foundation and basement. It is used when pressure underground water flows through the area and general deep drainage is not able to cope with the assigned functions. Thanks to the ring drainage, the structure is completely protected from soil moisture. The efficiency of a ring-type drainage system depends on the size of the area and the location of groundwater
The system may well be installed after the house is put into operation.
Reservoir drainage is another type of drainage system that is organized to drain groundwater, so it is important to carry out work on its arrangement in parallel with the main construction process. In most cases, such a system is associated with a drainage pipe located on top of the ground at the base of the house. Reservoir drainage must be considered in the case where the tubular system does not cope with the task, or there are flooded closed zones on the site, or there are different, uneven rocks on the site
The main feature of the reservoir drainage system is the ability to remove groundwater and capillary moisture from the soil. To arrange a groundwater drainage system, a decent layer of sand is poured under the building and gravel or crushed stone ditches about 20 cm deep are made in it. The location of the channels is determined for each site individually, depending on its characteristics and hydrogeological indicators.
Reservoir drainage must be considered in the case where the tubular system does not cope with the task, or there are flooded closed zones on the site, or there are different, uneven rocks on the site. The main feature of the reservoir drainage system is the ability to remove groundwater and capillary moisture from the soil. To arrange a groundwater drainage system, a decent layer of sand is poured under the building and gravel or crushed stone ditches about 20 cm deep are made in it. The location of the channels is determined for each site individually, depending on its characteristics and hydrogeological indicators.
Also, deep drainage can be divided into types according to the type of execution:
- Horizontal type drainage
. This includes wall, ring and reservoir drainage systems. - Vertical drainage
is located at a certain depth in the soil, and therefore requires the installation of additional pumping equipment. Arrangement of the system is a rather complex process, therefore such a drainage system scheme is used very rarely. - Combined drainage
involves the combined use of horizontal and vertical drainage systems. Recommended for use in regions with difficult climatic conditions. The cost of arrangement is quite high, so the system is used in extreme cases.
Conclusion
Self-manufacturing of a drainage system is beneficial only in the case of deep ring drainage, manufactured along the outer perimeter of a ready-made foundation, since work on its implementation does not require the use of special equipment. In the case of reservoir drainage, all work is much more complicated and requires the specialist to have certain skills, as well as the presence of special tools, such as a level and a vibrating machine.
What is drainage?
Drainage is a system that removes excess moisture from a building using a pipe structure. There is an opinion that to effectively collect water, only a blind area is enough, but experts in this field recommend installing a full-fledged drainage system, which allows for much better protection of the building from the harmful effects of moisture.
No matter how beautiful the blind area is, it will not completely protect the house from moisture. Source pinterest.at
A drainage system for a home can be of three types:
- Open. It is a structure where open type trenches are used as drainage drains, the depth and width of which is 0.5 meters. This is the easiest drainage option for self-installation. The disadvantages of such a system include the unaesthetic appearance, as well as the unreliability of the structure, which will require additional reinforcement of the walls with special trays;
- Backfill. This is a structure where prepared trenches are filled with coarse crushed stone or rubble, and turf is laid on top. The advantage of such drainage is its long service life and ease of installation. In addition to the advantages, there are also disadvantages: low throughput, inability to carry out maintenance;
- Closed. This is done by laying drainage pipes with holes in the ground. This system is efficient and does not have the disadvantages of other systems. Its disadvantage is that the installation is quite complicated.
A closed drainage system is difficult to do correctly without certain skills and knowledge. Source handmaster.ru
Types of drainage systems
Depending on the severity of the problem of flooding in the area, there are several ways to make drainage around a private house.
Surface drainage
This type includes storm drainage (storm drainage). The advantage of such drainage is that its arrangement is simpler and accessible after most types of work on the site have been completed. Surface drainage systems can only remove rain and melt water; they cannot cope with groundwater.
There are two types of surface drainage devices: linear and point.
Linear drainage
Focused on draining storm or melt water from the entire site and from the house in particular. Water flows into channels dug in the ground and is discharged into a drainage well. As a rule, the channels have a straight linear shape and are closed with gratings.
Point drainage
Focused on the rapid removal of water generated from local sources (for example, under roof gutters, watering taps, etc.). Point drains are covered with decorative metal gratings to prevent clogging of the channel with debris and leaves. Drainage pipes are laid from each point and connected to the main main pipe leading to the drainage well.
According to the method of installation, drainage can be open or closed
Open drainage
A system of trenches, gutters, drains or drainage trays.
This drainage is a trench that is designed to drain storm and melt water from the house and the site.
The principle of an open drainage system
A ditch up to half a meter wide and 50-60 cm deep is dug along all sides of the site and around the house. All these trenches are connected to a common drainage trench.
In order for water to flow freely into the trench from the side of the house, a bevel is made in the ditch at an angle of 30°, and a slope towards the main water intake trench (or drain well) will allow water to be drained by gravity in the desired direction.
The advantage of an open drainage system is the low cost and high speed of work. But, if you need to drain a large amount of melt and rain water, you will have to install a deep drainage line into which someone could fall. Unimproved ditch walls are destroyed. Such a system spoils the appearance of the site.
The service life and safety of such a system can be increased by using special trays (made of plastic or concrete), which are covered with gratings on top.
Open drainage around the house
Closed drainage
It has a more aesthetic appearance compared to the previous one, as it is equipped with a protective grille, but the receiving ditch is much narrower and smaller. Their types are presented in the photo.
Closed drainage around the house
Backfill drainage - a system of backfilled trenches
It is used when the area of the site is small and it is impossible or impractical to make open drainage. The disadvantage of this system is the inability to carry out maintenance of the trench after installation without dismantling.
Proper drainage around a house of this type is achieved in several stages.
a trench is dug to a depth of about a meter with obligatory observance of a slope towards the drainage well;
Geotextiles are laid at the bottom of the trench;
the trench is filled with gravel, crushed stone, etc.;
A layer of turf is laid on top. This stage is optional, but allows you to give the site a more aesthetic appearance.
Backfill drainage
Deep drainage
Disposal of a large amount of groundwater requires the construction of a solid system - deep drainage of the site. The device of a deep drainage system is used in areas with clay soil, located in lowlands and characterized by a high groundwater level.
The installation process is labor-intensive and consists of laying pipes (the diameter depends on the amount of water drained) from perforations into deep trenches (depending on the height of the soil water).
Causes of excess humidity
If the building is located in a lowland on unstable soils, its foundation constantly interacts with water. The paths of moisture penetration can be different:
- in the absence or improper installation of a stormwater system, water collects during precipitation;
- melt water runoff in the spring increases the risk of flooding in low-lying areas;
- high level of underground water horizon, especially during periods of oversaturation of the soil with moisture.
These factors seriously affect the integrity of structures and reduce living comfort.
Wall foundation drainage. Stages of arrangement
Let's consider a more labor-intensive case, when the construction of a house has already been completed and it has been put into operation, during which it became clear that it is impossible to do without wall drainage.
Step 1. Trenches of the required depth and pits for wells in the right places are dug around the house.
Drainage ditches
Ditch
Step 2. Using a level, check for unevenness.
Step 3. Pour a sand cushion to the bottom, carefully tamping the sand and not forgetting to check the slope. The layer height should be about 0.15 m.
Gravel bed filling
Step 4. Geotextiles are laid in the ditch so that the edges of the fabric extend beyond the boundaries of the trench.
Fastening geotextiles to the walls of the ditch
Step 5. Fill the ditches with a layer of gravel, making a trench in the backfill for laying the pipe and checking the slope.
Step 6. The drains are laid and connected to each other. Once again check compliance with the slope.
Drain connection
Drain pipe
Step 7. Inspection and drainage wells are installed in the corners and perforated pipelines are connected to them. The bottom of the pits is also pre-filled with sand and a concrete base is poured for plastic structures.
Drain gasket
Manhole - top view
Step 8. The pipes are wrapped with geofabric, which provides additional protection against silting. At pipeline bends, it is worth securing the textiles with twine.
Gravel backfill
The pipes are covered with geofabric
Step 9. A twenty-centimeter layer of gravel is poured onto the drains and wrapped with the remaining geotextile sheets, which are secured with rope.
Step 10. First pour a layer of sand on top, and then soil.
A pipe without perforation will also need to be drawn from the drainage well, through which the wastewater will be discharged outside the site, for example, into a ditch or into a filtration well. The connecting pipeline must run downhill. Otherwise, a pump must be installed in the drainage well.
Drainage ditches are filled with rubble
Upon completion of installation, it is worth organizing a meter-long blind area around the house.
These measures, provided all the rules are followed, will ultimately help protect the house and basement from the destructive effects of underground and atmospheric moisture.
WHY ARE WELLS NEEDED?
At every 90° turn, inspection wells are installed (sometimes, to save money, they are made at every second corner).
On straight sections they are installed every 50 meters.
They are made from large diameter pipes. You can also find ready-made prefabricated wells on the market.
It is recommended to create a sludge collector at the bottom so that small particles that fall into the pipe can settle in it without clogging the pipe.
To do this, the drainage pipe is fixed at a level of 20 cm above the bottom of the well.
When there is quite a lot of sludge, it is removed with a special pump. The pump is lowered into the well, then, after agitating the water at the bottom with a pressure jet, it is turned on.
Types of foundation protection systems
Formative drainage
Constructing a building on clay soil requires protecting the basement from dampness. Foundation drainage in the form of a monolithic slab requires the installation of a special system. It is laid after digging a pit under the building and comes in two types:
- single-layer – sand or crushed stone;
- two-layer - a combination of layers of crushed stone and sand or the addition of a geotextile membrane.
A layer of gravel or crushed stone is poured to a height of 30-50 cm; it should extend beyond the contours of the building. There are drains along the perimeter. If the site has a large volume of formation water, a two-layer system is used, and discharge pipes are additionally laid under a layer of crushed stone.
Formation drainage device
To prevent the drainage layer from flooding, it is covered with a special cloth, an economical option is glassine, a more expensive and effective option is a drainage membrane. This fabric provides a connection between reservoir and wall drainage.
Wall drainage
For buildings with a basement and ground floor, this method will be an indispensable option for removing moisture. If the drainage system is installed after construction is completed, then it is necessary to dig trenches around the perimeter of the building. Their depth must exceed the depth of the foundation. The width is determined by the convenience of doing the work. Before starting work, the basement walls are waterproofed. This step is important to prevent moisture from entering the building. Coating or penetrating insulation is used. The coating option is a liquid bitumen mastic, which is applied to the walls in a layer of 2-4 mm. Penetrating compounds change the structure of concrete and close the pores. A waterproof layer is formed on the surface of the material.
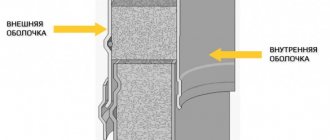
Among the innovative devices for protecting the foundation from excess moisture, drainage membranes have appeared. This is a waterproofing fabric made of dense polyethylene. Spike-like protrusions are created on its surface. They provide free space through which excess moisture flows into the drainage. To improve performance, the material is made multilayer; the membrane is complemented by a non-woven geotextile fabric designed to retain soil particles. The canvas is attached to the foundation wall with plastic dowels, which are driven above the waterproofing layer. The side with the spikes is turned towards the building, the membranes are laid with an overlap, and the seams are sealed with mounting tape.
Another modern way to remove moisture from the foundation is drainage mats. This is a multilayer composite fabric that performs the functions of protection, waterproofing and filter. The material is strong and durable, it does not deform during use. The mats are laid vertically on the foundation walls after applying a layer of mastic waterproofing. During installation, it is necessary to reduce the number of joints by laying the material in one sheet. The junctions with the wall and the seams are taped with waterproof tape. The structure of the mats is designed so that moisture flows through them into the drainage pipes.
Wall drainage device
The technology for installing wall drainage has the following stages:
- digging a trench with a slope of up to 2 cm per linear meter towards the collector;
- backfilling and leveling the sand cushion;
- laying geotextiles, the edges of the fabric should protrude from the trench;
- a layer of gravel or crushed stone up to 10 cm high is poured, it is necessary to check the level for the presence of a slope;
- perforated PVC pipes are laid;
- the drains are connected to each other, vertical pipes are installed at the turns, through which the system will be flushed;
- an outlet well is installed at the lowest point of the network;
- the pipes are covered with gravel, and overlapping drainage geofabric covers them on top, and the sheets are securely fixed at the ends of the branches with a polymer rope;
- the system is filled with river sand, which compacts well.
Differences in the design of wall and trench drainage
Ring drainage
This type of drainage system will protect against storm and groundwater. It is assembled in a closed circuit. To remove excess moisture, deep and linear drainage is used. The trench for drains is located 3 m from the house, its depth should be 40-50 cm higher than the foundation level. The ring system is arranged similarly to wall drainage, the only difference being the distance from the building. This option is suitable for old buildings when it is dangerous to dig up the ground near the foundation. The drainage system, which is a single circuit, has a slope towards the storage well (2 cm by 1 m).
A system of special gutters, the safety of which is ensured by drainage grates, will effectively remove moisture from the surface of the area near the building.
Ring drainage
Laying technology
For the system to work properly, you need to know how to properly lay the drainage pipe, depending on the type. For each drainage pipe, the installation technology will vary slightly depending on the design. But the initial stage is the same for everyone:
- Develop a drainage scheme: location of pipes, places for wells and revisions.
- Depending on the type of soil, the geological characteristics of the site, the location of groundwater and the required throughput, the size and type of drainage pipe are selected.
- Based on the planned route for wiring drainage pipes on the site, site planning and markings are carried out for excavation work.
The ideal option is when the drainage scheme is developed together with the house design
- They dig trenches. On dense soils with straight walls, on loose soils - with sloped walls, or strengthen them during work. The bottom is made 30 cm wider on both sides of the pipe.
- Level the bottom surface, compact the soil, form a slope towards the drainage well within 0.5-3.0% (minimum 0.5 cm and maximum 3 cm for each meter of length).
- Pour a layer of coarse sand about 15 cm thick and compact it, observing the slope laid down during the formation of the ditch bottom.
Further technology for laying the drainage pipe depends on its design.
Laying a drainage pipe with geotextile, if it does not have a factory winding:
- Geotextiles are laid on top of the sand. The width of the canvas should be sufficient so that the edges can then be brought together.
- Pour a layer of crushed stone (15 cm).
- Lay a perforated pipe and cover it with a layer of crushed stone on top.
- The edges of the geotextile fabric are wrapped and fastened together. As a result, the pipe should be uniformly filled with crushed stone on all sides of about 15 cm, the textiles should run along the sand-crushed stone boundary, and there should be free space left to the walls of the trench.
The principle of drainage is that water seeps through geotextiles, crushed stone and perforation, then flows by gravity through the pipe to the well
- Pour a layer of sand on the sides and top (about 15 cm).
- The removed or imported fertile soil is put back.
If the pipe has a factory winding made of geotextile, then the drainage installation procedure is reduced by two “steps”.
Note! You can buy geotextiles separately, choose perforated pipes without wrapping and wrap them before carrying out work.
When using pipes with a filter layer of polystyrene foam granules and windings, crushed stone is not covered. And if you believe the manufacturer’s advertising video, you don’t even have to fill in the sand.
https://youtube.com/watch?v=DloSGrkFtYA
The cost of installing turnkey drainage systems
Hiring specialists allows you to avoid many mistakes when arranging a drainage system. There are many companies on the market that provide drainage installation services, including project development and carrying out all the necessary work. The average cost of such services is 2300-5000 rubles per square meter and a depth of 1 to 3 meters, respectively.
Also, additional services may be offered, which are paid separately:
The price for drainage installation is cumulative and depends on the following conditions:
- Area of the site (cost calculation depends on the length of the canals);
- Complex of necessary works;
- Slope angle (height between the top and bottom points of the trench);
- Soil type (work on wet clay soil is more expensive than work on regular soil);
- Groundwater level (deep drainage is more expensive than surface drainage).
For a clear overview of drainage systems, watch the video:
Introduction
Until now, design organizations designing drainage systems (hereinafter referred to as drainages) in Moscow are guided by the “Temporary guidelines for the design of drainages in Moscow (NM-15-69)”, developed in 1969 by “Mosproekt-1” and “Mosinzhproekt”. During the practical use of the “Temporary Instructions”, new drainage designs based on the use of modern materials have appeared, both positive and negative experience in the design and construction of drainages has been accumulated, which necessitates the development of a new regulatory document.