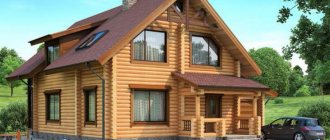
Wooden houses are one of the most popular offers on the modern construction market. Many companies offer turnkey construction. In this case, the customer immediately receives a finished home with all communications laid, interior and exterior finishing. However, in many cases, after some time, residents encounter serious problems associated with wood deformation. The reason for this is that during construction the shrinkage of timber houses was not taken into account.
The drying time of the timber can be several years after construction, depending on the type of material used, location, climate, type of foundation and many other factors. Finishing is not recommended for at least 6-8 months after the completion of the first stage of construction, that is, the construction of the house for shrinkage. It is also not recommended to insulate floors and roofs.
Shrinkage of a timber house: what does it mean?
Shrinkage is the process of timber drying , as a result of which the material decreases in volume, and the height of the building is correspondingly reduced. Depending on the initial natural moisture content of the wood, shrinkage can be up to 8-10 cm for a wall 3 meters high . Timber with natural moisture is considered to be wood material whose water to dry mass ratio exceeds 22% according to GOST 8486-86. The shrinkage process stops when the timber reaches equilibrium moisture content, i.e. when the percentage of wood moisture practically coincides with the ambient humidity. On average, this takes from 6 to 12 months.
The phenomenon of shrinkage is characteristic of all types of wooden buildings (only a frame house or a house made of laminated veneer lumber practically does not shrink). It is due to the fact that wood loses moisture, thereby decreasing in size. In addition, the lower crowns of the frame experience additional loads from the weight of the building, which further increases their deformation. As a result, a change in the geometry of the structure occurs. If you build a building and carry out finishing work without taking into account shrinkage processes, this can lead to misalignment of door and window openings, the appearance of gaps between the crowns and deformations in the finishing of the floor and walls, general destruction of the finishing as a result of the appearance of excess internal stresses, and molding of walls and ceilings in as a result of insufficient air convection.
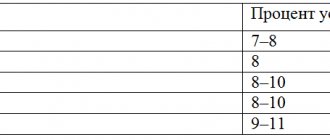
Shrinkage of wooden houses occurs most intensively during the first 3 months after completion of construction work. In the future, it goes away gradually on average up to 2 years. Its value is usually measured in centimeters for every 3 meters of wall height. This value depends on the type of material. For timber it is minimal compared to logs. However, the change in geometry is still quite significant to not be taken into account. For different types of timber it can be:
- planed or not planed edged – 6-8 cm;
- profiled natural humidity – 6-8 cm;
- profiled glued chamber drying – 2-3 cm.
According to our construction experience, it is optimal to build a house from material that is not stale, freshly sawn . This material has the necessary plasticity. Drying the material directly in the structure ensures minimal deformation . Which certainly has a positive effect on the quality of the entire building.
Possible problems
When shrinking a log house, a number of defects may occur that will lead to serious problems:
- Changing the geometry of load-bearing walls and partitions.
- Cracking of the building facade. Occurs due to the influence of critical temperatures and lack of effective ventilation.
- Warp walls.
- Jamming of windows and doors.
Due to the high humidity of wooden surfaces, the risk of infection by fungi and mold increases. To protect the material from damage, you need to pre-treat the timber with a special antiseptic.
Cracking of timber
What is included in shrink construction
The construction of a house for shrinkage is carried out without finishing. First of all, the foundation of the building is erected. Afterwards, the builders begin constructing the log house. Then the floor beams are installed, the rafter system and the roof of the house are constructed. The subfloor is not laid so as not to interfere with the air convection necessary for ventilating the log house during the drying period.
An example of a work plan for shrinkage construction:
- Installation of a log house on jute, wooden dowels;
- Installation of floor joists;
- Installation of floor beams;
- Installation of the rafter group;
- Installation of sheathing;
- Installation of a vapor-permeable membrane;
- Installation of a ventilation gap for attic floors;
- Installation of metal tiles;
- Installation of ridge strip;
It is strongly recommended not to carry out finishing work on the interior and exterior of the building, including using lining, siding or other materials until the shrinkage processes are completely completed.
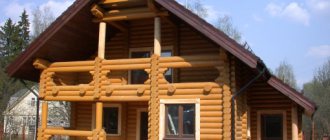
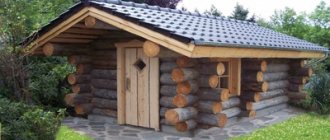
Examples of houses for shrinkage
Choosing a project and building materials
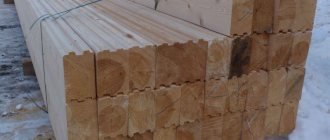
For the construction of a log house, the following types of timber are used.
| Varieties | Characteristics |
| Profiled. | Its shrinkage is minimal (3–5%), since special methods are used to reduce the moisture content of the wood. A bathhouse made from it produces a minimum number of cracks, because the system of tenons and grooves promotes a tight fit of the beams to each other. |
| Glued. | Consisting of specially treated and longitudinally glued boards and is resistant to cracking. Almost no shrinkage (only 1%). |
| Ordinary. | With natural moisture, the timber ensures shrinkage of the log house by 50% greater than the use of blanks that are dried in special chambers. |
Baths made of timber have great versatility. They come in one-story, two-story, have different shapes and are combined with a variety of materials.
When choosing a project for a future building, you should pay attention to every detail
Single-story baths do not have stairs, which take up useful space. This circumstance allows you to optimally distribute space for different rooms. The project is ideal for a small family.
The bathhouse with a veranda looks picturesque. The project also assumes the presence of premises on the top floor.
Which is better: a turnkey house or a shrink-wrapped house?
Turnkey construction is popular among customers, primarily due to the convenience of this solution. Indeed, it is always convenient to receive a property completely ready for occupancy in a short time. You can move into it immediately after completing the main work. However, in the case of wooden buildings, this advantage can result in serious problems, as a result of which it will be necessary to completely change the finishing elements, install new windows and doors. In addition, the floors may separate and the gaps between the crowns may increase. Deformation of water supply and heating pipes and significant tension in electrical wiring are also possible, which can lead to accidents. Therefore, we consider this approach to construction to be incorrect.
Construction of a house for shrinkage takes longer than turnkey construction, but this is due to the properties of the material. At the same time, the risk of damage and deformation of the building’s structural elements and finishing elements is almost completely eliminated. Accordingly, you get rid of quite significant and unjustified costs for eliminating these defects.
It should also be noted that this particular construction option is a more rational solution from a financial point of view for many clients. This is because construction costs are spread over a longer period of time. First, the costs of building the log house itself are paid. After this, within 6-12 months you can process and prepare the country house for finishing.
After completion of the shrinkage processes, finishing is carried out. Thus, payment of the cost of the house is carried out in stages, as if “in installments”. There is no universal turnkey finishing, because each customer has his own requirements for finishing, based on his own idea of comfort and coziness. Therefore, the estimate for finishing is drawn up individually for each customer, taking into account all his wishes.
Since “turnkey” construction (i.e. with finishing) with a responsible approach to houses made of natural moisture logs is possible only after a period of shrinkage, we recommend that you carefully read the contract with the contractor. Please note that payment can be made upon commencement of work.
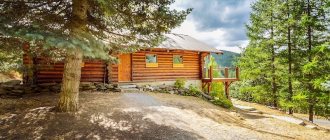
An example of a house made of timber for shrinkage, built according to project No. 17 from our catalog.
For example, the same project (No. 17) in the turnkey version. Additionally, at the request of the customer, standard window openings were replaced in the project, and the balcony was excluded from the design in favor of increasing the size of the attic rooms.
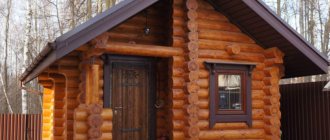
Bathhouse “turnkey”
This is an ideal option for everyone who wants to get a ready-made bathhouse without unnecessary hassle and even post-construction cleaning. Everything is included in such construction: construction of the frame, installation of doors and windows, floors and baseboards, interior decoration, provision of the required communications. As a rule, a company building a turnkey bathhouse indicates in the contract the list of works that it is ready to perform within the agreed time frame. Anything more is usually paid additionally.
When choosing the “Turnkey Bathhouse Construction” service, you can count on the following advantages:
- saving time, which can be used for more necessary things;
- performing work at a high professional level;
- preliminary discussion with the construction company of individual wishes.
Shrinkage compensation
The consequences of timber frame shrinkage can be reduced by using special compensation solutions. This can significantly reduce the risk of damage and deformation of the structure, but this does not mean that shrinkage can be neglected.
Shrinkage compensation is ensured through the use of the following methods:
- When installing support pillars, shrinkage compensators must be used, since the longitudinal shrinkage of wood is minimal. The height of the support pillars can be adjusted using a screw jack (shrinkage compensator), which allows for uniform settling of the building.
- Sealing and insulation of roof joints using high-quality sealing material - jute, flax fiber, tow, etc.
- The use of casing is a special design in the form of a durable and rigid wooden box made of thick timber. It is mounted to compensate for the pressure of the log structure on the door or window opening. The casing prevents deformation of window frames and door frames during the shrinkage processes of the building. When installing the casing, a gap is provided between its box and the crowns of the log house. This gap is sealed with insulation and decorated with platband.
- The use of sliding fasteners during the installation of a roof truss system.
How to minimize shrinkage deformations?
To eliminate the risk of skewing walls, the appearance of a large number of cracks on wooden surfaces, and destruction of window and door openings, it is recommended to perform a number of actions:
- Before starting construction, make a high-quality waterproofing of the base so that moisture coming from the ground does not damage the wood. To do this, the foundation must be covered with liquid mastic, and 2 layers of roofing material should be laid on top of it. It is recommended to cover the first crown with used motor oil.
- To build a log house, use kiln-dried lumber.
- Maintain humidity in bath rooms at 40–70%. Also avoid temperature changes.
- Compensation bars must be installed along the edges of window and door openings. There should be about 4 cm of free space from the box or frame itself to the top of the opening.
- When constructing a log house, it is important to strictly follow the technology. Between the individual crowns you need to place jute insulation. The distance between individual bars should be minimal.
- The crowns can be connected to each other using wooden or metal dowels. It is recommended to choose the first option, since the wood may begin to rot at the junction with the metal.
- You also need to pay attention to the processing of the ends. It is recommended to cover them with protective compounds. The product should slow down the release of moisture. Additionally, boards are placed on top of the ends, which enhance protection from environmental factors.
- If individual supports are to be erected from timber, compensatory bowls (screw jacks) must be installed on top. With their help, you can adjust the location of the support during shrinkage, which will preserve their load-bearing qualities.
By performing these actions, you can minimize the occurrence of shrinkage defects, but you will not be able to completely cope with this problem.
Wooden dowels for timber
Work during the shrinkage period
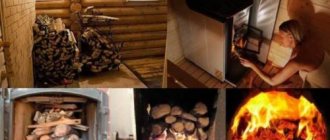
The fairly long process of settling an already built house can be used to qualitatively prepare the house for finishing at a calm pace:
- Insulation or caulking of seams.
- Antiseptic treatment of walls against insects, mold, in order to increase fire resistance.
- Wall sanding – performed 6 months after construction.
- Toning the walls of the log house and covering them with a protective composition.
- Waterproofing the foundation - additional treatment of it using special waterproofing compounds, drainage of groundwater. (in case of using a concrete foundation)
- Connection of communications, installation of blind areas, wastewater drainage systems and other external works.
Roof
There are two options: gable or single slope. For a bathhouse measuring 3x3, you can use the simplest option - a lean-to slope.
Installation of pitched roofs
If you choose this option, then you need to do the ceiling right away. For a bathhouse, it must be insulated; you can choose mineral wool (much more expensive and more complex) or polystyrene foam (cheaper and faster). Let's focus on a simple option - foam insulation. It is not afraid of moisture, and there is no need to use various steam and water barriers.
Foam insulation
Characteristics of foam plastic
Prices for foam insulation
PSB foam insulation
Insulation needs to be installed in several stages:
- nail edged boards to the ceiling beams from below, 20 mm thick is sufficient;
- lay foam boards on them. Place them as tightly as possible, avoid gaps. Polystyrene foam can be cut perfectly with a special carpenter's knife under a ruler. During the marking period, provide dimensions 1÷1.5 cm larger - the foam will shrink during installation, the insulation will become airtight;
- Lay any boards on top of the beams, these can be various sections, slabs, etc. The main requirement for them is to withstand the weight of people during the installation of the roof. Once the roofing work is completed, no one will walk on the roof anymore.
Ceiling insulation with foam plastic
If the roof is gable, then make a temporary ceiling, and insulation can be done later. Is everything ready? Great, let's build a roof.
| №№ | Illustration | Description and explanations |
| Step 1. | Check the vertical position and dimensions of the top crown. The dimensions are normal - excellent, there are significant horizontal deviations - no problem, we will level the horizontality with rafters. | |
| Step 2. | Determine the angle of inclination of the slope. We recommend an inclination angle of approximately 20°. Another important point is which direction the rainwater will flow, take into account the features of the site, the location of the entrance doors and the features of existing buildings. | |
| Step 3. | Place a stop for the rafters at the calculated height. It’s simple to do - install vertical supports from beams of a given height, place a horizontal beam on them. The distance between the supports is approximately 1.5 meters. The structure can be assembled without cuts; it is enough to use metal corners and self-tapping screws. In order for the stop to withstand angular forces, secure it with corner boards to the floor beams. | |
| Step 4. | Measure the length of the rafters taking into account the overhang. For our case, 3.2 meters is enough. For rafters, use 50x100 mm boards; for a 3x3 meter bathhouse, 6 pieces are enough. | |
| Step 5. | Install the outer rafters, stretch a rope between them and lay all the rest along it. To secure it to the beams, it’s safer to make notches; if you don’t have the desire or skill, use metal corners. | |
| Step 6. | Ondulin | For the roofing we chose ondulin - one of the cheapest and fairly high-quality materials. You should not use various advertised hydrobarriers. Firstly, if you install the roofing material correctly, there will be no leaks. Secondly, if they exist, then no barriers will help: they will sag under the weight of the water and tear over time. |
| Step 7 | Lathing. Ondulin is in many ways similar to ordinary asbestos slate, the difference is that it has less physical characteristics in terms of the perception of vertical forces. This means that the sheathing should be laid more often; each sheet of ondulin should rest on four slats. The distance between the slats is 35÷40 cm. Instead of slats, you can use narrow unedged boards; they are almost the same in cost, but when nailing ondulin, there is less chance that the nail will “go nowhere.” | |
| Step 8 | Ondulin fastening | Carefully align the first row, do not rush the sheets to arrive immediately; for beginners, it is advisable to lay out the entire row and check its position, and only then pick up a hammer and nails. Ondulin can be fastened with ordinary slate nails; fixation is carried out in the upper wave. The lower the slope angle, the greater the overlap of sheets should be. In our case, the sheets should overlap by about ten centimeters. Be careful not to overdo it with driving force, so as not to damage the wave. If you wish, install a drainage system. |
| Step 9 | Fill up the spaces between the rafters and the wall of the bathhouse on the side of the elevation of the slope with boards, install wind boards. |
That's it, urgent work is done, the log house can be left for the winter. During this time, the bathhouse will shrink and the relative humidity will stabilize to natural values. If you want to wash faster in your own bathhouse, continue construction work.
Construction for shrinkage: the opinion of E-Terem
Building a house from shrinkage timber requires a certain amount of patience from the customer. He will have to wait quite a long time for the possibility of a full-fledged move-in. However, this is the correct method. It allows you to avoid unpleasant consequences and significant unjustified costs, and also get a reliable and high-quality home that will last for many years.
The high professionalism of our company’s builders makes it possible to minimize the customer’s costs for repairs, distribute payments in stages and reduce the time for final delivery of the project.
Baennik - bath spirit
In the past in Rus' there was a special bath spirit, which people called baennik, or bannik, bainik, and also anchutka. This is the spirit that settled in every bathhouse behind the stove or behind the shelf. There, according to people's retellings, he was hiding.
In the legends of the northern part of Russia there was also a woman who personified the same bathhouse spirit. She was called bannitsa, or obderiha. According to legends, she was a very domineering mistress of the baths. She had big scary teeth and long, always flowing hair. If someone wanted to take a steam bath in the bathhouse, he had to ask the bathhouse attendant for permission, and after washing, thank the hostess for her hospitality.
As for the baennik, he also washed himself in the bathhouse, but only after three visits from visitors. He took with him to steam various spirits, devils, demons, goblins, barnacles, swamp cones and other evil spirits. And if someone decides to go to the bathhouse during this time, then, most likely, he will not return from there alive, because the demons will strangle him, and it will seem to people that the person simply evaporated.
In appearance, the baennik appears as a black, barefoot and shaggy man with a long beard, hair and eyes with a twinkle. It is believed that he scares unwanted visitors who came to the bathhouse at the wrong time by knocking, throws hot stones and all kinds of garbage at them, and can scald them with boiling water. If you want to run away from him, then you need to do it facing him, that is, backwards, so that you can see his eyes, and he cannot scald you.
To neutralize the evil bath spirit, it was believed that he needed to sacrifice a black chicken. And if the bathhouse burned down, a new steam room was built in its place, after first strangling the black chicken and burying it in front of the threshold of the bathhouse, without plucking it. After this, they walked away backwards, bowing continuously. These are the strange beliefs and customs that existed in Rus' and many people really believed in them and in some parts of our country they still believe in them.
Influence of climatic conditions
A tree cut down in winter has a natural moisture content that is the same as that of timber that has undergone chamber processing. This is because during the winter months the air is drier and wood absorbs less moisture. Therefore, shrinkage of a building made from profiled timber will occur within 6 months. While a box erected in the summer will give final shrinkage no earlier than in a year. This is due to the fact that the material must adapt, passing the test of all temperature changes.
To avoid undesirable consequences of uneven drying, you can first use antiseptic or fire-retardant coatings of different tones. In order for the shadow side of the box to dry out and shrink equally with the more heated facade, you need to treat it with a dark composition, and the opposite wall with a light one.
Final part
After the roof is erected, the bathhouse must be left to stand for at least six months, since after this period of time the deformations are not very significant. However, the final shrinkage period depends on the quality of the timber used, so you must initially select a material that has the correct cross-section and relatively low humidity. For more information, see the video in this article.
Did you like the article? Subscribe to our Yandex.Zen channel