Warm greetings to all blog readers!
Today I’ll tell you how to tighten screw piles with your own hands. This is a personal experience I had in the fall of 2021. The construction project is a new bathhouse with a terrace. I’ll tell you about my ideas, what problems I encountered during installation work and how they were solved in practice.
The construction of a new bathhouse is planned on our summer cottage. There were plans for it for a long time, but as they say, “everyone got around to it” - either there was no time, or there was no money. The decision to build was made last summer, and at the end of September, after the harvest, the foundation with the first crown of timber was already on the site. So, the topic of the article is: how to tighten screw piles yourself.
Why pile foundation?
The idea of making a strip foundation “disappeared” immediately. There are several reasons. Firstly, I didn’t want to bother with concrete, formwork and other hard work. Secondly, the price of such a foundation would simply be “unaffordable.” Thirdly, since the dacha is located near the river (200-250 meters), there are often floods in the spring. The area is flooded by an average of half a meter. Therefore, it was decided to raise the bathhouse above the ground by about a meter.
In order not to worry about the drilling work myself, I found a company that manufactures and installs screw piles. I signed a contract and ordered 15 piles with a diameter of 89 mm from them. 3 meters long, plus 15 headbands and installation. Of course, all the drawings of the future structure were previously made and agreed upon with the company. I did all the calculations myself.
I’ll say right away that the bathhouse is planned to be large. Dimensions along the axes: 5 by 8 meters. An open terrace 2.5 by 5, a large recreation room: 3.5 by 5, a separate sink and steam room, the size of each room is 2.5 by 2.5 meters. Naturally, the parameters indicated are not pure, since some space will be “eaten up” by the interior decoration.
The installers arrived on the appointed sunny day. They brought piles, a diesel generator, a hydraulic installation for driving piles, and scaffolding - after all, it is impossible to install equipment on a three-meter pipe from the ground. By this time, I had already made markings and dug small pits for future supports. The area around made it possible to screw in any pile without any problems.
Support depth
The tip of the pile rests on a stable type of soil, with the exception of hanging types, which transfer pressure to the sides. The length of the pile element is taken as the distance from the bottom of the grillage to the main soil layer. In this case, the calculated settlement indicator should not exceed the permissible level limit.
SNiP 24.13.330-2011 gives immersion values for different regions:
- seismically hazardous areas - the depth of screw pillars is at least 4 meters;
- when resting on wet sandy soil - at least 8 meters, the reduction in depth is justified by geological studies of a specific area;
- in other cases, the height of the piles is determined by calculation.
If the stand rests against a solid obstacle at a depth of more than 1.5 meters, it can be left in this position and the top cut off level. The screw rod is turned until it goes deep into the soil; after stopping, the pile is considered to be correctly buried.
Problems encountered when driving piles
Hopes that all work would be completed by evening disappeared immediately after the first minutes. The pile did not want to be screwed in. Entering the ground 70-80 cm, it “lay on its side” or simply stopped spinning from the powerful hydraulic installation. After experimenting with drilling in different places, the installers were unable to tighten a single support. After working for half a day, they left, leaving me with piles and “headaches” about what and how I should do next. Yes, by the way, they offered other piles - “self-tapping screws”, the price of which is 3 times more, which did not suit me at all.
Self-tapping piles
When signing the contract, a clause was discussed regarding test drilling of the soil on my site. I refused for a simple reason: a year ago, two neighbors in their dachas “put” their garden houses on screw piles. They didn't have any problems installing the base. Relying on this, I had to pay the company 3,000 rubles just for trying to make me a screw foundation (a contractual penalty).
After this turn of events, I decided to order a manipulator based on a car or tractor. I called the numbers that my friends provided me, and also searched on Avito for neighboring cities. What struck me most was the response from company managers and private owners of manipulators. After listening to me, they asked me one question and answered it themselves.
The question was something like this: “Do you live in Myski or Mezhdurechensk, in the floodplain of the Tom or Mras-Su rivers?” Of course, Mras-Su is my native river and I have lived here for more than 40 years. The result is that none of the companies and none of the private owners (owners of special equipment) came to me. There is only one conclusion - they simply knew about the problematic soils in our area. But this begs a reasonable question: why did everything go like clockwork for my neighbors?
I didn't stop there and moved on. I decided to “find” the brownies. This is a drilling machine with a powerful auger based on a tractor or truck. They are most often used for drilling holes for the installation of electrical supports (poles). This turned out to be a problem altogether. The technique is specific and used quite rarely.
I found it in the local city electrical network (there is a price list for equipment services to the public). I wrote an application and paid for the service. But after a few days they politely refused me and simply returned the money, arguing that all the special equipment was very, very busy. By the way, here is an interesting and educational video from Vladimir Efremov - this is so that you can take a break from my story...
Where to begin
To determine the type of soil, it is necessary to remove the soil from deep layers.
Before deciding to build a house on stilts, you need to study the condition of the soil and determine the level of groundwater. Such information can be obtained from geodetic, construction organizations or from neighbors who are or have carried out construction.
To independently determine which soil layers lie beneath the construction site, test drilling is carried out. In several places on the site, wells are dug, 1.5 m deeper than the length of the pile. Particles of soil present inside the well remain on the drill blades.
If a flooded area is detected, you need to position the piles for the screw foundation so as to bypass it.
Solution
As I already mentioned, it was September, the weather was nice and warm, and our whole family was still living at the dacha. One evening I decided to dig a hole for the pile by hand. I prepared a bayonet shovel, a narrow selection and a crowbar. Half an hour of work and the preparation for the pile was ready. It turned out to be no more than 30 cm in diameter and about 100-110 cm deep.
Now I knew the reason for all my troubles in terms of unsuccessful attempts to install a screw foundation. It turns out that everything is simple: after removing a layer of 60-70 cm, very dense clay began. And in it, large stones of irregular shapes, 10-20 cm in size, seemed to be melted in. This layer of clay with stones was small - only 30 centimeters. I had to work painstakingly and persistently with a crowbar and shovels. There was gravel and sand deeper, but I didn’t touch it anymore.
Very dense clay and stones did not allow the pile blades to be screwed in deeper. The stones simply got stuck between the blades. I was also struck by the fact that 8-10 years ago, on this site 15 meters from the construction site, I carried out excavation work to bury the strip foundation of an old house. The excavator dug trenches up to 2 meters deep, but there was no layer of such dense clay. This is how strange it turns out: here there is one soil, and 10 meters away there is another. Although this may be a feature of our river floodplain.
Choosing the right diameter
The diameters of piles produced in production and their purposes are indicated in the table:
| № | Diameter | Purpose |
| 1 | 5.7 cm | Suitable for installing chain-link fences. |
| 2 | 7.6 cm | They are used as supports for concrete fences, small utility buildings, and country houses. |
| 3 | 8.9 cm | Suitable for the construction of one-story houses. One such pile can withstand a load of 3 to 5 tons. |
| 4 | 10,8 | They are used in the construction of two-story houses made of light building materials. A support of this diameter can withstand a load of 5 to 7 tons. |
How to tighten screw piles yourself
Having prepared several holes, it was decided to try to screw it in on our own.
They worked together, and the piles were screwed in relatively easily and stopped at approximately the same level. Approximately, this is 170-180 cm. Apparently, at this depth, other denser material began, and maybe the same - large stones. The freezing depth in our region is much less. The work was carried out in a standard way: a bent crowbar was inserted into the technological hole at the top of the pile. On both sides, the scrap was extended with pieces of pipes of 2.5-3 meters. The result was quite good leverage, since the site for construction had been prepared in advance. Vertical control was carried out using a regular bubble level, without using a double-sided magnetic level. The holes were filled and compacted with the soil that was removed from them.
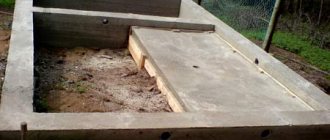
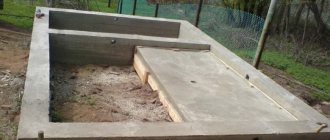
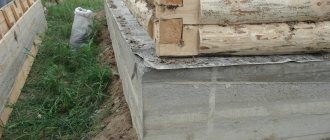
After all the piles were screwed in, I made horizon markings on the pipes to cut them into one plane. For this, a conventional hydraulic level was used. I have a laser, but on a bright sunny day this option is not suitable. The initial height of the pile was marked 100 cm, respectively, at a higher level of the site it turned out to be 80 cm. And this is clearly visible in the photo.
To accurately mark the horizontal cut along the perimeter of the entire pipe, a regular A4 sheet of paper was used. It is just enough to wrap a pile with a diameter of 89 mm. and at the same time make precise, neat markings. The black marker was clearly visible on the red color of the iron pipe.
A small “grinder”, 4 thin cutting discs of 115 mm, 45 minutes of leisurely work and all the piles were cut to the same level. The remainder of the excess cut pipes turned out to be from 40 to 65 cm. And do not forget to wear safety glasses or a mask. You will have one eye and no other...
Now the piles had to be filled with concrete. River sand (about 40-50 buckets) and 2 bags of grade 400 cement were prepared in advance. The solution was prepared in an old aluminum tank, which used to be used in a canteen or public catering facility. With the help of a hammer drill and a mixer attachment, such work was not difficult. Cement and sand were mixed in a ratio of 1:3.
Some time after pouring and tamping (usual reinforcement is 6-8 mm for puncturing the solution), the concrete shrinks. You have to add another 6-8 cm of solution to the pipe level. It’s worth taking this into account and not installing the headers right away.
The next day the headrests were installed and welded. Installation is simple: you put it on top of the pipe and weld it with a vertical seam (I did exactly that). The slag was removed from the welds with a small hammer.
Since I have a good spray gun, a compressor and long oxygen hoses, I decided to paint the screw piles black. We used 3 in 1 metal and rust paint.
Carrying out marking
Before starting work, you need to make markings.
Driving the piles according to plan requires careful marking on the ground. The racks are placed at the required distance, not exceeding 3 meters. Increasing the run leads to sagging of the grillage trim. The perimeter is marked on the site, and diagonals are measured to check, the size of which must match.
First, mark the corner elements and twist them in the center of the bar. If the extreme dimensions of the grillage are indicated, subtract 0.5 of the width of the bar on both sides. After installing the first rod, determine the position of the second support, focusing on the dimensions of the foundation and the distance between the centers of the heads.
The house is placed parallel to the fence, the road, the red line of the street, so from this line they measure the same distance as the first support and place the second rod. They dig a pit, insert a post, check the vertical and measure the gap between the axes. Screwing begins if there are no deviations or the element is aligned to the design and planned position.
The place of the third support is found at the intersection of two linear distance indicators, the accuracy of the marking is checked by comparing the legs and hypotenuse of the formed triangle. Use pegs, nylon cords and a tape measure. The work is carried out together. The permissible error for horizontal measurements is 5-10 mm, and for vertical measurements - no more than 2°.
Installation of piping and unfinished work
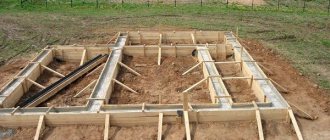
The main work was completed, but there was still some tying left that needed to be done. At that time, the money had already been spent, the materials had run out, but 1 cube of timber 150 by 150 mm remained. 8 pieces of timber were just enough for these purposes. The first crown was laid along the entire perimeter and along the main load-bearing partitions. Pieces of linoleum were placed under the timber on metal headrests.
Attaching the beam to the head was done using “wood grouse” - large self-tapping screws with a diameter of 8 mm. and 100 mm long. with a head for a head at 13. In the corners, the timber was connected at an angle of 45 degrees. The load-bearing beam for the partitions was attached to the wall beam thanks to fasteners made from angle iron. Something similar is sold in any hardware store...
The base plane turned out to be perfectly flat. There was no need to put anything extra under the headrests to level the logs. Although I know that many construction companies are pursuing this option in order to correct their “jambs” (different levels of heights in piles).
I will do the metal lining of the screw piles in the spring. I will use a corner or square profile pipe. You will see the result of my actions in other blog articles. And in conclusion I would like to draw some conclusions.
Calculation of the mass of the house
Calculate the total weight of all construction and finishing materials that will be used during construction. The estimated maximum weight of furniture, household items, and people who will be in the house are taken into account. Calculate the mass of the bathtub or pool, taking into account that the tank will be filled with water.
Take into account the load of the snow layer that may lie on the roof in winter. This indicator is calculated on the map depending on the region:
Lessons and conclusions from the work done
So, first: what you want to do well, do it yourself. Of course, if you don’t know how to do this, the conversation is different. But look, I even offered money, asked how much was needed for the work, agreed to the amount offered, but in the end no one helped me. Maybe I didn’t offer the right amount for the work...
Second, always do preliminary soil drilling. It's easy to end up in a situation like mine. Any self-respecting company must carry out such work. Yes, you will pay extra money, but you will no longer find yourself in the same circumstances as I was. As a result, a week of time was lost while searching for equipment, etc.
Third, don’t be fooled by the lowest prices. Low price is not always profitable. You can lose significantly on the quality of the piles themselves and the quality of installation work. Choose something in between in terms of cost and be sure to enter into an agreement for the services provided, and also require all paid receipts.
I will end here. If you have any questions, ask. If you have any suggestions, write. Has anyone encountered other problems? Let us know, readers will be interested. And don't forget to watch the video below about how to tie screw piles. Peaceful and bright skies to you! Bye!
Wisdom quote: The true is too simple, one must always go to it through the complex ( Sand Georges ).
Where is grillage used?
- During the construction of baths, technical buildings with a small mass of load-bearing structures;
- When constructing residential buildings on slopes with a large inclination angle;
- If you need to make a garage or basement built into the depths;
- When stratification is detected during soil surveys, especially when combining clay and sandy soil;
- When restoring stone and concrete foundations of old buildings, if subsidence of individual corners is detected. Then special supports are placed under the base, then the platform is poured and only then the supporting grillage is spread around the outer part.
Pile-grillage foundation in section.
Features of installation technology of various types of support pillars
The principles of construction of a pile foundation are set out in SNiP 2.02.03-85 and SP 24.13330.2011. Each technology differs in the method of construction, as well as the types of power elements.
Work on laying the foundation for all types of piles begins with clearing the site of construction and other debris, unloading materials, preparing technical equipment, and marking the field in accordance with the plan.
Bored
The piles are made at the construction site. Algorithm of technological operations:
- In designated areas, pits are constructed to the designed depth.
- The bottom of the well is covered with a layer of sand and the material is compacted to obtain a height of at least 20 cm.
- Using technology without the use of casing pipes, the walls of the well are strengthened to protect them from destruction by clay solution. In most cases, inventory pipes are used, which in private housing construction can be replaced with sheet roofing felt.
- A reinforcement cage is prepared and placed inside the well.
- Fill the structure with mortar, leaving protrusions of the longitudinal reinforcement above the surface.
- After hardening, align the support at the same level.
Screw
Installation of screw products can be done manually or using gear units for installation. Technological processes for laying the foundation on a marked field:
- screwing the rods to a depth when the blades are immersed in the bearing layer;
- alignment of the protruding parts of the piles at the same level horizontally;
- concreting the pipe cavity to prevent oxidation of the metal inside the supporting elements;
- welding of ends;
- cleaning of welds and coating with a hydrophobic compound.
Installation of reinforced concrete screw piles is carried out using special equipment, since the structural elements have significant weight and it is almost impossible to manually ensure the alignment of the pillar.
Installation of reinforced concrete supports using the drilling method
The need for preliminary drilling of wells for driven piles arises in the following cases:
- The power of hammers for driving is not enough to independently overcome the resistance of the soil.
- Construction is carried out on highly dense, permafrost or, conversely, heavily waterlogged soils.
- Piles must be inserted into the ground at a certain angle.
Sequence of technological stages of pile laying:
- leader drilling of pits;
- cleaning of mined-out land;
- immersion of reinforced concrete pillars;
- alignment of structures protruding above the surface at the same level.
Drivers
To install the driven supports, special equipment with a fixed diesel hammer is used. Excavation algorithm:
- Marks are made on the driving posts in 1 m increments.
- Using slings, the product is lifted into a vertical position and fixed above the design point.
- The blows of the diesel hammer are made with a gradual increase in force. The height of the working stroke is no more than 0.5 m.
- To ensure that the bearing layer is reached, after the pile is immersed to the design depth, 10 final blows are made. If the pile remains in place, then the installation of the load-bearing element is considered complete.
Strengthening the Northern Fleet
The need to strengthen the structure may be caused by errors in design and construction, changes in hydrogeological conditions, or the appearance of additional loads on the foundation.
Reconstruction stages:
- design and calculation of a new foundation;
- delivery of materials to the site;
- lifting the house on jacks;
- dismantling the old power structure;
- marking the pile field;
- installation of new supports;
- pile tying;
- returning the house to its original position.
Which ones are best suited for private construction?
The choice of a specific brand and size of trunks is, first of all, made based on the type and characteristics of the soil.
After determining the most suitable variety (single or multi-bladed, length, tip type), the trunk diameter is selected. The calculation is made based on the bearing capacity of the support.
For private houses, trunks of relatively small diameter are usually used:
- VS-57.
- VS-76.
- VS-89.
- VS-108.
Large diameters require significant effort when immersing, so they are practically not used for private housing construction.