Protective screens for sauna stoves are made from various non-combustible materials in compliance with certain air gaps. Also often, in order to create an effective thermal barrier, a reflective sheet of polished stainless steel is placed between the wall and the metal stove at a certain distance from the protected surface and the heated body of the stove. Another common option for thermal protection is to install a brick wall between the stove and the flammable exterior wall finish, but this solution is quite labor-intensive and requires certain skills.
Selecting a protective screen
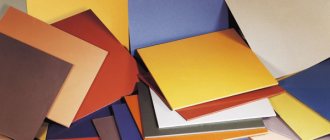
There is a large selection of specialized materials from which a wooden sauna stove fence can be made. First of all, we are talking about:
- Natural stone;
- Basalt slabs;
- Metal floors;
- Decorative shields.
It is worth focusing on a number of parameters, including price, durability and acceptable operating conditions. Due to frequent temperature changes and high humidity in the room, cheap panels may fail over several seasons.
In such conditions, natural stone performs best. Most often, brick is used for the screen of a sauna stove, since with its help you can independently lay out the required shape of the future protective structure. As work progresses, you can easily make any adjustments to make the bathhouse more comfortable to use. A screen for a stove in a bathhouse with your own hands is the best thing you can do for an excellent and safe holiday.
Technologies
There are several proven technologies for bricklaying around metal furnace equipment:
- Heat shield. A brick fence that does not exceed the dimensions of the furnace in height. Promotes better heat transfer.
- Continuous cladding. It quickly releases heat to the surrounding space, which increases the cost of heating the premises. This technology is used when it is necessary to make a beautiful decorative design, sacrificing the performance of the furnace equipment.
- Convector masonry, which has vents. Suitable for metal heating units. In this case, the size of the steam room is not important.
Cast iron stove lining
Additional aspects
It is worth understanding that not all situations require a protective screen at all. For example, for brick kilns with an initially protected firebox, fences are not required. If the screen needs to be installed, then red ceramic materials are selected for it, capable of withstanding severe temperature changes and exposure to moisture.
Conclusion
A DIY sauna stove screen is an important sauna structure that can prevent accidental burns and balance the operation of the stove. By implementing one of the proposed schemes, you can achieve a combination of protection efficiency, good functionality of the stove and good visual qualities of the entire system.
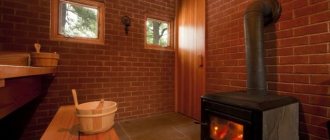
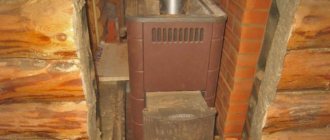
Heat-resistant screens for sauna stoves began to be used relatively recently, since today the stove is a separate device that is not part of the sauna. In the past, stoves were made of stone, so additional fencing for the stove in the steam room was not required.
Today, a brick screen is often created for a metal stove in a bathhouse, since metal is an excellent conductor of thermal energy and can therefore heat up to very high temperatures. Any contact with the metal body causes serious burns that do not heal for many weeks. Thus, a protective screen for a stove in a stainless steel sauna makes your vacation safe.
Why is it necessary to line the stove in the steam room with bricks?
If you were still in doubt up to this point, check out this list:
- The metal structure heats up very quickly, which does not allow the body to adapt to the high temperature.
- A metal stove cools down as quickly as it heats up. You have to constantly monitor the temperature by adding logs, which is not very economical.
- The material lined with brick will not heat and dry the air so quickly, which means the atmosphere in the steam room will be more comfortable.
- There is a high probability of being burned on the walls of a metal structure. People sitting next to the stove will not feel comfortable.
All these small shortcomings can be easily eliminated with the help of cladding, which will increase the performance of the stove, improve its design and neutralize harm to health, because people go to the bathhouse to improve their health, and not vice versa!
This is the most optimal solution in terms of efficiency and labor costs - to combine the advantages of a metal and stone stove.
Factory-made metal sauna stove “under the lining”
At the moment, factories are producing stoves that are initially designed for further lining with brick; this design is the golden mean that will allow you to profitably equip an excellent steam room.
For lining the furnace you need to use only these types of bricks:
- red ceramic brick;
- fireclay brick.
You don’t have to search on the forums, there’s no point in us deceiving you! If you take any other brick, it may crack on its own or peel off from the adhesive mixture, and you will need to reposition it over and over again!
Do not take sand-lime brick. It is great for cladding a house, but it is not suitable for lining a sauna stove. Lime-based bricks are simply not able to withstand constant temperature changes and high humidity in a steam room.
After just a few weeks of use, it will begin to deteriorate. And from a decorative point of view, it is not suitable and additional cladding will still be required.
A good option would be refractory fireclay bricks, which are specifically designed for sudden temperature changes.
Fireclay brick
Outwardly, it is, of course, inferior to red ceramic brick, but this issue can be resolved with decorative finishing cladding.
If there are no remaining bricks on the farm, it is better to buy a new one! Give preference to ceramic red brick. Its specific gravity is much lower than that of fireclay. It demonstrates excellent technical properties, reliability and durability. And externally, the stove, lined with red ceramic bricks, will delight you for many years with its stylish, authentic look.
The process of lining a sauna stove with bricks is not very complicated, and if you strictly follow the detailed instructions, even a beginner can handle it.
Brick lining scheme
When is protection needed at all?
The need to install protective casings and screens does not always arise. If a fire-safe distance is maintained between the stove and the nearest flammable surface, additional protection is not needed. At this distance, the IR rays are scattered, weakened, and the amount of them that the wooden wall receives can no longer lead to damage.
It is believed that the safe distance from the wall to the brick stove (quarter-brick laying) is at least 0.32 m, from the wall to the metal stove (not lined) - at least 1 m. For a metal stove lined from the inside with brick or fireclay, the distance decreases to 0.7 m.
Thus, maintaining fire safety distances is more possible in large baths, where the issue of saving space is not relevant. In family steam rooms, where every centimeter of space counts, installing a stove 0.3-1 m from the nearest walls is impractical. In this case, the safety distances established by the standards must be reduced using screens and casings.
Masonry mortar
Durability depends on its quality.
Sand. It should be fine without impurities and poured through a sieve with a mesh of 1.5 mm.
Clay. Pour into a container and fill with good water (not musty), then stir. After kneading, the water should cover the clay. The mixture is left to “sour” for 2-3 days. Then filter through a sieve, rubbing out lumps. Add a new portion of fresh clay to the container and soak again. And so on until the required volume of paste-like consistency is formed.
Clays have different fat content. Particularly oily ones are “neutralized” by adding sand (otherwise they dry out and crack). The proportion of added sand ranges from 0.5 to 1.5 by volume. A good solution is to use fireclay clay. Some craftsmen add heat-resistant glue. However, I will not recommend it because the results may vary.
Protective screens around the stove
Protective screens are insulation panels that cover the side surfaces of the furnace and reduce the intensity of thermal radiation. Screens can be metal or brick. As a rule, they are used for metal furnaces.
Method #1 - metal screens
The most common protective screens are factory-made steel or cast iron sheets. They are installed around the stove, at a distance of 1-5 cm from the walls of the firebox. Depending on the need to insulate one side or another of the furnace, you can purchase side or front (front) screens. Many metal furnaces are initially manufactured with protective screens in the form of a protective casing.
Protective screens make it possible to reduce the temperature of external metal surfaces to 80-100°C and, accordingly, reduce the fireproof distance to 50 cm. The total distance from the firebox to the wall (including a gap of 1-5 cm) will be 51-55 cm.
Installing protective screens is not difficult. Thanks to the presence of legs, metal panels are easily bolted to the floor.
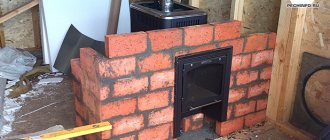
Method #2 - brick screens
A brick screen can cover all the side surfaces of a metal furnace, representing its outer cladding. Then the stove will be in a casing made of brickwork. In another case, a brick screen is a wall separating the stove and the flammable surface.
To lay the protective screen, solid fireclay bricks are used. The binder is cement or clay mortar. It is recommended to use half a brick (thickness 120 mm). But, if there is a lack of material, it is possible to make a wall of a quarter of a brick (60 mm thick), although in this case the thermal insulation properties of the screen will be reduced by half.
Small openings (sometimes with fire doors) are left at the bottom of the shield for air convection between the brick wall and the stove.
The brick walls of the screen must end at least 20 cm above the top surface of the oven. Sometimes the masonry goes all the way to the ceiling.
The brick screen is not installed flush against the walls of the stove, the optimal distance is 5-15 cm. The acceptable distance from the brickwork to the flammable wall is 5-15 cm. Thus, the use of a brick screen allows you to reduce the distance from the stove to the wooden wall to 22-42 cm (stove - ventilation gap 5-15 cm - brick 12 cm - ventilation gap 5-15 cm - wall).
Iron stove shielding effect
The filling screen is often advertised as the most convenient and safe for use in home baths. Most home-grown experts believe that finishing the walls and iron stove with rubble or crushed basalt best ensures heat transfer into the air and at the same time reduces the surface temperature of the heater. In reality, an iron stove, after being lined with crushed basalt or quartzite, produces very strong heat in the immediate vicinity of the stove, while at a distance of up to one and a half meters the air in the steam room does not warm up well enough.
Lining the stove in a bathhouse with brick gives a somewhat different effect:
- A thermal gap of several centimeters is created between the iron wall of the housing and the brick lining, due to which a third of the heat is transferred into the air flow flowing around the stove. Therefore, if you cover the stove in a bathhouse with your hands according to all the rules, the amount of heat produced will not decrease, but the outer brick surface will be much colder than the iron one;
- The smooth flat surface of the brick lining, like the smooth iron wall, has a concentrating effect, so instead of chaotic dispersion, radiant heat easily reaches the most remote corners of the sauna steam room.
Advice! If, after lining an iron stove with bricks, it suddenly turns out that the radiation from the iron stove causes the parts of the room that are too far away to warm up weakly, in this case the outer surface of the brick screen can be lined with heat-resistant tiles.
Any smooth plane, no matter whether it is metal or polished malachite, which is used as cladding and lining for expensive cast iron structures, gives off the bulk of the heat in the form of radiation. Therefore, the iron walls of a not very hot stove quickly dry out the floor and make the air too hot to breathe. Even at a distance of a meter and a half, the radiated heat of a stove that is not equipped with a brick screen severely burns the legs, arms and face
Even at a distance of a meter and a half, the radiated heat from a stove that is not equipped with a brick screen severely burns the legs, arms and face.
Iron furnace lining design
The weight of a steel or cast iron stove rarely exceeds 80-90 kg; another 40 to 100 kg can be provided by filling the heater. Without a brick lining, the stove structure can be freely installed on a heat-resistant, durable pallet without fear of damaging the joists or wooden floor boards.
In order to line an iron stove, you first need to decide on the basic design parameters:
- Dimensions and width of the lining. The shielding wall of the furnace can be laid out in half a brick, or in a quarter of a one and a half block. In the first case, the thickness of the lining is 12 cm, in the second it is only 8.8 cm;
- The size of the gap between the lining wall and the iron body of the furnace. Depending on the slot parameter incorporated into the design, a “cold” or “hot” brick screen is obtained;
- Choose a method to strengthen the base. It is impossible to lay the lining directly on the floor of the steam room, for reasons of the strength of the wooden base and the requirements of fire safety regulations.
In the first two rows of the lining, special air intake windows are made, through which cooler air near the floor, due to thermal suction, enters the gap between the iron wall of the stove and the brick screen, is heated and thrown out through the top layer of the heater under the ceiling of the steam room. Thus, overheating of the lining brick is eliminated, and at the same time good heat transfer of the furnace is ensured.
But you should not abuse the number of windows; it is enough to make one window in the lower tier of the lining and one in the middle part of the masonry to improve the operation of the heater. To improve heat extraction, additional steel pipes - “locomotives” - are installed from the lower rows of stone into the heater.
If you pour boiling water into the pipe, the heater practically “explodes” with a huge amount of hot steam due to the sudden evaporation of water and hot air passing through the gap between the brick lining and the iron wall of the stove.
Important! Practice shows that if you properly line a metal stove in a bathhouse, the heating time of the room remains virtually unchanged. If a corner location is chosen for the steam room, the iron stove is tightly shielded from the walls
For normal airflow of bricks closed in the corner, a sanitary gap of 100-120 mm is left; windows for steam and air intake are not made on this side of the lining
If a corner location is chosen for the steam room, the iron stove is tightly shielded from the walls. For normal airflow of bricks closed in the corner, a sanitary gap of 100-120 mm is left; windows for steam and air intake are not covered on this side.
How to make a protective screen for a sauna stove with your own hands
Rest assured that there is nothing difficult in creating a protective screen for a bathhouse with your own hands.
It is recommended to prepare all the necessary materials and tools in advance, as otherwise this will significantly slow down the progress of work. Having everything you need will help not only not to stop construction and installation, but also will not confuse the overall “engineering idea”.
Made of brick
Brick and concrete mixture are used as the main working material. Mixtures that are designed for use at high temperatures should be used. If you do not want to spend money on purchasing it, then you should add clay to the standard mixture. This will strengthen the future structure.
When calculating, it is necessary to take into account three parameters to determine the required amount of brick, namely:
Keep in mind that in the masonry it is necessary to calculate an additional few millimeters between the bricks for the concrete mixture.
- The manufacturing process is no different from laying bricks. All that needs to be done is to create a kind of brick “fence” around the stove of the required height.
- After installation, it takes at least 5-7 days for the solution to dry completely. A longer period is required due to the confined space - the solution dries worse in it.
- After completing the last stage of work, you should additionally check the strength of the masonry. If necessary, additional basalt slabs can be installed on top of the brick to provide greater security.
Made of metal
Metal structures are more durable, since this material can more easily withstand temperature changes. The complexity of installation and the price of such slabs are slightly higher than their brick counterparts.
The work will require sheet metal: zinc sheets or steel, as well as additional mineral insulating materials that are not subject to combustion and melting at high temperatures. A welding machine and sheet fastening mechanisms are also required.
The thickness of the insulating material should be at least two centimeters, and the height of the shield should be 5-10% greater than the height of the furnace. Remember that the wall of the structure is double, so eight sheets of metal are required to complete the job.
Step-by-step manufacturing instructions
- Prepare all necessary materials and consumables;
- Place the insulating material in an even layer on the sheet of metal;
- A second layer of metal is applied on top;
- Special fasteners are welded using a welding machine to hold the structure together.
- The produced sheets must be installed around the furnace on all sides using fasteners.
- It is recommended to place insulation under the bottom to prevent unintentional charring of the floor and fire in the room.
Preparing and laying bricks
Calculate how much brick will be needed at the initial stage, then clean it and soak it in water for 12 hours. This is a mandatory procedure, since the material tends to absorb liquid from the solution. You can select installation options:
- lattice;
- a solid well.
The first one is more beautiful, as it has many holes. At the same time, it is this feature that leads to a decrease in the efficiency of the heat shield. If the body of the heating equipment has a rounded shape, the material is laid in accordance with the shape of the object.
Of course, this approach will require significant effort, but the arrangement of the rows will not change. A distance of less than 5 cm should be left between the metal and the stone. There is no need to install spacers and lintels. The metal will begin to expand when heated, which will put pressure on the brick.
An average oven usually requires 13 to 15 rows of bricks. It is better to carry out the work in several stages. In 1 day it is enough to lay 7 rows and leave them overnight. The next day, they check how well the structure has shrinked, after which they begin to complete the remaining rows. The thickness of the masonry is half a brick.
Features of installing metal protection
Installation of a metal screen is usually carried out in such a way as to create a structure like a box. The outside is stainless steel or sheet metal coated with heat-resistant paint. As a result, an air gap appears between the metal sheets, which ensures good thermal insulation.
There are holes in the lower part of the structure that provide air circulation and prevent overheating of the metal box. To implement such protection, you can use one of two schemes.
Scheme 1
A polished metal sheet is selected, which has much better heat transfer. As a rule, such screens are used on the rear walls of the furnace, preventing heat loss. Of course, you should not attach this protection directly to the wall - the risk of fire will increase many times over.
For proper installation, it is necessary to place a non-combustible layer between the protection and the wall so that there is air space behind the sheet. There should also be a short distance from the protection to the floor - this allows air to blow across the screen, removing heat.
Scheme 2
To implement such a scheme, thermal insulation is first laid on the wall, and then metal protection is placed on top of it. The design will largely depend on the chosen insulation.
Depending on the selected thermal insulation, the arrangement of the protective screen will look like this:
- When using rolled material, the cladding is created in such a way that the distance between the planks is slightly less than the width of the material. The insulation is placed between the planks and fixed with special dowels with a large head.
- If mineral cardboard or asbestos sheet is used as a heat-insulating material, then it must first be attached to the wall, and the metal sheet is fixed on top.
Making masonry for a furnace with a remote firebox
Sometimes there are stoves in which the main part is located in the steam room, and the firebox is placed in the dressing room or outside. In this case, the cladding is performed using a slightly different technology.
- After defining the furnace and completing the foundation, an opening for the firebox is made. It must exceed the dimensions of the firebox by 25 cm on each side.
- The stove is installed level so that the edges of the firebox do not protrude beyond the limits. After installation, you can begin to perform insulation. Insulation work is carried out using basalt cardboard, ceramic fabric, aluminum foil and mineralite sheets. The latter is one of the most modern insulating materials, which, when heated, does not release toxic trace elements into the atmosphere. Basalt cardboard is cut into wide strips and secured with a stapler to the walls of the hole. The protruding edges are carefully wrapped. A similar procedure is done with ceramic fabric, and then with foil.
- Holes corresponding to the size of the firebox are cut out in two sheets of mineralite and secured with self-tapping screws on the side of the steam room.
- The brick is placed in water for half an hour. At this time, the solution is prepared. The work starts outside. The first row is laid in half a brick. To form a decorative protrusion, the last brick is laid across the row. When making the second row, leave a protrusion for the ash pan, which will ensure air circulation. When making masonry, maintain a distance of 3 cm between it and the stove in order to maintain the integrity of the masonry longer and also to prevent overheating.
- After the masonry is slightly higher than the firebox, two steel corners are laid. They should not come into contact with metal. Then the masonry continues to the desired height.
- After the masonry is completed, the protruding edges of the thermal insulation should be removed, and the resulting gaps should be filled with basalt wool.
- Then work continues inside the steam room. The type of masonry depends on the choice of the owner. Before starting cladding, install the stove and mark the location of the masonry itself.
As you can see, lining a stove with bricks on your own is not as difficult as it might seem at first glance. If you know how to properly line an iron stove in a bathhouse with bricks, then no questions will arise. The main thing is to prepare thoroughly and carry out all work in compliance with the rules and regulations.
Conclusion
The importance of the above-mentioned bath structure cannot be overestimated, therefore the design of this stage of construction should be carried out at the very beginning. Remember that the safety you provide is exactly the factor that will allow you to enjoy the bathhouse and your work for many years! During the heating of the bath, the surface of the stove heats up to 300-400°C
At the same time, it begins to emit infrared rays and itself becomes a source of heating. The coming heat is distributed throughout the steam room, but first of all it hits the walls adjacent to the stove. If the walls are wooden, then under the influence of high temperatures their charring begins. And there it’s already a stone’s throw away! The only truly effective way to insulate wooden walls from heat is to create protective screens and cladding from non-combustible materials in the bathhouse.
During the heating of the bath, the surface of the stove heats up to 300-400°C. At the same time, it begins to emit infrared rays and itself becomes a source of heating. The coming heat is distributed throughout the steam room, but first of all it hits the walls adjacent to the stove. If the walls are wooden, then under the influence of high temperatures their charring begins. And there it’s already a stone’s throw away! The only truly effective way to insulate wooden walls from heat is to create protective screens and cladding from non-combustible materials in the bathhouse.
Finishing
The solution may take time to set, so it is better to wait 2-3 days. Finishing involves cleaning the brick from the mortar and giving it a uniform shade.
It is more convenient to remove excess solution using a drill with a brush attachment. The work is dusty, so use a respirator and goggles.
After cleaning, stains of uneven color may remain on the bricks. To even out the shade, use a solution of laundry soap and water and a hard, dense brush. After this, the brick “coat” is washed with water. The result is a beautiful shade without blemishes.
Carry out the first fire after lining slowly, allowing the brick to gradually absorb the heat.
That's probably all. I think that you will feel the comfort of a lined stove right away. The heat will become more balanced, and the heat source will delight you with a pleasant view and pleasure from independent work.
Wisdom Quote: The greatest happiness in life is the confidence that you are loved (Hugo Victor Marie).
Required materials and tools
For work, prepare the following tools:
- bubble level 90 cm long;
- plumb line;
- steel square with sides 40x60 cm;
- mason's hammer and small trowel;
- pencil, tape measure and cord for marking;
- Master OK;
- container for mixing masonry mortar;
- a grinder with a circle for stone, it will be needed to adjust the brick to size.
What is needed to build a stove
To build the furnace, you should use ordinary refractory bricks made of red baked clay. According to the standard, their dimensions are 12.5 × 25 × 6.5 cm. However, various brick factories can produce batches of material that differ in dimensions. Based on this, before work you should carefully select the size of the bricks.
To construct a firebox, bricks made of fireclay clay, grade Sh-5, are required. They can be light yellow, pinkish or white. This material is fireproof and can withstand exposure to open flames.
Fireclay brick sizes may vary slightly. There's nothing wrong with that. Typically, the fuel chamber in a sauna stove is not connected to its body. Therefore, there is no need to adjust the brick rows to a single level.
It is not worth laying out the stove completely from fireclay material:
- firstly, it is expensive;
- secondly, fireclay bricks cool faster than their ceramic counterparts.
Furnace mortar
You should not completely build a stove using such a mixture. At a temperature range of +700-800º, such a solution is baked to a monolithic state. There will be no such temperatures in the external part of the structure. Therefore, the fireclay gradually cracks and falls out of the masonry.
For laying the stove body, a clay-sand mortar is used in a ratio of 1:5. The sand must be quartz - river or quarry. The quality of the first variety is slightly worse. The grains of river sand are round, so the solution made from it has worse properties.
Clay must be taken from a quarry, raised from a depth of at least two meters. How to check its quality:
- Soak some clay (300 g) in water for one day.
- Then make a ball out of it and let it dry.
- After a couple of days, throw the bun onto a hard surface. If the ball breaks up into large fragments, then the material is suitable for oven mortar.
Also prepare steel wire with a cross section of 3 mm. This will be used to secure the doors of the firebox and vent. For installation of casting you will need an asbestos cord. This heat insulator is used to wrap the edges of the grating, which are embedded in the masonry. Thanks to this, the brick does not crack due to high temperature.
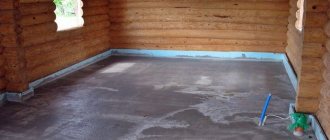
Foundation arrangement
Now on the Internet you can find many drawings, photos, and plans for building a foundation for lining a stove in a bathhouse with bricks. What is this building?
The foundation is made in the form of a quadrangular well, the height of which is equal to the height of the furnace. To cover the metal walls, use solid or masonry with windows, through which not only fuel is thrown in, but also ventilation around the heating surface is enhanced.
According to experts, wooden floor beams can withstand up to 650-700 kg of load. Although practically, it is not recommended to give a load of more than 400 kg per 1 m². Therefore, it is advisable to further strengthen the existing frame with an iron structure from an angle (50 mm), or screw piles, provided that approximately 180-200 bricks weighing 3.5 kg each will be used for the screen.
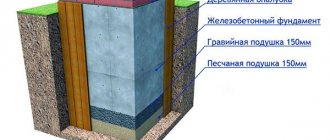
Foundation construction algorithm
- Cut a square of a certain size in the floor (if it is already installed), dig a pit approximately 35-45 cm deep.
- Fill the bottom with coarse crushed stone, lay waterproofing, and install formwork.
- Place pieces of reinforcement in the foundation frame, apply the required amount of mastic waterproofing, and fill the structure with concrete approximately 15-20 cm above the ground.
- Bring the “pillow” to the floor level with ordinary bricks, on which the stove and lining will be placed.
- Wait about 3 weeks until the concrete shrinks, then lay thermal insulation and steel sheet (3-5 mm thick) under the stove.
Preparation of the solution
In order to properly line an iron stove in a bathhouse, it is best to use a classic clay-sand mortar. You can add a small amount (about a sixth) of grade 400 cement to it. This ingredient can only strengthen the entire structure, since the temperature of the future screen will not be high enough.
Since little clay is required, it is best to buy it at a building materials store. For rural residents, such a problem as purchasing clay should not exist.
To prepare the solution, you need to take sifted sand and mix it with clay in equal proportions. Add water gradually until you get a thick mixture that can easily slide off the trowel.
What other materials are used to line a sauna stove?
It turns out that not only bricks can be used to line sauna stoves. Granite or marble slabs are an excellent substitute. They also tolerate temperature changes well, have a large mass and high thermal conductivity. In addition, such finishing will give the bath room an unusually beautiful and unique look. Not everyone can afford such luxury, from a financial point of view. But if you have some leftovers, you can use them to build a stove partition.
True, the installation of such slabs is a little more difficult in comparison with brickwork. To ensure a beautiful appearance of the lined stove, it is necessary that the work be carried out by a specialist. At the very least, the owner needs to at least consult with such a person.
Minerite slabs are also used to construct a heat shield. With their help, the wall is mounted much easier and faster, even in comparison with masonry, and is able to withstand temperatures of 360-400⁰C. But the heat capacity of this material is low, so it can be used as a good partition that will not be able to accumulate heat.
Manufacturing of furnace equipment
You can assemble a simple stove for a black sauna with your own hands. To do this, you need to come up with a design, draw up a drawing, prepare tools with consumables, and perform assembly.
Drawing up a diagram
The first stage of self-construction of furnace equipment is drawing up a diagram. In the drawing you need to note the dimensions and design of the stove, indicate the location of the stones. After preparing the drawing, you can calculate the amount of consumables.
Preparation of tools and materials
After drawing up the diagram, you need to prepare tools and consumables:
- Stones that will accumulate heat will not be destroyed by temperature changes or exposure to moisture. It is better to use jadeite.
- Set of locksmith tools.
- Metal rods.
- Fireclay bricks.
- Boards, fittings, wire.
- Container for mixing masonry mortar.
- Trowel, spatulas of different sizes.
- Bayonet, shovel.
- Welding machine.
- Hammer.
Dimensions and location of the structure
To calculate the dimensions, you need to choose a place for a homemade stove and adhere to some rules:
- For a steam room with a volume of 10 m3, the following equipment dimensions are suitable - 150 by 100 cm, height up to 50 cm.
- The optimal shape is rectangular. Thanks to it, the room will warm up evenly.
- It is better to install the structure opposite the door. This way the cold air will spread heat throughout the room.
Foundation
A homemade stove for a black sauna will weigh a lot. Therefore, you need to build a foundation for it. Foundation construction process:
- Dig a pit 60 cm deep.
- Place a 15 cm thick layer of sand at the bottom of the hole.
- Pour a second layer of expanded clay 15 cm thick and compact it.
- Lay two layers of roofing felt on top of the expanded clay.
- Tie a metal frame from reinforcement and place it in the hole.
- Put together the formwork. Make it so high that its height exceeds the bathhouse floor by 50 cm.
- Mix the cement mortar and pour it into the formwork to the required height.
Wait until the base hardens (7–10 days), disassemble the formwork.
Construction of the structure
Oven assembly process:
- Place 2 layers of roofing felt on the base for waterproofing.
- Mark the dimensions of the structure.
- Mix the masonry mortar. To do this, you need to mix 5 parts clay with 1 part cement.
- Lay out the first row of fireclay bricks and check it with a building level.
- The next rows are laid so that the seams do not coincide.
- Stop at the 4th–5th row and install a grate made of thick reinforcement.
- Leave space for a combustion hole through the row of bricks.
- Secure the grate on which the stones will be laid.
- Make the last row of fireclay bricks.
You need to start laying out the stones from large to small.
Purpose
The portal in the bathhouse is a U-shaped structure, which is intended for decorative framing of stove equipment on the front side. The upper part of the structure can be used as a shelf for photographs, jewelry, watches, and candles. Portals are often made around combustion chambers to improve their appearance.
There are several types of portals, which are divided according to the material from which they are made:
- The portal of the stove in the bathhouse is made of brick. High temperatures are dampened by thick brick walls. If decorative elements are needed, they can be purchased at the same store as the brick. It is recommended not to completely fill the space between individual elements. It is better to fill this distance with a special grout for joints.
- Structures made of natural stone. Possible options include marble, shell rock, sandstone, and travertine. If the surface of the stones is porous, they should not be secured around the oven door. They will quickly become covered with soot, which is more difficult to remove from uneven surfaces.
- Ceramic tile. This material can withstand high temperatures and does not absorb soot.