What kind of joists should I use for the floor?
Due to the nature of use (under load, hidden), the choice of coniferous wood is optimal.
Most often they use cheap pine, spruce, and fir. The use of larch is justified in case of high humidity in the room. Timber for logs is not necessarily purchased of the first grade; a second or third grade is sufficient, provided the geometry of the lumber is correct. The section of the beam is a rectangle with a side ratio of 1 to 1.5...2 (thickness of the logs to height). Only one side should be flat and smooth, although it is advisable to use planed timber with all smooth surfaces - this will facilitate the process of leveling the base. The dimensions of the timber are selected depending on the planned load and the size of the room
The length of the span (that is, the distance between the walls) and the type of supporting surface for the logs are taken into account. If the beams are laid on a solid surface (concrete floor slab, compacted embankment on the ground, old floor with a solid base), it is permissible to reduce the requirements for the cross-section and strength of the material
If the span size is between two table values, the larger integer value is adopted taking into account the strength. For example, for a room 3.5 m long we take a span of 4 m. Accordingly, the timber (joists for a wooden floor) should have a cross-section of 180x110 mm or more.
Important: when choosing the direction of laying the joists, you should take into account the direction of the incidence of sunlight (in rooms with windows) or the predominant movement (in narrow passage rooms such as a hallway). In both cases, the logs are placed across (light rays or movement)
This ensures their uniform wear and loading, as well as deformation.
The distance between the beams depends on the thickness of the flooring (floorboard or slab materials). On average, without adjusting for the individual characteristics of the room, you can take the data from the table. For detailed calculations, you should study our article “Distance between floor joists.”
It should be noted that ALL wood for flooring on joists should have a moisture content of no higher than 12%; when purchasing, you should prefer chamber-dried wood. When drying naturally, the material must be kept for at least 5 years.
Selection of wooden blocks
Why is the spacing between floor joists so important? The distance chosen between natural wood blocks directly affects the strength of the future structure.
When choosing a timber, such as in the photo, take into account the following points:
- As practice shows, bars for joists should be chosen exclusively from coniferous wood, which has a low cost - this is material from pine, spruce, and fir. When there may be high air humidity in the room, it is better to purchase larch products. Despite the fact that their price is higher, they are not subject to rotting.
- To save money, buy lumber of lower grades, the moisture content of which is no more than 20 percent.
- The bars must be selected exclusively with a rectangular cross-section. In addition, their height should exceed the width by about 1.5 - 2 times. Thanks to this shape and cross-section parameters, the logs can withstand significant loads.
- The dimensions of the bars are chosen taking into account the size of the span, or rather the gap between the wooden elements of the lower trim. You should also take into account the thickness of the thermal insulation material used. If the pitch of the floor lag is 70 centimeters with a room span of 2, 3, 4, 5.6 meters, the cross-section of the products should be 11x6, 15x8, 18x10, 20x15, 22x18 centimeters, respectively.
- In the case where the span width has an intermediate value, you should choose the most approximate option, taking into account the safety margin.
- When buying timber, you need to carefully inspect it so that the material does not have defects. Before calculating the floor lag, you need to take into account a margin of 10-15% (read: “How to calculate the floor lag - possible options”).
Floor frame
First, let's study the main constituent elements and main rules:
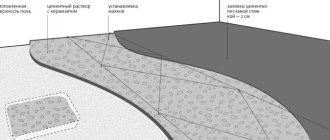
- The underground space from the pads to the floorboard must be at least 1 cm (and no more than 25 cm for floors on the ground). This is necessary for good ventilation inside the frame.
- Logs
are transverse bars that serve as the basis for further cladding with boards. They can rest on beams, a concrete slab, posts, and even on the ground (when using pads).
- The width of the logs when laid on a slab should be in the range of 80-100 mm and 100-120 mm when laid on posts or beams. The thickness when laid on a slab should be 25-40 mm, and when laid on posts - 40-50 mm.
- Beams
are horizontally laid structural elements that perform load-bearing functions. They are supported at least at two points on load-bearing walls. - Columns
(linings) are used to level the base. For logs with a thickness of 40-50 mm, linings are installed every 80-110 cm. - The pitch of laying the logs depends on the thickness of the sheathing. For example, if you use the thinnest floorboard 21 mm, then the step of laying the logs should not exceed 30 cm.
- It is best to use a thicker floorboard 35 mm, and make a standard laying step of 60 cm, especially if you are going to insulate the base. This way you won't have to cut the insulation to width.
Calculation 1.
Initial data - support on the floor slab along the base screed, with adjustable clamps (screws), under the laminate. The dimensions of the room are 3x5 m, the span is 3 m (parallel to the wall with the window). Under the laminate it is necessary to install a rough flooring made of 20 mm plywood.
According to the table, for such a thickness of flooring (plywood), the lag pitch can be taken as 300 mm, and the section of the beam for a span of 3 m can be 150x80 mm. The calculated quantity x will be at a distance from the walls of 50 mm, a beam width of 80 mm and a lag pitch for plywood of 300 mm
5000 – 80x – 300(x-1) – 100, x = 12.1 beams.
Since the number of logs cannot be less than an integer, we accept the number of beams as 13 or - with a low load, you can increase the distance to the wall - 12 pieces.
If, under the same conditions, the log pitch for a floor made of boards 50 mm thick is calculated, then the calculated number of beams x with a distance between them of 1000 mm will be
5000 – 80x – 1000(x-1) – 100, x = 3.6 beams.
We take the whole amount of 4 pieces (it is not advisable to reduce their number here).
Floor installation without screed
Water heated floors without screed are used quite often today. A concrete base is certainly reliable, but it cannot be installed in every room. It is in these cases that an alternative heated floor system is used. Installation of such structures is easier than designing a screed, and in operation they are in no way inferior to it.
Underfloor heating system without screed
If the house is built of timber and the rooms have low ceilings, making a concrete screed can additionally “capture” an already small space. In addition, laying a concrete base is a labor-intensive and dirty job. In this case, the ideal solution for you would be a water heated floor in a wooden house with your own hands.
A water floor without a concrete base is installed on a wooden or polystyrene covering. Pipes are laid in special recesses. For better distribution of warm air, special metal plates are installed. The laid pipe system is covered with waterproofing material on top, and a finishing coating is applied to them.
Pipe system for wooden heated floors
DIY installation features
To prevent the wooden frame from rotting, vents are installed to ventilate the floor.
Before installing the frame floor, impregnations are purchased to extend the life of the load-bearing elements. Use heated drying oil or waste oil from engines. When installing a frame floor, exits for sewer and water pipes are provided, space is left for them, or they are installed immediately.
Assembly steps:
- production of vents in the foundation or plinth;
- preparation for laying heated floors, installation of the system;
- laying beds, supports and floor purlins;
- installation of strapping and logs;
- insulation, insulation;
- clean flooring.
The supporting base is mounted on the ground, often a reinforced concrete monolithic slab. The preparatory floor is made of unedged material. The supporting frame is made of wooden purlins, logs are placed on them, beams are load-bearing elements. The supports are wooden posts for purlins that protect the beams from contact with the mortar. The lathing is made with a wooden lath with a cross-section of 50 x 50 mm, which is mounted on a beam system.
Features and nuances
To make a floor in the premises of a wooden house, you can use various technologies for laying it and choose different materials, including for insulation, sound and waterproofing.
In particular, as insulation, in addition to mineral and glass wool, you can use expanded clay poured into the recesses between the beams, sawdust or slag. Styrofoam sheets will also work. However, materials such as expanded clay, slag or sawdust are better suited for the installation of floors on the first floor, especially under bathrooms.
At the same time, when laying the floor of the second or more floors, it is better to use mineral wool for better sound insulation. It is also better suited for attic floors.
Decorative rafters: 0% load
First of all, decide on the most important point: the type of roof and its purpose. The fact is that the roof of a residential building in winter can withstand a large cap of snow, constant wind at altitude, it is often insulated from the inside, but completely different requirements are placed on the rafter system of a small gazebo hidden under the canopy of trees.
For example, if you are building a pergola in its classical sense, then it does not matter at all what exactly the distance between the rafters will be - this is a purely aesthetic factor:
The illustration above shows that even such a building has its own pitch of rafters. After all, here it provides both the aesthetic factor and the rigidity of the structure itself. But they choose a step arbitrarily.
Fixation to concrete pillars
This method involves fixing beams to concrete pillars, using similar fasteners, but designed specifically for pillars.
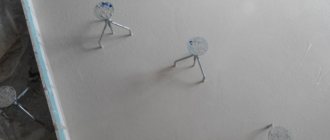
- The pillars must be covered in advance with a waterproofing layer (bitumen or mastic is used). Their upper part can be protected from moisture with roofing felt. You need to pre-drill holes in the posts and beams.
- Next, you need to drive dowels or anchor spacers into them.
- Then the beam is attached to the post with self-tapping screws 2-3 times longer than the width of the spacer.
- The timber is attached to the posts using iron plates with screws. They are fixed to the posts with dowels-nails, and to the beams with screws.
Thanks to the study of all these fastening methods, the question of how to install joists on a concrete floor disappears by itself.
Installation of a frame on wooden floors
Logs on wooden floors of houses are arranged as follows:
- The beams need to be attached to the strapping beams, or rather to their sidewalls.
- The horizontal position of the lags is checked using a control rod; you can omit the use of linings.
- For fixation, screws with a diameter of 6 millimeters are used. It is necessary that fasteners exceed the width of the beams by 2-2.5 times.
- Next, holes are drilled in the joists and beams, and then the wooden products will not crack. The diameter of the drill should be 2.5 millimeters smaller than that of the screws.
- If the beams are located far from one another, it is necessary to install double logs. To do this, one row of bars is attached to the beams, and on top of them the next, but with a smaller step.
Waterproofing
To protect wooden logs and insulation from moisture, the balcony slab is covered with waterproofing. Its installation depends on the selected material.
Types of waterproofing:
- Coating. Applied with a brush, it hardens to create a seamless, moisture-resistant coating. For protection you can use “Liquid Rubber”. However, for adhesion of coating waterproofing, the temperature on the balcony must not be lower than +15 ˚C.
- Pasting. It is made using roll materials: PVC film, Penofol. This is the most economical method, but it requires reliable connection of the joints. There is also self-adhesive waterproofing "TechnoNIKOL", for installation of which you do not need adhesive tape and a torch. The adhesive moisture protection technology can be used at any temperature.
- Deep penetration compositions. Getting into the pores of concrete, they form a barrier to moisture. They can be used in dry weather at temperatures from +15˚C. Another disadvantage of such compositions is their high cost.
Before laying the logs on the concrete floor, the surface is first waterproofed
The most economical and frequently used types of waterproofing on the balcony are roofing felt and PVC film. However, the materials are outdated. The service life of roofing felt is no more than 5 years; when heated and frozen, it melts and cracks. And PVC film is easily damaged by mechanical stress.
Before waterproofing, the concrete floor should be cleaned of dirt and dust. A bitumen-polymer primer is applied to the screed under any type of waterproofing. The drying time of the composition is from 20 to 30 minutes. The surface of the balcony floor and the lower parts of the walls to a height of 15 cm are covered with moisture-proof material. Markings on vertical structures for waterproofing can be made with masking tape.
TechnoNIKOL self-adhesive roll film is cut to fit the size of the room. Adjacent sheets are laid with an overlap of at least 10 cm. The minimum width of the end joint is 15 cm. When connecting sheets in a T-shape, the corner of the middle covering is trimmed. The overlap of the wall waterproofing strips is 10 cm. Each connection is treated with a bitumen-polymer primer.
Other rolled materials are laid in a similar way. However, the joints are sealed with waterproofing tape.
Installation of decking over concrete floors
The installation of joists over concrete floors follows the same rules as for plank floors: the pitch between the supports depends on their cross-section, and the cross-section depends on the area of the room. However, there are some nuances that change the sequence of work.
For example, before laying the supports begins, it is necessary to lay waterproofing material on the floor surface. This is necessary so that the floor does not become damp. Layers of heat and sound insulation are placed on top of the waterproofing, then a cement or dry screed is installed. This increases the wear resistance of the floor, and the structure retains its original performance properties for many years. On top of it you can lay laminate, linoleum, parquet boards and other materials.
When the screed is ready, the lags are installed. When attaching logs to a concrete floor, boards shorter than 2 m are not used, and if there is not enough length, the logs are joined together at the ends. Otherwise, installation work is carried out according to the same principle as when installing decking over plank floors.
Further floor arrangement
Further installation of the floor along the joists involves two more stages of work.
The first stage is laying the finished floor
After installing the logs, thermal insulation, waterproofing and sound insulation, the finished floor is laid. They begin to lay it from the corner of the room. The first row of boards is placed tongue-and-groove against the wall, with a gap of 10 mm between the wall and the boards. This will compensate for the deformation of wood that appears from temperature changes and changes in humidity levels.
The next row is placed offset to the previous one by approximately 2 lags. To lay the boards tightly, apply a piece of wood to the ends of the board being attached and hit it with a hammer.
The boards are fastened to the joists with screws, the heads of which are driven into the boards.
After laying the boards, the expansion joints are covered with plinths.
Expert advice:
- lay the floor on a concrete base after leveling all the joists along the horizontal plane;
- boards must be attached to all beams;
- their size is chosen so that the joints between them are in the middle of the lag.
- To prevent them from cracking, it is necessary to make small-diameter holes in them for self-tapping screws. For the screw head it is necessary to make a countersunk hole, for drilling which you need to use a drill of a larger diameter.
- Instead of a plinth, you can install profiled strips - fillets.
- holes for pipes need to be made 8-10 mm larger.
To increase the accuracy of installation, experts advise that before fastening the boards, tighten them together with the staples of a construction stapler.
The second stage is the final finishing of the floor
This is the most critical stage of work on arranging a floor on a concrete base on joists. The appearance of the floor and room depends on the choice of finishing material. Listed below are the main types of final floor finishing.
Parquet
Parquet consists of solid wooden planks from which the floor covering is laid. It makes the floor very attractive. This flooring has a long service life - more than 30 years. In addition, part of the parquet can be replaced at any time.
Laying parquet requires a lot of experience, so it is difficult for an ordinary person to lay it falsely, since the technology for laying parquet is complex and labor-intensive. In addition, this coating is expensive. During operation, parquet requires careful handling, as it is scratched and afraid of moisture. To keep this floor always beautiful, it must be regularly polished and varnished.
Linoleum
This floor finish is very popular today. This is due to the low cost, practicality and ease of installation of this flooring material. You can lay linoleum indoors yourself, because this does not require special knowledge and skills. A floor covered with linoleum is resistant to moisture and aggressive liquids, while it looks beautiful.
Linoleum is easy to clean and sweep. Thanks to the wide variety of textures and colors, it can be matched to almost any color of furniture and wallpaper.
Linoleum can be laid on top of boards, plywood or concrete. Thick linoleum with a base of more than 3 mm can hide small unevenness in the floor and seams of sheet materials.
The disadvantage of linoleum is its low maintainability. If a hole appears on it, then it will not be possible to seal it and make this place invisible.
Laminate
This flooring is quite expensive. In appearance and performance characteristics, this material is similar to parquet. It is easy to install and does not require special care. The choice of laminate on the finishing materials market is quite extensive, so everyone can choose the option that suits them.
Fiberboard
Fiberboard is rarely used today for finishing floors. This material is mainly used to level the floor for the installation of other floor coverings. The sheets are secured to the floor with small nails or self-tapping screws. After fixing, the fiberboard is painted in 2–3 layers. This material is also afraid of moisture, because it swells under its influence.
Carpet
This floor covering looks beautiful and additionally insulates the floor. At the same time, carpet quickly loses its attractiveness (the pile wears out and gets worn out), which is why it is used only in bedrooms and children's rooms, where people rarely walk.
It is difficult to clean and quickly absorbs moisture. Drying the carpet without dismantling it is extremely difficult. In terms of installation, the material is convenient; it is simply rolled out on the floor and trimmed where needed.
Functional rafters: detailed calculation
We come to the main question: what distance should be between the rafters of the roof of a residential building? Here, be patient and carefully study all the nuances.
Point 1. Wall length and choice of rafter spacing
The first step in installing rafters on the roof of a residential building is usually chosen structurally based on the size of the building, although taking into account many other factors.
For example, the easiest way is to install rafters in 1-meter increments, so for a wall 6 meters long, 7 rafters are installed as a standard. At the same time, you can save money by placing them at a distance of 1 and 2 meters, and you will get exactly 5 rafters. It can also be placed at a distance of 2 and 3 meters, but reinforced with lathing. But it is extremely undesirable to make the rafter spacing more than 2 meters.
Point 2. The influence of snow and wind loads on the shape of the roof
So, we settled on the fact that the average distance between the rafters of a regular roof is 1 meter. But, if the area has a significant snow or wind load, the roof is flat or simply heavy (for example, covered with clay tiles), then this distance must be reduced to 60-80 cm. But on a roof with a slope of more than 45 degrees it can even be increased by a distance 1.2 m-1.4 m.
Why is this so important? Let's figure it out. The fact is that the air flow collides on its way with the wall under the roof of the building, and turbulence occurs there, after which the wind hits the eaves of the roof. It turns out that the wind flow seems to bend around the slope of the roof, but at the same time trying to lift it. And at this moment forces arise in the roof that are ready to tear it off or overturn it - these are two windward sides and one lifting one.
There is another force that arises from wind pressure and acts perpendicular to the slope, trying to press the roof slope inward. And the greater the angle of inclination of the roof slope, the more important are the safe wind forces and the less tangential ones. And the greater the angle of the slope, the less often you need to install rafters.
This map of the average wind load will help you understand whether to make a high roof or a flat one:
In the Russian climate, a standard house roof is exposed to atmospheric phenomena such as snow for a significant part of the year. And here, too, you need to take into account that the snow bag usually accumulates more on one side of the roof.
That is why in places where a snow bag is possible, you need to install paired rafter legs or make a continuous sheathing. The easiest way to identify such places is by the wind rose: single rafters are placed on the windward side, and paired rafters are placed on the leeward side.
If you are building a house for the first time, then do not rely on your own intuition, but rather determine the average snow load for your area according to official data:
Installation of a wooden floor on joists on wooden bases
Such floors can be made in both wooden and brick buildings and can have several varieties. The features of flooring need to be considered at the building design stage. Not only the purpose of each room and its size are taken into account, but also the climatic zone of residence, microclimate requirements and the financial capabilities of the developer. Below are step-by-step recommendations for constructing this type of flooring.
Laying a wooden floor on joists in a wooden house
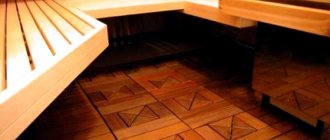
Wooden floor - photo
Depending on specific conditions, the algorithm can be slightly modified, but all main construction operations must be completed. The base can be moisture-resistant OSB boards or sheets of plywood. The design of the floor coverings provides for the possibility of laying insulation; the use of rolled and pressed glass wool or polystyrene foam is allowed. If there are insulation materials, then you should definitely install hydro- and vapor barriers.
roll waterproofing
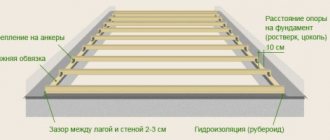
Step 1. Take the dimensions of the room and calculate the number of joists, taking into account the above recommendations. Prepare materials and tools, make markings. Do the work slowly; mistakes made at this stage have extremely negative consequences. Eliminating them will take a lot of time.
Step 2. Start installing the logs from the outer wall ones. If the room has subfloors, then the logs can be fixed directly to them. To make work easier, it is better to use metal squares with perforations; such elements significantly speed up work and increase the stability of the joists. Using the mark on the wall, taking into account the thickness of the floorboards, align one end of the joist and fix its position.
Installation of floor joists
Do the same actions at the second end of the log, constantly monitor its level position. Once the lag lays down normally, you can firmly fasten the ends and begin installing intermediate fasteners. The distance between them depends on the thickness of the boards that are used for the logs; it is approximately 70 centimeters.
Step 3. You need to stretch the ropes between the outermost logs; align all the remaining logs along this line. Constantly check with a level; installation accuracy should be ±1–2 mm. There is no point anymore, it takes a lot of extra time. A small difference in height will be removed during finishing of the front surface of the floorboards.
Step 4. If the floors are warm, then you need to lay thermal insulation between the joists; waterproofing and vapor barrier are used to prevent moisture from entering. The distances between the logs must be adjusted taking into account the length and width of the insulation. This can be either mineral wool or polystyrene foam, or bulk types of insulation. If all the preparatory work has been completed, you can begin laying the floorboards.
Laying thermal insulation between joists
Thermal insulation of the floor with mineral wool
There are options for installing joists on floor beams. These are so-called ventilated floors and are most often used for non-residential premises. There is no need to be particularly precise; size alignment is done using lags. The logs are attached to the beams with nails or self-tapping screws from the side. The algorithm of work is the same. First, the extreme ones are placed, a rope is pulled between them and all the others are fixed along it.
Laying lags on the beams of the lower frame
Ventilation is carried out through special vents in the foundations; the distance between the ground and the floor must be at least fifty centimeters. Otherwise, the air exchange rate does not meet the required indicators, and this causes damage to wooden structures.
Distance between rafters: principles and examples of calculating the pitch of a rafter system
The task of correctly calculating the distance between the rafters is a very important one.
How seriously you begin to solve this problem will determine not only the reliability and durability of the roof, but also all subsequent work on it: laying insulation, installing roofing, installing additional elements. If you simply adjust the pitch of the rafters to the roofing sheets, as many do, then it is not a fact that insulation will then fit between the rafters. If you focus only on insulation, the very first winter with its abundant Russian snow will crush the rafter system. That is why it is important to choose the optimal rafter pitch for all slopes, and we will now tell you how to do this.
Lags - what is it?
Installing a wooden floor on joists in a private house is an old technology. Some changes have been made to it today, but the basic principles remain the same. This floor design is characterized by such advantages as simplicity and reliability. Hence, in principle, its popularity.
So, what are lags? Essentially, these are beams laid across the room. They become the basis for laying wooden boards on them. Typically, lumber is used for this, although we must pay tribute that in the construction of private houses it is allowed to use reinforced concrete products, metal profiles, and today even polymer materials.
The design of wooden logs can also be different. Of course, the best option is an even beam adjusted to certain dimensions. Because it’s easier to work with this material: adjusting, setting and assembling. You can use boards laid on edge with a thickness of at least 50 mm. If the distance between the supports for the logs is large, then the boards are knocked together in twos or threes.
Sometimes they even use logs or round timber, which is hewn on one side to a flat surface, on which a counter-lattice is then laid under the floorboards.
Round timber floor joistsSource artc-alisa.ru
Note that in some respects wood is inferior to a concrete base. But it also has its great advantages:
- low specific gravity, which creates virtually no load on the foundation and additional supports;
- the floor base formed on logs is ventilated, which significantly increases the service life of the entire structure and the finishing coating as well;
- Communication networks can be easily placed between the joists, and getting to them in the event of an accident will not be difficult;
- Insulation is usually laid between the lags, which makes this design comply with regulations and standards;
- using logs, you can also level the floor structure, and this is much easier and cheaper if such a problem arises with concrete floors;
- the strength of the log structure is not inferior to any other;
- this design evenly distributes loads over the entire surface of the foundation;
- The floor itself, laid along joists, is easier to repair.
More recently, wooden floors in a private house with joists were criticized for being difficult to combine with heating systems: water and resistive. Today, the problem has been solved by new construction technologies that have emerged. That is, making a warm floor based on wood today is not a problem.
Warm water floor in a wooden floor structureSource i.ytimg.com
What should be taken into account when making calculations?
When performing the calculation, the following factors are taken into account:
- thickness of the flooring material (chipboard, boards, etc.); approximate step between floor joists; expected specific maximum load on the floor.
All these parameters will determine the cross-section of boards, timber and other lumber used to construct the floor.
When calculating what distance should be between the floor joists, it should be remembered that the outermost joists cannot be placed further than 30 millimeters from the walls; an allowance must be made for this in the calculations.
As a result of calculations, the result is usually not a whole number, but it should always be rounded up so that the actual number of lags does not turn out to be less than the calculated one. Otherwise, the strength of the floor structure may not be sufficient, especially considering that such savings will be completely insignificant compared to the likely risk.
The cheapest floor joists can be found at sawmills, followed by online construction stores.
When it comes to floor installation, it is not recommended to save too much.
The logs must have not only a suitable cross-section, but also sufficient density. If you make the lag step for a floor made of boards too large, the boards will begin to sag and “play.” Likewise, if the distance between the joists for an OSB floor is made greater than acceptable, then the slabs will begin to crumble and crack.
Cleaning and finishing of wooden floors
- A wooden floor is “no worse” than parquet and also needs sanding before varnishing.
- A wooden floor, like parquet, is sanded using a parquet sanding machine. Grinding is carried out in two stages. First with coarse sandpaper and then with fine sandpaper. (Read more about sanding a wooden floor HERE or HERE or HERE)
- After sanding the floor, wall skirting boards are installed. The screw caps securing the skirting boards to the floor or wall are recessed by 3-4 mm. Then they are puttied.
- The wooden floor is varnished 2-3 times. Each subsequent layer is laid on top of the completely dry previous layer of varnish. The baseboards are varnished along with the floor.
- Wooden floors laid in this manner can be re-sanded and re-varnished.
Wooden floors not laid with tongue and groove planks
It is better not to use non-grooved boards for finishing the floor. But still, if you really have to, then before laying all the boards you need to trim them on a machine.
- Self-tapping screws are screwed into the board perpendicular to the floor into its front part. The heads of the screws are recessed by 5-6 mm.
- After sanding, the entire floor is puttied to hide the caps and seal the seams.
- After the putty has dried, the floor is sanded one last time with very fine sandpaper.
- The floor is varnished at least 3 times.
That's all! The laying of the wooden board on the joists is completed. Walk on a smooth and beautiful floor.
Opolax.ru
Photo album: “Laying a wooden floor from tongue-and-groove boards on concrete joists”
- Home wood protection
- How to level a wooden floor
- How and with what to drill wood correctly?
- How shelves and paintings can change the interior
- How to choose the right solid board
Distance between rafters
Along with the permissible load on individual elements - the mauerlat, horizontal, diagonal and vertical girders, one of the most important parameters is the pitch (span) between the rafters. The combination of optimal values of the entire structure is the key to its durability and strength.
Step width between joists
The pitch between the joists is selected taking into account the thickness of the floorboard. The thicker it is, the larger the step between the bars is allowed. In addition, a thick board sag less under loads.
The table below allows you to quickly select the distances between the bars.
You can also resort to the following rule: when the width of the logs increases by 5 mm, their pitch increases by 10 cm.
When installing plywood, the cross-section of the joist is calculated differently. This is due to the fact that it has great bending strength. With a thickness of sheet material of 1.5-1.8 cm, it is fashionable to place logs against each other at a distance of up to 40 cm. It is necessary to install the beams so that the sheets are fixed at the edges and in the middle. Moreover, the edges of the sheets should fit half the width of the beam.
Technical characteristics of logs and requirements for their installation
Logs are distinguished from beams by their smaller size and mobility. If beams cannot be moved after installation, and repairs are very long and labor-intensive, then logs are a mobile architectural element. They are much easier to install and, if necessary, repairs are carried out faster.
Distance between joists
Optimal section proportions
Before you start building a floor, you need to study the requirements of regulatory documents for the size of the joists and the distance between them, taking into account the thickness of the floorboards.
Table of lag sections at a pitch of 70 cm
| Distance between joist supports | Linear dimensions of logs |
| 200 cm | 110×660 mm |
| 300 cm | 150×80 mm |
| 400 cm | 180×100 mm |
| 500 cm | 200×150 mm |
| 600 cm | 220×180 mm |
Table of distance between joists depending on the thickness of the board
| Thickness of pine floorboard, mm | Distance between adjacent joists, cm |
| 20 | 30 |
| 25 | 40 |
| 30 | 50 |
| 35 | 60 |
| 40 | 70 |
| 45 | 80 |
In order to learn how to independently make calculations based on tables, it will be useful to consider a simple example. Initial data: the length of the room is 10 m, take a floorboard 30 mm thick.
floorboard
Lags
Batten
Calculation method
According to the table, with such a thickness of the board, the distance between the logs is 50 cm; with a room length of 10 m, 20 logs will be needed. The distance between the logs and the walls cannot exceed 30 cm. This means that we will have to increase their number by one piece, the distance between the others will decrease to 45 centimeters.
Important note. During calculations, all roundings should be done only downwards, thus creating an additional margin of safety.
There is no need to calculate dimensions and distances accurate to the millimeter; no one takes such measurements. By the way, during construction, the vast majority of architectural elements and structures are measured in centimeters, the greatest accuracy is half a centimeter. Millimeters are almost never used during measurements.
Floor joists
A wooden beam of rectangular cross-section can be used as a log
Floor materials by joists
When selecting wooden materials for floor joists, you must decide in advance on the type of floor covering and select the required cross-section of the timber.
The timber for the logs is usually pine. The cross-section is selected depending on the operating conditions and restrictions on the permissible ceiling height. For laying on a flat concrete base, timber 50 × 50 mm or more is suitable. It should be taken into account that if the cross-section of the log is less than the double cross-section of the board being laid, then the timber will not be able to contain the stresses that arise in the boards when they dry out or become waterlogged. Therefore, the board for 50 × 50 timber should be no thicker than 25 mm. And depending on the thickness of the board, the optimal lag pitch is selected.
OSB, plywood, chipboard, and board can be used as rough flooring. The finished floor is made of parquet, laminate or boards. Floor boards are the most common material, which is made in different thicknesses, profile shapes and from different types of wood. The required amount of boards is calculated based on the area of the room with a 15% margin.
The choice of floorboard largely depends on how we will lay the floor. There are two common installation methods:
- On a prepared, level base (subfloor) made of waterproof plywood, chipboard or OSB. In this case, the floor board may not be too thick (16-25 mm).
- Directly to the logs. When laying the floor on joists, the thickness of the board depends on the distance between the joists. The table for matching the board to the lag pitch is given below in the review.
Required tools for floor installation:
- Hammer.
- Screwdriver (drill).
- A jigsaw or a hand-held circular saw (hacksaw).
- Planer, tape measure and square.
- A special tool for pulling together floorboards (you can also use improvised tools and devices).
Online calculators
To simplify calculations, you can use an online calculator. However, to enter data into it, you must first determine the cross-section of the timber, the thickness of the flooring and what pitch of the floor joist is accepted.
Attention: in this calculator there is a distinction between the concepts of “subfloor” and “floorboard”. This refers to a two-layer plank flooring, in which subfloor boards are first laid at intervals of 2 cm (to compensate for temperature and humidity deformation), and then a flooring is created from floorboards and they undergo finishing treatment (varnishing, painting).
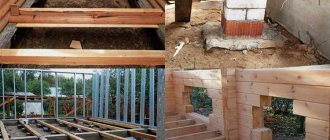
Wooden floor on posts along joists
The figure shows a design option for a wooden floor on joists in a private house with an underground space.
The space under the floor is formed by the fact that the logs are laid on fairly high columns of brick or concrete blocks. This design allows you to raise the floor level of the first floor with a minimum volume of backfilling the basement space with soil.
Here the basement and basement space under the floor are outside, outside the thermal envelope of the house, and will be cold.
To ventilate the underground space, vents are made in opposite external walls, above ground level - through holes covered with a metal mesh to protect against rodents. The same openings should be in the internal load-bearing walls.
Air movement under the floor occurs mainly due to wind pressure.
In winter, there is a danger of soil freezing in the underground space, which can lead to heaving soils causing the floor to move relative to the walls.
To prevent freezing, it is recommended to close the vents for the winter and insulate the base. However, deterioration of ventilation as a result of closing the vents leads to the accumulation of moisture in the insulation and wooden parts - reducing the thermal resistance and durability of these elements.
It must be said that such a device for underground space has been used in private construction for a long time. The design was not originally designed for the use of effective floor insulation.
In houses with weak floor insulation in winter, part of the heat from the room penetrated into the underground space and warmed it, preventing freezing, but increasing heat loss.
Modern floor insulation practically blocks the flow of heat into the subfloor from the premises. Freezing of the subfloor can only be prevented by saving ground heat.
Given modern requirements for energy saving, a cold underground ventilated through vents is not the best option.
It is still used rather by inertia.
Scheme of effective underground ventilation in the basement of a private house through an exhaust duct. Read more. . .
To ventilate the subfloor of a private house or cottage, it is beneficial to use effective ventilation through an exhaust duct. This ventilation scheme is the only correct option for a house with an insulated base or basement.
Determination of loads on the roof as a whole and rafters separately
So, we have determined that, in addition to other design factors, a whole set of loads simultaneously acts on the roof rafter system: the weight of the sheathing, the snow cap, wind pressure. After you add all the loads together, be sure to multiply them by a factor of 1.1. It is necessary to make calculations for destruction, i.e. for the full load acting on the roof, plus a small margin. This way you can build in an additional 10% strength in case of unforeseen circumstances.
Now all that remains is to divide the total load by the planned number of rafters and find out whether each of them will cope with its task. If it seems that the structure will be frail, feel free to add 1-2 rafters to the total, and you will have peace of mind for your home.
The standard roof structure consists of rafters and lattice purlins, and each of these elements responds only to the load that puts pressure on it, and not on the entire roof as a whole. Those. Each individual rafter is subject to its own load: total, but divided by the number of rafter legs. Therefore, by changing the pitch of the rafters, you change the area and force of the load - reducing it or increasing it. If changing the pitch of the rafters is inconvenient for you, work with the parameters of the cross-section of the rafter legs, and the overall load-bearing capacity of the roof will increase significantly:
When making this calculation, try to ensure that the longest rafter in your project is no more than six and a half meters, otherwise, increase their length. What is it for? On roofs with slopes up to 30 degrees, the rafters are so-called “bending elements”. Those. they work specifically for bending, and there are certain requirements for them. And the possibility of rafter deflection is calculated using a special formula. If the result exceeds the norm, then the rafters are increased in height and a new calculation is made.
But on a roof with a slope of more than 30 degrees, such rafters will be considered “bent-compressed” elements. That is, the rafters not only bend slightly under the weight of the roof, but are also compressed from the ridge to the mauerlat. In addition, the crossbar, which usually holds the two rafter legs, must also be checked for tension.
Useful tips
There are a number of tricks to make laying plank flooring easier:
- The boards should be positioned so that the rings face in different directions.
- For convenience, the boards should be numbered before laying.
- Nails should be driven into the wood at an angle.
- To ensure a tight fit of the floorboards, a bracket is driven into the joist at a distance of 6 cm from the outer board. The distance between the board and the bracket is filled with a lath, after which a wedge is driven between the bracket and the lath. Then the boards are pressed tighter and can be secured with nails.
- Then the bracket and the batten are removed and further laying of the boards begins according to a similar procedure.
- The last remaining board should be leveled with a plane and installed with glue and nails.
- Gaps near the walls are masked with baseboards.
How to properly insulate a veranda from the inside and from the street - keeping the warmth in the extension
The country veranda (closed and open), if desired, can be converted from summer to winter, i.e. from cold to warm. From the veranda you can make an entrance hall, a corridor in the house, a full-fledged room or a winter garden, a greenhouse, in general, a warm room that can be used all year round. Therefore, it will be useful to learn how to insulate a veranda for winter living. Below are step-by-step instructions with photos, drawings and diagrams.
How to insulate a veranda from the inside and outside
Which side to insulate the veranda - from the inside or outside
Insulation of a cold veranda begins with the choice of insulation and its installation location. As a rule, the veranda has a beautiful external and internal decoration. And deciding which side to hide under the insulation is not easy.
To make a final and informed choice, we offer arguments in favor of one or another type of insulation.
Insulating the veranda from the inside
- can be performed in any weather;
- free access to surfaces at any height;
- in one approach you can insulate all surfaces: walls, ceiling, floor.
- requires dismantling of the existing coating;
- the freezing point shifts into the wall, which leads to its destruction.
Insulating the veranda from the outside
- the way of life caused by repair work is not disrupted;
- all garbage remains outside the veranda;
- maintaining the veranda area;
- shifting the freezing point in the insulation, which reduces the rate of destruction of walls, and the walls can accumulate heat;
- veranda decoration. A veranda covered with OSB boards or plywood can be transformed after insulation and subsequent finishing.
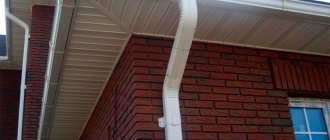
External insulation of a wooden veranda made of timber or logs will protect the wood from getting wet, preserve the interior of the extension, and make it possible to update the facade. Among the disadvantages: deprivation of the opportunity to observe the condition of the log veranda from the street.
How to insulate a veranda - materials
With the existing variety of thermal insulation materials, the choice still remains difficult. However, among those that have proven themselves well:
Penofol
Flexible foil insulation Penofol can be used as an independent thermal insulation material or in combination with other types of insulation.
The material is environmentally friendly, thin, has low vapor permeability, is easy to install and is fireproof. Among the disadvantages: softness, small thickness.
Styrofoam
A rigid, lightweight material that does not change its properties over the period of operation. Easy to install using both frame and frameless methods. Disadvantages: interesting for rodents and flammable.
Note. Insulating the veranda with polystyrene foam saves the owner from installing a hydro and vapor barrier, because polystyrene foam has practically zero hygroscopicity and vapor permeability.
Expanded polystyrene
It has all the advantages of foam plastic, and is also very durable and easy to cut. Cons: poor sound insulation, destroyed at high temperatures (over 100°C), does not burn, but does not self-extinguish.
Mineral wool
Flexible (soft) insulation with low thermal conductivity, non-flammable, durable in compression (for dense types) and tensile, provides excellent sound insulation, and is resistant to temperature deformation. Mineral wool is resistant to chemical and biological activity. Disadvantages: it requires a frame, over time it loses density (cakes), which means its thermal insulation properties decrease.
Basalt wool
According to the characteristics, the material is identical to mineral wool, while being environmentally friendly.
Polyurethane foam (PPU)
Polyurethane foam insulation is available in three varieties:
- Dense (hard, rigid) panels
- Flexible (soft) plates
- Inflatable (sprayed)
Among the advantages: light weight, ease of installation and application, resistance to chemical and biological activity. Cons: expensive, deteriorates from mechanical stress, subject to aging when exposed to ultraviolet radiation.
Flax, tow, moss
Materials designed to insulate a veranda made of timber and logs without disturbing the appearance of the building.
Flax, tow, and moss are absolutely environmentally friendly, but difficult to install. In addition, they are desirable prey for birds that use materials to build their nests.
Synthetic insulation for construction
Polymer insulation eliminates the disadvantages inherent in natural materials. For example, building a veranda using warm house technology.
Do-it-yourself insulation of the veranda to the house
When planning to insulate a veranda, you need to remember that insulating only one surface will not give the expected result. After all, heat evaporates from it in different directions.
Insulation of the floor on the veranda
Reducing heat loss and retaining heat as much as possible can only be done using an integrated approach; first, let’s look at how and with what to insulate the floor on the veranda
1 way:
we remove the boards of the existing floor and the subfloor (as well as floor coverings: linoleum, laminate);
pour expanded clay between the joists;
re-lay the floor.
Method 2:
We dismantle the floor covering or carry out work on the existing floor. Then it will serve as a rough coating;
we install 50x50 wooden blocks on the joists or on the subfloor;
lay a vapor barrier film;
lay insulation (for example, mineral wool). We make sure that there is no free space between the frame and the insulation. If there is one, it must be filled with scraps of material and blown out with foam;
Cover the material with a vapor barrier or penofol on top. The foil part of the material faces the inside of the room. The joint is glued with metallized tape (for example, Izospan Isospan).
installing flooring.
Additionally, you can insulate the foundation of the veranda.
Insulation of the veranda roof
A significant part of the heat is lost through the roof of the veranda (heat loss from the roof depends on the design and material). How to insulate a veranda roof - from the inside or outside? A simple pitched roof does not have an attic, which makes it difficult to move around. To perform insulation, you need to dismantle the roofing material. Therefore, the roof of the veranda is insulated at the construction stage or from the ceiling.
Insulation of the veranda ceiling
It features the same sequence of actions as floor insulation. Only the work has to be done under the shed. This creates some difficulties when installing insulation.
How to insulate the ceiling on the veranda - methods
Method 1 – frame
you need to dismantle the ceiling covering, if it is plasterboard, and replace it with plywood or OSB;
a hydrobarrier film is attached to the ceiling surface;
for soft insulation, a frame is made of timber (the thickness of the timber is equal to the thickness of the insulation);
Insulation is installed between the frame beams.
the insulation is covered with a vapor barrier film;
the ceiling is decorated with plasterboard or lining trim.
Method 2 – frameless
Suitable for polyurethane foam and rigid insulation. In this case, the insulation is installed directly on the ceiling. Then the surface of the ceiling needs to be puttied.
Insulation of veranda walls
It can also be done in two ways: framed and frameless. The work is carried out in the same order as when insulating the floor.
How to insulate a wooden veranda
Many people are interested in the results of external insulation. The natural beauty of wooden lining will be hidden under a layer of insulation. Professionals recommend dismantling the existing trim, performing insulation, and then installing the lining in place. At the same time, you need to perform dismantling carefully so as not to damage the lamellas. However, some of the lumber will still have to be replaced. You can even out the difference in shades between the old and new lining by sanding the board.
Insulation of a wooden veranda in a house made of timber and logs
It is carried out by hammering natural insulation into the cracks (caulk, sealing cracks between logs).
Insulating a house using the “warm seam” technology - video
If a veranda made of timber has lost its attractiveness, then insulation occurs by installing a frame outside the extension. Insulation (thermal insulating material) is inserted inside the frame and covered with facing material (for example, lining, siding).
Insulation of veranda windows
Wooden windows can be insulated if they are protected from the outside of the building with film. At the same time, it is necessary to leave space between the window and the film. This gap (air cushion) will prevent the accumulation of moisture and destruction of the wooden frame. The film is attached to the frame using a construction stapler. The disadvantage of film insulation is that the transparency of the window is reduced, so it is removed during the warm season.
Note. Users advise that when insulating windows with film, stuff the slats onto the frame, and then attach the film to them. The film will be removed in the spring, but the slats will remain. Thus, the tree frame is not so damaged when installing/dismantling the film.
How to calculate the distance between floor joists
The correctly selected distance between floor joists determines the strength and durability of this engineering structure. Today, the vast majority of developers choose to create a wooden floor. The surface made of natural material is environmentally friendly and aesthetically attractive. In most cases, floor joists are used to create a reliable and practical floor. Depending on the specifics of the project, boards and plywood are placed on them. These materials have different technical characteristics, which require a special approach in each case.
What does the step depend on?
The distance between the joists for the floor boards depends on the load on the assembled floor, the dead weight of all the wood material and the dimensions of the room, as well as the cross-section of both the board and the timber. A step that is too small, although it will add strength, will result in excess weight of the structure or building; a recalculation of the plan starting from the foundation will be required before construction begins. Too large a step - the boards will bend under the weight of people, furniture and equipment; in the worst case, the floor may crack and fall either onto the floor below, or come into contact with the subfloor (foundation) of the building, thereby disrupting the thermal vapor barrier of the latter. In any case, if the boards are damaged or people and objects fall through in the room, repairs will be required, including strengthening the “lag” component.
The laying of additional joists with the possible replacement of existing, damaged ones is inevitable. Likewise, the boards themselves will be replaced - those that have become deformed.
Installation of logs
Correct installation of floor joists with your own hands is done as follows:
- The logs must first be set clearly in level. To do this, you can use wooden choppers if the height of the timber is not enough;
- Before properly placing the logs in the center of the room, it is necessary to tie around the perimeter. To do this, edge joists are installed with a gap of 5-10 millimeters to the wall. You should not leave any wedges in this gap, since such an element can lead to various squeaks of the coating during operation;
- then all intermediate beams are installed. They must be positioned perpendicular to the window openings so that natural light hits the flooring longitudinally. The floor covering is also done in the same way, since the rays of sunlight will make the seams visually invisible, which will allow you to take high-quality photos and upon visual inspection the floor will be more aesthetically pleasing;
- Before laying the floor joists, you need to choose a method for fastening them, and then install them in such a way that the structure is motionless, but the fastenings are not rigid. If you overdo it and strongly pull the joists to the floor, the effect of excessive vibration may occur and any impacts on the floor will lead to sound spreading through the ceiling to the lower levels of the building. Experts are recommended to adhere to the rule: fewer parts means less risk of various noises and squeaks.
Moreover, self-tapping screws must be present in all areas of the board or sheet that is laid on the log. In the case of plywood, there should be twice as many fasteners, and the logs should be located much closer so that the strength of the coating does not deform during operation.
Bottom line
The article describes in detail how to correctly lay joists with your own hands. It is worth remembering that only strict adherence to instructions, accuracy and precision when carrying out work will allow you to achieve a good result. If difficulties arise, you can always contact specialists who will install the entire floor in the shortest possible time, saving the customer’s effort and money.
How to save on lumber
Every developer who has encountered the purchase of material knows that the thicker the lumber, the more expensive it is. And, probably, everyone tried to save money on this.
Such savings can result in high costs for repairs or complete remodeling of the floor, and worse, lead to injuries when it is destroyed. But you can still save money without violating quality standards.
The smaller the distance between the support posts, the thinner the beams can be used.
Example: for logs of 6 m, you need to use a wooden beam with a side section of 220 mm by 180 mm. If you install a support column in the middle, you get not one 6-meter column, but two, 3 meters each. A 3-meter product requires a beam with a side section of 15 cm by 8 cm.
Thus, the greater the number of supports that are installed, the smaller the cross-section of lumber can be used.
Installation of logs under plywood
Thus, installation of plywood on joists can begin immediately after marking and securing the pads. The beams are laid parallel to the wall with window openings in order to be perpendicular to the sunlight entering the room. For the distance between floor joists under plywood, it is best to choose an interval of 40-50 centimeters (read: “What is the distance between floor joists when installing a floor”). Only the two outer beams at opposite walls should be installed at a distance of 30-40 centimeters.
All other logs should be fixed at the same distance, strictly parallel to each other. The height can be checked using the horizon line previously drawn along the walls. Closer to the center of the room, such a tool will usually help determine how smooth the surface is. Naturally, all beams should have the same linear dimensions, but for the outermost logs near opposite walls it is best to use beams that are larger in width than those located between them.
The logs are secured to the prepared linings using screws. The fastener must be recessed into the beam so that the head does not protrude on the surface. It will probably not be very aesthetically pleasing if the laid floor covering is damaged. In the photo and upon visual inspection, such a floor can no longer be called high-quality.
The design becomes even more reliable if, after installation, each wooden element is coated with parquet glue or a similar mixture. It is advisable to fill the space between the joists with insulating or soundproofing material. Most often, mineral wool, expanded clay or polystyrene are used for these purposes. Various communications are also laid in the voids. From above, the contents of such areas are covered with parchment or bitumen paper (more details: “Laying plywood on a wooden floor - which one to choose and how to lay it”).
An alternative way to secure the joists does not require the use of spacers. In this case, the logs are also leveled with pieces of roofing material, and secured with long anchors or dowels, the length of which exceeds the thickness of the beam by 5-6 centimeters.
Creating a base for plywood
Although this material is highly durable, its resistance to bending and pressure is much less than that of solid wood.
Based on this, the distance between the logs when building a plywood floor is taken less than when working with boards. Typically, plywood is used to create a subfloor. Linoleum, carpets and rugs, parquet and engineered boards are laid on the surface.
For work, you should purchase slabs with a thickness of at least 12 mm. If the coating is two-layer, then you can limit yourself to plywood with a thickness of 8 mm.
When designing the parameters of the sheathing, you should focus on the dimensions of the plywood. In construction stores you can purchase sheets in formats 1525x1525 mm and 1220x2440 mm.
When working with slabs 1525x1525 mm, the logs are laid in increments of 50 cm. If the coating is made in a single layer, then the interval should be reduced to 38 cm. After laying the logs, crossbars are fixed between them at the same distance.
If the choice is made in favor of a material with a format of 1220x2440 mm, then a frame with a side of 40 cm is made. That is, in all cases, the distance between the logs is a multiple of the dimensions of the plywood. This is done so that the edges of the sheets are on the beam, and not in a suspended state.
Since the plywood, after being fixed to the frame, will be covered with a finishing coating, you should buy slabs with one-sided sanding. To create the first layer, it is advisable to purchase unsanded plywood. When carrying out construction in rooms with high humidity, the choice should be made in favor of waterproof material.
The slabs are laid in a checkerboard pattern. Before screwing them in, you need to make holes for the screws and chamfer them.
This is necessary so that the plywood does not crack and the screw heads are recessed into the subfloor. It is necessary to leave a technological gap of 2-3 mm wide between the sheets of material. After installation, it is sealed with mastic.
In order for the floor covering to serve for a long time and be durable, the floorboards not to creak or bend underfoot, you must first correctly calculate all the design parameters, including at what distance to lay the floor joists. The correctness of this calculation will determine not only the durability of the floor covering, but also the amount of material used for it, and therefore the cost of the work.
Electrical transformer installation in a floor structure on joists
The floor in a wooden house is most often arranged as a structure on wooden beams - logs. This leaves its mark both on the coating design and on the nuances of using heated floors. On wooden floors along the joists, it is possible to install an electric heated floor; it is installed in the space between the joists while observing safety precautions.
Requirements
A warm electric floor in a structure with logs is made from both a heating cable or mat and infrared film.
Important! When calculating, assume the total power of the system is not higher than 80 W/m². If a cable is used, its power should not exceed 10 W/m (linear meter). A floor heating system, which is installed in the air gap between the top covering and the thermal insulation, will work better in this design.
The heating element itself should be no closer than 3–5 centimeters from the bottom edge of the wooden covering
A floor heating system, which is installed in the air gap between the top covering and the thermal insulation, will work better in this design. The heating element itself should be no closer than 3–5 centimeters from the bottom edge of the wooden covering.
Cable heated floor in a structure with logs.
The basic requirements that must be adhered to are:
- If a heating cable is used, it should be located at least 3 cm from the joists and any other wooden elements.
- The heating cable is mounted on a metal mesh with small cells, which is attached to the joists.
- A layer of heat and sound insulation must be applied. It is recommended to use 5-10 cm mineral wool.
In addition, it is recommended to use underfloor heating systems equipped with two temperature sensors - in the floor structure and in the room. This allows you to more accurately control the heat and prevent overheating.
General recommendations
Make sure the wood is dried and treated with antiseptic or bitumen. This will significantly extend the service life of the structure. When the humidity is more than 20%, the tree can become warped, compromising the integrity of the structure. Boards brought from a warehouse should lie at room temperature for several days. This is especially true during the winter season. It is not recommended to lay the floor when the air humidity is less than 60%.
You should not saw or plane boards in the room where the floor is being installed. Sawdust can cause rot.
Use the rule after installation. Lay it across the beams, remove gaps, leveling the height. This is easy to do with the help of special modern adjustable fasteners that have appeared on the construction market. The floor is laid only after all leveling procedures.
The smaller the pitch, the longer the floor will last. However, the main indicator of durability is the material of the coating and base. The most durable wood is larch.
The installation of beams is usually carried out along the window, i.e. across the room. The floor boards are then placed along the length of the room, i.e. from the window. However, this is just a recommendation and a matter of taste.
A board is attached to each beam. Holes for screws should be drilled in advance to avoid delamination.
The most common option for the space between the joists is from 50 to 56 cm. As a rule, it does not exceed a distance of 69 cm.
Removing joists and wooden floors is quite simple. It is necessary to remove all the furniture from the room, remove the baseboards, and open the boards or sheets of chipboard. After inspection, the old boards are replaced with new ones. The logs themselves can be partially replaced. Simply cut out a piece of rotten wood and install a new one.
Don't forget to use a protective impregnation on new boards. Check the ends of the beams for rot, and inspect the base insulation, if any. Repairing the floor can be a reason to insulate your home.
Insulation materials
The veranda is a great place for relaxation, family tea parties and friendly gatherings. In the warm season, the terrace becomes the most popular part of the house and a great opportunity to gather dear people together. However, with the onset of cold weather, the idyll ends - no one wants to sit on a cold veranda. But the situation can be easily corrected - all you need to know is how to properly insulate the veranda. By the way, proper insulation will not only preserve the usual comfort, but will also help protect the corners of the extension from the formation of black spots that occur under the influence of low temperatures.
Content:
- What is the best way to insulate a veranda?
- How to insulate a wooden veranda?
- Tools and building materials
- We insulate the floor
- How to insulate walls?
- How to insulate the ceiling on the veranda?
- How to insulate a summer veranda?
- Features of insulation from the outside
- Veranda: photos of insulated options
- Video: how to insulate a veranda
What is the best way to insulate a veranda?
The range of thermal insulation materials is quite wide, so the selection process remains more relevant than ever. Meanwhile, there are samples that have proven themselves best. These are the ones you should give preference to when purchasing.
The leaders in the number of positive reviews are mineral wool and polystyrene foam. A profitable way to insulate a terrace, and even save a significant amount. To improve the created effect, a foam pad is used. Metallized sheets reflect cold street air and prevent precious heat from escaping. Penofol is a high-tech heat insulator consisting of foamed polyethylene covered with aluminum foil. This material can be used both in tandem with other thermal insulators and alone. Of course, the first option is more effective, because allows you to use the benefits of protective raw materials to the maximum.
How to insulate a wooden veranda?
The problem of how to insulate a cold veranda begins to worry the owners of country cottages with the onset of the first frost. Will you really have to leave the tradition of relaxing on the terrace until spring? Not at all - warm yourself up and continue enjoying life!
Tools and building materials
- insulation (penofol, mineral wool, expanded polystyrene, etc.);
- polystyrene foam (thickness at least 10 cm);
- nails, hammer, nail gauge;
- scissors, hacksaw;
- tape measure, pencil;
- scotch;
- paint, brushes;
- putty knife.
We insulate the floor
If you are thinking about how to insulate a plank veranda, but don’t know where to start, then experts advise that the first step is to protect the floor. Some people mistakenly believe that it is not necessary to insulate floors and that you can limit yourself to just the walls and ceiling, but this opinion does not correspond to reality. If there is no continuous foundation strip, then the question of how to insulate the floor on the veranda takes on a different meaning. Defining.
The seams between the boards are puttied, then painted and punched with penofol on the underside. The inside of the floor can be insulated with polypropylene-based linoleum or felt-based carpet. Arranging a second floor is considered a more complex, but also more reliable method. It is used as a rough version, followed by installation of thermal insulation and finishing coating. The only thing, keep in mind that this will significantly reduce the ceiling height.
How to insulate walls?
How to insulate a veranda from the inside? If this problem is relevant to you, then get ready for the fact that you will have to completely replace the wall cladding. The boards are removed using a nail gun. To prevent the tool from leaving marks, place a piece of cardboard under it. The more carefully you remove the old boards, the easier it will be to install new ones. One of the simplest solutions is to attach insulation with a foil layer (10-15 mm thick) to wooden brackets, and finish the walls with MDF panels on top.
If the walls are brick, then it is necessary to make a sheathing of transverse wooden beams with a section of 25x40 mm. In this case, the insulation used is thicker - 25-30 mm. It must be cut into strips and laid between the beams. There should be no gaps.
The following method is no less popular. After carefully measuring the area, penofol is cut into pieces of the appropriate size. Leave a couple of centimeters at the top and bottom for folding. Cover the walls with material and secure the edges with tape. Next, polystyrene foam is laid on top of the penofol. The panels should fit together as tightly as possible. In narrow, hard-to-reach places you will inevitably need pieces of non-standard shapes and sizes, which can be cut using an ordinary hacksaw.
Nail the trim. If the thickness of the insulation is chosen correctly, then the boards will not bend and “sit” perfectly. The final stage is painting the trim and replacing the ceiling plinth.
Choosing a decking material
The type of wood must be selected taking into account the characteristics of the room. Of course, the financial side is also important; the highest grade of material will cost much more, but if the floor will be covered, for example, with paint, then it is better to choose the second grade. If a varnish coating is provided, then the first grade is required. When the floor is laid in utility rooms, preference can be given to the 3rd floor. Which breed is better to choose:
- Fir, pine and spruce are soft species. Such a coating will not be practical or durable, since even heels leave marks on such a surface. Such flooring is possible if the room has low traffic and if it is treated very carefully.
- Oak is the most durable material, but such flooring is expensive. It can be used in any room.
- Another species is highly durable - this is Siberian larch, it has the peculiarity that the wood contains resins that protect it from rotting, so this flooring is often used in bathhouses.
- And for arranging children's premises, alder or aspen is ideal.
When choosing, you need to pay attention to the moisture content of the wood. If you use wet material, then after some time the flooring will dry out and cracks will begin to appear.
But overdried material can create cracks. The ideal humidity is 12%. You need to carefully inspect the material and do not use defective boards. You need to purchase material with a 15% reserve.
Wood is a very high-quality and durable material, but in order for it to justify itself in operation, it needs to be processed. Now you can buy various antiseptics that will protect wood from rotting, fungi, mold and beetles.