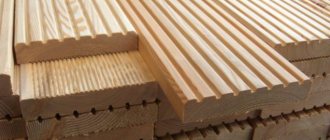
Lining is a type of lumber that is similar to edged wood. The only difference is the presence of longitudinal grooves, which ensure adhesion of the elements without the formation of gaps. Finishing from lining creates a microclimate in the room suitable for relaxation, while its arrangement does not require experience in finishing, as when working with wood. To obtain the expected result, it is enough to follow the step-by-step instructions and select materials in accordance with accepted rules.
Choosing the wood from which the lining is made
Before sheathing the inside of the bathhouse with clapboard, the owner of the room will have to decide on the type of material and wood. First, there are two types to choose from: regular lining and its Euro version. Finishers often prefer eurolining. The reason is the appropriate length of the groove and a wide ridge, which ensures a tighter fit of the elements than when working with ordinary lining. The eurolining is also equipped with holes for ventilation. Their task is to protect the material from the formation of condensation and subsequent deformation. The service life of such lining is many times longer than that of a conventional one, since the highest grade wood is used for its manufacture.
The finishing of the bathhouse with clapboard is carried out taking into account the specifics of the room - high levels of humidity, temperature changes. These factors are taken into account when selecting wood. Species that release resin when heated are not suitable for this, including most coniferous trees.
The following types of wood are suitable for finishing baths:
- Alder. Hygroscopic wood with low thermal conductivity. Used for interior decoration in country houses and baths. In addition to the pleasant aroma, the fumes it produces have a beneficial effect on human health. Medium price material. Sold in pieces up to 3 m in length.
- Oak. This wood is elite and one of the most expensive. Its advantage is that the oak panel does not require additional processing or protective coatings. Oak wood is also considered eternal - the finish will last for decades even with regular use of the steam room, since such wood does not rot. African oak, abash, has similar properties. Its only difference from the usual one is its light brown color and less processing complexity.
- Aspen. The wood is soft and easy to work with. Over time, its strength increases, the material tolerates high humidity and temperature changes without consequences. The only drawback of aspen lining is that over time its surface becomes dull. To return it to its original appearance, you will have to sand the outer surface of the lining with fine-grained sandpaper.
- Linden. The material not only looks beautiful and is easy to process, but also emits beneficial fumes when heated. Therefore, linden is one of the traditional materials for finishing both the dressing room and the steam room. The wood is light, with a reddish or brown tint, does not dry out due to changes in humidity and has its own matte shine. The only drawback is the oxidation of iron when interacting with such lining. Metal parts in the steam room or dressing room will have to be coated with special compounds, or their use will have to be abandoned.
- Cedar. Durable wood in shades from beige to coffee, the color depends on the region where the wood grows. Expensive and resistant to changes in temperature and humidity, it needs to be treated with an antiseptic before use as a finishing material. The disadvantage of cedar lining is the risk that over time the finish will begin to release resin without heating the room.
- Larch. Coniferous wood with antiseptic properties. Lining made from it becomes stronger when used in rooms with high humidity. Lining is in demand, found everywhere, its price is an order of magnitude lower than that of other types of coniferous species suitable for installation in a steam room.
- Hemlock. The second name of the tree is Canadian hemlock. It is resistant to temperature changes and increased humidity, and is also much higher in mechanical strength than pine. Like cedar and linden, it releases essential oils beneficial to human health when the room is heated.
Pine is used with reservation. You have to be careful when finishing the inside of the bathhouse with it - the wood releases resin when heated. This substance stains things and sticks skin to wooden surfaces. Can cause burns if heated too much. Therefore, only the dressing room and dressing room are upholstered with pine clapboard, choosing other types of wood for the steam room.
Methods for attaching panels to walls
Using nails or self-tapping screws is the traditional option for attaching panels to walls. A more modern method is the use of clamps. It does not damage the panels, but requires additional costs of both time and money when installing the lining.
Using nails or screws
This method will require a screwdriver or hammer, as well as special nails or self-tapping screws - galvanized or made of copper alloy. Such fittings are more expensive, but if you save on them and buy ordinary nails, they will begin to rust over time. This will lead to the appearance of red streaks on the lining, which will spoil the appearance of the finish and stain the skin and things when touched. The fasteners are driven or screwed into the lining tenon at an angle of 45 degrees. The fastening points will have to be sanded so that there are no burrs or other defects left. The disadvantage of this method is that holes will have to be created on the planks when fastening them with nails. And when you try to remove the lining, the fastening points will be further damaged, which precludes the reuse of the panels if necessary.
Fastening with clamps
Do-it-yourself installation using clamps is safe for lining strips because it does not damage them. A clamp is a special bracket that is attached to the lower half of the lining groove - a recess into which the tenon of the next plank is inserted. The fastenings of the bracket are covered with the next strip in the row. Fixing the staples to the sheathing beams is carried out with nails or self-tapping screws.
With this installation method, the lining is not damaged, and there are no nail heads or screws left on the outer surface of the cladding, which eliminates the risk of getting burned or getting a rusty drip on your clothes after visiting such a bathhouse.
It is also easier to partially replace the lining mounted in this way - just pull the boards out of the grooves and pull out the fasteners. If you do not work carefully, it will be the staples that are damaged, not the boards.
We recommend reading:
Fiber optic bath lighting
Proper surface preparation
Before starting facing work, it is necessary to prepare the walls, ceiling and floor. They should be isolated from moisture, insulated and ensured strength. Wooden surfaces of the ceiling and walls must be treated with a penetrating primer with an antiseptic additive. If the walls of the sauna are made of bricks or blocks, they are leveled using cement plaster.
Particular attention is paid to the floor surface, since in order to cover it with tiles or to create a plank flooring, it is necessary to have the most even rough base with a small slope angle.
Methods for laying lining
Before choosing a method for laying lining, the first thing repair professionals advise to start with is to assess the humidity in the room. If finishing is needed in a steam room, then you should focus on horizontal placement of the slats. Vertical installation is suitable for a dressing room or sauna. This is due to the fact that the “vertical” method has a number of disadvantages:
- There will not be sufficient air circulation between the foil and the lining; this will lead to the formation of condensation and the development of mold on the inner surface of the trim and the sheathing beams.
- The finishing below will begin to deteriorate from moisture faster than the upper elements. With a horizontal mounting method, it will be enough to replace the lower strips. If you decide to attach the trim vertically, in the future you will have to trim each plank from below to replace the damaged area.
- When gaps form between adjacent elements, moisture will get inside and not flow down, as happens when installed horizontally.
The vertical method of attaching planks takes less time, so it is more often used by hired craftsmen. Also, the vertical placement of the lining does not make the room visually lower. Most often, to combine practicality and convenience, two installation methods are used simultaneously. In this case, the lower section of the walls is trimmed with horizontal planks so that, if necessary, they can be easily replaced. And the upper half of the wall is sheathed with vertically arranged boards.
Covering depending on the material of the bath
Covering the bathhouse with clapboard, as well as attaching foil in the steam room, was invented primarily for the purpose of preserving heat inside the room. Additional thermal insulation can be placed under the lining, and the film reflects up to 95% of the heat back into the room, creating the effect of a thermos and reducing the cost of heating a bathhouse or sauna. In order to properly sheathe a bathhouse to solve practical problems, and not to give the room an attractive appearance, you will have to take into account the material from which the structure is made. Some baths do not require additional insulation, others are more capricious and are subject to increased moisture formation. For long-term service of the steam room, you will have to take into account all its features.
Is there a difference between a bathhouse and a sauna?
In a Russian bath, the temperature is maintained below 100 degrees, but the air humidity reaches 70%. The Finnish version of the steam room, the sauna, is characterized by dry air, but at the same time its increased temperature. Therefore, it is allowed to use the vertical method of laying lining in the sauna, but you should avoid using coniferous wood in the finishing. The Russian bathhouse is less capricious in the choice of material, but requires more careful installation of the finishing - horizontally with the possibility of replacing several planks if necessary.
Finishing a brick or block bath
Such a bathhouse is sheathed from the inside not only to give it the appropriate style, but also for the purpose of additional insulation, as well as to comply with the requirements of the law on silence. First, they install the sheathing, between the rods of which insulation is laid - mineral wool or ecowool. After this, the foil is installed on top and a counter-lattice is made. The lining is attached to the slats of the latter.
It is advisable to cover such a bathhouse with clapboards on the outside, but such finishing is carried out at the request of the owner. If you make external cladding and place insulation underneath it, you won’t have to lay mineral wool on the inside - just install a vapor barrier, a counter-lattice and secure the lining to the walls and ceiling.
Frame building
The walls in such a bath are made in the form of a “sandwich” of two boards or panels, between which insulation is placed. If the thickness and material of the insulation are selected correctly, additional thermal insulation for such a bath will not be required. In this case, it is enough to install the sheathing, attach the foil to it, mount the counter-lattice and install the lining panels.
If the thermal insulation of a frame bath is poor, you will have to additionally cover it with insulation either outside or inside under the lining. In the future, you have to foil and decorate the bathhouse according to the generally accepted algorithm.
Do you need cladding for a wooden bath?
A bathhouse made of wood does not need additional cladding, because initially it contains the most suitable material for such a room, and the appearance is preserved as traditional as possible. The exception is situations when the owner of a wooden bathhouse did not calculate the thickness of the walls and the room turned out to be too cold. A wooden bathhouse will also have to be lined with clapboard if you plan to lay foil in order to create a “thermos” in the steam room and reduce heating costs.
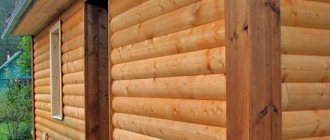
What to do with a log house
The expediency of finishing a log house is similar to a bathhouse made of boards. But in a log house it is more difficult to install sheathing and lay insulation due to the unevenness of the walls. Even before foiling or finishing such a bathhouse, you will have to carefully caulk it and seal all the cracks.
Inspection of the main elements of the structure
Repairing a bathhouse without a preliminary assessment of the condition is unacceptable. Therefore, first visually check the main components and structures of the building. During the inspection, existing problems and malfunctions are identified. Based on these data, a method for eliminating them is chosen and the amount of material required is determined. Inspect the bathhouse in this order:
- External walls. Cracks and crevices are identified, the integrity of external corners and related elements is assessed, the presence of thermal insulation material, its condition and the quality of installation are checked.
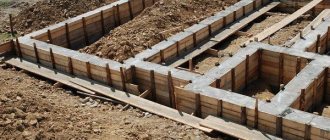
- Foundation. Determine its integrity and subsidence on the ground.
- Roof and ceiling. Assess the condition of the structure. During the ceiling inspection, the stove and chimney are inspected.
- Doors and windows. Determine the condition of the frame, its location relative to the level (horizontalness) and the tightness of the opening.
- Internal walls and cladding. Detect the presence of mold, mildew, and traces of soot. Assess the general condition of the facing and thermal insulation material, vapor barrier.
- Floor. The floorboards are dismantled and the technical condition of the supporting structure of the floor, materials and insulation, and drainage system are checked.
One problem entails damage to several structural units of the building at once. Repairs need to be comprehensive, and an audit will help you understand where to start.
Bathhouse repair always begins with an inspection and identification of current problems.
Step-by-step guide to covering a bathhouse with film and clapboard
Sheathing begins with calculating the amount of materials and choosing one of them. Aluminum foil is used as a vapor barrier and heat repellent. This material is not recommended for use in residential premises, as it emits substances that are unsafe for humans in large quantities. But people visit a bathhouse or sauna for several hours and not every day. Therefore, there will be no harm from such finishing. In addition, the foil section will be hidden in the wall by the final finishing - clapboard.
The creation of sheathing and installation of heat insulation begins after the installation of all communications and ventilation is completely completed.
The lining is chosen with a thickness of 12.5 mm, a working width of about ten cm. The length of the panel ranges from 2 to 6 m, depending on the width of the wall. Or its height if vertical laying of panels is planned.
Initially, a sheathing is created, insulation is laid and a vapor barrier is installed. After this, holes are cut in the insulation opposite the ventilation windows. Upon completion of these manipulations, they proceed to laying the lining in the chosen method.
We recommend reading:
Why and how to make a good vapor barrier for a roof?
Protection from moisture and heat loss
Before finishing the room, it will have to be protected from condensation and heat loss. For this:
- Film waterproofing is installed or a special composition with similar properties is applied to the wall. The vapor barrier film is fixed using nails on wooden walls or slats on stone and brick walls.
- Install the timber sheathing. The pitch between the axes should be equal to the size of the piece of heat-insulating material. The height should be equal to the thickness of the insulation.
- Place the insulation in the recesses of the sheathing with an overlap of 1 cm.
- Foil is attached to the lathing slats. Its pieces are placed overlapping, the joints are taped with aluminum tape. To fix the film, they often choose either small nails or a construction stapler.
- A counter-lattice is attached over the lathing slats and the foil fixed on them. It follows the contours of the first sheathing and creates a gap between the foil and the finishing.
At this stage, the main thing is not to confuse the aluminum film with the vapor barrier foil, which protects the insulation from the formation of condensation on the wall of the building. If you neglect this step, the insulation will become damp due to contact with cold air from outside after the walls freeze. A damp insulator will become a breeding ground for mold and harmful bacteria.
Ventilation
After installing the insulation, ventilation holes are cut in it according to the size of the ventilation windows existing in the room. Initially, it is recommended to make one hole under the ceiling of the bathhouse, and another one at the bottom. This approach ensures better air circulation and rapid removal of excess moisture after bath procedures. It is best to force air circulation in the bathhouse, that is, install not only a shaft, but also a fan on it to blow through the rooms.
Creating a sheathing
Lathing over the foil should not damage the film. Therefore, it is advisable to clean the slats in advance from burrs and knots, and also to file the corners on them at 45 degrees. When installing the lathing in a steam room or dressing room, you will have to follow a number of rules:
- The batten should not reach another wall or ceiling. Otherwise, when heated, the wood will expand, which will lead to swelling of the entire counter-lattice mesh.
- Installation of the sheathing is carried out level, if thermal insulation has not been completed before. When using insulation, a level is not needed - the bottom sheathing is already installed in compliance with the geometry of the room.
- When installing the sheathing on the ceiling, you can use hangers - metal pins that are fixed to the ceiling. Their use makes it possible to artificially lower the ceiling in the bathhouse and reduce the cost of heating the room during operation. Suspensions are also installed by level; due to the specifics of the room, you need to choose those that are not susceptible to rust - aluminum, galvanized, etc.
- The optimal lathing pitch is 50 cm, this distance is enough to fix the lining. If the previous sheathing is wider than the required distance, you will have to add additional strips. In this case, they will have to be fixed only in the corners to the previous sheathing, and not to the insulation.
- For fastening the counter-lattice, self-tapping screws or stainless steel nails 9-10 cm long are best suited. Drive them in so that the heads are flush with the board. If you ignore this step, you won’t be able to lay the lining evenly because the caps will get in the way.
It is better to drive the fasteners at an angle from top to bottom, and not perpendicular to the wall. This approach ensures that the wood remains in place even as it expands due to heat.
Fastening the lining
Before attaching to the walls and ceiling, the lining panels will need to be properly processed. Preparation includes:
- Trimming the lining to the required size. Initially, the panel length is up to 6 m; few people will need such a large panel even with horizontal installation. The planks are cut with a jigsaw, the edges are polished so that there are no burrs or nicks.
- Drilling holes for self-tapping screws or fixing clamps. During installation, this will be more difficult to do, since you will have to be distracted by processing each panel, rather than installing them on the walls using the designer’s method.
After preparation is completed, the lining is laid in the chosen method. In this case, you will have to follow a number of rules:
- The gap to the floor should be about 2 cm. When fixing the lining to the ceiling, you need the same distance from the walls.
- You will have to cut off the ridge from the first plank, which is inserted into the groove. With the cut section, it is turned towards the nearest wall, the installation of the next plank is carried out in the groove of the first. The first plank is fixed against the wall with self-tapping screws, regardless of the chosen method of fastening.
- When using clamps and fixing them to the sheathing with mounting brackets, they must be driven in at an angle.
- The groove and that part of the main width that prevents the insertion of the lining into the space remaining between the adjacent plank and the wall are cut off from the final plank.
For better fixation when working, you can use a wooden or rubber mallet. The blows of this tool will ensure better adhesion of the panels to the sheathing, but will not damage the lining, unlike metal products.
Useful tips
The cheapest pine wood can be used to build a dressing room, a relaxation room, but not a steam room.
Finishing with wooden clapboard is expensive; to reduce costs, experts give some advice:
- Use slats of short length (up to 1.5 m), which are cheaper, connecting them on a joining strip.
- Hardwood boards should be installed only in the steam room; the remaining rooms should be sheathed with budget-priced softwood lumber.
- Combine types of lining in a steam room, where the quality of the material is important, install extra-class slats, and use class B in other rooms.
- Perform hidden fastening of the lining by driving a nail at an angle of 45° into the groove or tenon. This will prevent metal contact with water and slow down corrosion processes.
- Insulation during the construction phase seems like an extra expense, but it will quickly pay for itself thanks to fuel savings.
A step-by-step plan will allow you to complete all the work yourself.
Additional protection - special compounds and impregnations
Wood is a pleasant-smelling, natural material, which, in addition, gives the bathhouse the appropriate atmosphere of a rustic steam room. Using wood clapboard simplifies the procedure for finishing a bathhouse, and also saves material and costs - covering the walls and ceiling with clapboard will ultimately be cheaper than making a bathhouse from wood or covering it with untreated boards. But the finished finish has a significant drawback - without treatment with waterproofing compounds it will not last long: moisture passes through the connecting seams, settles in the grooves, reaches the vapor barrier material, accumulates on it and provokes the development of mold. To avoid this, you will have to treat the walls, floor and ceiling after finishing with a waterproofing solution.
Protective impregnation will extend the service life of both the finish and the bath itself. The main thing when applying it is to read the manufacturer’s instructions on the packaging and act in accordance with the algorithms specified therein. The safest and most effective waterproofing agents for baths are those containing wax. Water-based impregnations can also be used.
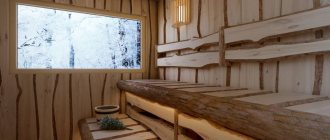
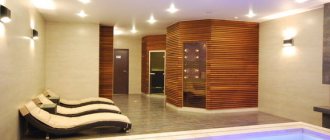
Decorating the rest room
The bathhouse is always perceived as a place of relaxation from everyday worries. Each room in it is intended for its own purposes. The name of the relaxation room speaks for itself: this is where you relax after water treatments. Therefore, it is important to create a cozy and relaxing environment in it.
Proper finishing of a relaxation room in a bathhouse is not an easy task, the implementation of which can be entrusted to specialists: designers and artists.
A cozy environment is created through the correct choice of facing materials, furniture, accessories, organization of lighting and illumination of various zones and architectural elements of the room.