A Russian steam room is a structure that is intended for health-improving procedures that help relax the soul and body.
An important functional element of the steam room is the shelf - a special wooden flooring.
A modern bathhouse shelf can be made with your own hands in accordance with the operational features of the room and the individual preferences of the bathhouse owner.
How to make shelves
Before purchasing material, it is recommended to make a drawing or sketch of the future design. It is not necessary to draw all the nodes on it, since such products are extremely simple to manufacture. But it is advisable to put down the dimensions in order to calculate the number of boards, bars and necessary fasteners.
How to make shelves in a bathhouse with your own hands: design diagram with dimensions Source mebel-expert.info
Material calculation
The lumber needed to make this simplest structure is timber for the frame and edged boards for the flooring:
- Support posts and crossbars are made from bars or thick boards. Their number depends on the size of the frame and the cross-section of the bars. A cross-section of 50x50 or 50x80 mm is considered sufficient, with a maximum of 100x100 mm. There is no point in taking thicker bars. The smaller the cross-section, the more often support posts should be installed to distribute the load evenly. For example, the step between supports of 50x50 mm should be 60 cm. It can be increased by 1.5-2 times when using more massive lumber. Knowing the height and depth of each shelf, it will not be difficult to calculate the moldings from the drawing.
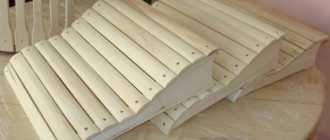
- The boards laid on the frame must have a thickness of at least 25 mm after final sanding. And their width should be no more than 4 times their thickness. That is, the thicker the board, the wider it can be. The quantity is calculated taking into account the gap between adjacent boards, which is necessary for better ventilation and quick drying. Its standard size is 1-2 cm between adjacent flooring elements and between its inner edge and the wall.
The flooring for the bed is made sparse Source art-rybakow.ru
See also: Catalog of companies that specialize in the construction of baths
Before making shelves and benches in the bathhouse, make sure that the lumber does not have defects in the form of deep cracks, through knots and signs of rotting. It must be thoroughly sanded, getting rid of all burrs and roughness.
The fasteners will require galvanized self-tapping screws and steel corners to securely fix the frame elements. If the flooring is supposed to be folding, then you need to take care of stainless steel hinges.
Frame installation
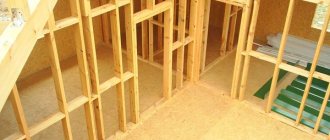
The frame begins to be assembled from the upper tier adjacent to the wall. Why cut off the required number of racks of the estimated height and transverse lintels, the length of which is equal to the depth of the shelf.
Let's tell you in more detail how to make shelves in a bathhouse with your own hands: a step-by-step guide will make the work easier:
- Strapping bars are attached to the walls along the inner perimeter of the shelf at a given height.
- Support bars are installed under the harness: at the extreme points and intermediate ones.
- Opposite them, a second row of supports is placed and secured to the first by horizontal jumpers.
- Then the supports of the second row are connected by jumpers to each other. They form the outer trim.
- The lower tier harness is attached to the outer supports and the whole process is repeated.
Manufacturing
To make shelves of the required size for a suitable number of people, you should prepare the necessary tools and materials. To work you will need:
- wooden boards from the selected wood species;
- wooden beam;
- stand boards for fastening the structure;
- self-tapping screws;
- corner;
- nails.
At the initial stage, the instructions provide for assembling a frame for future shelves.
Assembling the frame base and installing the flooring
The wooden frame base is assembled from 10 prepared beams with a cross-section of 5 × 7 cm and 5 rack boards for attaching shelves. The beams for the frame are mounted vertically and fastened horizontally to each other using strapping. Fixation to the racks is carried out using a paired connecting element.
To provide additional strength, the structure is additionally mounted to the wall surface.
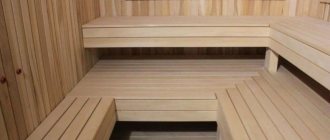
Smooth boards pre-treated with an antiseptic are used as flooring. Installation of boards is carried out in compliance with the technological gap between them of 6 mm. For the lower shelf, 3 boards are used, for the upper bench - 7.
Next, the flooring is installed on the prepared frame with fixation using self-tapping screws, which must be recessed 5 mm deep into the wood. The fastening elements are driven in from the reverse side of the shelves. The boards are laid with a gap at a slight inclination of 2 degrees.
Fixation of the structure
The shelves are fixed to the wall while maintaining a gap of 11 cm. The bottom shelf has a movable structure mounted on special mechanisms - runners, which simplifies the process of cleaning the steam room.
The photo shows a step-by-step algorithm.
In places where the wooden frame of the shelves comes into contact with the floor surface, special rubber gaskets are installed for additional waterproofing.
Video description
An example of the frame of an L-shaped shelf is shown in the video:
The frame can be assembled on steel corners, but a more reliable connection is considered to be cutting into half a tree, when a step is cut out at the end of each part, and they are connected to each other by the resulting ledges.
Advice! To reduce the effect of moisture on the racks, rubber gaskets are placed under them or plastic heels are attached to the lower end.
It is very important to use a building level during the manufacture of the frame, periodically checking the correct installation. All racks must be installed strictly vertically, and the lintels must lie in the same horizontal plane, otherwise it will be difficult to lay the flooring boards flat when covering them. And when fastened with force, internal stress will arise in them, which over time can lead to the formation of cracks.
Manufacturing of flooring and backrest
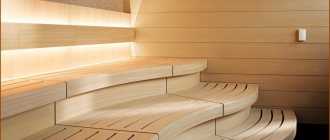
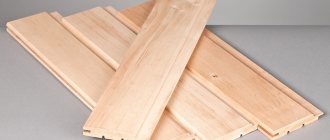
The question is often asked: how to properly make shelves in a bathhouse with your own hands - placing the flooring boards parallel to the wall or in the transverse direction? It doesn’t matter; they can even be mounted diagonally, if that is the design idea. The main thing is to carefully process and polish the ends and round all corners to minimize the possibility of injury and discomfort.
Shelves with cross deck Source www.saunainter.com
Method of assembling a retractable structure
Separately, it is worth dwelling on the technology of assembling the retractable system. To do this, beams are mounted on the end walls. On them and on the side parts of the couch, axles are fixed from the inside, onto which wooden planks-levers are put on. It is advisable to cut the corners on these slats so that the mechanism moves smoothly.
The thickness of the bars in the end parts of the sunbed frame and on the walls should be equal. To securely fix the levers on the axles and allow them to move without play, wooden washers are put on them.
This design allows you to move the shelves only 0.8 times the length of the wooden arms. They serve as a support for the bed when extended or retracted.
A similar mechanism is provided for steam rooms in which the size of the shelves in the sauna matches the length of the wall.
Video description
The following video tells how to make shelves in a bathhouse with your own hands: a step-by-step description of all stages:
For vertical cladding, you can take lumber of a smaller thickness, since they will not experience a heavy load.
All upholstery elements, including the lounger itself, backrests and decorative details, are recommended to be made from wood of the same species, which reacts equally to all changes in the environment.
Protective treatment
Protective treatment with antiseptic compounds will help extend the service life of the shelf and maintain its original fresh appearance for a long time. It is especially necessary if the steam room does not have a ventilation system or the shelf design is closed.
When purchasing a protective composition, you need to make sure that it is intended specifically for use in saunas and baths, since all other products can release toxic substances when the temperature rises. Varnishes, paints, drying oils, solvent-based impregnations and various wood bleaches are not suitable for this purpose.
If desired, you can look for a tinting impregnation to change the shade of the wood, giving it a more noble look. Or tint only the decorative elements and cover the main structure with a colorless compound.
An example of using tinting compositions Source vodabereg.ru
Bathhouse sizes depending on the number of guests
Mini-steam room size chart
Everyone sees relaxation in a sauna in their own way: for some, bathing procedures are relevant only in complete solitude, for others, going to the sauna necessarily means several hours in a large group of friends. The size of the sauna and other bath rooms may also depend on this. First of all, you need to determine the number of people who can be in the steam room at the same time.
For one person, the minimum area in the steam room is 1.5 by 1.2 meters, excluding the size of the oven. In this case, the steam room has one shelf attached to the floor or directly to the wall. Wall-mounted ones are considered the best, because in a small steam room the owner tries to save space as much as possible. With this fastening, a place is created under the shelf in which you can store various bath items.
If the bathhouse is designed for simultaneous visits by two or more people, its size should accordingly be larger. Shelves need to be placed there so that each guest feels as comfortable as possible. Avoid so-called “inconvenient places” so as not to offend anyone. If several people visit the steam room at the same time, you need to provide more shelves. They can be placed at the same or at different heights. The steam room will be more spacious if the shelves are placed under the walls at the same level. But in this case, the area of the room increases, and it will take longer to warm it up. Therefore, it is better to install the shelves in steps, maintaining a standard distance of 35-40 cm between them. There should be at least one meter from the ceiling to the highest shelf so that it is convenient to get up from it.
The optimal height of the steam room is from 2 to 2.5 meters. If you make them higher, the steam room will take too long to warm up, and all the steam will concentrate closer to the ceiling. In the case of low ceilings, steam, on the contrary, will very quickly leave the room through the ventilation
When arranging a bathhouse for several people, the first parameter that you need to pay attention to is the steam room. And you can build on it and think about the area of other rooms
Even for a large group, there are no special requirements for the shower, toilet and dressing room of the sauna. They can be made minimal in size, because it is unlikely that several people will be there at the same time. But the dimensions of a relaxation room or room with a swimming pool should be more impressive if several people are planning to relax in them.
The area of the pool room also depends on the type of pool you plan to install: spa, mobile or stationary. A small room with an area of 6-8 square meters is quite suitable for installing a mobile or spa pool. Much more free space will be required to equip a stationary pool.
How to care for shelves
Despite the fact that making shelves does not require serious financial investments and labor costs, any bathhouse owner does not want to redo them every few years due to loss of appearance, mold or other problems. Simple rules for caring for bath furniture will help you avoid them:
- Each time after completing the bath procedures, the steam room must be ventilated by opening the door and window, if any.
- To speed up the drying of the shelves, wipe them with a dry cloth that absorbs water well.
- During drying, all water from containers must be poured out or closed with lids.
- Things remaining on the surface should be removed, and traces of dirt and soapy compounds should be washed off. You cannot use abrasive or chemically aggressive products for this.
Regular cleaning and ventilation are required to extend the life of bath furniture Source scontent-cdg2-1.cdninstagram.com
In general, the interior of the bathhouse should be kept clean and dry, periodically carrying out general cleaning. It is better to make the beds of the shelves in the steam room removable, and in hot weather take them out to dry in the sun.
Wood selection
In conditions of high temperature and high air humidity, which are typical for a steam room, it is recommended to use special types of wood for arranging shelves. They must meet the following requirements:
- high resistance to fire, temperature changes and humidity;
- good density of the fibrous base;
- low thermal conductivity;
- insignificant content of resinous compounds.
Often linden, aspen, abashi are used to make shelves, and rarely poplar or birch.
These tree species have good performance characteristics, durability and wear resistance.
It is not recommended to use coniferous trees to make bath furniture.
Aspen
This is one of the best natural materials, which is used to make furniture in the bathhouse, in particular, shelves. It has medicinal properties, is relatively cheap and practical to use.
Aspen purifies the air quite well, neutralizes negative energy, and restores strength. For this reason, aspen shelves are simple, affordable and durable.
The only hidden drawback of the material is the predisposition to internal rotting of the fibers, so you need to choose wood especially carefully.
Linden
Excellent material for making bath shelves and tables. It has many advantages - it is easy to process, has an attractive appearance, is resistant to stains, rotting and cracking, durable, and affordable.
When heated, wood emits a delicate and pleasant odor, which has a beneficial effect on the respiratory system. The disadvantage is the tendency to darken during prolonged use in damp areas.
Abashi (African oak)
This is a unique material that has high strength, inertness to overheating and mechanical damage. Abashi heats up quite slowly, which completely prevents burns at high temperatures.
The wood is available in dark and light colors and excellently retains its performance characteristics throughout the entire period of use.
The disadvantage of abasha is its high cost and the complexity of initial processing.
What to make better from: choosing the material
What is better to make? It is clear that it is made from wood, to which, in fact, there is no alternative, but which species are most suitable? We have already written about this, so now it will be very brief.
Coniferous species should absolutely not be used in a sauna where temperatures are high, in a Russian bath - if desired, and in mixed modes it is also not worth using at all.
Cheap aspen and linden are worthy competitors of expensive abasha , because in addition to low thermal conductivity, it is not highly resistant to water, mushrooms, etc.
You can experiment with other hardwoods, taking into account their thermal conductivity (the higher the density, the higher the thermal conductivity - the easiest way to decide by eye), rot resistance and other characteristics. For example, oak is dense, but does not deteriorate in water. Like larch, which, by the way, does not emit resin.
Features of the steam room and furniture for it
Everyone knows that the smaller the steam room, the warmer it will be. Current heating costs will be lower, since a small room will need to produce less steam. Therefore, for a good arrangement of the steam room, simple and simply even furniture is always useful. Often, ladders to climb onto shelves have several steps at once. It's convenient and simple.
If the room for the steam room also allows you to create a separate area for a sofa and a chaise lounge, then you can easily recreate this yourself. A small sofa with a rounded shape will look attractive.
Care instructions
Adviсe:
- The bathhouse must have a good ventilation system so that after the procedures the surfaces dry quickly.
- After visiting the steam room, the surfaces should be wiped with a dry cloth.
- Do not use chemicals to clean wooden surfaces. It is better to choose laundry soap.
- You can clean the wood from dirt with a soft brush. If stains remain, you need to use fine sandpaper, but after this treatment the surfaces must be coated with an antiseptic.
- Every month it is necessary to renew the antiseptic layer.
- If fungus or mold appears on the tree, it is necessary to dismantle the affected part and replace it with a new one.
It is impossible to imagine a classic steam room of a Russian bath or Finnish sauna without wide shelves. They are needed for visitors to sit or lie down when visiting the steam room. Before making your own canopy, you need to select the material and size of the structure.
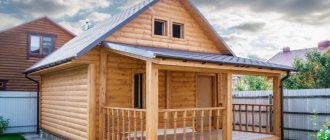
Ideal sauna for a summer residence with a relaxation room
The steam room has a compact metal stove. A brick heater is excluded, otherwise you will have to combine a steam room with a shower due to lack of space.
The outer part of the firebox opens into the dressing room.
There are layouts for a one-story bathhouse or with an attic. In the first case, the rest room is harmoniously combined with a locker room (average dimensions - 2 * 4 m). If the bathhouse has an attic, then there is space below for a dressing room and a staircase that leads to the second floor, and bathhouses, and a full-fledged recreation room is moved to the attic.
It is permissible to attach a terrace to the bathhouse for outdoor recreation or to make it with panoramic glazing for year-round recreation.
The flooring in the bathhouse should not be slippery, so tiles without a smooth glossy finish are chosen for finishing, or the floor is made of planks, anti-slip rubber mats and wooden grates are laid.
The remote heating of the stove in the rest room will add a cozy atmosphere, especially on cold winter evenings. Near 1.5 m from the firebox, the floor is covered with non-combustible material (stone, sheet of metal).
A classic Russian bath implies the presence of a large reservoir with cold water for dousing and a contrast shower. In small buildings it is placed directly in the steam room.
For interior decoration of bath rooms, lining remains the most popular option. It covers the walls and ceiling. Wood fits perfectly into country (rustic) and chalet styles.
A more expensive interior design option is a stone floor. Typically, this finish is combined with a neat solid oak table, a leather sofa and armchairs. The walls are covered with block house or clapboard.
A beautifully decorated veranda will become a cozy corner for relaxation after bath procedures.
If you can’t do the layout of the premises yourself, problems arise with calculations, you can use a free construction calculator or order a consultation from a construction company.
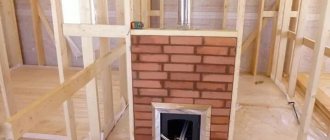
Furnace installation
The stove in the steam room can be installed in iron, brick or electric. The location for it should be chosen at the bathhouse design stage. The furnace firebox can be located both inside the steam room and outside it.
Installation procedure in a steam iron stove:
install the stove on a pre-prepared base;
Base for installing the furnace
Furnace foundation - photo
they line it with bricks along the walls and inside the partition;
Brick is laid between the walls of the furnace and the timber, the cracks are sealed with basalt cardboard
The walls near the stove are protected with refractory bricks
a metal passage for the chimney is installed in the opening on the ceiling;
Installed ceiling trim
a pipe and damper are installed on the stove, a tank is connected and a double-walled chimney is brought out through the ceiling, insulating it with non-combustible material;
Ceiling trim is fully insulated
a metal sheet with a hole through which the pipe passes is fixed on the roof.
Chimney passage through the roof
Installation of an electric heater
The electric oven is installed on a pre-prepared platform or hung on the wall using special brackets. It does not require installation of a chimney.
It is imperative to observe the distances specified in the instructions from the oven to the walls and shelves.
Brick oven
The brick oven is laid out at the stage of construction of the bathhouse.
Only that part of it that will contain the stones should go into the steam room. It is best to place the firebox in the dressing room or outside.