Experienced builders know that the strength of the foundation under the walls of the house directly depends on the correctly chosen design of the reinforcing frame to create a strip foundation, and the correct installation. In this design, all the, so to speak, “responsibilities” of its constituent elements are clearly distributed. Thus, the reinforcement takes on deforming linear stresses that arise not only from the weight of the walls, but also from temperature changes, and the concrete part of the structure prevents its compression. Thus, together these materials create reliable support for the walls.
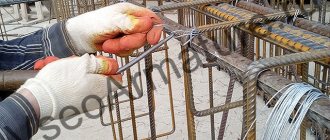
Knitting reinforcement for a strip foundation
Tying reinforcement under a strip foundation is the best option for fastening the metal “backbone” of a reinforced concrete structure. Such a connection, while maintaining the given linear and spatial forms of the frame, nevertheless leaves the opportunity to somewhat “balance” when the concrete hardens and gains its grade strength, taking the optimal position when exposed to emerging loads. If you make the skeleton of the foundation rigid, that is, fasten the reinforcement by welding, then even with slight shrinkage of the soil or under pressure from the walls of the house, the concrete part of the structure may begin to collapse, since when the solution hardened, the optimal shift of the frame parts did not occur and in a seemingly strong monolithic the slab retains significant internal stresses.
Strip foundation in private construction: features and limitations
The basis of the strip foundation is concrete. This material was widely used as a basis for the construction of buildings back in Ancient Rome. And only 200 years ago they figured out how to increase its strength using a frame made of steel rods. A new building material, reinforced concrete, combined the advantageous characteristics of metal and concrete and made it possible to build impressive structures. The process of placing a metal frame in concrete began to be called reinforcement.
When a country house is being designed, a strip foundation is most often chosen as the basis for it. The preparation of a strip base (like any other) takes 25-30% of the construction cost; the reason for its demand is a successful combination of qualities:
- Simple in design.
- Suitable for projects with basements (unlike the pile-screw analogue) and heavy floors (reinforced concrete, monolithic).
- Does not require the use of special equipment.
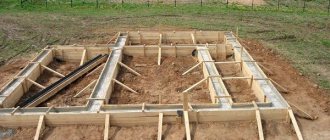
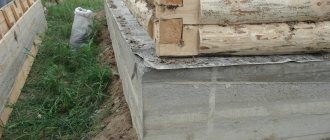
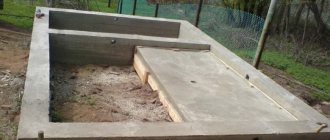
Strip foundation in formwork Source profundamenti.ru
Despite its wide distribution, strip foundation also has limitations in use:
- Beneficial only on dry and rocky soils.
- Not suitable for installation on problematic (wet, heaving, peaty) soil; it will have to be poured to great depth, which is unprofitable.
The shape of the strip foundation is determined by the layout; it has a closed shape and is laid along the entire perimeter of the house, under load-bearing walls and internal partitions.
Making your own hook
Despite the low cost of a crochet hook for reinforcement, some experienced craftsmen who have worked with reinforcement for many years prefer to use homemade ones rather than purchased ones. This has its advantages.
- When making it yourself, you can give the handle the optimal shape so that it fits comfortably in your hand. Your hand will get less tired and your productivity will increase.
- The choice of steel for production; you often come across factory hooks made of soft metal. As a result, it cannot withstand the load and bends.
- Make a hook for crocheting reinforcement of the required size. There are times when it is impossible to get to the place of tying with a factory hook because of its length.
- Small, but still savings (if materials and tools are available).
Electrode hook
An electrode hook is suitable for small amounts of work. When it is necessary to tie a small frame from reinforcement.
Making a hook with your own hands takes only 5 minutes. You will need: electrode 4, pliers and a grinder (if not, you can do without it).
Let's look at how to do it step by step:
- We beat the electrode off the protective coating.
- We retreat 1-2 centimeters from the edge and bend it at 80-90 degrees.
- We retreat 3-4 centimeters from the other edge, make the first bend at 90 degrees. We retreat another 10-12 centimeters, and make a second bend at 90 degrees. We retreat another 4-5 centimeters and make a third bend.
- Let's sharpen the tip of the hook a little so that the wire can peel off better.
The hook is ready, it should have the same shape as in the drawing below.
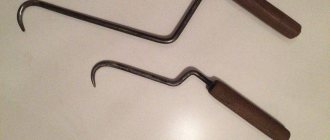
Homemade hook made from rebar with a wooden handle
A homemade hook is most often used by professional reinforcers, thanks to the advantages described above. Its production will take about 2 hours, and the result will be a hook that is in no way inferior to the factory one.
To make a hook you will need the following materials and tools:
- Corrugated fittings 8-10 in diameter, 35-50 centimeters long;
- wooden blank for handle;
- 2 washers - the diameter is equal to the hook handle;
- 2 nuts;
- pliers, knife or hatchet;
- grinders and welding;
- drill with drill 8-10 diameter;
- sandpaper.
Manufacturing procedure:
We grind the ribs of the reinforcement on a grinder so that it becomes smooth. We take a corrugated one, not a smooth one, since a higher grade of steel is used for its production, the hook will be stronger. Let's prepare the pen. Using a drill, a drill of a suitable diameter, drill a hole in the center of the workpiece. Afterwards, if necessary, we adjust it to the required size using a knife or hatchet. At the same time, make sure that the hole is in the center of the handle. Next, sand the handle until smooth with sandpaper. We put a nut on the edge of the reinforcement and weld it by welding. Put a washer on top of the nut, then put on the handle, then the washer and nut again
It is important that there is a small gap between the washers and the handle so that the hook handle can rotate well. To do this, place a piece of paper folded a couple of times between them.
Then weld the second nut. Be sure to place water near you so that if the pen catches fire, you can immediately extinguish it. Now we will sharpen the edge of the reinforcement with a grinder, do not overdo it so that it does not turn out too thin, otherwise the crochet hook will bend. We retreat 1-2 cm from the edge of the handle and make a bend at 90-140 degrees (it all depends on the chosen type of hook, see examples of bends in the picture below). We retreat 1-2 centimeters from the edge of the reinforcement and bend the tip of the hook with pliers at 80-100 degrees. Make sure that the bends are in the same plane. To increase the service life of the handle, we cover it with impregnation for wood against rotting and moisture in 2 layers. After drying, coat it with wood varnish. The hook is ready, all that remains is to make a couple of ties for testing; if it fits well, then you don’t need to bend anything, otherwise you can bend it a little to fit your hand.
Photos of handmade hooks for tying reinforcement
We recommend watching the video instructions for one of the options for making a crochet hook with your own hands.
That's all. Now you have not only learned about knitting devices, but also learned how to make a hook for tying reinforcement with your own hands and can easily cope with this task.
Prerequisites: why reinforcement is needed
The foundation is created in order to withstand the load of the structure; It works best with evenly applied pressure. But in practice, the load is too often uneven and internal stresses arise in the foundation. The reason may be both changes in the soil and design miscalculations (unequal weight of individual parts of the structure).
Design errors will definitely become noticeable Source homeklondike.site
Concrete has excellent resistance to axial compression and weak resistance to tension. Reinforcing bars have natural plasticity and compensate for the lack of concrete. The latter, in turn, protects the metal from corrosion.
During operation, concrete (which resists compression) and metal (tension) are able to most effectively resist multidirectional loads, protecting the structure from destruction. Correctly carried out reinforcement not only increases strength, but is also a means of saving: it allows you to reduce the cost of concrete (reduce the massiveness of the foundation).
Plastic clamps for fittings.
When constructing reinforcing mesh, another type of clamp is used - plastic. They are used to fix composite casting mesh, or fasten iron rods to plastic ones.
Their role is reduced to quickly linking various reinforcement elements, transverse and longitudinal conductors. They replace fixing tying wire and welding. It is not their task to create strong connections; the main thing is to keep the frame motionless while the solution is pouring and hardening.
You can learn more about plastic fittings in a separate article: plastic fittings - types, characteristics, use.
Clamps significantly speed up the work process and facilitate the work of the knitter, allowing a non-professional to cope with the work. However, their use has its disadvantages:
- plastic becomes brittle at subzero temperatures and may not withstand night frosts;
- such structures cannot be carried, much less dropped;
- do not step on reinforcement tied with plastic clamps;
- during concrete pouring, fixation may be hidden;
- purchasing a large number of units of this product will require additional financial costs;
- if you need to adjust the position of the reinforcing mesh, you will have to cut through the plastic clamps, since most of them are one-piece.
You can watch this video to see how to properly use tie-down clamps:
Plastic clamps consist of a head with a toothed lock and a tail with sawtooth notches. Once you insert the tail into the lock, its reverse movement will no longer be possible. You just need to tighten it tighter for a tight fit.
Its other name is cable tie. For construction purposes, ties whose length varies from 120 to 150 mm are suitable; shorter or longer elements are not needed.
They vary in width, and therefore in the load they can withstand. High-quality clamps are made of nylon and can withstand significant tension: with a width of 10 mm, the breaking force is 200 kilograms.
There are reusable models with a pop-up lock; they can be removed when you need to make adjustments to the configuration of the reinforcing cores.
Recently, models with a stainless steel lock and a steel band have appeared on the market. They do not have all the disadvantages of plastic clamps, but are more expensive and can increase construction costs.
Reinforcement requirements
The strip foundation is laid with a margin of safety; it must be resistant to external factors (mechanical and climatic). How to correctly knit reinforcement for a strip foundation is described in the provisions of SNiP 52-01-2003, which contain detailed requirements for design and materials. There are a number of requirements for fittings:
- The placement of the reinforcement cage should not interfere with the correct technological pouring of concrete.
- The reinforcement is installed with a given design step.
Calculation of the spacing of clamps when reinforcing a corner Source ep2nnov.ru
- At frame intersections, floating (movable) connections of rods are not allowed using any connection method.
- It is necessary to create a protective anti-corrosion layer for the structure.
- Replacing the type of load-bearing rods is allowed if the calculated load-bearing capacity remains the same.
See also: Contacts of construction companies that offer foundation repair and design services
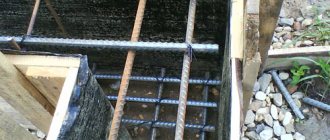
How to knit the frame?
When reinforcing a small volume of concrete, builders simply place the reinforcement in the formwork and then fill it with mortar. However, if large concrete products are to be reinforced, for example, a monolithic (slab) or massive strip foundation, then a frame is required. The reinforcement must be distributed evenly throughout the entire volume of concrete in order to reliably perform its function of increasing the strength of the structure. In these cases, a complex frame is made from metal rods.
crochet hook
The first option is the simplest and most accessible. If necessary, you can buy it in a specialized store for a hundred rubles or even cheaper. Moreover, it can be made by hand if the suitable material is available - we will return to this later. The downside is low performance. A novice knitter, with a sufficient supply of wire, will be able to produce 6-10 knitting per minute.
Screw hook
The screw hook is the next step in the development of the tool for knitting reinforcement. Outwardly, it looks a little like a regular one, but thanks to it, the knitting speed will increase, and the worker will get tired much less. If, when working with a regular hook, a specialist must twist the ends of the wire and manually twist them, then a screw hook is much more convenient.
Loop the loop and ends, then gently but firmly pull towards you. The plastic handle will be fixed in the hand, and the hook itself will begin to spin quickly, securely tightening the loop. Such a tool costs from 600 to 1000 rubles, depending on the manufacturer and store. It will be an excellent choice if you need to perform work once on a relatively large object. The knitting speed will increase, however, the wire will still have to be cut and bent by hand.
Materials and tools used for reinforcement
Since the reinforcement cage increases the stability of the structure by taking on a significant part of the load, its quality becomes fundamental. The frame is formed from interconnected reinforcing bars. Various are used for knitting the frame:
Types of fittings
Manufacturers offer fittings that can be divided into:
- Material of manufacture. Steel reinforcement is a classic, time-tested option; It is divided into 6 strength classes, it can be bent and welded. Composite reinforcement contains carbon, basalt, glass or aramid fibers. It is lighter, cheaper, does not corrode, does not bend and cannot be welded.
Reinforcement with a periodic profile has improved characteristics Source yar-limb.ru
- Profile. Reinforcement with a smooth profile is more often used as connecting jumpers. Reinforcement with a periodic profile has a relief surface, which improves adhesion to concrete.
Connection materials
Knitting of reinforcement for a strip foundation, the pattern of which can change, is done using:
- Knitting wire. Reliable and common knot connection technology. There are different knitting patterns.
- Threaded and crimp couplings (at mechanical joints).
- Metal paper clips. The reinforcement elements are connected without tying a knot.
- Plastic clamps and clips (fasteners). Plastic products provide simple and quick installation and are resistant to corrosion. Their use is not approved by all professionals.
Composite reinforcement bars secured with a clamp Source 1-detective.ru
- Welding. The process is fast, but the welds form a rigid connection, differ in density from the base metal and are susceptible to corrosion. When the load changes, they burst and reduce the strength of the foundation. The method is suitable for connecting rods of large diameters (in industrial facilities); To obtain a high-quality weld, you need a highly qualified welder.
Materials
To assemble the frame, special annealed wire is used. It is durable, but at the same time quite soft. This allows you to tighten the knots without the risk of tearing it. The recommended diameter of this material depends on the cross-section of the reinforcing bars and ranges from 1.0 to 1.4 mm.
Cheap wire comes without coating and is called black. It is more resistant to corrosion and has a protective layer of zinc.
Knitting wire is produced in two versions: in coils and measured (in segments). Working with a skein is more difficult because it has to be cut into pieces by hand. The measuring material can be used immediately. Wire with loops at the ends is especially convenient.
Requirements for reinforcement cage parameters
The rods that make up the structure differ in purpose:
- Working fittings. This is the name given to the longitudinal horizontal rods placed along the foundation strip.
- Clamps. They are divided into transverse horizontal and vertical, connecting the frame into a single whole.
The reinforcement frame of the foundation in private construction often has the following parameters:
- Fittings. Metal or composite, with a cross-section of 11-14 mm (for a small outbuilding), with a periodic profile and a cross-section of 12-18 mm (for reinforcing a strip foundation).
An example of how to knit foundation reinforcement with transverse clamps Source massimo.spb.ru
Important recommendations for choosing reinforcement for the foundation
Diameter
When choosing reinforcement for the foundation, first of all, pay attention to the diameter of the rods. The relationship is simple: the thicker the reinforcement, the more severe loads it can withstand
When determining the optimal diameter, first of all, the characteristics of the soil are taken into account (the main point is heaving) and the expected weight of the finished building, taking into account the weight of its internal arrangement and residents/visitors.
This is how it should be ideally and according to the rules. Along with this, many private developers refuse to draw up design documentation and perform related extensive calculations, adhering to average and generally accepted values. In the case of the construction of relatively small buildings, for example, such as a bathhouse, such an approach is acceptable.
The recommendations are as follows:
- if the structure is erected from relatively light materials (timber, gas blocks and other lightweight building elements from this series), reinforcement with a diameter of 1.2 cm is used. It is impossible to use rods with a diameter of less than 12 mm for arranging the foundation - reinforcement so modest in its overall characteristics is only suitable for use in the construction of supports for fences, gates and other light utility structures;
- if construction is carried out using heavier materials, the recommended diameter of the reinforcement changes accordingly. In most cases, rods with a diameter of 1.4-1.6 mm are used.
Assortment of fittings
Class
The second important indicator is the class of the reinforcement. For a private foundation, class A-3 material is suitable.
Corrugated fittings A3, steel grade A500S, GOST 5781-82
The fittings of this group are very easy to use (easily bends without the use of special tools), durable and reliable. Less commonly used are rods of class A-2 (they can be bent 180 degrees, A-3 – 90 degrees).
Table of reinforcement classes and steel grades
Video description
How to properly crochet reinforcement in the video:
Calculation of the amount of consumables for tying reinforcement
The amount of material (in linear meters) is calculated based on:
- Foundation parameters (length, width, depth)
- Reinforcement schemes (number of layers and longitudinal rods in width)
Most often, reinforcement material is sold not by linear meters, but by kilograms. There are special tables for converting values. Plastic fittings are often sold by linear meters.
Scheme of strip foundation reinforcement Source kamtehnopark.ru
Approximate prices
The cost of tying reinforcement, as estimators say, “sits” in the total price of 1m3 of reinforced concrete. In square or linear meters it is calculated individually for each type of structure. In this case, it is necessary to take into account various parameters (the width and height of the grillage, the thickness of the slab, the cross-section of the reinforcement, the level of complexity of the frame, etc.).
For approximate calculations, builders use prices in rubles per 1 ton of metal used. Today in 2017 it averages from 20 thousand rubles.
Reinforcement knitting pattern, corner reinforcement
The correct knitting of reinforcement for a strip foundation, optimal in many respects, is a “cage” connection of the reinforcing frame rods. In this case, the rows are secured with wire (or other chosen method) at an angle of 90°. The knitting pattern consists of several sequential operations:
- A fragment 25-30 cm long is cut from a coil of knitting wire (for rods with a cross-section of 8-16 mm).
- The wire is bent in half and placed under the overlap of the rods, placing it diagonally.
- The hook is hooked onto the loop (the place where the wire is bent), the opposite end of the wire is circled over the intersection of the rods and placed above the hook.
- By rotating the hook around the upper end of the wire, a twist of 3-4 turns is created.
- The hook is removed, the ends of the wire are bent inside the structure.
Crochet technology
There is nothing complicated in this operation. After doing it several times, you will quickly get used to it.
The essence of the method is as follows: the intersection of the rods is covered with steel wire folded in half. The crochet hook is inserted into the loop and the other free end is grabbed with it. After this, the tool is rotated until it is tightened. The ends of the wire are bent inside the frame.
The craftsmen know one little secret that guarantees tight contact: after not tightening the loop a little, you need to pull it towards yourself and only then tighten it to the end.
Scheme for knitting reinforcement using a hook
Working with a screwdriver is not fundamentally different from crocheting. The advantage is higher speed and less labor intensity. When using a screwdriver, do not forget to set the rotation speed of its chuck to minimum.
You should not knit reinforcement with an electric drill. The large inertia of this tool does not allow you to accurately determine the moment of completion of tightening.
Methods for connecting steel rods and the main types of nodes are shown in the diagram below.
Video description
About the intricacies of reinforcement in the video:
The corners of a strip foundation cannot be reinforced by simply overlapping the rods; This is considered a gross violation of technology. To reinforce the corners and connect adjacent linear elements with them, bent rods are used; the corner fragment is reinforced with L-shaped or U-shaped anchors.
Rods laid at the corners of a building without bending, at right angles, are unable to create a rigid structure. Such sections of the foundation are highly likely to be subject to destruction in the future.
Reinforcement of corners requires compliance with technology Source zen.yandex.ru
How to make a device for bending reinforcement with your own hands
Based on the drawings of serial bending machines, as well as numerous videos on the Internet, you can make such a device with your own hands. You simply cannot do without such a device if you are going to make a reliable reinforcing frame to strengthen the foundation of your future home and buildings for other purposes.
A simple homemade machine for bending reinforcement
The elements of a homemade machine for bending reinforcement are a metal frame, to the surface of which a thrust pin is welded (you can use a regular corner), and a rotating metal platform, controlled by a lever (the central and bending pins are fixed on its surface). The choice of the size of such a device, as well as the distance between its elements, is influenced by the diameter of the rods that you are going to bend on it. This device can be attached either to the surface of the workbench using bolted connections, or to the floor of the workshop, but for this the machine must be equipped with legs.
Reinforcement technology: execution order and features of the stages
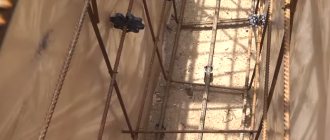
The frame for the future foundation is calculated and installed based on the dimensions of the trench, using working reinforcement and auxiliary wire. Its parameters are calculated in advance, taking into account the expected load; It is convenient to assemble the structure on a long workbench. Installation of fittings takes place in stages:
- Vertical elements (clamps) are assembled. The vertical position of the rods is checked using a plumb line.
- The lower horizontal belt is mounted. The lower belt works to deflect the foundation downwards. It is attached with a knitting wire to vertical clamps.
- The upper horizontal belt is mounted. Its task is to resist the upward bending of the foundation strip.
- Corner elements are mounted. They need to be given special attention because they connect the sides of the foundation. Additional rigidity is provided by additional vertical posts, which are laid twice as often.
- The formwork for the foundation is being prepared.
Installation of a linear fragment of a reinforcing frame Source beton-house.com
- The prepared reinforcing frame is being laid. During the installation process, pipes are laid between the reinforcement bars (the utility and ventilation systems will subsequently be laid through them).
- Concrete is poured. Filling is carried out in several stages, with each layer leveled (manually or with a vibrating platform). This technology ensures uniform distribution of the concrete mixture.
- The foundation is being waterproofed. After the concrete has dried, the foundation strip is covered with bitumen mastic or roofing felt. This operation is an important measure to preserve the foundation.
If the frame is assembled in a trench, rods are first driven into the ground, observing the calculated distances. Transverse jumpers, lower and upper reinforcing belts are fixed to them.
Types of tools for knitting reinforcement
The knitting method involves using steel wire to manually fix rods perpendicular to each other in places where they intersect crosswise.
A crochet hook is a simple and safe tool that allows you to tie reinforcement bars quickly, securely and evenly.
Today, there are three types of ready-made hooks for knitting reinforcement bars, which can be purchased in the store. In addition, you can make a hook for the reinforcement yourself.
Manual
Photo of a purchased hook. The handle rotates freely.
A simple hook is a rod attached to a handle with bends that grip the wire. The hook for tying the reinforcement is rotated manually. The advantage of hand tools is their availability, durability and ease of use.
A hand crochet hook is an excellent option for novice builders, which will allow you to understand the knitting algorithm and feel the optimal degree of wire tension to obtain high-quality knots.
Screw
The knitting wire is selected with a diameter from 0.8 to 2 mm.
A semi-automatic hook is a reversible tool that operates by forward movements of the handle. The device has a rod with a hook in the form of a drill, which fits into the funnel of the handle along the thread, tightening the wire.
The cost of such a tool is higher than a manual one. But the screw tool makes it possible to cope with a wide range of work in a short time - in order to completely tighten the knot, it is enough to make only a couple of movements.
Mechanical
Builders who value every second choose an automatic hook (gun) for tying reinforcement. The operating principle of the gun is based on fully automatic rotation of the hook. This device is the most modern and advanced, allowing you to achieve maximum results and speed without large labor costs on the part of the builder.
Operating principle.
Buying such a hook for household purposes will not be justified: working with a gun requires a fairly large consumption of wire, and the cost of the device is high. But on large projects or when performing work that needs to be completed in an extremely short time, this option is ideal!
Homemade
Photo: hook made of wire with a diameter of 3-4 mm.
Purchased hooks are not always able to fully satisfy construction needs. Often, the shape of their rod has incorrect bends, and the length of the tools is made too short, which significantly affects the quality of work. So how then to make a hook for tying reinforcement correctly?
To make a device for tying reinforcement with your own hands, we will need a welding electrode or steel wire with a diameter of 4 mm.
In order to make a hook, you need:
- Make a handle for the device from a piece of thin hose to the size of a rod or trowel without a spatula.
- Insert the electrode into the hose or insert trowels into the funnel and secure (for example, using epoxy resin).
- Bend the rod at an angle of ninety degrees at a distance of about 5 cm from the handle (the bent rod should resemble a rocker in appearance).
- Bend the end of the rod in an arc.
- Before work, sharpen the sharp edge of the electrode using a file or sharpener.
A hook can be made from an unnecessary screwdriver or a handle from a construction roller, bending the sharp end at the required angle and sharpening it slightly. An automatic mechanism can be made by inserting an electrode rounded at the end into a screwdriver.
A homemade tool is perfect for household purposes, will save money and allow you to quickly knit even and reliable knots.
Rules
Before starting to knit the reinforcement into the frame, it is necessary to prepare longitudinal and transverse rods, as well as clamps and wire.
All this is cut to a certain length.
In addition, for proper strapping, you should prepare a diagram according to which the frame will be constructed. The calculation of the material is carried out based on the selected scheme.
Can it be welded?
The metal rods of the frame can be connected by knitting or welding. Both options are valid. Welding requires less time and effort. But it has obvious disadvantages - when welding, the metal loses strength.
In addition, welding produces a rigid connection, which can negatively affect the concrete as it shrinks. Another disadvantage of welding is that the welds can break down over time due to mechanical stress, making the frame ineffective.
Professional builders prefer strapping to reconciliation . This is a more labor-intensive connection option if done manually.
But it provides: flexible fixation that does not violate the integrity of concrete during shrinkage, soil mobility, and vibrations.
The rods retain their original characteristics as they are not overheated.
Does the knitting pattern depend on the number of floors of the building?
The principle of tying reinforcement does not depend on the size of the building. But the more massive the building and the more solid the reinforcing frame, the higher the requirements for wire for knitting.
For reliability, plastic clamps are sometimes used instead of wire. They are more expensive, but stronger than wire. For a light one-story house, a simple knitting with wire folded in half is sufficient.
Rules for fastening rods
According to this scheme, you can tie the reinforcement:
- The wire is tied in half.
- A hook is inserted through the loop.
- On the reverse side, the end is wrapped around the intersection and also placed in the hook.
- The wire twists.
Recommended rules and methods of work when knitting:
- The rods are pulled up, twisted, the ends are bitten off with wire cutters;
- The wire twists several turns when it is tightly stretched;
- The rods and clamps are tied.
Using paper clips, staples, clamps
If necessary, speed up the knitting using the above-mentioned materials. In these situations, knitting is done by hand without using a tool. Rods with a small diameter can be tied with self-tightening plastic clamps. Universal devices suitable for any sections. They are light, installed by hand and do not smudge. Do not forget that they have low strength and can be damaged at low temperatures.
Advantages of staples and other fasteners of the same type:
- Productivity increases;
- The density of connected nodes increases;
- Easy to use.
Reinforcement clamps
To fix the position of the reinforcement cage relative to the base and formwork before pouring concrete, reinforcement clamps are used. They allow you to create an outer layer of concrete of the required thickness around the reinforcement frame. Most often they are made of plastic and have different shapes.
Clamps for fittings in the form of stars.
They are also used to distance reinforcing bars inside the frame. More information about clamps can be found in the article: clamps and stands for fittings.
By correctly using the elements discussed in the construction of reinforced concrete structures, you can be confident in the quality of the work performed and that the constructed structure will reliably serve for a long time.
Knots and twists - diagrams
Techniques for tying rods vary and depend on the type of knot and the angle of access. As a rule, when tying by hand:
- The areas connecting the horizontal reinforcement to each other are tied with diagonal double loops, with 2-3 turns of the ends until there are no backlashes.
- The connection nodes of vertical and horizontal reinforcement are fixed with cross-shaped or mutually diagonal loops. The ends are scrolled at least 3, but no more than 5 times.
Arrangement of formwork and cushions
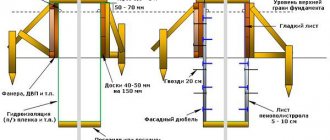
In order to make formwork, choose one of the types of material: OSB boards, wooden panels, plywood or fiberboard. The main task of formwork is to hold the concrete so as not to bend under its weight and pressure. It is important to understand that the higher the foundation, the stronger the material for the structure should be.
The assembly stages can be divided into 3 steps:
- First step. Install spacers along the entire perimeter of the trench so that the length of the spacers is twice the height of the foundation. They are located, retreating from the bottom of the base by 70% of its height. Their main task will be to hold the wooden base.
- Second step. At this stage, formwork is installed from a material that has been selected in advance. So that it can be disassembled, wooden elements are fixed inside. Gaps in the finished structure of more than 3 mm are prohibited. This approach will prevent concrete from leaking out and will not lead to deformation of the finished foundation.
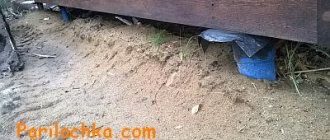
- Third stage. At the final stage, lubricate the formwork with technical oil (inside). This is necessary for easy dismantling of the formwork after the concrete solution has hardened. After this, a sand cushion is placed at the bottom of the trench. Its thickness is up to 20 cm. It is recommended to lay this thickness in two layers of 10 cm. After laying a 10 cm layer of sand, tamping is performed. The second 10-centimeter layer is also compacted. To simplify compaction, the sand must be moistened.