Clay for masonry
The most important thing when installing a sauna stove with your own hands is to choose a high-quality binding solution. That is why you will need to buy or make your own high-quality clay mixture.
Clay can be divided into 3 groups: normal, oily and lean. It is believed that option 1 is best suited for masonry; in this case, the stove can be quickly put into operation, and the clay will not crack.
Do not forget that the service life will depend on the type of clay chosen. The fact is that the furnace experiences severe overloads, as it first heats up to a temperature of 1000 degrees or more, and then cools down.
That is why even a small impact or load from its own weight will cause cracks to appear. Such a mixture will simply crumble within a short time.
If strong gaps appear between the bricks, this can result in carbon monoxide entering the bathhouse.
Material for production
You can consider the following options for yourself:
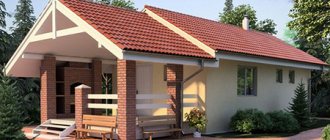
- Brickwork. It has been used for these purposes for a long time and is rightfully considered traditional. For many, this is a priority material, despite the complexity of execution. It is believed that laying out a stove yourself is much better than getting a ready-made one. This preference is due to the special warmth and atmosphere that lasts much longer. But do not forget that in this case a foundation is first laid, which is located separately from the foundation part of the bathhouse. Also, the dimensions of the structure and the furnace may not match. In this case, it is worth turning to projects with small-sized masonry. It is necessary to have certain experience in order not to cause harm to the health or life of people. Therefore, if you have doubts, it is better to turn to experienced professionals;
- Metal stoves are quite popular due to their compactness and ease of installation. In addition, its manufacture will be much easier, especially if you have experience in electric welding. You can use materials that seem intended for recycling. For example, you can make a sauna stove from a pipe, old car rims, unusable gas cylinders, old barrels, etc. For baths, steel stoves are usually used. The use of a cast iron stove for a bath is not always considered appropriate. Its positive qualities are the ability to maintain temperature for a longer time and good heat capacity. However, it is unstable to sudden changes in temperature and is quite fragile. Therefore, splashing cold water on hot metal is very risky, because the cast iron can crack. A steel stove cools down quite quickly after firing. This is its main drawback. This mainly occurs because the sheet thickness is insufficient;
- The combination of brick and metal is considered the most appropriate. In this case, a massive foundation is not needed, nor is sealing the joints during laying. The metal body is lined with brick. Building walls is quite simple. Such cladding can protect against a hot metal surface and serves as a good decoration for the bath interior, hiding the not very aesthetic appearance of the steel body.
How to test clay?
Before you make a sauna stove with your own hands, you must test the clay first; now we will tell you in more detail how to do this. Mix a kilogram of clay with 0.5 liters of water, then stir well so that no lumps form.
Then roll 2 balls with a diameter of 4 cm with your hands, then flatten them with a board to a thickness of 1 cm. Now the resulting clay cakes should be left at a temperature of 25 degrees until dry. You need to leave them for about 24 hours, while maintaining a constant temperature.
When the clay is completely dry, it needs to be thoroughly inspected. If the cake is cracked, this indicates a high fat content of the clay; we would not recommend using such a composition when creating a stove.
Also try dropping the cake from a height of 70 cm; if it breaks into pieces, then this is not the best clay. If the clay does not crack and passes the second drop test, then you have clay with good binding properties.
Note!
Do-it-yourself vegetable garden: new interesting garden crafts for the street at your summer cottage (photo/video review)
DIY ceiling installation: step-by-step description of how to make a ceiling. Review of modern structures and ideas for their design (105 photos)
Do-it-yourself garage doors - a detailed description of the construction of various types of garage doors (120 photos)
A stove is created from steel, and there is no need to create detailed drawings of a sauna stove with your own hands. Next, we will take a closer look at how the furnace is laid.
Metal heater stove, is it suitable for a bath?
Metal stove heater
This furnace design is the simplest. For work you will need sheets of steel with a thickness of at least 5 mm, a welding machine and a grinder (or a gas cutter), pipes for water supply and drainage, refractory bricks, stove clay solution, stones, pipes for the chimney, tap, stove doors with latches and hinges, metal profile for mounting the stove support.
Sample furnace heater
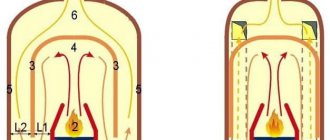
The structure itself consists of a water tank with pipes and a tap connected to it. The tank is heated from the back wall of the stove, the internal space of which, in turn, is zoned into a firebox and an open heater. Flue gases are disposed of through a chimney exiting the firebox through the heater and the walls of the bathhouse.
First of all, it is necessary to cut out the bottom and side walls of the future stove from steel sheets and connect them by welding. We weld corners inside the stove - they will support the sheet of metal on which we will lay the stones.
Making a frame for the stove
On the front wall we cut out a rectangular hole for the door, and from the cut out rectangle we make a door. You can weld it around the perimeter with strips of steel for a tighter fit. We drill several holes in the lower part of the door or front wall of the firebox to allow air to enter the stove. We weld the door hinges and the hinge for the bolt.
Making a door
We line the interior of the furnace with fireclay bricks
To make a chimney, we will prepare a pipe and make a hole in the sheet of metal on which the heater will be located. We weld the pipe to the steel sheet.
Metal stove for a bath
Let's start installing the water tank. It consists of three walls and a bottom, hermetically welded together and the back wall of the furnace. We weld the inlet and outlet pipes for water to one of the side walls of the tank. Then we weld the tap at the bottom of the tank. We install the entire structure on a frame made of steel profiles or on a brick base 20-30 cm high. We cover the metal parts of the stove with fireproof paint. We lay stones on top (soapstone, porphyrite, basalts, etc.) ranging in size from 5 to 12 cm. We install the chimney and chimney, pour water into the tank, cover it with a lid and ignite the finished stove, checking the structure for the presence of draft and the absence of smoke in room.
To modernize a potbelly stove for a bath, you can equip it with an ash pit with a grate and a box for collecting ash. This will greatly simplify cleaning the stove, and the ash door will help to better regulate the draft, and, accordingly, the temperature and rate of fuel combustion. For the same purpose (regulating the heating temperature of the stove), as well as to reduce heat loss through the chimney, it is equipped with a valve. It can be a gate type or any other.
Chimney damper
Gate valve - view 2
Bricklaying
A DIY metal sauna stove is an excellent choice, since heating occurs very quickly. The furnace is usually lined with metal in 2-3 layers, in which case the brick will warm up well and transfer heat to the room.
When laying the stove, make sure that the seam is even; for fireclay bricks, a layer of the mixture of 0.4 centimeters will be enough. If you make a larger layer, there is a possibility of cracks appearing. Next, you can look at a photo of a sauna stove made by yourself.
If you decide to weld the stove yourself, it is better to use sheet steel 4 millimeters thick. A steel stove will cost you a couple of thousand, but it can serve you for several decades if used correctly.
How to make a brick sauna stove with your own hands
If you chose the option of making a stone stove, you have made a choice in favor of a durable and safe heating device. In order for it to meet all the requirements of a Russian steam room, you need not only to choose the right material, but also to correctly assemble the structure. Let's look at this in more detail.
Tools and materials for work
To lay a brick oven, you will need the usual mason tools: a trowel, a building level, a concrete mixer for mixing the mortar. For such a heating device, you will have to purchase some metal parts: grates, doors for the firebox and vent, asbestos-cement and steel pipes for the chimney. And, most importantly, you need to stock up on the right brick.
How to choose the right brick for a sauna stove
A good brick for a stove should be especially durable, withstand extremely high temperatures, not be afraid of fire, and at the same time accumulate heat well. The so-called fireclay brick is considered the best for such purposes - it is light yellow. This material is quite expensive, so in order to save money it is combined with ordinary red solid brick. That is, fireclay is used in the firebox area, and red in the area of the chimney and external walls.
For cladding, you can also use hollow bricks marked M 75-150
How to choose a brick for a stove:
- tap it with a hammer, a suitable brick emits a ringing, clear sound;
- check the material for compliance with the geometric parameters 65x120x250 mm. It is better not to use uneven bricks; it will be very difficult to achieve a tight structure;
- examine the lot for defects and noticeable cracks.
High-quality material must have certificates - ask the seller for them.
Related article:
Dimensions of red brick , varieties and areas of application, weight depending on purpose, quantity in a pallet, price per piece of a particular brand and type, video about production - in our publication.
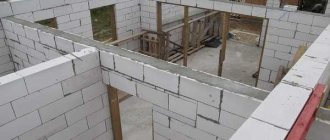
Laying the foundation for a sauna stove
A brick oven weighs at least 500 kg, so this design needs a high-quality, durable foundation. The foundation cushion should be 10-15 centimeters larger than the size of the sauna stove. The depth of the base is below the soil freezing level.
Important! The foundation of the stove is made completely separate from the foundation of the bathhouse. There should be no ligaments or jumpers.
The distance from the walls of the room to the future masonry is at least 35 centimeters. Walls made of flammable material should be additionally protected with metal sheets or ceramic tiles.
Cement or lime mortar is used to fill the foundation.
The foundation walls are covered with waterproofing material. A sand cushion 10-15 centimeters thick is poured into the bottom of the trench, then a 15-centimeter layer of crushed stone, and only then concrete is poured over the reinforced frame. To prevent voids from forming in the fill, the freshly poured foundation is pierced several times with a thin piece of metal reinforcement. It is important to take your time and let the foundation sit and gain the required strength. Before starting masonry, it is necessary to waterproof the upper part of the base.
Advice! If you have already laid the floor in the bathhouse and only then decided to work on the foundation of the stove, do not forget to cover the boards with polyethylene, preferably reinforced, before starting pouring.
Secrets of brickwork
Conventional cement mortar is not suitable for laying a furnace. The fact is that it cannot withstand high temperatures. For this reason, clay is used as a binding material for ovens.
The composition of the binder mixture is simple: clay, water and a little sand. The sand must be sifted; debris and large particles will not allow you to achieve the desired seam format.
Kiln masters advise using freshly mined clay rather than dry clay. Its “fat content” differs in different regions, so before work it is better to make several test batches with different proportions of sand. Make some flat cakes out of them and leave them to dry. Select the batch that has the least number of cracks after drying. If you don't have the opportunity to get clay yourself, buy it at a hardware store. It is sold dry in bags.
Ask sellers for fireclay clay, this material is the most suitable for our purposes
Popular masonry schemes
Drawings of brickwork for sauna stoves may vary in size and shape, nuances of the organization of the chimney and the location of the stones and water tank. Here are the most popular ordering options from online DIYers.
Features of arranging a brick stove for a bathhouse with your own hands
For the external walls of the heating device, a solid element is used, but keep in mind: you cannot use silicate or hollow bricks for work. Master stove makers advise that before doing the laying, do a “try-on”: lay out all the rows dry in accordance with the chosen pattern. This technique will allow not only to determine the exact location of the chimney, but also to check all the material for defects.
Expert's point of view
Dmitry Kholodok
Technical director of repair and construction
Ask a Question
“You cannot alternate fireclay and ordinary bricks in masonry; such oven walls can burst due to different heating.”
During the laying process, all joints should be carefully sealed so that carbon monoxide does not penetrate into the room during the combustion process
Before putting each brick in place, it is moistened in a basin of water, this will ensure good adhesion to the clay. For the stove, the bricks are not tapped for proper shrinkage. If one element does not fit as it should, it is removed, the clay is removed and re-installed. Each next row is laid only after the bottom one is completely installed. All excess mortar displaced from the seams must be immediately removed both inside and outside. If you leave clay stains inside, the high temperature will cause it to collapse over time and clog the chimney.
Installation of chimney, grates and doors
All cast iron parts must be installed not after, but during the laying process. To ensure that the stove doors of the vent and firebox are firmly fixed in the brick, they are wrapped with asbestos rope. This technique allows you to tightly seal the space between the metal and the brickwork. The doors will expand slightly at high temperatures, but the asbestos will prevent the masonry from being destroyed.
An important point in placing the grates is to ensure that they lie strictly horizontally and do not rest against the bricks
If the grate bars rest against the masonry, when heated they will slowly destroy it. When making a stove for a bathhouse with your own hands, do not forget to equip the chimney with a damper. With its help you can control the draft and regulate the temperature.
What is the best way to line a stove?
The stove, in principle, can simply be plastered, but it is rare that any plaster will last long on such a heating device. It is best to veneer the masonry. This can be done with natural stone, facing bricks or tiles. If you make tile cladding, you need to choose the right material. There are four most suitable options:
- Terracotta - this tile is produced without glaze and has no mechanical impurities. This is simply high-quality heat-resistant clay that does not emit any toxic substances even under extreme heat.
- Clinker tiles are fired at 1200°C during production, so they don’t care about the temperature in the bathhouse. This lining is durable and abrasion resistant.
- Porcelain tile is an artificial material consisting of clay, kaolin base and quartz sand. It is not afraid of temperature changes and hot water, has a rich palette and textured surface.
- Soap chloride - this material is of mountain origin. It holds temperature well, cools for a long time and is not afraid of humidity.
If you choose natural stone for cladding, pay attention to crimson quartzite. This is not a cheap pleasure, but this stone is the best that can be for a sauna stove. The photo shows examples of sauna stove cladding.
Choosing a water tank
To make the tank, you can use stainless steel or heavy-duty cast iron. We would advise you to give preference to the first option, since cast iron is more expensive and the water takes longer to heat up.
Note!
Insulate the foundation with your own hands - a step-by-step description of the use of the best materials and technologies (90 photos)
- Do-it-yourself pergola on a summer cottage: step-by-step instructions with photos and descriptions
Laying laminate flooring with your own hands: a detailed description of how to lay laminate flooring. Laminate calculation, step-by-step description and installation secrets (105 photos and videos)
Stainless steel is superior in price in this regard, and the water also heats up quickly. The only drawback is the service life; a cast iron tank in this case will last much longer.
Portal for a sauna stove - what is it?
A mantel with a clock and candelabra is an attribute of the English living room in any historical film or TV series. In addition to the shelf, the fireplace opening is framed on both sides by a kind of “columns” supporting the shelf. It was this U-shaped structure that received the name “portal” , which translated means “gate”. While the design of the furnaces themselves may have different configurations.
But when it comes to the portal for the stove to the bathhouse, this is just an imitation by analogy . In fact, a stove and a fireplace are significantly different from each other. When we bring the firebox into the rest room, we do not have the opportunity to greatly vary the size of the “window” behind which the firewood will burn - such doors are made in several standard sizes , the largest of which is called “panoramic”. A separate publication is devoted to the dimensions of furnaces.
If you want to learn more about fireplace stoves for baths, with a detailed analysis of the types and sizes of glass, self-cleaning systems, tips for purchasing and installation, we recommend reading this article.
Also, the stove manufacturer can offer its own version of the “portal” - most likely it will be a wide metal frame, a kind of “platband”, which is installed as decoration.
But wiring a fuel channel through a wall is usually accompanied by replacing the flammable material of the wall with a non-combustible one , that is, for example, a piece of a log house is cut out and a brick wall is put in its place. This meets fire safety requirements. And at the same time, we have a basis for creativity, because it is this brick wall that they try to decorate in one way or another , including by creating a beautiful portal for a sauna stove.
Let us clarify what minimum dimensions such a cutting partition should have.
IMPORTANT! According to SNiP, the shortest distance from the stove to the combustible wall material should be at least 38 cm. In height, it should not be lower than the top edge of the stove.
However, in both cases it is better to add extra centimeters than to regret it later. It is better to increase the distance on the sides of the fuel channel to half a meter, and in height - whatever you like, even up to the ceiling. Although you can limit yourself to the comfortable height of that same mantelpiece. It's up to you to decide.
The connection between the combustible wall and the brick wall is not made directly; , for example, special mineral wool without organic fillers or basalt cardboard, should be placed between them The same applies to the gap between the fuel channel and the brick. All these joints are later masked using decor.
Oven in the steam room
passage through the wall of the fuel channel of the same furnace
portal of the same furnace from the firebox side
How to choose the tank volume?
This parameter should be selected based on how many people will visit the bathhouse. Let's say there are 4 people in your family, about 1 needs 30 liters of hot water.
As a result, we get that the tank must be at least 120 liters. Plus you need to add a little more to it, because you won't always use up the water all the way to the bottom.
As a result, we get approximately 150 liters; this is the volume of the tank that needs to be installed in the bathhouse.
Now you know how to make a sauna stove yourself. We wish you success in your work!
Optimal oven dimensions
For anyone who installs a stove on their own, the most important parameter is its size for a specific room, namely the length of the sauna stove.
In order to determine it, it is necessary to carry out special calculations based on the following parameters:
- The ratio of the stove to the total area of the room to be heated. This is one in fifty (seventy);
- The combustion hole should be one in two or two in three deep;
- The combustion volume should be related to the chimney section as one to ten.
Metal models used in Russian baths can be from four hundred to six hundred and eighty centimeters long.
For brickwork, the usual length is either 89 by 102cm or 102 by 129cm.
How to choose an electric heater for a mini sauna
“Mini” is considered a sauna with a small room of no more than 1.5 cubic meters. It is designed for the simultaneous presence of 1-2 people in the steam room. The recent trend is to install small bathhouses directly in the apartment of an urban building. They consume little electricity, the main thing is to ensure reliable thermal insulation. The heaters in the mini-sauna are small in size. Manufacturers put the words “Mini” and “Compact” on these devices.
The market presents mini-heaters with the following trademarks:
- Sawo; Mini and Mini-X series;
- Harvia; Vega Compact, Delta series.
These are the most common brands of mini ovens. Other manufacturers have them too. The positive and negative aspects of using mini-ovens are common to all electrical units installed in a home bathhouse.
- Advantages and disadvantages of metal siding
TOP 5 popular myths about plastic windows
We are building a house, what should we pay attention to?
pros
- making electric heaters from different metals;
- electricity is converted directly into thermal energy;
- mobility of devices, possibility of installation anywhere in the steam room;
- the power of small heaters installed in apartments is compared to an electric kettle, the device consumes less energy than home steam irons;
- Proper grounding ensures fire safety.
Minuses
- using electricity is quite expensive;
- the mini-sauna is designed for no more than two people present;
- difficulties with wires; you need to invite an electrician to install a three-phase wire when the heater consumes 380 volts; for proper grounding.
There are mini-heaters that are designed to operate from networks with standard 220 volts; if the owner knows how to do grounding, he can connect such a stove himself. It is important to be sure that the wiring is secure.
Features of furnace installation depending on the material
At the bathhouse you can find not only iron stoves, but also other heating options. The bathhouse has its own peculiarities. It is worth analyzing all the details and only then installing cast iron or steel on the wooden floor of a frame or timber building.
Cast iron
A good foundation is a must. This material is very heavy, so you should expect a lot of weight.
Steel iron
This is the correct approach with reliable insulation. The steam room heats up well and quickly, and the walls heat up to high temperatures, so you should take this into account and be careful.
Brick
This is one of the safest options. But for a steam room this requires a long installation. In addition, such an installed structure is much more expensive than the metal version.
Useful video
Not just diagrams, but also a description of the advantages and disadvantages of vertical and horizontal structures (not necessarily made of pipes). Plus interesting life hacks.
Even more diagrams, even more explanations about them. However, the main concern of the author of the video is that you get a stove for a real Russian bath. So sauna lovers don’t have to watch it).
+++
We hope that you have received some kind of holistic understanding of what a sauna stove is. Other things can only be learned from practice and experiment. Good luck to you!
Vertical model
A vertical stove for a bathhouse, made by yourself, is most similar to a potbelly stove. The body is elongated in height, the heater tanks are located on top. Kamenka is closed. The heater heats up when hot smoke moves through the stones. The tank is located above the heater. The pipe in such models is mounted - it is mounted on the furnace body from above.
It is possible that the body will have to weld an additional box with a door, and cut a hole in the body for the firebox - and take the firebox into the dressing room. In this model, you can also weld the heater on the side.