Reads: 1,485
Reading time: 5 min.
no comments
Felting is the modern name for the art of wool felting. With its help you can create bright and original accessories, toys, clothing and shoes. It’s easy to master this technology, as a small master class on felting a hat will prove.
All felting techniques are divided into dry and wet felting. The first uses special needles of varying thicknesses, with the help of which the material is given an overall shape and small details are created.
Hat “Viola” using wet felting technique
Make your own floral print hat using the wet felting technique.
The work will seem easy and understandable to you thanks to the step-by-step descriptions of all stages given by the author of the master class.
For work you will need the following materials and tools: - wool for felting 18 microns of gray color, volume 100 g; — wool for felting 18 microns blue (just a little); — white viscose fibers; - silk fibers of blue and green colors; - pieces of natural blue silk; — a backing for the laminate (for transferring the pattern); — protective film (air bubble); - mosquito net; - soap or soap solution; - needle and thread; - scissors.
To construct it yourself, draw a center line (50 cm), and on both sides put a horizontal segment of 19 cm. The result is a rectangle measuring 50 * 38 cm.
From the bottom of the figure, set aside a segment of 40 cm upward - the radius of the cap. At the top of the head, from the center line to the left and right, set aside 9 cm segments, drawing a perpendicular from these points until it intersects with the radius of the cap.
From the formed intersection with a radius of 10 cm, round the corners. Step 2 Transfer the pattern to the backing sheet and cut along the contour.
Step 9 Next, cut the silk into strips. For small petals you need 12 strips measuring 8*7 cm, and for large petals you need 3 strips measuring 10*9 cm.
Please note that the silk must be cut at an angle of 45 degrees to ensure that the petals are elastic.
Step 13 Next, bend the rectangle in half, with the wool facing inward. Gather the lower edge of the petal onto a thread, moving 2-3 mm from the edge of the silk, and pull it off, forming a petal.
The author emphasizes that the threads should be matched to the tone of the silk, because... We will not remove them, and the cotton from the threads falls well.
Step 16 Now start assembling the flowers. So, for one flower you need 4 small and 1 large petal.
They should be positioned as in the photo:
Step 27 Having completed the folding, remove the cap from the template.
Step 28 After the hat is almost ready, form the top of the hat by first placing it on a blank, carefully smoothing out all the creases.
LiveInternetLiveInternet
—Quote book
For almost 2 years now, I have washed all my underwear and belongings of my three men, of different ages.
Sewing secrets starting with the word “How.” “, part 6 Often, when we start sewing, we get stuck in the search engine.
Love to sew. Sewing tricks! (50 tips for seamstresses). (click on the pictures) .
Types of needles for sewing machines Types of needles for sewing machines Often, many sewing masters...
Bread in a bread machine Bread without yeast in a bread machine Although almost all people love bread.
—Categories
- DO IT YOURSELF (55)
- Alterations (15)
- Note to the hostess (10)
- Home dry cleaning (10)
- HOLIDAY LOT (42)
- iPhone (4)
- (1)
- ALL DIFFERENT (110)
- KNITTING (245)
- Hook (86)
- Useful tips (48)
- Knitting needles (105)
- ROOMS DESIGN. (126)
- HEALTH (172)
- ART (71)
- ROOM FLOWERS (33)
- COOKING (348)
- Baking (56)
- Decoration of dishes, tables (11)
- Bread maker (8)
- Air fryer (6)
- Multicooker (5)
- Sweet pastries (55)
- Dessert (41)
- Preparations, marinades (31)
- Meat dishes (41)
- Drinks (24)
- Vegetables (26)
- Various recipes (59)
- Fish dishes (26)
- Salads, snacks (52)
- Sauces (13)
- Cheese, cottage cheese, yogurt, products made from them (14)
- MAGIC, MYSTIC (123)
- WORLD HISTORY (56)
- FASHION (28)
- MUSIC (102)
- DIARY, COMPUTER SETTINGS (268)
- Computer (165)
- Diary Settings (89)
- THE UNKNOWN (144)
- POLITICS, WORLD GOVERNMENT (49)
- NATURE, CITIES (68)
- HANDCRAFTS (775)
- Batik (52)
- Felting bags (30)
- Wallow. Links. MK (28)
- Felting scarves (25)
- Shoe felting (21)
- Felting flowers (19)
- Felting clothes (14)
- Felting hats (12)
- Wallow. Drawing with wool (11)
- Felting mittens, gloves (6)
- Crazy Wool (5)
- Felting jewelry (2)
- Wallow. Miscellaneous (36)
- Stained glass, glass, mosaic (20)
- From paper, cardboard (119)
- From plastic bottles (31)
- Master class (197)
- Soap making (71)
- Gift decoration (47)
- Weaving (cords, lace, etc.) (59)
- Miscellaneous (162)
- Candles (19)
- Jewelry, costume jewelry (61)
- Drawing lessons (32)
- Flowers made of ribbons and fabric (107)
- FACE AND BODY CARE (110)
- MOVIES+DOWNLOAD (87)
- Audiobooks (17)
- SEWING (182)
- Tips (16)
- Shoes (14)
- Blouses (13)
- Alterations (13)
- Dresses (9)
- Miscellaneous (7)
- Skirts (7)
- Coat (4)
- Bags (3)
- Pants (2)
- For interior (2)
- ECO-COSMETICS (198)
Felting wool hats
Nowadays, things made with your own hands are becoming a real rarity and are practically going out of fashion. It is much easier for people to go to a store and buy everything they need for personal use. But despite the rapid development of production rates, the traditions of manual labor and independent production of things are preserved in small volumes.
In this article we will discuss methods for felting hats made from real wool. If you have free time and a desire to try to prove yourself in this area, you can do this by following the instructions and step-by-step plan.
Manufacturing the product will not require you to have any special skills; anyone can handle this task.
Felting a wool hat - what do you need to know?
When deciding to create a wool hat, you need to prepare everything you need for the job. To do this, you need to know exactly a few basic points, without which nothing will work, and the thing will be done incorrectly:
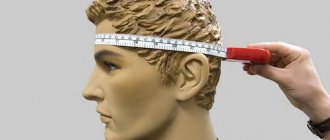
- measurements that determine the volume of future work;
- creating a pattern to accurately reproduce the desired image;
- preparation of all basic tools and materials : wool, soapy water, spray bottle, rolling pin or round stick, oilcloth, graph paper, scissors, measuring tape.
If you already have experience in felting, you can experiment and try new ways. The more options, the better and faster you will do. In the case of the first attempt, you should adhere to the diagram and manufacturing instructions.
The first thing to consider when making household items is taking measurements. It doesn’t matter whether you are making a hat for yourself or as a gift to friends and family, correct sizing is very important. Depending on the style of the headdress, we may need the head circumference and height of the desired product. You should also take into account the wool reduction factor, which is usually in the range of 1.3 - 1.6. It is necessary because after felting the final item will decrease in size relative to the original version.
The reduction factor must be taken into account. If this is not done, the hat will turn out several sizes smaller.
After taking the measurements, we begin to create a pattern, on the basis of which further work will be based. Depending on what model you want to create, the patterns will be slightly different. For convenience, you can use ready-made patterns or outline the outline of an old hat.
We are considering the regular classic version, which is the most convenient to use. It is built as follows:
- Take graph paper and a pencil.
- Draw a dome-shaped image according to the measurements taken. For convenience, you can use the pattern of an old hat.
- After this, increase the contour by the corresponding KU values.
If your calculations result in a non-integer number, it is better to round it up.
The main material we have to work with is wool. To work, you will need two types : the main one for creating a hat, additional fibers for applying a pattern on the headdress.
100 g of wool for a hat. There is a complex calculation system, but it is not entirely accurate, so it is better to take extra material to add if necessary.
LiveInternetLiveInternet
—Categories
- AND THIS IS MY WORK (535)
- Waldorf dolls (40)
- Scrapbooking, photo albums, etc. (31)
- Dogs, doggies. (4)
- Mice (2)
- Foxes (1)
- knitted toy (7)
- Hedgehogs (18)
- Bunnies (61)
- Cats, cats, kittens (10)
- Bears (199)
- my Master Classes (94)
- stoles (3)
- primitive doll (1)
- miscellaneous (40)
- Miniature, roombox (34)
- elephants, hippos, etc. (3)
- textile doll (28)
- Tilda (2)
- sewn toy (9)
- My city is Verkhoturye (10)
- Bodyflex (3)
- PAPER CREATIVITY (223)
- paper cases-weaving (76)
- quilling (8)
- scrapbooking (149)
- Exhibitions (18)
- EMBROIDERY (744)
- rococo (5)
- satin stitch embroidery (13)
- cross stitch (525)
- ribbon embroidery (16)
- embroidery on plastic canvas (27)
- magazines and books on embroidery (148)
- monochrome embroidery (24)
- miscellaneous embroidery (63)
- relief embroidery (17)
- embroidery stitches (19)
- KNITTING (1313)
- accessories, etc. (52)
- mittens, gloves, socks, booties, etc. (80)
- knitting - machine (11)
- knitting for home (43)
- knitting on a fork (2)
- hats (51)
- for children (102)
- for women (405)
- for men (27)
- craft magazines (185)
- bedspreads, blankets (35)
- work process (closing loops, etc.) (38)
- miscellaneous (angels, bells, butterflies, etc.) (78)
- napkins, tablecloths, potholders, etc. (123)
- bags, cosmetic bags. (45)
- crochet patterns (188)
- knitting patterns (100)
- shawls, stoles, headscarves (98)
- Computer matters (20)
- avatars (1)
- FOR YOURSELF LOVED (54)
- bathhouse (9)
- health (16)
- cosmetics (20)
- hairstyles (10)
- HOUSE (770)
- lampshades, lamps, etc. (24)
- everything for the kitchen (62)
- craft magazines (89)
- interior (38)
- how to decorate your home (114)
- carpets, rugs (39)
- indoor plants (19)
- master classes (89)
- pillows (185)
- bedspreads, pillowcases, etc. (2)
- work in the garden (66)
- various interesting things (32)
- napkins, tablecloths - sewn, embroidered, etc. (10)
- sachet (7)
- housewife tips (8)
- watch (15)
- how to decorate your home (99)
- curtains (22)
- PAINTING (153)
- batik, fabric painting (10)
- glass painting (32)
- stencils (70)
- drawing lessons (46)
- TOY (860)
- accessories for toys, furniture, etc. (15)
- butterflies, bees, insects, etc. (19)
- hippos, elephants, etc. (34)
- dolphins, fish, turtles, etc. (15)
- dragons, dinosaurs, etc. (1)
- hedgehogs (14)
- bunnies, squirrels, etc. (126)
- toy on a frame (2)
- cats, cats, kittens. (84)
- crocodiles (3)
- chanterelles (1)
- horses, moose, giraffes, etc. (34)
- lions, tigers, etc. (8)
- cars (6)
- bears (165)
- mice (27)
- monkeys (5)
- sheep, cows, pigs, etc. (23)
- doggies, dogs (31)
- birds (80)
- various knitted toys (124)
- textile toy (55)
- themed educational toy (33)
- tilde (32)
- felt toy (61)
- turtles (1)
- Games for children and adults (5)
- Historical moments (16)
- Competitions (26)
- Piggy bank of different thoughts and thoughts (94)
- poems, parables, etc. (42)
- humor (19)
- DOLLS (602)
- Waldorf dolls (7)
- knitted doll (25)
- other dolls (29)
- magazines and books on dolls and toys (100)
- clowns, clowns, etc. (9)
- doll on frame (8)
- felt dolls (21)
- matryoshka (11)
- clothes, shoes, etc. for dolls (74)
- face decoration (15)
- primitive doll (130)
- textile dolls (158)
- tilde (26)
- elves, gnomes, fairies, etc. (38)
- COOKING (106)
- Fish dishes (3)
- Meat dishes (15)
- Baked goods, sweets, etc. (29)
- Side dishes (9)
- cooking magazines (5)
- books and magazines on cooking (23)
- Canning and preparations. (1)
- Drinks (5)
- Salads, snacks. (15)
- Sauces, gravies, etc. (2)
- Soups (4)
- Decoration of products and table. (4)
- Personal (66)
- For cat lovers (11)
- Workplace organizer (50)
- covers for typewriters, scissors, etc. (13)
- Just a photo (17)
- Various videos, music. (21)
- FELT (147)
- felt stitches (2)
- A man with a capital letter. (9)
- SEWING (120)
- for children (46)
- accessories (6)
- for women (22)
- various interesting things (47)
- sewing technology (8)
- Encyclopedia of needlework (1378)
- applique (90)
- costume jewelry, beading. (179)
- roll everything (30)
- decoupage (63)
- pincushions (65)
- paintings, panels (27)
- books and magazines on needlework (170)
- boxes, caskets (102)
- modeling - from clay, from paper, from plastic, etc. (20)
- patchwork technique (140)
- macrame.weaving. (44)
- MASTER - CLASSES (117)
- soap making (33)
- woodworking (13)
- leather work (7)
- different packaging (31)
- wedding theme (20)
- candles (5)
- salt dough (8)
- various souvenirs (31)
- bags, cosmetic bags, wallets.. (102)
- slippers (54)
- New Year theme (137)
- Easter theme (26)
- spot painting (4)
- tatting (11)
- flowers (knitted, beaded, sewn, etc.) (52)
- Exchange fair, prize draws (26)
—Tags
—Applications
- Postcards
Reborn catalog of postcards for all occasions - I am a photographer
Plugin for publishing photos in the user's diary. Minimum system requirements: Internet Explorer 6, Fire Fox 1.5, Opera 9.5, Safari 3.1.1 with JavaScript enabled. Maybe it will work - Online game "Big Farm"
Uncle George left you his farm, but, unfortunately, it is not in very good condition. But thanks to your business acumen and the help of neighbors, friends and family, you are able to turn around a failing business.
—Help for newbies
Hat styles that you can make yourself
If desired and creative, you can create almost any model. It all depends on your experience and creativity. It is worth noting only the most popular options for this manufacturing method. These include:
- classic elongated hat;
- stylish and irresistible beret;
- image of an animal head or cartoon characters.
You can try to create this and much more at home. After taking all the measurements and carrying out the preparatory part, you can begin the main stage of work.
How to felt a wool hat - master class
To ensure that you get a good, high-quality hat, perform all steps carefully and follow the sequence of all stages. For convenience, here is a felting diagram:
- Prepare your work area by laying out the film and template.
- Start laying the wool strands on the bottom layer in rows. In this case, each row should overlap the previous one, covering it by about half.
- So you should lay out 3-4 layers, perpendicular to each other. Make sure the material is distributed evenly.
- Leave overhangs on each layer that extend beyond the edges of the template. This will be needed for further bending of the product.
- Treat the workpiece with a soap solution, spraying it evenly from a spray bottle.
- After this, cover the wool with film on top and smooth the material.
- Turn the workpiece over and carefully fold the edges of the wool around the entire perimeter.
- Repeat laying the wool on the other side.
- Treat the reverse side with soapy water and fold the edges of the product.
- Once both sides are soaked, start working with the rolling pin, rolling out the wool evenly.
- At the final stage, place the hat on a towel and continue felting until the desired size.
- Let the product dry.
Wool Watercolor Basics
Paintings “painted” with wool are in no way inferior in their aesthetic qualities to real paintings. The secret of wool watercolor is quite simple: very thin fluffy combed wool is laid out in separate strands in layers. First, the master creates the background, and then works on the drawing and small details.
- The wool is not fixed to the substrate in any way, so the finished painting must be immediately framed under glass.
- Having a sketch and stencil worked out to the smallest detail is a guarantee of beautiful and neat work.
- When “painting”, apply the stencil to the objects being depicted and press lightly so as not to make a mistake in the proportions.
- Make all elements a little smaller than intended: under the glass they will be flattened and acquire the desired size.
- Lay out the wool so that the strands extend beyond the edges of the backing. The frame will press the excess, and you can remove it without damaging the painting.
- To create watercolor transitions, lay out layers of thin, sparse, almost translucent strands of wool. The more layers, the more expressive and brighter the drawing will be.
When working in wool watercolor technique, be careful with your hands. They must be clean and dry. Remember that this painting cannot be washed or ironed! In addition, wool watercolors are sensitive to high humidity: the image may become deformed.
Wool paintings, master class
Features and Benefits
Among nonwoven materials, a distinction should be made between felt and felt, although both materials are similar. Felt can be either natural from the fluff of rabbits and goats, or from synthetic fibers. Compared to felt, felt is a more flexible, soft and lightweight material. Although these characteristics apply more to felt and factory-produced felt. Craftsmen who felt by hand create felt of varying densities and thicknesses, from translucent webs to fabric several centimeters thick.
An important feature of felt hats is the use of exclusively natural materials in their production, since only 100% sheep wool can be felted. In such a hat it is not hot indoors and not cold in the cold. This means you don’t need to take it off on public transport or in a store, which will allow you to preserve your hairstyle and the intended image as a whole. Felt is an excellent thermostat that does not allow moisture to pass through, but absorbs it like a sponge. The felted hat is not afraid of snow and is not blown away by the wind. At the same time, the hat is lightweight, you can roll it up and put it in your purse without fear of ruining it.
A felted hat is a bright and unusual accessory that will not let you go unnoticed. Therefore, when choosing a felt hat, you should carefully consider your overall look.
Models. Color and print
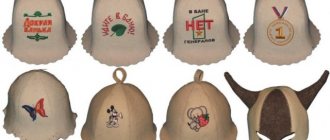
Most often you can find felt animal hats. Stylized owls and foxes, raccoons and cats will be an excellent addition to a youth's informal wardrobe or will highlight mother and baby on the playground if the choice falls on a family look. Funny ears, horns and faces will appeal to children, teenagers, anime lovers, and will also cheer up everyone who treats fashion and themselves with humor.
Beanie hats are made from thinner felt. The folds on the caps are not draped, but are created by the craftsman during the felting process. The trend of the coming season is beanies with a lowered crown, which look more voluminous compared to the classic model, which is important when shaping the silhouette as a whole. After all, in a tight-fitting hat, the head may seem disproportionately small in relation to the figure in voluminous outerwear. Felt beanies, delicate, feminine, warm, will go well with a fur coat and winter coat, quilted or woolen. Designers suggest combining them with stoles and shawls made of thinner felt of the same color as the hat.
Felt hats as art objects! Here there is room for the imagination of the masters to run wild. After all, with the felt technique you can create not only on a plane, but also in three-dimensional space. Hats turn into voluminous flowers on the head, fields, meadows, waves... Such things are unique, and even if desired, the author is unlikely to be able to create an exact copy.
Often felting masters - felt makers - create a one-of-a-kind canvas, mixing textures, textures and colors, like an artist using oil paints on canvas. The result will not leave anyone indifferent. The hat is an art object suitable for truly creative and daring people and will fit well into the boho style.
If you want to express your own ideas in an unusual hat, then you can place an order with a master and jointly think through a project that will be brought to life by a professional. Or make a hat with your own hands using the wet felting method. To do this, you will need wool, water, soap and... hands that are laid out, and then rubbed for a long time, minutes, and stroked this wool. Perhaps you will be fascinated by the process itself, because it is not for nothing that this type of needlework has so many fans and admirers at the present time.
Felt hats and bonnets will be very popular in the coming season. The catwalk presented a wide variety of hats made of non-woven materials: berets and bowlers, fedora hats and cloche hats. Preference should be given to soft shades - lilac, gray, rich blue. Felt hats decorated with luxurious embroidery, metal rivets, and voluminous abstractions made of yarn look very impressive.
The favorite headdress of Parisian women, the beret, can also be made using the felting technique. This model of headdress often appears in the collections of famous designers and promises to return to fashion for a long time. The beret is suitable for girls of a fragile build with graceful features. The beret models that are relevant for the coming season are made in pastel colors - beige, light grey, pale pink and turquoise.
What to wear with
Today, a felted hat is made so skillfully that it easily fits with any type of outerwear. For example, a felt hat with fur trim looks luxurious in combination with a fur coat or woolen coat. Original models with horns and ears are also suitable for a youth jacket or down jacket.
Felting a hat will give you the opportunity to reveal not only your creative abilities, but also bring things of unusual beauty to your wardrobe. Felting is an old craft that was widely used in creating wardrobe items. In the old days, not a single fair was held without sales or purchases of felted items. There are two felting techniques: dry and wet. For wardrobe items use wet, for bulky items - dry. Wet felting a hat involves compacting the material to form a single fiber.
How to care?
Felted hats should be worn without fear of washing! The lightness and delicacy of felt hats creates a false impression of their fragility and fragility. It's an illusion. With proper care, high-quality felt will serve you for a long time and retain its original appearance.
If the felt hat is a little dirty, try scrubbing the dirty spot with a dry clothes brush , then wipe with a damp cloth or wet sponge. For felted products, only delicate hand washing in water at a temperature of 30-40°C is suitable. You should use special gels for washing wool containing lanolin, such as Laska, Dreft, or you can use hair shampoo. Woolen items rarely need to be washed - just leave the hat in warm water for 1-2 hours and then rinse well.
It is better to wring out the hat using a towel. Next, the still wet hat needs to be given its original shape, straightened with your hands and put on your head. It is better if for this purpose you use a head a size or two larger than yours, since woolen products shrink significantly when drying. After this, you can finally dry the hat on a three-liter jar or hat blank, if you have one.
Let's briefly look at the images that can be created using a felted hat, using examples of the work of the talented felt maker Valentina Shileiko.
A bright beanie hat with a color gradient from light gray to mustard yellow goes well with a voluminous chunky knit scarf and an oversized coat. Overall, we see an easy, youthful boho-chic look that is perfect for city walks.
This season's cocoa-and-milk beret looks elegant in a monochrome set. A great example of how felted items go well together without looking too overwhelming.
Hats that will set the mood for a family photo shoot. The family look of a fox mother and a bull son can be used both for a home fairy tale production and for a matinee in kindergarten.
Fashion trends
A felted hat is a unique handmade product. Possessing it is a great and warm happiness, and making it yourself is a skill worthy of praise. Fashion influences felted hats, and now classic hats acquire a youth style, become modern and very fashionable.
Georgian felt hat
The Georgian or Svan hat personifies the rich flavor of Georgia. In this country they are sure that such a hat is a talisman, a priceless gift and simply a universal thing.
The svanka has a round shape and sits loosely on the head, thanks to which it is not hot and, as Georgians say, headaches and the stress of a hard day go away.
Fashion trends have adopted the classic style of the Georgian national hat. Today this original model is complemented by a felt visor, flowers, horns and other decorations.
Hat Rose
Among modern models, a hat with delicate draperies in the shape of a rose stands out clearly. The process of its manufacture includes the technique of wet felting. At the last stage, the crown of the cap is twisted, creating “rose petals”. On the reverse side, the petals are securely reinforced with stitches, so the model will not lose its presentable appearance for a long time.
The felt hat Rose goes perfectly with a romantic look and will be an elegant addition to a coat or fur coat.
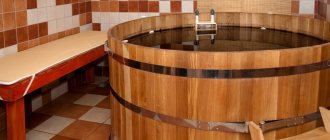
Watermelon hat
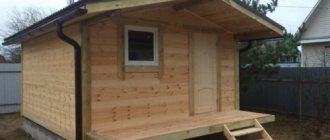
But an original Watermelon bathhouse hat can be an option for a gift for yourself or your loved ones. It can be done in two solutions:
- half a watermelon with rind;
- red watermelon with seeds.
The first option will be created using the wet felting technique, while the second includes a combination of methods. Thus, the red base of the cap is created in wet felting, and the seeds are later attached using a dry technique using a special needle.
As a gift, the Watermelon hat is suitable for men and women, because it looks bright and very creative, and handmade makes the gift unique.
With horns
British artist Barbara Keel became the author of stylish hats with horns. Using the wet felting technique, she creates hats with sheep, deer and other horns. Bright photographs of her family wearing handmade hats are blowing up the Internet and causing a lot of people to want to copy such models.
Well, it’s not difficult to recreate the model, because it is made like an ordinary felt hat, and later the horns are attached to it.
The model of a felt hat with horns will be an original option for youth casual style, will conquer extravagant natures and simply create a fashionable New Year's look with magical transformations.
With ears
Another model of a hat, made similarly to the model with horns, is a model of a felted hat with ears. The ears of a seductive cat on a “swanka” style hat, complemented by a modest visor, look interesting and sexy.
Features and Benefits
Among nonwoven materials, a distinction should be made between felt and felt, although both materials are similar. Felt can be either natural from the fluff of rabbits and goats, or from synthetic fibers. Compared to felt, felt is a more flexible, soft and lightweight material. Although these characteristics apply more to felt and factory-produced felt. Craftsmen who felt by hand create felt of varying densities and thicknesses, from translucent webs to fabric several centimeters thick.
An important feature of felt hats is the use of exclusively natural materials in their production, since only 100% sheep wool can be felted. In such a hat it is not hot indoors and not cold in the cold. This means you don’t need to take it off on public transport or in a store, which will allow you to preserve your hairstyle and the intended image as a whole. Felt is an excellent thermostat that does not allow moisture to pass through, but absorbs it like a sponge. The felted hat is not afraid of snow and is not blown away by the wind. At the same time, the hat is lightweight, you can roll it up and put it in your purse without fear of ruining it.
A felted hat is a bright and unusual accessory that will not let you go unnoticed. Therefore, when choosing a felt hat, you should carefully consider your overall look.
Models. Color and print
Most often you can find felt animal hats. Stylized owls and foxes, raccoons and cats will be an excellent addition to a youth's informal wardrobe or will highlight mother and baby on the playground if the choice falls on a family look. Funny ears, horns and faces will appeal to children, teenagers, anime lovers, and will also cheer up everyone who treats fashion and themselves with humor.
Beanie hats are made from thinner felt. The folds on the caps are not draped, but are created by the craftsman during the felting process. The trend of the coming season is beanies with a lowered crown, which look more voluminous compared to the classic model, which is important when shaping the silhouette as a whole. After all, in a tight-fitting hat, the head may seem disproportionately small in relation to the figure in voluminous outerwear. Felt beanies, delicate, feminine, warm, will go well with a fur coat and winter coat, quilted or woolen. Designers suggest combining them with stoles and shawls made of thinner felt of the same color as the hat.
Felt hats as art objects! Here there is room for the imagination of the masters to run wild. After all, with the felt technique you can create not only on a plane, but also in three-dimensional space. Hats turn into voluminous flowers on the head, fields, meadows, waves... Such things are unique, and even if desired, the author is unlikely to be able to create an exact copy.
Often felting masters - felt makers - create a one-of-a-kind canvas, mixing textures, textures and colors, like an artist using oil paints on canvas. The result will not leave anyone indifferent. The hat is an art object suitable for truly creative and daring people and will fit well into the boho style.
If you want to express your own ideas in an unusual hat, then you can place an order with a master and jointly think through a project that will be brought to life by a professional. Or make a hat with your own hands using the wet felting method. To do this, you will need wool, water, soap and... hands that are laid out, and then rubbed for a long time, minutes, and stroked this wool. Perhaps you will be fascinated by the process itself, because it is not for nothing that this type of needlework has so many fans and admirers at the present time.
Felt hats and bonnets will be very popular in the coming season. The catwalk presented a wide variety of hats made of non-woven materials: berets and bowlers, fedora hats and cloche hats. Preference should be given to soft shades - lilac, gray, rich blue. Felt hats decorated with luxurious embroidery, metal rivets, and voluminous abstractions made of yarn look very impressive.
The favorite headdress of Parisian women, the beret, can also be made using the felting technique. This model of headdress often appears in the collections of famous designers and promises to return to fashion for a long time. The beret is suitable for girls of a fragile build with graceful features. The beret models that are relevant for the coming season are made in pastel colors - beige, light grey, pale pink and turquoise.
How to care?
Felted hats should be worn without fear of washing! The lightness and delicacy of felt hats creates a false impression of their fragility and fragility. It's an illusion. With proper care, high-quality felt will serve you for a long time and retain its original appearance.
If the felt hat is a little dirty, try scrubbing the dirty spot with a dry clothes brush , then wipe with a damp cloth or wet sponge. For felted products, only delicate hand washing in water at a temperature of 30-40°C is suitable. You should use special gels for washing wool containing lanolin, such as Laska, Dreft, or you can use hair shampoo. Woolen items rarely need to be washed - just leave the hat in warm water for 1-2 hours and then rinse well.
It is better to wring out the hat using a towel. Next, the still wet hat needs to be given its original shape, straightened with your hands and put on your head. It is better if for this purpose you use a head a size or two larger than yours, since woolen products shrink significantly when drying. After this, you can finally dry the hat on a three-liter jar or hat blank, if you have one.
Let's briefly look at the images that can be created using a felted hat, using examples of the work of the talented felt maker Valentina Shileiko.
A bright beanie hat with a color gradient from light gray to mustard yellow goes well with a voluminous chunky knit scarf and an oversized coat. Overall, we see an easy, youthful boho-chic look that is perfect for city walks.
This season's cocoa-and-milk beret looks elegant in a monochrome set. A great example of how felted items go well together without looking too overwhelming.
Hats that will set the mood for a family photo shoot. The family look of a fox mother and a bull son can be used both for a home fairy tale production and for a matinee in kindergarten.
To make an impression and be noticed, all you need is a small black dress and... original accessories. Pastel shades of pink, blue and turquoise highlight the exquisite fantasy shape of the cape and felted cap.
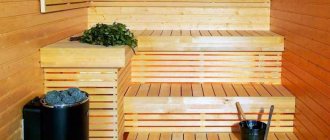
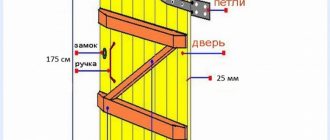
Step-by-step felting of a bathhouse cap: master class from professionals
For bath lovers, an original cap will be an excellent attribute in a hot sauna. Wet felting is great for wardrobe items. Consider a master class on making a bath cap.
To work you need:
- Material for pattern;
- Wool;
- Polyethylene;
- Nylon fabric;
- Warm soapy liquid;
- Sanding machine, if available;
- Gloves for work.
We make a pattern on paper. The hat will be in the shape of a bell. We focus on size 56. Based on this, the width is 44 cm and the height is 28 plus 6 cm to create a semicircle. Let's make another pattern on polyethylene.
We put the polyethylene under the paper and begin to lay out the wool. Let's choose the main shade and start working from the top of the head. Thin strands will make approximately 6 rows.
The next step is to wet press the pattern. Place a nylon cloth on top of the felt ball and moisten it with a soap solution. It will be convenient to use a spray bottle.
We begin to wipe the future hat, moving from the central part to the sides. When the wool lies evenly, you can begin to make circular movements, lifting the nylon fabric. These manipulations must be performed until the felt stops stretching.
We apply a film pattern to the product. It is necessary to press down the template well. Carefully tuck any protruding fibers behind the film.
Next you need to place the second ball. Now starting from the bottom and moving to the top. Next you need to carry out the same manipulations as with the first layer. Cover with a nylon cloth, moisten and smooth out a little. Then the hat blank must be turned over. Carefully tuck any protruding fibers behind the film.
Now you need to make a cross layer of wool. On the sides the villi can boldly protrude, while at the top and parallel to it a straight line should form.
The thickness of the wool layer should be the same in both balls.
Then we again cover the cross layer with a cloth, spray it with soapy water, and rub it. Turn over and remove any protruding fibers.
On the other side the process is similar. Then repeat the cross layer on both sides. Total of 4 layers in total on each side.
The wool needs to be pressed. To do this, you can use a special machine or work manually. There is no need to process the edges.
Monitor the moisture content of the product. In case of high humidity, remove excess water with a towel.
Next you need to roll the hat onto a stick and roll it on a bamboo mat. The procedure will take 5 minutes, after which the product is straightened and the felting side is changed. You need to allocate 20 minutes for this. During surgery, smooth out any creases. After this, the cap must be turned out and the procedure repeated. The product resembles a cap.
It’s time to add a soap solution to well-felted wool. It is better to work with gloves. You need to crush the product thoroughly.
While felting, straighten the craft on both sides.
When the product begins to shrink, you need to put the hat in hot water and wrinkle it a little. Next, lower the product into cold water. Repeat this contrast again. This is an important measure so that the hat gets used to changes in temperature in the bathhouse. When finished, rinse the product in warm water and dry with a towel.
The still wet hat must be put on the workpiece and given the desired shape.
If desired, you can create a woolen decor. You can also make the lining on silk.
"Winter Queen"
We present to your attention a master class on felting a very fashionable “Winter Queen” hat with earflaps from wool.
To work you will need:
- Wool;
- Viscose fibers;
- Hook;
- Beads for decoration;
- Threads;
- Film with pimples;
- Underlay for laminate;
- Hot water soap solution;
- Felting machine (if you don’t have one, you’ll have to felt it by hand);
- Scissors;
- Bead needle;
- Felt pen;
- If available, you can use a roller massager;
- Rolling pin.
First you need to make a pattern template, we make a drawing on a substrate under the laminate.
Please note that in this photo the numbers are in centimeters; the pattern is designed for head sizes 54-56.
We transfer the ear of the cap and the frontal part to a simple sheet of paper. You need to draw a pattern on the piece of paper; the stripes should be no wider than one centimeter.
If you do not know how to draw, you can transfer the drawing from a computer or print it and transfer it to paper using carbon paper.
Now we need to make a prefet. We lay out a rectangle of white wool, the direction of the wool should be different (vertical and horizontal).
You need to lay viscose on top of the laid wool in a dense layer.
Now we wet the whole thing with a hot soapy solution and cover it with bubble wrap. We process with a felting machine, stopping for about ten seconds at each section.
Now we wrap this blank together with the film onto a rolling pin and roll it out; this needs to be done about two hundred times.
Now the product needs to be smoothed and dried, you can iron it.
Now, using a special disappearing marker, draw a picture according to the template and cut it out.
This is the beauty we got:
Now we begin to lay out the wool on the hat. We place the applique on the stencil with the wrong side up (as shown in the photo) and begin to lay out a layer of viscose.
We make a layer of wool on top, lay it out in thin strips, slightly overlapping each other. Lay out the first layer vertically and the second horizontally.
Now we wet the wool with hot soapy water and cover it with bubble wrap. Distribute the water evenly over the stencil, while trying not to move the wool.
Now we turn the product over and remove the first layer of bubble wrap and repeat all the same steps as with the first side.
We bend the protruding edges to the other side.
We close the application very carefully, without moving it in any way.
When folding the edges, try to avoid creases and sharp corners.
On this side we also lay out the wool in two layers horizontally and vertically. We also lay out viscose, avoiding the frontal part.
We treat the product with a hot soapy solution, cover it with bubble wrap and turn it over to the other side. Place a layer of viscose on this side again. Place the second applique piece face up. Now we turn the product over and lay out the applique on this side.
We wet the workpiece with a hot soapy solution, cover it with bubble wrap and process it with a felting machine, no more than fifteen seconds in each area.
Now press the applique with your fingers so that it does not move while rolling.
Now we wrap the hat in a “sausage” and roll it on each side about two hundred times.
We unfold it and press the applique again, but this time stronger and more confidently.
Now very carefully cut the product along the edge, try not to touch the appliqués.
Lightly press down the cut areas with your hands.
We extract the pattern template from the product. Now you need to very carefully cut between the frontal part and the front.
Smooth out the fold lines along the entire perimeter of the hat and press with your fingers.
For faster and better felting, you can walk over the product several times with a massager.
As you can see in the photo, at this stage of work the applique has not yet completely fallen onto the cap.
Now we lay out our hat on a towel as shown in the photo, roll it up and roll it about two hundred times, sometimes making sure that the sides of the hat do not lean against each other.
This is what our applique should look like after we rolled it in a terry towel.
Now we will roll with our hands; to do this, wet the hat with hot soapy water and begin to knead it, knead it as if you were working with dough.
This is how much our header has shrunk compared to the template:
Now cut the ears very carefully along the contour of the applique.
An interesting idea - felting a hat with ears
The felting technique can be used when creating a hat with earflaps. You can also create children's versions of the product with cat ears.
Let's consider an interesting option for hats with ears. For work we will need:
- Wool is the main material;
- Material for pattern;
- Soapy water;
- Polyethylene;
- Sanding machine (if available).
The usual pattern involves a circle in the shape of the head. For hats with ears, you need to cut out an ellipse. We take head circumference data, but stretch the circle. The correctness of the calculation can be easily checked using a thread. Use it to measure the circumference of your head and compare it with the drawn ellipse.
The most important part of the pattern is drawing the ears. We draw them in a circle, taking into account that the ear deviates from the center if you look at the head profile drawing.
At the end of intensive felting, we give the product a contrasting bath, after which we rinse the hat and allow it to dry on the workpiece. Malachai is ready to use.
Stylish looks
A felt hat with natural silk decor will appeal to young girls and women. Fashionable loose fit and gathers make the model universal for any combination.
A great option for a felt hat for a fun photo shoot is a cap hat with contrasting inserts and original flagella on the top of the head.
A cute and funny hat with deer horns will make your youth look bright and memorable.
An amazingly beautiful set of a hat, gloves and a scarf, made of merino wool in mustard colors, will refresh any look and emphasize the delicate taste of the owner.
Animal hats are at the peak of popularity today. Why not choose felt as a material? A fluffy panda with cute ears is ideal for a youth look.
Looking for an option for a children's party? Take a closer look at the cute “Fox” hat model in a bright orange shade. The naturalness of the material will give you comfort, and its originality will allow you to become a holiday princess.
A boyarka hat in rich colors is a bright detail of an everyday look.
Felting a men's hat for everyday wear
Wool hats retain heat well and regulate humidity. For a fisherman husband, such a gift will be a real salvation on winter fishing.
In the appropriate store you need to buy wool of the desired color and density.
The set of tools remains the same. We will need:
- Wool;
- Polyethylene;
- Soapy liquid;
- Felting machine (if available);
- Pattern paper;
- Nylon fabric.
The sequence of work and technique is maintained. We measure the circumference of the head and make a pattern. Next, we place the felt in several balls and knead it thoroughly, spraying it with soapy water.
After repeating the manipulations on both sides, we begin felting. The process will take about an hour. After this, we wash the product and leave it to dry on the workpiece.
In Georgia, woolen hats are considered a traditional headdress for men. This wardrobe item can be found in every Georgian.