Unfortunately, not all users pay due attention to the drain in the shower stall; they believe that this is not a bathroom and, in principle, no problems can arise with this unit. This is not the case, as practice shows; to remove some problems, you have to completely dismantle the shower stall. This is time-consuming and expensive, and is associated with risks of damage to individual parts and assemblies. Replacing them with new ones is problematic, and not all can be repaired.
Shower drain
Organization of drainage from the shower stall
There are 2 types of shower cabins. The first ones have a tray with a hole, used to collect and drain waste into the sewer pipe. The installation of the drainage system in this case is carried out without preparation. Cabins without a tray require the installation of more complex equipment: water enters the sewer through a channel built into the floor. Such booths are built in public institutions.
Shower drain with point water collection
The drain for point collection of water is a device installed under the floor. Designs of this type have securely fixed components and smooth internal surfaces. Installation of filter elements is mandatory.
Reliable drain design.
When arranging the ladder, the following components are used:
- garbage bin;
- rubber seals ensuring tightness;
- a water seal that prevents gases from entering the room;
- protective mesh cover;
- frame.
Ladders are made from polymers or metal.
Based on design features, the following types of drain systems are distinguished:
- Horizontal. Small devices are equipped with side outlets. Horizontal drains are used when finishing bathrooms in residential buildings and apartments.
- Vertical. Drainage devices have a high throughput capacity. They are often installed in swimming pools. Clogging of a sewer outlet is rare, but failure of the drain results in the need to remove the facing material and destroy the cement backing.
Lattice covers are available in round, rectangular or square shapes. The height of the body depends on the type of ladder.
When purchasing plumbing fixtures, take into account the following characteristics:
- resistance of the grid to loads (this element should not deform under the influence of a person’s weight);
- outlet diameter (you need to purchase products with a pipe with a cross-section of at least 5 cm);
- throughput capacity (must exceed the amount of wastewater discharged);
- the presence of a garbage container and a water seal.
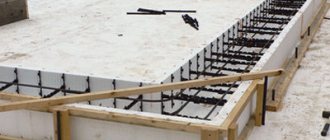
Channel system
Installation of a duct system requires floor preparation. If the drain is located next to a wall, the pedestal should have a slope in one direction.
Channel drain system.
Details of the drainage system are installed before the floor covering. A plumbing fixture consists of a pipe and a container for collecting water. The drain hole is covered with a grate. The channels are made of metal, ceramic or plastic.
The device is sold ready for installation. The kit includes a siphon that prevents gases from entering the shower room. It is connected to a common pipe with a flexible hose. The areas surrounding the drain hole are sealed with tiles.
Before the purchase
When choosing a shower siphon that is right for you, it is recommended to take into account a number of nuances.
Among them, the most important is the diameter of the drain hole. According to European standards, it should be 52, 90 and 62 millimeters. Most often, modern varieties are produced with precisely these diameters, but there are often cases when a careless manufacturer does not comply with the technology. To avoid trouble, be sure to measure the diameter of the drain before purchasing. The second important characteristic that is worth paying attention to is the throughput parameter. It is determined from calculations of the permissible water layer for the pan
At a level of no more than 12 centimeters, use a shower siphon with a diameter of 52 and 62 mm; if the value is higher, then it is better to purchase a design with a neck of 90 millimeters.
Cleaning
Since, in addition to the drainage function, shower siphons also perform a protective role, it is recommended to clean them by hand from time to time. Over time, a huge amount of dirt and hair accumulates in the structure. In addition, the advantage of such a device is the ability to return them if small objects fall into the drain.
To clean the siphon (which, by the way, can be done without waiting for blockages, at least for the sake of prevention), you need to unscrew the elbow and clean out all the dirt and residues accumulated in it. For particularly heavy stains, you can use a rough brush to remove stubborn dirt. For lazy people, a shower siphon that can clean itself will be a godsend.
Types of siphons for shower stalls with a tray
Shower cabins with trays are equipped with drainage systems that differ from those used in the arrangement of stationary structures. When choosing plumbing fittings, the design and principle of operation are taken into account.
Classification by mechanism of action
According to the mechanism of functioning, siphons are:
- Simple. Included in the set of budget cabins. The drain hole is covered with a rubber stopper to prevent water from draining. After removing this part, the liquid begins to flow into the sewer pipe. The main advantages of such a system are ease of installation and reasonable price. The disadvantage is that it is inconvenient to remove the plug.
- Click-clack. Siphons of this type are equipped with a lever, pressing which helps open the hole. The device consists of several pipes connected by one water seal.
- Automatic. The valve is permanently located above the drain. The system is equipped with a switch that, when pressed, moves the plug. The first use of the button removes the plug, the second returns it to its place. This device should be used with caution.
An excellent choice of Click-clack shower tray valve.
Structural classification
Based on their design, there are three types of siphons.
Siphons can have the following designs:
- Tubular. The drain tube has an elbow structure, which prevents the water seal from disappearing. Installing such a system prevents the appearance of unpleasant odors in the room. A siphon for a shower cabin with a low tray has a drawback: the curved parts of the corrugated hose accumulate dirt that must be removed with chemical compounds. Inconveniences also arise when disassembling a system installed in a limited space.
- Bottle. The siphon design includes a flask resembling a jar. Particles of contaminants accumulate at the bottom of the sump. When clogged, the flask is dismantled and washed. The liquid constantly present at the bottom of the jar prevents foul-smelling gases from escaping from the drain hole. In the event of a breakdown, any part of a plumbing fixture can be easily replaced. The main disadvantage is considered to be the large dimensions, which do not allow installing a siphon under a low tray.
- Corrugated. The outlet is a flexible tube, one side of which is inserted into the sewer pipe, and the other is connected to the opening of the pan. The device can be positioned at any angle. This allows it to be installed on low pallets. When draining a large volume of waste, the corrugated tube moves and must be returned to its original position. The water seal is located separately from the drain channel.
Exploitation
Sink valves are easy to operate. Care consists of control and timely cleaning (if necessary). To clean the shutter device, remove the grate, remove the water seal from the glass, and remove deposits. In general, mechanical cleaning is rarely resorted to. To make siphons less likely to become clogged, experts recommend cleaning the sealing product once every six months as a preventative measure. This is done using household chemicals suitable for plastic structures.
If a blockage occurs, air purging of the hydraulic seal under high pressure is unacceptable. It can lead to rupture of parts of the structure. It is also unacceptable to try to remove debris with sharp objects, as this can damage the walls of the corrugated pipe or other parts of the valve structure.
Choosing the right drain
When choosing drain structures for shower stalls, observe the following rules:
- The body of the plumbing fittings should not be compressed by the cabin parts. It is necessary to determine in advance the distance from the floor to the bottom of the pallet. This space includes siphons no more than 20 cm high.
- The diameter of the neck must match the dimensions of the drainage hole.
- The sewer pipe must lie below the level of the drain pipe.
- The filter component ensures rapid removal of liquid from the low pan.
Exploitation
Sink valves are easy to operate. Care consists of control and timely cleaning (if necessary). To clean the shutter device, remove the grate, remove the water seal from the glass, and remove deposits. In general, mechanical cleaning is rarely resorted to. To make siphons less likely to become clogged, experts recommend cleaning the sealing product once every six months as a preventative measure. This is done using household chemicals suitable for plastic structures.
If a blockage occurs, air purging of the hydraulic seal under high pressure is unacceptable. It can lead to rupture of parts of the structure. It is also unacceptable to try to remove debris with sharp objects, as this can damage the walls of the corrugated pipe or other parts of the valve structure.
Installing a drain for a shower stall with your own hands: step-by-step instructions
The installation procedure depends on the type of drainage structure chosen, however, there are general recommendations that improve the quality of the work performed. If the siphon or drain is installed incorrectly, the risk of flooding or sewer gases entering the room increases.
Installation of a shower channel
This system is laid under the floor. Before installation, the grille is covered with masking tape.
The work order includes the following steps:
- Preparation of the external surfaces of the canal. Sanding with sandpaper improves the adhesion of plastic to cement mortar. After roughening the surface, wipe it with a degreaser.
- Securing the channel. At this stage, a bracket is used. The water collection tray is grounded. The sewer pipe requires rigid fixation, because it will experience stress when a person is in the shower room. One end of the corrugated tube is connected to the sewer line, the other to the channel pipe. The hose is inserted into the holes until it stops. Before installation, the surface of the tube is treated with sealant.
- Connecting a tray for water drainage. To do this, use a pipe with smooth internal surfaces.
- Elimination of gaps between the channel and the pedestal. The thickness of the cement layer is selected taking into account the type of tile being laid.
- Floor covering. The height of the tiles should overlap the edges of the channel. The material is laid starting from the drain hole. Form a slope of 1 cm/m. The joints of the tiles and the decorative grille are cleaned of cement and sealed with sealant. After the composition has dried, the cabin becomes ready for use.
When laying a duct system, the following points are taken into account:
- The distance between the drain outlet and the sewer line should be minimal.
- Before installation, the drain capacity is determined. The tray is placed on the floor, after which water is supplied under pressure.
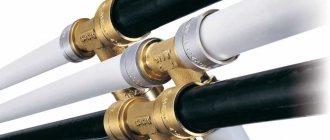
- To connect structural elements, hoses with a cross-section of at least 40 mm are used.
- The duct system located close to the door is equipped with a sectional grille.
Installation of water drainage drain
We follow all the rules when installing the ladder.
This plumbing fixture is installed in the same way as a duct device. Cheap ladders do not have latches. To hold the body in its normal position, improvised materials are used - tiles, bricks.
You cannot fix the drain with foam, because... it fails under load.
The cement screed gives the structure horizontal stability. The formation of the floor is carried out in stages. Watching the appropriate video will help you complete this stage of work correctly.
Installing a siphon on a pallet
A correctly assembled siphon for draining a shower stall.
The process of installing a siphon on a low or high tray cabin includes the following steps:
- Connecting the drain outlet to the water seal. The pipe is equipped with a conical rubber seal. The narrow part is left at the neck. The outer surfaces of the gasket are coated with sealant. One end of the pipe is inserted into the flask or elbow tube all the way. Fixation is ensured by tightening the nut.
- Installation of the plug. A sealant is applied to the water seal pipe. Screw on the plug. If such a detail is not provided for in the siphon design, this step is skipped.
- Neck connection. A gasket is installed between the pipe and this part. The nut is tightened until it stops. At this stage, make sure that the seal does not move. If this happens, you need to unscrew the nut and return the gasket to its original position.
- Installing a siphon on a pallet. The neck is aligned with the hole, the drain hose is connected to the sewer line. The upper part of the plumbing fixture is secured with a screw. A sealant is preliminarily placed under the neck.
- Arrangement of a drain-overflow system. This stage is performed when installing a high pallet. The hole in the wall of the container is combined with a flexible tube connected to the water seal.
Types of cabins and equipment
It is worth immediately noting that all types of shower cabins differ in shape, materials of manufacture and method of installation relative to the bathroom space. Let's look at each type in more detail:
Closed models
They are the most common option. Every second person who prefers showers can find this type. It is characterized by closed walls and is a separate small room. An enclosed shower cabin also has a door, a tray, a roof and a shower head. Additional functions are built inside that are necessary for a comfortable shower. If desired, you can install a water heater and even a radio. The main disadvantage of this type of shower cabin is the cost, which is higher than the market average.
Much depends on the manufacturer, as well as the material from which the booth is made. One of the main advantages of such models is good sound insulation. Advantages also include additional features, variety of models on the market and quick installation.
Open cabins
In this case, the wall will be the wall of the room itself. The complete set of this type of shower stall includes only a door, a tray on which a person stands, and a shower head. The option is quite simple and does not have any additional features. Mostly such models are installed in the corner of the bathroom. Of course, their main advantage is cost. This cabin is the most budget-friendly among all those on the market. It is also possible to construct a cabin of any size that will be necessary for comfortable use.
Their main drawback is the difficult repair of sewer and water supply units. Open models do not have an upper base, that is, a roof. Thus, a “tropical shower” is not possible in this case. A regular shower head is used, which is connected to the mixer. This type of shower stall is intended only for just washing, but not relaxing under warm water.
Pallets are needed to collect water and also drain it into the sewer. According to their shape, pallets are divided into corner and rectangular.
When choosing it, first of all pay attention to the depth, which is divided into:
- Deep or high pallets. Very similar to a small bathtub, in which you can sit and draw water.
- Medium size pallets. They are considered the most universal and are used much more often than other types.
- Low pallets. They are quite compact. They are often called flat. This is due to the fact that they are practically invisible. Such pallets require special techniques for installing water drainage. Otherwise, problems may arise and the water will not go down the drain.
The most common pallets are made of acrylic.
You can also find products made from other materials:
- cast iron;
- steel;
- earthenware;
- from artificial marble;
- natural stone.
As a rule, the most popular and frequently used is the acrylic tray. It is durable, easy to maintain and inexpensive. The most expensive is a pallet made of natural stone. Its main advantage is fast heating. As a rule, the tray retains heat for a long time, which makes your stay in the shower more comfortable.
Walls are essential components of a shower room. Their main function is to protect against the ingress of water, which can extend far beyond the cabin. The raw materials for the production of doors are plastic, glass or aluminum. Glass doors are the most popular. They are presented on the market in two versions: frosted and tinted glass.
The standard equipment of the shower stall includes the following elements:
- pallet;
- back panel;
- roof;
- racks.
Drain care
Regardless of the quality of installation of the shower drain system, blockages occur periodically. They lead to stagnation of water in the cabin and the appearance of an unpleasant odor in the bathroom.
If the water does not drain well, then you need to check the siphon.
You can clean the drain in the following ways:
- Mechanical. In this case, a metal cable or plunger is used.
- Chemical. Special compounds are used to clean pipes. Aggressive substances damage plastic. Preference is given to gel-based products. You can use traditional methods, such as cleaning the sewer system with vinegar and soda.
When connecting the cabin to the sewer through a corrugated pipe, it is more difficult to clear blockages. You need to remove the hose and rinse it with a powerful stream of water. In some cases it is necessary to replace the siphon.
Required Tools
When installing and connecting a shower cabin to the sewer, you will need certain tools and consumables. The base is made by pouring a concrete screed, which means you should prepare a tool for preparing the solution, carrying out concrete work and applying waterproofing:
- construction mixer;
- shovel;
- measuring container;
- Master OK;
- grater;
- grater;
- putty knife;
- knife;
- scissors.
Tools for concrete screed
The cabin is connected using:
- Bulgarians;
- electric drills;
- hammer drill;
- screwdriver;
- grinding machine;
- hacksaws for metal;
- pipe bending device;
- screwdrivers;
- pliers;
- vice;
- wrenches, socket wrenches, plumbing wrenches, adjustable wrenches;
- chisels;
- chisels;
- hammer;
- mallets;
- paint brushes;
- spatula.
Cabin Connection Tools
Supplies you will need:
- polyurethane foam;
- silicone sealant;
- FUM tape;
- cuffs;
- hairpins.
Quality control and the necessary measurements are provided by a building level, tape measure, metal ruler, corner.
In conclusion
Installing a shower stall in your home is not a difficult task. Particular attention should be paid to connecting the pan to the sewer; communications will be hidden, so it is better to do everything correctly right away than to correct minor defects later. The proposed material will allow you to correctly connect the pan to the sewer.
Sources:
- https://sovet-ingenera.com/santeh/vanna/sliv-dlya-dushevoj-kabiny.html
- https://stroyday.ru/remont-kvartiry/ustanovka-i-remont-santexniki/sliv-dlya-dushevoj-kabiny.html
- https://stroy-podskazka.ru/vannaya/dushevye-kabiny/sliv/
- https://stroitelniportal.ru/stati/santehnika/vybor-i-montazh-sliva-dlya-dushevogo-poddona-svoimi-rukami/
- https://gidroguru.com/vnutrennyaya-kanal/razvodka/dush-kabiny/2557-sliv-dlya-dushevoj-kabiny
- 1
What is the difference between a ladder and a tray?
In simple terms, a shower drain differs from a tray in size and appearance. A drainage device with a square or round grate is called a drain. A shower tray is a drainage channel with a rectangular grille.
Since the trays have a larger grid area, they also have a larger area for collecting water from the floor. Many people think that if the shower tray is larger than the drain, then the water will flow into it faster. However, this is not quite true. I'll explain why a little later.
Rectangular designs
Despite the similarities in the installation rules for all types of cabins, a rectangular shower has its own installation algorithm: first of all, the back panel with the equipment is attached. After that are the side walls. Lastly, the front part with the doors is attached.
Other features:
- Such a shower does not always require a tray. The drain can be installed directly into the floor, providing an inclination angle of 2 degrees. For an impressive appearance, the floor with a built-in drain is decorated with tiles (using a level at each step so as not to change the angle of inclination). It is allowed to use a special drain snake (drainage) around the perimeter of the cabin instead of a standard siphon.
- The faucet and shower pipe are not mounted on the roof or side panel, but directly into the wall.
- Instead of a metal profile, hinges can be used to fix the walls.
Material of walls and doors
There is not much choice in cabin wall materials. It is either glass or plastic.
The priority is glass, which can be frosted, transparent or a combination. Also, modern cabin doors can be tinted or any desired color, in accordance with the design of the entire bathroom.
For the shower stall, you can choose translucent matte doors.
Glass walls are installed framed and frameless. The frame is made of steel or aluminum and looks stylish and modern.
The frame shower cabin in gold color looks gorgeous.
Frameless cabins fit perfectly into any bathroom interior. Metal corners look stylish and modern.
Plastic is also not ignored; it gives an aesthetic appearance, transparency and lightness to the structure. In addition, it is easy to use and maintain, relatively inexpensive and durable.
In addition to the walls, if there is space in the bathroom, fences in the form of a niche are also installed, finishing them with tiles or stone. There is also a fence on the floor about 10 cm high from the same material. Such podiums with sides are relevant in the bathrooms of apartment buildings, where such a cabin is installed already during the process of living there. In a private house, fencing may not be required if the floor is sloped for such purposes.
A good solution would be to make a small side.
As for the doors, they are installed from the same material as the shower walls - glass or plastic.
Types of doors:
- Glass blocks. Allows you to separate the space of the shower stall in the bathroom.
- PVC curtains. The advantage of them is that they are relatively inexpensive and can be changed periodically depending on wear or mood. They are quite dense and do not allow water to pass through. The average size of such a curtain is 90*90 cm.
If there are no fences, you can put a special circular frame and hang a curtain on it; during the procedures, everything is tightly covered with it, and after that it simply moves, leaving one pallet.
An economical and unusual solution is a circular curtain.
There are options without fences at all, but the downside is that during the washing process the entire bathroom will be flooded and everything will be covered in soapy spray.