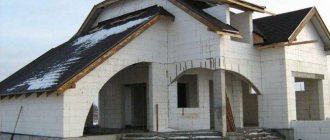
In areas with difficult terrain and unstable soils, the right solution is to build a bathhouse on screw pile foundations. Such a structure can be located on the shore of a reservoir or on a slope, significantly reducing the occupied area of the site. The arrangement of the premises remains practically unchanged, however, the drainage in the bathhouse on screw piles is arranged with some features.
Drainage on screw piles: how to do it
By building a foundation on screw piles, a number of problems can be avoided.
Firstly, this option will take a minimum amount of time.
This design can last about 75-150 years. Everything will depend on the quality of the coating that protects against corrosion.
If necessary, the foundation can be reinstalled in another place, because the piles are reusable.
This design will help avoid additional costs for waterproofing.
At the stage of arranging a drain in a bathhouse on screw piles, you will need a plastic drain and a polyvinyl chloride film.
A drain is installed in the corner of the room where the washing room is located.
If the floor is wooden, the edges of the boards are treated with an antiseptic (this will prevent rotting). Then the film is laid. They try to replace it at least once every few years.
Pipes running outdoors must be insulated with special materials. Otherwise, they will not survive the winter.
The distance from the sewer to the steam room should be within three meters. Pipe installation can be done in two ways:
- lay them under the foundation;
- make holes in the finished base.
It is more practical to choose the second option. Otherwise, the holes may simply differ from the diameter of the pipes due to soil shrinkage, trivial errors in calculations, as well as the use of low-quality building materials.
Before you start designing drain holes under the floor in the bathhouse, make sure there are no communications. It is necessary to take breaks from work to avoid overheating of the tool and to ensure that there is no mechanical damage. The diameter of the holes should be slightly larger than the diameter of the pipes.
Foundation cladding
In order for the support pillars to have a more presentable appearance, as well as to protect them from dirt and dampness caused by melting snow or flooding with water from a reservoir, they should be additionally finished. Various facing materials will help protect the floor in a bathhouse on screw piles, as well as emphasize the appearance of the building itself.
Since the main damage can be caused by snow and flows of dirty water in the off-season, special attention should be paid to the waterproofing qualities of cladding materials.
Note that natural and artificial stone is very durable and absolutely waterproof.
Old floor replacement technology
Consists of the following steps:
- Skirting boards are removed. This must be done carefully so as not to damage the boards. Wooden pads will come in handy.
- The screws are gradually removed from the boards.
- The logs and beams are inspected for traces of mold and mildew. Infected, rotten elements are removed.
- The logs are dismantled. Areas with chips are trimmed and sanded.
- The lower part of the walls, which was under the baseboard, is treated with an antiseptic. Logs suitable for reuse are also disinfected.
- Now you can begin laying the new flooring.
Photo: interior of a Russian bathhouse
Arrangement of the floor in the steam room with your own hands
The principles of installation and overlapping of the rough and finishing floor covering may depend on the materials used and the assembly method. If the main material for building a pile bathhouse is a log or timber, it will be enough to equip only a rough floor covering. Finishing is carried out only after the shrinkage processes of the structure are completed. If the main structural elements and walls of the steam room are built from an adhesive-based material, then the subfloor, insulation “pie”, moisture insulation and finishing coating can be installed two months after the main construction is completed.
Insulation of the floor in a bathhouse on a pile-screw base
For the installation of rough flooring, a chain link or other low-grade board is usually used, including unedged wooden materials. You don’t have to worry that the subfloor will in any way affect the condition of the screw base
But at the same time, it is important to check the consistency of the material fragments with each other in terms of thickness
One of the best types of insulation, which is recommended for use in bathhouses, is foamed polystyrene. Among specific brands, we can name such manufacturers as Penoplex or Technoplex. The insulator is sold in the form of sheets. In central Russia, to insulate the subfloors of a steam room, it is better to use insulation with a sheet thickness of 50 millimeters. If winters in the region are severe and reach 40 degrees Celsius and below, the best solution would be to lay a double layer of polystyrene foam.
Waterproofing floors in bathhouses on stilts
Before installing the waterproofing material on the surface of the subfloor, you need to make a hole in the sheets of insulating material where the glass of the system used to drain the water will be placed. Its diameter should be equal to the cross-section of the installed corrugated or plastic pipe, or be 1.5-2 millimeters larger than it.
Once the corrugation is in place, you can begin laying the insulating film. For the floor of a bathhouse constructed using the pile-screw method, the best solution is the use of an EPDM rubber membrane. A solid sheet of material must be rolled out over the surface of the heat insulator, leaving overlaps on the walls, 25 to 30 millimeters wide in each direction. To avoid deviation of the waterproofing sheet from the specified perimeter, a special aluminum threshold must be placed along the edge of the sink or steam room. It will press the membrane tightly against the insulation material.
Shower floors in a pile bath
The next step in the design of the bath room is the installation of the finished floor. Metal mounting elements called “moths” are attached to the wall. They will serve as fastenings for the finished floor joists. The spacing between beams may vary depending on the area of the steam room. The foundation on screw piles guarantees a high level of foundation rigidity. But professionals advise installing the bathhouse floor beams at a distance of 50 centimeters from each other.
The pouring floor boards are laid on top of the installed logs. Most often, the thickness of the floorboards varies from 25 to 35 millimeters, and the structure is made on the basis of wooden pins and is removable. The boards must be sanded first, this will help avoid chips and splinters.
Drain device
Due to the fact that panel, frame baths or log buildings are mainly built on a pile foundation, the grillage is constructed mainly from timber or rolled metal.
Organization of drainage using tiles at an angle
In this case, draining can be done in several ways at once:
- Pouring the slab grillage;
- By laying an asbestos-cement sheet on the beams with a screed or facing with flat slate tiles on it, and ensuring the required slope due to the difference in the thickness of the glue;
- By securing a galvanized sheet to a grillage with a slope towards the sewer drain (for wooden floors);
- By laying a membrane on the subfloor, attached to both side surfaces of the walls (for wooden floors).
Membrane drainage device
Membrane drain
The most economical option is to perform drainage using EPDM membranes. The design will be like this:
- Subfloor joists secured with metal holders;
- Subfloor, which can be made from tightly laid boards 25-30 cm;
- Insulation, which is used as EPPS with a thickness of 80-100 mm;
- A drain installed in the subfloor and insulating material, and inserted into a drain with a dry water seal;
- Membrane laid over the entire perimeter. It should also be placed on the walls on the sides, taking into account the elevation of the finished floor;
- Finishing flooring logs secured with profile holders;
- The finishing coating is in the form of an edged board, which is not recommended to be firmly fixed, but attached to 10 mm dowels.
This fastening of the finishing coating allows you to remove the boards in any area for garbage collection and sewer drain cleaning. For the water drainage device, the slope is arranged directly in the membrane during installation. The bottom of the EPDM is pressed, then the waterproofing is slightly raised towards the top and secured with slight tension.
Watch the video on how to waterproof a drain using a membrane and install a drain cover.
For frame baths, in order to line the walls from the inside, a vapor barrier device is required, and the scheme will undergo some changes:
- First, the subfloor is laid, and its insulation is carried out in exactly the same way as in the first solution;
- The membrane is fixed to the walls with a slight launch using a stapler; a tension is created for the drainage device;
- The frame of the walls is sheathed with a vapor barrier material, while its lower edge is laid on top of EPDM - when moisture accumulates, it will flow onto the membrane without destroying the wooden elements of the load-bearing frame.
Application of sheet materials
Creating a slope from porcelain stoneware or tiles using sheet materials will cost a little more, but it is quite possible to do it yourself.
Watch the video on how to make a drain slope using tiles.
In this case, it is necessary to observe the following technology:
- The subfloor is made of edged boards on joists;
- Extruded polystyrene foam XP5 is used as insulation;
- Dry screed is made from asbestos-cement sheets or CSP;
- For waterproofing, an EPDM membrane and polymer mastic coating are used;
- The drainage is arranged only in the form of ladders with dry water seals;
- For cladding, tiles or porcelain stoneware are used, laid with an inclination towards the ladder.
Drainage device when screeding
Dry seal design
Screed without coating is performed in order to save on finishing. In this case, you will need wooden ladders that are laid when using the bathhouse, and removed at the end of the bathing procedures for drying.
In this case, the drainage is arranged after two- or three-layer waterproofing of the screed with mastics, penetrating substances or using hydroglass insulation. Sewage drains are embedded in the foundation, for which it is best to use dry water seals.
Drainage device when pouring the slab
The slab is poured during the construction of the foundation grillage. In this case, the drainage slope is set directly along the slab, and the sewer hole is arranged by installing a pipe of the required diameter into the formwork.
Water seal in the bath
A water seal is a specially created water plug that protects the room from the unpleasant “aroma” of sewage. Water accumulates in the curved section of the pipe, completely blocking the diameter. Thus, the water does not allow bad odors to enter the room.
When is it necessary to use a water seal in a bath?
It is necessary to use such a design for sewerage if water is drained into the general water supply system. If the liquid is drained into a pit outside the bathhouse, there will be no bad smell. If the bathhouse sewerage system was connected to a common system, then you can use ready-made siphons (as for a washbasin or bathtub) of any type. Metal or plastic corrugated hose or bottle-type closures are commercially available. In rare cases, cast iron water seals are found, but they have not been produced for several years. In essence, such a device consists of two glasses inserted into one another. After the floors in the bathhouse are filled, the top of the water seal should be in a small recess to completely drain the liquid.
This device has two main advantages:
- it should serve as a settling tank;
- even if the water inside it freezes, it should not be damaged.
Making a water seal yourself
You can do it quite simply with your own hands. To do this, you need to take a piece of pipe of the required diameter and bend it in the shape of the letter “U” and weld it to the pipe after the drain funnel (usually its height is 50-70 mm). It is best to do this when laying the foundation and arranging the floor, however, if the bathhouse is already ready, and an unpleasant odor overshadows your stay in it, then you can install it later.
If the sewer pipes are accessible and the foundation of the building is columnar, this will greatly facilitate the work. You can weld the required piece of pipe to the drain pipe under the bathhouse. If there is no access to the pipes, then it will need to be organized: disassemble part of the floor if it is made of wood, or cut it out using a grinder if it is concrete. After this, a bended pipe is attached to the sewer using welding or a coupling.
It is also necessary to take into account that water can evaporate, and if you do not use the sewer for a long time, after 40-50 days it will completely dry out and gases will freely enter the room.
What is a dry water seal?
This design can also be dry. There is no water in it, and dry materials are used as a damper. This option, as you understand, is not capable of freezing, and it comes in several types:
it is a membrane held in place by a spring when there is no water. When liquid enters, the spring power is not enough to hold it, the flap rises and the liquid drains. An object of a certain shape (often a large diameter ball) blocks the air passage. When liquid enters, the object floats, opening the drain. More complex models use molecular memory of the material.
You can make a simple dry water seal for a bathhouse with your own hands; there is nothing complicated about it. You need to choose a plastic ball slightly larger than the drain pipe. When there is no water, such a ball will block the access of air from the sewer. As soon as the liquid flows, the drain will be released. This type of system can also work in winter, even if the ball freezes to the drain, a little boiling water can literally melt the ice in a matter of minutes, and the system will work normally.
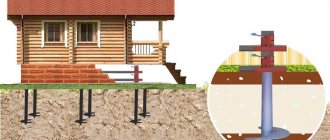
Foundation for a bathhouse with drain: manufacturing
Modern baths differ in their design and wall material, so the method of eliminating condensation plays an important role. Therefore, when designing bathhouse foundations, a drain is often initially provided for, which can be done with your own hands in the shortest possible time. But to do this, it is worthwhile to imagine a little about the technology for draining bath wastewater, how to predict its composition and method of purification. Only then can it be foreseen what kind of foundation should be used for the bathhouse, and what materials it should be made from.
But, given the small mass of the building, it is now possible to make a screw base on piles with your own hands in the shortest possible time and with minimal financial costs. And to improve waterproofing, it is always worth installing high-quality floor insulation, especially in cold geographical areas.
The wastewater can be gray or brown, respectively, it is sent first to the filter or directly to the septic tank.
The presence of a toilet in the bathhouse is also taken into account, which can work constantly or periodically. Then the drain should be sent directly to the septic tank, where wastewater is treated from feces.
If there is no toilet in the bathhouse, and the wastewater contains only shampoo and soap, then the drainage can be directed to a graphite filter for simple cleaning.
How the system works: when can you do without a septic tank, are there bathhouses without drainage?
You can do without a septic tank when it is possible to connect to the central sewerage system. If there is no bathroom in the bathhouse, then the requirements are slightly reduced - you can make one well, filling its bottom with crushed stone.
If there is no toilet in the bathhouse, then the water used will be practically clean, that is, an overly complex design is not needed here.
If you don’t plan to install a bathroom, then you don’t have to install a special system in the sauna that is responsible for filtration. Another option is to install rings that do not have a bottom. So, the water will drain away on its own, penetrating into the soil. If the bathhouse has a bathroom, you need a septic tank that includes several chambers.
Typically, the material for a septic tank is selected depending on the groundwater level. If the mark is high, then you should not give preference to metal and PVC barrels. It is better to use them if the groundwater level does not exceed a critical level. A bath drain from a barrel is an ideal option for sandy soils.
The depth and dimensions of the septic tank must be selected individually. For example, at a significant depth, a smaller diameter of materials is used. The area allocated for the septic tank must be accessible for pumping out the AC using a machine or a special pump.
Advantages of a columnar, screw foundation on piles for a bathhouse
- For the foundation, you can use available materials: metal pipes, concrete and reinforcement. After all, the structure of the bathhouse is light; it is not built from natural stone or concrete, but in most cases from wood. But it is quite difficult to insulate the floor due to the relief of the base.
- An open drainage space can be laid between the screw piles or a protective grille with porous insulation can be installed;
- The design is perfect for buildings built on swampy soils and subject to seasonal movements due to soil freezing;
- Floor insulation is done directly during installation of the second floor;
- Pipe communications can be laid at different depths, additional insulation of pipes can be provided, but it is not recommended to install pipes at a depth below the lower edge of screw piles;
- You can build a bathhouse on a large slope with your own hands in the shortest possible time;
- Load-bearing structures are installed directly on the upper horizontal leveled edge of the foundation; this can also be a second floor with insulation.
Frame with cladding: walls and roof
The upper ends of the supports will be supported by grillages - horizontal beams that serve as support for the walls.
It is quite risky to use timber with a diameter of less than 15 cm for these purposes. After fitting and making joints, the grillages are connected using self-tapping screws (metal corners will add reliability). It's time to connect communications and sewer pipes to the future drain and prepare to install walls and roofs. The size of the beams for the walls depends on the shape of the roof - on a pitched roof it is more rational to use materials of different lengths. The pitch between the wall posts holding the cladding (edged boards with a thickness of 5 cm or more) is calculated using the formula: the distance between the screw supports divided in half.
Installation is carried out using corners and is reinforced with struts to ensure reliability. The planned parameters of the walls are adjusted and leveled.
Construction Features
A bathhouse is a structure with a unique operating mode. Warming up of rooms occurs infrequently, but up to very significant temperatures with prolonged cooling, therefore frame structures are ideal for its construction.
Frame bathhouse on screw piles is one of the most common types
This choice is due to the following factors:
- There is no need to insulate the walls, because there is no stable heating and maintaining heat for a long time loses all meaning;
- In winter, walls made of logs or bricks turn into ice blocks, which cannot be warmed up quickly;
- An insulating material is laid inside the frame, which allows you to retain heat from the stove, warm up the rooms faster and reduce heating costs;
- A wooden floor in bathhouses on a screw pile foundation warms up much faster than a concrete screed or monolithic slab;
- Conventional wooden flooring cannot organize the drainage of water from the foundation or organize high-quality drainage in bathhouses on screw piles.
Kinds
Two types of coverings can be installed in frame houses - wooden and concrete. Each of them has certain characteristics and is built differently.
Wood
The most popular type of flooring for classic Russian baths. Advantages:
- environmental friendliness of the material;
- low price;
- slow freezing of the material;
- attractive look.
Flaws:
- over time, wood loses its attractiveness;
- wood is destroyed by prolonged exposure to moisture.
To avoid destruction, the wood must be coated with special antiseptics.
Leaking
Leaky structures consist of several levels:
- building foundation;
- beams located on the foundation;
- boards attached to beams at small intervals.
Soapy water flows through holes in the floor onto the ground or into a prepared drain. The washing room is very cold in winter.
Leak-proof
Leak-resistant wooden floors are continuous flooring made of planks that are angled in one direction. At the lowest point there is a drain grate through which waste liquid is removed from the bath. Leak-proof deck design:
- OSB boards up to 6 mm thick;
- windproofing, waterproofing;
- thermal insulation made of mineral wool;
- OSB protective board 18 mm thick;
- two layers of polystyrene foam;
- vapor barrier;
- fiberglass reinforcing mesh;
- concrete screed with reinforcing mesh;
- plank flooring.
It is pleasant to steam in a bathhouse with a leak-proof flooring in winter and summer.
Concrete
These are the most expensive, complex structures in terms of arrangement. Advantages:
- durability, strength, reliability;
- absence of harmful substances during strong heating;
- withstand frequent temperature changes and prolonged exposure to moisture.
Flaws:
- Without additional insulation, concrete freezes quickly.
- It takes a lot of effort and money to build a concrete foundation.
After laying the floor, you need to do decorative cladding of concrete surfaces to improve their appearance.
Well with a filter at the bottom
The design of a drain pit with a filter bottom is used primarily to purify wastewater from dirt and chemical elements, as well as to retain bacteria. Subsequent filtration of water is carried out directly by the soil layer. But at the bottom of the well, crushed stone, crushed brick or sand are used as a filter.
To ensure the outflow of water from a bathhouse designed for 3-4 people, a well with a diameter of 1.5 m and a depth of 2 m is sufficient. It can be either rectangular or round in shape - the latter option is preferable due to the uniform distribution of pressure on all walls. The cylindrical design will need correction much less often.
Since it is necessary to drain the bathhouse at the dacha without damaging the building itself, it is advisable to retreat from it at a distance of about 3-5 meters. Such a gap will ensure, first of all, the safety of the bathhouse foundation from being washed away, and will also prevent the penetration of unpleasant odors from the well into the bathhouse. But if you locate the drainage hole further, you will inevitably have to purchase additional pipes for water drainage. In addition, it is difficult to ensure the correct angle of inclination over a long distance.
If the soil on your site is dense enough, then simply dig a hole for drainage and lay filter materials at the bottom - sand, crushed stone and broken brick. Additional strengthening of the walls is not required.
According to the drainage diagram in the bathhouse, a trench can be dug from it to the pit, through which water will randomly flow by gravity into the well. However, it is best to equip the drain with pipes made of asbestos, metal, plastic or ceramic, with a diameter of 50-100 mm. In this case, a trench is also necessary, but its depth will depend on the depth of soil freezing, but not less than 50 cm. The pipes are laid at a slope of 20 mm at every meter of distance.
At the design stage, the future design of the drain and the features of the floor organization are thought out in detail. An economical option for draining a bathhouse in a country house is to make the floor sloping towards the drain hole. With this design, wastewater enters the pipes and is discharged directly into the drainage pit.
An alternative to a drainage pit is to use a sealed septic tank, such as one made of plastic. Such a device will be especially relevant in cases where the bathhouse is equipped with a toilet, that is, the nature of the wastewater will require more thorough cleaning.
How can you arrange a kitchen sink drain at your dacha?
To organize a drain at your dacha with your own hands, you need to connect a corrugation to the kitchen sink and create a water valve by bending the corrugation in an N-shape so that water always remains in it. Then connect the corrugation to a plastic pipe with a diameter of 50 mm and bring it outside the house. By the way, the kitchen sink should be equipped with a grate to prevent large food waste from falling into the drain pipe. When installing a drain on the main line between the kitchen in the country and the drainage container, it is necessary to install an intermediate siphon so that all foreign particles that are heavier than water settle at the bottom and do not fall into the container. The siphon should be equipped with an inspection window so that you can unscrew the lid and drain the water with solid particles into a bucket. This will reduce the entry of organic matter and sand into the drainage container. In this case, the volume of the barrel will be enough for a longer time, the barrel will last longer, and otherwise the rotting processes will lead to its silting.
When mixing for concreting, you need to add a spoonful of any washing powder to a bucket of water into the solution. This additive will facilitate the mixing process, improve the quality of the solution - increase its moisture resistance, strength, frost resistance, and protect it from cracking.
Then you need to take a metal barrel; if it is closed at both ends, then on one side you need to cut out the bottom using a chisel and hammer. Place the barrel with the open end down in the hole on a pre-filled bed of gravel and small crushed stone. The prepared pit for draining water at the dacha must be larger than the height of the barrel. At the other end of the barrel, you have to make one hole for the pipe, connect the barrel and the pipe taken out of the kitchen with a tee with flanges. All joints: pipes with the barrel, as well as with the outlet pipe from the sink, must be sealed.
Possible options for draining a sink in the countryside, organized by yourself, are shown in these photos:
For better resorption of waste water, you can additionally dig drainage trenches on the sides of the barrel as wide as it is, approximately 1.5-2 m long. The trenches must be filled with crushed stone and large boulders. Cover the top of the trench and barrel with a layer of earth 30 to 100 cm thick, flush with the surface of the site, and cover it with turf. On top you can plant flowers, grass and a couple of birch trees - they love water. As practice shows, if you drain a sink in your dacha in this way, the structure will last about 7-10 years.
Why choose screw supports for self-assembly?
Constructions of this type are best suited for doing construction work yourself.
Firstly, when using screw piles, the use of expensive special equipment is not required, which for various reasons cannot always be delivered to the site (for example, due to the impossibility of driving to the construction site). Pile supports can be screwed into the ground yourself with the participation of one or two assistants, using lever mechanisms.
Secondly, such designs are initially sold ready-made. Piles can be installed immediately after they are delivered to the site.
Basement design options
As you understand, when using screw piles, there is no base under the bathhouse as such, but there is a so-called basement space. This is the distance from the grillage/subfloor to the ground surface.
How to decorate this space so that the overall design of the bath complex looks attractive?
The easiest way is to sew up the basement space with any sheet basement decorative material. This can be all available options for basement siding, profiled sheets, metal siding.
You should not cover the basement space with regular vinyl siding. It may not be enough even for one season, since it is thin and relatively fragile. Vinyl wall siding will definitely not survive the winter; it will be broken in cold weather, since it becomes extremely brittle at low temperatures.
Floor design in baths
It makes sense to analyze each type of flooring in detail when it comes to residential or public buildings. However, installing a floor in a bathhouse on screw piles is possible even with minimal knowledge and skills.
If a sufficiently high grillage is provided, then a hanging non-leaking plank floor in a frame bathhouse on stilts will be the optimal solution. An additional layer of insulation will allow you to use the bathhouse at any time of the year, otherwise in winter such a floor will be very cold.
A pile foundation allows you to protect the lower part of the deck from any external influences, in particular precipitation, flooding or simply moisture. But from the inside, such a floor is constantly subject to changes in temperature and humidity, because condensation forms in the steam room, and water is also supplied to the washing room.
Preparatory work
So, the foundation is installed and the walls are erected. Now we are making the floor in the bathhouse on screw piles. You need to thoroughly prepare for this work, study the technology, purchase everything you need, and invite assistants.
For work you will need the following materials:
- tongue and groove board;
- beam;
- fastening material - nails, etc.;
- cement;
- coarse sand;
- expanded clay and/or other bulk materials;
- roll waterproofing;
- antiseptic composition;
- mineral wool or other insulation.
Tools and equipment for work will require:
- construction mixer;
- tank for mixing the solution;
- wood hacksaw;
- grinder saw;
- construction knife;
- hammer;
- mittens, work clothes, rags.
The list of necessary tools and materials can be specified after it has been determined from what material and in what way the floor in the bathhouse will be installed on screw piles.
Options for draining a bathhouse on a pile foundation
In the case of using a screw foundation, it is best not to make a drain under the bathhouse, but to move it outside the building area.
The most correct option would be to use a sewer pipeline and drain bath wastewater into a pit or septic tank next to the bathhouse, or into a common house septic tank.
In this case, you can use both a pouring floor with a drain plane and concrete floors with drains to collect wastewater. Further, through the pipes, the water can be removed beyond the sauna base.
As you can see, before draining the bathhouse, you should think about how best to implement the bathhouse sewerage project.
How to make a drain under a bathhouse when there is only one room in it, which combines both a steam room and a washing compartment? This can be done using a pouring floor in the steam room, when a galvanized iron trough is installed under it, which collects water. Next, the water is sent through a ladder in the trough to the outside, into a cesspool or septic tank.
How to drain a bathhouse on stilts when you need to combine the drainage from the washing compartment and from the bathroom? All you need to do is link the two drains, with the toilet drain being fitted after the wash compartment drain. In this option, the water from the washing compartment will not only push waste from the bathroom ahead of itself, but will also clean the entire length of the drain pipe.
Installation of the support structure
Happy owners of a new bathhouse with a foundation rising above the surface often face difficulties in weeding out weeds from under the structure. A mound of sand early and easily will prevent this problem. It is enough to place roofing material under the building and cover it with a ten-centimeter layer of sand.
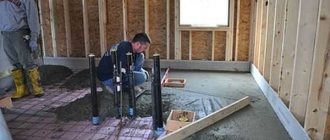
The procedure for constructing a foundation is very simple:
On a pre-prepared (cleaned and marked) site, in pre-designated places, small holes are made (up to half a meter deep). Screw piles for the bathhouse are installed in them.
Using a special lever (must be included in the kit), they are immersed to the required depth (depending on the nature of the soil and the dimensions of the future bathhouse, on average 1.5 - 2 meters into the ground).
Before installation, it is recommended to treat the piles with a special anti-corrosion solution (especially if there is a risk of contact with groundwater)
After installation, it is necessary to check the angle of deviation from the vertical position and level everything to the required height.
Stages of floor insulation
Let's look at the main points of thermal insulation of different structures.
Wooden
Sequence of work:
- On top of the beams, rough covering elements are packed in steps equal to the width of the board.
- A moisture-proof film or other waterproofing material is fixed with a construction stapler.
- Depending on the design, insulation is laid across or along. To increase the effect, it is recommended to lay a foil vapor barrier film on top. Ondutis R Termo is popular. Plus, it protects the insulation from getting wet.
- The next layer is the sheathing. It consists of stuffed thin bars and slats. Responsible for floor ventilation.
The final step is laying the finished wood flooring.
Concrete
Work order:
- Ruberoid, insulating film are laid on top of the established concrete base, or the surface is simply coated with bitumen mastic.
- A layer of expanded clay, perlite is poured or polystyrene is laid (optional).
- A metal mesh is attached, which will serve as reinforcement.
- A self-leveling concrete screed is poured.
At the request of the owners, tiles are laid or removable wooden panels are used.
For self-construction, both concrete and wooden floors are suitable. In bathhouses made from fresh logs, the best addition will be a plank floor, in brick buildings - a monolithic concrete slab. In both options, it is necessary to decide at the project development stage whether the design will be torrential or not.
Floor materials
Wood (coniferous species) is most often used for flooring in bathhouses. Concrete screed is no less popular. Considering that a bathhouse is a room with special operating conditions, it is necessary to carefully select the flooring material. So, a concrete floor will become a reliable and durable foundation, but its installation will be somewhat more expensive than a wooden structure.
Flooring options
However, a wooden floor is more preferable, since it can be repaired at any time by replacing a damaged element without dismantling the entire structure. And by regularly treating the floor with antiseptics, its service life will double. As an option, you can make a combined floor in the bathhouse - in rooms with high humidity (steam room, wash room) use a concrete screed, and leave a wooden floor in the remaining rooms.
Advantages and disadvantages
The construction of a bathhouse on screw-type supports is deservedly popular. Such bases are much more economical than conventional ones. When building a bathhouse, supports can be installed in 1-2 days.
The supports can be installed by two people; no special equipment is required. Piles can be installed in areas of any complexity.
It is possible to carry out construction in forest clearings, between trees. There is no need to clear the area and remove bushes.
Information. It is not necessary to remove soil and remove construction debris that remains after the construction of a conventional foundation from under the pile foundation. This will save a lot of energy.
A pile-screw foundation is excellent for building a bathhouse on soils whose aquifers are at a high level. You can also install supports on soft soils. Screw piles provide a high degree of stability of the base, because when they go down, they reach hard layers of the soil.
The advantage of such a foundation is that you can always make an extension to a bathhouse on screw piles, which will not “walk” due to the fact that it has a separate base.
Screw-type supports have excellent load-bearing capacity. It is worth noting that when they are installed, the soil does not change its structure, only becomes more dense. The blades with which the piles are equipped distribute the load evenly. Soviet engineers were the first to decide to use them. Such structural elements contribute to resistance to frost heaving.
Attention! The advantage of a screw foundation is the almost complete absence of shrinkage. This means that you can erect a bathhouse or any other building immediately after completing the installation of the supports
Construction can be done at any time of the year. The base is durable, it will last at least 100 years. It is possible to install a turnkey bathhouse on stilts near utilities.
The advantages of this type of foundation are undeniable, but the technology also has a number of disadvantages. The main thing is that the piles are made of metal
This material is susceptible to corrosion, so it is important to choose a manufacturing company that strictly adheres to manufacturing technology when producing supports.
Important! If the site has rocky soil, ordinary piles for soft soil will not be suitable. Installation in rocky areas is only possible using special equipment or special types of piles
But this significantly increases the cost of construction.
By installing screw-type supports, you can only build a building without a basement. Subsequently, it can be completed, but its insulation will require significant financial investments. This will lead to the fact that the cost of a pile foundation will be equal to that of a strip foundation.
Below you can watch a video about the pros and cons of screw piles and the foundation made from them:
Site preparation and procurement of materials
The speed and quality of installation of pile-screw foundations largely depends on the preliminary preparation of the construction site.
Before starting construction, it is necessary to clear the area of weeds , bushes and trees that may interfere with the work.
If the installation of piles is carried out in winter, snow should also be removed from the area where the bathhouse will be built.
It is also necessary to take care of the supply of water and electricity in advance. Water will be needed to prepare the cement-sand mixture, electricity is required for lighting and operation of electrical equipment.
To build the foundation, you will need steel screw piles with a diameter of at least 89 cm . The optimal metal thickness is 3.5-4 mm. Supports with such parameters can withstand operating loads of up to 5 tons.
When filling the internal cavities of pile supports, you will need a sufficient amount of concrete mixture grade M300 or higher. To prepare it, you should purchase sand, cement and crushed stone in advance. If desired, special modifiers can be added to the solution to increase the frost resistance of concrete.
Wood boards, channels or a metal profiled pipe can be used to tie the pile-screw base . If wood is used, when purchasing materials it is also necessary to purchase special means for its antiseptic treatment.
For anti-corrosion protection of channels and profiled pipes, any metal paint that has the appropriate properties can be used.
The last item on the list of required materials is waterproofing. As such, you can use liquid rubber and hydrophobic paints.
Insulation of the floor in a bathhouse depending on its type
Let's start with the fact that the baths may not have a rest room, but there will always be a steam room and a washing room, as well as a dressing room. These three rooms have different humidity and temperature conditions. However, this does not prevent you from making the same floor everywhere. The only material you can use for it is concrete or wood.
It’s difficult to make concrete, it requires not only experience, but also assistants, but it will last for half a century without replacement. Wooden is much easier to manufacture, but wood quickly becomes unusable in contact with moisture, which means you will have to replace the entire floor in just a few years.
The general requirements for any of the mentioned types are as follows:
- the surface must be rough enough to prevent slipping;
- cleaning the room and drying it should be easy and simple;
- the presence of a rapid outflow of water, due to which the water will not stagnate and microorganisms will not have time to multiply in it.