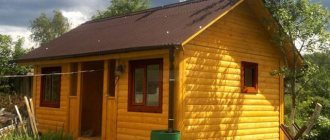
The main advantage of country life is that you can build a bathhouse and steam in it every day. For lovers of heat and birch brooms, the presence of such a house is a given. But if previously bathhouses were built exclusively from logs, now they can also be built from SIP panels. This option has its advantages and disadvantages.
One of the advantages of a bathhouse made from SIP panels is the speed of construction. Since such buildings are not made large, you can get a full-fledged sauna within a week after the start of construction work. All that remains is to do the interior finishing and you can check how good the steam is.
Another advantage is the low cost of such an event - SIP panels are much cheaper than a log house or brick. Another bonus that will allow you to save money is that the building is lightweight and can be placed on a pile-screw foundation, rather than erecting a monolithic foundation.
The high thermal insulation of the panels will play into the hands of those who like to take a steam bath - after all, maximum temperatures can be reached many times faster than in a bathhouse made of classic materials.
The disadvantages of SIP baths include:
- The first disadvantage is that construction must be carried out by professionals. This is necessary to ensure that the technical characteristics of the room meet the standards. That is, you won’t be able to feel like a canonical man and build a bathhouse with your own hands.
- The second disadvantage will be that you will have to make additional insulation in the steam room, since the polystyrene foam that is inside the panels does not best withstand temperatures above 120 degrees. It begins to lose its functional qualities and along with it the entire building loses them. Although, of course, it is problematic to achieve such temperatures, it is better to protect yourself in this regard, so that in a few years it does not come to rebuild everything.
- And the last disadvantage that bathhouses built using SIP technology have is the aesthetic side. If you do not carry out additional finishing work, then the bathhouse will lack the canonical smell of wood and it will bear little resemblance to the classical ideas about it. But this can be easily dealt with - simply by covering the interior with clapboard.
Based on the above, we can safely say that a bathhouse built using panel-frame technology, like houses made from SIP panels, is not much inferior in its characteristics to buildings made from traditional materials.
Such a phenomenon as a bathhouse made of sip panels appeared in the everyday life of lovers of steam rooms and saunas relatively recently, no more than ten years. The very idea of building from a material based on OSB boards and thick sheet foam looks extremely attractive and interesting. If houses are built from new insulated packages, then the construction of a bathhouse from sip panels will certainly be no less successful.
Construction of a bathhouse from sip panels: pros and cons
First about the material. Baths have always been in first place in terms of the number of fires, so it would be strange, knowing about the tendency of wooden slabs to catch fire, to try to build a steam room out of them. The secret here is simple: vulture panels for residential buildings and baths are made from special types of foam with a fire-fighting additive. Walls made of unlined material are classified as resistance class “G1”.
It is not difficult to make a bath box based on slabs of pressed shavings and thick, 70-150 mm, high-pressure polystyrene foam. The question is whether it is worth experimenting and trying to build a bathhouse building from sip panels in conditions where there are a huge number of projects for timber and log buildings.
Sip panels have two huge advantages, thanks to which the material is intensively displacing mineral wool, penoplex, and various types of backfill heat insulators from the construction market:
- Very low thermal conductivity with minimal weight. From sip panels 200 mm thick, you can easily build a bathhouse with almost zero heat loss through the walls;
- Thanks to impregnation with paraffin melts and polymer resins, a heated OSB board becomes practically impervious to water vapor, there are no cracks or pores. In a bathhouse, moisture falling on a heated sip panel gradually evaporates and is carried outside the room.
SIP material looks like a sandwich of two cladding slabs, between which a layer of thermal insulation is laid. According to reviews, a sauna made of sandwich panels heats up for a maximum of an hour in cold and humid windy weather, and cools down within a day. In the summer, a steam room made of sip panels can keep heat for three to four days, video
The negative aspects of a bathhouse made of newfangled material include:
- Low mechanical strength of the walls; if a one-story steam room can be assembled by stitching together ready-made panels on vertical wall posts, then a building with an attic will require the assembly of a load-bearing frame holding the ceiling and the attic with a roof;
- There is a risk of degradation of polystyrene foam under the influence of high temperatures, especially in the area of the walls adjacent to the stove and chimney.
Quantity calculation
To calculate the number of sandwich panels, the following factors must be taken into account :
- Bath dimensions: length, width and height.
- The span width, which must be a multiple of the panel sizes.
- Roof thickness.
- The area occupied by doors and windows.
For example, if the length of the bathhouse is 6 m and the height is 3 m, then for horizontal installation you will need 3 panels of 6 m each. If they are installed vertically, then purchase 6 panels of 3 m each.
To calculate the number of panels for the roof, you first need to find the length of the slope using the formula:
C=Öa2 + b2
Where:
- a is the height of the slope;
- b is the distance from the greater height of the slope from the smaller plane.
When the length of the slope is calculated, the length of the roof overhang is added to it. If there is not enough experience in carrying out construction work, then it is better to seek help from specialists to perform the calculations. This will avoid unnecessary expenses on building materials.
Bathhouse made of sip panels: projects
From a heating engineering point of view, a sauna room made from sandwiches can be called the most efficient due to its good heat retention. The issues of resistance of sip panel structures to moisture and fire depend 100% on the correct layout and professional design of the building structure. Simple and effective methods used in wooden steam rooms and baths can reduce the risk of problems to almost zero.
The simplest backyard steam room project
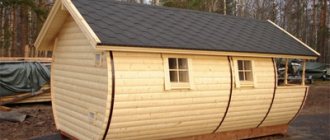
The designs of saunas made from sip panels presented below can be called a classic version of a steam room intended for home use. The small size and ease of assembly allows you to install the box on your own in the courtyard of a private house in just a couple of weeks of work.
This type of bathhouse is built in a format of 3.7x4.7 m with a steam room of 5 m2, designed for simultaneous visits by three people:
- The total area is 15 m2, the steam room is 5 m2, the dressing room, also known as the relaxation room, is 6 m2, the project has a “cold terrace” of 2.2 m2;
- According to the project, the bathhouse body is built from sip panels 124 mm thick, with a ceiling height of up to 2.5 m, an insulated ceiling and a flat pitched roof;
- The building is installed on a bored pile foundation, 40 cm high.
According to the project, the outer walls are covered with plastic panels, the interiors are finished with linden lining.
For suburban areas, you can use a design for a more spacious version of a country bathhouse.
The main difference from the previous bathhouse construction scheme is the increased area of the relaxation room - 10 m2.
According to the project, instead of a classic dressing room, a full-fledged rest room with furniture and sleeping places is equipped.
Such a bathhouse can be used as a temporary shelter during the construction of a suburban area with full-fledged housing.
The above project of a two-story bathhouse with a residential second floor can completely replace a garden house on the site.
Features of sauna buildings based on sip sandwiches
It cannot be said that this type of building simply copies standard solutions used in the arrangement of wooden baths made of timber and logs. Bathhouses made of sandwiches based on OSB and foam plastic should absolutely not be installed on a slab or MZLF foundation. Buildings of this type are supported only on piles or columnar supports, otherwise the basement and floor will become unusable within six months of operation.
The second condition is the use of exterior and interior decoration. If for a bathhouse made of maple or cedar beams the walls outside and inside the room do not need to be finished, then for vulture panels the use of lining, plaster or siding is mandatory. Otherwise, OSB boards will delaminate due to rain and frost.
Walls made of sip panels, unlike timber or log masonry, do not allow water vapor to pass through, so for a sip bath it is extremely important to arrange ventilation for all parts of the building, from the foundation to the roof and attic.
Benefits of the new technology
The Canadian construction method is ideal for cases where construction needs to be done quickly, regardless of weather conditions and the nature of the soil in a particular area. Out of the 4 weeks of technology provided for by the project, the construction of the box takes only 5-6 days. The rest of the time is 4 days for the foundation and 10 days for laying sewers, installing stoves and electrical wiring, finishing the steam room and protecting external walls.
Construction of a bathhouse according to the Canadian scheme can be carried out at any time of the year, and if a pile foundation is used, then the box can be placed in a wetland area right next to a reservoir.
Canadian baths do not shrink. Even if the wooden frame on which the floor slabs and truss system of the bathhouse are mounted according to technology shrinks under load, the walls, ceilings, and window openings will still remain unchanged. The frame is needed as an auxiliary part used for precise installation of slabs.
For your information! Canadian baths are considered the warmest, while the wall insulation, unlike basalt or mineral fiber, does not lose its properties over a decade and a half of operation.
If construction technology is followed, heat loss is on average 30-35% less than in the case of an insulated timber bathhouse.
In fact, Canadian baths successfully combine the advantages of timber, frame and foam concrete building options in one design. External OSB boards treated with chemical impregnations, from which the surface of the walls are formed, do not require special preparation for applying any protective or insulating coating.
Do-it-yourself sauna from sip panels
The construction of the future steam room box is usually carried out in two stages. First the foundation and outer walls. To simplify the work, blanks from sip panels are marked and cut in advance in accordance with the project. Next, the material is brought to the site, and the box of the future bathhouse is assembled.
The second stage is to assemble the ceiling and internal partitions of the bathhouse. Most often, they have to be cut from standard sheets of sip panels, adjusted and installed in place.
The kit includes everything necessary for arranging a pile foundation and installing a sauna frame made of sip panels. Finishing materials, heating equipment and communications are purchased separately. As a result, on assembly work to build a bathhouse based on sip panels, you can save up to 30% of the estimated cost of the project.
Construction of the foundation
The best option for a foundation for a building made of vulture sandwiches is considered to be a foundation on screw supports. You can wrap the pipes yourself by hand or rent a special machine.
The main thing is to screw the screw supports to the calculated depth in a strictly vertical position. On sandy and sandy loam soils, bored or yew piles can be used.
The upper part of the supports is cut to the level of the foundation and waterproofing must be applied, after which a mounting beam or log with a milled support belt equal to the thickness of the sip panel is laid. According to the project, the sauna frame can be reinforced with a metal channel if the height of the roof ridge exceeds the width of the base of sip panels by more than 1.5 times.
Subfloor logs are sewn along the laid beams, then a vapor barrier, on top of which insulation from the same sip panels is laid. The joints are covered with polyurethane foam.
Pest Control
The concept and design of Canadian baths was developed as temporary housing in conditions of very low temperatures, frost, and high air humidity. Of course, the technology to protect against rodents and woodworms appeared much later, and it does not always work as planned.
The main method of protection in the Canadian version involves the use of a foundation on screw piles in combination with special repellent impregnations of the outer OSB sheet. In our realities, bathhouse owners have added metal and fiberglass mesh to the basement of the building.
This is enough not to fear for the integrity of the walls of a Canadian bathhouse built on a country site.
Bathhouse price. The largest number of myths is associated with the cost of building bath complexes. Most often, a company that produces turnkey Canadian baths includes a minimum set of works in the project. For a price of $340 per square meter, a building without exterior finishing and, most often, without connected communications can be offered.
At the same time, for the same price you can purchase a ready-made bathhouse made of profiled timber, under approximately the same conditions.
Pros and cons of SIP panels
SIP panels, which are popular today, mean a structurally insulated material consisting of three main layers: two outer layers - particle boards or wood boards, an inner one - insulation, which is either mineral wool, polyurethane foam, or expanded polystyrene. The layers are connected under high pressure with a special adhesive composition - this allows the final product to be given the necessary strength.
- efficiency of construction - it will take no more than a week to assemble the box itself, even if you work with long breaks;
- high thermal insulation - since a significant part of the panels is insulation, they retain heat well;
- low weight - due to their lightness, the panels do not cause hassle in transportation and handling;
- high sound insulation - despite their modest thickness, walls made of SIP panels insulate sound very well;
- no temperature restrictions - you can start building a building from panels in any season of the year, even in winter.
SIP panels are a material that is gaining popularity in the construction market
- fragility - many manufacturers claim that the service life of the panels is 50 years, but, as practice shows, the real figure is no more than 30 years;
- low environmental friendliness - the panels contain a lot of synthetic products that are by no means environmentally friendly;
- high tendency to burn – SIP panels ignite very quickly at high temperatures (more than 100 degrees).
What are sandwich panels
The basis of the material most often includes chipboard sheets (if it is SIP) or steel sheets. The panel consists of several plates, between which insulation material is placed.
Sandwich panel composition
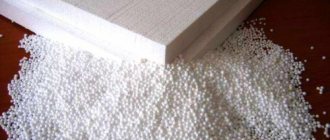
There can be several fillers for slabs:
- Styrofoam;
- mineral wool;
- polyurethane foam.
When building a bathhouse yourself, any of the proposed options can be used, however, based on such an indicator as environmental friendliness, mineral wool . Polystyrene foam and polyurethane foam are considered less environmentally friendly. However, such materials have excellent thermal insulation and sound insulation properties, and also have a very insignificant weight. However, when using these two materials, you should be prepared for the fact that the chimney will have to be completely insulated.
For the production of SIP panels, only high-tech equipment is used, which allows connecting individual elements to each other using an adhesive composition.
Manufacturing of sandwich panels
In this way, it is possible to achieve a high-quality, inexpensive and at the same time durable material that can withstand significant loads on a par with rounded logs. Based on its thermal insulation properties, the material can be compared to timber (kiln-drying) with dimensions of 20x20 cm or brickwork consisting of two bricks.
Comparison of material thicknesses to achieve the same thermal insulation value
Panels with a length of 7 m and a width of 2.4 m are considered standard. But the thickness can vary between 12-22 cm.
Preparation for construction
If you have decided to independently build a house or bathhouse from SIP panels, the first thing you need to do is prepare a building design. Here you can go two ways: either first develop a project and then order material for it, or immediately adjust the project to the standard dimensions of the panels. The second option is much cheaper and simpler, so it is better to choose it.
In the project, first of all, it is necessary to indicate the location and area of all premises of the building. It is also necessary to indicate the types and areas of location of the main engineering systems: ventilation, sewerage, water supply, heating.
SIP panels - lightweight material
The second stage of preparatory work is the purchase of building materials. For external walls you will need panels with a thickness of at least 20 cm, and for internal walls 12-14 cm will be enough. Be sure to pay attention to the marking of the particle board used in the panels - it should be intended for use in conditions of high humidity levels.
Advice. Buy SIP panels of class E1 or E0 - their external panels have the lowest content of forylmadehyde, so they are the safest.
Preparatory work
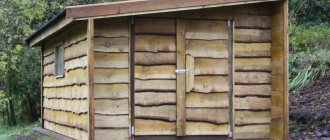
If it has been decided to build a bathhouse using sandwich panels without outside help, then first you should select the most optimal project for the future construction.
Bathhouse project example
Once the project is ready, you should begin purchasing all the necessary materials. For a bathhouse, you should purchase panels with a thickness of partitions of 10 cm and external ones of 20 cm, which will be more than enough. Oriented strand boards will act as barriers. For their production, compressed sawdust is used, which are glued together with synthetic wax and resins.
Oriented Strand Boards
To increase the strength indicator, the outer panels are made longitudinal, while inside they will be placed transversely. Such materials have their own classification, which fully complies with all declared standards. The special additives contained in the material must be at a minimum level and be completely safe for human health. Otherwise, during the heating process, specific substances may be released that will negatively affect the general condition of visitors.
Floor installation
In a house made of SIP panels, it is recommended to install the floor on joists - it’s more reliable. To do this, you need to prepare beams and tenon beams with a cross-section of 20 x 5 cm - the latter will be inserted between the panels.
Further work is carried out according to the following scheme:
Important! Along the entire perimeter of the base, extreme gaps of 15-20 cm should be left for further installation of walls.
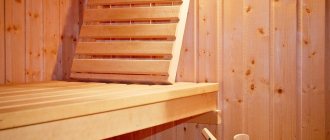
Finishing the interior walls of the bathhouse
To decorate the interior walls, Canadian cedar wood is used, which has a number of excellent physical properties:
- It has dense wood that does not absorb moisture, which prevents it from rotting.
- When heated, Canadian cedar wood releases essential oils that have a beneficial effect on health.
- Canadian cedar has a beautiful, distinct texture that can decorate a bathhouse.
- Canadian cedar wood is a fire-resistant material.
- The color of this tree can be varied: light amber or red-brown.
- For finishing interior walls, lining, panels and boards made of Canadian cedar can be used.
- The high density of wood and its wear resistance ensure a long service life.
Wall installation
The construction of the walls of a building from SIP panels begins with laying the “bench” - a guide board. Its dimensions must correspond to the thickness of the panels: if you use material 22 cm thick, prepare a board 5 x 20 cm. It must be fixed along the outer edge of the floor with a shift of 10-12 mm.
The installation of the panels themselves should begin from the corner: vertically join the two elements and “put” them on the bench. Pre-close their bottom and side grooves with foam. Next, adjust the panels vertically and horizontally and secure them to the bed with self-tapping screws in 15 cm increments. Then install a 5 x 20 cm square board between the panels and connect all three elements to each other with self-tapping screws in 50 cm increments. Mount all panels using the same pattern.
House made of SIP panels
When the walls are ready, foam the upper grooves of the panels and attach a frame of 15x20 cm bars to them using self-tapping screws. Next, secure the floor beams to the harness. Corners or brackets are suitable for this. The next stage is the arrangement of floors, which is carried out in exactly the same way as laying the floor.
Window and door openings can be cut both on already installed panels, and in advance - even at the stage of planning the location of the elements.
Consumables, additional materials and tools
To build a bathhouse from the specified material, it is recommended to prepare tools in advance :
- a circular saw;
- roulette;
- building level;
- screwdriver
You also need to buy self-tapping screws and a wooden beam from which the frame will be built. Often, timber is purchased to match the thickness of the panel itself, and the self-tapping screws must be the same thickness as the SIP panels.
To arrange the foundation, piles are prepared or a strip foundation is poured. To do this, you need to prepare boards, drainage, and also dig a small trench. You also need to purchase panels for the roof, materials for hydro- and vapor barriers and ventilation.
Assessment of the condition of the steam room
A Finnish bathhouse in the Leningrad region, created from structurally insulated panels (SIP) 10 years ago, when they had just begun to become widespread in the Russian Federation, was chosen as an object for assessing the physical condition. The building failed the strength test.
- The bathhouse was initially built with some violations of the general technology, since its construction was carried out by an amateur - the owner of the site. In particular, this led to regular freezing of joints during the cold season. By the way, home-grown Russian architects neglect technological standards in 80% of cases.
- As you know, when building baths, insulation is required. These are relatively soft substances - polyurethane foam, basalt fiber, etc. Due to the systematic influence of heat and the static effect of the structural mass, the insulation located inside the panel was deformed.
- The steam room was not equipped with additional thermal insulation. As a result, the polystyrene foam layer could not withstand 120-degree temperatures and gradually lost its original functional properties.
- In high latitudes, a common everyday phenomenon is excessive dampness. Therefore, the room began to bloom even with ventilation. It turned out that it was not powerful enough. The consequence was the gradual deterioration of the structures.
- Over time, the material was chosen by domestic rodents, noticeably damaging the internal surfaces.
- No matter how advertising tries to convince you that SIP panels are inert to fire, that is, fireproof, the fact remains that they are flammable, which was successfully confirmed during operation.
- There was always a foreign, unpleasant chemical smell in the steam room until it was lined with natural clapboard from the inside.
- Over the course of 10 years of service, many self-supporting insulated wires turned out to be mechanically damaged, and quite significantly.
- The room proved to be insufficiently warm, which is unacceptable for a good bathhouse.
However, suppliers who do not benefit from any kind of anti-advertising prefer to claim that all such things are nothing more than myths.
Domestic experts are increasingly inclined to believe that the frame method of constructing buildings is not the best option for constructing a modern bathhouse. The practicality and cost-effectiveness of the idea actually turns into early self-destruction of the structures.
Installation of the bath frame
It is the frame that will be assigned the load-bearing function of the future bathhouse, and the further operational life of the building and its level of safety will depend on its quality.
To make the frame, you will need a wooden beam, the surface of which is pre-treated with various antiseptic impregnations.
Bath frame
The required cross-section for the timber will depend on the load-bearing capacity of the insulation used. However, the thickness of the heat-insulating material used should not be greater than the timber itself. The material is placed between the posts.
To install the upper and lower trim and corner posts, you will need a beam with a slightly larger cross-section than the one that was used when installing the intermediate supports. The strapping is carried out starting from the corner part of the foundation, using timber with a section of 10x10 cm.
Installation and fastening of frame structure racks
When connecting in the corners of the strapping beam, it is necessary to use the paw method. And for greater reliability, it is also recommended to use nails. Previously placed pins will help avoid possible displacement of the beam in the future.
Connecting a beam into a paw
The concrete surface is completely cut off using roofing felt or any other similar material before laying the lining beam begins. Eight braces should be placed in the corners.
Bathroom flooring installation
In order for the structure to be durable and incredibly strong, all wooden elements should first be treated with special fireproof and antifungal impregnations several times with an interval of several days.
Sequence of upcoming installation work:
- A beam with a cross section of 10 cm is attached to the foundation pillars. Galvanized fasteners will help with fixation. However, first they need to be concreted into the thickness of the base.
- The bottom harness is done completely. Boards 5 cm thick are nailed around the inside perimeter.
- The logs are installed on the base of the floor, which are screwed using self-tapping screws. The step will be about half a meter.
- OSB on both sides is treated with a composition based on a bitumen primer, after which they are laid along the joists. Jumpers are installed between the lags, but only in those places where the individual sheets will be joined.
- After completing the installation work of the first layer of flooring, you should immediately begin the second. The order will be the same, but the material will spread across the joists.
Bathroom floor installation
Features of sandwich panels
Depending on the type of installation, they can be roofing or wall. The first option is profiled on one or both sides at once, while the second is smooth, profiled and decorative products. In any case, in the construction industry this is a popular solution for the construction of residential, office and utility buildings.
The main thing is to take care of protecting the frame from corrosion (if it is made of metal) and from rotting (if it is wooden), then the material will not accumulate condensation and need additional ventilation, like steam rooms made of timber. This design will be lightweight and will not require large expenditures, both in time and investment. And it can be used all year round, even at low ambient temperatures.
You just need to carefully choose sandwich panels for a bathhouse, taking into account what kind of insulation and coating it contains. Experienced builders prefer OSB boards with expanded polystyrene (filler). It is environmentally friendly and light in weight, so it is safe for health and does not weigh down the structure, conducting heat well. The optimal panel sizes are 75-100 mm.
Bathhouse roof installation
First you need to install the rafters. All necessary manipulations are performed on the ground, after which the finished frame will be raised for construction. Before working with wood, all surfaces must be treated with one of the many antiseptic compounds.
Then you should follow the following sequence of actions:
- Beams (mauerlat) are fastened along the perimeter of the building and their subsequent fixation.
- The ridge board is fastened in the central part.
- The outer rafters are installed, and then the inner rafters. The step will be about half a meter (no more!).
- A persistent corner is installed on the rafters.
- Jumpers are installed between the rafters, the main (end) part is installed, and overhangs are installed.
- The vapor barrier material (membrane) is laid overlapping.
- The sheathing is installed, into the holes of which the insulation is placed.
- Waterproofing material is laid (the overlap will be 10-15 cm).
- A counter-lattice is formed, the thin strips of which are nailed on top.
- The roofing material is being fixed. In this case, it is necessary to leave a small space for waterproofing, which will be 1.5-3 cm.
Bath roof layers
If the structure must be lightweight, then the floor material should be selected based on this parameter. Ondulin will fit perfectly.
Site preparation and foundation pouring
Before you begin building a frame-type bathhouse using SIP panels, you need to prepare a work site designated for construction. The area must be cleared of stones, construction debris, grass, trees, bushes and other vegetation.
If the site is inclined or there are significant unevenness, then the site is leveled using an auxiliary layer of soil, or the top layer is cut off until the optimal result is obtained.
Construction of a building on a slope
A cord and wooden pegs will be needed to apply the necessary markings for the future foundation for the bathhouse. Each angle must be carefully measured and be 90°.
If the bathhouse is small, then installation is allowed without constructing a solid foundation. However, if the soil on the site is clayey, then it is still recommended to install a strip foundation. A small ditch, no more than half a meter deep, is dug under the foundation. But a width of 40 cm will be more than enough.
Strip foundation for a bathhouse
The formwork is being installed. The resulting molds are filled with cement-based mortar and pins are inserted into the still wet foundation, which will subsequently participate in fixing the strapping.
Pouring the foundation of the bathhouse
Immediately after the foundation has completely dried, you can begin laying a layer of waterproofing (2 layers of roofing material) and installing strapping type timber on it.
Installation of strapping beam
Before proceeding with the actual assembly of the structure, you should make sure that the cement is completely dry and mature. Drying should take about a week to be more convincing. Afterwards, the layer is opened and kept in the sun for several more days.