Cinder blocks are often used not only in the construction of residential buildings, but also in the construction of outbuildings and cellars.
Another type of building where it is typical to use cinder blocks is a bathhouse. A sauna made from such material is always cheaper to build than if it were built from other raw materials. If you build walls yourself, then you need to know the features of this stone and the subtleties of the work technology.
Heated floor installation
Laying and securing an electric heated floor to a grid
We carry out the work in the following order:
- To facilitate the installation of electrical heating systems, a fiberglass reinforcing mesh with a cell size of 50x50 mm is laid on the vapor barrier material. We lay the mesh with a slight overlap and tie it together.
- We lay out the electric cable for heating on the floor in a “snail” or “snake”. We fix it to the grid.
- Then we install a warm floor sensor in the wall.
- We connect and connect all components of the system.
- After checking that the device is working properly, you can begin pouring the screed.
Laying the foundation
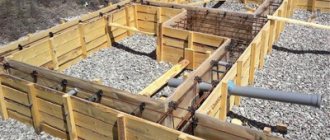
Shallow strip foundation
The type of foundation for a bathhouse is selected after examining the soil on the site. When laying the foundation for a building on clay or peat soil, you will need a columnar or strip foundation and good waterproofing. A dense rocky area does not need a foundation for a lightweight cinder block building.
The first stage of laying the foundation is marking the selected area and preparing for its work. When installing a strip foundation, a shallow trench is dug along the entire perimeter of the walls of the building. The depth of the pit is 50 cm, width - 40 cm. Then formwork is made, the manufacture of which can be read here.
The hole needs to be filled with sand
Sand and gravel are poured into the bottom of the trench and carefully compacted to create a cushion. Stones or broken bricks are laid on it. Formwork made of boards is placed on top. Due to the high hygroscopicity of cinder block, it is necessary to raise the foundation to 50 cm above ground level. Concrete is poured into the removable formwork and covered with a film for several days to prevent moisture loss.
When laying the foundation of the building, they simultaneously lay the foundation for the stove. It is performed by analogy with the common foundation, but does not come into contact with it.
Bathhouse layout
The creation of a bathhouse layout is carried out taking into account the creation of the necessary functionality and the number of people who can simultaneously be in one room. At the same time, you should strive for the smallest possible area so that it can be warmed up easier and faster. The layout of a standard bath includes the following rooms: dressing room, washing room and steam room. In some cases, a recreation room is equipped.
Figure 1. Diagram of a cinder block bathhouse.
The area should be distributed as follows:
- The dressing room must have a minimum area of 1.5 m wide and up to 2 m long.
- The steam room and washing room are calculated based on the number of people in them at the same time with an area of 1.5-2 m2 for each, as well as taking into account the location of all the necessary furniture and accessories.
Figure 2. Drawing of a typical bathhouse design for 3 people.
The design of the heating furnace should also be chosen in advance so that the power is sufficient to efficiently heat the steam room to the required temperature and it is necessary to provide for the installation of a foundation for it if it is planned to be laid out of brick. For electric furnaces, a separate foundation is not needed, but the load-bearing capacity of the floor will need to be strengthened. The advantage of electric furnaces is the speed of heating and the need for constant heating, since they cool down quite quickly. In addition, they do not emit smoke or soot. Brick structures need to be heated for a long time due to their massiveness, but they will give off heat for a long time.
Cost of work: what does the price depend on?
If it is not possible to build a sauna from a cinder block with your own hands, then you can use the services of contractors. The cost of the work will depend on several factors :
- project complexity;
- type of foundation;
- size of the building;
- construction region.
Average prices for the service in Russia range from 150,000 to 360,000 rubles per object.
Bathhouse made of cinder block: pros and cons, characteristics of cinder block
Cinder blocks are made from different admixtures that have different origins. It is best to choose blocks that are not only durable, but also environmentally friendly.
When purchasing material, you should not save money so that the resulting building lasts for more than one year.
Cinder block is usually used for those buildings that do not carry a large load.
If you properly insulate the building, it will be as warm as wooden options.
Some builders prefer not to buy a ready-made cinder block, but to make it themselves, which will not only save a little money, but also make blocks of any size.
Any person strives to equip his own summer cottage with the necessary additional structures. One of these is the bathhouse. Previously, its construction was made of wood. This material gave the building an aesthetic appearance and also provided good thermal insulation. However, to build a bathhouse, you must have certain skills in working with wood.
According to regulatory documentation, this is a building material that has a rectangular shape and is made from cement mortar. To obtain it, a special solution is poured into a mold, after which it is pressed mechanically (or wait until natural shrinkage occurs). A cinder block can be solid or hollow, that is, when there are holes in the rectangular shape.
They are designed to make the structure lighter, as well as for better adhesion to the cement-sand mortar during laying. The procedure for making cinder blocks can be seen not only at the factory, but also directly at the construction site, using improvised means. What are the pros and cons of a cinder block bathhouse using wood and gas? This article will help you compare this. Let's take a closer look at these structures.
What are the pros and cons of a gas bathhouse made of cinder blocks? Among the positive aspects, the reviews highlight the following:
- thermal conductivity;
- speed of construction of the bathhouse;
- moisture resistance and fire resistance;
- environmental friendliness;
- price.
Let's consider each of the properties separately.
All you need is to have basic knowledge and skills. If they are not there, then you will have to spend money on a team of specialists. Among the shortcomings, one can only note the appearance. Wood analogues look much more organic.
Reviews say that cinder block is in no way inferior to brick in this indicator, since it does not contain flammable substances or materials. As for the penetration of moisture, here the cinder block is again head and shoulders above wood. Despite the fact that it is highly hygroscopic, moisture does not cause corrosion and rotting. However, the interior of the room should still be covered with waterproofing.
Environmental friendliness
What are the pros and cons (comparison) of a cinder block bathhouse in terms of environmental friendliness? When making cinder blocks, no materials are used that have an impact on human health.
Price
Reviews say that when it comes to cost-effectiveness, there is no better material than wood. Cinder block is in second place. Here you have to spend money not only on blocks, but also on the production of cement mortar.
LAYING CLASS BLOCKS
Building a bathhouse from cinder blocks is no different from creating buildings from ordinary brick, and their installation does not require any special techniques. The main difference is the hygroscopicity of the block, and it also predominates in volume, is harder, more fragile and has voids.
The main thing in laying blocks is to regularly have a plumb level “at hand” and not allow the walls to bend, but to increase the rigidity of the structure, a metal masonry mesh should be laid every 2 rows, and in critical places it is better to fill the voids in the sides with concrete.
At the beginning of the process of laying cinder blocks, so that the masonry of the lower rows does not collapse prematurely, it is necessary to reliably isolate the walls from the foundation. For this purpose, bitumen mastic is usually used, and on top there are 2-3 layers of roofing material laid on a heated base.
Preparation of masonry mortar
The key to the strength of creating cinder block walls is the preparation of good masonry mortar and ease of handling. Particular attention is paid to its viscosity, strength after hardening, spreadability over the surface, absence of lumps and solid inclusions.
A sand-cement mixture in a ratio of 3:1 is considered optimal, but with an increase in the proportion of cement, the strength of the solution increases.
The masonry mortar is prepared from Portland cement, no lower than grade M400, and sifted sand, and clay inclusions improve its plasticity. You must add water to the mixture carefully, since a liquid solution only creates difficulties in work.
The mass of the solution must be plastic and not spread over the surface. To increase plasticity, plasticizers are added to it, which are supplied by the retail chain and are easy to use.
Along with natural plasticizers, there is another way to increase the plasticity of a solution, which is cheaper. Plasticizers can be clay or detergents, for example, for dishes or surfaces, but they must not contain chlorine or its components.
For 50 kg of cement or one bag, you will need only 10 ml of concentrated substance, but pre-diluted with water before use. This proportion of it does not have a significant impact on the reliability of the masonry.
The consumption of masonry mortar is approximately 30-40 kg per cubic meter of masonry, which needs to be prepared in small volumes, as it quickly sets and loses its plasticity.
Wall masonry
The most common methods in the construction of walls are the spoon and butt masonry methods, as well as their combinations. In the first case, cinder blocks are placed parallel along the direction of the wall.
In the bathhouse project under consideration, this is exactly the type of block laying that is assumed. If a thicker wall is needed, then the indicated masonry techniques alternate, but the consumption of blocks also doubles.
It is important to adhere to the “checkerboard” order of the seams so that they have a shift of more than 1/3 of the size of the block, and if the cinder blocks are not intended to be filled with expanded clay, then they should be laid with voids down.
The sequence of laying the walls is as follows.
- After waterproofing the foundation, the locations of door and window openings, internal walls, partitions and holes for floor beams are marked.
- The laying of walls begins with monolithic cinder blocks, which are first placed in the corners of the structure. In the initial row of each corner, two blocks are laid, and on top they are overlapped “in a dressing” with another block of the second row.
- The building level controls the equal height of the stacked blocks in the corners, and the tape measure controls the correctness of the rectangle of the building by the equality of its diagonals.
- After carefully checking the orientation to align the blocks, a cord is stretched between the corners of the structure, along which the blocks are laid out using mortar.
- The solution is applied with a trowel to the surface of the foundation for the bottom row or to the previous row in a layer of 20-25 mm, as well as to the end parts of the cinder blocks. If there are no monolithic cinder blocks, then their voids in the masonry of the initial rows are also filled with mortar.
- Each cinder block is installed at an angle of 90 degrees and pressed into the mortar mixture so that the entire mass sits at once, then the block is leveled by tapping it with a rubber mallet or the handle of a trowel. Some of the mortar will protrude from the seams, so it must be removed immediately and ensure that the seam thickness does not exceed 10-15 mm.
- Subsequent rows of blocks are also laid out from the corner and aligned horizontally. If large distortions of the blocks are observed, then their bottoms should be filed a little.
- For the strength of the structure, reinforcement or masonry mesh is laid every 2-3 rows, and reinforcement of some shafts is often used, in particular, the side shafts of door and window openings and corners and filled with concrete.
- One row before the window opening, a masonry mesh is placed on the wall, and the voids in the blocks above it are also filled with mortar.
- The ceilings of door and window openings are equipped with steel angles, welded reinforcement rods and masonry mesh, then the lintels are enclosed in formwork and filled with concrete.
- On top of the walls, so as not to damage the surface of the upper blocks and strengthen the upper trim, a light belt of concrete with reinforcement 100-150 mm high is usually mounted, which is also a Mauerlat and provides for fastening the roof.
Features of laying hollow cinder blocks
Voids in cinder blocks, on the one hand, reduce their thermal conductivity, but, on the other hand, the area of their adhesion to each other is reduced, so some of their features should be taken into account when laying walls, which boil down to the following.
- In the process of laying walls, the need to cut cinder blocks inevitably arises. Such an operation is usually carried out with the sharp side of a construction hammer or a trowel, but unlike brick, a cinder block is characterized by increased hardness and crumbles easily, so it is more practical to use a “grinder” with a special cutter for working on stone.
- The type of block determines the technology for its installation. So, when laying hollow blocks, the mortar is applied along the edges, and excess masonry mortar is not allowed because, falling into the shaft under its own weight, it disrupts the valuable air gap and increases the thermal conductivity of the walls.
- The formation of cracks in masonry joints should not be allowed, and each time after laying a cinder block, the mortar on the outside and inside is leveled flush with the block.
- Unlike monolithic blocks, reinforcement of hollow cinder blocks is mandatory, since the small area of their contact does not provide sufficient strength to the walls.
- Reinforcement is required for blocks located in the first row, in every 2-3 rows, under window openings, in the area of lintel support and near the insulation. To place the reinforcing rod in the cinder blocks, special recesses are provided, but instead of reinforcement, the use of metal masonry mesh is allowed.
- If you install lintels only made of metal over door and window openings, then there is no need for formwork and a pause when the concrete gains sufficient strength.
- On top of the walls, a concrete belt can be created from hollow cinder blocks, having previously laid a masonry mesh underneath them so that the concrete does not fall through when filling the voids.
- Due to the hygroscopicity of the material, it is not recommended to erect walls in inclement weather, and also during long breaks in work, the building box should be protected from adverse weather conditions.
Cinder block for building a bathhouse - construction features, pros and cons
The advantage of cinder block is its low price, and also the fact that you can make it yourself using waste (or almost) materials. Despite its low cost, this material has good characteristics: it is quite durable, has good thermal conductivity and frost resistance.
The properties of cinder block can only be assessed in comparison with other building materials. For convenience, they are summarized in a table. As you can see, according to some indicators he is quite up to par, but according to others he loses in many respects
Please note that expanded clay concrete is included in a separate column here, since it is often considered as a separate material
Comparative characteristics of building materials
Another plus is its larger size (compared to brick) with low weight. This combination allows you to build faster, and you can work alone. You can remove the walls of a small bathhouse from a cinder block with your own hands in about three weeks (this is with dimensions of no more than 6 * 6 * 2.8). The large size of the block also means reduced consumption of masonry mortar (compared to the construction of a brick wall).
Disadvantages of cinder block
The main disadvantage of cinder concrete is its possible health hazard. Since industrial waste is often used as fillers, they are not always safe. In theory, manufacturers should not use hazardous materials in production, but it is better to control it. If you decide to buy a batch of cinder blocks to build a bathhouse, break off a piece from the finished block and take it to the laboratory for testing. Yes, it costs money, but health is more expensive.
The second significant disadvantage is the high degree of water absorption. You will need to do a very good cut-off waterproofing of the foundation, and also take care of high-quality hydro- and vapor insulation of the walls. Particular care will need to be taken to create a vapor barrier in the steam room of a Russian bath - under these conditions with an air humidity of 50-70% - the cinder concrete must be insulated very carefully, possibly with several layers and/or materials. Only in this version will the building stand for a long time.
The next unpleasant moment is the unattractive appearance. But this is already a controversial point. Firstly, since it is not recommended to operate cinder block buildings without finishing (they absorb moisture strongly), it does not play a special role. Secondly, a technology has emerged that makes colored blocks, and their front surface is very attractive. In addition, there is equipment that forms a surface similar to torn stone. With the appropriate coloring it looks very good.
You can argue about the unattractive appearance
It is much more important that it is difficult to secure anything in hollow blocks - only using special fasteners or in pre-installed embedded elements.
If we talk about bathhouses, then the walls made of slag concrete will have to be insulated. To avoid problems with moisture removal, insulation is best made from mineral wool. Stretch a waterproofing membrane over it (which releases steam from the bathhouse, but water does not penetrate into the insulation from the street), and then cover the bathhouse with something. Be it siding, clapboard or block house.
In principle, with proper insulation and waterproofing of the walls, a cinder block bathhouse is a good budget option. Yes, the material is not ideal, but it simply is not ideal.
Wall requirements
The walls of the bathhouse made of the specified material are subject to special requirements specified in SNiP II-L.13-62. In addition to the fact that during the design, procedures for vapor and waterproofing must be provided, when constructing walls, moisture must not penetrate into the material.
The main requirement for thickness is to ensure proper thermal conductivity of the room . To do this, you need to calculate it in advance. For the calculation, the required thermal conductivity for different regions is used: you can find it on the Internet in tables.
They also take the coefficient of thermal conductivity of the cinder block and the thickness of the block used. It must be divided by a coefficient; the resulting indicator must be greater than the parameter indicated in the table. If it is smaller, then the thickness is chosen incorrectly. Typically, a thickness of 380 mm is enough to build a bathhouse.
Advantages and disadvantages of cinder block baths
Like any other material, cinder block has its pros and cons, which will inevitably affect the performance characteristics of the building. Let's take a closer look at the positive aspects, advantages and disadvantages of a cinder block bathhouse.
Advantages of a bathhouse made of cinder blocks
The most significant advantages include the following factors:
minimum budget. Cinder block is one of the cheapest materials, so the estimate for construction work will be small. If you have a limited budget, cinder block is the best option for building a bathhouse;
significant time savings. Thanks to its impressive size and correct geometric shape, building the box will not take much time. Suffice it to say that one cinder block is equal in area to 4.5 bricks;
Possibility of making cinder blocks yourself. Construction costs can be significantly reduced if you make cinder blocks yourself. The manufacturing technology is extremely simple, and anyone can cope with this task. Another advantage of making blocks yourself is that you will not purchase counterfeit ones;
possibility of independent construction. Laying cinder blocks does not require any special skills. With due patience, accuracy and attentiveness, you can build a bathhouse from cinder blocks on your own. This will allow you to avoid paying money to hired workers;
long period of operation. If high-quality materials are available and construction technology is followed, the building can last up to 100 years;
cinder blocks do not ignite
The material is able to withstand temperatures up to +800C without breaking down, which is very important for such a building as a bathhouse. Cinder block not only does not burn, but also does not support combustion;
environmental Safety
The blocks are made from natural materials and do not emit toxic substances even at high temperatures;
biological resistance. Cinder block does not contribute to the spread of fungus and mold, and is also not of interest to mice, rats and other rodents;
a large number of exterior finishing options. A ventilated facade can be attached to the walls, decorative plaster can be applied, they can be lined with tiles or facing bricks.
High thermal insulation properties. The voids inside significantly reduce the thermal conductivity of the cinder block. This material property is especially important for a steam room, since heated air and steam remain inside.
Disadvantages of cinder block baths
Along with the above advantages, there are also disadvantages:
- the need for a reinforced foundation.
The weight of one solid block can reach 28 kg. To withstand such a load, the foundation must be very strong; you cannot skimp on this. If the foundation is not strengthened sufficiently, shrinkage cracks may appear; - low moisture resistance.
The hygroscopicity of cinder block forces us to take additional measures to ensure hydro- and vapor barrier. If appropriate measures are not taken, the room will be damp and condensation may appear on the walls; - difficulties with laying communications
. The high strength of the blocks makes it much more difficult to form grooves and drill holes. To perform these works, you will need a special expensive tool, which will entail additional costs; - unpresentable appearance.
The bathhouse, built from cinder blocks, without external decoration, resembles not a temple of purity, but a camp barracks. In addition, the exterior finish protects the walls from excessive moisture absorption. Siding, facing bricks, and various types of decorative plaster can be used as exterior finishing; - heavy weight
The significant mass of cinder blocks (some types can weigh up to 28 kg) greatly complicates the laying process. In some cases, one block has to be laid by two people.
Having analyzed the above advantages and disadvantages of a cinder block bathhouse, we can confidently say that with a minimum budget, building a bathhouse from this material is completely justified. High thermal insulation properties, strength, environmental friendliness and long service life, combined with an affordable cost, make cinder block the best option for the budget construction of a bathhouse.
CALCULATION OF THE NUMBER OF BLOCKS
Building a bathhouse in a country house from cinder blocks with your own hands will require purchasing the necessary materials in sufficient quantities.
First of all, you need to calculate the required number of blocks. In this procedure, greater clarity is given by a table containing all the main and auxiliary parameters of the structure.
The table shows that the dimensions of the block are larger than its actual dimensions - the difference of 10 mm takes into account the thickness of the seam between the blocks. According to the table, it is not difficult to calculate the number of products that will be required to build the walls of a bathhouse in one block according to the above sketch of the project option.
The procedure for calculating the number of blocks:
- First you need to determine the number of rows of blocks - 12 (2.4/0.2).
- Calculate the total number of blocks - 600 pcs. (48/0.08).
- Determine the total number of blocks, excluding door and window openings - 51 (4.08/0.08).
- Adjust the total volume of blocks – 549 (600-59).
- Taking into account the 10% reserve, you need to purchase 560 blocks.
- Determine the cost of a batch of products, depending on their type (monolithic, hollow).
Selection of materials
When building a bathhouse with your own hands from cinder blocks, it is important to choose the right material. Modern blocks are available in several varieties
They differ primarily in composition.
Types
Characteristics
Cinder blocks made of cement-sand mixture with the addition of slag. This is the cheapest option, but also the least aesthetically pleasing. It has a variation in size, and the surface is not smooth. Arbolite blocks (wood concrete). When making blocks, sawdust is used as a filler. In this material, pores of increased size are formed, which increases the thermal insulation characteristics, but reduces water resistance. Wood concrete has a breathable effect, i.e. ability to pass air. Expanded clay blocks (expanded clay concrete). In such blocks, expanded clay is used instead of slag.
They are somewhat more expensive than cinder blocks, but their reduced water absorption attracts attention when building baths.
By design - solid and hollow. The first option is suitable for load-bearing walls of a bathhouse. Hollow blocks have cavities that occupy 20-40% of the volume. This design reduces strength, but improves thermal insulation properties and reduces weight. They are used for laying internal walls and frame technology.
Based on the size of the blocks, there are two types of standard elements:
- full block - standard size 390x190x180 mm;
- semi-block – available in dimensions 390x120x180 and 390x90x180 mm.
The weight of the blocks depends on their structure and filler:
- a full-bodied element weighs between 23-28 kg;
- hollow block – 18-23 kg;
- semi-block (full-bodied only) – 9-15 kg.
When choosing cinder blocks, you should pay special attention to the quality of the product. Currently, they are produced by a variety of manufacturers, including
hours and using artisanal technology. For laying the walls of a bathhouse, the actual variation in the sizes of the blocks in one batch and the quality of their surface, as well as the strength and geometric clarity of the corners and edges, are important.
What supplies and tools will be needed?
For the construction of a bathhouse you will need the following tools :
- hammer;
- order;
- level;
- lace;
- trowel;
- plumb line;
- container for mixing the solution;
- a spatula with teeth or a special container;
- electric drill with attachment.
The list shows the minimum that is needed only for the construction of walls. For foundation work, you will also need a concrete mixer, roofing material, a laser level, a water level, and a square. To equip the roof, you need the material from which the flooring will be made, as well as metal or wooden structures to create a rafter-beam system.
You also need to prepare a cinder block in the required quantity and a solution. The solution used is a cement-sand mixture , which is mixed with water in a concrete mixer or bucket using a drill.
Advantages and disadvantages
Block building materials have their pros and cons. You definitely need to know them if you plan to use blocks in the construction of a bathhouse. To begin with, it is worth considering in more detail what advantages such elements have.
There are several advantages of such material as blocks.
- A structure built from blocks will not shrink, like, for example, buildings made of wood.
- A steam room made of blocks can be built almost immediately after the main finishing.
- The construction of such a bathhouse will take a minimum amount of time.
- All repair work can be carried out without the involvement of outside help, but experts recommend inviting at least one assistant. This way construction will go much faster.
- The final cost of a block bath will be 2-3 times lower than in the case of building a wooden steam room of exactly the same dimensions.
- Block materials are absolutely safe for human health. They do not contain hazardous chemical compounds, so even at elevated temperatures they do not emit harmful substances.
- The blocks are relatively light in weight. Thanks to this characteristic, you can significantly save effort and money on preparing a high-quality foundation.
- Many consumers choose block materials for construction because they do not support combustion.
- A bathhouse made of blocks is not subject to rotting.
- The blocks are easy to maintain. They do not need to be regularly coated with antiseptic compounds, as is the case with wooden buildings. Block materials are not susceptible to mold and mildew.
- Walls built from such raw materials are “breathable” due to their diffuse properties.
- Many types of blocks, for example, gas silicate ones, boast good heat and sound insulation properties.
- The service life of quality blocks is very long.
Currently, many owners choose block materials for the construction of baths (and not only).
However, these products also have their disadvantages.
- The blocks absorb moisture, so the bathhouse must be provided with high-quality waterproofing, otherwise the material may simply collapse.
- A bathhouse made of blocks requires a vapor barrier. This is explained by the fact that condensation almost always accumulates inside walls made of such materials, so it is impossible to do without vapor barrier materials.
- Blocks are durable materials, but in this regard they are inferior to brick.
- Popular gas silicate blocks contain aluminum powder and lime. These components reduce the positive characteristics of the material.
Many problems associated with block baths can be completely avoided if they are constructed in a high-quality manner and also take care of hydro- and vapor barrier in advance.
Making cinder blocks with your own hands
To minimize costs, the cinder block manufacturing process can be done independently, having the necessary equipment.
From the technical side, the process is not complicated, but it requires a lot of time and effort. According to experts, it is better to establish cinder block production in a dry and clean room with a good ventilation system.
The whole process is carried out in several stages:
Stage 1
First of all, you need to prepare a mold for making blocks. You can buy it at a construction supermarket or make it yourself. The best option is a cinder block machine for making cinder blocks with two square-shaped pockets of low productivity, which will allow you to produce up to 2-3 blocks in one cycle.
Stage 2
To prepare the solution you will need: 7 parts of filler (slag, sand, gravel, crushed stone, etc.), 2 parts of fine gravel, 1.5 parts of cement (grades M 400 and 500), 3 parts of water. All components are mixed until a homogeneous mixture is obtained. It is recommended to add a plasticizer to the finished solution, which will provide the product with frost resistance and water resistance.
Stage 3
A solution with a small slide is laid out in the prepared form on the machine, a pressing element is inserted and the vibrator is activated for 5 seconds. This is necessary for the initial precipitation of the solution. If the volume is insufficient, part of the solution is added and repeated pressing is performed.
Stage 4
Drying the finished blocks requires from 5 to 8 days, taking into account the air humidity in the room. Complete hardening occurs within a month.
Stage 5
A day after production, homemade blocks can be carefully transferred to a place prepared for storage. When a plasticizer is added to the solution, the finished material can be stored after 8–10 hours
The blocks are stored in pyramidal stacks of 100 units at a short distance from each other for better drying of the side parts.
Construction of walls and finishing
Experts conditionally divide the construction of a bathhouse into several stages: construction of the foundation, walls, roof and floor, insulation, interior and exterior decoration.
First of all, we prepare the area
We clear it of debris, remove the top layer of soil, it is important to remove turf and various vegetation
We make markings, drive pegs into the corners of the future building and stretch a rope between them. As you work, measure the corners of the future building; they should be 90 degrees.
If you have a columnar foundation, mark the placement of the pillars; if you have a strip foundation, mark the width of the foundation.
The foundation is the basis of any building, so pouring the foundation is very important. To make a foundation, you need to dig a pit, compact and level the soil and fill it with concrete.
The foundation must rise above the ground by at least half a meter so that the cinder block does not collapse, absorbing moisture.
When the foundation is dry, it must be covered with a waterproofing material - bitumen or roofing felt.
Reinforcement must be laid every three rows of masonry to make the structure more durable. It is best to use metal mesh as reinforcement.
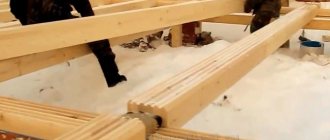
The last row of cinder blocks will end with bars, which will serve as the basis for the future roof.
It is also better to immediately lay window and door openings with wooden blocks.
Cinder block masonry technology on video.
After erecting a foundation 70 cm high, the first row of blocks is laid on a mortar 2 cm thick. This is due to the fact that the blocks are as far as possible from the ground, and therefore from water. Before starting construction, it is better to tighten the measuring cord and lay the bathhouse from the corners. The thickness of the binder solution should be no more than 15 mm, otherwise the bath frame may lose its heat-insulating properties.
By periodically rechecking the evenness of the wall masonry, it will be possible to achieve a minimum consumption of finishing materials during external finishing. If hollow blocks are used during construction, then these voids do not need to be filled with concrete. This can also lead to a decrease in thermal insulation properties. It is advisable to immediately apply a waterproofing primer at the same time. So the walls are up.
There are a few things to consider when building a roof. Since increased heat generation in a bathhouse is a common occurrence, moisture will condense in the ceiling area as a result of the meeting of a warm and cold front. To prevent this, you need to install a vapor barrier film between the ceiling and the roof. Next, the roof and ceiling are additionally insulated using cotton wool. Now that the roof is in place, the next stage begins - the interior decoration of the bathhouse.
The inside of the cinder block frame needs to be plastered. Here the layer of mortar can be 1-2 cm. Next, the bars are nailed vertically onto smooth walls at a distance of approximately 50-60 cm from each other. Now the bathhouse needs to be insulated, so mineral wool is laid between these bars. Since cinder concrete itself is warm, thin cotton wool can be used.
A vapor-repellent film with a layer of foil is attached to it with a stapler to the bars. This is necessary so that the cotton wool and the frame as a whole do not become damp from the inside. Next, horizontal bars are nailed to secure the lining. These bars simultaneously allow you to maintain a gap for ventilation of the wall from the inside. To prevent the appearance of mold and mildew, the lining must be coated with an acrylic product for bath surfaces.
Internal insulation
The structure of cinder blocks is porous, which allows for excellent heat retention, but the same porous surface absorbs moisture. Therefore, maximum protection of the walls eliminates the accumulation of moisture inside the blocks.
Before insulation, the internal walls of the bathhouse are lathed with wooden slats at least 50 mm thick, on which a layer of mineral wool, basalt insulation, polystyrene foam or any other material is laid. The thermal insulation layer is covered with foil film or aluminum foil, which performs the function of waterproofing
Particular attention should be paid to the tightness of the joints of all layers
Aluminum foil is used as a material for insulating seams. If such insulation is insufficient, it is possible to lay one layer of non-combustible mineral wool between the wall and the vapor barrier layer.
Cinder block bathhouse: pros and cons
Before choosing cinder blocks as the main material for building a bathhouse, you need to study all the advantages and disadvantages.
In most cases, buyers pay attention to the positive aspects of the material, which are represented by the following list:
- low cost of the material - this factor is the fundamental reason for choosing cinder blocks;
- has established dimensions, making the calculation of the number of cinder blocks for construction simple and accurate;
- quick construction of walls - large dimensions contribute to rapid progress in work;
- fire safety - even after a fire, the bathhouse can be restored, since the blocks will not be damaged.
Regardless of the impressive positive aspects, you need to pay attention to the shortcomings of the material:
- some unscrupulous manufacturers use various impurities in the production of cinder blocks, which, when heated, begin to release toxic substances - this can be avoided if you request a quality certificate when purchasing the material;
- cinder blocks are excellent conductors of heat, so in the summer it will be very hot in the bathhouse, and in winter it will not be warm enough - double-sided thermal insulation will be required to prevent such problems;
- cinder block has hygroscopic abilities, which is why moisture can destroy the material - protection from moisture is necessary from inside and outside the building;
- cinder blocks will not protect against sounds from the street;
- the material cannot be processed because it is hard, but at the same time easily destroyed;
- the weight of one hollow block reaches 20 kg, while a monolithic one – 30 kg;
- plaster on cinder block walls does not adhere, so it is not used as a decorative finish (plastering the walls from the outside with subsequent installation of panel materials is allowed);
- It is impossible to hang heavy objects on the walls, since standard dowels are not suitable - you can correct the situation with special fasteners with preliminary calculation of the seam in the wall.
The presented material is suitable for building a simple bathhouse on a summer cottage or near a private house intended for permanent residence
It is only important to take into account all the rules and recommendations for self-construction
Cinder block laying. Video:
How to make a project?
To prepare a project for a future sauna, you can contact a special company, where they will develop a plan for the owner. You can also search for ready-made projects on the Internet or purchase from friends. What to consider when drawing up such a plan :
- The area of the plot, its boundaries, allocated for the construction of the sauna.
- Condition of the soil in the selected location.
- Necessary communications that will be connected to the sauna.
- How will communications be entered into the bathhouse?
- Dimensions of the building itself.
- Interior layout.
It is favorable to place a green area around the steam room: trees, bushes. To prevent the foundation from subsiding later, it is important to know the condition of the soil. To do this, samples are taken and examined. , as well as the arrangement of pits for drainage and sewerage, depend on the condition of the soil Electricity and water will be supplied to the building; all this is provided for in the project.
Note! In suburban areas, free-standing bathhouses are not made large. Often these are buildings measuring 6x4 meters and a ceiling height of 2.5-3 meters. A building built from cinder blocks will retain heat better if it is small.
It is important to immediately think about the number of rooms and their sizes - this will determine how much cinder block stone is needed for internal walls and partitions. The rooms that are most often located in a bathhouse are: steam room, locker room, waiting room, shower room, cooling area, relaxation room, toilet.
Photos of bathhouse projects of different sizes and layouts:
Speed and ease of construction, lifespan of the building
The standard dimensions of ordinary solid bricks (L*W*H) are 250*120*65 mm, which is 1.5-2 times smaller than the dimensions of cinder blocks. And thanks to the large size of the latter, the work is done much faster.
Cinder block laying
Cinder block masonry requires a perfectly horizontal foundation (strip, columnar), equipped according to all the rules. In the event of deformations and movements of the foundation, large cracks may appear on the wall of the bathhouse, which will pass not along the seams, but through the rows of the blocks themselves. However, if the bathhouse construction technologies are followed, it will last about a hundred years (by the way, wooden bathhouses are rarely used without repair work for more than 30 years).
The long service life is also affected by the fact that slag concrete is too tough and not to the taste of insects and rodents, which often live in log houses and spoil expensive wood.
There are several construction features that can cause inconvenience:
- the construction of building walls is unacceptable in rainy weather;
- the skeleton of the bathhouse must not be left without a roof for a long time;
- high-quality waterproofing is required due to the high hygroscopicity of the material;
- in cinder block buildings it is not recommended to construct reinforced concrete slab floors;
- in the case of the construction of a two-story or more building, reinforcement of the rows with metal rods is required;
- walls are erected exclusively on a high (more than 50-70 cm above soil level) foundation;
- Difficulties may arise with the installation of heat, electricity, sewer and water supply networks.
Furnace laying
There are a large number of sauna stoves on the modern market, with heaters, fireboxes and water tanks.
It is worth considering that it is quite problematic to build stone stoves yourself without the proper experience and skill. Metal furnaces can be ordered from forges and specialized and specialized workshops. Fans of classic brick and metal stoves should take into account that special autonomous foundations with a depth of more than 500 mm and dimensions that are 10% larger than the dimensions of the stove itself are poured under such stoves.
Installation of modern type stoves is possible after completion of interior decoration. Old-style stoves were built before the interior finishing work was completed.
For more details, read the article Brick sauna stove.
What needs to be done to insulate a bathhouse
Below we will separately consider how to insulate a bathhouse made of expanded clay concrete blocks (cinder blocks, foam blocks), but at the same time we will talk about each plane separately. That is, it will be described separately.
We insulate the wall
In order to insulate a bathhouse made of foam blocks, expanded clay or slag blocks, first of all, you need to choose insulation. Let's say right away that the most environmentally friendly product in this situation will be felt, but since it is not available for sale on the construction market, we will have to choose from what is available. It should be taken into account that the installation will be carried out in a hot and damp room and due to with this, select the material.
| Type of insulation | Expanded polystyrene (foam) | Extruded polystyrene foam | Mineral wool |
| Environmental friendliness of the material | Not recyclable | Not recyclable | Cannot be recycled. Releases phenols |
| Chemical resistance | Destruction from diesel fuel, gasoline, acetone, oil paints and ultraviolet rays. Resistance to weak acid alkalis. Swells and crumbles when exposed to water. | When exposed to water, the material shrinks as the binder is washed out. Resistance to alkalis. At high temperatures it releases phenol | |
| Lifetime | 30 years | 50 years | 50 years |
| Thermal insulation | After 60⁰C, material destruction occurs | Excellent thermal stability |
Based on the above data, we can come to the conclusion that in order to insulate a bathhouse made of expanded clay concrete blocks, of all the listed materials, mineral wool will be the most suitable (this includes stone wool, glass wool and slag wool). Its price is not very high, and you can also choose the required thickness (from 20 to 200 mm) depending on the climate of your region. But in any case, you will need foil for waterproofing.
If the mineral wool does not have a foil layer, then it needs to be added, and foil polyethylene foam, which you see in the photo above, is excellent for this. The thickness of such material varies from 2 to 20 mm, and by covering a layer of mineral wool with this, you significantly increase the effectiveness of thermal insulation.
For wooden lining, that is, for cladding a steam room, you need a sheathing that will be mounted on brackets, or it will be thick bars between which it will be installed. The second option is simpler, but mounting the beam on a block wall is not so easy, even if it is plastered. The fact is that if the thickness of the sheathing is 100 mm, then anchor bolts will be needed to fasten it, which is not entirely acceptable for a wall made of such material.
We continue to consider how to insulate a cinder block bathhouse from the inside and will install the sheathing. Place some kind of waterproofing material on the wall, under the brackets, and then attach the consoles themselves with bod profiles. Mineral wool is threaded directly through the pawns, and then carefully covered with foil polyethylene foam, trying to ensure that there are no holes left.
Ceiling
Thermal insulation and waterproofing of the ceiling with your own hands occurs, in principle, in the same way as, only the installation plane changes. Considering that there cannot be foam blocks on the ceiling, but, for example, a wooden floor or a concrete slab, it can be successfully used as a sheathing use timber.
Floor
Almost any materials are suitable for the floor in the bathhouse, for example those that are used to insulate the loggia, that is, extruded polyethylene foam or expanded clay. After all, you will still be pouring a cement screed, so both will do, but expanded clay is much cheaper. The thickness of the thermal insulation layer will depend on the degree of soil freezing and the general temperature in your area.
CONSTRUCTION OF THE ROOF
When the box for the structure is erected, all that remains is to put it under the roof, but it would hardly be appropriate to invent a complex roof for a bathhouse in the country. The harmonious completion of the building can easily be achieved with a simple gable roof.
Its construction with your own hands does not cause additional complex problems, and it allows you to equip both a mini-loft and an attic, but before the actual construction of the roof, the bathhouse box made of cinder blocks is allowed to settle for at least half a month.
The roof for a bathhouse made of cinder blocks does not differ significantly from the roofs of other structures. If the Mauerlat is a concrete belt, then it is enough to lay waterproofing and floor beams on it, which will become a good support for the rafters and then the bathhouse ceiling can be easily attached to them.
Roofing felt, metal tiles, corrugated sheets, etc. are suitable as roofing materials. Due to insufficient environmental friendliness, one should refrain from using slate or ondulin as a roof.
Results
On the market of materials offered for construction, sand block is a profitable raw material for realizing your plans. The properties of the material provide an expanded scope of application. It is used in the construction of residential and non-residential premises, low-rise buildings, and with thickened masonry - even multi-storey buildings. By giving it preference, you will reduce costs and quickly build the planned facility.
3/5 (2 votes)
Filontsev Viktor Nikolaevich
On the website: Author and editor of articles on the website pobetony.ru Education and work experience: Higher technical education. 12 years of experience in various industries and construction sites, 8 of which were abroad. Other skills and abilities: Has the 4th group of electrical safety clearance. Perform calculations using large data sets. Current employment: For the last 4 years he has been acting as an independent consultant for a number of construction companies.
Buildings made of slag, gas and foam blocks
Which blocks are best to build a bathhouse from? Let's try to understand this issue in detail. Is it worth using blocks to build a bathhouse at all?
Foam block
The main advantages of such materials include low cost and speed of construction. But the service life of block buildings is significantly lower than that of wooden or stone ones. A bathhouse made of slag or foam blocks will cost 2 times less than a wooden one.
However, taking into account the finishing, the savings will not be that big. After all, such a building will require additional waterproofing and insulation.
Bathhouse made of cinder blocks
Cinder block building
Bathhouse made of cinder blocks
Cinder blocks are made from pelite, ash or slag. Less commonly, gravel, crushed stone, and sand are used as filler. You can erect a building from large blocks (their standard size is 390x190x188 mm) in a matter of days. Moreover, cinder blocks are often made at home, even in the absence of special equipment. Thus, the final cost of the building will seem to be lower.
But for a bathhouse, it is the finishing that will be the decisive factor - not only internal, but also careful external cladding will be required. Products made from cinder blocks without it will quickly absorb moisture. Therefore, before you start building a bathhouse from blocks, calculate the final cost of not only the foundation, walls, floor, ceiling, but also the finishing.
Building made of aerated concrete blocks
Laying aerated concrete blocks
Building made of aerated concrete blocks
Aerated concrete is concrete that has a cellular structure. In addition to sand and cement, it contains special gas-forming agents that foam the solution. Due to the appearance of air bubbles (pores), the material acquires increased heat-shielding properties.
Aerated concrete is much easier to process than regular concrete. It can be sawed and drilled. A nail can be driven into a wall made of aerated concrete without any effort. A significant drawback of the material, just like cinder concrete, is its rapid destruction when wet. Therefore, buildings made from it require waterproofing.
The weight of the blocks is significant, so the laying will have to be done by two people
You need to work with blocks carefully - they are quite fragile
Application of insulating elements
The bathhouse is a specific structure. In addition to the fact that any cinder block building requires shelter from external moisture, bath conditions necessitate reliable protection from the inside
Particular attention is paid to the steam room, where it is necessary not only to protect the structure of the building, but also to preserve heat and steam
External protection of a cinder block bath includes waterproofing and insulation. On the outside, roofing felt is most often used as waterproofing. In order to insulate buildings from the outside, you can use any thermal insulation material:
- mineral wool;
- Styrofoam;
- expanded polystyrene;
- urethane foam, etc.
Internal protection is provided on the walls and ceiling. It includes steam, hydro and thermal insulation. Vapor insulation is made of rolled material with a layer of foil, and the vapor barrier is laid with foil towards the room. For waterproofing, roofing felt or thick polyethylene film is used.
When choosing insulation, it is important to consider that polystyrene foam cannot be used in the steam room. When heated above 60 degrees, it can release substances harmful to humans
Price
Table. Cost of cinder blocks
| Cinder block material | Number of voids | Size, mm | Price in rubles for 1 piece | Photo |
| Sand cement | 2 square, open bottom | 390x190x188 | 37 | Sand-cement wall block |
| Sand cement | 2 square, bottom closed | 390x190x188 | 39 | Sand-cement wall block |
| Sand cement | 3 square non-through | 390x190x188 | 37 | Sand-cement wall block |
| Sand cement | 7 slot voids | 390x190x188 | 41 | Sand-cement wall block |
| Expanded clay concrete | 8 slot voids | 390x190x188 | 44 | Expanded clay concrete wall block |
| Sand cement | Monolith, partition | 390x90x188 | 27 | Sand-cement partition block |
| Expanded clay concrete | 2 through slots, septal | 390x90x188 | 26 | Expanded clay concrete partition block |
| Sand cement | Full-bodied | 390x190x188 | 60 | Solid cinder block |
| Expanded clay concrete | Full-bodied | 390x190x188 | 50 | Expanded clay concrete wall block |
| Expanded clay concrete | Full-bodied | 390x120x188 | 35 | Expanded clay concrete wall block |
The price of solid building bricks of standard size M100 and M150 for 1 piece is 10-13 rubles. And if the estimate includes work on insulation, waterproofing, and finishing, then the benefit of building a cinder block bathhouse turns out to be very small.
However, savings can be achieved by making the required number of cinder blocks yourself.
Table. Brief step-by-step instructions for making cinder blocks yourself for building a bathhouse
| №№ | Process description | Photo |
| Step 1 | We make a metal/wooden mold or purchase a vibrating machine for the production of wall blocks. | Form-stretcher Metal mold |
| Step 2 | Prepare a sufficiently liquid solution for pouring into the mold. The approximate composition is as follows: - cement M400 or M500 - 1 part; — blast furnace slag 9-10 parts; - water. The compositions of slag concrete are presented in the following table. When making blocks with voids, you can use bottles, inserting them into the poured mixture with the neck up. The blocks can be tinted by adding crushed red brick to the mortar. | Form filled with solution |
| Step 3 | 24 hours after pouring, we take out (shake out) the blocks and store them for final air drying (takes from 10 to 20 days). Before each subsequent pouring of the mixture, rinse the inside of the mold with water, dry it, and wipe it with diesel fuel. | Making cinder blocks |
The compositions of slag concrete are presented in the following table.
Table. Slag concrete - number of components for different grades of block strength
| Brand of cinder concrete | Cement M400 (material per 1 m3 of slag concrete, kg/l) | Lime or clay (material per 1 m3 of slag concrete, kg/l) | Sand (material per 1 m3 of slag concrete, kg/l) | Slag (material per 1 m3 of slag concrete, kg/l) | Volumetric mass of slag concrete, kg/m3 |
| M10 | 50/45 | 50/35 | 100/60 | 700/1000 | 900 |
| M25 | 100/90 | 50/35 | 200/125 | 700/900 | 1050 |
| M35 | 150/135 | 50/35 | 300/190 | 700/800 | 1200 |
| M50 | 200/180 | 50/35 | 400/250 | 700/700 | 1350 |
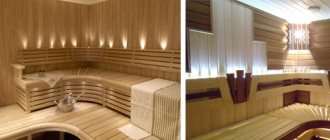
Interior finishing: final work
Preference has always been on the side of wood. It is convenient, hygienic, and easy to replace if necessary. Not to mention that different types of wood have different healing effects on the human body, and their very atmosphere is an integral part of traditional bath culture.
The tree must be one that is not capable of overheating and causing a burn to a person. For the interior decoration of the steam room, initially only deciduous varieties were used: ash, alder, birch, poplar, larch, aspen, linden. Resinous types of trees and any conifers are unsuitable for interior finishing. And the choice in the design of a washing room is practically unlimited: ceramic tiles, plasterboard, and any moisture-resistant decorative materials are appropriate here.
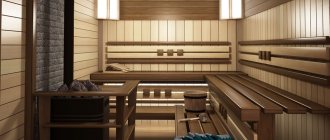
Warm floor in the steam room
Work on thermal insulation of the floor begins already in the process of laying the foundation. Initially, it is important to make important engineering decisions that will ensure the drainage of water from the steam room and washing room. To reduce heat transfer through the floor, it is necessary to eliminate the possibility of freezing of the soil under the bathhouse at the very beginning. This problem is solved by using expanded clay concrete screed on the ground. A fairly easy insulation option: it does not require special skills, but that’s not all that needs to be done.
The next step on the path to a warm floor is to warm it up. Naturally, the floor won’t just warm up, but we have a stove and we can use it. To do this, a special insert is made into the combustion chamber of the furnace, with an air supply regulator. This inset is lowered below floor level. In this case, the stove can take cold air from under the floor, and the already heated air will descend in its place. By ensuring such circulation, we will simultaneously get rid of unpleasant odors that may accumulate in the underground.
What do homeowners think?
The strength of a building made of cinder blocks is not disputed, but the reviews from builders are clear: they have a high level of hygroscopicity, which negatively affects durability and heat capacity.
“When building a summer house from cinder blocks, I noticed that the material lying on the ground absorbs water quite well. To waterproof the walls, the house had to be completely treated with water repellents and siding installed.”
Ilya, Penza.
Reviews of cinder block houses indicate that it is very difficult to build perfectly smooth walls from concrete blocks. But mistakes can be easily corrected with dry mixtures (plaster and putty).
“I made molds from sheet metal for cinder blocks, but after removing the finished product, I discovered that the edges were uneven. Therefore, after the walls were built, the house was plastered for painting.”
Alexander Guskov, Mytishchi.
Before buying cinder blocks, people think about how long a house or outbuilding will last. As practice and reviews show, there are many buildings built from cinder blocks in the 60s of the last century. They are still durable and serve homeowners well. The secret lies in the selection of filler.
“I was choosing material for the bathhouse and outbuildings. A neighbor-architect recommended a cinder block, which is based on sintered ash from burnt coal at a thermal power plant. It is very dense and durable, does not emit unpleasant odors, and does not crumble over time.”
Valentin Kozlov, Kineshma.
Reviews about the heat capacity of cinder blocks are contradictory and often contain only statements unsupported by facts. With an average solid stone density of 1,200 kg/m3, the thermal conductivity coefficient is approximately 0.65 W/m*K. For comparison: the same indicator for ceramic bricks without voids is 0.8 W/m*K. In order for a residential building in central Russia made of slag blocks to be warm enough without additional insulation, the thickness must be at least 40 cm.
“We bought a cinder block house, the walls were only 14 cm thick. We were afraid that it would freeze in the winter, so we decided to insulate it. We contacted the design bureau, a specialist recommended thermal insulation under the siding using simple 10 cm polystyrene foam, but of the external type, in order to move the dew point outside the fence. Otherwise, the material will get wet and collapse.”
Anatoly, Stavropol.
An important point is the safety or environmental friendliness of cinder blocks. They argue until they are hoarse about their harmfulness. Some reviews call for banning them as a source of radiation and toxic fumes, others claim that these are the machinations of competitors and suggest testing raw materials in laboratories. And as an example they cite people who have lived in such houses for more than 20-30 years. According to the manufacturers, in order to eliminate any danger, the slag lies in the open air in a dump for at least 1 year. The same thing with a finished block, but the period is reduced to 3-6 months.
“Since the temperature in the bathhouse is always high, I didn’t want to build it from hazardous materials. I went to a plant in the Moscow region and chose cinder blocks, since the cost was reasonable, delivery was inexpensive, and in addition they provided a sanitary and epidemiological report, certificates of compliance with GOST 6133-99 and radiation safety.”
Igor Kalugin, Dmitrov.
The disadvantages of cinder blocks are that they are hygroscopic. For protection you will need:
- Treatment with waterproofing coating agents (bitumen mastic, liquid rubber, liquid glass) or injection ones (Tiprom, Penetron).
- Surface cladding with siding, plaster, decorative brick, clinker tiles and the like.
Care should be taken when purchasing. Products from an unknown manufacturer with broken geometry and a strong foreign odor may contain impurities that are toxic to humans
Preference should be given to serious companies. Attached is a full set of certificates and reports on the quality of cinder blocks.
Main stages of construction
The fastest and most inexpensive way to build a steam room on your site is to build a bathhouse from cinder blocks.
Literally during the holiday you can cope not only with the walls, but also even finish the interior decoration of the steam room and washing room. The only thing you will need to take care of from the very beginning is to choose a good, really high-quality cinder block, because it is made mainly from various impurities, and therefore is inexpensive. In addition to being cheap, slag concrete blocks have the following advantages:
- They have high thermal insulation properties.
- Very light - much lighter than concrete and water.
- Can be absolutely any size.
- Completely resistant to mold and mildew.
- Absolutely fireproof.
- They are extremely easy to use - the bathhouse can be built in a matter of days.
https://www.youtube.com/watch?v=1BMehi4cwNU
Now about what exactly a cinder block is. Essentially, this is a type of sand-lime brick, but there is no quartz sand - instead, porous slag is used, which is very light and cheap. The structure of the cinder block is porous, and therefore provides excellent thermal insulation for the bathhouse. And this is the most important thing.
1. Laying the foundation. The choice is influenced by the soil of the site. Under normal conditions, it is best to equip it with pillars connected to each other by reinforced concrete beams. On difficult soil (clayey or mixed type), a strip base will look more reliable.
Due to the considerable degree of water absorption of cinder blocks, the height of the base of the bathhouse should be at least half a meter from ground level. After the concrete has completely hardened, they begin laying waterproofing. For this purpose, it is recommended to use molten bitumen and roofing felt.
2. Installation of walls. Before starting masonry work, it is necessary to start laying out the foundation of the heating furnace. The construction of external walls and internal partitions should be carried out in strict accordance with the approved project. Openings for windows and doors are left at the planned points. To further strengthen the bathhouse, reinforcing rods 10-12 mm thick are placed every two to three rows of block masonry.
3. Construction of the roof begins with the preparation of floor beams and installation of rafters. The roofing sheet is laid on the finished structure. After this, they begin to work on the ceiling.
4. Insulation of bathhouse walls made of cinder blocks. First, basalt thermal insulator is attached to the external walls with your own hands, then foil paper. The internal surfaces of the bath are finished with several layers of protective materials. Mineral wool is placed between the beams of the wooden frame. A vapor barrier with foil is secured on top.
5. Exterior finishing. The building is decorated with cheap clapboard, beautiful siding or practical plaster. The most presentable and respectable appearance will be when faced with imitation timber or façade slabs.
6. Interior design. It is better to cement the floor in the bathhouse, and then insulate it and protect it from moisture with a reliable layer of waterproofing. Molten bitumen and roofing felt are suitable for this purpose. Ceramic tiles or wooden floors are used as flooring. The walls are decorated with clapboard or wood.
approximate cost
To calculate the required number of building materials for a box, they rely on the main parameters - the size of the structure and the price of one block. First, the volume of the building as a whole is determined by summing up the length of all walls and multiplying by their height and thickness. The volumes of windows and doors are subtracted from the result obtained.
The final costs of building a bathhouse consist of a combination of prices for materials, loading and unloading and installation work, and transportation. A standard one-story structure, consisting of three rooms with an open veranda, but without internal insulation, can cost approximately 200-250 thousand rubles.
Reviews of cinder block baths
“We had to build a cinder block bathhouse due to lack of money. At first I thought it was temporary, then I’ll build something more solid. On the advice of experts, I insulated the walls of the house from the outside and inside, lined them with clapboard, and raised the floor higher. The result was such a great bathhouse that now I can’t be happier. And I definitely won’t change it.”
Grigoriev N.N., Ekaterinburg.
“Several years ago we bought a nice country house. A cinder block box from a small bathhouse was found on the property. Since there was little money left after the purchase, they decided to equip it with minimal effort. Instead of wooden blocks, the facade was faced with plaster, under which a layer of foam plastic was laid.
Alexander, Sverdlovsk.
“I always dreamed of having my own bathhouse with a steam room and brooms. When the opportunity arose, I took a swing at the log house. But harsh calculations showed that I couldn’t afford that amount, so I had to save money and replace it with a cinder block. But the inside of the walls was finished with a wooden block. Now there is just a fabulous forest smell in the steam room. My family and all my friends appreciated the beauty.”
Zadorin Nikolay, Kostroma.
“I built a small bathhouse at the dacha with my own hands. I tried to properly insulate the walls, floor, ceiling and protect from moisture. The bathhouse is heated by a conventional wood-burning stove. Literally two hours later, the temperature in the steam room rises to such a temperature that any sauna would envy. The whole family has been using the sauna regularly for three years now. Since then, neither adults nor children have ever had a cold.”
Evgeny Ilchenko, Moscow region.
construction of bathhouse walls from cinder block
Laying walls from cinder blocks is a simple procedure and practically no different from laying brick walls. Every three rows it is advisable to lay a reinforcing mesh, which will increase the rigidity of the walls and the strength of the wall masonry. The first layer of masonry is made of bonded layers, then there are three spoon layers. Bonded masonry is done across the walls, and spoon masonry is done along it.
It is recommended to stack the blocks together using a construction tool - a trowel, using cement-sand mortar to connect the elements. If a cinder block needs to be divided into two parts, it is cut using the sharp edge of a construction hammer or a trowel. A cement pad is laid on each new row of cinder blocks, and the next layer of material is pressed into it.
Wall thickness for a bathhouse in the Urals
Calculation of the thickness of the walls should be carried out at the planning or design stage of the bathhouse in order to determine the required width of the foundation, take into account all the required materials and upcoming financial costs.
The thickness of the walls is calculated based on the coefficient of standard heat transfer resistance of the enclosing structures. For Yekaterinburg and the Ural region it is 3.49 m2 °C/W, according to SNiP 02/23/2003 - Thermal protection of buildings.
The calculation of the minimum wall thickness is determined by the formula: δ = λ R
where δ is the wall thickness in meters;
λ—specific thermal conductivity;
R - standard thermal resistance.
Example 1: Calculation of the minimum thickness of a wall made of ceramic solid bricks for the Ural region.
δ = 0.6 · 3.49 = 2.1 m.
Based on the calculation, it can be seen that in order to achieve the required heat transfer resistance in winter, it is necessary to erect a brick structure with a thickness of at least two meters. Naturally, no one builds like that. The thickness of the walls is reduced through the use of insulation, for example, using a layer of mineral wool slabs, the thermal conductivity of which is 0.03 W/m∙°C.
Example 2: Calculation of the thickness of the insulation for a sauna made of brick, lined with clapboard on the inside.
δ insulation = λ · R insulation.
R insulation = R standard - R sheathing - R brick.
R brick walls (250mm) = δ/λ = 0.25/0.6 = 0.41 m2 °C/W
R sheathing (14mm) = 0.014/0.15 = 0.09 m2 °C/W
R insulation = 3.49 - 0.09 - 0.41 = 2.99 m2 °C/W
δ insulation = 0.03 · 2.99 = 0.09 m.
Conclusion: when building a one-brick sauna for year-round use, you need insulation made of mineral wool slabs 100 mm thick and lining 14 mm thick.
Example 3: Calculation of the insulation thickness for a bathhouse made of pine timber 200×200 mm.
R insulation = R standard - R timber - R sheathing.
R walls made of pine beams = δ/λ = 0.2/0.18 = 1.11 m2 °C/W.
R clapboard cladding (14 mm) = 0.014/0.15 = 0.09 m2 °C/W
R insulation = R norms - R brick - R sheathing = 3.49 - 1.11 - 0.09 = 2.29 m2 °C / W.
δ insulation = 0.03 · 2.29 = 0.07 m.
Conclusion: to build a bathhouse from 200x200 mm timber, with 14 mm clapboard cladding, you need 70 mm thick insulation.
Minimum thickness of walls made of various materials in accordance with the coefficient of thermal resistance for the Ural region.
| Wall materials | Wall thickness | Thermal conductivity, W/m∙°С |
| pine | 0,62 | 0,18 |
| larch | 0,45 | 0,13 |
| cedar | 0,33 | 0,095 |
| Linden | 0,52 | 0,15 |
| Ceramic brick | 2,1 | 0,6 |
| foam block | 0,4 | 0,12 |
| Aerated concrete block | 0,52 | 0,15 |
Recommendations for the technology of lining a bathhouse with clapboard
- The material must be in the required condition. The lining must spend at least a day in climatic conditions comparable to bathhouses. Otherwise, it may dry out to cracks (if it is too wet) or swell (if it is dry), which will greatly deteriorate its appearance and performance properties.
- Nail thin slats onto the finished thermal insulation with a pitch corresponding to the width of the finishing panels. Use stainless nails (bronze, copper). The best way is to assemble the panels into a groove.
- Always mount the lining in the steam room horizontally - this will allow you to easily change the lower beams as they wear out, which will prolong the operation of the sauna for a long time.
- Wood is best suited for flooring. Any synthetic coating is poisonous at bath temperatures and is therefore not suitable. It is not advisable to use oak - it is slippery and therefore dangerous. In addition, it has a low heat capacity. It is possible to install heated floors in the dressing room and rest room.
If you approach the construction and decoration of a bathhouse creatively and wisely, then more than one generation of lovers of paired procedures will delight with its unique design and therapeutic warmth.
How to insulate a bath ceiling
Panel ceiling
Panels for such a ceiling are usually sold with all the necessary layers of waterproofing, insulation and moisture resistance. The standard width of the mineral wool layer contained in ceiling tiles is about ten centimeters.
Since such panels have considerable weight, it is better to lift them first and then connect them in parts at the top.
Fixed ceiling
The basis for insulating a false ceiling is the attic frame. A waterproofing layer should be placed in these floor beams, which will eventually cover the entire internal surface. The next layer is the installation of wooden flooring. Then the required amount of insulation, such as mineral wool, is placed in the spaces between the beams.
After insulation, it is necessary to ensure moisture insulation using foil material. Now you can cover the ceiling with wood paneling.
Flat ceiling
Deck ceilings are independent of the attic frame. Because they are mounted directly to the walls. For its construction, wooden boards about thirty centimeters wide are used.
Insulation is carried out from the attic side. All necessary materials (vapor barrier, insulation, waterproofing, as well as plywood flooring) are placed on top of the floor ceiling. This method of ceiling insulation is the fastest, but is only suitable for a small bathhouse.
Features of ceiling insulation
The question of how you can insulate a bathhouse from the inside with your own hands is asked by some amateur builders. Having taken a steam bath in their own bathhouse for the first time, they come to the conclusion that the structure they built has a number of design flaws that prevent the bathhouse premises from being heated to the optimal temperature and contribute to their rapid cooling.
However, insulation with modern materials is not contraindicated for any bathhouse, including a wooden one, and it should not be neglected when constructing a brick or cinder block bathhouse. Many owners pay close attention to the thermal insulation of ceilings and walls, rightly believing that the greatest heat loss occurs on these surfaces, but floors also need reliable thermal protection. Only in this case will an optimal microclimate be created in the bathhouse.
Floor insulation
You have to do the insulation of the bathhouse floor from the inside with your own hands if this operation was skipped during the construction stage. When making internal thermal insulation of the floor covering, it should be taken into account that the height of the room will become smaller. It must be remembered that high-quality insulation of the floor, as well as other surfaces in a room with high humidity, is impossible without good waterproofing, which will protect the insulation and the structure itself from getting wet and destroyed.
https://www.youtube.com/watch?v=
You can insulate a concrete floor with expanded clay or expanded polystyrene (foam plastic). It is better to use extruded EPS, which can withstand higher loads than foam. It will not pose any threat to health, since it will be covered on top with a layer of waterproofing and a concrete screed.
Before laying the insulation on a cleaned base treated with an antifungal agent and primer, you need to put a waterproofing material made of rolled bitumen material or dense polyethylene, or coat the ceiling with waterproofing mastic. It is necessary to insulate not only the floor, but also the walls of the room to a height corresponding to the total thickness of the insulation and screed.
Expanded clay is poured onto the membrane or expanded polystyrene slabs are tightly laid. The bulk insulation is leveled, and the gaps between the slabs are sealed with foam and EPS scraps. Another waterproofing membrane is laid on the heat insulator. All its joints, as in the first layer, must be sealed. The edges of the waterproofing material must be glued to the edges of the lower membrane, creating a waterproof “bag” for the thermal insulation.
A reinforced screed will be poured over the waterproofing. It can also improve the thermal insulation characteristics of the floor if the solution is prepared from expanded clay. After the concrete has hardened, a finishing coating can be applied to the screed.
Bathroom ceiling insulation
When installing a ceiling in a bathhouse, it is necessary to take into account not only the fact that it accounts for up to a third of heat loss, but also the fact that the accumulation of condensation on the surface reduces any insulation measures to nothing. Therefore, vapor barrier from the inside is required here much more than for walls, actually going to first plan. This type of work in this case requires much more effort than a similar one in a sauna.
Initially, it is recommended to cover the ceiling with hewn and dried boards 40 mm thick
The wider the boards you can find, the more beautiful they will look, no matter what type they are. Even with bitches, it will be even more beautiful
It is not advisable to use clapboard; it may move. Large thickness of boards is not desirable due to the accumulation of a large amount of cold during periods of absence of heat. This leads to the appearance of condensation on the ceiling while heating the steam room. A layer of waterproofing must be placed on them; this can be a regular greenhouse film or other vapor barrier material.
Panels for such a ceiling are usually sold with all the necessary layers of waterproofing, insulation and moisture resistance. The standard width of the mineral wool layer contained in ceiling tiles is about ten centimeters.
Since such panels have considerable weight, it is better to lift them first and then connect them in parts at the top.
The basis for insulating a false ceiling is the attic frame. A waterproofing layer should be placed in these floor beams, which will eventually cover the entire internal surface. The next layer is the installation of wooden flooring. Then the required amount of insulation, such as mineral wool, is placed in the spaces between the beams.
After insulation, it is necessary to ensure moisture insulation using foil material. Now you can cover the ceiling with wood paneling.
Deck ceilings are independent of the attic frame. Because they are mounted directly to the walls. For its construction, wooden boards about thirty centimeters wide are used.
Insulation is carried out from the attic side. All necessary materials (vapor barrier, insulation, waterproofing, as well as plywood flooring) are placed on top of the floor ceiling. This method of ceiling insulation is the fastest, but is only suitable for a small bathhouse.
Wooden floors are often installed in timber baths.
Concrete can be poured if the walls are built from brick, cinder block, foam block or frame method.
Sometimes, according to the personal preference of the owner, a concrete floor is also made in a wooden bathhouse.
Wherever concrete is used, it always needs special insulation, since cold and moisture have a destructive effect on it and also create discomfort in it.
The insulation of the floor in a bathhouse should be approached with particular scrupulousness, because it is most exposed to humidity, and must also withstand the contrast in temperature of the soil and the air in the room.
Before installing any floor in a bathhouse, you need to clean the soil surface and cover it with a thick layer of expanded clay (medium size) or slag. The height of the embankment of this insulation should be at least twice the width. If there is an opportunity to make the layer even thicker, you should definitely take advantage of it. In the case of a concrete foundation, expanded clay should be poured to its entire height.
We suggest you read: How to heat water
Concrete floor
Before insulating and pouring the floor in the bathhouse, you should install a drain pipe. Then it must be attached to the level where the screed will later be. After this, you can start working on the floor:
- First you need to compact the soil.
- Then cover the walls with materials for.
- Sand (from eight to ten centimeters) is poured on top of the soil, after which it must be moistened and compacted.
- The next layer is roofing felt, which should protrude 15 centimeters on the walls. The overlapping sheets of material must be connected using moisture-resistant tape. You can also use tar mastic.
- Then a layer of expanded clay is poured onto the floor, the height of which should not reach the highest point of the foundation by 5 centimeters.
- After spreading the expanded clay evenly, cover it with plastic film. Then XPS boards (about five centimeters) are laid on it.
- Now you need to lay the reinforcing mesh, leaving cells from five to ten centimeters.
- Then you can set beacons for alignment. They should be placed at a slight angle towards the drain pipe so that the concrete floor has an unnoticeable slope and any excess water can flow into the drain.
- The next step is to attach the damper tape. This will ensure the safety of the screed and its evenness even with sudden changes in temperature.
- Then you can pour the concrete mixture, distribute it evenly over the entire surface of the floor and level it with the rule.
- When the screed is completed and the concrete begins to gain strength, it is coated with a special primer, which penetrates deep into the concrete and has waterproofing properties.
After the concrete and primer have completely dried, you can begin laying the tiles. Wooden flooring is also often used in a bathhouse.
Wooden floor
A traditional wooden floor in a bathhouse requires a lot of effort. Particular care should be taken to ensure waterproofing, good ventilation and preservation of floor heat. For good ventilation, it is necessary to leave several channels in the foundation, which will serve as the ventilation system of the bathhouse.
Step-by-step guide to performing the work:
- First you need to attach the drain pipe and determine the location of the drain (often it should be in the center).
- Then the soil is compacted. A layer of roofing material is laid on it, rising to the surface of the walls up to twenty centimeters high.
- A large amount of expanded clay is poured over the waterproofing layer. But it should not reach the floor beams by about 25 centimeters.
- Then the beams are installed. Before using wood to build a floor in a bathhouse, it must be treated with antiseptic agents.
- At the bottom of the beams, you need to install cranial bars, to which the rough beam will later be attached.
- After making the subfloor, it should be covered with film. Which does not allow steam and moisture to pass through.
- Then it is covered with insulation, such as mineral wool or expanded clay.
- Now the entire structure should be covered again with a film that insulates the vapor.
- The joists should be secured so that they are perpendicular to the beam frame. A hole is cut in the center for drainage.
- Boards cut at an angle of about seven degrees are attached to the flooring. They should increase the cutting angle as they approach the drain.
- Insulation should be laid in the holes between these slats (with a layer equipped with foil towards the top). The sheets of foil material are connected with waterproof tape. Subsequently, the entire sheathing must be closed.
Now you can lay the flooring on the wooden floor. It must be new, high quality and waterproof.
You can insulate the ceiling and roof of a cinder block bathhouse with polystyrene foam, or even better, spray it with polyurethane foam. The insulation of a bath structure is carried out with the obligatory installation of vapor insulation, which is often confused with thermal insulation, but there is a difference, and it is quite significant. Vapor barrier is necessary to maintain normal humidity levels in combination with a certain temperature. Thermal insulation retains heat and nothing more. The differences between the processes become obvious when insulating the bathhouse ceiling.
Flaws
The material in question has quite a few disadvantages:
- Low load-bearing capacity of blocks. It is advisable to build only small buildings based on blocks of this type, since there is a risk of deformation under loads.
- Necessity of finishing. The appearance of cinder blocks cannot be described even by the term “for an amateur.” For a country bathhouse where you don’t plan to invite guests, the appearance of the external walls is probably not a problem, but the inside will still have to be finished.
- Weak resistance to water. Wood waste, which occupies up to 90% of the volume of a cinder block, absorbs water. This leads to a change in their internal structure and properties. Systematic exposure to water leads to the destruction of blocks. The situation is aggravated by the fact that there is also hot steam in the bathhouse, which easily penetrates into the block.
- The need for waterproofing load-bearing walls and reliable drainage. These works complicate the construction technology and increase the cost of the bathhouse.
- Cinder blocks crumble easily. Hence the difficulties in preparing the blocks for work or in laying utility networks (electrical wiring, drainage canal).
- The need to check the material before starting work. The quality of cinder blocks varies greatly depending on the integrity of the manufacturer.
Possible difficulties and errors
There are several mistakes in the cinder block manufacturing process:
- materials are selected incorrectly;
- incorrect proportions;
- lack of compaction;
- poor quality drying.
Please also pay attention to the following possible non-compliance with the rules:
- If Portland cement of a grade lower than M400 is used to produce cinder blocks, the stone will be flimsy and will not be suitable for construction.
- Failure to comply with the proportions leads to an incorrect consistency of the mixture, which leads to cracks and crumbs.
- If you do not compact the mixture with a hammer or vibrating plate, there will be voids inside the stone.
- If the product is not completely dried, it will not be suitable for further use.