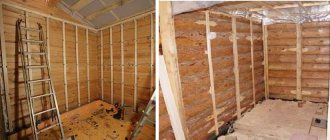
Without exaggeration, we can say that this flooring option has been tested for centuries. The technology of laying wooden floors on logs has been used for several centuries with minor changes. This is the most environmentally friendly solution for flooring, but at the same time, this coating has a number of disadvantages and important nuances that you need to know before starting work.
Laying a wooden floor on joists
Features of the floor design on the first floor
The floor on the first floor is of three types:
- cold without underground (on the ground);
- insulated floor with cold underground;
- cold floor with warm subfloor.
Let's look at the features of each design.
A cold floor without an underground is laid as follows:
- First, a sand cushion is built and compacted;
- calcined sand 15 cm thick is poured;
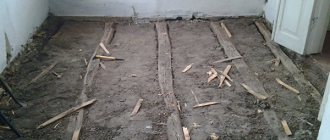
- Logs 15 cm thick are mounted on top. In order for the logs to stand firmly in place, they are buried in the ground and rested against recesses in the walls of the building. The joists must be treated with an antiseptic;
- A single plank floor 25-40 mm thick is laid on the logs. When installing a cold floor on the ground, it is important that the ground is dry.
a) Logs embedded in calcined sand.
b) Logs embedded in a layer of clay and slag.
c) Wooden blocks coated with bitumen on a base of sand, concrete and clay.
An insulated floor with a cold underground is installed on support pillars.
- A layer of sand 10-15 cm thick is laid in the underground and compacted.
- Concrete vertical pillars are poured at the height from the ground level required for constructing the underground. The depth of the supports should be greater than or equal to the depth of soil freezing in your region of residence. The cross-section of the supports is 300 * 300 mm. Reinforcement with a frame, so that the protective layer of concrete is at least 50 mm.
- Waterproofing is placed on the supports in two layers, wooden dies 3 cm thick.
- Logs with slats at the ends are installed on the supports, and a floor made of edged boards is mounted on top. This is a subfloor.
- A vapor barrier and insulation are laid on it.
The finished floor can be made of wood boards, tongue-and-groove boards, or edged planed boards. This type of flooring is installed in a house with a high groundwater level.
It is necessary to provide underground ventilation to prevent rotting of the floors.
A cold floor with a warm subfloor is installed in places with low soil water levels.
This design is similar to the previous one, but instead of a subfloor and insulation, a finished floor is laid. This type of floor is most suitable for southern regions with mild climates.
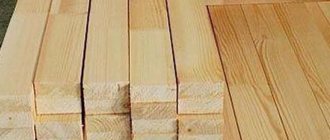
What to look for when choosing wood
- Wooden products must be dry. Raw elements will sooner or later give up excess moisture, which will lead to deformation of the material. Ideal humidity is 12–16%. Over-dried products are also of poor quality.
- It is very important to inspect the material for cracks, holes and other defects. If there are any, you should not buy products even at a big discount.
When choosing a material, it is advisable to selectively inspect at least a dozen boards - It is recommended to purchase boards from the same batch. In this case, they will be the same size and manufactured under the same conditions. This means that the color and pattern will not differ.
- It is better to choose products 2 meters long. If your budget allows, it’s worth buying tongue-and-groove wood so that you don’t have to sand it later.
- Even if you check each product from a batch, there is still a risk of buying crooked or damaged boards, so it is recommended to order with a margin of 10–15%
One of the signs of high-quality material is the presence of vacuum packaging
Types of floors
Your home, built independently, will delight you for decades if you choose the right technology for laying and insulating the floor. A wooden house can have a concrete or plank floor. Sometimes heated floors are installed. The system of such floors differs in the coolant and the degree of efficiency of work.
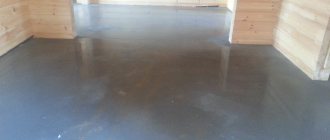
Concrete floor
Concrete floors are strong and durable. It is equipped with a concrete screed. At the same time, the base of the floor is leveled. Any type of flooring can be laid on a leveled base. The screed gains the required strength in about a month at above-zero temperatures. You can do the concrete screed yourself, without the help of specialists, which will save time and money.
The disadvantages of a concrete floor are:
- heavy weight and high load on the foundation;
- low temperature: it's cold to walk on. To increase its temperature, the floor is insulated. Concrete floors can be installed in two ways: on the ground and on the floors. When the house shrinks, cracks may appear on it.
Wooden floor
environmentally friendly wood coating, does not emit harmful substances;
wood is a warm, natural, breathable material that creates a healthy microclimate in the house;
has a variety of textures;
the material is repairable. If some structural elements are rotten, they can be replaced by dismantling the coating partially, not completely;
the number of tools and equipment for installing a wooden floor is minimal.
high price;
complex and lengthy installation.
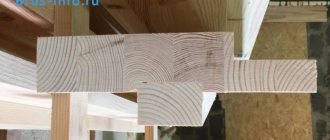
What are logs and what are their advantages?
Joists are transverse beams on which the flooring is laid. They look like bars or boards. Insulation is often placed in the free space between them, and cables and communication pipes are also hidden. A floor with this design has high thermal insulation properties and high reliability.
In addition, their advantages include a number of the following qualities:
- Due to their high strength, logs are able to withstand significant loads.
- By filling the free space between the beams, it is possible to increase not only the thermal insulation, but also the sound insulating properties of the floor.
- Floors with joists are much easier to repair. This requires removing the floor covering and replacing damaged elements.
- On top of them you can lay numerous types of materials, which can be wood, tiles and a number of others. It is important to follow the correct technology.
- Using lag it is quite easy to level the surface, even if there are significant level differences on it. Unlike concrete floors, the material consumption increases quite slightly.
- The structure created from these elements creates minor loads on the base. For the same floor height, poured concrete is an order of magnitude heavier.
- When installed correctly, the floor on the joists is ventilated, so the floor covering laid on them is well preserved over a long period of operation.
What is better to make from: wood or concrete?
To determine which flooring material to choose: wood or concrete, let’s compare them.
Price
The price of wood is much higher than concrete. Concrete is a mixture of sand, gravel and cement. A bag of cement costs 500 rubles. A screed 5 cm thick requires half a bag of cement: 250 rubles.
A bag of sand and gravel mixture costs 100 rubles. To create a concrete solution you need one and a half bags: 150 rubles. Total 400 rubles. If specialists perform the screed, they add 300 rubles/m2 for the work.
The total cost of a non-reinforced screed is 700 RUR/m2.
If you are laying wooden floors that are not insulated, then dry timber with a cross section of 100*150 mm for joists will cost on average 400 rubles/m2. Inch tongue and groove board - 700 RUR/m2. Payment for work—400 rub/m2.
The total cost of wooden floors is 1500 RUR/m2.
These prices are indicative and are as of 2021.
Deadlines
The screed gains strength in 28-30 days. So that cracks do not form on it and it dries evenly, it is covered with film and periodically sprayed. You cannot walk on the screed for three days. Wooden floors can be used to place furniture on and move around on the day of installation.
Engineering Communication
Typically, utilities: water supply, sewerage, heating pipes are located under the floor. In case an old wooden house needs to be repaired or after an accident, wooden floors can be partially disassembled, sawn and easily removed. After eliminating the emergency condition, individual parts can be replaced. With a concrete floor the situation is more complicated. The dismantling process is complex and time-consuming. You will have to use professional equipment and tools.
Durability
Concrete floors last much longer than wood floors. The quality of the coating can be judged after it has hardened. If wooden floors are laid from raw boards, then after a while you can hear a squeak. The floors need to be disassembled and screwed back together.
Peculiarities
Plank floors attract attention with their simplicity and practicality. The undoubted advantage of the flooring is its naturalness and original appearance. Wood naturally has an interesting texture, so plank floors require minimal finishing. If you simply varnish the boards, they will look like an expensive design solution.
Additional advantages include a warm surface and ease of use. This is reflected in the fact that even in winter you can walk barefoot on wooden flooring without feeling that it is winter outside. The material does not require special care: even if the varnish or paint is wiped off, you can easily apply a new coating.
The following types of boards are used for arranging a wooden floor:
- parquet - an original version of interior decor;
- tongue-and-groove – tongue-and-groove locking connection, which simplifies the installation process;
- deck - a practical and inexpensive solution for all occasions;
- two-layer version - the upper part is usually made of valuable wood.
Taking into account the listed features, you can choose a natural wood floor to suit every taste and budget.
The designs also have disadvantages. If the floor is laid incorrectly, the plank floorboards will creak over time. Almost all types of wood, with rare exceptions, are dependent on the level of humidity: dampness contributes to the appearance of fungus and mold.
Important! Despite its popularity and prevalence, wood can hardly be called a cheap material, therefore, when planning to lay a floor, you need to prepare in advance for significant expenses.
How to choose the right wood
The quality and durability of the floor directly depend on the type of wood chosen. Each type of lumber has its own technical characteristics and features that the home craftsman needs to know about.
The most common options:
- Larch.
An ideal option for arranging floor coverings. The wood type has a soft structure, so the floor will be resistant to intense loads. Larch does not attract insect pests and gains strength when in contact with a humid environment. The fact that in Venice almost all old houses stand on pile foundations made of larch beams speaks in favor of wood.
- Oak.
A real king tree that can last for hundreds of years. Wood has a very interesting texture, so it usually does not require finishing, harmoniously combining with any expensive renovation, especially with antique furniture. However, laying a wooden floor in a private oak house will be a very costly undertaking financially. Wood is very difficult to process.
- Ash.
Wood produces a warm and unpretentious floor that attracts attention with its optimal price-quality ratio. Ash is very dependent on external influences, especially on a humid environment, so it must be painted or covered with several layers of varnish.
- Beech.
In many characteristics and indicators it resembles an oak board, but has a more affordable price. The material holds paint well, so it is in consistently high demand in private construction.
- Pine.
The wood is usually used to make parquet or tongue and groove boards. Lumber is interesting in terms of price, but if the boards are not properly processed, their service life will be short.
Having chosen the best option for yourself, you can begin installation work.
Wooden floors on poles (supports)
Wooden floors on supports are installed in a certain sequence:
- markings are made;
- the plant layer is removed from the soil;
- the soil in the pit is removed at least half a meter deep;
- crushed stone is laid;
- a layer of sand is poured onto it, which is moistened and compacted;
- install brick supports. The width of the pillars is 1.5-2 bricks;
- 2 layers of roofing material and wooden stands are laid on top of the supports. The pads are fixed;
- Logs made of coniferous timber are installed on the linings. Before use, they are treated with antiseptic agents;
- so that during frost and thaw there is no movement, the slag is filled in. It does not reach the log by 5 cm. The resulting space ensures ventilation of the structure;
- boards are placed on the logs and driven in with long nails at an angle of 45 degrees. The gap between the walls and boards is 1.5 cm. It is necessary to compensate for expansion. They are covered with baseboards.
The supports can be poured from concrete, as described above. Sometimes, instead of formwork, asbestos-cement pipes or ventilation ducts of round or rectangular cross-section are used.
When installing pillars, it is important to pay attention to the top level. It must be leveled horizontally and vertically using a level or laser level. The distance between supports is 1m.
Wood preparation
Before laying joists and flooring, it is necessary to treat the materials with special antiseptic impregnations. In most cases they are supplied finished, but sometimes there are burrs that need to be removed with a plane. It is also important that the tree lies indoors for 2-3 days, then the humidity level will become the same as in the room.
High-quality wood impregnation is the key to the durability of floors
Floors on joists
The installation of a floor in a wooden house on joists is identical to the installation of a subfloor. There are differences in the methods of attaching the joists. They are fixed to the base and grillage. They are located at a distance of 2 cm from the walls.
First they make the strapping. The logs are attached to it with anchors, but not rigidly, but only slightly fixed so that they do not wobble. The step between the lags is 40-60 cm.
Skull bars are attached to the bottom edge of the joists. Boards are laid loosely on the bars.
Polyethylene film serves as waterproofing. The joints are fixed with a stapler. The film goes onto the wall.
Insulation is laid over the waterproofing.
The vapor barrier membrane is installed in the same way as waterproofing. A counter-batten is nailed onto the vapor barrier layer. It creates a ventilation gap. You can lay sheets of chipboard or boards on the logs.
By the way, such floors can be insulated from below.
Single layer floor
Single-layer flooring is laid in two versions:
- on brick supports. Beams are placed on them, and flooring in the form of boards or sheet materials is laid on top;
- along the beams. Brick supports are not used. The beams are embedded in the walls. The distance between them is large: about a meter. Therefore, the flooring is attached to the sheathing. The sheathing is made from square timber. It is fixed with nails. It is necessary to ensure its horizontal position so that the coating laid on the logs is even. If you plan to install only boards, and the finishing coating: laminate, linoleum will not be laid, then the boardwalk is considered finished. At the end of the work, the floor is varnished.
Double floor
A double floor consists of a rough and a finishing coating.
Skull bars are nailed to the bottom of the installed logs. Boards are placed tightly between the skull blocks.
Moisture-proof material is laid on the boards. Then the insulation and vapor barrier membrane are laid. Tongue and groove boards of the finished floor are laid on it. To ensure that the space between the finished and subfloor is ventilated, vents are made in the corners of the finished floor and covered with decorative grilles.
Installing logs yourself
For logs laid on columns (pedestals), we use 50x100 mm timber. At the same time, we leave the distance between the centers of the columns (pedestals) at a meter or so. As the distance between the columns increases, the section of the log also increases.
Diagram of floor arrangement using joists on posts
When making a wooden floor using joists with your own hands on concrete floor slabs, we lay the joists directly on the concrete. For logs laid on a solid base, you can use timber of a much smaller cross-section, because they will not experience bending load. In fact, in this case, logs are needed for precise alignment and for nailing the boards. The size of the bars 40x50 or 50x50 will be quite enough.
I recommend: Question: How to repair and insulate a roof
The distance between the lags depends on the thickness of the coating material. For a milled board it will be 60 cm. For a covering made of plywood or OSB with a thickness of 14-18 mm, the step will be no more than 40 cm.
We install all the logs strictly parallel to each other, in a single horizontal plane. First, using a construction bubble level, we set the outermost lag. Then, at the same height, using a hydraulic level or a laser plane builder, we set the joist on the opposite side of the room. Between the outer lags we stretch a fishing line, along which we place all the rest, if necessary, placing dry wood plates or plastic wedges (sold in stores). This is usually required when laying joists on a concrete base. The columns should be brought out, as they say, “to zero” during the laying process.
To reliably fix the logs, several methods are used:
- Foaming the gaps between the joists and the concrete floor with polyurethane foam.
- Installation of metal corners. On one side they are attached to the concrete floor, on the other to the joists.
The first method also provides sound insulation from impact noise. The second method allows you to securely fix the logs, which in principle is not particularly necessary, since the logs are securely fixed by the coating nailed to them. The only convenience of fixing the lags is to avoid accidentally knocking them down during work and when nailing down the covering.
Fixing lags on metal corners
Materials for processing logs
In order for logs to be used for a long time, it is important to protect them from harmful environmental influences: precipitation, wind, dampness. Therefore, before installation they are treated with various means.
Bioprotective compounds
Bioprotective compounds protect wood from fungus, mold, and insects. The protection period is from 25 to 30 years. Concentrates are used. Sometimes pigment is added to them, with which you can ensure uniform application of the product. Bioprotective products are environmentally friendly, do not emit toxic substances, and are hypoallergenic. The smell is slightly perceptible. They are applied before installing the floor.
Leave-in antiseptic
A non-washable antiseptic is necessary to protect against high humidity and temperature changes. Product consumption: 400 g per 1 m. To achieve a certain result, it is important to apply up to 4 layers of the product. Neomid works well.
Folk remedies
Folk remedies include:
- transformer oil. It penetrates deep into the pores of the material and protects it from pathogenic microorganisms;
- resin Birch resin protects against fungus, mold, rot and bugs. but does not protect against fire;
- used motor oil. It has good protection against insects and bacteria. Its cost is low, but a significant disadvantage is the strong odor that does not disappear for several months.
WOOD SPECIES AND THEIR CHARACTERISTICS
Wood species differ from each other not only in appearance, aesthetic effect, but also in operational properties. For flooring, the first thing to consider is the hardness of the rock, that is, its resistance to dents and wear resistance.
In practice, various types of wood are most often divided into the following groups:
- very soft - spruce, poplar, willow, linden;
- soft - pine, fir, larch;
- medium hard - pear, walnut, birch, alder;
- hard - maple, oak, ash, yew;
- very hard - rosewood, beech, hornbeam.
TABLE OF WOOD HARDNESS
So, when choosing a tree, you should take into account not only the external decorative appearance, but also how well this or that species will meet the functional requirements for the future floor. The very soft and soft wood is suitable for residential areas with little abrasion load on the floor covering.
However, coatings made from medium-hard wood cannot always be used in rooms designed to receive large numbers of visitors.
Installation of subfloor
The subfloor is a flat surface, without dips and depressions, on which the finishing coating is laid.
The subfloor performs a number of functions:
- holds insulation;
- distributes the load evenly;
- hides communications, insulating material;
- reduces noise levels between floors;
- reduces heat loss in the room;
- is the basis for finishing coating.
May be interesting: TOP 8 remedies for getting rid of bark beetle
For the subfloor, unedged boards, plywood, OSB, and gypsum fiber board are used. To ensure a reliable base, the subfloor is made in two layers. It is important that the joints and seams of the layers do not coincide with each other.
Floor installation in a wooden house is carried out in the following ways:
- on the logs. This method is used when it is necessary to raise the floor level. To retain the insulation, sheet materials or plank flooring must be laid on the subfloor;
- hem at the bottom. It is performed if it is necessary to save the height of the house. Hemming beams or joists from below is also necessary to support the insulation and other layers of the technological cake. It is not possible to nail the boards with continuous flooring. You need to put insulation between the joists. If it is afraid of moisture, then it is necessary to lay a vapor barrier film on top. Sometimes the filing is done on cranial bars. They are nailed to the sides of the joists from below. These are small bars 10-20 mm. Rigid insulation is mounted between them: polystyrene foam or short boards.
Basic rules for installing joists
When installing logs yourself, you should strictly follow the following rules:
- Before installing the log, the surface must be cleaned and primed;
- all wooden elements of the pie structure are thoroughly dried and treated with antiseptic antifungal drugs;
- sand or fiberboard can be used as a soundproofing material;
- adjustable floors with your own hands must be fixed well, and then use a long construction level to make sure that the logs are installed straight horizontally;
To control the horizontality of the structure, you must use a level - Under no circumstances should you begin installing the floor without checking the horizontalness and evenness of the joists;
- floor boards are attached to each and every joist;
- In order not to spoil the board, the slots for fastenings must be made in advance; when using self-tapping screws, the holes are made with a thin drill.
Finished floor installation
Most often, to install a finished floor in a wooden house, a board processed on a milling machine and having a tongue-and-groove lock is used. The first board is laid with a groove against the wall, leaving a compensation gap of 1.5 cm. The tenon of another board is inserted into the groove and hammered with a mallet. Reinforce the boards with self-tapping screws, screwing them into the center of the board and joists. The self-tapping screw should be twice as long as the thickness of the board.
The second fastening option is to screw the screws into the tenon of the board at an angle of 45 degrees. To prevent the board from splitting, holes are drilled in it in advance. Finished floors are laid after finishing the interior finishing of the house.
Useful tips
Expert recommendations:
- The prepared boards must first be laid on the beams and marked.
- After trying on, you need to number them so that there are no problems with selecting a suitable element.
- The fastener caps are recessed into the surface, but are not too tight.
- If the boards do not fit together even with the help of a mallet, it is recommended to step back 2–3 cm and secure a batten to the joist. Then a wedge should be driven between it and the board, which will drive the tenon into the groove.
If the tenon does not fully fit into the groove, then it can be driven through a wedge - After installing all the boards, you need to sand the joints to smooth out any possible height differences.
Laying a wooden floor is a fairly simple procedure that requires careful selection and sorting of materials. The remaining manipulations can be easily performed even by a novice home craftsman.
Concrete floor in a wooden house
The best technology for arranging a concrete floor in a wooden house is to pour it over the ground. The soil must be dry. Let's look at step-by-step instructions for installing a concrete floor in a log house.
Preparatory work
To prevent cracks from appearing on the concrete after some time, it is important to thoroughly prepare the soil before pouring it. To compact the sand cushion, use a vibrating roller or vibrating machine. To compact the sand tightly, it is moistened before starting work. A layer of gravel is poured on top of the sand.
Waterproofing
The next step is laying the waterproofing layer. Waterproofing will prevent the absorption of moisture from concrete and protect from groundwater.
As waterproofing, you can use polyethylene film or bitumen-based roll materials. The film is laid, extending 20 cm onto the walls. The film is overlapped by 10 cm, and the joints are taped. Coating materials can be used.
Pouring the subfloor
The basis for the hydro- and vapor barrier layer is the subfloor. The thickness of the fill is up to 5 cm. It must be smooth, without differences.
Vapor barrier and insulation
A vapor barrier membrane is laid on the subfloor. It prevents the formation of condensation. Insulation is installed on the vapor barrier layer. The following can be used as thermal insulation materials:
- mineral wool. To prevent it from getting wet, it is covered with plastic wrap;
- Styrofoam. It is also protected with film;
- extruded polystyrene foam. It is elastic, so it quickly regains its shape. It is used in places with significant floor loads.
Screed device
The last step is pouring the screed. They start pouring concrete from the far corner. Align the screed using the rule according to the beacons. This screed is wet. It dries for 30 days.
Dry screed is performed using sheet materials. First, a plastic film is laid down. Plywood, plasterboard, fiberboard are laid on a 5 cm layer of sand or expanded clay. Sheet materials are fixed with self-tapping screws. The joints are puttied and sanded.
Final stage
First, insulation is laid between the joists, then a polyethylene film is laid, which serves as a waterproofing material.
Required:
- thermal insulation material;
- vapor barrier film;
- construction stapler and staples;
- self-tapping screws;
- screwdriver
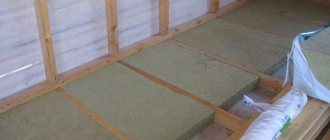
The next stage of work is thermal and sound insulation of the floor. As joists and lintels are installed, cages are formed that must be filled with protective material such as rock wool or glass fiber boards. To ensure the best indoor comfort, the thickness of the material should be equal to the thickness of the log, that is, it should be 150 mm. In this case, not only sufficient sound insulation of the room will be ensured, but also its thermal insulation.
The material should be inserted into each “window”, then covered on both sides with a vapor barrier film with an overlap of 150 mm. It is best to attach the film to the joists themselves using a construction stapler. To avoid saturation of the wool with moisture and, as a result, freezing of the structure, it is necessary to pay special attention to those areas of the ceiling where, on one side, there may be a negative temperature. In this case, this place must be provided with a vapor barrier layer as much as possible.
https://youtu.be/0JX2NOUi23M
Next, you should move on to the rough flooring, which can be done either with edged boards or sheet materials. You need to choose the base of the floor based on the finish. For example, if laminate will be laid in the future, then the base must be made of plywood, the thickness of which should not be less than 18 mm. The subfloor must be attached to the beams with self-tapping screws, since they press the board very tightly against the joist and hold it tightly.