Wooden lining of the walls with clapboard adds stateliness to the room and classic elegance. But, rooms where the sun is present most of the day (southern) are not advisable to be decorated with clapboard. When exposed to ultraviolet light, it will quickly lose its color. After a few years, dark spots will begin to appear.
Walls are often lined with clapboard, especially in dachas and apartment loggias. This gives comfort, incredible coziness.
Classifying the material
When purchasing lining, the quality, cost of the material, and the room where the walls will be finished with lining will be taken into account. There are many options.
Natural lining is made from the following wood species:
- Conifers;
- Deciduous.
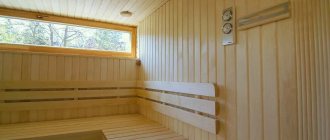
For example, hardwood panels are suitable for saunas and baths. Since they do not emit resin, like conifers, at high temperatures and significant temperature changes. Coniferous walls will not look neat and will be sticky. It is also easy to get burned by tar discharge.
Among conifers, only cedar from Siberia is a pleasant exception. Its wood is of a high class. The cost of such panels is decent. But the quality and durability will justify all the costs. Trees such as cedar, larch, pine, eucalyptus, and spruce are considered soft. Below is the wall decoration with clapboard in the photo, which will help you choose the design that you like best.
The most persistent are deciduous (ash, aspen, linden, alder). Linden is recognized as the best for baths. When the air temperature rises, it begins to release a slight odor, which has a positive effect on the human nervous system. According to quality, wood is divided into classes: premium/extra, a, b, c.
Examples of cladding
- There is an opinion that lining is more suitable for a bathhouse or cottage than for an apartment or cottage. This misconception is successfully refuted by designers who harmoniously integrate wood cladding into a wide variety of trends and styles.
- Wood lining in the interior harmoniously combines with wallpaper, tiles, and plaster. With a professional combination of textures, you can create a stylish and elegant interior.
- Lining can become an integral part of an interior in Scandinavian style. In this design, it is in harmony with artificial or natural stone and large beams on the ceiling.
- Anyone who is in love with Provence will certainly suit the walls made of wood in natural tones. In this option, the combination of wood with plaster and rough board floors looks nice and relaxed.
- Another style that requires the use of natural wood cladding is Russian. The walls, lined with a block house, look like the walls of a log house.
- You can also use lining in high-tech style. In this version, the materials are painted in neutral white or gray colors and are used as a background for rich accessories.
- Fans of minimalism will most likely like the combination of lining with a strict cladding made of ceramics and stone.
See below for more details.
Types of installation
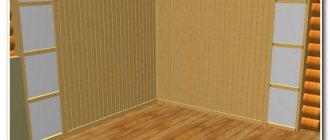
Naturally, before you start covering the walls with wooden lining with your own hands - an example in the video, you need to decide on its type and direction. Be it horizontal, vertical, diagonal, herringbone, diamond or brick laying, mixed.
Horizontal installation is considered a classic (in Russia, for sure). Has a positive effect on expanding room space. A small disadvantage that can be avoided (during installation, the grooves are directed downwards) is dust and moisture that collect at the joints of the boards. Following this recommendation, start laying from the top.
Vertical placement is the most popular among Finns. It makes the ceilings visually higher. This effect is especially important for low rooms. Installation of wall trim with clapboards begins from the most difficult angle.
Diagonal installation (and mixed) have differences in direction and aesthetic appearance. Installation is much more complicated than previous options. The interior, decorated with wood of different types and shades, looks especially bright and unusual.
It is easier to install wooden panels on walls horizontally with belts or vertically.
The vertical version of wall covering with clapboard is simply necessary for rooms with high humidity, places where frequent condensation is possible (bathhouse, kitchen, etc.). Because the horizontal method will not protect against excess moisture. The type of installation, when installing boards vertically, affects whether the tongue and groove will be cut, in what place, and by how much.
When mounted horizontally, the final result looks very attractive. Here the lining is installed, directing the ridges upward to protect the grooves from the accumulation of water. This will prevent the occurrence of rotting, microbes, and fungi in the future. When installing the first bottom board, the edge of its groove is cut off. This removes the pocket that will collect moisture.
The diagonal option for placing lining is used less often. This happens more difficultly, with a large amount of material waste. From the point of view of beauty, it is practically no different from previous installation methods. This DIY clapboard wall decoration will add zest to the room.
There are shaped styling: herringbone - a little difficult, but possible. A vertical sheathing is required, on which template-cut fragments of material will be mounted.
Wall cladding with diamond-shaped clapboard is more complex. The sheathing is made in the form of a framed cross. The bars are fastened diagonally in its quadrants. The labor spent on installing diamond-shaped lining is worth it. The result looks incredibly stylish and expensive.
Lining surface treatment
Indoors, the lining can be left in its original form, since it is not subject to extreme changes in weather conditions and has a beautiful wood grain. But if there are frequent changes in temperature and humidity in the room, for example in kitchens, bathrooms, especially on balconies, saunas and baths, then in such cases it is necessary to carry out protective treatment of the surface of the lining. Otherwise, the surface of the wood will turn blue and dark gray.
You can process and paint the lining before installation or after installation. However, it is advisable to paint the new lining before installation. Because, like any lumber, lining has a small percentage of shrinkage. As a result of shrinkage, unpainted areas will appear at the joints of the interlocking joints in the form of lighter stripes that were not visible before shrinkage. In this case, it will be necessary to additionally paint the surface of the lining.
The surface of the lining can be coated with different types of paints and varnishes. To do this, you need to decide why you need to treat the surface. If the lining is installed outdoors and is exposed to direct exposure to ultraviolet rays, precipitation, and sudden temperature changes, then it is necessary to choose the most protective materials that cover the lining with a thick film. Such protective compounds include all kinds of antiseptics against fungus and insects, and compounds that increase the fire resistance of wood. After treatment with antiseptics, the lining on the street is covered with one of the types of paints based on acrylic, oil or latex. It is recommended to treat the lining that will be installed outdoors with antiseptics on both sides; the cut ends also need to be treated well.
To paint lining indoors, choose compositions that do not create a dense film on the surface of the material, which preserve as much as possible the beautiful wood texture, giving it a specific shade. Compositions for interior painting preserve the breathability of wood and at the same time create a protective layer against moisture, prevent the accumulation of dust, protect against insects, and preserve texture and color. Such materials include: wax-based compositions, oil-based compositions for wood, different types of stains and varnishes for wood. Indoors, the lining can be processed only on one front side.
Thus, in order to choose a material for treating the surface of the lining, you must proceed from the technical characteristics of the room and your own taste preferences. There is no universal recommendation for painting lining.
Having completely assembled the lining and processed its surface, the final stage is to cover its end parts on the ceiling and near the floor with baseboards, as well as look at the decorative corner in the corner of the walls, if aesthetics require it.
Having considered all the stages of self-installation of lining, we can conclude that almost anyone can cope with this process. It does not require years of experience or great physical strength. The process of laying lining is quite exciting and interesting. And working with natural wood always brings only pleasure.
How does installation work?
Everything happens in order.
The sheathing is being done. Without it, channels appear where moisture collects, dampness appears in the room, fungus may develop, and the wall will even begin to rot. Therefore, they carry out repair work according to all the rules. Even if the walls of the house are perfectly smooth and are themselves wooden, it is still necessary to install sheathing before covering the wall with clapboard.
The clapboard wall decoration is installed with mandatory channels for ventilation (they are specially cut out in the boards). No way without lathing. It should be made of wood, like the panels. This is important, because the material acts as a damper. Particularly important when using min. materials on the walls. The same function is supported by gaps (deformation) between the wall itself and the boards. Connectors range from 5 mm and larger.
For example, there are often cases where wooden boards are laid on steel sheathing (as when installing drywall). After a short time, the material begins to expand and cracks appear. But, having removed the plinths several years after installation, it is discovered that the seemingly smooth surface of the wooden sheathing has only slightly moved around the edges. It doesn’t matter what type of sheathing will be, the basis for its installation is the same for everyone: the sheathing bars must be positioned strictly perpendicular to the boards.
Don’t forget about the bars that are located at the edges:
- The ends of the boards should not hang;
- When installing the lining diagonally, its sheathing must have a frame (solid);
- The thickness of the bars starts from 20 mm, width - from 30 mm;
- The size of the installation step of the bars is at least 4 boards wide;
- From the ends, the fastening points are placed at a distance starting from 50 mm.
Do-it-yourself step-by-step finishing
Proper preparation of all surfaces, structural elements, cladding, and fasteners will allow you to create high-quality clapboard surface finishes. All calculations and measurements are required according to:
- selected type of canvas;
- room dimensions;
- the presence and location of door, window openings, niches or other objects in them.
Fastening the lining is the penultimate stage of finishing before covering with strips, skirting boards and other auxiliary parts.
Frame installation
You can fasten the lining without it, but there are no guarantees that the material will retain its qualities for a long time and will not begin to deteriorate due to the lack of a ventilation slot on the back side. Therefore, craftsmen recommend making load-bearing sheathing regardless of the presence of insulation between its bars.
Installation instructions:
- Room measurements. The room is measured around the perimeter, all key locations of corners, door openings, windows, etc. are marked.
- Calculation of the amount of material required for sheathing. To do this, you need to multiply the perimeter of the room minus the openings by the number of steps in the arrangement of the bars. This is done by fixing the panels vertically.
In the case of horizontal calculations, the calculations will be a multiplication of the perimeter of the room, divided by the step width (the number of vertical beams is determined), by the height from the floor to the ceiling. In this case, the amount of material that fills the openings of windows and doors according to the plan is subtracted.If a diagonal or combined method of fastening cladding panels is assumed, then the calculations (as for standard fastening) are simply multiplied by the required coefficient, since the bars must be spaced more often.
- Marking. Using a building level and a plumb line, a control zero line is applied on the wall opposite the door. For vertical fastening - at a distance of 5-6 cm from the floor and ceiling for the first and last plank. For horizontal - in the corner, at a distance of 5-6 cm from the adjacent wall. Tip To facilitate subsequent work on the installation of other sheathing elements, you can stretch a fishing line between the control beams. It will mark the level along the length or width of the wall.
- Measuring and cutting bars. Since it is better to save resources by gradually cutting the bars to the required length, this must be done accurately and from fresh measurements. Let the labor intensity increase a little, but due to this the surface will be perfectly flat.
- Fastening the bars. A block of the required size is leaned against the wall at the marking site. Using a drill with a thin drill, approximately 2.1 mm, as for screwing self-tapping screws into wood, holes are drilled in the block and wall to the depth until it stops. Then these holes are re-drilled with a thicker one (according to the diameter of the unopened dowel casing), and the dowel casings are inserted. Only after this the element is leaned again in the same place and secured with dowels.
Actions are carried out until the installation of all the necessary load-bearing elements of the sheathing is completed.
Before installation, all wooden materials must already have a dried protective coating against rot and harmful microflora.
another article
Fastening the panels
Depending on the orientation of the direction of the canvases, the lamellas can be attached in several ways. The installation mechanism will depend on:
- depending on the type of fastener;
- grade, type of lining itself;
- features of the room being finished, its microclimate, and other characteristics;
- the presence of a heat, steam, waterproofing layer under the finish.
In general, fastening is a cyclical process:
- The location of the first board on the sheathing is checked by level.
- Fixation is in progress.
- The ridge of the next one is inserted into the groove of the previous panel, and the maximum joining density is achieved (how to properly join lining panels?).
- The second board is fixed in the same way as the first, and the next one is taken.
- The process is repeated until all necessary surfaces of the room are completely covered.
separately
Some laying rules
In order not to spoil the finished repair, when installing the lining, follow some rules:
- Do not install lathing directly on a damp, porous wall;
- The wall must be properly prepared;
- The best option is cement plastering;
- If the room is dry, there are smooth walls plastered with concrete - the bars are secured with EC staples (which are used for drywall). These are plates that have been perforated.
To ensure that everything is done masterfully, the bars are chosen as smooth as possible. The staples are attached to the walls, the middle block is installed (placed first), along the edges of which the staples are bent, and the ends of the blocks are secured. Next comes the bending of the intermediate brackets, the block is mounted completely (without deformations). Subsequent bars are leveled with the middle one and placed evenly along this plane.
The surest preparatory method for walls under lining is to carry out a vapor barrier. For some rooms this is extremely necessary (kitchen, bathhouse, hallway, etc.).
Decorating walls with clapboard with your own hands requires care.
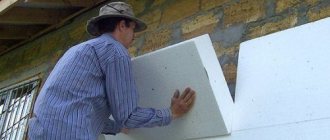
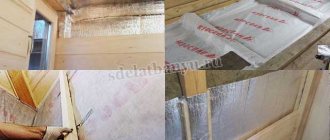
The wall must be completely leveled, insulation must be placed on top, with the foil side facing out. The insulating material (on special tape) is placed with an overlap (15 cm). Next comes the fastening of plywood pads (of the required thickness, at least 8 mm) to the wall under the bars. Then sheathing beams are attached to them.
This results in a well-ventilated spatial gap (between the lining and the insulating material).
The basic principle of laying lining is to start work from the most difficult small places; finish in large, simple sections.
When the wall is already covered with clapboard, the baseboards are attached. Covering walls with clapboard yourself helps you save money and find interesting solutions. An analogy with laminate flooring is appropriate here.
Which fixation option should I choose?
It is important to decide on the method of fixing the board materials. You can sheathe a wall using several methods:
- Through view of fasteners. This is the simplest solution that does not require much effort. The idea is that the screws are screwed directly through the front side. This method involves applying markings so that the fastening points are located on the same line. In addition, holes are drilled on the carriage board in advance, which will prevent the wood from deteriorating and cracking. When screwing in the screws, make sure that their heads are completely recessed into the wood. This can be easily achieved if you pre-drill out a place for the head with a large-caliber drill. The resulting holes are masked with special eraser plugs or filled with putty. Among the disadvantages, this method significantly disrupts the external aesthetic appeal of the coating.
- The lining can be attached to the wall using decorative nails. Their hats were initially decorated to match the color of the material.
- Hidden nails without heads would be an excellent option. The peculiarity is that such nails can only be driven at an angle of 80 degrees. This will make it possible to hide those areas that have been violated.
- If you have a professional stapler on your farm, you can use staples for fastening.
Important! You should not buy a manual tool for driving staples, which is sold on every corner, since its use does not provide reliable fixation.
- For the smallest thickness of the carriage board, clamps are used. The main advantage is that the fastenings are invisible.
The method of attaching the lining to the wall is selected individually, based on the specific situation. But we note that recently it is the clamps that have become the most popular.
Advantages of the material
Lining made of natural wood has a number of advantages that are known to many. Let's look at the main ones:
- Environmentally friendly finishing material;
- There are no emissions of substances that negatively affect humans;
- Allowed for use in children's rooms and rooms where allergy sufferers live;
- Duration of operation (if you periodically carry out special processing of wood, it is maintained in ideal, new condition);
- Wood paneling does not burst or scratch;
- Not afraid of damage (minor mechanical);
- It is easy to realize any design fantasy (due to different wood species, their coating with varnish and paint);
- Withstands temperature fluctuations (certain types of wood);
- It is moisture resistant;
- Modern types of panels have high fire safety;
- Withstands significant influences both indoors and outdoors (one of the main differences from plastic lining).
Where to apply
Clapboard finishing is often used in steam rooms and other bathhouses. In this case, choose panels made of linden and alder (for steam rooms) and coniferous wood (for other places). These types of wood are endowed with healing properties, thanks to substances that are released when heated. Boards with knots cannot be used in steam rooms, as the corresponding areas become hotter. For a good aroma, it is recommended to install several pine boards in the area of the stove. The lining treated with protective compounds is suitable for cladding facades; the type of wood in this regard is not particularly important. Interior decoration is a complex task; panels in a uniform color scheme are required. Mahogany lining is used for cladding walls in expensive mansions. The panels are also used to make partitions to divide space: both in apartments and in open areas.
Tricks, nuances
Once the material is purchased and delivered to your home, it needs to be adapted to the future location. Before finishing the walls with clapboard (example in the photo), the panels are dried for 1-2 weeks indoors or outdoors.
If the material was located outside, it will have to be left for another day or two in the room where repairs will be made to decorate the walls. This manipulation will avoid possible deformation of the boards on the wall.
Then, no longer worrying about possible unpleasant consequences, they proceed directly to work.
Craftsmen prefer to fasten the boards to the sheathing with special clips (mounting):
- Drilling;
- Starters;
- Kleimers.
Claimers are the most productive. Installing one mounting point takes a couple of seconds. They do not spoil the wooden lining.
Required protection:
- Grinding;
- Primer;
- Coating with acrylic varnish (colorless, tinted).
The varnish will not only protect against damage and radiation, but will also add fire resistance to the material.
General recommendations
There are two main options for covering the surface with clapboard: adhesive and frame. The first requires a perfectly flat plane. Therefore, the preferred method is the construction of a sheathing. In addition, it allows you to create additional space for insulating the room.
The construction of the frame provides additional opportunities for insulating the room
To attach the lining to the wall you will need:
- Tool. In this case, you need to prepare: a drill with various attachments, a level (plumb bob), a hammer, pliers, an electric jigsaw or a hand saw.
- Slats for the frame. A solid wooden beam with a cross-section of 30*60 mm is ideal for this purpose. The substrates are immediately prepared. They are used to level racks.
On a note! If the surface has a significant slope, then setting up a wooden beam will be a rather complicated procedure. In this case, a metal profile is used.
- Fasteners: self-tapping screws, dowels, nails, clamps; if required, additional elements for the frame (suspensions).
You should know that before covering with clapboard, even if the frame method is used, preliminary preparation of the surface is required. The procedure is simple; the old decorative layer is removed, and all defects are well covered. Additionally, priming is carried out.
Varnish and paint selection
Means to maintain the excellent appearance of the panels for a long time are used in the initial stages, before covering. And walls covered with natural clapboard, an example in the photo below, must be treated upon completion with additional colorful materials.
In addition to them, to give a spectacular finish to the lining laying, at the end of the repair, the wood is coated with tint compounds.
It is based on a couple of components that greatly influence the appearance of the finish. Varnish happens:
- Alkyd;
- Acrylic;
- With a water base;
- Polyurethane;
- Mixed (acrylic with polyurethane).
Alkyd takes a long time to dry. For faster drying, use special. solutions. This varnish will give the room a sharp, not very pleasant smell, which is difficult to dissipate. But these little things can be tolerated, because the alkyd will give the boards reliable protection from moisture.
Acrylic – quick-drying. Used inside and outside buildings. Moisture-resistant, tolerates high temperatures well. The presence of many shades and colors is attractive. All surfaces treated with this varnish can be washed without problems, dirt and dust can be easily removed from them.
Water-based varnish is the safest and most environmentally friendly among all products. Dries quickly, odorless. Characterized by the absence of chemicals. solvents. There are water- and dirt-repellent varnishes. Caring for materials coated with this varnish is very simple. The cost is quite high.
Polyurethane. The most versatile one today. It will prevent the wood from turning yellow. Shades are offered in brightly saturated, semi-transparent shades. The product is presented for every taste. Do not forget about the primer of the required tone, especially if the choice fell on a light varnish color.
An interesting, practical, often used when covering walls with boards yourself is impregnation of wood with oil. Thus, the panels acquire an unobtrusively shiny, beautiful tone.
For our climate, in order for the board to look perfect for more than 10 years, it must be treated with acrylic varnish in two layers.
Preparing the wooden base
To obtain a properly equipped frame made of beams, you will need to prepare the following consumables and tools:
- a set of bars with a section of 30 by 30 mm;
- cuttings of thin boards used as substrates for bars;
- set of screws and dowels;
- hacksaw or jigsaw;
- screwdriver;
- electric drill;
- a set of chisels and screwdrivers;
- hammer (mallet).
In addition, you will need a tape measure, a corner, a set of plumb lines and a building level. It is recommended to begin the installation of the sheathing by fastening the outer frame bars, after which all the remaining bars are attached between them (in increments of approximately 50-60 cm).
During the process of attaching the beams, it is necessary to constantly ensure that the surface formed by the beams for laying the lining is as smooth as possible.
You can properly prepare a flat surface by placing pre-prepared planks under the bars in the required places. The correct alignment of the frame is checked using a level and plumb line. The filling of all intermediate beams is carried out taking into account the framing of window and door openings necessary for fixing the cladding elements.
Before use, all wooden frame elements must be treated with fire retardants and antiseptics to ensure their protection from mold and fire.
Features and purpose
Lining is a natural and environmentally friendly material. Its positive features include the following characteristics.
- Nice appearance. The never-repeating original wood pattern makes it possible to create extremely interesting finishing materials. The variety of colors, shades and contrasts makes it possible for designers to actively use it in their own projects. Using this material you can not only change the appearance of the interior of residential premises, but also make the facade of any home more attractive.
- Wear resistance. The lining boards are thoroughly impregnated with all kinds of protective agents; the treated surface will serve for decades. The boards fit tightly together when laid, resulting in an extremely strong surface that perfectly protects internal or external walls from the influence of negative factors.
- Easy to install. Installation can be carried out even by those who know absolutely nothing about construction. The ease of installation greatly attracts consumers, since by spending a minimum of time on mastering the most important rules of finishing, you can save significant money on paying specialists.
- Good sound insulation. When installing the lining, a slight air layer is formed between it and the wall of the house, which counteracts the penetration of third-party sounds and ensures silence in the house.
- Affordable price. The cost of the material varies over a relatively wide range, which makes it possible to choose the most cost-effective option. It should also be noted that installation does not require careful preparation of the base, which helps reduce the cost of finishing work.
Lining is an almost universal product used for covering various types of surfaces, from the walls of a room to the ceilings. It can be used for finishing a bathroom in an apartment, a bathhouse, a sauna, office premises, cladding a log house, lumber, frame, brick house or building made of aerated concrete. You can line the roof with clapboard, since the tongue-and-groove connection used makes it possible to give the cladding the appearance of a monolithic covering.
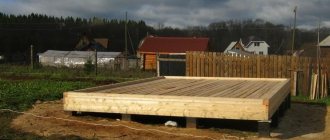
Vertical cladding of a frame house
The advantages of frame construction are the ability to quickly build a house, make it warm and beautiful. It was difficult to cope with the volume of work together with Kirill. We worked as a team of 4 people. The frame was installed earlier; the company that produces ready-made home blocks itself delivered and installed them.
Vertical cladding of a frame house
I calculated how much lining we would need to cover the walls outside and inside, taking the size from the frame drawing. Now the lamellas have been cut in advance. The length of each board was 5 cm less than the height. The idea to sheathe the block house vertically with clapboard belonged to my nephew. Original design and practicality were combined in this solution. The textured wall looked decorative and original on the streets. The water flowed down the varnished surfaces without stopping.
Horizontal slats for fastening the lining simultaneously held the mineral wool laid in the space of the frame. To begin the trim, we first nailed the slats horizontally to guide the trim slats vertically. We will screw fasteners into flat bars. A detailed action plan can be seen in the video. We decided to do the street front façade last.
By this time, a plan for the decorative design of the outer cladding should be born in the head of our assistant Kirill. The appearance of a private home is of great importance. We used fasteners with clamps. They made it possible to fix and guide each board separately, maintaining a gap for expansion. The end bar was installed at the top. An ebb tide was installed below.
Application
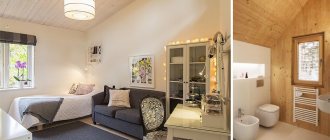
More and more residents of private houses are choosing the interior of walls made of lining inside the house. This is explained not only by the comfort and magnificent beauty of the interior, which are achieved through the use of wood, but also due to the presence of certain properties that the lining has.
Among them:
- Excellent sound insulation;
- The surface does not require further leveling;
- A wonderful aroma of wood that will appeal to all residents;
- Biological features and high environmental friendliness of the tree;
- Various methods of laying the lining, as well as its different widths and other basic parameters of the panels, allow you to visually change the proportions of the space.
This is what clapboard cladding on the inside of a house looks like
. Let’s say a few words about the space-changing properties of clapboard:
- To begin with, it is worth noting that any decorative lining for interior decoration is made of wooden panels, the width of which is usually 8.8 cm, this in turn is the standard working size. The length of the slats will vary (from 1 to 6 meters), their variation depends on the dimensions of the room and installation methods. Before purchasing sheathing material, it is necessary to make accurate preliminary measurements;
- Another important point is the method of laying the slats on the walls. They can be located vertically or horizontally. The horizontal position expands the space of the room, while the vertical laying increases the height of the room.
This is interesting: Glue 88 - technical characteristics and scope of application
Calculation of the required number of parts
They should be taken with reserve. Perhaps some part will be damaged during transportation and installation. There is a certain percentage of defects in ready-made kits. Each prefabricated element must be checked upon purchase.
The calculations use the area of the visible part that is not hidden by the grooves and protrusions covering the joints. To find out the required number of prefabricated elements, the floor area is divided into it, taking into account the finishing of the walls.
If the last row turns out to be cropped, you need to calculate how it relates to the whole. If its width is half the size of the whole, it will require half the material to create it. The boards can be cut and each half used as a separate prefabricated element.
- Doors and partitions
How to cover a door with clapboard yourself