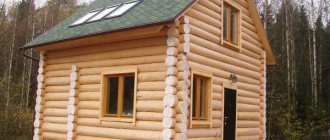
A bathhouse built with your own hands is a source of pride. Easy to use, comfortable and aesthetically pleasing to look at. Not every bathhouse needs finishing - it depends on the material it is made of. The log structure itself is beautiful, but its siding will look strange. But if the bathhouse is built from brick, stone or a wooden frame, then finishing it with siding will add that missing charm to the structure, which may be lacking.
- What is siding?
- Is it possible to cover the outside of a bathhouse with siding?
- Bathhouse covered with siding: photo
- What types does it come in?
- Siding for a bathhouse: which is better?
- How much does it cost to cover a bathhouse with siding: prices for material and cost of work
- How to cover a bathhouse with siding with your own hands?
- Where to buy from the manufacturer?
Is it possible to cover the outside of a bathhouse with siding?
Covering bathhouses with siding is gradually gaining momentum. People notice that neat external decoration not only adds attractiveness to the bathhouse, but also protects the material that was the main one in its construction: brick, stone or wooden beams. Sheathing from the inside has become widespread relatively recently. Many people want to preserve the traditional image of a wooden bathhouse not only from the outside, but also from the inside, in the dressing room, even if the bathhouse is built of brick or other non-wood material.
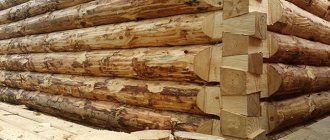
Wooden (log, timber)
The cladding of a wooden bathhouse is the most unpopular, since wood looks more advantageous against the background of buildings made of other materials. But, again, it all depends on certain conditions: from the condition of the wood itself to the correctness of the construction. Perhaps in your case, siding will help hide serious damage and flaws resulting from mechanical stress or after improper construction of a bathhouse. Sheathing is also used as a protective material: wood is less susceptible to rotting and exposure to precipitation.
To prevent condensation from accumulating between the wood and the siding, the cladding must be done using ventilated facade technology with insulation.
Thus, bathhouses made of timber can be finished due to the above problems, but this has not received proper distribution. Still, the appearance of the logs is attractive in itself, and many are accustomed to building baths the old fashioned way, without using any third-party materials.
Frame
Today, when constructing a frame bathhouse, siding is used quite often as a cladding material. The ease of construction compared to a log bath allows you to save a decent amount of money, which can be spent on decorative finishing. Since the walls of frame baths do not retain heat as well as those made of timber, they are additionally insulated. Sheathing is applied on top of the insulation: it increases the strength of the walls and enhances the protective function against moisture and cold. The frame of bathhouses is usually made of coniferous wood, so siding is ordered, as a rule, the one that successfully imitates wood.
Another
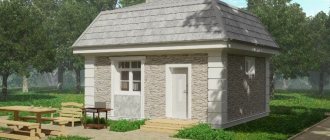
Baths built of brick and stone are becoming widespread. They heat up quickly, are less fire hazardous, and finishing with facade slabs will give the building the desired look. The choice of finishing material is distinguished by its variety: there is siding that imitates natural stone, wood or the same brick. The complexity and versatility of texture relief, the use of many shades for every taste - all this is common among cladding materials, and siding is the most popular among them.
Briefly about the main thing
When choosing an external finish for a bathhouse, the issue of the need for external insulation is first decided.
In most cases, it is necessary to leave an air gap between the insulation and the facade materials to ventilate it.
Most often, practical modern materials such as vinyl and metal siding and corrugated sheets are used for cladding.
Wooden panels also remain popular, but they are more expensive and require constant maintenance.
OSB and DSP boards are quite suitable as inexpensive or temporary finishing, and façade panels made of fiber cement, wood-polymer composite or slab insulation with stone finishing will give the bathhouse the most solid look.
Ratings 0
Bathhouse covered with siding: photo
The installation of siding as a cladding material for baths fits perfectly into the image of a summer cottage. A bathhouse stylized to match the desired image brings aesthetic pleasure to the owners, and the protective characteristics of the siding will for a long time relieve the hassle caused by the negative influence of weather conditions: frost, humidity, ultraviolet radiation, etc.
Front area finishing
The cladding of the front part of the steam room is made from the material used for finishing the facade. The material used in the construction of this segment of the bathhouse is also important:
- The wooden pediment can be covered with any material. First you need to install waterproofing, for which a membrane material is used.
- The concrete gable parts are pre-leveled, the sheathing is attached to them, and the sheathing is mounted. The use of molded relief elements is permitted.
Attaching the sheathing material to the pediment is done in several ways:
- Using aluminum stands. They are attached directly to the gable surface of the bathhouse building.
- If the upper front part of the facade is made of wood, the siding is attached directly to the surface.
- Using slats made from wooden materials. The elements are pre-installed on the gable part of the building.
After covering the gable and roof, drains must be installed and a sewerage system for wastewater must be installed. These measures will provide additional protection to the building.
What types does it come in?
If we focus on such a covering material as siding, then its finishing options are striking in their diversity. Facade siding comes in different types, differing in their structure: concrete, vinyl, metal, wood. Each of them is described in more detail below.
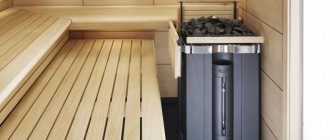
Vinyl
Vinyl siding has become widespread in Russia. It is usually made from two types of PVC, forming two layers: the upper one is protective, and the lower one provides mechanical reliability.
The main advantages of this material are: low cost, light weight and variety of colors.
However:
- upon contact with fire, vinyl siding emits vapors that are dangerous to humans;
- at low temperatures, vinyl becomes very brittle (therefore, it is recommended to use it only for the facade, but not for the base);
- a sharp temperature change threatens the material with deformation;
- If installed incorrectly, condensation will accumulate under the vinyl layer, which contributes to the rapid spread of rot over the entire surface of the bathhouse.
- There are certain restrictions on the depth of texture, which somewhat limits the range of imitated materials.
Metal siding
Every day, metal siding is becoming increasingly popular in the field of cladding materials. It is made of aluminum alloy or galvanized steel and coated with a paint and varnish base. In terms of installation qualities, it is lightweight, but at the same time has sufficient strength. Fire is not a threat to metal siding, nor is cold. Metal calmly tolerates sudden temperature changes, mechanical damage or the harmful effects of ultraviolet radiation.
It would seem that metal siding has some advantages, but its main disadvantage is the paucity of texture variations. Whatever color the front panel is painted, it will be clear that it is a metal product, which, unfortunately, does not coincide with the image that we usually associate with a bathhouse.
Besides:
- if chips form, even a galvanized surface will not save the panel from rust;
- the cost of metal siding is higher than that of wood and vinyl;
- During rain or showers, there will be quite a strong characteristic noise in the room.
Concrete
The real sales leader in the field of cladding materials is fiber cement or, in other words, concrete siding. It has those qualities that customers value so much: high technical characteristics coupled with a variety of textures and colors of products.
So, concrete:
- has high strength, which provides products with the necessary crack resistance and resistance to mechanical damage;
- provides the best protective properties against aggressive external influences: moisture resistance does not allow precipitation to destroy the siding, anti-frost additives make concrete more wear-resistant compared to other materials, the harmful effects of sunlight do not have a negative impact on facade panels, and fungus or termites bypass concrete panels;
- it is fire resistant, which at a critical moment can play the most important role in preserving the integrity of the bathhouse or even human lives, because in the event of a fire, literally seconds count (concrete siding is able to hold back flames longer than other materials);
- allows you to imitate any texture: from simple smooth and wood-like to brick and stone masonry (framed, polished, pebble, rough natural).
Of course, concrete panels cannot be classified as lightweight, therefore, when considering this cladding option, it is necessary to take into account the type of construction - for example, finishing frame baths with concrete is not allowed.
The LOBAS company produces and supplies fiber cement siding. You can view a selection of a wide variety of concrete facing materials on our website.
Under a log/under a tree
Facade siding imitating logs or wood is steadily popular as a cladding material for bathhouses. The main component of its structure is either vinyl or acrylic. It is light, plastic and, in addition to its aesthetic function, performs a protective function, blocking the access of negative climate changes to the surface of the bathhouse.
Among the disadvantages of this type of coating, it should be noted the tendency to form “waviness” due to sudden temperature changes and the likelihood of condensation accumulating between the cladding material and the wall of the bathhouse.
V stage. Installation of siding panels
The technology for installing wood siding and vinyl siding is significantly different. Thus, wooden siding must be secured with screws and clamps screwed in diagonally. And only after installing all the horizontal elements can various platbands be installed. But to install vinyl siding, you first need to install the corners, tie strips, drain strip and starter strip, and only then begin paneling.
Window siding
In addition, finishing walls with siding should be done only taking into account possible future deformations of vinyl panels that may occur due to natural temperature changes. Therefore, it is imperative to leave a distance of at least 7 mm between the ends of all panels, and the gap between the self-tapping screw or nail head and the panel should be 0.9 mm.
It is also important to know the features of installing vinyl panels. So, the panel needs to be lifted up until it connects with the starting bar
There was a click - the bar was installed. All panels are secured in the same way. All parts are connected to each other and a beautiful, homogeneous surface is obtained.
You need to start covering the outside of the house with siding in the direction from the center to the edges. The fasteners must be placed in the very center of the holes, which must first be made using a hammer drill. And you need to screw the panel not “tightly”, as many people think, but so that the panel itself can move freely within the holes made by the hammer drill.
Also, every 5-6 rows it is necessary to check the alignment. If reinforcement gets in the way, a new row should be started near its protrusion so that there is no excess overlap. The soffit accessories need to be secured just before the last row of vinyl panels is installed.
A bathhouse or house covered with siding always has an attractive and neat appearance. If the cladding technology has been followed exactly, the siding walls will last for decades. And for an old wooden house or bathhouse, siding is, without exaggeration, a second life. The finishing of facades with siding is especially effective. But the most beautiful option for a wooden bathhouse is a blockhouse, namely wooden siding, a high-quality imitation of timber. Such a bathhouse will be wooden both inside and outside, and it will look excellent.
Siding for a bathhouse: which is better?
Of the above types of siding for cladding the external walls of a bathhouse, the most suitable for all technological and aesthetic characteristics are concrete panels. They are easy to install, do not require subsequent maintenance, and meet all technical requirements that are so valuable to the customer:
- high performance qualities, such as wear resistance, strength, frost and fire resistance, moisture resistance;
- unique in their diversity palettes of colors and textures that will emphasize the individuality of a particular bath.
In addition, fiber cement facade slabs are distinguished by a reasonable price for their stated advantages, which is good competition for other types of siding.
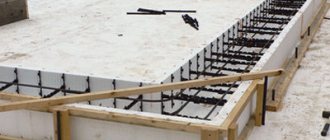
Preparing the structure
So what's important to know?
Stages of work
| The walls should be as smooth as possible | Only then can high-quality fastening of the sheets be achieved. If you plan to finish a wooden structure, it is better to wait for it to completely shrink. Otherwise the structure will look bad. |
| Between the caps and panels of the parts you need to leave a small space (about 1 cm) | Temperature changes can cause siding to warp. |
Having familiarized yourself with these requirements, you can proceed to preparing the bath.
Here are the important points to remember:
- There should be no cracks or holes in the walls, otherwise the panels will be attached unstable.
- It is better to choose self-tapping screws or nails made of stainless steel. They must be at least 30 mm in length and at least 8 mm in diameter.
Tools required for installation:
- Hammer.
- Spring center punch.
- Scissors for cutting metal.
- Roulette and hammer.
- Parts for fastening.
- Punch punch for perforation.
- Stapler for construction work.
Wooden siding for a bathhouse is best suited for cladding.
First, measurements are taken:
- It is necessary to measure the walls.
- Window.
- Broken and triangular pediments.
- Soffits are also calculated.
Here are instructions that will help you correctly calculate the required amount:
- Having received the overall dimensions of the walls (this includes width and height), it is necessary to calculate the working area. To do this, use the formula S= wall length * wall height.
- Using the same principle, the size of the remaining walls is calculated, then the indicators are added up and the main footage is obtained.
- Then you need to calculate the area of doors and windows. The resulting number is subtracted from the area of the walls of the building.
- The same formula is used to calculate the area of one siding panel.
- The area of the house is divided by the area of the panel, the number that is needed is obtained.
| Bath length | Bath width | Height | total area | Area of doors and windows | Quantity of material required |
| 8 | 5 | 3 | 24 | 7 | 17 |
| 9 | 8 | 3 | 27 | 9 | 18 |
| 15 | 12 | 3.5 | 52.5 | 15 | 37.5 |
Before starting work on installing siding for a bathhouse, you need to be well prepared:
- Remember that the finishing of the external walls of a wooden bathhouse begins only after it has completely settled.
- Make sure that there are no cracks in the walls of the bathhouse and that the surface is completely flat. Otherwise, the finish will look crooked and adhere unsteadily to the sheathing.
- For the sheathing you will need a punch, hammer, tape measure, fasteners, spring punch, tin snips, staple gun, punch and level.
- Fasteners (nails, screws) must be made of stainless steel. Their length must be at least 30 mm, and the diameter of the cap must be at least 8 mm in diameter.
How much does it cost to decorate a bathhouse with siding: prices for material and cost of work
Pricing depends on several factors: type of product, region of the manufacturer, complexity of installation. For example, the average cost of 1 m2 of concrete siding in Moscow is 1000 rubles, and in Nizhny Novgorod – 770 rubles.
The LOBAS company has long established itself in the market as a responsible performer. Facade tiles made of fiber cement are made of high-strength concrete in accordance with GOST standards. The price of a product per 1 m2 starts from 600 rubles excluding delivery, which is significantly cheaper than the cost of siding from competing companies.
Lining
To preserve the appearance of a traditional Russian bathhouse, when decorating the external walls, a common cladding material is used - clapboard. Eurolining is especially in demand. This is a wooden board of small thickness. Lining has all the advantages and disadvantages characteristic of wood. To extend the service life of eurolining, it is treated with antiseptics and coated with varnish or paint.
In order for the cladding of the bath to be done correctly, it is necessary to strictly adhere to the installation technology. Step-by-step execution of all operations will allow you to carry out the cladding yourself:
- Install brackets on the wall. In this case, it is necessary to observe a step that should not exceed 50 cm. The brackets must be positioned horizontally.
- Cover the outer surface of the wall with mineral mats. For fastening, use the prepared adhesive composition. The use of dowels is acceptable.
- Attach a guide to each bracket. To check the correct location of these finishing parts, use a building level or plumb line.
- Cover the insulation with waterproofing material.
- Attach the lining to the fixed guides.
Bathhouses can be lined with clapboards with a humidity level of no more than 15%. Otherwise, after drying, unwanted gaps may appear in it.
How to cover a bathhouse with siding with your own hands?
In order to tile a bathhouse yourself, it is not at all necessary to have a special education. It is enough to approach construction responsibly and competently study all technical issues so that subsequently no problems arise during installation and further operation.
For glue/CPB
To install facade slabs with glue or DSP, materials and tools are used such as:
- building level;
- Master OK;
- Bulgarian;
- tape measure or ruler;
- brush for cleaning the surface, brush;
- primer;
- glue or DSP.
Before starting installation work, the surface of the façade should be cleaned of dirt and dust and coated with a layer of primer for better adhesion. At the same time, it is necessary to give the panels the required dimensions by cutting off the excess parts with a grinder.
The next step is to lay DSP or tile adhesive on the back side of the panel and level the solution with a trowel.
Concrete slabs are laid joint-to-joint, and the seams are covered with polyurethane foam to reduce heat loss. It should be noted that the mounting foam or adhesive must be selected for the climatic region of construction, since sudden temperature changes can affect an incorrectly selected adhesive component, and then the concrete siding may crack or fall off.
Alignment of installed siding panels occurs first manually, and after connecting to the surface, using a building level.
You can also familiarize yourself with the process of installing concrete siding with glue in the following video.
On the sheathing
Before you begin plating the bathhouse, you should carry out preparatory work.
If the bathhouse is built of wood, then you need to wait until it shrinks completely so that after installation the façade siding continues to perform its protective and aesthetic functions for many years.
First of all, you need to correctly calculate the amount of siding that will be needed for cladding the bathhouse. To do this, we calculate the area of the surface to be covered, subtract from it the area of window and door openings and divide by the area of one façade panel. The resulting value is the number of slabs required for installation.
To work, you need to prepare the following materials and tools:
- building level;
- grinder;
- hammer drill and screwdriver;
- hammer and hacksaw;
- tape measure or other measuring device;
- brush or rag;
- additional elements (planks, corner supports, corners, profiles, ebbs, screws or other fasteners);
- stapler (for attaching the protective membrane).
First you need to install the sheathing on which the façade panels will be supported. It should be noted that when installing horizontal siding, the sheathing is installed vertically, and when installing vertical siding, it is installed horizontally. The sheathing pitch is no more than 40 cm.
We recommend using galvanized metal sheathing, since wood sheathing must be protected from rot, fire and insects. Plus, you can’t use it raw, as it will shrink when it dries.
The first step is to trim the fiber cement panels with a grinder to the required configuration. Then you should clean the cut siding from construction dust using a brush or dry cloth.
First, straight hangers are installed, and profiles are attached perpendicularly to them with hardware. We use dowels 100-140 mm long if the surface of the bathhouse is insulated or will be insulated.
The Crab profile connector can also be used to connect profiles.
Simultaneously with the installation of the sheathing, we recommend insulating the walls by laying layers of insulation in the space between the profiles. After installing the insulation, a protective membrane should be secured to its surface using a stapler. This will provide the façade with hydro- and vapor barrier.
The next step when covering the bathhouse is to set a guideline for the subsequent correct installation of the ebb. You can stretch the string to determine the accuracy of laying the façade panels. Using a level, check the parallelism of the tensioned thread.
We install the ebb and flow panels using self-tapping screws or dowels no less than 25 mm long onto embedded parts. Siding installation is done to the right or left towards the center and always from bottom to top. It is necessary to monitor the accuracy of installation, periodically checking with a level the accuracy of fastening the facade slabs.
Corner panels are mounted end-to-end or overlapped.
Walls finished with fiber cement siding acquire the desired aesthetics in the appearance of the entire bathhouse, forcing you to admire its appearance.
The following video shows how to cover a bathhouse with concrete siding using ventilated facade technology.
How to sheathe a pediment?
The pediment is the upper part of the house, bounded by two slopes. Let's look at gable cladding using fiber cement siding as an example. The cladding of the upper part of the house occurs in stages. First, you need to prepare the surface (clean off dirt and dust, cut down protruding parts with a grinder), and also use a laser or improvised means to measure the plane of the pediment in order to subsequently accurately install the vertical hangers.
The procedure for installing siding will be as follows.
- Before installing the panel, we apply it to the next one, align it along the edge, insert it into the lock and mark the edge of the next element with a pencil.
- Next, we place one panel on top of the other, outline the corners, cut off unnecessary material - and both parts of the siding are ready for installation.
- Installation of concrete panels is carried out using embedded parts and hardware. If the surface is concrete or brick, then the siding is secured with dowels - 6x40 mm nails, if wooden - with self-tapping screws.
- Assembly is quick: the selected panel is interlocked with the previous lower part, and the upper part is attached to the wall with dowels.
- The seams of the cladding are not sealed, which ensures complete ventilation of the facade. If the surface of the gable is smooth, then the use of sheathing is not necessary.
After the gable is completely sheathed, it is necessary to mount the overhang with siding panels, having previously calculated that there will be a coincidence joint to joint.
After covering with siding, its surface should be cleaned of construction dust accumulated during installation.
Stage IV. Installation of J-profile
You need to begin the siding installation itself by installing the J-profile (lathing) and the starting profile, as well as internal and external corners. The sheathing itself is installed by stuffing metal slats at a distance of 30-40 cm from each other. Then you need to install vinyl panels on this base.
Often the material for the sheathing is an antiseptic wooden beam, the cross-section of which is 50x50 mm. The beam is installed vertically and in increments of 50 cm
When installing the sheathing, it is important that its outer sides are always in a strictly vertical position. To do this, you can even pull the thread and place the rest of the bars under it
Types of siding profiles: regular J-profile - a; bendable J-profile required for arched window and door openings - b; high J-profile, for window and door openings, which is installed instead of platbands - in; F-profile for spotlights - g.
By the way, during the installation itself, you can safely carry out thermal insulation and sound insulation work. For example, use siding together with cellular glass insulation and penoplex. Or take mineral wool, cut its sheets and, after installing them, straighten them between the sheathing.
In order to leave a ventilated space between the insulation and the siding, you need to install a counter-lattice
To do this, a rail is screwed to the J-profile, the cross-section of which must correspond to the size of the ventilation gap. We bring to your attention another video about the direct installation of siding panels:
Where to buy from the manufacturer?
When finishing a bathhouse with concrete siding, it is necessary to ensure not only the external beauty of the cladding, but also the high performance characteristics of fiber cement panels. The LOBAS company is ready to present to your attention concrete facade slabs of a wide variety of textures and colors. They are made of high-strength reinforced concrete and have all the important characteristics that help maintain the attractive appearance of the bathhouse, as well as protect it for the longest possible service life.
Frost resistance, fire resistance, moisture resistance, high strength, resistance to ultraviolet radiation, wear resistance and long service life - all this characterizes our products, produced under the brand of proven quality for a decade and a half. Moreover, all products regularly undergo quality checks in independent research laboratories, and their quality is confirmed by various certificates of conformity.
Sometimes individual questions require specialist advice. Our employees are ready to help you at any stage of the production process: from making drawings according to your wishes to ordering fiber cement boards of non-standard sizes or rare textures. If you find it difficult to decide on the choice of concrete siding, our managers will always help you choose the best option. Call our toll-free number and we will be happy to answer all your questions!
*Not a public offer. Check current prices on the company's website.
Thus, covering a bathhouse or house with fiber cement siding is the best option among all others. The protective characteristics of concrete will help protect the building from the negative impact of the outside world, and the ease of installation will not cause any trouble. The appearance of the panels will give the bathhouse or home an attractive beauty, and the low cost will pleasantly surprise the buyer.
Installation of panels
The base strip is attached first.
This will be the starting point on which the evenness of the entire installation will depend, so you need to check it 5 times before installing it. To mark the installation line for the plinth strip, you need to be 20 cm above the level of the ventilation ducts in the bathhouse foundation. Having secured the base strip, the horizontality is checked again, and if there are no deviations, you can proceed to further actions. All subsequent panels are installed until the lock clicks, if panels with such fastening are selected. The planks, installed in a tongue-and-groove or overlapping manner, are fixed with staplers or small nails in special places, which are then covered with the next panel. In this way, the entire wall rises. At the level of installation of windows or doorways, the panels are cut to the required size, and the corner joints are closed with additional strips.
The entire installation process is carried out under constant control of the level of horizontal laying of the panels. Even a slight misalignment can affect the evenness, ruining the entire appearance. The panels are fastened with self-tapping screws; there is no need to screw them in all the way, leaving 2 mm for the deformation gap. Then neither heat nor frost in winter will affect the integrity of the finish and the appearance of the bathhouse finished with siding will cast a yoke of envy on the neighbors for a long time.
https://tutknow.ru/building/banja-i-sauna/1887-kak-obshit-banyu-saydingom.htmlhttps://domsdelat.ru/otdelka-vneshnyaya/obshivka-bani-sajdingom-svoimi-rukami-poshagovaya- instrukciya.htmlhttps://arbolit.org/instruktsii/vneshnyaya-otdelka-bani-saydingom.htmlhttps://montazh-saidinga.ru/obekty/doma-i-dachi/mozhno-li-obshit-banyu-sajdingom-183https: //proekt-banya.ru/article/otdelka-bani-saydingom
Finally, some tips
How to cover a bathhouse with siding as accurately and correctly as possible:
- It is important not to forget that the material can slightly change shape under the influence of temperature, so it is advisable to fasten the siding so that it can easily move in the fastening holes.
- When the wall is finished, the finishing strip is installed.
So, is it possible to cover a bathhouse with siding? Now this question should not cause difficulties. To help, we recommend that you watch the video in this article and familiarize yourself with all the details of the cladding.
Decorative design of the pediment
What is the best way to cover the gable of a bathhouse? The answer to this question depends on what material was used to manufacture it and decorate the facade of the building.
- The wooden pediment is sheathed with any material with preliminary waterproofing of the surface.
- Concrete and brick pediments have no restrictions; the only requirement is leveling the surface and installing sheathing under the cladding.
The pediment cladding is made with the following materials:
- professional sheet;
- siding;
- bitumen shingles;
- block house;
- stucco.
The finishing material is attached to the pediment on a prepared surface, on a wooden sheathing or aluminum posts.
To decide what material to cover the facade of a bathhouse with, it is important to take into account not only your financial and technical capabilities, but also the design features of the structure. At the same time, all the work on installing the cladding can be done independently, the main thing is to follow the basic rules and recommendations.
Roof cladding
To finish the roof in a steam room, it is advisable to use corrugated sheets. This material is made from high quality galvanized sheet steel. At the production stage, each sheet is processed in roll forming machines. The corrugated sheet is protected from corrosion by a galvanized layer.
Stages of building a bathhouse roof from corrugated sheets:
- A sling system is installed.
- A sheathing is installed, which is coated with an antiseptic compound that protects the product from rotting under the influence of moist air and high temperature.
- Wooden surfaces are coated with paint that has fire retardant properties.
- Thermal insulation is being installed. This ensures protection of the corrugated sheet from sudden changes in temperature.
- A waterproofing material is placed on top of the thermal insulation, protecting the insulation from the accumulation of moisture as a result of the appearance of condensation on the inner surface of the profiled sheet. When choosing this element, you must carefully examine its structure.
Vinyl
Of all the options, PVC siding is considered one of the best solutions when it comes to cladding the external walls of a bathhouse. Siding panels are made in two layers; the outer sublayer is saturated with additives that increase the resistance of the plastic to ultraviolet radiation. The inner layer has high density and strength, is not afraid of water, high temperature and deformation.
Vinyl is preferred when planning to cover the outside of a bathhouse with siding for several reasons:
- Affordable price, for a bath there is no point in overpaying for exclusive aluminum panels;
- Excellent decorative qualities of the cladding. Even the old bathhouse box looks like new after finishing;
- It is easy to repair and does not require heavy lathing for finishing with panels.
The disadvantages include the flammability of the material and the increased coefficient of thermal expansion.
Important! This means that finishing a bathhouse with vinyl siding cannot be planned if the stove chimney exits through the wall.
Also, you should not use vinyl for finishing if the surface is heated unevenly, for example, due to poor thermal insulation, part of the walls in the steam room area heats up to a high temperature, while the rest of the bathhouse remains moderately warm. In such a situation, vinyl panels are easily deformed and lose their original appearance.
Wood
Natural wood panels are practically not used for additional finishing of baths. It turns out to be unprofitable in terms of price and operating conditions. Pure wood siding does not provide any additional advantages over vinyl or metal and is often used as a restoration finish for old frame or log baths.
Aspen siding is often used for the restoration of original sauna buildings, when the sauna owner needs to restore and update the previous appearance of the building. Old log houses and boxes with carved crowns, platbands and shingled roofs are never sheathed with plastic. In this case, finishing with wooden siding will be the only correct solution.
An excellent alternative to wood are panels made from polymer-sawdust or decking boards. In appearance, such siding cannot be distinguished from natural wood by its pattern and texture, the price is affordable, and its resistance to sun and moisture corresponds to the characteristics of vinyl panels.
Cladding with wood-look metal panels
Metal siding panels
The most expensive and durable finishing option. It is widely used for decorative design of frame residential buildings. Siding metal can last at least 25 years without signs of corrosion on the front surface. Unlike vinyl, it perfectly withstands the strongest gusts of wind, which often happens if the sauna box is installed in an open area.
Not every bathhouse can be lined with metal siding on the outside. Metal panels have one significant drawback - the high thermal conductivity of the material. This means that if the walls of the bathhouse have high vapor permeability, and this is how good steam rooms should be, then in winter ice will definitely build up on the inside of the finish. As a result, the decorative finishing of the bathhouse may simply collapse under its own weight.
Advice! Metal siding is perfect for frame buildings of a bathhouse made of SIP panels.
The vapor permeability of a sandwich made of OSB board and polystyrene foam is practically zero, in addition, there is almost no shrinkage of the structure, so for this type of bathhouse box, finishing the walls with metal will be the ideal solution.
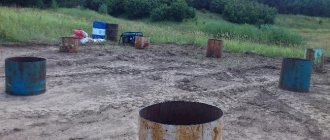
Tsokolny
The lower part of the wall, adjacent to the foundation of the bathhouse, is considered the most vulnerable to moisture. The wooden crowns on the base are rotting, the brick walls of the bathhouse are overgrown with moss. Therefore, to combat negativity, several types of basement siding are used:
- Composite panels based on polypropylene and granite chips imprinted into the front part of the finish. One of the most durable materials, easy to cut and cut, withstands even impacts from icicles and snow falling from the roof of the bathhouse;
- Metal siding coated on both sides with polyester resin. Most often used to finish the base of bathhouses of any type and design, from projects on stilts to strip foundations. Durable, easy to repair;
- Asbestos-cement panels with the texture and pattern of brick or rubble masonry. It is heavy and difficult to install, but costs several times less than previous models.
Vinyl siding can be used to finish the base of the bathhouse. For example, if you need to cover the lower part of the walls of a timber or log steam room. It is clear that the problem of damaged crowns cannot be solved in this way, but vinyl material is quite suitable as a decorative finish.
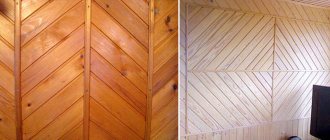
Imitation of timber
One of the modern types of lining is imitation timber. For facade work, boards 15 cm wide and more than 10 mm thick are suitable. A smaller size will look like a simple lining. The main difference between this material is a special groove in the center, which allows you to relieve tension in the wood, extending its service life.
The raw material for imitation timber can be any type of wood. It is better to use coniferous species for finishing the facade.
Positive aspects of the coating:
- Naturalness;
- Easy installation;
- Resistant to chemicals and mechanical damage;
- Beauty;
- Has various dimensions;
- Provides additional thermal insulation;
- Long service life.
But this coating also has its drawbacks:
- Periodic treatment with moisture-protecting compounds is required;
- Subject to combustion;
- Requires treatment with an antiseptic;
- If the material is of poor quality, it may become deformed during operation.
Block house
There are several types of blocks:
- natural - made from deciduous and coniferous trees;
- metal - made from galvanized steel;
- acrylic - based on polymer resin;
- vinyl - made from PVC powder.
Any type of block material is suitable for finishing. You should prepare screws and 6-7 mm clamps for fastening, mineral wool as insulation, log parts for creating sheathing, a membrane with vapor barrier properties, a waterproofing agent, antiseptic impregnation and fire retardant, which are used to pre-treat the wood elements. Cladding stages:
- Secure the vapor barrier film in a horizontal position. Secure it with staples or a construction stapler.
- Install the assembled sheathing in a horizontal position. It is attached to the wooden base with self-tapping screws and nails. It is advisable to fix it to a brick wall with dowels for frames. In the latter case, it is necessary to pre-drill the recesses.
- Lay insulation in the spaces between the beams.
- Use a stapler to secure the waterproofing material.
- Build a similar sheathing on the main frame, placing it in a vertical direction.
- Cover the outer surface with block houses. The direction of installation is from bottom to top horizontally.
- Using clamps, secure the panels.
- After completing the finishing work, hide the screw heads using sawdust paste and PVA glue. You can also use special plugs and leftover block materials.
- Place plinths in the corners. Decorate windows with slopes and doors with cash.
Blockhouse cladding
Is external insulation necessary?
Baths come in different types: wooden, frame, built of brick and concrete blocks. And they are used in different ways: some often and throughout the season, others only in the summer, once a week. Before you can cover the outside of a bathhouse cheaply and beautifully (or expensively and solidly), you need to resolve the issue of the need for its external thermal insulation. Then it will be more difficult to do this - you will have to remove and redo the decorative cladding.
When thermal insulation is not required
It is clear that summer baths, even those used daily, do not need insulation. But not all all-season buildings need it.
- Log or timber bathhouse.
They are dressed in a “fur coat” only for commercial use, when it is important to keep warm constantly and spend less money on heating. To insulate private baths, high-quality caulking of the seams is sufficient to prevent heat leakage through the cracks. Wood has very low thermal conductivity, it “holds” the temperature inside the steam room well and does not allow frosty air from the street to penetrate. And if the frequency of fires does not exceed 2-3 times a week, there is no point in external insulation.
A log house made of timber with windproof seams does not need to be insulated. Source i1.wp.com
- Frame bath.
In such structures, thermal insulation material is already part of the structure.
- Periodic baths.
If you steam no more than once a week, it makes no sense to insulate the bathhouse from the outside, regardless of the material of the walls. During this time, it will freeze through in any case, unless you maintain a positive temperature in it with heating devices. Therefore, you don’t have to worry about this and think only about how best to line the outside of the bathhouse.
When is it better to insulate a bathhouse?
It is necessary to insulate the walls from the outside if:
- the sauna is heated frequently and it is necessary that it does not get too cold between sessions, especially if there is water left in the tank;
- the number of steamers in a family or company is large, the procedure takes a long time and it is necessary to maintain the desired temperature all this time.
In such cases, external thermal insulation significantly reduces fuel consumption, which ultimately saves money and simplifies the work of the stoker. It is especially needed for buildings built from heat-intensive materials - concrete, stone, brick.
High-quality insulation saves energy, time and money for the bathhouse owner. Source yandex.net