Natural stone is mounted on a specially prepared construction site. It goes well with different landscape options, so it is a popular method of creating a unique design.
For many centuries, natural stone has served as a most valuable decorative element that can visually unite separate home objects into a single whole.
We will tell you further how to make a blind area from natural stone (sandstone, flagstone, granite) with your own hands.
Step-by-step installation instructions
Depending on what material is on the surface of the plinth, there will be several features when laying artificial stone.
For example, if the base is made of aerated concrete, then it must first be primed. Then the aerated concrete is plastered with one layer of cement-sand mortar. The layer thickness is 2 cm.
If the base is plastered, then its surface must be leveled with sandpaper or a special tool. If the base is made of sand-lime brick, it also needs to be plastered with a mortar of cement and limestone.
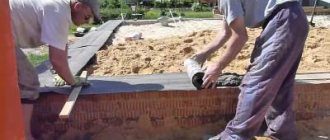
To install homemade stone from concrete and cement, a water repellent and glue are used. Laying is done from top to bottom, with the pattern first laid out on the floor. When using the jointing technique, the finished result will look more attractive.
What is natural stone?
Natural stone is a natural material of high strength and resistance to external factors. It is used for finishing to significantly transform the facade of the house. In addition, it acts as protection for the foundation from mechanical and climatic influences.
The following features and advantages of the material can be highlighted:
- High strength compared to other finishing materials.
- Easy care that does not require special detergents.
- Long service life exceeding 25 years with proper care.
- Aesthetic appeal and combination with other materials.
- Resistance to temperature changes and severe frosts.
- Withstands direct contact with fire.
- Full moisture resistance, which allows you to cope with the effects of water, various aggressive solutions and liquids.
For cladding the basement of a house, you can choose stone of different sizes and shapes. Smooth dies or protruding elements are presented. This allows you to choose a finish taking into account the features and shape of the building.
Cladding of facades and plinths with decorative stone in Nizhny Novgorod
In recent years, artificial stone has been quite often used for cladding the facades of houses made of brick and monolithic concrete, foam blocks, wood, expanded clay concrete and aerated concrete blocks, etc. Finishing the facade with decorative stone is a great way to give your home a special style, emphasizing your taste with an exquisite design solution. By entrusting the finishing of your home to the specialists of our company, you receive a professionally completed finish - a guaranteed high-quality result. Thanks to numerous partnerships in the construction process, we use exclusively high quality decorative stone, which affects not only the strength and durability of the finish, but also the appearance of the facade.
A person is greeted, as they say, “by his clothes.” In the same way, the first acquaintance with a house begins with the facade. So, in order to create a good impression at first glance, you will need high-quality and interesting cladding of the facade of the house, the price of which, of course, may vary. For the cladding of building facades, it is a priority area in which our company’s specialists have achieved a high level of skill and can offer you such methods of façade finishing. Of course, the cost of façade cladding depends to a large extent on the cost of materials, since the cost of façade cladding work offered by our company is very affordable and will suit any client.
cladding facades with natural stone
Facing a façade with natural stone is not a cheap matter, and among the materials offered, granite is the most expensive. But, if you pay tribute to its beauty, sophistication, chic, nobility, which it brings to the appearance of your home, and thanks to which the cladding of facades in Moscow becomes original and spontaneous, it becomes clear that its high cost is completely justified.
COVERING FACADES WITH DECORATIVE STONE
For those who do not have sufficient funds, but for whom cladding the facade of a house with stone is important, there is a good solution among our company’s proposals - cladding the facade with decorative stone, made on the basis of artificial materials. Artificial stone is made using cement or acrylic resin, and in addition to lower cost, it has other advantages. Artificial stone is lighter, more convenient to use, and is produced in a wide range of textures and colors, so decorative cladding of a facade with artificial stone can sometimes look much more original and interesting than cladding facades with natural stone. With the help of decorative stone, both the cladding of the facade of a cottage, the cladding of the facade of a country house, that is, the finishing of new buildings, and restoration work to restore the facades of ancient houses can be carried out.
Laying stone on the plinth
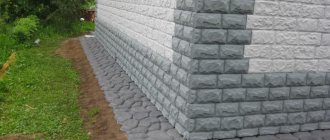
Why is laying natural stone the most popular way to finish a basement? There is more than one reason to explain this. Firstly, the base, for the cladding of which the laying of decorative stone was chosen, is protected in its most vulnerable part - at the junction of earth and air. In this place, it is affected by many destructive factors: evaporation from the soil, temperature changes, humidity. In addition, laying stone on the base becomes a powerful protection for the foundation, protects it from negative chemical and mechanical influences, and provides additional thermal insulation.
Laying sandstone on vertical surfaces
It is rare that the entire façade of a building is covered with sandstone. Usually the base is tiled and sandstone is laid out with decorative elements along the wall.
Sandstone is laid on concrete or brick. Laying sandstone on wood is not practiced. Even if you treat a wooden surface with a special solution, sandstone will not last long there. Wood and stone have different expansion coefficients. When temperature changes occur, a gap forms between the wood and the stone, which will increase over time. As a result, the sandstone slabs will completely move away from the surface.
Surface preparation
- Clean the wall on which the sandstone will be laid from dirt.
- If the wall has loose plaster, treat it with a deep penetration primer. The primer will strengthen the plaster layer. But when it comes to facade work, loose and crumbling plaster must be removed. The surface must be strong and level.
- Moisten the surface. There is no need to apply a regular primer to the surface. Sandstone is laid on cement mixtures - for better adhesion, the surface must be wet. After treatment with a primer, practically no moisture is absorbed into the surface.
- Using dowels, secure the reinforcing mesh.
- Dilute the cement mixture for spraying. To prepare the solution, use a ready-made mixture, or mix sifted sand with cement. For 1 part cement, take 3 parts sand. The spray solution should be thin enough, but not so thin that it slides down the wall. Apply the mixture with a trowel so that it fills the joints of the brickwork, irregularities, and completely covers the surface with a thin layer.
- Prepare a solution for laying sandstone. For the solution, take 2 parts of Ceresit 117 glue, 1 part sand and 1 part cement. There is no exact recipe here for the reason that sandstone can be laid on an adhesive solution. But experts believe that sandstone holds up worse with a purely adhesive solution.
- Start laying sandstone from bottom to top. You can start laying after the spray layer has dried - after 2-6 hours, depending on the layer and weather conditions.
- Apply the solution to the surface. The layer of mortar depends on the thickness of the stone. Level with a notched spatula. The heavier the stone, the larger the spatula teeth should be - up to 10 mm.
- Position the stone in the wall and press it into the mortar. There should be no air voids left under the stone.
- Immediately remove any solution that gets on the front of the stone with a damp sponge, without allowing it to set.
- After the solution has dried, the seams are rubbed down and the sandstone is varnished.
- If trimming is necessary, the flagstone is cut with a grinder.
Requirements
Properties required for the clay that is used inside the “pie”:
- clayey granulometric composition;
- the percentage of plasticity is low;
- high adhesive properties;
- flow rate no more than 0.5;
- low porosity and ability to absorb moisture, the indicator decreases when the material is compacted;
- minimal water permeability.
Properties that a clay composition must have when used to create a top layer:
- high density from 1600 kg per cubic meter. m;
- low frost heaving;
- water resistance;
- low porosity and fluidity;
- minimal plasticity;
- load-bearing capacity from 4 kg/m3;
- sand content no more than 15%.
When to start finishing the basement
It is best to finish the base after the blind area around the house has been made. In this case, the finishing material will hang over the path. As a result, even the most slanting rain or streams of water flowing down the walls will not be able to get between the wall and the blind area - the water hits the path at a distance of several centimeters from the joint. It is through this joint that water penetrates to the foundation, bringing dampness and other problems.
You need to start cladding the basement of the house after the blind area around the house has been made
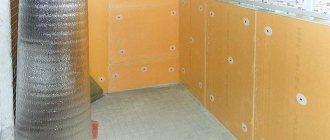
One more thing. Many people are thinking about whether to insulate the basement or not. If you want to save on heating, the answer is to insulate it, just like the blind area. The unit for insulation and cladding of the base - one of the options - is shown in the photo below.
When installing an insulated base, EPS boards are laid under the finishing
When using the basement as a residential floor, there are no questions regarding insulation, since the answer is clear - insulate it, of course. But even if you don’t have a subfloor, heating costs will be much lower, and the floor in the house will become much warmer.
Main types
A huge number of blind areas can be found on the territory of houses in our country. But among all, I would like to highlight three main types:
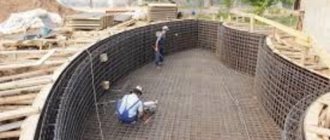
- Based on concrete. This is a common arrangement model for private homes. Here the foundation is dug deeper, sand is poured in, everything is leveled, a mesh with a cell of 100 by 100 mm is laid, after which the screed is poured. Make sure that its size is at least 10 cm. You should buy high-quality concrete, for example the M200 - M250 brand is quite suitable. Both quartzite, granite and expanded clay can be used as a concrete filler.
- From tiles. This method will be more expensive, but it looks better. In this case, paving tiles are selected to match the overall design of the exterior of your yard, after which a sand cushion is made on which the tiles are placed. The size of the blind area can be the same as for a concrete structure, but often, in order to save money, they make the width 40-60 cm. The cost of this option is more expensive, since in addition to the tiles, curbs also have to be laid around the perimeter of the entire house.
- Soft base. The method is used to decorate the yard. A hydrofilm is installed on the prepared base, which will protect against moisture from underground. It is on top of the film that fertile soil is poured, which is then sown with a lawn. This option is used less frequently, but has a place in modern construction.
Creating stamped concrete
And all thanks to the use of special metal or polyurethane stamps. Such concrete, after a decorative imprint, becomes stamped or printed.
Ready-made embossing of various shapes is sold in construction stores. The thicker the stamp, the easier it is to work with and the more accurate the pattern will be. The thinner it is, the softer the embossing becomes and the more difficult it becomes to work with.
You need to finish the blind area with stamped concrete at a fast pace, because the material sets quickly. In addition, to obtain a clear imprint of the design, you need to make an effort by pressing the stamp to the desired depth. And uneven lines or extra notches are difficult to correct. Therefore, this type of decor requires concentration, accuracy and dexterity.
Technology for creating a printed concrete base:
Pouring the concrete base and smoothing the surface. Stamping is applied only to freshly poured concrete. Applying hardener. The first layer of hardener of the desired color is poured onto the slightly set concrete (there are 30 shades to choose from). The solution is scattered with a ladle or trowel from the center to the edge
The mixture penetrates deep into the pores of the concrete, making it stronger and more resistant to stress. The solution is absorbed within 10 minutes, during which time it is important to completely smooth the hardener over the entire area using a trowel. After this, the mixture is scattered in a second layer (to fix the color) and leveled in the same way over the entire surface.
Sprinkling the surface with a release mixture
This mixture will prevent the concrete from sticking to the dies. Processing the edges with special sandpaper to give the corners the desired texture. Installation of stamps on the surface. The concrete should become similar to plasticine, and when pressing your finger, there should be a recess no larger than 6 mm. Under such conditions, you can begin to make impressions. The embossings are laid out and pressed by stepping on them. Applying impressions over the entire area of the blind area and eliminating inaccurate lines. In places where several dies are joined, smearing of the cement mortar may occur. To restore the clarity of the lines, a hand roller is used, which is rolled along the joints and seams. Then the unevenness and remains of concrete on the seams are rubbed down with sandpaper. Creation of shrinkage seams. After the surface has hardened, you need to make shrinkage joints using a grinder. They will prevent the formation of cracks after the concrete has completely dried. Washing the coating. 24 hours after embossing, you need to rinse the entire area of the blind area with water, and then perform an acid wash. Hydrochloric acid will increase the brightness of the color and open the pores of the concrete for the sealant to penetrate. Coating the surface with a special varnish-based sealant (3 layers). It is needed to protect the base from wear and chemicals, add shine to the coating, and enhance the color of the hardener. The varnish sealant is rolled over the prints with a roller.
Blind area for a house made of printed concrete, video instructions:
Requirements for building materials
To create a blind area, it is necessary to take into account some requirements when choosing a material.
Sand
Sand can be quarry or river, as both are suitable for this design. But due to the high cost, the first option is usually used.
Crushed stone
When creating a structure, you can use crushed stone of different fractions. When laying, the material will differ:
- crushed stone up to 5 mm is used for dusting;
- Material up to 20 mm is excellent for compaction;
- large stones up to 40 mm are not suitable for the top layer;
- crushed stone from 40 mm is used only in the construction of large structures.
Read more here.
Membrane
It is recommended to use a high quality profiled membrane. This material has 2 layers: a membrane with convexities through which water will be drained, as well as geotextiles.
Clay
The cheapest material for creating a blind area is clay. It reliably protects the foundation from precipitation. Used as the first layer of the cake for waterproofing.
Possible mistakes
Natural stone is heavy, so the main mistakes that developers make occur when choosing a blind area and violating the design dimensions: width, depth and slope. Therefore, the structure does not fulfill its protective functions.
The most common mistakes when making a cake are a violation of the process of compacting layers and the absence of a waterproofing layer, which leads to the destruction of such a blind area already in the first year of operation.
Types of blind areas, their pros and cons
The blind area can be constructed using a variety of materials. Each option has certain pros and cons. Based on the specific type of structure, the structure in question can be rigid, with a fixed base, or consisting of separate components. Let's look at the main strengths and weaknesses of the various options.
Concrete
The most uncomplicated, inexpensive blind area, characterized by an extremely simple design. It is built very simply. This requires only formwork, which is reinforced if necessary. Subsequently, it is filled with concrete solution.
The main advantages of a concrete blind area are as follows:
- such designs have an affordable cost;
- durable;
- efficient and functional;
- easy to install and repair.
The disadvantages include the following:
- not the most impressive look;
- the need for repair work when cracking occurs;
- it is necessary to prepare the formwork;
- it takes extra time for the formwork to harden;
- The installation work itself turns out to be much more labor-intensive.
From crushed stone and gravel
This option is related to the category of soft blind areas. It is most often mounted on heaving and moving soils. This ensures excellent performance of the structure, as well as a long service life.
The most important advantages of such blind areas are related to the following parameters:
- they are made from available materials;
- erected quite quickly and simply;
- there is no need to additionally provide special expansion and expansion joints;
- Such specimens look more aesthetically pleasing and attractive.
The main disadvantage of the blind area under consideration is that it is less resistant to mechanical damage than its concrete counterpart.
With decorative trim
To get a beautiful cladding of the built blind area, you can use a variety of materials. This can be paving stones, paving slabs, porcelain stoneware, pebbles and other similar options. Each of these options requires the use of a specific styling technique.
For example, in most situations, very aesthetically pleasing paving stones are mounted on a soft-type blind area with clay castle equipment. But such a popular coating as porcelain stoneware must be laid on a concrete solution that has not yet hardened.
Insulated version
Penoplex insulation
A tape resembling a “pie” in design will help reduce the heat loss of the building and “heat” the first floor and basement. Insulation is important if the foundation is made of slabs.
This opportunity presented itself with the appearance on the construction market of a large number of different thermal insulation sheets, which should have a number of important properties.
- moisture resistance;
- immunity to the effects of microorganisms (saprophytes) and insects (mites, beetles, etc.);
- maintain high thermal insulation performance for at least 5–7 years.
These characteristics are almost fully met by polyurethane foam, polystyrene, polystyrene foam (but rodents can make nests in it), and expanded clay (requires waterproofing due to susceptibility to moisture).
The leaders among insulation materials are modern materials: tile extruded polystyrene foam, consisting of cells connected hermetically, and penoplex. They have high hydro and thermal insulation characteristics and wear resistance (service life up to 20 years).
The algorithm is simple, even a novice builder can handle it if he carefully reads the topic:
Variety of sandstone
Sandstone rocks differ in mineral composition. The traditional scientific classification of material is based on this principle. There are:
- arkose minerals, in the structure of which feldspars dominate over quartz;
- greywacke minerals, characterized by a complex composition due to a large number of rock fragments.
Depending on the color, mineral content and scope of use of sandstone in construction, the stone is terminologically divided into several more types.
Shell rock is a building material, a type of porous rock. It has a sedimentary type of formation. It contains calcium, iodine and salt impurities. Despite the fact that the stone seems light, airy, and fragile, in practice it has amazing properties. Shell rock brick does not require additional noise and sound insulation. It is harmless to use and has an attractive texture.
Oolite is a rounded mineral formation based on sedimentation, composed of calcite with the addition of impurities. The core is fragments of shells, grains of sand or other foreign objects. The structure of the stone is of two types - radiant fibrous and layered.
Pisolite is a type of oolite consisting of large spherical minerals.
Lithographic mineral - unlike previous rocks, has a monolithic structure and is a solid stone.
For what purposes is it used?
Stone has long been particularly popular in construction and finishing works due to its durability, reliability, structural and color diversity.
During production, this material acquires the necessary surface texture: polished and ground, chipped and filmed, as well as heat-treated, which greatly increases its scope of application. This material is used for rigid, bulk and multi-layer blind areas.
Problems solved by facing a blind area using natural stone:
creating a representative appearance;
- construction of a monolithic structure without voids and defects;
- long period of use, capable of maintaining its original consumer qualities for at least 300 years;
- use of environmentally friendly building materials;
- durable building structure;
- invulnerability to natural precipitation, temperature changes and UV radiation.
What it is?
Lemesite is a rock of sedimentary origin with a unique molecular structure. This is a natural burgundy stone in the form of a flat slab of arbitrary shape. It is characterized by a rough surface type and torn edges. On average, its thickness varies from 1 to 5 cm.
Natural stone belongs to limestone rocks. Its age can be millions of years. The stone is named after the nearby Lemeza River deposit, located in Bashkortostan. Today it is mined in the Urals.
Lemesite was formed from fossilized columnar algae of different diameters. The pattern of the mineral is related to the direction of the cut. This may be a cross section of algae with a round cross-section with clearly visible annual rings and spots. In addition, the cut can be longitudinal, with the pattern consisting of stripes and arcuate lines.
The mineral has a high-density, homogeneous, fine-grained structure. It may contain fossilized algae, insects, and skeletons of marine life (single-celled organisms, fish).
Natural fossil refers to rare stone structures. The formation of the mineral occurs primarily on the seabed. Its formation takes place without air access during a chemical reaction with the components of sea water.
Lemezite has exceptional purity of shade, decorativeness and durability. It crystallizes in the form of layers of great thickness. This is an environmentally friendly natural stone with unique characteristics:
- it is high-strength (dry compressive strength is 94 MPa);
- its average density parameters are 2.63-2.9 g/cm3;
- tumbled flagstone has a low moisture absorption coefficient (0.07-0.95);
- it is inert to chemical influences and easy to use;
- resistant to temperature changes, frost-resistant;
- non-radioactive, amenable to grinding and polishing.
How to choose flagstone for paving?
When choosing stone for paving paths, the following factors are taken into account:
- Flagstone thickness. The optimal thickness is 40-60 mm. Slabs of smaller thickness are fragile, crack and delaminate. For slabs that are too thick, additional preparation of the bed is required.
- Material and origin. It is better to take slabs mined from nearby quarries. Stone quarried in other regions may be sensitive to weather conditions. In terms of strength, granite flagstone is stronger, but it is more difficult to cut. Sandstone and slate are easy to work with, but are vulnerable to weather and dynamic loads.
- Shape and texture of stone. By definition, flagstone is flat. A too rough stone with grooves and potholes will not only prevent you from walking barefoot along the paths in summer, but will also be subject to rapid chemical weathering under the influence of precipitation. At the same time, overly smooth slabs pose a traumatic danger - it is easy to slip on them in rain and ice.
What to make a blind area around the house from?
When creating a blind area, it is important to choose the right material. Also, the sequence technology must be strictly observed
When performing work, the following sequence should be observed:
- Crushed stone up to 15 cm thick.
- Sand backfill.
- Insulation.
- Waterproofing.
- Drainage pipes.
- Reinforced mesh.
- Concrete.
The underlying layer is sand and crushed stone, which is necessary to create a flat surface. Its thickness is 0.2 m. In addition, you can use clay or soil.
For draining soils, sand and crushed stone are usually used, which must be compacted well. For loam and clay, native soil is used. When laying sand and crushed stone, water will form near the foundation. To solve the problem, you can use a drainage pipe, which will require additional costs.
Correct pie diagram
The choice of stone laying technology directly depends on the type of soil and groundwater level in the construction area. If in some cases it is enough to build a blind area on a sand cushion with stone reinforcement, then in others it is necessary to follow a complex technological cycle.
A professional pie for a concrete blind area made of granite stone should consist of the following layers:
- Priming.
- Clay.
- Waterproofing
- Pressure bar.
- Sand pillow.
- Geotextiles.
- Crushed stone.
- Sand or reinforced concrete.
- Stone.