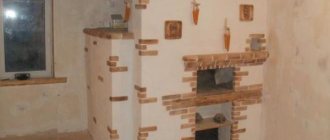
Brick oven
The brick kiln is still in demand by people. Some populated areas are not gasified and a stove in a residential building is necessary. Sometimes it is an additional source of heat in order to save gas or electric heating.
In a country house you can not only spend the summer, but also celebrate New Year, Christmas and other holidays - romantic, unusual and healthy. A simple stove or fireplace will create comfort in the house; you will want to be at the dacha on weekends, sitting comfortably in the warmth.
When installing the stove, a number of conditions must be observed. In addition to choosing the correct design, installation location, components and materials, you need to understand what stoves are coated with so that they do not crack or crumble. A responsible attitude to the work at the construction stage of the building itself and the use of appropriate quality materials does not lead to cracks in bricks and finishing materials.
Tips and tricks
Experienced experts recommend the following:
- Never use sealant for purposes other than its intended purpose. If it is not intended for repairing combustion chambers, then there is no point in using it there. Saving a penny - a large-scale loss, plus harm to health and danger to life.
- Carry out repairs after stopping the combustion process, taking into account the operating temperature of the sealant, as indicated on the packaging.
- Remember that sealants must dry thoroughly. Give them the time recommended by the manufacturer.
- To improve adhesion between surfaces, they should first be sanded well. A rough surface will improve the adhesion of metal and brick.
- Remove excess thermo-compositions before they harden, otherwise it will be extremely problematic to do this later.
- Do not buy products from dubious brands that do not contain instructions for use.
- Always follow the precautions stated by the manufacturer.
Remember that repairing cracks and insulating individual sections of stoves and fireplaces is a responsible job. If you don’t have the skill, then it’s better to entrust it to professionals.
Exterior finishing of stoves
You can increase heat transfer, hide minor deformations and give the stove a more aesthetic appearance by plastering or tiling.
Plastering is the most common; it is possible after settling and complete drying of the masonry.
Important! The walls of the oven intended for plastering should not be dirty and smooth; the solution will not have the necessary adhesion to them. The plastered surface will have defects after drying.
Tiling gives an elegant look and protects the room from the penetration of flue gases when small cracks appear in the masonry.
What requires more attention: a stove in the country, a wood-burning stove in the countryside, or a sauna stove?
Furnaces in which coal and brown coal are burned are subject to especially high temperature loads.
A few years after construction, repairs are required for bathhouse and country stoves. Heating appliances in which tin bread, loaves and pizza are baked almost around the clock are subject to intense temperature effects.
Italian Pompeii ovens are built in many countries. Pizza baked in such facilities has a special taste and smell. This oven is usually built outdoors. Food is cooked under a brick vault, under the influence of fire and the heat of heated bricks. There are two types of Pompeii ovens - Neapolitan (with a low arch, intended mainly for baking pizza) and Tuscan (with a high arch, which allows you to put a pot or pan inside and cook not only pizza, baked meat and fish, but also soups).
What causes cracks
When malfunctions of the furnace equipment are discovered during use, the first thought that arises is: the furnace is cracking, what should I do? To begin with, it doesn’t hurt to figure out what led to this.
The following factors may be the reasons:
- donkey foundation or structure itself;
- unscrupulous craftsmen and unprofessional work;
- low quality material or unsuitable mortar for masonry or plastering was used;
- the drying process of the masonry is disrupted;
- long heating breaks, sudden temperature changes;
- the technology was not followed when applying each layer during plastering;
- The ventilation system is faulty, condensation.
Note!
Chipboard: what is it? Types, application features, photos, sizes, thickness, explanation, manufacturers
DIY houses made from shipping containers step by step: instructions, diagrams, pros and cons, photos, design
Working pressure in the heating system in a private house: what it should be, how to create it, instructions for adjusting it yourself
Is it possible to use a stove with cracks?
There is only one answer to this question: it is prohibited. Do not use a stove with cracks and endanger people’s lives. If there are no structural defects, it is necessary to begin troubleshooting as soon as possible.
Important! Fires in most cases result in death due to carbon monoxide released, not fire.
How long does it take to dry?
It is not recommended to use the oven until the solution is completely dry. When using different materials, this period may vary. Using heat-resistant glue as a putty, the layer of solution will dry within a few hours.
It will take more time for the solution of clay and sand to dry and form. In this case, you will be able to use the stove only after a day. Then the brick oven, protected from cracks with mortar, will remain crack-free for a long time.
Therefore, we do not advise you to rush, immediately flooding your Russian stove with a stove bench. Repairing cracks in a furnace is a simple but important job. The choice of material for the solution is a purely individual matter. The main thing is to do the work carefully and responsibly. Then your house will always be light and clean, without the smell of burning and smoke penetrating through the cracks in the walls of the stove.
Diagnosis of problems
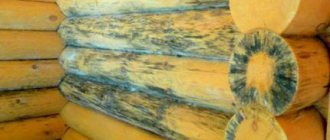
The diagnostics of all surfaces will answer the question why a brick stove is cracking. The worst option would be widening through brick cracks. You can’t do this without the help of a specialist; you may need to re-lay the furnace.
Small cracks in bricks caused by high heat allow you to carry out the work yourself. The cracks need to be filled and the surface re-plastered.
Oven adhesive
In building materials retail outlets there is a dry adhesive special mixture, as well as a ready-made solution of fireclay clay and cement. This glue is durable and fire-resistant. It is convenient to fill the voids of bricks with ready-made plastic material.
The dry composition is not difficult to dilute in accordance with the instructions. It is recommended to work with a small amount of material, as it dries quite quickly. Along with the advantages, ready-made glue has the disadvantage of being quite expensive.
Clay-sand mixture
Affordable economy class material. To prepare the proper quality solution, only high-quality clay and river sand are used. The clay is poured with water in a convenient container and diluted to the state of milk, then rubbed through a fine sieve.
When the clay and water settle, the liquid top layer is drained. Sand, sifted twice, is added to the clay mixture, ratio 1:2. The liquid composition is diluted from the clay mixture to a creamy consistency and mixed thoroughly.
Note!
Three-way valve in a heating system: instructions on how to choose and install correctly in a private home
Why the bottom of the battery is cold and the top is hot - let's look at the reasons. Review of recommendations on what to do and how to fix it
How to insulate a dog house for the winter with your own hands and inexpensively - step-by-step instructions with photos and descriptions of all stages
It’s easy to check whether the solution is ready. If small pieces of the mixture remain stuck to the stirrer, then the solution is ready, and if large enough pieces remain, then by diluting with water the mixture is brought to the required condition.
A solution containing clay is more likely to lead to defects. There are no exact instructions for preparing the solution; it is prepared based on the experience of the master. There are not many professional craftsmen, so such a solution is not often in demand.
Putty materials
Inventive people are ready to give advice on any matter, including the choice of materials for repairing stoves. Recommendations must be taken carefully, separating the wheat from the chaff.
A mixture of clay and sand
There are well-known putty compositions that have been tested many times over. You can use them without any doubt.
It is customary to cover stoves with clay. The material definitely inspires confidence, but first you need to check what type and grade of clay is suitable for making mechanically strong, heat-resistant putty. The stove should be sealed so that it does not crack later.
The composition is prepared by mixing equal parts of clay and sand. Both components must first be sifted and separated from large impurities. Due to the fact that the clay composition in different deposits varies greatly, it is advisable to check the strength of the mixture.
Advice! You need to make balls from the slurry formed after adding water, let them dry well and examine them carefully. If cracking is not visible, the materials are suitable.
It would be advisable to tighten the inspection requirements by throwing dried cakes from a low height. If they did not collapse and successfully passed the tests, the chances of making a high-quality repair of the furnace increase.
When preparing homemade putty, monitor the condition of the wooden mixing spatula. The gruel should not stick to it. If clay adhesion is noticeable, it is better to increase the amount of sand in the mixture.
Of course, if possible, it is advisable to take a special type of clay - fireclay. It is characterized by fire resistance and strength. You can buy it in building materials departments. Before use, fireclay raw materials should be kept in water for a couple of days.
Adding straw and horse manure
A popular folk method of preparing grout for stoves is to add chopped straw or chaff (husks, chaff) to the mixture of clay and sand. You need a lot of it. So, if 4 buckets were taken of clay, one bucket of sand will be needed, and straw - from 40 kg to 45 kg. You can hear advice about the benefits of adding salt to the grout at the rate of half a regular glass per bucket of the mixture. It is recommended that the quality and quantity of additional components be determined based on the local situation.
Important! You cannot use mortar with straw for laying. It is only suitable for covering surface cracks, for plaster.
In some places, people recommend covering stoves with a mixture containing horse manure. Now it is not so easy to find it, it makes no sense to insist on such technology.
Special formulations
If there are building materials stores nearby and you are willing to spend money, it is better to buy ready-made adhesives: soft or hard. The viscous solution is convenient for covering small cracks. Complete plastering of the stove can be done with solid compounds. Sometimes cracks in the masonry are sealed with a special heat-resistant sealant, and small cracks are filled with asbestos fiber.
Fireclay clay
One of the best materials to cover the stove so it doesn’t fall off. Affordable, sold in stores, packaged in 20 kilograms. Resistant to moisture and temperature. Also intended for plastering surfaces.
The finished solution is obtained as follows: fireclay clay is mixed with cement and sand, the ratio of the components is 2: 1: 7, respectively, water is added. For better pliability of the material, you can initially fill the clay with water, then wipe out the lumps, add cement and sand. The thickness of the mixture depends on what type of work is being carried out, and skill experience also plays a role.
Frequently asked questions and answers
It is not always possible to find complete information in the instructions on how to properly use the sealant. This leads to a number of errors and problems in the future, which in no way depends on the quality of the thermal paste itself.
Is it possible to seal the joint between the chimney and the roof when it is frosty outside?
It is better to carry out all work with sealant in the dry and warm season, then its adhesion will be as strong as possible. Look for sealants that work in cold temperatures, but be aware that they will take a long time to dry. If it is -2°C, then most likely the process will be successful. If we are talking about severe frosts, then it is better to wait for a thaw, since the mixture will not be able to polymerize correctly.
Experts use a trick, forcing the sealant to work using heat guns. The latter are located in close proximity to the processing site, increasing the temperature by 10-15°C.
The sealant is not drying well, what can I do to help?
This picture occurs if the ambient temperature approaches zero. Accordingly, to solve the problem, the surface and air should be slightly warmed up. But the best adhesion of the two surfaces occurs when all the work is completed in the summer.
Can the sealant cause a spark?
If we talk about those sealants that are used for combustion chambers, then they do not contain any elements that can somehow influence the combustion process. But such a sealant must be marked “fire resistant”. This means that it can be used in areas of active combustion.
In conclusion, it is worth noting that heat-resistant sealants have different compositions and can be used for different purposes. Before purchasing, it is important to evaluate at what temperatures it will be used in order to determine the desired composition. Please ensure that the sealant does not contain hazardous components that can release toxic substances when heated.
Oven grout
To eliminate defects that occur in the oven, ready-made heat-resistant grout is sold. Because of its high cost, home craftsmen prefer to make such a solution themselves.
The clay is prepared as for a clay-sand mixture. The soaked clay slurry is combined with sifted sand and while mixing, chopped straw is added, the component ratio is 1:4:5. 1 kg of coarse salt is added to the finished solution, which makes the composition more plastic and resistant to cracking.
Grout perfectly fills voids. You can also use it to plaster the stove surface with the first rough layer.
Popular brands
Heat-resistant grouts are offered for sale in a large assortment from both domestic and foreign manufacturers. The craftsmen have formed attachments to certain brands, confirmed by positive work experience.
The universal product Terracotta has proven itself well, which can be used to cover the walls of stoves, fireplaces, and other heating devices. The walls of the stove with Terracotta can heat up to no more than 400 ℃.
The prepared heat-resistant paste adheres well to the surface without trying to move downwards under its own weight. It is important to mix the dry mixture with water correctly, in the proportion indicated on the box. The desire to save money, to make a lot less often, will not lead to a good result.
Superfireplace hot-melt adhesive from the Plitonit company demonstrates interesting possibilities in its application. The product, as the name implies, can be used both for gluing tiles and for filling joints. The mass adheres well to the surface and can withstand heating up to 150 ℃.
Polymin P-11 heat-resistant adhesive is characterized by multifunctional capabilities, which can be used to glue tiles and grout joints. The heat resistance of the product is slightly higher than that of the previous representative. Polymin P-11 can withstand heating up to +160 ℃ without damage.
The composition of MIXONIT FUGA KL is designed for maximum heating only up to 100 ℃, but such a fugue has not only thermal, but also chemical resistance, and can be used for grouting joints with a width of up to 20 mm.
Having assessed the features of each brand of product, you can always choose the grout that is most suitable for a specific stove or fireplace.
It would seem that with the arrival of gas in rural homes, stove heating is a thing of the past. But modern rich cottages are increasingly equipped not only with fireplaces, but also with entire stove complexes. It's stylish, environmentally friendly and fashionable. The crackling of wood and the play of flames give unprecedented comfort. Accordingly, the problems of maintaining the stove in working order returned.
Covering stove cracks
The material for the upcoming work has been selected, and another question arises: how to properly seal the stove?
You can start working only after cleaning the brick from decorative finishing and plaster. Using a suitable tool, the gaps between the masonry with cracks are widened to fill an area of about 10 mm with adhesive.
When using ready-made adhesive solutions, it is advisable to adhere to some rules:
- prepare the working solution in a limited volume due to the drying speed;
- Wet all cracks with water;
- tightly fill the gaps with adhesive;
- Lubricate the top of the oven with the prepared solid mixture;
- wait for it to dry completely and start plastering.
An unheated stove is a bad option for carrying out repair work with materials containing clay. It is recommended to heat it slightly; this will help you see imperfections and eliminate defects before the putty dries.
The sequence of work will be slightly different:
- Before sealing the cracks, stir the mixture again until smooth (the contents have different densities);
- make sure the material is of high quality. To do this, you can manually make a spherical object, and if cracks appear on it, add a little water;
- wet all the cracks with water and fill tightly with glue (it’s safer to use your hands);
- Plaster also after final drying. Next you can use whitewash.
The importance of plastering work
Furnace finishing options are not limited to just applying layers of plaster. The cladding is done using fireclay or ceramic tiles, decorative stone, metal elements, and is also completely abandoned if the “bare” stove masonry looks neat and stylish. However, plastering, which was practiced by our ancestors, has its advantages and practical benefits:
- correction of masonry defects;
- leveling the surface of the walls;
- protection from insects that make nests in the seams between bricks;
- preventing the release of carbon monoxide into the room through cracks and gaps in the finishing layer;
- reducing the risk of fire;
- increasing heat capacity, which allows you to heat a house using less fuel;
- safety during operation, since the surface of the oven does not heat up to temperatures that could harm people.
In addition, plastering is an accessible and low-cost process.
It is also worth taking into account its versatility and flexibility in use. Plaster is effectively used in working with all types of stoves, from finishing from scratch to restoring old structures, and decoration possibilities are limited only by imagination
Oven overheating
Having installed a new stove, or repaired damage to the old one, you should not test its strength by heating it to its fullest.
The first fire must be carried out with a small amount of firewood, increasing the amount each time. And then there will be no need to get rid of the next problems again.