Wooden logs are essential to ensure natural ventilation of the underground space and better heat retention in the premises. Thanks to the use of logs, the floor covering can last much longer. However, among people who do not have much experience in construction, you can often hear the question: is it necessary to attach joists to a concrete floor? Experienced craftsmen know that for a truly durable flooring that does not change its geometry under load, and for its long service life, it is imperative to correctly fix the logs on any supporting structure, including on a concrete screed.
Now that it is clear whether it is necessary to attach the joists to the concrete floor, it is worth noting that this task is not difficult, does not require special skills and knowledge, and, therefore, can be done by any home craftsman.
Technical features
Installing a floor on joists on top of a concrete base is a common solution. However, it comes with the potential for three common problems. These include:
- destruction of the monolith due to the use of many fasteners;
- deterioration of the situation with sound insulation of the floor due to the appearance of sound bridges in places where hardware is immersed in a dense structure;
- the appearance of squeaking due to friction of wood fibers on metal, which is inevitable if installation is carried out without following the rules.
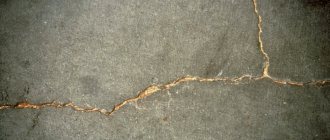
All this can be avoided. So, if a concrete screed collapses, it means it was made with violations of the technological process or is of low quality. It is recommended to dismantle this coating and replace it with new material. A properly prepared solution, after hardening, retains its characteristics after drilling holes in it.
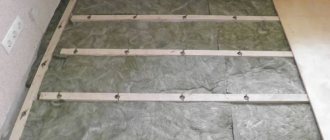
Regarding noise transmission, the solution is insulating material. Installing joists on a concrete base involves the formation of voids between the beams. They can be filled with a heat insulator or an acoustic analogue, which will dampen sound waves.
Laying insulation between joists on a concrete floor Source nikastroy.ru
To prevent squeaking, it is enough to assemble the most rigid structure possible. The main thing is to correctly determine the loads in advance and select resources in accordance with the calculations. Use only dry timber to avoid future deformation.
Recommendations for choosing lumber
Experts advise giving preference to blanks made from coniferous trees. They contain natural wax throughout, which makes the fibers resistant to moisture and rot. There are also antiseptic components that resist the formation of fungus and mold. Also, such rocks have quite high strength.
Regarding humidity, the recommended limit is 18%. Before laying the logs on the concrete floor, the workpieces are kept inside the workroom for several days. This way, the lumber will undergo an acclimatization procedure, which will further simplify the process of rejecting workpieces. If the timber is not dry enough it will begin to warp. Its craftsmen recommend immediately replacing it with suitable material. Next, the selected timber is treated with antifungal agents and compositions containing fire retardants.
Example of pine timber Source twimg.com
Another selection criterion is the variety. This is a classifier of lumber according to a number of characteristics, which means the permissible number of various types of defects. Thus, timber is characterized by 5 quality categories. But for lags, as a rule, options of 2 or 3 varieties are used. It is possible to be present here:
- a small number of knots and end cracks;
- resin pockets in the amount of up to 4 pieces per linear meter;
- double core;
- sound spots (up to 20%);
- blunt wane along the entire length of the workpiece.
Of course, you can choose selected timber or class Extra, Prima or A. Here, all defects, knots, insect marks and dull wane are either absent or their number is reduced to a minimum. However, the requirements for floor joists are not so high and low grades (except for the last one) are cheaper.
Signs for sorting wood blanks Source potolok-exp.ru
See also: Catalog of companies that specialize in the reconstruction and rebuilding of houses
The cross-section of the timber for mounting the logs on a concrete base is determined by the degree of load on the logs from further finishing, furniture, equipment and people. As a rule, blanks with a thickness of 50-60 mm are used. But there are some recommendations from the masters:
- 40 mm – the side of the beam that is in direct contact with the base;
- 50 mm is the minimum thickness provided that the logs are laid on point supports;
- 75-100 and 100-120 mm – the width of the bars for the first and second options, respectively.
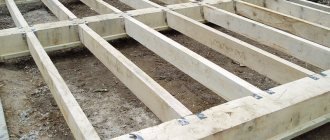
If possible, the length is chosen so as to exclude connecting nodes in the segment between the walls. The direction is most often observed along the short side. But it is worth paying attention to human movement in high-traffic areas. Here the installation is carried out in a transverse position.
An example of the location of the logs across the movement Source superpol-spb.ru
Installation on plywood base
Laying a wooden floor on a concrete screed can be done using moisture-resistant plywood, the thickness of which ranges from 12 to 18 mm. How it's done?
- Plywood is cut into squares 40x40 or 80x80 cm.
- Plywood sheets undergo rough sanding.
- The sheets are spread at intervals of 4 mm diagonally towards the future wooden floor. First, the plywood is fixed with glue, and then with dowels. It is necessary to retreat 10 mm from the wall. Laying plywood sheets is similar to laying bricks. The screw heads are recessed by 3-4 mm.
- The surface is cleaned of dust and dirt.
- The floorboards are attached with self-tapping screws to the plywood.
Laying wooden floors on a concrete screed is not difficult. If the installation technology is followed, such floors will last for many years and will provide warmth and a comfortable microclimate in the house.
Dear reader, leave your opinion on the article in the comments and share your secrets of installing wooden floors.
Carrying out installation work
In the case of wooden products, choosing fasteners is not difficult. Nails and screws are suitable here. When working with concrete, different solutions are required. Let's consider the criteria for choosing fastenings for joists to a concrete floor:
- Level . The evenness of the rough base determines whether it is necessary to compensate for one or another height. That is, the logs will be laid directly on the floor, attached to the walls or using adjustable devices.
- Humidity . This criterion applies to the work space. For example, for flooring over a monolith in a bathhouse, it is important to consider samples that will cope with changes in humidity, temperature, and chemical reagents for a long time.
- Load . The use of floors can vary in intensity and pressure from certain factors.
Another point concerns the floors on the ground floor, which are located above the basement. Condensation often forms under wooden flooring, causing the material to rot. To avoid this, the logs are fixed to supports.
Self-tapping screws
Such fasteners are considered the simplest and most accessible, but their use is not always acceptable.
Example of dowel-nails with nickel plated Source stroikrep.ru
For example, in the case of a support system without direct contact of the timber with the base. The installation process includes the following steps:
- holes of the required diameter are drilled at the location of the hardware (both in the concrete screed and in the wooden blank to prevent the appearance of cracks);
- a plastic dowel is driven into the hole formed in the subfloor;
- the self-tapping screw is screwed through the beam and plunged into the dowel, the head is recessed into the wood a few mm.
The optimal distance between fasteners when using self-tapping screws is 400-600 mm. It is recommended to choose fasteners with a nickel plated diameter of 3.5 mm. The drill bit for the timber is selected with a size of 4-5 mm. The depth of immersion of the dowel into concrete must exceed 50 mm.
Step-by-step instructions for attaching joists to a concrete base with your own hands
The simplest solution for installing a wooden covering over joists is to fasten the profile using dowels.
To carry out the work you will need the following materials:
- Beam 50 x 70 mm.
- Dowel-nail 8 x 120 mm.
- Fiberboard sheet.
- Polyethylene film.
- Insulation mats.
Installation work:
- We clear the room of unnecessary objects and debris.
- We cut out spacers 100 x 100 mm from fiberboard.
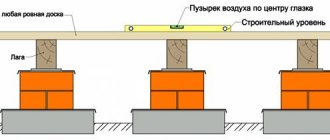
- Using a water level, we level the floor and mark the locations of the joists on the walls (it is better to mark a solid line along the contour).
- We prime the surface.
- We lay plastic film on the base. Each subsequent layer of material should overlap the previous one by 3-5 cm. We seal the joints with tape.
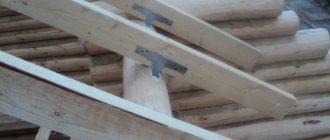
- We lay out the timber according to the marks on the wall parallel to the window opening. We splice the logs using angles or perforated plates.
- We begin installation of the structure. To do this, we make through holes in the log furthest from the window, the diameter of which should be equal to the size of the plastic plug of the dowel. The drill must pass right through the body of the wooden profile and also capture 50-70 mm of the concrete base.
- We press the part tightly to the floor. We check the coincidence of the holes and install the dowel-nail.
- Use spacers to level the horizontal level according to the marks on the wall and secure the profile with a hammer on the nail head. Using the same scheme, we install the next lag at the doorway. We stretch the cord between them on both sides and continue installation.
- When all the profiles are laid in place, the gap formed as a result of level adjustment between the base and the joists is sealed with polyurethane foam.
- We lay insulation mats in the gap between the beams and pre-fix the structure with transverse slats.
Briefly about the main thing
The joists on the concrete floor are fixed directly or at one or another height.
The choice of fasteners is determined by the degree of evenness of the rough base, load and aggressiveness of operating conditions.
If the base is level, then you can use nickel-plated screws and plastic dowels with a length of 50 mm or more or anchor bolts to strengthen the structure.
An alternative to self-tapping screws are mounting angles, with which you can additionally adjust the verticality of the beam and the rise in case of slight deviations of the base in level.
If you need to raise the logs, you can fix them using brackets to the walls or using adjustable fastenings to the floor.
The height of the logs above the floor can be adjusted using plastic stands or studs with counter nuts.
The essence of the operation of adjustable fasteners is the presence of threaded elements and support elements for the beam.
Ratings 0
What should the cross section of the log be?
The strength of this part of the floor depends on the material of manufacture and the accuracy of load calculations. When choosing the size of the timber, the maximum permissible load on the floor is taken as a basis. For living rooms, this figure is 300 kg per 1 m2. For non-residential premises it is individual in each specific case, so before purchasing the material you need to calculate this indicator.
Basically, timber with a profile aspect ratio of 1.5 x 2 is laid under the floorboard.
The height of the beams must also be selected taking into account the thickness of the insulation. If iron and concrete elements are installed, their cross-section may be smaller. This is due to the fact that these materials are able to withstand high loads for a long time.
Atypical situations
Sometimes in old houses, when trying to replace a wooden floor with a new modern design, you have to deal with atypical floor slabs. In these cases, you have to come up with non-standard ways of laying and fastening the lags. One such situation is described in detail in the following video. As you can see, in addition to standard methods of fixing load-bearing beams, you can come up with many more methods. In fact, it doesn’t matter how the logs are attached, the main thing is that they are correctly located in the horizontal plane and can withstand the vertical load.
Rehabilitation of coating
In the video below you will learn how to replace and repair an old wooden floor in an apartment.
Let's watch and learn:
Over time, when using a plank floor, situations often arise that require its complete or partial replacement.
Considering the degree of damage to the coating, it is advisable to use both cosmetic (superficial, without fundamental changes) repairs and major repairs (with complete dismantling and installation of new wood).
The entire floor repair process consists of three main stages:
- Removal/elimination of old or damaged coating.
- Leveling the surface and preparing it for installation of a new floor.
- Directly laying the new coating itself.
In addition, the following construction tools are needed in repairing a wooden floor: crowbar, hammer, nail puller, screwdrivers, jigsaw and saw.
Their use at all stages of repair work allows us to achieve the most effective results.
So, when replacing a plank floor:
- First of all, the room is cleared of various interior items.
- Next you need to dismantle the old coating. To do this, using a crowbar and a nail puller, carefully remove the existing decorative thresholds, floor ventilation grilles and baseboards, lifting them only 1-2 cm around the perimeter of the room. This is followed by the sequential elimination of nails and screws connecting the floor to the joists.
- After removing the decorative elements, it is necessary to carefully inspect the entire surface and find the narrowest board in width, from which the dismantling of the floor begins. If one is not found, then the board laid quarter down is removed first. In this case, the direction of movement is necessarily from the corner of the room to its center. As a result, there should be a concrete or wooden floor with moisture and sound insulation backfill, on which the new floor is actually laid.
- Before laying new boards, all measurements of the length, width of the room and the distance perpendicular to the joists must be taken. Next, the board is cut so that there is at least 9 mm from the wall to it. After which the flooring is made, taking into account no more than 4-6 boards at a time. They are secured with special parquet nails.
However, a wooden floor does not always require major reupholstery.
Most often, it is simply restored by replacing worn and deformed floorboards with new ones.
Partial replacement of boards is carried out by lifting the damaged part of the floor and separating it from the joists.
This should be done carefully, without disturbing the integrity of the rest of the coating.
If gaps form between the old and new boards, they are sealed with a special wood putty.
But what if a fairly new floor begins to creak unbearably?
All owners of wooden floors face this problem sooner or later, preferring to solve such issues with radical measures.
Factors that cause such an unpleasant squeak may be:
- improper use of wood flooring;
- violation of the humidity level in the room;
- morphological changes in boards and joists;
- worn floorboards;
- weakening of fastening inter-plank connections.
Stages of dismantling boards of an old wooden floor in an apartment.
There are several ways to eliminate creaking floorboards:
- Filling the underground space with polyurethane foam . A temporary and quite expensive method.
- Driving wooden wedges between boards and beams , which neutralizes the friction of the floorboards. However, if they are heavily worn, this method will be ineffective.
- Application of metal anchors . This method is good and highly effective for coatings laid on concrete slabs, but it is expensive.
- Floor screed . With this method, a complete audit of the condition of all boards and joists is carried out, which are replaced if necessary.
- Spot repairs using self-tapping screws or laying plywood over the subfloor.
Which method should I use?
It depends on each individual case and the financial capabilities of the owner of the plank floor.
Step width between joists
The pitch between the joists is selected taking into account the thickness of the floorboard. The thicker it is, the larger the step between the bars is allowed. In addition, a thick board sag less under loads.
The table below allows you to quickly select the distances between the bars.
You can also resort to the following rule: when the width of the logs increases by 5 mm, their pitch increases by 10 cm.
When installing plywood, the cross-section of the joist is calculated differently. This is due to the fact that it has great bending strength. With a thickness of sheet material of 1.5-1.8 cm, it is fashionable to place logs against each other at a distance of up to 40 cm. It is necessary to install the beams so that the sheets are fixed at the edges and in the middle. Moreover, the edges of the sheets should fit half the width of the beam.
Classification
Floors consisting of screed, insulation and floor covering are called separate.
A complete analysis of the element allows us to identify several categories of floors, divided by purpose. These are industrial buildings, residential buildings, public institutions and livestock buildings.
There are several more distinguishing features, first of all, division by type: monolithic, roll and piece. Analysis of the installation site is divided depending on the location: above a heated room, floor construction on the ground, along the interfloor ceiling.
Regarding sanitary standards, there are 3 types of floor installation:
- single-layer, made of material that complies with GOST for heat loss and sound transmission;
- separate structure, made of a separate layer of sound insulation, screed and finishing coating;
- hollow, made along logs (cuts) with heat and sound insulation laid between them.
You can understand how to make a good floor while meeting numerous requirements only after fully familiarizing yourself with the standards.
Tools
To install the beams, the following tools are required:
- electric drill or hammer drill;
- screwdrivers or screwdriver;
- electric circular saw or simple hacksaw for wood;
- plane;
- hammer;
- tape measure and level;
- fasteners.
Other tools may be required.
Insulation and sound insulation
Soundproofing and insulating floors on beams is quite simple. For example, you can cut TECHNONICOL into strips and lay it between the beams. In this case, the self-adhesive side section that overlaps the beam must be rolled with a roller. For additional insulation of the floor, you can place mineral wool on top of the TECHNONICOL. This sound insulation allows you to protect your living space from noisy neighbors downstairs.
The height should not exceed the bars. In those places where it is higher than the log, its thickness must be reduced. To do this, the cotton wool needs to be cut lengthwise with a knife. If the result is rags, this will not affect the properties of the material.
Preparatory activities
The quality of the concrete on which the wooden floor is laid is regulated by SNiPa 3.04.01-87. Inconsistency of the base leads to deformation and premature failure of the parquet.
In order to properly lay a wooden floor on a concrete base, it is necessary to carry out preparatory work. Such measures will ensure a long service life of the parquet. The preparation of the concrete base is carried out in the following order:
If, after the floor has hardened, any unevenness remains on it, then it should be removed by sanding.
- Drying concrete. Laying of a wooden floor is carried out no earlier than a month after pouring. This is exactly how long the material needs to acquire the necessary strength.
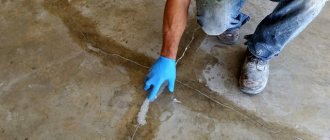
- Elimination of defects. Using self-leveling mixtures, the pits are leveled, and the bumps are smoothed by grinding.
- Arrangement of communications and cables. A diamond drill is used for this procedure.
- Waterproofing. Necessary to prevent moisture penetration from the concrete base.
Eliminating squeaks
Over time, the installation of a wooden floor leads to drying out and changing the shape of the boards. As a result, the floorboards begin to creak. Causes of floor squeaks:
- Gaps form between the boards and joists;
- the ends of the floorboards rest against the walls;
- fastening elements have become loose;
- friction between the side surfaces of the boards.
A squeaky floor usually requires major repairs. This is not always possible. Often, owners make cosmetic repairs to the wooden floor in the apartment so as not to open it. This can be considered a temporary measure, since a lasting effect is not expected here.
If you have a subfloor in your home, a creaking floor can be repaired by inserting wedges from below between the floorboards and joists. There is no access to the floor from below in the apartment, so the following methods are used.
- The floorboards are secured with self-tapping screws installed oppositely at an angle of 45–600 to the surface of the board, which should be pulled to the joists.
- Talc or graphite powder is poured between the floorboards.
- The space under the boards is filled with foam.
- The floor is covered with 12 mm thick plywood sheets.
- On creaking floorboards, nails are replaced with self-tapping screws. Such an event often eliminates problems with squeaking.
Base made of concrete and reinforced concrete (laying on an uneven base)
Before installing the logs, the uneven concrete floor is leveled with a cement screed. This technology allows you to make a smooth and reliable base for parquet, laminate or floor tiles, as well as well insulate the floor and protect the room from external noise.
For most floor coverings, a spacing between joists of 60 cm is suitable, but floor tiles require cells measuring 30x30 cm because they are very fragile.
Reinforcing mesh in the screed and spacers between the beams increase the rigidity of the floor. Thermal insulation material can be placed in the resulting cells.
Selecting finishing material
In the process of refinishing a finished wood floor, you will also need boards. Their dimensions are not very important, because the main load will fall on the outer covering. Today on the market there are boards whose width reaches 135 mm, while the most popular are 100 mm products. The thickness of the floorboards can be selected taking into account the size range - from 28 to 40 mm, but most often boards of 30 or 35 millimeters are used.
When choosing a length, you need to focus on the largest size of the room. One floorboard should cover the entire room lengthwise. It is not recommended to install lumber with a thickness of less than 22 mm, as this coating will sag and individual elements will quickly fail. The quality of the wood will play an important role, so you need to choose the best grade of floorboards with a minimum number of defects.