If you can use a variety of materials to build a private bath, then it is better to make bath furniture, household items and accessories from wood.
A bench or bench for a bath is an important decorative and functional part of the interior. It is used in the steam room, washing room, relaxation room and even in the dressing room. The bench can be purchased ready-made or made independently from available material.
Variety of designs and requirements for them
The word “bench” often serves as a collective name, although in any bathhouse, strictly speaking, there are three types of structures. They have a lot in common, although there are differences:
- Bench . A bench in a bathhouse usually means a portable seat (although there are both portable and stationary options).
- Bench . A seat with or without a backrest, but then adjacent or attached to the wall. A bench, as a rule, is a stationary object.
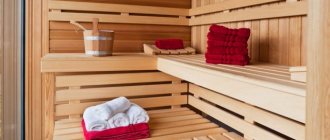
- Shelf (or sun lounger) . A seat or lounger with strictly defined dimensions is installed exclusively in the steam room. The design of the shelves (emphasis on the last syllable) is extremely varied. There are stationary, removable options, as well as their varieties: tiered, folding, folding.
The terminology is not strict: a bench can be used as a shelf in a steam room. However, no matter what the bathhouse bench is, there is a set of requirements that are the same for all bathhouse furniture. One of the main ones is safety and the associated sustainability.
Bench and benches in the recreation area Source homeli.ru
To prevent a person sitting on the edge of a bench from turning over with it, the structure must have the correct proportions, be low enough, and have a comfortable wide seat to distribute the weight. The weight of the product also plays a big role in stability. In addition to safety, the following qualities are important:
- Two interrelated qualities: functionality and convenience . The size of the furniture plays a big role here.
- When creating bath benches and sun loungers, design is not important : traditional simplicity of forms is welcome.
- Reliability . A lot depends on the design here. For example, a bench in the form of a board with two supports will quickly sway under the weight of those sitting and fall apart. The structure must be strengthened with the help of spacers between the legs, installation of additional (intermediate supports), and braces.
- Durability . You should not use too massive boards to make bath furniture: they absorb more moisture, take longer to dry, and are more difficult to dry properly.
Corner bench in the washing room Source dekoriko.ru
Means of protection
But progress is progress - the Finns have plenty of compounds that are suitable even for their hot sauna , not to mention the much “cooler” Russian bath. Such impregnations can protect wood from water, darkening, rot, etc. In this case, the surface will not feel greasy to the touch.
But in all other rooms, except for the steam room, you are completely free to use any compositions that can protect the wood from the action of water, bacteria, fungi, insects and rodents. If desired, you can also coat it with fire retardants - compounds that make the wood non-flammable.
Why it is necessary to protect wood in a washing room - it’s clear, water flows there. But the rest of the bath rooms are not entirely dry either. Be that as it may, the humidity in the bathhouse is high everywhere. So saturate and varnish with whatever you see fit.
Ergonomics of bath furniture: optimal sizes
The size of benches and other furniture affects the comfort of bath procedures. Sitting on a bench that is either too low or too high is equally uncomfortable, which must be taken into account when purchasing (or making) furniture. When choosing the size of a bench for a bathhouse, much depends on the area of the premises, but, for example, the height of the seat, a key parameter for convenience, does not depend on the dimensions of the steam room.
When choosing the size of bath furniture, many owners are guided by the size of regular visitors to the bathhouse. But, if the “users” are of normal height, you can take the average shop sizes with the following values:
- For sitting . The optimal height would be 50-80 cm, width - at least 40 cm. An additional element is a footrest.
- For the sauna . They are traditionally made a little taller, 50-90 cm, and wide, 40-50 cm, so that you can sit half-sitting. It is logical that the element of furniture is a fairly high back, from 100-110 cm.
- For lying down . The average height is 50 cm, width is at least 90 cm. A footrest is not needed for this design.
The upper tier is often made wider Source vsyakraska.ru
- Length . A bench intended for one has a length of approximately 90 cm. A seat for two will be 60 cm longer, for three – 120 cm.
- Seat features . It is necessary to leave gaps of 1-1.5 cm in the seat between the boards. Thanks to the gaps, water will drain faster from the wooden surface and it will dry faster.
Colonial Rec Room Bench
If the appearance of the bench is not very good, you can change it and improve it.
To do this, decide on the processing style and buy decorative materials. Go to visit your friends and take a photo of the benches in the bathhouse, and then choose a processing method. The colonial style allows you to make the bench noticeable and expensive. The work is performed in the following sequence. Brush the bench elements with a wire brush and apply a layer of white glaze to the surface of the wood. Wait until dry and re-brush the wood with a wire brush. The furniture will be bleached with grooved brush marks. Apply a layer of varnish to the surface; after drying, the furniture can be used.
Types and quantities
Furniture for different bath rooms differs in parameters and appearance. Thus, benches for the washing department have the following features:
- The simplest and at the same time stable model, capable of supporting the weight of not only a person, but also a container of water. It shouldn't tip over if you sit on the edge.
- For production, wood species that are resistant to contact with water and high air humidity are selected.
- For safety, the supports are moved to the edges of the structure, the boards chosen are thick enough, from 4 cm.
- The natural location is along the walls, near shelves for bath accessories.
Furniture intended for the rest room is more comfortable:
- Typically, wooden benches have a backrest and can be moved.
Two-tier design for a steam room with an additional shelf Source ytimg.com
- Any wood, even soft wood, is chosen for production, since air humidity is close to normal.
- The surface of the material needs careful processing, and the products themselves can be decorated.
The optimal number of benches for a bathhouse is determined based on the number of visitors to the bathhouse. It is important to arrange them so that they allow free movement around the room. To solve the problem, it is convenient to make a drawing with preserved proportions.
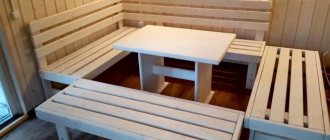
In a small bathhouse in the washing room, as a rule, two benches are placed; they are designed for one and two visitors. In the relaxation room, the furniture is placed around the table and has large dimensions so that you can lie down.
See also: Catalog of companies that specialize in the design and construction of baths of any complexity
Care Tips
Sauna benches are used in difficult conditions and therefore require special care. To make wooden furniture last longer, you need to follow these recommendations:
- regularly ventilate the room to avoid the development of fungus and mold;
- Complete each bath day by cleaning all rooms and drying all equipment;
- periodically you need to heat the bathhouse empty, bringing the temperature to 100 degrees (to destroy all pathogenic microorganisms);
- From time to time inspect the structures for the appearance of rot.
A wooden bench is a mandatory attribute for a bathhouse, which requires proper care. You can make it yourself, and it won’t take much time.
Requirements for material and homemade structures
All bath furniture is made of wood, which is not surprising, given the naturalness and environmental friendliness of the material. However, there are some requirements that wood intended for use in specific conditions must meet.
One of the options for a mobile bench Source mebpilot.ru
When evaluating different types of wood, pay attention to how well they correspond to the following parameters:
- Moisture resistance . For the bathhouse, choose breeds that are least susceptible to any type of humidity, and therefore resistant to the appearance of fungus and rot. Moisture resistance is explained by the presence of special resinous substances; They extend the life of the furniture.
- High density . Dense wood is more suitable for a bathhouse, as it is less susceptible to cracking due to temperature changes. A crack is the result of wood breaking along the grain, caused, for example, by uneven drying. Cracks in bath furniture are extremely undesirable, as they are dangerous due to splinters.
- Low thermal conductivity . The parameter depends on the density, humidity and direction of the fibers. Thermal conductivity along the wood fibers is almost three times higher than across it. This can be taken into account when choosing a material: the lower the thermal conductivity, the less the surface heats up and the less discomfort from touch.
- Durability . The boards should be free of knots, chips and other defects. All of them contribute to a decrease in strength.
Processing the edge of the seat Source pinimg.com
Homemade wooden structures must meet the following requirements:
- The surface of the material is carefully leveled by grinding. To do this, use manual sanding (with sandpaper with sequential changes in grain size) or a grinding machine.
- The corners of the furniture must be rounded, since radius parts are safer.
- Stability is important for all objects, even with uneven load; a margin of safety is also required.
- The space under the bathhouse benches is not sewn up; this helps the wood dry out faster. For the same purpose, a gap of 7-10 cm is left between the object and the wall.
- Furniture is placed only against blank walls so that those sitting do not get caught in a draft.
- It is prohibited to use paints and varnishes for surface treatment; when heated, they release dangerous volatile compounds. There will be an unpleasant smell in the room, and such a procedure will have very little to do with health.
- Naturally based antiseptic impregnations (vegetable oils, wax) are allowed.
Natural oil for shelves in baths and saunas Source prom.st
Required Tools
Tools for making a bench
It is better to use electric tools for cutting boards; work with them is easier and faster. You can use a hand saw and plane.
Prepare tools for assembling a bathhouse bench:
- miter saw;
- screwdriver with attachments;
- electric router;
- grinding machine with a set of attachments;
- hammer, mallet (for wooden fasteners);
- tape measure, level, construction square.
Brushes of different sizes, rollers and a ditch are needed for finishing the surface and pre-impregnating the wood.
Material selection
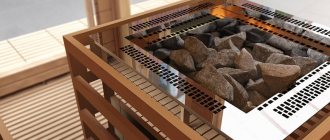
Not all wood is suitable for making bathhouse benches, which is due to the special (and different) microclimate of the premises. For example, you should not use coniferous wood in a steam room: the resin contained in such wood melts at high temperatures and appears on the surface, which can cause burns. However, for a rest room or washing room this is an acceptable option.
The classic list of wood types for bath furniture is as follows:
- Linden . One of the most commonly used materials for making bath furniture. An important advantage of linden wood is that it has medium density and therefore heats up slightly. In bath conditions it is short-lived; when exposed to water and steam, it is quickly exposed to mold. This is visible externally: over time, the surface darkens.
- Aspen . Light, uniform wood with a pleasant-looking texture, resistant to abrasion and easy to process. Aspen is considered a budget option for bath furniture; it has poor resistance to water; It takes a long time to dry, but it is not prone to cracking and does not warp.
Benches in the interior of a log bath Source par-torg.com
Subtleties of manufacturing
You can easily and simply make any bench design for a bathhouse with your own hands. To do this, just study the instructions and show a little imagination and ingenuity. Before starting production, you should think over and decide on the dimensions of the product, select the material, and prepare the tools. The design of the simplest bench model consists of crossbars, slopes, a seat and legs. Having decided on the parameters and shape of the bench, you can begin manufacturing:
- First you need to prepare all the components of certain sizes;
- all prepared parts must be thoroughly sanded using special sandpaper;
- then on each leg you need to make a groove of the required size; therefore, tenons are made on the crossbars;
- the legs are connected to the crossbars using special construction glue and nails made from wooden blanks.
The final step in the bench making process will be fixing the seat. It is fixed to the structure using special screws. To avoid rot, the screws should be slightly deepened. The deepening area of the fasteners must be covered with a special putty. That's all - a wonderful bench for the dressing room is ready. The process of making a steam room bench is somewhat more complicated and will take a little longer.
To slightly simplify and speed up the process, you should prepare a diagram or drawing in advance. After this, you need to prepare the necessary materials and tools. Following the drawing, all parts are cut strictly to size, and then carefully polished, after which you can proceed directly to assembling the structure itself.
The first thing you need to do is make the frame of the product. Then you need to attach prepared, polished slats to the frame at a distance of about 1 centimeter. The gap is very important, since, firstly, when interacting with water, the wood will expand slightly, and, secondly, this will allow water to drain onto the floor. To connect, you can use wooden nails, dowels or self-tapping screws. Structures with several tiers are made in a similar way.
Interesting: How to make shelves for a steam room with your own hands: drawings and dimensions
Modern manufacturers of various processing and impregnation products offer a wide range of different compositions. Therefore, in order to extend the service life of the structure and protect it from moisture and rot, you can use a special composition based on vegetable oils. Furniture that is carefully processed and impregnated with such a special product will be more resistant to various negative influences.
For the dressing room, you can make a bench in a certain style. In this case, you just need to put in a little effort, patience and strictly follow the instructions and advice of experienced craftsmen. For example, making a design in a country style will not be difficult. To do this, just strictly follow the instructions:
- the structure must be pre-treated with a metal brush;
- carefully sand the surface of the bench until the natural structural pattern of natural wood appears;
- then a layer of translucent azure is applied to the surface;
- the coating is thoroughly dried and a second layer of composition is applied;
- after the coating has completely dried, use a hard sponge to carefully and carefully remove the top layer of glaze;
- If you are satisfied with the result, you can treat the structure with colorless varnish.
After thorough drying, the product is completely ready. The design is ideal for use in a waiting room. A stylish and original bench, made in country style, will decorate the room. It must be recalled that using such a design in a steam room is not recommended, since when heated, the varnished surface of the bench will release substances harmful to human health.
Tools
Let's start with the tools that are needed to make a bathhouse bench with your own hands from wood. It is clear that carpentry has been around much longer than power tools, so the same result can be achieved, say, by choosing a groove with a chisel or milling cutter. However, using a power tool is more difficult because it requires both good skill and adjustment. Therefore, we will present a more “democratic” option with modern hand-held power tools:
- Miter saw;
- electric milling machine;
- screwdriver;
- electric planer.
Material selection
It would seem that nothing could be easier than choosing the material for the future structure. Some people think that even coniferous varieties are quite suitable for making benches. Actually this is not true. When heated, resin will appear on the surface of the furniture, which can cause a burn. Such wood options are suitable exclusively for a washing room or recreation room, but not for a steam room.
Aspen also seems like a good option. However, during operation in humid conditions, such a bench will begin to rot from the inside. Oak is really suitable for making structures, although high-quality material costs a lot. Let's consider the classic varieties of trees for furniture in a steam room.
Linden
High density (500 kg/cm3) allows the material to withstand the effects of elevated temperatures, such furniture does not overheat. During the heating process, this wood releases useful elements into the air. Linden is easy to process; it is pliable. However, it also has disadvantages. You cannot do without pre-processing the wood before making the bench. If you neglect preparation, the material will accumulate moisture and begin to deform, and then completely rot.
Meranti
Red wood has a high density (610 kg/cm3). This material is dense and heavy, so you will never encounter overheating of the bench. This design will be resistant to temperature changes and humidity levels. This tree has no knots and is characterized by low fiber, making it easy and pleasant to work with.
Abash
This is truly an ideal option for making a bench for a bathhouse. The porous structure of the material has no moisture and no tendency to accumulate. The density of the material is quite small (only 390 kg/cm3), but it does not heat up even with significant heat in the steam room. It is not difficult to guess that such wood is expensive. This is mainly due to the delivery of raw materials from Africa.
Pine
From a price point of view, pine is considered the most profitable material. Select good quality specimens. The wood should be free of various knots, blue stains and resinous pockets. Unfortunately, all the main advantages of the material end at an affordable price. Pine has a low density, so this product will not last long. Changes in temperature and humidity levels will lead to deformation and cracking.
Birch
This is heavy wood with high density (600 kg/cm3), which allows the bench not to react to changes in humidity. The thermal conductivity of birch is at an average level, but there will be no burns when heating the bench. The material has good viscosity and does not deform during operation. It is easy to process: it is malleable. For a steam room with birch benches, it is important to ensure good ventilation.
To make a bench, you can use more outlandish types of wood.
Bench manufacturing technology
Step-by-step instructions for a do-it-yourself wooden bench for a bath include the following steps:
- Cutting the timber into 4 fragments, each 40 cm long.
- Assembling U-shaped racks. Two pieces of timber 60 cm long need to be knocked down to form transverse jumpers.
- Cutting according to the specific length of slats for making a seat. It is optimal to use slats with a length of 160-170 cm.
- Assembling the bench. The prepared slats need to be stuffed onto the jumpers, avoiding a gap of less than 1 cm between them. This is necessary to remove excess moisture and to expand/contract the natural material when exposed to temperature changes and high humidity. In addition, it is recommended to retreat 20 cm from the edge in order to achieve increased stability of the structure.
- Bench strapping. To create a strong bench, the legs and stands need to be connected using the remaining slats, 10-15 cm away from the floor. Special corners are also suitable for these purposes, but it is advisable to attach them from the inside of the product, otherwise a burn will appear on the skin at the point of contact. That is why it is advisable to recess the fittings used in the manufacture of the bench by 2-3 mm.
Simple shop
To manufacture the product, the following tools are required: a screwdriver, a hammer or mallet (if the fasteners are made of wood), a plane, a grinder, a jigsaw or a wood saw. For subsequent treatment of the product with protective agents, you will need brushes of different lengths. For work, you also need boards with a cross section of 50 x 100 mm.
For the seat you will need 3 pieces of 180 cm each, for the crossbar - 1 element (140 cm), legs - 4 pieces. 40 cm each, spacer fragments – 4 pcs. 10 cm each, fastening strips. Even an inexperienced craftsman can cope with the manufacture of such a device. You just need to follow these steps:
- Careful grinding of the material, rounding of the ends and edges of the boards.
- The seat elements are laid on a flat surface so that their bottom side is directed towards the master. They need to be aligned in length, and small liners should be inserted between them so that the distance is the same.
- Stepping back 20 cm from the edges on both sides, you should determine the center of the seat in width. This is where the fastening strips are fixed. They will help connect the elements of the upper part into one structure.
- At a height of 15 cm from the floor, spacers are attached to the legs. They can then be attached to the seat and mounting strips.
- Installation of the cross member.
To connect all the elements, it is better to use wooden wedges, dowels (if logs are used for manufacturing) or nails. If you decide to use metal screws, then their heads need to be recessed into the body of the wood, after which these places are puttied. You can also screw them in from the back of the bench.
Prepare tools
Parts drawing
Sand the material
Align all bench elements
Make two side legs
Attach backrest supports
Install cross member
Install bench seat slats
Attach the backrest
Finished bench
Making a two-tier bench
To make such a design you will need a drawing. This is the only way to take into account every little detail and insure yourself against remaking the bench. Working with such a workpiece is much easier and more enjoyable.
Let's look at how to make a structure 3 m wide, 3.6 m long and 2.4 m high.
- At a long blank wall, install a frame made of 50x70 mm timber.
- Sand 12 pieces of 110cm length and 6 pieces of 90cm length for the top shelf.
- For the bottom shelf, sand 6 pieces of 140 cm length and 6 pieces of 60 cm length.
- Make seats (flooring) from boards approximately 20x120 mm, their length should correspond to the length of the wall.
- For free flow of water and ventilation, leave 1 cm gaps between the boards.
- For the transverse ligament between the posts of both shelves, it is necessary to prepare 3 beams.
- For the upper tier, knock down the racks in a U-shape and connect them with two boards. Using 5x5 or 10x10 cm bars, attach the structure to the wall.
- Knock down the racks for the lower tier in an L-shape. Combine the long sides with the racks of the upper tier. Connect the lower racks together with boards.
- The work on the frame is completed. Now lay the boards on the tiers. To connect, use convenient fastening methods (the best option is wood nails).
Finishing and decor
The finished bath bench must be treated with a natural-based antiseptic composition. If you want to make it in country style, then you need to adhere to the following algorithm of actions:
- Sand the surface along the grain with a brush.
- Clean with a grinder until a relief pattern is formed.
- Apply translucent glaze in two batches.
- Wipe the surface with a dry sponge; when it dries, remove the glaze.
- Cover the bench with varnish.
Making and giving the bench the desired appearance is quite simple if you follow all the recommendations regarding assembly and finishing.
Means of protection
If you made a bathhouse bench with your own hands, then you need to take care to protect it from the occurrence of fungus and mold, prevent fire or change in appearance. For this purpose, special compounds are used, which are applied before the first use of the furniture. They must not contain harmful chemical components. The packaging of the product should be marked “for baths and saunas.”
The most resistant to water are aspen and larch. These materials do not need to be further processed. In other cases, the following tools will be required:
- Oils. They are quickly absorbed into the wood and do not form a film. Such compositions are used in steam rooms and reliably protect furniture from moisture.
- Oil wax. It contains flax or hemp oil and a bee product. This type of product is used in a steam room or washing room. When exposed to high temperatures, the substances do not become hazardous to human health.
- Bleaches. They contain oxidizing agents that prevent the wood from darkening.
- Fire retardants. Since the benches will be used in conditions of elevated temperatures, as well as near open sources of fire, the risk of fire should be prevented.
No paints or varnishes should be used. Since the protection will need to be renewed periodically, the previous one must be cleaned before applying the next layer.
Oil
Oil wax
Bleach
Fire retardants
Video description
About a simple linden bench in the following video:
- Pine . Pine is a low-density wood species, and the density depends on the age and growth conditions of the tree and affects its ability to hold fasteners. In terms of price/quality ratio, this is the most advantageous material. The wood is resinous, but without treatment in a humid environment it deteriorates quite quickly.
- Birch . The wood is dense, but relatively soft and pliable, which allows it to be processed with hand tools. But in conditions of high humidity, birch quickly becomes affected by mold and darkens. Birch benches need special protection and good ventilation.
- Larch . The wood has a pleasant golden-honey color, it is durable and resistant to moisture (under its influence it becomes harder). This property ensures a long service life of bath benches and benches without changing the color and texture of the surface. The only drawback of the material is its cost.
- Oak _ Oak wood is dense (and therefore heavy), hard and durable. It is more profitable to make benches for the dressing room from it: the material has a beautiful texture and is not afraid of water, but due to its high density it heats up noticeably. Oak products cost a lot, but they last a long time.
Bench and bench made of pine Source par-torg.com
Wood of other valuable species (for example, maple, cedar) is used less frequently. If you have the opportunity to choose wood, it is convenient to use the following criteria:
- Coniferous species are not used to make furniture for the steam room, since they release resin when heated. However, they are ideal for rooms with lower temperatures, where the healing pine scent acts as aromatherapy.
- The optimal choice for a paired compartment is deciduous varieties.
- An important quality is high drying speed; to a greater extent it is inherent in lumber from linden, aspen, and oak.
Processing methods
Wooden structures for baths are impregnated with special natural-based products. The use of oil-based varnishes and paints is unacceptable, since when heated they will smell unpleasant and release toxins. The following compounds will help protect benches from mold, fire, and rotting:
- Oils. The products protect wooden products in the steam room from moisture and do not form a film on the surface.
- Oil wax. Made from natural ingredients, used in washing and steam rooms. The composition does not emit toxic substances when heated strongly.
- Bleaches. Contain oxidizing agents that prevent the formation of a dark shade.
- Fire retardants. They are relevant if the sauna bench is installed next to an open fire or is operated at elevated temperatures. Such means prevent accidental fire of the product.
How to make a universal bench for your garden with your own hands
Before processing, the surface of the bench is thoroughly sanded and polished. The layers of wood are removed slowly and not too deeply. After this, the products are applied in 1–2 layers, and the bench is allowed to dry completely. It is recommended to carry out all procedures strictly according to the attached instructions.
Oils
Oil wax
Bleaches
Fire retardants
How to make a bench
If you don’t have a lot of experience and specialized skills, you should start by making a bath bench. Technologically, this is the simplest design, consisting of two types of parts: supports and seats. A novice carpenter must adhere to the following order:
- Draw a diagram of the structure indicating the dimensions of each element.
- Stock up on material. You will need 2 boards (150x20x5 cm), 2 planks (10x2 cm) and 2 beams (5x5 cm). Self-tapping screws will also be needed. All lumber must be sanded.
Diagram of one of the bench options Source parilochka.com
Footrest
You will need 5 planks 600x70x20 mm, 2 planks 400x70x20 mm and a block 50x50 mm for making the legs.
Step 1. Well-polished planks 600 mm long are laid out in a row on a flat surface. Gaps of 10 mm are left between the slats and aligned along the length.
Step 2. Place two transverse planks on top, placing them along the edges of the planks, flush with the ends. The product is secured with screws.
Step 3. The block is cut into pieces 3-4 cm high; these will be the legs for the stand. They are applied to the transverse strips at the corners and secured with screws. Finally, treat the stand with stain or colorless wood primer.
You can make the stand not with a straight surface, but with a rounded one, which is much more comfortable for the feet. How to do this is detailed in the video.
Design possibilities
Despite the fact that bath furniture has mainly a utilitarian purpose, there are some possibilities for its design. To ensure that the benches do not stand out from the general style, you can use the following finishing techniques:
- In a traditional Russian bathhouse, massive benches made of logs would be appropriate, and the bench in the dressing room can have a simple shape, and the back of the bench in the rest room can be decorated with carvings. Wooden barrels and tubs will serve as a harmonious addition to the interior.
- A country-style bathhouse will be decorated with a bench, the seat of which is made of boards with uneven edges. Here it is important to ensure that the bend is comfortable (for the back this does not matter). Benches with backs can be complemented with massive armrests.
- Benches intended for saunas have a strict shape, a carefully polished surface, and they try to choose light wood for manufacturing. Such structures are attached along the walls, and the side surface is covered with boards (in the sauna the steam is dry, so ventilation is not so important).
Table and benches in country style Source nikastroy.ru
Blueprints
Below we present several drawings that we found on the vastness of the worldwide computer network. We do not claim authorship and do not know their authors, therefore we cannot provide links to primary sources (see appeal to copyright holders). We have taken the liberty of adding some explanations to these drawings.
Not the easiest bench. Please note that instead of timber for the legs, boards were used, mounted with both glue and self-tapping screws . The connection of the legs with the spacer is done in a quarter. The long side of the bench is sheathed with boards according to exactly the same principle as the short side (see the blue blocks and their fastening - the same is perpendicular). The seat is also attached to the finished frame with self-tapping screws - you can make it simpler, only from bars, without an end strip on both sides (if you make one, then with a tongue-and-groove connection ).
But this drawing is easier to implement. Please note that the legs are attached to the seat using a dovetail joint , which is additionally secured with pairs of plugs. A massive spacer will not allow the structure to wobble. It is noteworthy that the authors did not do without metal fastening - in the middle of the spacer it is supposed to drill a hole for a long self-tapping screw , which will fasten the spacer to the seat.
Here is a variation of the first drawing. This is no longer just a bench, but a whole sun lounger. First, a seat is prepared from polished boards 50x100 mm, which are fastened with two transverse bars. The legs are attached to the bars, and instead of the usual spacer or jib, the frame is sheathed on top (immediately under the seat) with a 25x150 mm board around the perimeter.
A small portable “banquette” can also be useful in a bathhouse. It is made extremely simply: the frame on which the seat slats are placed is attached to the U-shaped legs. By the way, the design is quite flimsy ; it would be strengthened from below with a spacer either in the form of a frame “O” (rectangle) or “I” (Latin “I” with transverse dashes). Everything is self-tapping.
Quite a simple model on dowels. The drawing shows that the authors considered a pair of dowels sufficient for attaching each side panel to the seat, and the transverse beam is attached with a tongue-and-groove connection, and the tenon, it seems, is machined from the beam itself. And in the sidewalls a hole of the appropriate diameter is drilled for the tenon. Such connections are mounted on glue.
In this design, it is not entirely clear why make a groove in the sidewall, if anyway the crossbar will then be attached to it using self-tapping screws ? (Which will then have to be masked with putty.) The seat is secured to the frame using dowels.
But the option is generally the simplest and even hacky , which can even be made from moisture-resistant plywood . Of course, you can’t put such a bench in a steam room, but it may well fit somewhere in a waiting room. Since the fastening is not shown in the drawing, we dare to suggest fastening the structure with ordinary corners.
A simple and reliable bench with dowels and screws. All the details can be seen in the figure; in total you will need 8 dowels and 12 screws. Please note that the leg extensions (replacing the jibs) are attached to the legs with self-tapping screws through the grooves on top. And this construct is attached to the seat from the reverse side.
Variation on the crossbeam . Judging by the appearance, everything was done using a board of the same thickness - 38 mm, that is, a sanded “magpie”. The fastening is not shown in the drawing, but it can be assumed that it can be fastened with self-tapping screws.
ATTENTION! Do not forget that it is best to install stainless steel fixtures in the bathhouse.
An interesting option, say, for a relaxation room. X-shaped legs look beautiful, and the way to make them is to make notches half the width of the board on both “legs.” Fasteners - glue and self-tapping screws.
Briefly about the main thing
A bench in a bathhouse is one of the most important elements of the interior, creating a comfortable environment. Furniture can be purchased ready-made or made independently, which is especially beneficial if you need a product with non-standard dimensions.
Furniture for different bath rooms differs in size, shape and design (for example, a bench in a Russian steam room does not have a backrest). It is made from wood with certain properties that can withstand regular changes in temperature and humidity. Moderately hard rocks are preferred, which when heated are pleasant to the skin and do not crack over time.
The design of the bench consists of a small number of simple elements; it is easy to make it yourself. The process will become more complicated if you want to decorate the furniture in some style or add armrests to it.
Ratings 0
Location
The first problem that needs to be solved is choosing a location for the bench. It affects the material of the structure. For example, for an old garden with large branchy trees, wood products are suitable; for a small area not heavily planted with trees and shrubs, small openwork structures are recommended.
If you look online for examples of photos of benches in the country, you will see that they are often an integral part of gazebos, verandas and summer areas. If you are planning to do something similar, then make sure that all the details are made in the general style.
Choose a place for the bench so that it offers a pleasant view. It’s unlikely that you’ll want to admire your neighbors’ fence or the walls of your barn.
It is advisable that the bench be located in the shade. It is placed under the crowns of large trees or under canopies. Remember that it acts as a place for rest and relaxation.
You can put benches next to the beds. There are several advantages here. Firstly, the owners of the site will be able to monitor the growth of the crop. Secondly, the bench is suitable for taking a few minutes’ rest from physical labor (digging, watering, harvesting).
Don't forget about decorative decorations. Have you made a simple bench with your own hands? Place flowering shrubs around it. Flower beds are also suitable for decoration. They are placed on a raised platform or a special platform is created from bricks, tiles or logs.