The best situation is when the owner of a country house (for example) starts building a bathhouse, having clarified for himself as many issues related to it as possible. For example, the question of what kind of stove he is going to install will be very important, because it determines whether preparatory work is needed for it during the construction period and to what extent . And if he is going to cover the stove in the bathhouse with bricks, then he needs to make a base of appropriate size and strength. However, the question of how to line an iron stove with bricks may arise long after the construction of the bathhouse is completed. In this case, the matter may not be limited to simply erecting small walls, but will (possibly) even require dismantling the furnace. In this article we will sequentially analyze each option for the development of events in different scenarios.
Oven screen options
It is recommended to line the sauna stove with half a brick; this is the best option.
If the screen is made as thick as a brick, it will take a long time to heat up. In addition, a foundation will have to be built for such masonry. If you resort to a quarter-brick design, the bathhouse room will warm up quickly, but the radiation will be harsh. Regardless of the thickness of the masonry, the distance between the surface of the metal stove and the wall varies in the range of up to 10 cm. The screens can be a solid structure with ventilation windows, and the chimney is often also made of brick. Another solution is possible: to cover only certain elements of the furnace.
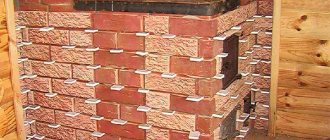
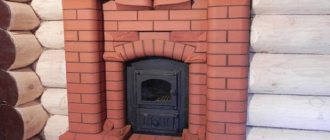
As for decor, there are many different options. The neatly executed masonry itself looks quite beautiful. The color of the red brick contributes to the design of the stove structure. At the owner's request, the bath stove can be faced with porcelain stoneware, decorative brick, natural stone, and tiles. The choice is a matter of taste and the costs planned for these purposes.
Overlay methods
In essence, stone cladding is used to act as a heat shield for a furnace. Due to the fact that such a structure is not susceptible to the main thermal effects, it can be constructed in the form of:
- Continuous lining, which is characterized by rapid heat transfer, which causes a decrease in furnace performance. In this option, cladding is rarely performed, and most often to give the metal stove elements of a decorative nature. At the same time, the quality of heating is in the background.
- A heat shield that will look like a small stone fence. This option is quite comfortable for others and helps to increase heat transfer.
- Convector facings with vents. This structure is the most optimal for bathing needs and is suitable for any metal structure, regardless of the size of the steam room.
What do they line stoves in baths with?
Today, the choice of materials for lining sauna stoves is quite wide. Natural stones include various types of natural stone with different processing options, from a rough, natural surface to a smoothly polished surface. Among the man-made ones are decorative fireplace tiles and heat-resistant solid finishing bricks, which are also made from natural materials.
Table “Natural materials for lining sauna stoves”
| Natural materials | Advantages | Flaws |
| Soapstone (soapstone) | High heat capacity, fire resistance, environmental friendliness | Loses water and acquires a porous structure. Talc forms dust deposits |
| Serpentinite (Serpentine) | Beneficial effect on the body | Low-quality material contains foreign inclusions |
| Jade | Healing properties, tonic effect | Not found |
| Slate stone "Lapland Silver" | Bactericidal, restorative properties | The shale structure of low-quality material quickly collapses |
Table “Artificial materials for lining sauna stoves”
| Man-made materials | Advantages | Flaws |
| Fireplace tiles | Variety of designs, high temperature resistance | Poorly retains heat, has more decorative than practical value |
| Heat resistant brick | High heat capacity, uniform heating, soft heat | Solid brick takes a relatively long time to warm up |
| Porcelain tiles | Heat resistance, strength, wear resistance, resistance to temperature changes | Gives off heat quickly and cools down |
When choosing which brick to line a sauna stove, many prefer heat-resistant brick with a smooth surface. Bricks with decorated surfaces of various textures and colors are also widely used.
Sauna stoves lined with brick are completely safe. The brick lining protects a person from the hot surfaces of a metal furnace. In conditions of limited space, this is one of the main components of the safe operation of a stove in a bathhouse.
Foundation arrangement
Now on the Internet you can find many drawings, photos, and plans for building a foundation for lining a stove in a bathhouse with bricks. What is this building?
The foundation is made in the form of a quadrangular well, the height of which is equal to the height of the furnace. To cover the metal walls, use solid or masonry with windows, through which not only fuel is thrown in, but also ventilation around the heating surface is enhanced.
According to experts, wooden floor beams can withstand up to 650-700 kg of load. Although practically, it is not recommended to give a load of more than 400 kg per 1 m². Therefore, it is advisable to further strengthen the existing frame with an iron structure from an angle (50 mm), or screw piles, provided that approximately 180-200 bricks weighing 3.5 kg each will be used for the screen.
Foundation construction algorithm
- Cut a square of a certain size in the floor (if it is already installed), dig a pit approximately 35-45 cm deep.
- Fill the bottom with coarse crushed stone, lay waterproofing, and install formwork.
- Place pieces of reinforcement in the foundation frame, apply the required amount of mastic waterproofing, and fill the structure with concrete approximately 15-20 cm above the ground.
- Bring the “pillow” to the floor level with ordinary bricks, on which the stove and lining will be placed.
- Wait about 3 weeks until the concrete shrinks, then lay thermal insulation and steel sheet (3-5 mm thick) under the stove.
Preparation of the solution
In order to properly line an iron stove in a bathhouse, it is best to use a classic clay-sand mortar. You can add a small amount (about a sixth) of grade 400 cement to it. This ingredient can only strengthen the entire structure, since the temperature of the future screen will not be high enough.
Since little clay is required, it is best to buy it at a building materials store. For rural residents, such a problem as purchasing clay should not exist.
To prepare the solution, you need to take sifted sand and mix it with clay in equal proportions. Add water gradually until you get a thick mixture that can easily slide off the trowel.
What other materials are used to line a sauna stove?
It turns out that not only bricks can be used to line sauna stoves. Granite or marble slabs are an excellent substitute. They also tolerate temperature changes well, have a large mass and high thermal conductivity. In addition, such finishing will give the bath room an unusually beautiful and unique look. Not everyone can afford such luxury, from a financial point of view. But if you have some leftovers, you can use them to build a stove partition.
True, the installation of such slabs is a little more difficult in comparison with brickwork. To ensure a beautiful appearance of the lined stove, it is necessary that the work be carried out by a specialist. At the very least, the owner needs to at least consult with such a person.
Minerite slabs are also used to construct a heat shield. With their help, the wall is mounted much easier and faster, even in comparison with masonry, and is able to withstand temperatures of 360-400⁰C. But the heat capacity of this material is low, so it can be used as a good partition that will not be able to accumulate heat.
Selection of bricks and binder
The brick screen of the heater has not only a protective, but also a decorative function
Therefore, it is clearly not worth taking everything that comes to hand for masonry - it is better to pay attention to the selection of materials, even if this involves additional costs
A brick, for example, must be solid - the screen must accumulate heat well and quickly. True, it is still better to refuse lining fireclay of the PB or ShA brands: their fireproof properties are of little use, and the appearance is not particularly attractive. Well, since the density of the brick must be moderately high so that the masonry has time to warm up, the best option can be called red clay stove brick of the M-200 brand.
The binder in the screen lining is a mixture of MSh-18 fireclay mortar and TsPS. The mortar is mixed with river sand in equal parts and soaked for 2–3 days. Cement grade 400 acts as a setting accelerator; it is added immediately before laying in an amount of 1/4 of the volume of the dry mixture of mortar and sand. To give the masonry a more refined look, the mortar can be tinted with chalk, red lead, ocher or soot.
The process of lining a metal furnace with bricks
The entire process of lining an iron stove can be divided into several stages.
Stage 1 Foundation
The most important stage of any construction is the installation of the foundation. The durability and strength of the entire structure depends on the quality of its installation. If during the initial construction a foundation was made for the stove, then in order to cover the metal firebox you will not need to construct a new foundation. But if you are unsure of the strength of the old foundation, you need to take the time to build a new foundation, since the weight of the entire structure will increase significantly. If the total weight of the entire structure is less than 700 kg, the foundation need not be erected.
Foundation construction procedure:
- After the issue of where to install the stove has been decided, it is necessary to cut floorboards around the perimeter of the structure, taking into account that the size of the foundation should be 10–15 cm larger on each side.
- Next, you need to dig a pit up to 40 cm deep.
- Then it is necessary to build wooden formwork according to the size of the pit and the planned structure.
- The next step will be to waterproof the foundation.
- Then we pour a cushion of sand and crushed stone of the middle fraction to retain moisture.
- We fill the foundation with cement mortar and be sure to lay a layer of reinforcing mesh on top. We use a building level to check the evenness of the surface.
- Then you need to wait time for the concrete screed to completely harden.
Stage 2 Foundation construction
- After the foundation mortar has completely hardened, you need to lay out the base in one row of brickwork.
- We check again with a building level that the surface is horizontal.
- We lay a layer of roofing material to waterproof the base.
- It is necessary to lay a sheet of iron on top, which should exceed the size of the brickwork by 10 cm around the perimeter.
- Then we install a metal stove.
Stage 3 Preparation of the solution
A mixture of cement and clay will serve as an ideal mortar for lining a metal firebox with bricks. Experienced stove makers advise determining the proportion of these components by appearance. It is believed that it is necessary to take the same amount of cement and clay, while adding up to 30% river sand to the solution.
The main thing when preparing the solution is to achieve a homogeneous mass, without pebbles and lumps, reminiscent in appearance of thick sour cream. To check the quality of the prepared masonry mortar, you need to apply a little of the mixture to the brick. A high-quality mortar should not flow or slide off the brick. If the mixture is not very thick, you can add a small amount of sand.
Stage 4 Brick preparation
To complete this stage of work, it is necessary to soak a selected number of bricks for masonry in water for 12 hours. This action is required to ensure that the brick does not absorb moisture from the mortar during laying. When using old bricks, it must be cleaned of sand and old mortar.
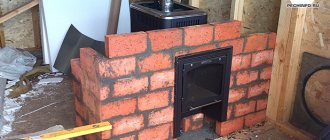
Stage 5 How to line a metal stove
The average height of the structure will occupy 13–15 rows of masonry. Therefore, it is advisable to divide the entire work process into two stages. First you need to lay 7-8 rows and let them dry. The next day, after checking the shrinkage, we lay the remaining section of the structure.
Brick finishing process:
- You need to build a row starting from the corner of the structure, not forgetting to control the horizontal laying with a building level. Checking the correct angle should be carried out using a plumb line or a protractor.
- It is necessary to spread a reinforcing mesh on the second row to increase the strength of the structure.
- On the same row you need to start creating air gaps through which heated air will flow into the room. This operation must be repeated on rows 6 and 8. It is not advisable to make many holes. Two at the top and two at the bottom will be enough.
- The third row is laid out in the same way as the first.
- In the place where you plan to install the door for fuel and the blower, you need to lay a metal corner.
- The last row is laid out randomly.
Stage 6 Pre-firing of the furnace
An important stage is the preparation of the manufactured structure for its further operation. Do not immediately heat the oven to maximum temperature. It is necessary to perform 2-3 preliminary fires, which use a minimum amount of fuel. Such actions will allow the solution to dry thoroughly. Remember that there are a large number of schemes and methods for lining a metal stove with bricks, which you can learn about in detail on many construction Internet portals.
Iron stove shielding effect
The filling screen is often advertised as the most convenient and safe for use in home baths. Most home-grown experts believe that finishing the walls and iron stove with rubble or crushed basalt best ensures heat transfer into the air and at the same time reduces the surface temperature of the heater. In reality, an iron stove, after being lined with crushed basalt or quartzite, produces very strong heat in the immediate vicinity of the stove, while at a distance of up to one and a half meters the air in the steam room does not warm up well enough.
Lining the stove in a bathhouse with brick gives a somewhat different effect:
- A thermal gap of several centimeters is created between the iron wall of the housing and the brick lining, due to which a third of the heat is transferred into the air flow flowing around the stove. Therefore, if you cover the stove in a bathhouse with your hands according to all the rules, the amount of heat produced will not decrease, but the outer brick surface will be much colder than the iron one;
- The smooth flat surface of the brick lining, like the smooth iron wall, has a concentrating effect, so instead of chaotic dispersion, radiant heat easily reaches the most remote corners of the sauna steam room.
Advice! If, after lining an iron stove with bricks, it suddenly turns out that the radiation from the iron stove causes the parts of the room that are too far away to warm up weakly, in this case the outer surface of the brick screen can be lined with heat-resistant tiles.
Any smooth plane, no matter whether it is metal or polished malachite, which is used as cladding and lining for expensive cast iron structures, gives off the bulk of the heat in the form of radiation. Therefore, the iron walls of a not very hot stove quickly dry out the floor and make the air too hot to breathe. Even at a distance of a meter and a half, the radiated heat of a stove that is not equipped with a brick screen severely burns the legs, arms and face
Even at a distance of a meter and a half, the radiated heat from a stove that is not equipped with a brick screen severely burns the legs, arms and face.
Iron furnace lining design
The weight of a steel or cast iron stove rarely exceeds 80-90 kg; another 40 to 100 kg can be provided by filling the heater. Without a brick lining, the stove structure can be freely installed on a heat-resistant, durable pallet without fear of damaging the joists or wooden floor boards.
In order to line an iron stove, you first need to decide on the basic design parameters:
- Dimensions and width of the lining. The shielding wall of the furnace can be laid out in half a brick, or in a quarter of a one and a half block. In the first case, the thickness of the lining is 12 cm, in the second it is only 8.8 cm;
- The size of the gap between the lining wall and the iron body of the furnace. Depending on the slot parameter incorporated into the design, a “cold” or “hot” brick screen is obtained;
- Choose a method to strengthen the base. It is impossible to lay the lining directly on the floor of the steam room, for reasons of the strength of the wooden base and the requirements of fire safety regulations.
In the first two rows of the lining, special air intake windows are made, through which cooler air near the floor, due to thermal suction, enters the gap between the iron wall of the stove and the brick screen, is heated and thrown out through the top layer of the heater under the ceiling of the steam room. Thus, overheating of the lining brick is eliminated, and at the same time good heat transfer of the furnace is ensured.
But you should not abuse the number of windows; it is enough to make one window in the lower tier of the lining and one in the middle part of the masonry to improve the operation of the heater. To improve heat extraction, additional steel pipes - “locomotives” - are installed from the lower rows of stone into the heater.
If you pour boiling water into the pipe, the heater practically “explodes” with a huge amount of hot steam due to the sudden evaporation of water and hot air passing through the gap between the brick lining and the iron wall of the stove.
Important! Practice shows that if you properly line a metal stove in a bathhouse, the heating time of the room remains virtually unchanged.
If a corner location is chosen for the steam room, the iron stove is tightly shielded from the walls. For normal airflow of bricks closed in the corner, a sanitary gap of 100-120 mm is left; windows for steam and air intake are not covered on this side.
How to determine the required thermal power of a sauna stove?
A potbelly stove has a simple design and operating principle; installing a stove with your own hands, although difficult, is a possible process. During installation, follow the manufacturer’s recommendations, as well as fire and safety rules:
- The stove is installed no closer than 1 m from flammable surfaces made or lined with wood. The walls near the stove are insulated. The surface is covered with heat-insulating material, after which it is sheathed with a metal sheet. From the firebox door to the opposite wall or partition, leave a distance of at least 1.25 m.
- The base for the stove must be strong and non-flammable. The optimal solution is floors lined with ceramic tiles. If this is not possible or the potbelly stove is mounted on a wooden floor, make a cement pad.
- The chimney pipe is installed using fire breaks. When passing through the roof and floor slabs, cuttings are made with a mandatory insert of heat-insulating material.
For the stove to operate, a stable draft is required. The installation of the pipe should ensure stable traction characteristics.
Separate requirements stipulate how to position the stove in the bathhouse, depending on the layout of the room.
The location of the stove is important, determining the efficiency of heating the steam room. You will need to make a project with clearly marked ventilation ducts, sun beds, and sinks. The location of the stove should ensure comfortable and uniform heating of the room and reduce the cost of connecting the water supply and chimney.
Installation of a potbelly stove in a wooden bathhouse is carried out according to the following rules:
- The stove is installed opposite the front door.
- Fire distances to adjacent walls are maintained.
- Be sure to protect the ceiling where the pipe is installed. To properly start the chimney, you need to take into account that the horizontal sections should not be more than 3 linear meters, 2 corner couplings. The head of the pipe must rise above the level of the flat roof by at least 0.5 m.
- It is recommended that the storage container be located not far from the washing area, within 2-3 meters.
The metal, while heating the furnace, becomes red-hot. To prevent burns from accidentally touching the steel, the stove is lined. Any refractory material with good heat transfer is suitable for performing the work.
Facing is performed in several ways:
- Fireclay brick, specially designed for cladding and construction of furnaces. Has good accumulating properties. After heating, a brick made of fireclay clay takes a long time to cool down and gives off heat. The disadvantage of the solution is the unsightly appearance of fireclay. The lined stove is subsequently lined with ceramic tiles or stone.
- Red brick - both hollow and solid versions are suitable. The use of facing or facade building materials is not allowed, since when heated, its surface begins to delaminate.
To line a metal stove with bricks, use ready-made or self-made clay mortar. For tiling, special adhesives are used.
Each firebox increases the strength of the masonry. But the first 1-2 furnaces are not carried out at full capacity. Convection wells are provided in the brickwork to improve the circulation of heated and cold air communicating with the furnace.
Using a potbelly stove with a water heating tank has several advantages. The work is based on the heating of convection currents, which allows you to quickly and evenly warm up the steam room. At the same time, during the fire, the water for washing is heated.
The thickness of the furnace metal is at least 4-5 mm. Experience shows that with intensive use of a potbelly stove with a tank for heating water, the stove will last at least 5-7 years, after which it will require partial repairs or replacement.
Another advantage is the following design feature. The wood-burning stove is a Canadian-type potbelly stove, uses the principle of long combustion, and continues to operate on one load for 4-6 hours. One kindling of the stove will last for the whole day.
It is convenient to heat a bathhouse with a potbelly stove, since heat begins to flow into the steam room almost immediately. It will take about an hour to fully warm up the steam room.
A wood-burning stove for a bathhouse has several disadvantages that must be kept in mind during operation. The body gets very hot during combustion, which is especially noticeable in the door area. It is not recommended to overheat the stove; this can lead to deformation and sagging of the fire door.
In general, a potbelly stove is a good option for those who are looking for a universal stove that can create the microclimate of a sauna and Russian bath, after simply switching the levers and dampers.
The capriciousness of the cast iron stove design is associated with low mechanical strength, a tendency to punctures and the development of hidden cracks. A bathhouse, and especially a steam room, is a combination of a hot surface of stones, metal and water. Steel can withstand contrasting temperature changes in the heater relatively painlessly, brick does not like it, and cast iron stoves are catastrophically afraid.
Therefore, during installation you will need to solve several main problems:
- Correctly install the cast iron stove body on the foundation;
- Provide protection from water getting on the hot surfaces of the cast iron stove;
- Install the chimney pipe without loading the cast iron outlet pipe of the stove.
With its own weight of 150-200 kg, the cast iron body puts significant pressure on the wooden floors in the steam room. Therefore, when installing the stove, you will need to either make a concrete or pile foundation, or equalize the load on the logs so that the weight of the structure with the loaded heater is distributed over at least three beams.
Theoretical calculations show that with normal and correct production of the floor with a lag pitch of 60 cm, the strength of the underground beams is quite enough to install a stove even with a brick screen 10 stones high. To equalize the load, when installing under the legs of the housing, you will need to lay a clay-asbestos screed with a thickness of at least 5 cm.
The installation of cast iron in the steam room of the bath will need to be done according to a free scheme. This means that the supports of the cast iron body remain loose and can slide along the steel sheet when heated.
The furnace body is extremely sensitive to improper distribution of vertical load. Most often, a skew in the distribution of weight on the supports occurs when the chimney pipes are installed incorrectly.
Another mistake during installation is an attempt to compensate for the pressure on the body from the weight of the chimney pipes by transferring part of the force to the firebox tunnel. In this installation option, the tunnel body acts as an additional support, which is strictly unacceptable. The firebox in the tunnel must have a certain gap, sometimes air, but better filled with basalt wool. Otherwise, under the weight of the chimney pipes after heating, the firebox will be damaged or simply chipped.
When installing chimney pipes, it is important to prevent the load from the weight of the chimney outlet channels from being transferred to the outlet pipe of the housing. Therefore, when lateral exhaust of combustion products occurs, the chimney pipes are not suspended from the ceiling beam. The structure rests on a rigid support in the area where the outlet from the chamber connects with the rotary elbow of the chimney.
Beam fastening of chimney pipes is carried out in the form of a sliding clamp. In this case, experts recommend using cast iron flue pipes for the lower part of the chimney. Unlike steel pipes, they are much more durable and do not create bending forces and vertical loads, like brick or ceramic chimney options.
The vertical outlet from the cast iron body is unloaded in a similar way, using an additional support and a rotary elbow.
If the installation is carried out taking into account the basic recommendations, the service life of a good quality cast iron stove can easily reach 30-40 years. But often a cast iron structure is mistakenly considered to be very durable and reliable in any, even the most barbaric, manner.
In a steam room, especially if the heating circuit has an open heater design, it is almost impossible to prevent water flows from reaching the hot cast iron body past the stones. As a result, the firebox or outlet pipe may burst as a result of thermal shock. In addition to complete destruction or splitting, cracks may form through which some carbon monoxide begins to penetrate into the steam room.
Manufacturers of cast iron stoves are well aware of the shortcomings of their products, so in most cases they will offer you a bath heater made of cast iron, with a special lining or screens made of chromed steel. More expensive models may have lining made of chalcopyrite or jadeite, which protects the cast iron from water and improves the appearance of the structure.
Therefore, when installing simple structures, even imported ones, it is considered more appropriate to cover them with a thin screen, ¼ brick thick.
A cast-iron stove, covered with brickwork, with a firebox placed in the dressing room, turns out to be much more convenient and practical than a steel or brick one. Installing protection and maintaining thermal clearances allow the body to work in a bathhouse for decades without problems.
Sauna stoves with an external fuel channel can be made of cast iron or steel. The design of this device differs from a conventional furnace for heating a bath precisely in the presence of a remote firebox, which can be removable - in heavy cast iron versions of products, or have an integral structure - in steel models. Thanks to this configuration of the stove, the combustion chamber door is moved into the room adjacent to the steam room or even outside.
Moving the furnace firebox into the dressing room provides many advantages during operation:
- When the stove is fired, two rooms are heated at once - the steam room and the dressing room.
- It becomes possible to add firewood, constantly supporting the combustion process while the steam room is in use.
- Since there will be no need to open and close the firebox door from the steam room side, the stove can be protected with a safety barrier (brick screen), which will eliminate the risk of burn injuries during water procedures.
- Garbage, which is often brought into the room along with firewood, will not get into the steam room.
- It becomes possible to place a niche next to the firebox for drying firewood, which, of course, cannot be done in a steam room.
- It ensures that clean air is maintained in the steam room, since when the door is opened to add firewood, gaseous products of wood combustion can enter the room in small quantities.
- The absence of a firebox door in a steam room will significantly save the free space of the room, and so, as a rule, it will not be too voluminous. Therefore, it becomes possible to install the heating device in a convenient location on the wall dividing the room.
Plating sequence
Diagram of an iron stove lined with bricks.
Before covering the stove with bricks. you need to make sure that the floor can withstand such a load. Without a foundation, stoves weighing up to 800 kg can be installed on a wooden floor. Of course, this is provided that the beams and joists are in good condition. A sheet of steel is placed on the floor, a layer of brick is placed on it, and then a stove is installed. If the floor is wooden, then a sheet of asbestos must also be placed under the metal. The steel sheet lining should protrude 30-40 cm in front of the front wall of the stove to prevent hot coals from falling onto the unprotected floor. Metal sheets with an asbestos cement backing also need to be attached to the walls of the room located next to the stove. It is necessary to take into account that a gap must be left between the stove lining and the wall of the room.
There must be a gap of 30-50 mm between the metal wall of the stove and the masonry. This must be done because metal and brick have different temperature coefficients of linear expansion. When heated, metal expands much more than brick, so if you place a potbelly stove closely, without a gap, the stove may collapse. Free space between the metal wall and the brick is also necessary for air convection.
As a rule, they line the stove with 1/2 brick. It makes no sense to make the wall thicker, since it will take too much time and fuel to warm up thick brickwork. Before you start covering the potbelly stove, you need to make markings, taking into account the gap. Mark the outer contour of the furnace. The first row is made continuous. You should try to make the thickness of the mortar between the bricks no more than 0.5 cm. In the second row, 1-2 holes are made on each side of the stove, depending on the size of the stove. The length of the holes is 1/2 of a brick. All subsequent rows are continuous, like the first row.
The front wall of the stove on the firebox side must be lined with ease of use in mind - the door must open and close freely. Here you can show your imagination and perform figured masonry. At the top of the opening above the door you need to lay a metal corner on which the top rows of bricks are laid. The upper part of the stove can be covered at your discretion, since technically it does not play a significant role, performing mainly a decorative function. The top of the oven can be made in the form of a vault or made flat.
After the lining is completed, the mortar in the joints should dry. This will take 1-2 days. After this, the surface of the masonry must be cleaned from excess mortar using a drill with a brush attachment. Then the masonry is washed with a soapy solution and a brush with stiff bristles.
Nowadays there is a large selection of metal stoves of various designs and price categories on sale. Metal stoves are used for heating private houses, temporary structures, at construction sites for heating workers, security guards and other purposes. The use of metal stoves in home baths and saunas is also increasingly gaining popularity, although in this case a brick stove is considered more traditional, but it cannot always be used for a number of reasons. The main advantages of metal stoves are their compactness (since not every room can install a brick oven), ease of installation, fast heating. The main disadvantage is that after stopping the fire, it cools down quite quickly. This drawback can be eliminated by lining a metal stove with bricks. This will greatly extend the heat transfer without increasing the size of the stove too much. If you made a metal stove yourself, then by lining such a stove with brick, you will give your stove a decorative look.
Having basic construction skills, you will be able to line an iron stove with bricks yourself; for this you will need the following materials and tools.
Calculation of material consumption
To calculate the amount of material required for masonry, you will need to take into account some factors. First of all, these are the physical dimensions of the kiln itself, as well as the method of laying the bricks.
To determine the amount of material required, the volume of the oven is multiplied by the height and divided by the size of the side of the brick. The result obtained is multiplied by 5-10%.
This will help compensate for brick breakage during work and transportation. When calculating, you should also take into account the brick for lining the foundation and chimney. When laying in discharge, naturally, much less material is needed.
Shielding of sauna stoves
Having understood how to line an iron stove in a bathhouse with brick, you can begin to study other methods of shielding metal stoves. The fact is that it is not always possible to line a metal furnace, so you have to find other ways to ensure fire safety.
Typically, protecting the walls of a room from fire when a stove is installed in it is carried out using special screens. In this case, in any case, the stove itself must be placed from the wall at a distance of at least 1 m for a brick wall, and 0.7 m for a lined metal wall. The use of protective screens can reduce this distance to 0.3 meters.
Metal screens are considered the most common. They are usually made of steel or cast iron. Such screens do not burn through and protect wooden walls well from overheating and possible fire. Such screens can be easily mounted directly on the wall or to the floor using metal legs.
Screens can be used to cover the entire oven. But at the same time, purely aesthetic goals will be achieved, but the issue of improving the heat distribution system indoors will not be resolved. To do this you will have to use other methods.
There is also the option of arranging a protective screen made of brick. In this case, the oven is not completely lined, but a protective wall is laid out only on one side. Its main purpose is to protect the wooden wall from fire due to overheating. Sometimes, for this purpose, a protective screen is erected to the ceiling.
The third option for arranging protective screens for furnaces is the use of various non-combustible materials. Usually this:
- basalt wool;
- basalt cardboard;
- asbestos cardboard;
- mineralite
Such materials are installed in place in the following order: ventilation gap, non-flammable insulation, sheet of stainless steel or other metal. To attach such a “sandwich” to the wall, you must use special metal bushings. The fact is that they do not heat up and at the same time allow the formation of a sufficient ventilation gap.
Finishing
The solution may take time to set, so it is better to wait 2-3 days.
Finishing involves cleaning the brick from the mortar and giving it a uniform shade. It is more convenient to remove excess solution using a drill with a brush attachment. The work is dusty, so use a respirator and goggles.
After cleaning, stains of uneven color may remain on the bricks. To even out the shade, use a solution of laundry soap and water and a hard, dense brush. After this, the brick “coat” is washed with water. The result is a beautiful shade without blemishes.
Carry out the first fire after lining slowly, allowing the brick to gradually absorb the heat.
That's probably all. I think that you will feel the comfort of a lined stove right away. The heat will become more balanced, and the heat source will delight you with a pleasant view and pleasure from independent work.
Subscribe to the blog for updates and stay up to date with all articles. Good luck and soft steam to your bathhouse! See you!
Wisdom Quote: The greatest happiness in life is the confidence that you are loved (Hugo Victor Marie).
Carrying out masonry
Covering the oven
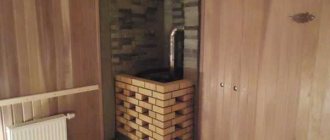
How to properly line a sauna iron stove with bricks? When covering a stove in a steam room, you should assume that the masonry is made in half a brick. To ensure air access, at least two holes the size of half a brick must remain in the second row of laid bricks. When carrying out the work, you should also remember that it is necessary to leave holes both for storing firewood and for accessing the ash pit. The size of the holes must ensure that the corresponding doors open freely.
Having brought the masonry to the upper edge of the door, corners should be installed on the outside and inside. They will provide support for the next brick rows and ensure uniform distribution of the load of the bricks laid on top.
During work, you can periodically leave holes to allow air circulation.
In its upper part, the masonry can remain open. In this case, the last row is laid out according to the level of the water tank. It is possible to construct a vault and cover a metal pipe with bricks only for purely decorative purposes. The work of arranging the masonry is much easier to complete if the masonry on top does not overlap
This is especially important for those who have to do such work for the first time.
Some useful tips
*
To ensure that the brick lining is correct and lasts for many years, you should use the following recommendations:
- the masonry is carried out in the usual way with dressing in half a brick;
- the structure cannot be connected to the bath walls;
- withstand a seam thickness of 5 mm;
- leave a gap of 3-5 cm between the metal walls of the stove and the screen;
- in the lower rows it is imperative to make openings through which cold air can freely enter. Accordingly, in the upper ones there are the same holes for the release of hot heat. Both below and above there should be no more than 2-3 openings, otherwise the wall, as a heat shield, will not fulfill its direct function;
- after laying each row, it is necessary to check it with a level: verticality and horizontality must be maintained everywhere;
- Carefully remove any remaining solution from both the inside and outside.
Important! If there is a convection casing in the stove, it should be removed before covering.
Masonry mortar
The inner surface of the brick lining of the stove can heat up to 350-400 degrees, so a regular cement-sand masonry mortar is only suitable for the screen of a sauna stove, spaced at least 7-8 cm from its body. In other cases, you need to use a clay-cement mortar, because stove clay is fragile and hygroscopic.
To prepare a solution for lining a stove with bricks, you must first sift the dry clay through a sieve with a mesh size of 1.5 mm. Next, the fat content of the clay solution is adjusted:
- A test portion of clay is mixed with mountain or ravine sand of fraction up to 1 mm in a 1:1 ratio by volume.
- Cover with water and knead until the dough becomes thick.
- Roll into a rope (sausage) approx. thick. 2 cm and length approx. 30 cm.
- Allow to dry not in direct light for 1-3 hours at a temperature of 30-15 degrees, respectively.
- Bend the tourniquet into a ring.
- If the rope is deeply cracked in several places or broken, the initial (base) solution is thin, you need to add more clay.
- The tourniquet bent smoothly or only the dried crust cracked - the base solution is greasy, you need to add more sand.
- The tourniquet cracked more or less evenly along its length to no more than 1/4 of the thickness - the fat content of the base solution is optimal.
A test portion of the working solution is prepared by replacing 1/8-1/3 of the clay with cement from M400; Usually they give 1/5 to start with. The dry mixture is gradually mixed with water, kneading until the cream becomes thick. Then check the solution for fluidity: dip a clean trowel into it and remove it, holding the nose down. There are 3 possible cases here:
- The solution drains, leaving stains on the trowel or completely exposing the metal - there is a lot of water;
- The solution drains, leaving a lumpy layer with lumps on the trowel - there is not enough water;
- The solution drains, leaving a thin, even layer of water in moderation.
Now you need to check the solution for stickiness (adhesion); This is important for laying half/quarter bricks. Take a brick, dip it in water, and apply a 3-5 mm layer of solution onto its bed with a trowel.
Immediately take a dry brick and place it on a layer of solution, without pressing down, immediately lift it. The mortar should not stretch behind the dry brick; sticking of several small, match-head-sized lumps is acceptable. If the mortar follows the dry brick, the proportion of clay in the base mortar must be reduced, respectively. increase the proportion of cement.
Next, the dry brick is again placed on the mortar, tapped with the handle of a trowel and left for 5-6 minutes. They try to lift it, the wet brick should rise with it. If it remains lying or gradually comes off while hanging, you need to add more clay in the base solution and, accordingly. less cement.
Brick screen design
A steel or cast iron sauna stove can be lined in several ways:
- Build a continuous partition up to the top edge of the stove, leaving several openings in the lower rows of bricks for air passage.
- Lay out the screen of the same height, but with numerous openings, as shown in the photo.
- Cover the stove completely with bricks on all sides and build a chimney.
The first option is the most common. The solid design allows you to accumulate maximum heat and serves as good protection for people steaming, because the surfaces of the iron walls heat up to a temperature of 700 ° C when the stove in the bathhouse reaches operating mode. This is fraught with burns from infrared radiation.
The lining with openings has more of a decorative function than an accumulating or protective one. Although such a partition saves some amount of heat. It is advisable to build in a small steam room, where there is a danger of accidentally touching the hot surface of the heater.
The latter option is suitable for homemade stoves welded from metal specifically for the bathhouse. Brickwork hides the not always presentable appearance of the product from all sides. The disadvantage of this method is the large amount of bricks and the complexity of execution, which requires skills in the stove business. The technique is described in more detail in the following video:
Kinds
Portals for furnace equipment in a bathhouse are classified depending on various factors. By form:
- arched structures;
- rectangular or square portals.
According to the material:
Brick, natural or artificial stone. Most often, these materials are used for decorative framing. They are suitable for lovers of the classics. They look impressive in baths made of wood. The best option is red brick or clinker. Often the metal elements of stoves are decorated using artificial or natural stone. Tree. Since this material is flammable, it cannot be used as a base for a portal. Wood is suitable only for decorative purposes. At the same time, it must be impregnated with a protective composition against fire. Ceramic tile. A finishing material, the appearance of which is chosen depending on the wishes of the owner. Experienced builders do not recommend using large tiles. Drywall, metal. Sometimes the decorative design of furnace equipment is made from these materials
It is important to choose drywall that is resistant to high temperatures. The frame is made of metal.
Technologies
There are several proven technologies for bricklaying around metal furnace equipment:
- Heat shield. A brick fence that does not exceed the dimensions of the furnace in height. Promotes better heat transfer.
- Continuous cladding. It quickly releases heat to the surrounding space, which increases the cost of heating the premises. This technology is used when it is necessary to make a beautiful decorative design, sacrificing the performance of the furnace equipment.
- Convector masonry, which has vents. Suitable for metal heating units. In this case, the size of the steam room is not important.
Cast iron stove lining
Burning
This is the easiest way when you need to remove insulation to transfer wires. This is also the most effective method if the inside is made of polyvinyl chloride. When a small area needs to be treated, use a lighter or soldering iron. Under thermal influence, the winding softens and it simply comes off the wire. If the winding thickness is small, this option is the most effective.
There is one drawback - it has a smell. Therefore, work must be carried out in a room with access to fresh air. Toxic emissions during the firing process negatively affect the body.
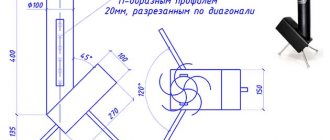
Ventilation windows for convection of air leaving and entering the oven
This is an important option that allows you to stabilize the air flows “washing” the furnace and improve the uniformity of heat transfer. If it is round (stove), then the ideology of ventilation ducts is preserved. Try to arrange them symmetrically, on three sides (conditionally), with two windows at the top and bottom, as it would be approximately in a rectangular masonry.
Classic option: two windows in the second row from the top and the second row from the bottom. So, on each side. The lower openings will provide suction of cold air, and the upper ones will provide the release of heated air. In addition, circulation will have a beneficial effect on the metal of the furnace.