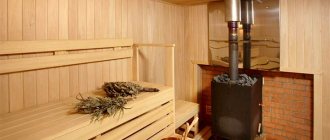
In a classic Russian bath, the main source of heating was a wood stove. The heater was made of refractory bricks and clay and served for many years. In modern baths, a metal stove has become an alternative to a brick stove.
In both design options, brick lining is popular. If for a traditional heater this is done more for the purpose of decoration, then for metal ones it is about longer heat retention, fire safety and only then decoration.
Users also search for:
- Heat-resistant plaster for stoves
- What stones are suitable for a bath
Is it necessary to line a sauna stove?
The answer is ambiguous and directly depends on the material from which the structure is made.
Brick
Lining a brick kiln is not necessary. The main raw material for masonry is refractory brick. The solution is a mixture of fireclay clay, sand and water. If the proportions and laying technique are followed correctly, the product is strong and durable. Such a stove retains heat well - the risk of burns upon contact with the surface is minimal, and has increased fire resistance compared to metal.
Cladding with tiles, stones, and tiles is used to decorate the product.
Metal
When choosing a finished metal stove, it is important to consider a number of requirements:
- Compact so that it does not take up much space in the room.
- The power of the equipment must correspond to the size of the room. If you buy a very powerful oven, it will be difficult to maintain the desired temperature.
- It is always necessary to remember to comply with SNiP and fire safety rules.
SNiP standards warn that a metal stove should be located at a distance of 15 cm or more from wooden floors.
The reasons why brick cladding is recommended are as follows:
- An iron stove heats up quickly, but also cools down quickly.
- Hot iron through radiation negatively affects the health of those present.
- When overheated, the metal loses its working properties. The product will need to be insulated.
- High risk of burns upon contact with hot metal.
- The air in the steam room becomes dry.
Advantages of brickwork around the stove:
- The air acquires the necessary humidity. It becomes pleasant to breathe in the steam room.
- The stove looks nice and neat.
- Warm air is distributed evenly throughout the room.
- The equipment retains and retains heat indoors longer.
- The level of fire safety is increasing. The risk of burns is minimal.
Most modern models of factory-made metal stoves are suitable for later covering them with brick.
A few final words
The labor costs and money spent on lining a sauna stove are more than justified.
A brick casing increases the operational safety of a metal stove; heat is distributed evenly, since the artificial stone first accumulates heat and then releases it. And the heat is retained much longer; you can steam in the sauna comfortably for several hours in a row. The benefits are obvious.
- Date: 01/18/2015 Comments: Rating: 45
It is known that the result of a trip to the bathhouse depends directly on the quality of the installed stove. Most owners prefer to use this attribute in a metal version.
Of course, stoves of this type can be installed in a short time, heat up quickly, have attractive appearance and are notable for their low price. However, they do not retain the heat of the base for long and cool down in a short time. Therefore, there is a need to periodically add firewood.
If you have a metal stove in your bathhouse, then to improve the distribution of heat throughout the steam room and increase safety, it is better to line it with bricks.
To heat the entire room, you need to spend a sufficient amount of time. The walls of the stove become very hot, as a result of which they quickly wear out. To increase the time of using this attribute and create conditions for more productive distribution of heat throughout the steam room, experienced craftsmen often resort to covering its base with a certain material. Let's consider what kind of brick to line a sauna stove and what material will give the best performance.
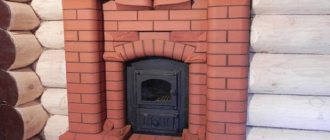
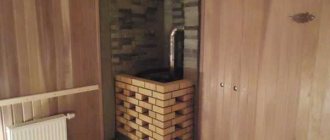
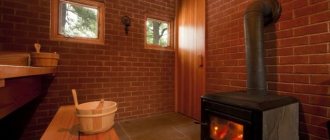
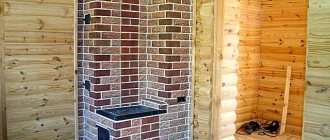
Stove cladding options in photographs
Below are ready-made options for cladding stoves that will fit perfectly into the interior of frame baths, as well as baths made of logs and blocks. The furnace firebox is located both in the steam room and in the dressing room.
Why is it important to follow installation technology?
Stone stoves are able to accumulate thermal energy and gradually release it into the steam room atmosphere. Proper installation of the heater is the key to quick and high-quality heating.
A conventional stove for a Russian bath assumes uniform and gradual heating. The heating process is a lengthy operation. Active vaporization begins only after the fuel burns out. Proper installation can significantly reduce the time it takes to get the steam room into working condition.
In addition, properly laid material will retain heat and release it slowly. Therefore, you will have to put a new portion of firewood into the firebox much less often.
What kind of brick is best to line an iron stove in a bathhouse?
Below we will look at the materials that are recommended for cladding and those that cannot be used for stove masonry.
Ceramic
It would be best to line the stove in the bathhouse with ceramic bricks.
It is very durable, lighter than fireclay. The completed finish looks beautiful and neat. It is allowed to use used bricks.
Chamotte
Fireclay is suitable for lining.
Its advantages:
- It is fireproof, which minimizes the risk of fire.
- Lasting. If you follow the masonry technique, the stove will last for years.
- Excellent heat retention.
But there are also disadvantages:
- The high price is why red ceramic is in great demand.
- The brickwork comes out rough and not very beautiful. Therefore, owners often have to re-finish with porcelain stoneware or tiles.
Fireclay is often used to line the internal parts of the stove, such as the firebox, line the chimney pipe, and lay ceramic on the outside.
Facing
The advantage is the choice of textures and colors. Will fit into any style of bathhouse design.
Minuses:
- retains heat worse;
- less durable compared to ceramic.
Hollow cladding is not used to decorate stoves, only solid cladding.
Silicate (white)
Sand-lime brick is not used for the internal and external masonry of the furnace, because it cannot withstand sudden temperature changes and is not resistant to high humidity.
Under such conditions, it will begin to crack and collapse within a few weeks.
White brick is used for laying small buildings, garages, and outbuildings, which are then lined with other materials.
Bookmark order
You have selected the largest specimens and are going to put them on the bottom. Their shape is arbitrary, often elongated to one side.
When installing, observe the following recommendations:
- Do not place oblong stones flat. It’s better to place them end-to-end, with the narrower side down. The rule is due to the greater speed of thermal energy propagation along the layers, and not across them. Another reason for this choice is the need for free passage of hot air between the stones. End masonry increases the number of gaps between specimens.
- In the bottom row you need to place rocks that will not quickly collapse from high temperatures. For example, it is a pity to put jadeite near the fire, because the stone is expensive, and such an arrangement will quickly crumble. For the bottom row, dunite, peridotite, and porphyrite are more suitable. These breeds are more adapted to high temperatures.
- After placing the first row, proceed to the second. Here, stones should also not be placed tightly. This is necessary for air circulation. Also, the distance between the stones is necessary to prevent destruction of the stove. The material expands when heated, and dense packing increases compression.
Plating methods
Stove makers use three methods:
- Continuous cladding. The method accelerates heat transfer. Rarely used, mainly for decoration.
- Creation of a heat shield. Acts as a partition. Increases the comfort of people sitting next to you in the bathhouse. Improves the level of heat transfer.
- The lining performs the function of a convector with vents. The best option for a bath. Suitable for any metal stoves. The area of the steam room is not important.
The layout of the lining will depend on its purpose and the functions of the stove. For decorative purposes, it is made in full brick. If the equipment acts as a water heater, then it must be laid in half a brick.
To correctly calculate the distance from the brick screen to the stove body, you need to add 2 cm per 1 kW of unit power.
There is no point in placing it close to the body - the lining will not perform the necessary functions.
People are also interested in:
- DIY metal sauna stove
- Brick stove for a bath
Is it possible to mix different breeds?
The purpose of mixing different types of stone is to save money. Filling a large oven with expensive rocks is quite expensive. Therefore, the volume is diluted with minerals of lower cost.
You can stack the stones mixed or in layers. Rocks that heat up faster are laid down. Other varieties are placed on top.
From an aesthetic point of view, beautiful stones are placed along the edge so that they are visible and pleasing to the eye. Nondescript varieties are hidden inside.
Subtleties of lining a stove with bricks depending on the room
The stove is installed directly in the steam room or the firebox is placed in the dressing room. Let's look at the nuances of each option.
In the dressing room
The advantage of a stove with a remote firebox is that it heats two rooms at once: a steam room and a dressing room. Great for small baths. It differs from conventional metal units by the presence of a fuel channel.
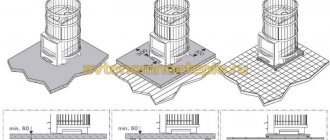
When installing, it is important to remember fire safety rules. The minimum distance from the wall is 0.5 m. Sections of the walls near the stove must be sheathed with thermal insulation; a protective fireproof screen can be installed.
The distance from the firebox door to the wall or door is at least 1.25 cm. It should be located towards the door to the steam room.
For a unit with an external firebox, the installation of the partition is carried out in stages as follows:
- A place for the oven is selected. The foundation is poured (detailed instructions are given in the section below).
- After the foundation has completely hardened, the structure is placed on it. An opening for the firebox is marked on the wall. It should be larger than the camera itself, 25 cm on each side. The exact choice of opening dimensions for a specific stove model is indicated in the product data sheet.
- A hole is cut with a grinder. Pieces of excess material and debris are removed.
- It is recommended to place the stove on the foundation again to check the correctness of the hole made and the evenness of the base.
- The oven is being cleaned. Thermal insulation material is being prepared.
- Basalt cardboard is taken and cut into strips. Attached to the walls of the hole with a stapler. Then the ceramic fabric is fixed in the same way.
- Aluminum foil is attached to the stapler.
- Take two sheets of mineralite. Carefully cut out a hole for the firebox.
- The blanks are placed on the side of the steam room. Mounted to wooden walls using self-tapping screws.
- The brick for facing is soaked in water. The mixture is being prepared for ordering.
- The masonry work begins in the dressing room. The first row needs to be laid in half a brick. The last elements of the row are placed across, so you get beautiful protrusions.
- In the second row there is space left for an ash pan. Air circulation will occur through it.
- The minimum distance from the stove body to the partition is 3 cm.
- When the height of the masonry is reached above the firebox, two steel corners are placed in the brick row. This will prevent contact with metal.
- Now the foil and the remaining cardboard are carefully trimmed. When a gap is formed, it is filled with mineral wool. They compact well.
- At this stage, laying in the steam room begins. The stove is placed on the foundation.
- The chimney pipe is connected.
- Marking is being carried out. A partition is created in the same sequence.
Another advantage of this design is that it reduces the risk of carbon monoxide entering the respiratory tract. Oxygen remains in the steam room, since fuel combustion occurs in another room.
In the steam room
This arrangement is less expensive in terms of materials, but requires increased attention and compliance with fire safety rules. There are open-type designs where stones are laid on top of the stove. By pouring water on them, you can regulate the amount of steam in the room.
A step-by-step guide to installing the unit in a steam room is described in the section below.
Recommended reading:
- How to clean a chimney
- Installing a stove in a bathhouse
Possible installation errors
Violation of stone laying technology is a risk of improper air circulation and, as a result, poor heating of the room. You can also experience accelerated destruction of the material, and sometimes damage to the firebox itself.
Common mistakes of inexperienced bathhouse owners:
- Incorrect quantity selected . Insufficient number of elements will not produce enough steam. If there is more material than recommended, it will not be able to warm up well.
- Incorrectly selected breed and fraction size . Steam formation depends on the properties of the components, and the circulation of gases in the space between the stones depends on the size.
Other materials for oven cladding
In addition to bricks, tiles, stones, and tiles are often used to decorate structures. Let's look at the features of each material in more detail.
Tile
The following types are suitable for cladding:
- Clinker. It is based on clay. Molding occurs under a press, firing at high temperatures. The material's properties are similar to ceramics.
- Terracotta. It is obtained from a mixture of terracotta clay and fireclay powder. The finished tile comes out reddish in color. Has good strength.
- Majolica. To create it for industrial purposes, a complex technological process is used, which is why the price of this material is high. Glazed look of tiles. Its working properties are similar to terracotta.
- Porcelain tiles. Marble chips are added to make durable tiles. The material is reliable and lasts for years. It has a beautiful view.
- Chamotte. A fireproof type of cladding, but its decorative properties are several times inferior to other tiles.
Tiles are considered a separate type of facing tiles for stoves. Their properties and features of use will be discussed below.
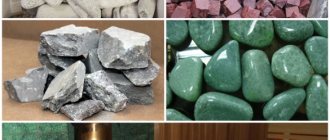
Stone
Natural and artificial stone is used to decorate the stove.
Of the natural rocks that are distinguished by their strength, resistance to temperature changes and heat transfer, serpentinite and soapstone are used.
Artificial stone is an imitation of natural stone. The properties and installation method are similar to tiles. It is lightweight, so for compact stove models it is necessary to pour a foundation, and it is much cheaper than a natural one.
Fixation to the walls occurs using glue with a layer thickness of up to 2 cm.
If, as a result of manual masonry, a pattern or a certain design should be obtained, then it is better to prepare a drawing in advance, make markings and designate each of the elements with numbers.
Tiles
Tiles are three-dimensional clay tiles. On the outside there are protrusions - rumps - with which the elements are connected to each other.
It is recommended to lay tiles immediately after the construction of a stove or fireplace (applies to brick ones). Correctly connected elements form a solid wall, which is very durable.
To decorate a metal stove with tiles, it is better to first make a brick partition and place pieces of wire in the seams between the bricks, with the help of which the elements will be connected to the masonry. The solution becomes an additional binder.
There are tiles on sale in round, square, triangular, and trapezoidal shapes. Wide selection of colors, reliefs.
Parts with multi-colored patterns, drawings of animals and plants are in demand.
Choosing the shape and size of stones
Placing stones in the sauna stove of the correct size and shape is the key to good and light steam. The shape affects the amount of water retained.
The ideal would be to choose a tumbled or chipped form:
Chip stones are large in area, the downside is strength, frequent cracks and breakages.
Tumbled - the most durable. During the process, fragile samples are eliminated. The area of such stones is not inferior to crushed cobblestones, the downside is their high cost.
Advice! Do not buy smooth, polished cobblestones. They retain moisture very poorly.
How to properly mix masonry mortar
For cladding, a solution of sand, cement, and clay is mixed. Clay and cement are taken in equal proportions and 30% of clean river sand is added to them.
The main condition is a uniform consistency, as thick as sour cream, without lumps.
It is better to mix the ingredients dry first, and then gradually add water. To speed up mixing, it is convenient to take a construction mixer.
Before use, let the mixture sit for about 30 minutes. You need to prepare the solution in small portions, otherwise it will thicken quickly.
A good mortar should not run off the brick.
If the thickness is insufficient, you can add a little sand.
Preparing stone for laying
Before laying, the stones must be pre-washed. The process takes several hours.
First, place all the stones in a container of clean water and leave for an hour and a half. No need to add detergents.
- After the allotted time has passed, check the stones: they should become slippery. This is necessary so that dirt can be removed from them more easily and quickly.
- After that, take a brush and carefully work them on all sides. It is advisable to use a brush with thick and stiff bristles, which can completely remove dirt.
- Then rinse the material with clean water and wait until it dries naturally.
- After the first heating, carefully inspect the stones. If they are washed well, the natural color will remain unchanged. If plaque appears on the surface, this will be a signal that the washing procedure must be repeated.
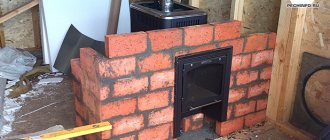
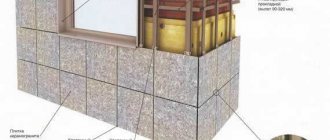
How to brick a metal stove in a bathhouse with your own hands
To make it comfortable to warm up near the sauna stove, it is recommended to cover it with bricks. We will discuss the main stages of work below.
Materials, tools
You need to prepare in advance:
- red ceramic brick M150;
- masonry mortar;
- cement, sand, crushed stone (for pouring the foundation);
- boards for formwork;
- roofing felt;
- reinforcing mesh;
- level, tape measure;
- construction mixer;
- shovel;
- plumb line, trowel.
The masonry mortar is prepared after the foundation has hardened.
Selecting a location
There are two most popular options:
- Install the stove in the corner. The advantage of this approach is the minimum consumption of facing bricks.
- Install it on top of a brick base, which is made above the floor level by about 0.5 m.
When building a bathhouse from scratch, it is important to think through the foundation and protect the wooden floors from fire.
The walls are made of wood, the floor must be separated with basalt slabs. The height of the slabs should be approximately 0.5 m larger than the stove.
Foundation for the stove
When the reliability of the old foundation is in question, it is better not to risk it and build a new one.
An important point: the stove foundation should not be connected to the foundation of the entire building.
If the weight of a stove with brickwork is up to 700 kg, then it is not necessary to pour a separate foundation for it.
The work order is as follows:
- Marking in progress. According to it, the floorboards are cut.
- The size of the foundation should be 15 cm larger than the dimensions of the stove on each side.
- When the boards are removed, a pit is dug up to 40 cm deep.
- The formwork is made from boards around the perimeter of the pit.
- Waterproofing is carried out with roofing felt.
- A cushion of sand and crushed stone (layer up to 15 cm) is poured onto the bottom and compacted.
- Cement mortar is being poured.
- Reinforcing mesh is laid.
- A thin leveling layer is poured.
- The evenness of the filling is checked by level.
The foundation hardening time is up to two weeks. Until it hardens completely, a break is taken in construction work.
Base
A brick pedestal is laid out in one layer on the frozen foundation.
The horizontality of the masonry is controlled by the level. Roofing felt is laid on top.
Then the iron sheet is laid. The dimensions are chosen 10 cm larger on each side than the base itself.
The oven is being exposed. To prevent the surface from becoming smeared during cladding, it is better to wrap it in plastic film during the work.
Preparing bricks for cladding
The first portion of ceramic bricks is cleared of debris. Soak in water for 12 hours. The procedure is necessary to ensure that the material does not take excess moisture from the solution.
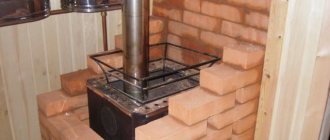
Furnace lining
When working, it is necessary to take into account the following nuances:
- The masonry can be solid or lattice. Solid - this is a large consumption of bricks, but high efficiency; with a lattice - a minimum of material consumption, but the efficiency of the screen is several times lower.
- If the body of the unit is round, in the form of a semicircle, then the masonry should completely follow the shape of the stove. If it is difficult to build it yourself, you need to invite a stove maker to help.
- The recommended distance from the body to the brick partition is 4 cm. There is no need to install jumpers between them. With a smaller distance, the brick will quickly begin to crack; with a much larger distance, the effectiveness of the cladding will be minimal.
- The average number of rows of bricks is 13-15.
- It is better to do the work more than in one day. First lay out 7 rows. Let it sit overnight. Check levelness in the morning. If there is no variation, then report the remaining rows.
- The thickness of the masonry is half a brick.
Main stages of lining:
- The order should start from the corner. Horizontality is checked with a level or a protractor is used.
- The solution is applied with a trowel. Excess must be removed immediately.
- There should be no leaks or excess mortar on the inside of the masonry. Otherwise, air circulation is reduced.
- In the second row, you need to leave two gaps the size of half a brick so that hot air can escape into the room. The same holes are left in the sixth and eighth rows.
- A metal mesh is laid on top of the second row.
- The first three rows are connected to each other with wire.
- The recommended seam thickness is 5 mm.
- In the row where there will be space for the ash pan and furnace door, a corner of metal is placed. To strengthen the row, the row is tied with wire.
- The firebox door is positioned so that when opened it does not come into contact with the walls.
- The last rows are laid out in any form at the discretion of the owners (arch, ladder, evenly).
The masonry can be finished at the level of the slab so that the hot coals are visible or the chimney can be completely covered with brick.
Finishing
After tiling, you need to wait at least three days until the solution dries completely. After this, the remaining solution must be removed.
To give the bricks an even shade, laundry soap is diluted in water. Using a stiff brush, the soap solution is applied to the walls and washed off with water. Next, wipe the surface with a cloth.
If desired, the seams can be made in a different color, but for this you will have to buy special stove paint.
Features of the first firing of the furnace
Upon completion of the facing work, a test firing of the furnace is performed. You need to start heating gradually, filling the chamber with wood only a little at a time. The first heating should take an hour, the second – up to three hours. With each subsequent heating time increases.
After each lighting, the stove is allowed to cool completely.
A properly executed lining of a metal stove will create a cozy atmosphere inside the steam room, retain heat longer, and its decorative design will decorate the interior.
When to start
The period of concrete strength development is 27 days. The thermal insulation layer is installed a week after pouring, when the foundation reaches 60% of the required value. You can load it on the 28th day. During this time, the base will gain the ability to withstand the load, its shrinkage will occur, which will eliminate distortion and cracking. Installation begins with putting the firebox in place.
Selection of lining material
Among the recommended types of bricks, the best are red ceramic or hollow fireclay. The latter is more expensive, but its use is mandatory if the gap between the walls of the firebox and the masonry is 2-4 cm, which will warm up to 400 C.
To use ceramic, you will need a gap of 7-10 cm. Then it will warm up to 200, which is not critical. Ventilation holes will solve the problem of overheating. This will reduce the cost of the design and speed up the heating of the bath when lighting. The ideal option is still fireclay, which was originally developed for elevated temperatures.
Solution manufacturing technology
Ready-made dry mixtures for stoves and fireplaces are sold. On the packaging there are recommendations for preparation (mixing with water). To prepare your own masonry mixture for lining, you need to purchase:
- refractory fireclay clay;
- construction sand (fineness modulus 1-1.2);
- cement without slag content (M500 D0).
Sand and clay are sifted and crushed stone and clay impurities are excluded. The proportion of aggregates is 1:1. The introduction of cement is optional, but desirable. 0.5 kg per 10-liter container of dry fireclay-sand mixture will be enough. After mixing the aggregates, add water. The volume is determined by the consistency of the finished solution (thick, plastic, does not stick to the trowel).
Ceramic tile
Ceramic tiles have the same fire resistance as brick.
At the same time, she simply has an incomparably greater variety of appearances.
Now, instead of tiles, almost all manufacturers have mastered the technology of semi-dry pressing, which allows you to create any designs and textures on the surface of the tiles.
This material received the trade name “Porcelain stoneware”, although it does not contain granite. Finishing a stove in a steam room with tiles has its advantages, and the main one is the variety of design solutions. Unlike brick, tiles can be any color.
The side of the old tile had a size of 10-15 cm. With modern porcelain tiles, the side length can reach 40 cm. The longer the side, the more accurate the coating. It has fewer seams, but the complexity of installation increases significantly. Porcelain tiles should be laid by specialists.
This requires a lot of experience. If the tiles are small, you can do the tiling yourself. There are no particular difficulties here. Laying is carried out using a conventional solution on a sheet of heat insulation. It is better to use a special solution based on a dry construction mixture for the appropriate purpose.
Tiles
Tiles are a classic solution for finishing stoves. They have cheap production technology and very reliable installation. The external surface, finished with tiles, looks like high-quality, thick tiles.
This appearance will be achieved only if you use tiles without a pattern on the front surface. They do not produce a special decorative effect, since they do not differ much from the usual tiles. The only benefit is in the strength of the fastening, which is why other tiles with a three-dimensional pattern on the front side are more popular.
Tiles are laid in the same way as tiles, but require a significant thickness of the finishing layer. If a portal for a sauna stove is made from them, then part of the wall and floor is covered with tiles. They don’t have to be used on the floor if the stove foundation is raised above the floor by one or two brick rows.
If the tiles have holes for wire, then it must be used.
The diameter of the rods is selected according to the instructions. Larger diameter means higher strength, but the complexity of installation increases.
On average, tiles are the same thickness as one brick.
They can just as well be used to create the same protective layer.
Arrangement of the base
After the foundation has completely cooled, the base is laid out. Install waterproofing based on roofing felt. A plywood sheet is laid on top of which a metal stove will be built. Cover the top of the oven with polyethylene so that you don’t have to clean the surface of the solution later.
Next, the solution is prepared. It is better to take a mixture of clay and cement for this. There are no exact proportions; they are guided by consistency: the mixture should resemble thick sour cream and be homogeneous. Stove makers recommend taking equal proportions of clay and cement, adding 30% river sand. Stir the dry mixture in a bucket and then add it to the water. The liquid must be added little by little to prevent lumps from forming.
Stir with a drill or mixer and leave to thicken for 40 minutes. You should not prepare the entire volume of the solution if you have doubts about carrying out all the work in one day. It is better to knead as much as is required for masonry in a separate period of time. If the composition hardens, it will be difficult to work with.
When laying bricks, you don’t have to mix the whole mortar at once