Safe and long-term operation of the building is possible only if the foundation is preserved.
The base of the building will remain solid and strong for many years if it is surrounded by a blind area - a special protective covering of the local area that protects the foundation and soil from moisture, frost and plant roots.
This building element is of particular importance in areas with sloping terrain, since precipitation here has an even greater destructive force.
We will tell you in the article how to make a blind area around a house on a site with a slope.
Why is it important to properly create a structure on uneven terrain?
It happens that in areas with a flat landscape, builders neglect to create a protective layer at the base of the building. This is considered a mistake, but if the house is on a slope or the area nearby is uneven, with differences in ground height, the absence of this building element will become a fatal flaw . A small hillock on a plot with a house on top is a classic of Russian reality.
Rain and melt water, rolling down the slope, wash away the soil and the foundation of the building can “slide” down, lose stability or be partially exposed. To avoid this, a reliable blind area is created in the immediate vicinity of the plinth wall.
When creating a protective coating for a foundation on a slope, it is necessary to strictly follow the construction technology in order for the protective coating to be fully effective.
What does a high-quality design give:
- Sediment is discharged to a safe distance . This is especially important in uneven areas, where there are holes near the foundation and sudden changes in ground height. Water will flow along the slope of the blind area from the base of the building into the storm sewer and drainage system. The building materials of the foundation will remain intact, the landscape will not change under the influence of atmospheric phenomena, the building will last much longer, without cracks or chips at the base.
Thermal insulation .
The protective layer isolates the lower layers of soil from air penetration. Thanks to this, with the onset of frost, the moisture in the soil does not freeze, the earth does not heave and does not create pressure on the foundation of the house. For objects on a slope, this is also relevant because, being on a hill, the building is blown by winds stronger than on a flat area.The blind area helps to retain heat on the ground floor, in the basements, and protects the floors of the house from freezing. The base of houses on stilts creates a single structure with soil protection, which does not allow cold air to pass through and maintains optimal temperature at any time of the year.
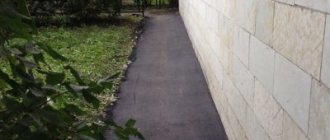
- Aesthetics . The presence of a covering under the walls of the building allows you to visually complete the work and create a complete picture of the finished house. The blind area is also used as a path; stepladders can be placed on it, used to create a resting area, a base for installing stairs at the entrance, and connected to the path on the site.
- Protection from tree and bush roots. Large plants are able to penetrate the foundation with their roots; as they grow, they destroy it and create cracks that extend to the walls. The blind area of houses on a slope is slightly wider and thicker than their counterparts on a flat area; it creates a sufficient barrier for trees and bushes.
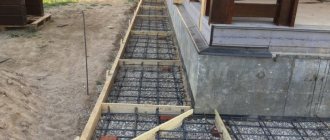
Work begins on the construction of the blind area after the completion of the plinth cladding. In some cases, when the foundation protection has a non-standard, stepped shape, it is permissible to create the first layers before the coating appears on the base of the building.
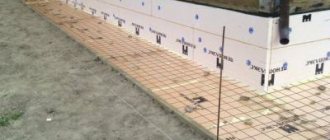
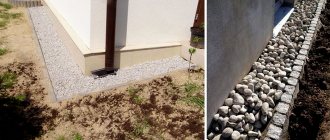
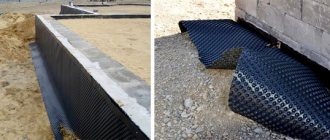
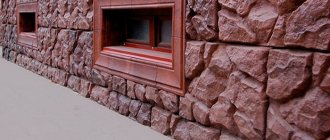
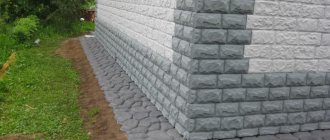
The blind area around the house on a site with a slope in the photo:
How is thermal insulation performed?
It is recommended to insulate the blind area around a house located on heaving soils. By not doing this, you risk the integrity of your home. The insulation will prevent the ground from freezing in the cold winter, thereby preventing it from heaving. Thermal insulation material – extruded polystyrene foam – is well suited for this.
Its main advantage is that it does not absorb moisture. Expanded polystyrene is placed between the base and the covering. The insulation must be removed from point loads. A coating of tiles, concrete, or cobblestones on a sand base is ideal. Gravel, crushed stone, expanded clay, and pebbles are not suitable for such a blind area.
Features and Requirements
The main thing that distinguishes a blind area for a building on a slope is the mandatory installation of storm drainage. The trench for the gutters is laid simultaneously with the ditch for the protective covering.
What other requirements must be met:
- the width of the blind area is at least 1 meter, since uneven areas are subject to accumulation of precipitation, according to SNiP, the protective layer should be 20 cm higher than the level of the roof overhang;
- trench depth 45 cm for covering with insulation (used most often in central Russia);
- The slope of the coating on an uneven area is the maximum possible - 10%, this is especially important for steep hillocks and lowlands, thanks to the slope, moisture is removed from the building quickly and does not linger even during heavy rainfall.
During periods of frost, being on such a blind area can be dangerous; it is necessary to sprinkle it with sand or not use it for passage.
Before starting work, a marking procedure is carried out. A blind area on a slope can be done in two ways:
Solid. Straight design, the ground is pre-leveled as much as possible, soil is added where necessary, holes and irregularities are brought to the same level. Afterwards they dig a trench and begin assembling the “pie”.- Stepped. Marking is carried out on each individual section of unevenness, each square is dug separately, and formwork is installed.
The result is a multi-level structure, possibly with several platforms. There is no need to level the site, each element is combined with the neighboring one, they are hermetically connected, there are drainage systems, storm sewers and a drainage system.
The choice of method depends on the specific landscape. For complex differences in ground level, a stepped system is recommended, but installation here is more complicated. It’s easier to do the full version; you can do it on your own in a short time.
Required layers and their sizes
The blind area of houses located on a slope can be of different types, depending on the nature of the soil, climate and the structure itself. Varieties:
- Concrete. This is a hard coating option, one of the most popular, does not require large financial costs, tolerates frost well, is used in any region, and can be created independently, without the involvement of equipment.
- Asphalt concrete. The principle of creation is similar to concrete, but the coating is expensive and special equipment is required for installation.
- Stone. Looks beautiful in the landscape, stands above average, and is preferable for regions where precipitation is not so frequent. On a slope you need to spend time to create it; installation of the coating is more difficult than on horizontal terrain.
- Bulk made of crushed stone, gravel, granite chips . This is a soft type of blind area, its installation is easier than a hard one. It is necessary to carefully consider the drainage system. It is not recommended to use on slopes in the northern regions and central Russia.
- Paving slabs . A universal option, looks solid, great for buildings on a slope.
- Hidden blind area . After the construction of the layers, the adjacent area is covered with a lawn or perennial plants, shrubs, compositions with stones and crushed stone are installed, which do not look like a path, but merge with the site and landscape.
Layers for a rigid blind area with insulation (concrete, asphalt concrete, paving slabs, stone):
geotextiles are laid on the prepared base, since the blind area on the slope needs enhanced protection from water flows, both external and underground, and there is also a high risk of ground movement;- a layer of crushed stone 10 cm, smooth and compacted;
- geotextiles reused;
- sand cushion, moistened with water and thoroughly compacted 15-20 cm;
- waterproofing material, with an overlap on the base wall;
- insulation layer, thickness 10 cm;
- waterproofing repeatedly (use roofing felt or membrane);
- crushed stone, 10-15 cm, leveled;
- reinforced mesh.
Next, a layer of concrete is laid out, its thickness depends on the type of coating. If this is the completion of the structure - 10-12 cm, if there is a tile or stone on top - 5 cm. For laying stone and tiles, a cement-sand mixture of 5 cm will be required after, asphalt concrete is laid in a layer of 15 cm.
Layers for a soft blind area with insulation (made of crushed stone, hidden covering, paving slabs without concrete):
- wet sand is laid on the prepared bottom of the trench, a layer of 10 cm;
- waterproofing with an overlap on the base wall;
- insulation layer 10 cm;
- waterproofing again;
- sand cushion 10 cm;
- geotextiles.
Further depending on the type of coating. For crushed stone, the next layer is the last, 15-20 cm of material (you can use gravel, granite chips).
For paving slabs:
- crushed stone 10 cm,
- cement-concrete mixture 5 cm,
- finishing coating.
For a hidden blind area:
- crushed stone 10 cm,
- geotextiles,
- lawn.
Soft pavement on slopes is not recommended for central Russia and northern regions. Only on slight slopes, in warm climates where there is little rain and snow rarely falls.
Concrete blind area
After preparing the underlying layers, you can begin pouring concrete.
You must first prepare the formwork for the concrete layer. After this, reinforcement is carried out. You can do it in two ways:
- Fill with crushed stone, on top of which install a steel or fiberglass mesh. In this case, it will be possible to save concrete.
- Install a reinforcing mesh onto the heat-insulating layer. This option is more reliable, but in this case the consumption of concrete is greater.
During reinforcement, wooden boards should be installed at a certain distance from each other, which will act as an expansion joint and prevent cracking of the coating. The bars are pre-treated with a special compound to prevent rotting. The boards are installed on a slope. While the concrete is setting, it is leveled using a rule, forming the required slope.
Technology and stages of construction
It is recommended to begin the construction of a blind area on a site with a slope earlier, before the roof is erected. The width of the canvas is at least 1 meter, this is enough so that water from the roof gets onto the covering and not onto empty soil.
Stages of work for a blind area with insulation and concrete covering:
If possible, level the area so that the soil is free of holes. Thoroughly compact the poured soil and moisten it generously with water so that it settles.- Place markings using pegs and thread. Start from the corners of the building, at a distance of 1 m. There will be a storm drain nearby, for which you need to leave a distance of 15-20 cm.
- Dig a trench 45-50 cm deep, level the bottom, compact the soil.
- Place geotextiles on the bottom, sprinkle it with crushed stone (10 cm), level it, and compact it. For better effect, it is recommended to use a vibrating machine for compaction.
- Re-cover with geotextile. Lay a layer of wet sand at a slope from the plinth wall. It should be 8-10% per 1 meter of blind area width. The layer is 15-20 cm, you can lay it sequentially, first 10 cm, compact it thoroughly, then another 10. Then moisten the sand cushion from the slack and compact it again.
- Lay a layer of waterproofing (for example, roofing felt) on the sand with an overlap of 15-20 cm on the base wall. Treat the joints with bitumen mastic and seal them tightly.
- Lay insulation (for example, polystyrene foam) 5 cm thick in 2 layers. Treat the joints with polyurethane foam.
- Another layer of waterproofing with an overlap on the base. 10 cm of wet sand on top, compact thoroughly, cover with geotextile.
- Crushed stone 10 cm, level, compact.
- Install the formwork (fix it motionless), form a damper joint between the wall and the blind area (it is 2-3 cm, it is needed so as not to damage the structure if the house shrinks). Place a 10*10 reinforced mesh inside.
- Place boards 5 cm high at a distance of every 2 meters across the width of the blind area.
They form expansion joints to prevent the coating from cracking during use and shrinkage. Install beacons on 4 sides of each side of the blind area, which will indicate the required angle of inclination and the maximum level of the concrete mixture. Install intermediate auxiliary beacons every meter. Stretch the thread the width of the blind area and lower it along the intermediate beacons so that the direction of laying the concrete mixture can be clearly seen. - The first layer of concrete is poured taking into account a slope of 10% from the wall, each square separately. After covering the blind area with a protective film and waiting until it dries completely, periodically moisten the surface with water to avoid the appearance of cracks. Thickness 5-7 cm.
- At the corners of the building (and every 2-3 meters of the wall, if it is long), lay gutters for drainage. Pour a homogeneous finishing layer (install the gutters motionlessly into the mixture), step by step, starting from the top point, use intermediate beacons, layer thickness 5-7 cm. Level the surface using a reinforcement rod. Carry out ironing. Cover with a protective film, wait until completely dry, and periodically moisten the concrete with water.
After creating the blind area, a ditch for storm drainage is necessarily formed along its perimeter. The depth depends on the size of the gutters, on average 15*15 cm.
Creating a concrete blind area on a sloped area - in the video:
What is the material?
Pebbles are a material of natural origin that is used in construction, as well as for decorative purposes. These are rounded stones measuring 10-100 mm.
They are formed from sedimentary or igneous rock. After mining, large pieces of rock are transported to a plant where crushing equipment breaks the pebbles into various fractions, which are subsequently sorted.
The main purpose of the pebble blind area is to remove excess moisture from the foundation. Its second function is additional insulation, which will help significantly reduce costs during the heating season.
The blind area is done immediately after finishing the outer surface of the walls, but before finishing the basement. This is done so that it is possible to leave a gap between the wall and the blind area. In no case is it possible to do without a gap; this will lead to premature destruction of the foundation.
The main mistakes during construction
Things to consider:
- It is imperative to create a high-quality drainage system and storm sewer system. Install waterproofing, protection from moisture should be maximum. As well as from possible soil movement (for this, an additional layer of crushed stone is placed at the bottom of the trench in the blind area on a slope).
- It is necessary to observe not only the slope of the soil, but also the slope of the blind area. The degree here is higher than that of a standard horizontal coating - 8-10%.
- The formation of damping and expansion joints is necessary in case of shrinkage of the structure or soil movement.
Before starting work, careful measurements are taken, beacons are installed, a thread is pulled so that defects can be seen immediately, until the building materials are installed.
Proper insulation
The use of polyurethane is irrational from an economic point of view. Polystyrene foam requires labor-intensive work. The best option for thermal insulation is extruded polystyrene foam. This is due to the following advantages:
- light weight, which simplifies installation;
- strength, which increases resistance to various types of impact;
- durability;
- high level of water protection.
Expanded polystyrene is laid in two layers to cover the joints, which in turn are sealed with sealant. First, a layer of sand is poured into the trench and roofing material is laid. A film is laid over the insulation, sand is poured on top and covered with an additional layer of film.
Prices for arranging a path on a slope
The price for installing a blind area on a slope is slightly higher than for creating a conventional horizontal covering. This is due to the cost of materials, more thorough preparation, and the complexity of calculations and installation. Also, the price depends on the type of future coating and the presence of insulation.
Average prices for a blind area on a site on a slope (with high strength, insulated):
- Moscow and Moscow Region – 3700 r/mp;
- St. Petersburg and Leningrad Region – 3000 r/mp;
- Krasnodar – 2700 r/mp;
- Rostov-on-Don – 2500 r/mp;
- Kazan – 3000 r/mp.
A lot of important and useful information about the design of the blind area is presented in this section.