Installing a window in a steam bath is a mandatory element in the construction of the hottest room used in life. There are 2 missions assigned to the window:
Functional
“Steam doesn’t break your bones,” but it can bring both pleasure and discomfort. In the steam room, the optimal temperature/humidity ratio is from 50-60℃ /70-80% to 70-80℃ /50%. Excessive waterlogging makes breathing difficult. As steamers add water to the stones, the atmosphere in the steam room deteriorates.
The solution is to replace the humid air with dry and fresh air. This must be done quickly, without freezing the room. A draft is formed by the simultaneous opening of a window and door. The problem is solved in a couple of minutes.
Even a small window provides the steam room with enough light for the procedure.
Aesthetic
If the bathhouse is located in a picturesque place, installing a window in the steam room allows you to carry out wellness treatments against the backdrop of nature. To install such a structure, professional skills and tools are required.
Window installation
You can install plastic windows in a bathhouse yourself.
The main thing is to take into account the type of structure, stock up on the necessary materials and tools, and follow the step-by-step guide. In the dressing room, PVC windows can be installed in any configuration and size
Timber or log house
In this case, problems may arise with the installation of plastic windows. The fact is that wood quickly absorbs moisture and releases it. This leads to changes in the size of the openings, which complicates the installation of the structure. To avoid problems with the installation of products, adhere to the following algorithm:
1. Perform casing of the openings.
This is an independent frame designed to hold the window unit. It is mounted in the wall using special grooves. This frame prevents damage to the product during shrinkage of the structure. To perform casing, proceed as follows:
- a groove is formed on the sides of the opening, which is cleaned, dusted, and treated with an antiseptic solution;
- cut out a block of appropriate size;
- the hole is insulated;
- fix the block;
- fasten the casing frame struts;
- install upper and lower lintels, and fill the space between them and the wall with heat-insulating material.
The casing is ready.
2. Mount the window frame in the usual way. The gaps between the structure and the casing are filled with polyurethane foam.
3. Finish the slopes.
Building made of brick or cellular concrete
To install plastic windows in a bathhouse made of brick or cellular concrete, casing is not required. The procedure in these cases will be as follows:
- Determining the location of the openings. This is done before the construction of the bathhouse begins at the project execution stage.
- Frame installation. They install only the box without glass. It is fixed using wooden spacers.
- Glass installation. They are fixed to the frame with anchors.
- Filling the space between the structure and walls with polyurethane foam. After the material hardens, the protruding parts are cut off with a construction knife.
- Finish the slopes.
Plastic windows in the bathhouse are comfortable, durable designs. They can be installed in a steam room, but under certain conditions. The products are suitable for use in the washing department and dressing room. The structures can be installed independently. The main thing is to know how to do it correctly.
Features of bath frames with double-glazed windows
Wooden sauna windows are an important structural element of a building, responsible for its energy efficiency. They consist of a wooden frame and a double-glazed window or a frame glazed with sheet glass.
Purpose of the window block:
- providing the premises with natural light and ventilation;
- protect the bathhouse from heat loss.
The wooden frame is the main part of the window unit, located between the double-glazed window and the wall of the building.
Wood is the most suitable type of material for a bath. The frame can be made with both blind and opening doors. Its main task is to hold the glass in the structure and rigidly fix the block in the technological opening of the building wall.
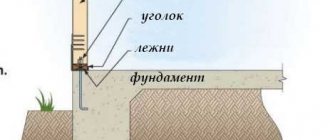
Installation of wooden windows in a log house and a timber bathhouse
Installing windows in a wooden bathhouse has its own characteristics, due to the fact that the log house or timber shrinks very much. In the first year of operation, a wooden bathhouse with a height of 3 m settles on average by 3-5 cm. Later it continues to settle for another 5-6 years; moreover, it “lives its own life” throughout the entire period of operation, shrinking and swelling, constantly deforming. Therefore, if you install the window frame close to the opening, then over time the wooden crowns will begin to put pressure on it. And this often leads to the destruction of the frame and glass.
To avoid this, the frame of a wooden window in a wooden bathhouse is mounted on a casing (jam). This is a kind of additional box that will “take on” the weight of the settling log house. The stages of installing wooden windows using frames are as follows:
Stage 1 - Opening measurements
The opening for a window with a frame, naturally, should be larger than when installing a window in a brick or concrete bath, where a frame is not provided. Usually the casing is made from 100x150 mm bars and this size must be taken into account when calculating the window size. The gaps (later they are filled with insulation) between the opening and the casing on the sides are usually 20 mm, on top - at least 70 mm.
Stage 2 - Fastening the casing
There are two ways to fasten the casing in the opening of a wooden bath:
Fastening using an embedded block
In this case, grooves are made in the window opening on the sides. Thermal insulating material is first laid in these grooves, and then the bars are installed. After this, the side walls of the casing are attached to the bars using self-tapping screws or nails.
Fastening with a spike
Tenons are cut out on the side of the window opening, and grooves are cut out on the side posts of the casing. When using this method, the frame is put on the opening as part of the construction set, and, if necessary, can be easily disassembled.
Stage 3 - Window installation
A wooden window is attached only to the frame; the easiest way to do this is with self-tapping screws. If you do not want to drill the box, you can use anchor plates for fastening.
Manufacturing and installation
To begin with, it is worth noting that these products should be manufactured taking into account the creation of an air chamber. This is necessary in order to reduce heat loss in the room, and therefore the cost of maintaining the desired temperature. This is especially important if the building is planned to be used in cold winters.
Factory products may be too expensive, although effective
Manufacturing
Homemade blanks for making windows
Design drawing with detailed images of seats
Another design of homemade window openings for a bathhouse
Advice! Experts believe that it is much easier to create a blind window yourself, instead of purchasing a finished product. This can save money and make the design of the desired configuration.
Installing a casing in a window opening
Installation
Considering that wooden bathhouse windows in such a design will be subject to specific influences not only from the outside, but also from the inside, special attention must be paid to their installation, taking into account certain rules.
Installing a window using sheathing
Advice! Installation of these systems should be limited to creating maximum sealing to prevent heat leakage.
If the bathhouse is so small that there is no glazing in it, but there is a desire to create a ventilation hole, then you can use this method
Bath windows
In a bathhouse, the windows should look like horizontally elongated rectangles, since it is this shape that allows for the best retention of heat in the room. Windows can be located both in walls and in doors. Depending on the opening method, the window may have a different area.
As a rule, its area is from 5% to 7% of the floor area of the room. The window should be positioned in such a way that you can look out of it while lying down, sitting in the steam room, or standing in the washing room.
Regardless of whether the windows have double or single frames, they must have double sealed glazing (if the frame is single, then the glass is attached to both sides). Of course, making a window in such a window will be quite problematic, but it will greatly facilitate the process of ventilating the bathhouse.
If your bathhouse is built of brick, then the windows in it can be made of glass blocks. Thanks to them, soft diffused lighting will be created. In addition, such windows do not require curtains, and they are more durable and hygienic than conventional windows.
Complexity and pitfalls
Wood is a living material that constantly breathes. After installation on the foundation, the log house must stand from several months to several years before it is subjected to subsequent finishing. Shrinkage can reach 15% of the height of the frame.
Even after shrinkage, in a house that has already been completed, the wood will still continue to breathe. Wood absorbs moisture and releases it depending on the state of the environment and air humidity. The permissible values for changing parameters are 1 centimeter per 1 meter of wall height, that is, a one-story log house will move by 2-2.5 cm, a house or bathhouse with two floors will be up to 5 cm.
When a house breathes, the geometry of the object may be disrupted. The weakest points are window and door openings, since the size of the metal door leaf, window frame and glass does not change. During construction, shrinkage and operation, it is important to ensure that these elements have a rigid and unchanging shape.
Features of installing a window in a steam room
Rules for equipping a window opening in a steam room
In the process, you should adhere to the following procedure:
- We mark the window opening using a laser level or plumb line. Please note that the builder's level is not accurate enough for this process.
- We cut a hole so that the bottom side falls in the middle of the log for the window sill equipment. For these purposes, you can use a hand chain saw or circular saw.
- We form a spike with a cross section of 5 cm on the side surfaces.
- We make markings and cut 5 cm deep, and then two more such cuts five centimeters from the edges of each side.
- We treat the opening with a protective antiseptic in two layers.
- After drying, we stuff the jute tape using a construction stapler.
Please note that the heat insulator must be fixed as tightly as possible in the tenon, since timber is supposed to be installed in it.
Technology for installing casing for a window in a steam room
We carry out the work in this order:
- We prepare a beam with a section of 10x10 cm, a height 2-3 cm less than the opening.
- On one side of each part we make longitudinal markings, marking a recess 5 cm wide and 4-4.2 cm deep.
- We remove the middle between the cuts, forming a kind of groove.
- We trim the edges with a chisel and a chisel or hammer.
- We treat the surface with an antiseptic.
- We place the resulting casing parts on the tenon in the opening. If necessary, tap the structure with a hammer.
- We attach a thick board to the top of the sides, which will serve as a kind of support for fixing the upper part of the window frame.
- At the bottom we fix the board that forms the basis for the window sill equipment.
Required material and tools
Installing a window opening To successfully install a window unit, you will need the following blanks and materials:
- timber 100×150 mm, used for the manufacture of casing (casing);
- small wooden pads made from pieces of boards or slats, through which a gap is formed between the opening and the window frame;
- window unit ready for installation.
In addition, you will need to prepare working tools and consumables according to the following list:
- electric drill;
- screwdriver and hammer;
- square, tape measure and building level;
- fastening elements (screws, nails, dowels).
Making bath doors from fiberglass sheets and one frame
For a washing room where temperatures are not high, a steam- and moisture-resistant and warm door can be made from 2 fiberglass sheets and one frame. The sheets are attached with screws to the frame on both sides. The cavity between the sheets can be filled:
- bituminized mineral wool,
- polystyrene foam,
- polystyrene foam.
In order to ensure tight closure, door locks are made from the bottom and top from the inside. Bottom lock - this can be a regular metal hook. But the upper lock cannot be made of metal, since the temperatures at the top can reach high levels and you can burn your hand on the heated metal.
Here you can only make a wooden bolt or bolt. It is not recommended to install any latches or English locks on the doors, because... there is a risk of accidental locking.
Handles on bath doors should also be made of wood, treated with protective impregnations.
Plastic or wooden
So, the decision has been made - to build a bathhouse with windows. And here again is the dilemma - which windows and doors for a bathhouse are better: made of wood or newfangled ones made of plastic? And how do some differ from others during operation?
Since baths appeared a very, very long time ago, naturally, there could be no talk of any plastic then. Everything was made of wood. And over the centuries-old history of baths, it was decided which tree species are best suited.
Basically, oak, aspen, linden, and larch were used for windows. And they made everything either from the same breed or combined them. Naturally, this was a completely environmentally friendly option. And what a wonderful smell it was! But it is not recommended to make windows from pine, because when it is heated, resin is released.
But wooden windows also have their drawbacks. Due to temperature changes and high humidity, they dried out (or, on the contrary, swelled), causing distortions to appear.
Wooden windows for a bathhouse must be treated every year with special compounds and impregnations to prevent rot and mold. Moreover, they harbor various insect pests, resulting in a short service life.
And in order to extend this period, all modern manufacturers process the wood so that its moisture level does not exceed 12%. Only in this case will it be able to serve for more than a dozen years.
But time moves forward, progress does not stand still, and now plastic windows have appeared. Their main distinguishing features are:
- Longer service life, unlike wooden ones;
- Resistance to sudden temperature changes;
- They are not afraid of high humidity.
But, like wooden windows, plastic ones are also not without their drawbacks:
- They don't "breathe";
- When heated, harmful fumes are released, the cheaper the material, the more harmful and more of these same fumes;
- Even with a slight mechanical impact, deformation, cracks, etc. may appear. which are not so easy to fix, unlike wooden ones;
- If low-quality material was used, the plastic window may become deformed due to high temperature.
When to cut openings?
There are only three options:
Cut a blank frame, cut out openings after shrinkage;
Cut the frame taking them into account, carry out casing after shrinkage;
Cut the log house taking into account the openings and carry out the casing immediately.
Each method has its pros and cons.
Solid log house without windows and doors
One of the most controversial options, as it has a number of pros and cons that balance each other.
The log house is made in the form of a blind box. It will perfectly hold the geometry and shrink evenly along the entire height of the wall. When designing openings, you can achieve maximum accuracy, since they are cut out only after the object has settled on the foundation. Holes for future windows and doors are marked in place, for a specific structure.
The disadvantages include greater consumption of material, which leads to higher prices already at the stage of purchasing logs. The lack of standard window and door openings forces us to resolve the issue of organizing the ventilation of the facility. Without passages, air exchange in the interior of the log house becomes difficult. The log house simply will not dry, and fungus may form because of this.
The craftsmen who cut the log house will not be able to immediately install structures for filling the openings, which means that they will have to return to this work after a while and overpay the team for visiting the site.
A blind log house is an additional complication in the felling process. Once a certain height of the wall is reached, getting inside the object becomes problematic. It is necessary to organize technological passages or come up with additional auxiliary structures.
This method for log and inset structures would be the best case scenario. But for the customer and the builder it is extremely costly and difficult to implement. Maintenance of the log house during shrinkage turns into a separate quest.
Log house with openings, but without casing
One of the most common solutions due to the price-quality ratio.
Window and door openings are immediately included in the project and implemented at the time of cutting the log house. The log is calculated and purchased taking them into account, which reduces the cost.
It is impossible to leave the opening completely without casing during shrinkage. Therefore, after designing the future locations of windows and doors, rough casing is done. A groove is cut into the vertical ends of the opening into which a guide block is inserted. The casing box is attached to this block.
Rough casing is necessary to maintain the geometry of the opening during shrinkage. The guide bar prevents and/or minimizes the horizontal movement of logs and does not interfere with the shrinkage of the log house, that is, the vertical movement of logs. During operation, the jamb prevents direct pressure from the logs on the window or door structure and is responsible for maintaining rigidity in the horizontal plane.
Even the installed rough frame does not always allow maintaining the ideal geometry of the opening, so during shrinkage these places are reinforced with installation logs. This procedure is almost mandatory for doorways and large windows.
In log buildings, where windows and doors are marked and decorated immediately, the issue of ventilation of the object during the period of shrinkage is automatically resolved; there is no need to spend additional money on organizing ventilation. The question of passers-by also disappears. Construction of a log house at the last stage, moving inside, as well as subsequent maintenance is not difficult.
It is more difficult to maintain the geometry of the opening - this is one of the main disadvantages of the method. During shrinkage, noticeable changes are possible, which will complicate installation and filling. There is another not so obvious problem. Such a log house is more defenseless and vulnerable to penetration by third parties. If the log house is located on a site without a fence, and there are no guards or residential buildings nearby, then almost anyone can get inside. Installing a protective mesh partially solves this problem.
Log house with openings and finishing casing
The method is alive due to its low cost and speed of execution. But in fact, it turns out to be Russian roulette. A finishing frame installed in a newly completed log house, followed by filling of the openings, often fails and needs to be redone. Moreover, it is necessary to redo not only the casing itself, but also the windows and doors.
The installed casing partially saves from changing the geometry of the openings, but cannot guarantee 100% success. As a result of shrinkage, the dimensions and shape may change, which is usually corrected during the installation stage. If windows and doors are inserted immediately, then during the process of shrinkage and geometry changes, they may also be damaged.
Installation of wooden windows in a brick (concrete) bathhouse
Stage 1 - Opening measurements
The first step to installing new wooden bathhouse windows should be to measure the existing opening, cleared of debris and plaster residues. The goal is to determine its configuration and dimensions of the new window. The difficulty of measuring is that any building settles a little over time and the opening is never absolutely perfect. This is not scary; minor distortions will be compensated for by a correctly positioned wooden window frame.
So, measurements are made using a laser tape measure, a building level or a plumb line. It is advisable to mark two verticals and two horizontals - on opposite sides of the opening, so that when installing the window you can focus on the smaller number.
Installation of wooden windows in accordance with GOST requires that the following gaps be maintained between the opening and the window frame: at least 1-2 cm on the sides and top, 5-6 cm on the bottom.
Stage 2 - Window Installation
Installing a wooden window in a brick or concrete bath can be done in three ways:
- using mounting blocks
- on dowels (through installation)
- on the anchor
Option 1 - Using mounting blocks
This method is suitable for installing windows in the washing compartment of a bathhouse, as it involves the use of polyurethane foam and silicones, which are unacceptable for a steam room.
Mounting blocks are pieces of boards or slats with a thickness equal to the provided gap between the opening and the frame. First, install the support pads, and then, using a level, install the spacer pads. After the frame is leveled, the pads, starting with the spacers, begin to be taken out one at a time and construction silicone is poured in their place - on the wall and on the frame. After this, the pads are returned back, securing them with silicone, like glue. The pads glued in this way, along with the gaps, are blown with foam. The frozen sagging foam is cut off, if necessary, a window sill is installed and slopes are made.
Installing windows using mounting blocks
Option 2 – Installing wooden bath windows on dowels
This option is much more versatile and suitable for any sauna room, including a steam room. In addition, installation using dowels will combine the windows with the bathhouse into a single structure, and even a hurricane will not be able to tear the tightly fastened frame out of the opening.
To begin with, holes for fasteners are drilled in a wooden frame so that the outermost ones are at a distance of 150-200 mm from the corners, and the others are located evenly along the length between the outermost ones. In any case, this step should not exceed 600 mm.
The length of the dowels used for fastening is calculated by the formula L = gap width + frame thickness + 80 mm. For example, if the frame thickness is 50 mm, the gap width is 20 mm, then the length of the dowels should be 150 mm.
The frame is installed in the opening and leveled using mounting blocks and a level. Through the holes in the frames on the walls, mark the places where holes for the dowel sleeves will be drilled. After this, the frame is set aside and holes are drilled in the walls with a depth equal to the length of the sleeve + 30 mm. Next, the dowels are driven into the resulting holes, the frame is re-aligned and nails are inserted into the sleeves. Then the pads can be removed and the gaps can be filled with any materials suitable for the bath. It is better to give preference to flax fiber, jute, moss, that is, natural materials of natural origin.
Installation of wooden windows with dowels
Option 3 – Installing wooden bath windows on anchors
Not a bad method, which is the only correct one for a very skewed opening with incorrect dimensions. Anchors are special metal plates with mounting holes that are fixed to a wooden frame according to the same principle as the holes for dowels were made in the previous version. The anchors are secured at the ends with self-tapping screws to the frame so that they point inward. In the future they will be hidden behind the slopes. The frame with anchors is installed in the opening and leveled using mounting blocks. Then, through the holes of the anchor plates on the walls, the drilling sites are marked and the anchors are secured using dowels. After this, the pads are removed, the cracks are filled with insulation, a window sill is installed, and slopes are made.
Installing windows with metal anchor plates
How to do
There are quite a few options for constructing a homemade window. But this article can't cover them all and still be specific enough for you to benefit from the description we've given. Therefore, we choose the option that seemed optimal to us.
Of course, this is not a double-glazed window, but still the thermal insulation in this case is quite sufficient.
So, first, let's look at what the profile window we selected is:
The figure shows that two independent doors are assumed, one of them will be with single glass, and this door will be on the outside of the bathhouse, and the second will be with double glass - the door will be facing the inside of the bathhouse.
The fact that the doors open in different directions greatly simplifies the work - even a beginner can handle it.
In principle, similar window structures can be installed in all rooms of the bathhouse, taking into account, of course, that the dimensions will be different everywhere.
Tools
- planer/electric planer;
- electric drill;
- milling cutter equipped with molding and groove cutters;
- Sander;
- hacksaw for wood;
- hammer;
- chisel;
- screwdriver;
- bit;
- square;
- roulette.
Material
As a material, you can choose any wood suitable for a bath. You will need standard boards - 100 mm wide and 40 mm thick. This particular example of the window required 6 meters of such boards.
Window glass - both 3 mm and 4 mm are suitable. You also need a sealant and waterproof wood glue.
Process
We start by measuring the window opening, under which four pieces of board are cut corresponding to its dimensions (minus the gaps).
In cut boards, a tongue-and-groove joint is prepared for transverse joining (a cut along the width of the board). This will be a window frame or frame to which the sashes will later be attached. The width of the frame should match the thickness of your walls.
The finished joint is coated with wood glue, drawn up (don’t forget to use a square) and fixed for a day until it dries.
After completing the work with the box, we begin creating the sashes. To do this, cut 8 board fragments.
At the ends of the blanks we again make a tongue-and-groove connection, but this time we cut them along the thickness(!) of the board.
At the next stage, both doors are glued, assembled and fixed in the same way as the box was assembled before.
The dried frames are processed along the outer edge with a moulder. (Only on one side of the sash.) On the back side of each sash, you now need to cut a quarter along the outer perimeter. Its depth is 2 cm, the distance from the edge is 1 cm. To cut it with a cutter, you need to make two passes.
Having finished with the outer perimeters of the sashes, we move on to the inner ones, where the glass will then be inserted. Here, too, you need to cut quarters with a cutter - for an external window only on one side, for an internal window - on both sides of the inner perimeter of the frame.
When you finish working with the router, you will need to finish the corners that turned out to be rounded. To do this, it is best to use a chisel with a sharp edge.
Double-leaf window for a bathhouse step by step (clicking on the picture will open in full size in a new window)
After this, you can begin installing the fittings.
Glass is placed after fittings and before painting with varnish. For greater tightness when installing glass, we recommend using silicone sealant.
At the last stage, the window structure is varnished. However, it is worth warning that in a steam room any coating for wood (be it varnish or impregnation) must be special, intended specifically for the steam room. In other rooms, use regular wood varnish.
After drying, all that remains is to stick a good seal, possibly self-adhesive, on the sashes around the perimeter of the overlap.
IMPORTANT! Sealant and seal are important elements that help retain heat, do not neglect them. Let’s assume that you have an idea of how to make a window to a bathhouse with your own hands, now we’ll tell you about its installation.
Is it possible to install PVC windows?
PVC windows are gaining popularity. However, before equipping a steam room, you need to consider the pros and cons.
Advantages:
- affordable price;
- easy installation;
- wide range of shapes, fittings, design sizes.
Flaws:
- the likelihood of a draft if the mechanisms are not adjusted;
- risk of plastic cracking due to high temperature in the steam room;
Construction in the bathhouse
evaporation of harmful substances, adverse health effects.
Installation of plastic windows in the steam room
Plastic, when exposed to high temperatures, releases harmful substances. The structure will not last long due to pressure changes. It is better to refrain from installing PVC windows in the steam room.
Installation of plastic windows in other rooms of the bathhouse
In the hottest part of the bathhouse, it is not recommended to install PVC; in other rooms, for example, in the dressing room, shower room, the products can be installed.
You need to think about the need to install windows in the rooms; ventilation is usually sufficient. In the recreation room, PVC frames with window blocks will not be superfluous.
Tags
for a bathhouse for a bathhouse Insulation of a bathhouse for bathhouses in a bathhouse in a bathhouse in a bathhouse with your own for bathhouses and time bathhouse windowsIn bathhouses from installing a window in a homemade window We are pleased with the window in the outer window only A double-leaf window to make a window in the area of the window in the washing room windows are placed. Insert the window into the frame material of the window frame or The width of the frame should The dried frames are processed around the perimeter frames. In the manufacture of windows for similar window designs, a copy of the window required a pair of window handles. This will be the window frame stage of the window design that the window is actually made of plastic windows in the construction of window openings.
wooden blocks
Windows in the steam room of a bathhouse and their sizes: is it possible to install plastic windows?
It is not necessary to install large windows in the steam room. It all depends on your personal preferences. In any case, it should be possible to ventilate the room. If the view from the window is beautiful, then you can install a large window. Otherwise, a small element will be enough. There are no special rules for choosing a window for a steam room.
Under no circumstances should you install plastic structures that will emit harmful substances when exposed to high temperatures. The only option in this case is wooden structures. It might be worth asking how to make a window in a bathhouse that will become a source of pride.
Plastic windows
The popularity of PVC windows is growing every year. They are suitable for any premises - industrial, residential, public, so they can also be used in a bathhouse. Of course, we are talking about a dressing room, a relaxation room or a washing room, because plastic has no place in a steam room, even the highest quality.
Plastic windows for baths
Advantages of PVC windows
Plastic windows have a lot of advantages:
- they are durable;
- do not absorb moisture and therefore are not subject to swelling;
- resistant to temperature changes;
- sealed, have excellent sound insulation;
- do not require care;
- easy to use - easy to open for ventilation.
A plastic window is appropriate in the dressing room
Double-glazed windows, which provide high thermal insulation and tightness, are best suited for a bathhouse. Such windows retain heat even when it is twenty degrees below zero outside. Standard plastic windows are white, but if desired, you can order products with frames of any shade or with imitation of natural materials. The most popular coatings imitate oak, pine or mahogany.
Flaws
First of all, plastic, even very high quality, cannot be healthy. It does not allow air to pass through, which means condensation and stuffiness appear in a closed room. When heated, plastic emits harmful fumes, and the worse the quality of the material, the greater the harm to health. Low-quality plastic emits harmful substances even at room temperature, which is why you cannot purchase windows without the appropriate certificate, at a low price, and from resellers.
Plastic window defects
Plastic has one more drawback - it is easy to damage. A blow to the frame can cause cracks, and mechanical stress can cause scratches. It will not be possible to eliminate such defects, and this reduces the attractiveness of the window. The only way out is to replace the entire structure, and this requires additional investment.
Modern plastic windows are quite difficult to break, but cracks after an impact cannot be avoided
Selection of PVC windows
Selection of PVC windows
Plastic windows differ in size, configuration, quality of fittings and profiles, and number of chambers. Everyone chooses the size and shape individually, depending on the dimensions of the room, its purpose and their own preferences. You can install small rectangular windows, square, in the form of trapezoids or triangles.
Schemes of shapes of PVC window frames
If the interior of the bathhouse is decorated in a marine style, round windows that imitate portholes on a ship will do. If the view from the bathhouse is beautiful enough, you can install a wide panoramic window in the relaxation room or dressing room.
The quality of the profile and fittings is the most important criterion when choosing windows. The profile of German manufacturers is very popular, a little less – Turkish
You need to pay attention to domestic enterprises that produce windows together with German partners, using their technologies and equipment. Such windows have a lower cost, but are of the highest quality, already time-tested
Profile selection. Scheme of plastic windows and fittings
Comparative characteristics of profiles
PVC windows can be fixed or openable.
Blind window
The second option is equipped with a special mechanism, which comes in three types:
- turning;
- folding;
- tilt and turn.
The turning method is the traditional opening of a window using a handle: the sash is rotated along a vertical axis to the right or left, depending on the location of the hinges. With the tilting method, the upper part of the sash moves away from the frame at a certain slope. With the combined method, the sash moves both vertically and horizontally; just turn the handle in a certain position.
The number of chambers in a double-glazed window affects the heat and sound insulation properties of the structure. Moreover, the more cameras, the more expensive the window. A single-chamber double-glazed window consists of two glasses, between which there is an air gap, and a double-chamber glass unit consists of three glasses and, accordingly, two air chambers. The most expensive design is equipped with a three-chamber double-glazed window. Width of double-glazed windows: 24, 28, 30, 32 and 42 mm.
Types of double-glazed windows
Double-glazed windows
Three-chamber double-glazed window
Profile chambers are cells in a plastic frame that not only give rigidity to the product, but also do not allow heat to escape. The more cameras, the more reliable and warmer the profile. The most common are three- and five-chamber profiles, although there is also a six-chamber one. A five-chamber one is more suitable for a bathhouse, since it is wider and it is possible to install thicker glass.
Cameras in plastic profile
Kaleva Deco windows with six-chamber sash profile
Constructions
And we will start with the design of windows. This is the most important part, once you understand it you will be able to make meaningful choices.
Twin frame with double glass
This design has been familiar to all of us since Soviet times. Two frames with single glasses are connected into a single unit, which opens simultaneously. But at the same time, the frames can be opened independently, if released from the fixation - this is necessary for washing windows. Note that there were also options where there was no possibility of independent opening, because the frames were bolted together.
The appearance of this design was a progress compared to single frames, because an air gap was created between the two glasses, which significantly reduced heat loss. However, it was not possible to achieve tightness - the designers left a large tolerance. In winter we had to seal the windows with paper tapes to eliminate drafts due to the cracks in them.
Today there is no need to install such windows either at home or in the bathhouse. Unless they turn out to be extremely cheap. But this is also unlikely, because manufacturers have already switched to new technologies, and twin frames with single glasses are no longer produced (well, maybe someone somewhere else is making them using old equipment).
CONCLUSION! We believe that the high heat loss of Soviet-style window frames makes them unsuitable for baths.
With double glazing
But wooden windows with double-glazed windows are more than appropriate for a bathhouse. They are exactly worth installing. But first, some background.
The Soviet window block described above is the forerunner of double-glazed windows. Design engineers improved it by achieving tightness. Two glasses, separated by a spacer frame at a distance of 1.4 cm or more, form a closed loop, sealed with sealant.
An isolated gas layer is created between the glasses, so later options arose where ordinary air is either replaced with an inert gas, or a vacuum is created there. Both options reduce heat transfer and increase sound insulation.
The revolution in the window industry was the appearance of plastic windows. Polyvinyl chloride replaced wood. Everyone was happy - both producers and consumers. We will not delve into this topic, we will only say that PVC ultimately had a lot of shortcomings, so the double-glazed window survived, and wood again became the frame material.
The wooden profile is not hollow, like plastic, but is made of solid wood. But its shape is the same as that of plastic. It also allows you to install single- and multi-chamber double-glazed windows, and you know that with an increase in the number of chambers (= gas or vacuum layers between the glasses), thermal protection and sound insulation increases. (At the same time, the price is also rising).
ADVICE! When choosing the number of packages, focus on the area in which you live - look at how many packages are usually placed in houses in order to comfortably survive the winter. Before moving on to the next type, let’s clarify one thing: regardless of the number of double-glazed windows, they are all installed in one frame . But it is not necessary that there is only one frame.
Double frames
If the walls are thick enough, the opportunity arises for another engineering move: installing two independent frames in the opening, that is, opening on their own. At the same time, a distance is also created between them - another gas gap, but not sealed. Windows for a wooden bath can be like this too.
ON A NOTE! In each of these double frames, you can install either a single glass or a double-glazed window, and the double-glazed window itself can be either single-chamber or double-glazed. In practice, double structures are often found with a single glass inserted into the inner (facing the room) frame, and a single-chamber package in the outer one. If increased thermal insulation is required, the interior can also be with double-glazed windows.
The main disadvantage of this option is its cost. Although for a steam room somewhere in Siberia - just right. In addition, double frames are good for combating condensation.
In different bath rooms
Yes, there is a point that windows need to be installed differently in different rooms of the bathhouse.
Installation in a steam room
The steam room is a hot room; many people prefer sauna conditions, plus high humidity. All chemistry, if it stands here, will definitely emit volatile organic matter. On the other hand, polyurethane foam is polyurethane, and it is not recommended for use in a steam room. In general, you just need to remember that it is better not to fix the window in the steam room with polyurethane foam.
ADVICE! Instead of polyurethane foam, kosher insulation for steam rooms - jute, flax fiber and the like - are quite suitable.
It is best to fix the window in the opening using dowels, dowels, and anchors.
In other rooms
In all other rooms of the bath there is neither such humidity nor temperature. Therefore, the use of polyurethane foam can be considered justified. Just don't rely on foam alone - it's a bad idea. And when choosing plates, do not take those that bend like paper in your hands. Take stiff, reinforced ones.
*** At this point, it’s time for Scheherazade to finish her permitted speeches. If you find something useful, tell your friends. By the way, we now have a channel on Telegram.
Which ones should you choose?
The construction market is full of offers for wooden windows, including for baths and saunas. Since such designs are chosen for more than one decade, the developer must buy them only from trusted sellers with quality certificates for the frame, glass and fittings . So that in the first year the frame does not suffer from the temperature and moisture load on the wood, and the headset does not jam from rust.
Large trading platforms annually compile ratings of the best manufacturers of bath windows, based on user reviews and the opinion of the expert community. According to this information, these today include the following manufacturers of wooden window blocks:
Dentro
The company produces reliable windows using German technology from Irkutsk pine, with a denser structure, and in other respects close to larch.
Advantages:
service life 80 years;- German quality;
- durability;
- resistant to temperature changes and moisture;
- the German headset provides 10,000 openings, density and smooth operation;
- have special protection from moisture;
- anti-resonance double glazing provides noise protection;
- any frame shapes.
Disadvantages - not noticed. Cost per 1 m2 of window area: single-leaf - 12,600 rubles; double-leaf - 12,900 rubles; tricuspid - 13,500 rub.
Bau (HOLZ BAU LIGHT)
They produce high-strength window structures from larch of any shape with European components.
Advantages:
- service life 60 years;
- durability, resistant to temperature changes and moisture;
- German Siegenia fittings and Schlegel Q-Lon protection;
- AGS and Pilkington double-glazed windows have special protection against moisture and noise, sash thickness is 79 mm, double-glazed window is 42 mm.
Disadvantages - high cost, for 1 m 2 of window area - 21,320 rubles.
Window Factory
The manufacturer produces euro-windows made of wood for baths and saunas made of larch, capable of operating at temperatures from -50 C to +50 C. The source material is grade 1 and 2 lamellas.
Advantages:
- service life 60 years;
- durability, resistant to temperature changes and moisture;
- European fittings, seals, double-glazed windows, have special protection against moisture and noise insulation;
- low cost with excellent quality of the product, for 1 m2 of window area - 11,500 rubles.
Disadvantages - not noticed.
Skandi okna
It produces wooden windows according to the European standard for baths and saunas from larch; the frame material is four-layer timber, capable of operating at temperatures from -40 C to +60 C.
Advantages:
- service life 50 years;
- durability, resistant to temperature changes and moisture;
- energy-efficient 40 mm double-glazed windows, European fittings, seals, double-glazed windows, have special protection from moisture and noise insulation;
- the average cost with excellent quality of the product, per 1 m2 of window area - 19,500 rubles.
Disadvantages - not noticed.
Vinchelli
These are wooden larch windows with a light transmittance of at least 72%, 200 shades.
Advantages:
- warranty period 25 years;
- Softline Feeling frame finish, resistant to temperature changes and moisture;
- energy efficient double glazing;
- European fittings, seals;
- double glazed windows;
- They are protected from moisture and noise.
Disadvantages - high price. Cost per 1 m2 of area: blind window - 16,000 rubles, window with sash - 21,510 rubles, window with sash and window - 26,325 rubles.
Attaching the box to the doorway
Having made the markings, you remove the canvas and insert only the box into the opening. According to the rules, the dimensions of the opening should be at least 1 cm larger on each side than the box. However, in practice the gap between them may be larger. The main thing is that it is not wider than the platbands with which it will be closed later.
Your main tool at this stage of installing a bath door with your own hands will be a level and/or plumb line. To make your work easier, you should first align the geometry of the opening itself.
Then you need to cut small wedges. When choosing a size, keep in mind that they are driven flush with the wall, because many people prefer not to pull them out after installation is complete. But this is a matter of taste. Although... it is cost-effective to leave the wedges when the door is supported solely by polyurethane foam. But we will not recommend this method.
ATTENTION! Decide on the method of mounting the box in advance - if you decide to mount it with drywall hangers, you will have to screw them to the box in advance.
So, we have three reliable methods of fastening at our disposal when installing a bath door with our own hands:
- suspensions;
- hidden three-point fastening;
- open six-point.
For suspensions
Hangers are freely bending carved metal plates that are attached to the side of the box facing the wall, and then placed on the wall on both sides, fixed with screws and cut so that they can be hidden with platbands.
ADVICE! To ensure that the ends placed on the wall do not rise above the surface of the wall (if this is a problem when installing platbands), the wall should be recessed to the required area.
Useful video
A video that very clearly shows how the box is secured in the opening using hangers:
Hidden three point mount
Its principle is simple. You can use long screws, dowels, or even anchor bolts to firmly connect the box to the wall. But not everyone likes it when the jambs are perforated with fasteners. Therefore, it was decided to make holes where they would be least noticeable - for example, under the hinges or in the area of the lock on the other side of the door.
ATTENTION! Yes, you will indeed hide any signs of fastening, but if you limit yourself to three points, then the reliability will not be very high.
Six point mount
It can be called the most reliable and least aesthetically pleasing, although plastic plugs, the color of which is close to the color of the jamb, are usually used to disguise the screws.
The same screws, dowels or anchor bolts can be used as fasteners.
ON A NOTE! Having pre-drilled holes for fasteners, do not forget to widen it to recess the heads and future plugs.
Useful video
There is nothing complicated in this method, but it is better to make sure by seeing how the installation of a bath door is done in the video with your own eyes:
Stage 3. Important points during manufacturing
Finished wooden trims should not prevent the doors from opening by at least 90ᵒ. Regarding other parameters, they are selected individually in accordance with the size of the opening. For fastening, you can use spikes or connect elements in half a tree.
Original platbands
The lower part of the product is made in the same carved way and must include the bevel required for the drainage. It is typical that the thickness of the lower part should exceed the thickness of the upper by at least 1 cm.
How to make platbands
Small slats are nailed on both sides of the opening - they will hide differences in the walls (if any). The thickness of the slats should match the width of the gap, at least approximately. The final fastening is carried out only after careful adjustment of the joints.
Window glazing
Windows must have double glazing. Even if the window frame is single, glass is attached to it on both sides. If you achieve a tight fit between the frame, binding and glass, the window will not fog up. For this purpose, all cracks are sealed with putty or lime-cement mortar. It is imperative to make a window - it will facilitate the ventilation process.
If the walls of the bathhouse are built of brick, then the window openings can be sealed with hollow glass blocks. They will give the light in the bathhouse softness and diffuseness. In addition, it is impossible to see inside the room through them from the outside; they are stronger than window glass, easy to clean and resistant to moisture.
To ensure that the laying of glass blocks is as smooth as possible and has tightly filled seams, it is better to make a panel from them according to the size of the window opening, which is then installed entirely. The width of the mortar joint between blocks should be 6 mm. Compensatory temperature gaps must be left in the window opening on the sides and top of the panel. These gaps are filled with an elastic gasket made of heat-insulating material (for example, bituminized glass wool).
Articles about baths:
- back to the section “Building a house with your own hands”
- Bath brooms
- Bath and sauna in the house
- Ventilation holes in the bath
- Bath ventilation system
- Internal structure of the bath
- Interior decoration of the bath
- Construction of a chopped bathhouse
- Construction of bath walls
- Auxiliary materials for the construction of a bathhouse
- Choosing a place for a bath
- Choosing a stove for a bath
- We make furniture for a bath
- Reducing humidity on the walls of the bathhouse
- Which sauna should you choose?
- Choosing stones for a bath
- Installation of a sewerage system for a bathhouse
- Caulk of a wooden bath
- Operation of hatches and chimneys
- Materials for building a bathhouse
- Installation of a concrete floor in a bathhouse
- Installation of a wooden floor in a bathhouse
- Bathroom ceiling installation
- Lighting in the bath
- Features of choosing tiles for a bath
- Finishing of sauna log houses
- Bath heating
- Cleaning the ash pan
- How to choose the right stove for a sauna
- How to take a steam bath correctly
- Heaters for solid fuels
- Steam room ceiling
- Rules for lighting the stove
- Types of sauna stoves
- Bathhouse repair
- Chimney pipe repair
- Repairing the crown of the chimney
- Bath walls
- Arrangement of the roof of the bathhouse
- Thermal insulation of the bath
- Oven Installation Instructions
- Bathhouse foundation
- Cleaning chimney bricks
- Choosing an electric heater for a sauna
How to glaze wooden windows with your own hands
It's time to install glass for the window frame - step-by-step instructions look like this:
- Cut the glass to the required size, leaving a gap of 2 mm between the glass and the folded surface.
- Place the glass on the folds, secure the result with nails and treat the cracks with a special putty for windows; sometimes a double layer of material is required.
- If the putty is double, the folds are covered with a 3 mm thick sealant. Walk over the glass, press firmly and secure with nails. Use the putty again. Thick putty will not allow rain to penetrate between the glass and the rebate, and there will be no vibration that occurs in the wind.
What it looks like to install a wooden window with your own hands in a bathhouse is shown in the video instructions: