The quality of clapboard finishing largely depends on the method of fastening. Fasteners must securely hold the material, and at the same time be completely invisible. To fix the panels to the sheathing, self-tapping screws, clamps, and screws are used, but the most practical option is nails. But the nails for the lining are not ordinary, but finishing nails, differing in the shape of the head and some characteristics.
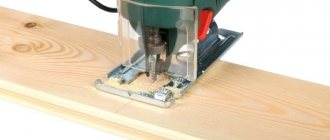
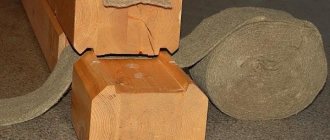
Nails for lining
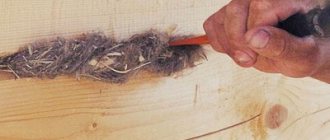
Scheme of fixing the lining
Mounting methods
We will look at how to properly fasten the lining to a wooden frame in different ways. Each of them has its pros and cons, so please read all the information below carefully.
Option 1 - using finishing nails
This fastener for lining is traditional and has been used for several decades; for this work we will need special nails with a reduced head. The length should be such that 2/3 of the nail fits into the bar; most often, products with a length of 30 to 40 mm are used. The price of 100 grams is 40-50 rubles, so this is also the cheapest method of fastening.
Finishing nails - the most budget-friendly solution
Let's figure out how the lining is attached in this case:
The first installation option is fastening into a groove, that is, into a recess on one of the sides; in this case, the nail is driven in at an angle of 45 degrees and covered with the next element. Below is a diagram of this technology;
This is what the groove mount looks like
You can also fix elements through a tenon; below we show how to properly fasten the lining with nails in this case. Here the nail is also covered by the next element, ensuring the perfect appearance of the finish;
This method is even simpler, but it is suitable for materials with a wide tenon
- Having chosen the option that you will use, you can get to work. Before attaching the lining to the wall, it is necessary to cut the elements to the required length so that there are gaps of several mm to compensate for deformations of the material due to temperature changes;
- The first element in the corner on one side is fixed through the top; anyway, the corner is covered with a plinth or other decorative element. On the other side, a nail is driven into the tenon or groove; this is done very carefully so as not to split the material or damage it. This way you can finish walls and ceilings quickly and reliably.
Remember that when fastening into a groove, the nails are located at an angle
Option 2 – use of clamps
It is impossible to discuss the question of how to fasten a wooden paneling without mentioning the clamps, which are special staples that are placed on the tenon of the elements and secured with nails. For lining, option No. 4 is used, and for block house and imitation timber - No. 5. The products are sold in packs of 100 pieces and cost about 50 rubles per pack; carnations are included.
The photo clearly shows how fastening is done using clamps
Instructions for doing the work yourself include the following steps:
- First, the number of fasteners is calculated, they are located on each edge of the frame, you need to multiply the number of structure edges by the number of lining panels;
- The location of the clamps when the elements are arranged vertically does not matter, but if the finishing is located horizontally, then they should be at the bottom;
It is important to position the fasteners correctly
The working process is very simple: the lining is put in place, fits well with the previous element, after which clamps are placed and secured with small nails. To make it easier to hammer them in, use a spacer.
Clamps can also be screwed on with self-tapping screws
Option 3 - use self-tapping screws
If you are thinking about how to fix the lining to the wall as securely as possible, then self-tapping screws are best suited
Their use is associated with some difficulties, but the fixation strength will be maximum, and if necessary, the finish can be disassembled without damaging it, which is also important
For work, fasteners of small thickness are selected
The workflow in this case looks like this:
- In the groove connection of the lining, holes are drilled at an angle of 45 degrees with a 3 mm thick drill;
- The element is attached to the sheathing, tightly joined, after which a self-tapping screw is screwed into it. The work should be done very carefully: the cap should sink into the material so as not to interfere with the joining, but at the same time you should not press too hard so that the wood does not crack.
In this case, accuracy is important
The question is often asked about what to attach PVC lining to; in this case, all of the above options are suitable. In addition, you can use a simpler option - a construction stapler, it is perfect for plastic.
Before attaching PVC lining, stock up on a stapler and staples
Nailing tool
To recess the nail head without damaging the finishing material, you need to choose the right working tool. Most craftsmen use a hammer - a cone-shaped metal rod.
Nail punchers
Its working end has a small diameter, so when driving it only touches the nail head and does not catch the wood. There are two types of finishers:
- with a grooved recess at the end - this rod is designed for nails with a recess on the head;
- with a recess under the head of the hardware - the rod securely grips the nail and does not slip off when struck.
The top edge of the tool is wide and flat, specially designed for hammering. The hammer is very simple to use: the end of the rod is placed on the protruding head perpendicular to the surface, the tool is held in this position with one hand, and the wide part is hit from above with a hammer with the other. As a rule, 1-2 blows are enough to sink the cap a couple of millimeters into the wood.
Homemade nail puncher
Advice. If there is no punch, it can be replaced with a large construction nail or center punch. To do this, the lower end of the product is ground down a little or cut with a grinder so that it does not slide off the hardware head. A large bolt will also work: it needs to be turned on a lathe so that the diameter of the rod matches the diameter of the nail head or is slightly smaller.
If the amount of work is large, it is very convenient to use another tool - a pneumatic nail gun. It is also called nailer and nail gun.
Pneumatic nail gun
There are special finishing nailers of various calibers designed for a certain size of nails.
Nails for air guns
This tool is quite expensive, but it has great advantages:
- reduces installation time;
- weighs little and fits comfortably in the hand;
- the nail goes in up to the head in one blow;
- fasteners do not bend, and there are practically no misfires;
- no need to exert much physical effort.
Disadvantages include the need for a compressor and connection to an energy source.
Air nailer - application
Fastening the panel with a nail gun
Installation of eurolining on walls or ceilings
Leading product manufacturers usually indicate how to fasten eurolining in the instructions included with the packaging. The sequence of work is as follows:
- A preliminary division of the sheathed surface into rectangular zones is carried out. This allows the boards to be optimally laid during the sheathing process.
- The required number of fastening brackets - clasps - is prepared. It is believed that 20 pieces are required per square meter of eurolining, but it makes sense to purchase clamps with a margin of 5-10%.
- Eurolining is installed from the bottom corner of the room, where there are no door or window openings. At the same time, horizontal placement of boards visually lengthens the room, and vertical placement makes it taller.
- The direction of laying the material is determined by the method of finishing the ceiling and floor: when subsequently installing skirting boards, it makes sense to move from top to bottom, and in the case of finishing with eurolining and the ceiling - from bottom to top.
When purchasing clamps, pay special attention to their quality: the clamps should not have traces of mechanical surface damage, dimensional instability, uneven thickness, etc.
It is important that when installing eurolining, clamps with a thickness of no more than 1 mm are used. The fact is that the panels of this material are thicker, and the reduction in the area of the room after covering will be more significant
It is unacceptable to use clamps that do not have a protective anti-corrosion coating.
The fact is that the panels of this material are thicker, and the reduction in the area of the room after covering will be more significant. It is unacceptable to use clamps that do not have a protective anti-corrosion coating.
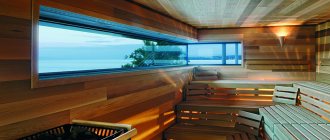
Which lining to choose for a bathhouse
Board type
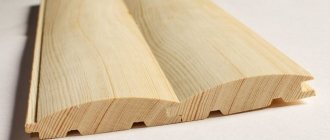
When finishing a pair of wooden linings, it is better to give preference to Euro linings.
- Firstly, because it has a large tongue-and-groove system (the length of the tongue reaches 8 mm).
- Secondly, because it is guaranteed to have compensation slots on the back of the lamellas, which promotes ventilation of the coating and prevents possible cracking of the lamellas.
- Thirdly, because the eurolining is already pre-treated with wood preservatives that can be used in a sauna.
Eurolining for a bath
Type of lining
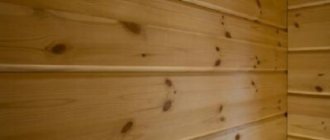
For a steam room, only the first or highest (elite) grade of wood is suitable, in which there are no knots, wormholes, etc. Please note that even living knots can gradually fall out under the influence of temperature changes.
Wood type
To understand which sauna lining is best, you need to know the characteristics of each breed. We will not review all the breeds available on the market, but will focus on those that are recommended by professionals.
The lining of the bathhouse can be made of deciduous and coniferous wood. The choice depends on the purpose of the bath room: steam room, dressing room, washing room, shower room, as well as on the properties of the wood itself.
The most popular material for a steam room in a bathhouse or sauna is hardwood lining. Their common advantage is that the wood does not heat up in the sauna and cannot cause burns when touched, and is also resistant to moisture.
Tags: bathhouse, lining, fasten, good
« Previous entry
Horizontal mount
Wooden panels are rarely mounted in this position, but if the need for this configuration does arise, then it is advisable to initially prepare a special false beam. This material is better suited for horizontal fixation than standard eurolining. False timber differs from traditional models in size - thickness 2.2 cm, width on average 14 cm, and length varies from 2.1 to 6 m.
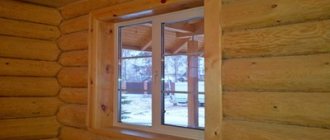
Now you can consider how to fasten the lining horizontally to ensure the same reliability and attractive appearance. First of all, a sheathing is provided on which the sheathing is attached. It can be fixed without the use of hardware - as a rule, your own fastening system is sufficient. But there are also differences in panels designed for horizontal fastening. There are chamfers on the edges of such timber. The installation features are due to the fact that the material should imitate the surface of a classic beam, so during joining there is no intermediate groove.
External characteristics
Depending on the purpose, the outer surface and shape of the wooden material can be made in various variations.
We suggest you read: How to paint a stove in a bathhouse
For the external cladding of a bathhouse, it is rational to choose wood in the form of a beam or a wide board. This form allows for perfect joining of individual elements, which prevents moisture from entering the cracks. External cladding of the bathhouse with wood that imitates a log will somewhat complicate the process of caring for the surface of the material.
Particular attention should be paid to how to attach the lining to the wall in the bathhouse. It is more rational to nail the lining to the frame using nails, since the use of special fasteners will incur additional costs.
Features of lining installation
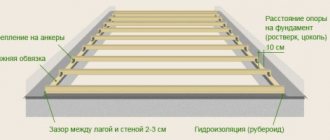
In most cases, lining panels are not attached directly to the wall, but to the sheathing, which eliminates the occurrence of deformations and premature destruction of the finish.
The distance between the bars should not exceed 60 cm
Between the beams of the sheathing, as a rule, heat and waterproofing material is laid.
The thickness of the bars depends on the thickness of the insulation
Several lamella layouts are used:
- Vertical. Laying begins from any corner (preferably in the direction from the light, so that the joints of the panels are not obscured), the first board is installed with the groove outward. This scheme is used when finishing rooms with high humidity (baths, saunas, opening verandas), since moisture is less likely to accumulate in vertical seams.
- Horizontal from bottom to top. The panels are positioned so that the groove points up and the tenon points down.
- Horizontal from top to bottom. The groove looks down and the tenon looks up.
- Diagonal and combined. Complex designs can give a unique look to a room, but require professional execution.
Fastening elements must not only securely fix the parts, but also be as inconspicuous as possible so as not to spoil the appearance of the decorative coating. In practice, several types of fixing the lining to the sheathing are used.
Classification
Creating an ideal wall surface in a bathhouse is possible through the use of high-quality materials. To know how to secure the lining in a bathhouse, it is necessary to distinguish by what characteristics it is divided.
Grade “Extra” and “A” are distinguished by high quality, an ideal smooth surface without various types of external damage, the same texture and color. Grades “B” and “C” do not meet the technical requirements, because there are visible external errors in the material on the surface (knots, deformations, various damages).
Types and features of material
The origin of the name of the material has its own history. Previously, freight cars were finished with such groove boards. For other purposes, the material was practically not used, not to mention the cladding of living quarters.
However, over time, they learned to use it for finishing baths and saunas, which provided comfortable operating conditions for the room, since the surfaces did not heat up to such high temperatures as the air (how to line a bathhouse with clapboard?).
Lastly, the panels migrated to the interior of residential apartments, in particular for finishing the kitchen, hallway and corridor, but the name “lining” is used to this day.
Depending on the type of wood, the panels are:
- conifers, usually pine;
- fake;
- alder;
- from larch.
Different types of wood have different properties, so they may not be suitable for exterior decoration or use in rooms with high humidity, such as larch or cedar.
By standard size there are:
- narrow canvases with a thickness of 13 cm;
- wide stripes up to 24 cm;
- thin from 1.5-1.9 cm;
- increased thickness up to 2-2.5 cm with a shortened tongue.
Important To choose the right material, you should take into account not only the type of wood, but also its size. This way you can save a lot if you correctly calculate the dimensions of the room.
here
Categories:
- block house with a rounded surface contour;
- American - with several grooves on the inside of the profile;
- regular with different widths;
- Eurolining with standardized dimensions.
Type of veneer covering:
- MDF;
- PVC;
- tree.
Lining made of wood or MDF belongs to the category of wooden or natural panels, and PVC belongs to plastic or artificial coverings.
The following classes of panels are distinguished:
- A;
- IN;
- Extra.
The differences between the material of each category are the presence of knots, their number and type.
- Category A lining has a small percentage of these formations that do not fall out over time.
- Group B includes materials of the lowest quality, most often for rough or facade finishing.
- The highest quality panels are in the Extra category, where not only are there no knots, but the surface of the material is perfectly smooth. Such products are intended for cladding inside saunas and baths.
Based on surface type, materials are divided into:
- processed;
- unprocessed.
Advice If the board already has some kind of protective coating, then it is very difficult to repaint it without damaging the existing appearance. If you need to implement your own design using various means and compositions, then it is better to purchase untreated panels.
We invite you to watch a video about the types of lining:
Lining the inside of the bathhouse with clapboard
The first step is to prepare the walls. The surface of the wall is leveled and cleaned of dirt, mold and other imperfections. Then they are primed with antiseptic agents.
At the second stage, hydro- and thermal insulation is carried out. For waterproofing, multilayer polyethylene film is used. Various types of insulation materials are used to insulate walls.
At the last stage, a special frame is constructed onto which the lining will subsequently be attached.
What kind of materials are used for the construction of baths - bricks, foam concrete and gas silicate blocks and much more. But only a tree can create that unique microclimate that will have a beneficial effect on the well-being of visitors to the steam room. And wooden panels are much more pleasing and familiar to the eye.
Eurolining in the steam room
Lining is...
Lining as a product was first used for covering the walls of carriages. This is where its name comes from. The difference from simple edged boards was the presence of grooves along the long sides of the lining, which ensured maximum contact between adjacent panels. The sheathed wall was without cracks or gaps, smooth and quite beautiful in appearance.
Wooden lining
Lining calm
Along with technical progress, the production of different types of lining has also stepped forward. Today it is produced in several versions of the profiles themselves, which differ in size, quality, and material of manufacture.
Note! You can find plastic lining on sale, but such panels are only suitable for lining the dressing room and dressing room in a bathhouse. Plastic does not withstand high temperatures and is not suitable for finishing a steam room. Wooden products, in turn, regulate the level of humidity by absorbing or evaporating water from their surfaces, and some types of wood additionally release aromatic components that have a beneficial effect on the human respiratory system.
Lining
Wood paneling can be regular or euro. The first has roughness and lint on its surface, the second is perfectly smooth. On the back side of the eurolining there are ventilation channels that prevent the accumulation of moisture (condensation) and relieve stress in the material. According to GOST 8242-88, the moisture content of wooden products is allowed within 12±3%, however, ordinary lining can be made from wood with a moisture content of up to 25%, which can lead to deformation during the operation of the bathhouse. Based on this, we will choose a suitable wooden eurolining for lining the bathhouse.
After building a bathhouse, questions arise about how to properly line it with clapboards and avoid frequent mistakes. We present useful tips on choosing material and how to install it.
We invite you to familiarize yourself with: Do-it-yourself cinder block machine: photos, videos, instructions
- Installation methods
- Sheathing instructions
- Preparatory work
- Frame
- Insulation
- Fastening the lining
Finishing with clapboard is a solution close to ideal. With the exception of a couple of negative points. The steam, which is now created using expensive steam generators and furnaces, quickly dissipates and the air temperature drops. Yes, and choosing and laying the lining correctly is not so easy. But for a real Russian owner, nothing is impossible!
A real Russian bathhouse, which became famous in Rus', is an ordinary steam room in a bare log house without any decoration. This technology contributed to the long-term preservation of steam: the heat-intensive massive walls coped with the task perfectly. The log house absorbs moisture well and just as easily releases it over time.
But such a design has significant disadvantages today. Firstly, logs, which were previously considered the most affordable material, now cost a lot of money. This means that it is simply a pity to destroy the building in such a merciless way. Secondly, to completely heat a mass of wet wood, it will take at least 4–5 hours, which is also not very convenient.
Today's technologies for arranging a bathhouse differ significantly from ancient Russian ones. Now it is much more convenient to decorate the walls with clapboard laid on insulation and foil. Heat energy consumption is reduced, warm-up time is reduced, and the building remains presentable longer.
Before lining a bathhouse with clapboard, you need to understand the types of material. Not only the appearance of the building, but even the health-improving effect of visiting it depends on how competent the choice is. Moreover, the type of wood, the class, and even its profile matter.
Wood is an ideal finishing material for a bath
The Russian bathhouse is primarily known for the presence of abundant steam indoors. This effect occurs due to the bare logs being cut without any special treatment. Heat retention in Ancient Rus' was achieved by creating especially dense and massive walls, which could absorb moisture from the air and retain it for a long time.
In addition, such walls were needed to transfer heat inside the bathhouse. Many people heard the loud hissing of the walls, which is why various stories arose in Rus'. In fact, the hissing came from the wood, which absorbed moisture vapor and set in motion the condensation effect. Most people tried to build a bathhouse from the thickest logs, as this ensured high-quality heating.
In those days, it took a long time to heat a bathhouse, about 4 hours. It should be remembered that wood is a hygroscopic material, which is why it quickly becomes unusable. Back then it was the cheapest and most widespread resource. But today everything has changed radically. A modern bathhouse requires a special approach to wall decoration.
Heating a steam room with clapboard becomes much easier, firewood is consumed in small quantities. The only drawback is that the sauna does not retain heat so well, so you have to use fuel much more often. Steam is created thanks to modern furnaces and steam generators. At the same time, you need to constantly monitor its supply and control the presence of heat inside the room.
High-quality lining prevents the formation of various bacteria, mold and mildew, while controlling the level of humidity inside the bath itself. The main requirements for the material are high moisture resistance and environmental safety.
Initially, bathhouse lining was made in quarter and tongue-and-groove. Because of this, over time, the slats shifted and the compressed joints were destroyed. At the moment, almost all lining is made in the groove and in the tongue.
Advice from the master!
It is important to know: to save money, try to search and purchase 1.5 m long lining at building materials warehouses. It costs much less than 2 m material. Processing lining with such a length in a bathhouse is quite simple. It is only necessary to sheathe the joint with a lath. At the same time, you will save a lot on building materials.
Covering a bathhouse with clapboard can be done in 2 ways: vertical and horizontal. Most experienced bathhouse attendants agree that clapboarding a bathhouse using the vertical method is not the best idea. The reason for this is the different temperature of the wood below and above, which will directly affect the service life of the material.
Advantages of horizontal sauna lining.
- If the floors darken, you can easily change the lining in the right place.
- Thanks to the presence of a vertical frame, the bathhouse will be protected from the inside from rats, mice and other rodents.
- Installing horizontal cladding is several times easier than installing vertical cladding.
- Liquid does not seep between the joints of the boards, the lining dries much better, which helps extend its service life.
- Ventilation outside the lining is carried out better due to the presence of a vertical frame. In addition, the space under the lining also becomes ventilated.
Please note: if the lining is fastened horizontally, the groove must be directed downward.
Advantages of vertical sauna cladding.
- The bathhouse becomes more like a sauna due to higher temperatures and dry air.
- Due to the absence of splashes, liquid will not seep between the joints of the boards, and accordingly, the wood will not darken.
- For good ventilation, it is enough to drill small holes under the lining.
Installation of finishing material
By weighing the benefits of each scheme, you can choose the most suitable option. Remember that the horizontal cladding method will allow you to achieve the effect of a real Russian bathhouse.
Finishing the bathhouse with clapboard in a vertical pattern will, in turn, ensure the presence of high temperatures. You will have a real sauna.
The sheathing procedure consists of 4 stages, each of which does not take very much time. Finishing a bathhouse with clapboards with your own hands is a simple process. Follow the instructions on how to properly line the interior of a steam room with clapboard, and you will succeed.
The first step is to choose a method for attaching the lining. There is no definite answer on how to properly attach the lining in a bathhouse, horizontally or vertically (lengthwise or across). Each master defends his point of view. But by summarizing their statements and user reviews, we can draw conclusions regarding the methods of laying the lining.
Laying lining along has become more widespread due to its comparative simplicity, convenience and high speed of work, and due to this, lower installation cost. Moisture (condensation) easily flows down vertically located lamellas. But, by the way, it also easily rises up through the microcapillaries that make up the wood. With this fastening, the tongue-and-groove system is more protected from water ingress.
Vertical fastening of the lining allows more heat to be accumulated inside the steam room, again, because the horizontal fastening of the sheathing beam interferes with the free movement of air. Experts note that vertical cladding is justified for saunas with their dry steam mode.
Creation of sheathing for lining
Lathing under the lining with your own hands is impossible without preliminary marking.
To do this, use a building level and a pencil. You need to decide on the direction of the lining in advance.
It can be placed vertically - this visually increases the height of the room, or horizontally - it expands the space.
As an option, you can use a mixed finish or diagonally. In any case, the bars must be perpendicular to the chosen direction.
Video - how to attach timber to concrete:
The choice of lathing step width depends on your goals. Of course, the smaller it is, the stronger the structure, but the higher the price. Typically used from 40 to 60 cm.
If you will also insulate the room, take into account, first of all, the size of this material.
In this case, the pitch of the sheathing should be slightly smaller than the insulation so that it fits more tightly.
To make the frame even, we will use a fishing line and a plumb line. Using the building level, we will use the tools described above to create a visualization. We will install bars along these edges.
The fishing line will serve as a guide. Depending on the chosen direction, it is pulled either horizontally or vertically. The bars are fixed close to these guides. If necessary, add wedges or wood chips, or, conversely, grind down the surface of the wood.
You can use a laser level in place of the fishing line.
If there are window or door openings around the perimeter, it is mandatory to secure the bars around them.
When you secure the structure, do not forget to check the level.
Installation of the frame on the ceiling is carried out in the same way as on the walls. The only thing is that a beam of slightly larger diameter can be used. This is due to the difference in the thickness of the insulation used.
If you are going to sheathe semicircular or oval rooms, do not use solid timber. In this case, carefully monitor the proportions.
Video - how to install correctly:
https://youtube.com/watch?v=-qXMF7ZpSSs
Features of installation of cladding in steam rooms under lining
The lathing for the lining in the steam room is done according to special rules.
First you need to attach foil to the walls.
It traps steam. It also implies the use of larger rack bars.
In order to install slats of a smaller diameter, recesses are cut out in the larger ones, where they are placed
This method allows you to create greater rigidity, which is especially important in such conditions.
Due to the harsh conditions this frame will be exposed to, the wood may become warped. By using this design, the likelihood that the finish will float is practically eliminated.
Features of installing lathing on the walls of log houses for lining
How to make lathing for lining on the walls of log houses?
The complexity of the design lies in the significant differences in the walls. It is more difficult to level such a surface. What to do in this case?
The frame in this case is installed on the basis of beacons.
They involve the use of pads
It is important to maintain the level when installing them. If the surface has strong protrusions, they can be cut off with an ax or plane
To summarize, let's focus on the important points. During installation, the choice of fastening depends on the surface. They are different for wood and brick. Do not forget to treat the surface with compounds against fungus, mold and rot.
Wood selection
The modern range of linings is distinguished by its diversity. The choice of wood type for the interior decoration of a bathhouse depends on external features, technical characteristics of the material and personal preferences.
The material for installing the lining in the steam room is chosen from deciduous trees, which will release useful substances during the heating process. This material has a beautiful, even structure and is resistant to high humidity and high temperatures.
Due to the oils contained in the wood, softwood lining is recommended for use in the design of showers and dressing rooms.
Before attaching the lining to the wall in the bathhouse, it is necessary to treat it with special means. Applying a protective impregnation will prevent the formation of mold and rotting. The use of other means is aimed at reducing the effect of high temperatures and excess moisture on the lining.
The steam room is best finished with hardwood lumber (linden or aspen). After proper drying, they have a high density, which allows them to heat up quickly and retain heat for a long time. However, it is worth considering that with prolonged exposure to high temperatures they begin to darken. To eliminate this drawback, you should ensure that the steam room is well lit, otherwise it will be too dark.
Coniferous lumber begins to release resin from the heat. On the one hand, many people like these “aromas” of pine needles, but on the other hand, hardly anyone would want to sit on a resin shelf. The best option here would be cedar.
Although it is expensive, it is of high quality, with a beautiful texture and healing material. In second place is larch, due to its unsurpassed moisture resistance. And on the last one, pine that is not subject to rotting, but can burn.
Recommendation! Another plus for aspen or linden lining is their lower thermal conductivity than coniferous options. Contact of a naked body with them will definitely not cause discomfort, much less burns.
Before installing the lining in the bathhouse, you should select it correctly. According to the quality, lumber of all species is divided into 4 main groups:
- “EXTRA”, “PREMIUM” – wooden moldings with an exceptionally smooth surface without knots or darkening.
- “A” – up to two knots per linear meter are allowed.
- “B” – there may be resin pockets, a couple of small through cracks and knots.
- “C” is a low-quality substandard material with many knots and through holes.
For cladding a bathhouse, the best choice would be lumber from the first two groups. In rare cases, you can use grade “B”, and boards with bars of the lowest quality should only be used to form hidden sheathing.
For lining a steam room, both regular lining (imitation of wooden beams with a tongue-and-groove joint cut out at the ends) and eurolining (with additional longitudinal cuts on the back side for moisture removal and ventilation) are suitable. A block house, a board imitating a log with a rounded profile, also looks good in a bathhouse.
Fastening the lining to the steam room can be done:
- vertical;
- diagonally;
- horizontally;
- and in various multidirectional combinations.
The most preferable horizontal option:
- clearly defined horizontal lines will visually expand the small space of the steam room;
- in the bathhouse there is always more moisture from below (sooner or later the wood will begin to deteriorate), and with this arrangement the lower rows can be removed and replaced;
- the vertical lathing hidden inside will not impede the hot air rising upward, promoting intra-frame ventilation.
Important! When fastening the lining horizontally, its grooves must be directed in the opposite direction, otherwise water will begin to accumulate in them.
Horizontal cladding
Horizontal cladding
First step
Proceed to attaching the lining. Start sheathing the walls from the ceiling to the floor. At the same time, try to direct the grooves downward - thanks to this, various debris will not get into them in the future, which will help to significantly increase the service life of the skin.
Horizontal cladding
Second step
Fix the clapboard sheet onto the sheathing bars. Use convenient fasteners. Insert the tenon of the next sheathing element into the groove of the fixed board. Secure it. Cover the entire planned space in this order.
Every 5-10 sheathing elements, be sure to check the evenness of the surface using a plumb line or level.
Cladding
Third step
Having reached the last board of the lining, adjust it to the width with a regular hacksaw or other suitable tool. Nail the board and hide the gap under the decorative baseboard.
Fourth step
Clean the finishing surface from dust using a damp sponge. If you wish, you can finish painting the lining, but this is not necessary - the wood already has an attractive appearance and a beautiful shade.
If a special lining will be used for the cladding, which outwardly imitates a rounded log, start finishing with the groove facing up - this way you will hide the joints.
Horizontal cladding
Additionally, the panels can be adjusted using a hammer, placing a piece of board under it - this way the finish will be fixed without gaps.
To fasten the “rounded” lining, use self-tapping screws. Twist the fasteners at 45 degrees. Place treated timber between the panels of such sheathing. This will create a beautiful finish without gaps.
Installing the first ceiling strip
Preparatory work for wall cladding
Before quickly sheathing the inside of the bathhouse with aluminum foil and wooden clapboard, it is necessary to insulate the walls. Before laying the insulation, install the counter-lattice and sheathing. A layer of vapor barrier is laid on top of the insulation.
Thermal insulation device
The best material for insulating baths is basalt wool. This material has good thermal insulation and a high degree of fire resistance. Basalt wool does not rot. This type of insulation does not burn and does not emit harmful substances. Basalt can withstand temperatures up to 1500° C.
Experts recommend using Rockwool brand “Light Butts” mineral wool. The mineral wool of this company is of high quality, increased density and affordable price.
To cut basalt wool sheets, large, sharp knives with a high-quality blade are used. When cutting, the knife blade is held at an angle of 30-45° to the surface of the blade. When tilted, the blades dull much more slowly.
The width of the canvas is taken to be 2 cm greater than the distance between the vertical posts of the sheathing. The increased width helps to fix the blades in a constant position.
Thermal insulation sheets are laid in 3 layers with overlapping joints. The amount of overlap is equal to half the length of the canvas.
All layers are laid in height within one span of the sheathing. The laying direction is from floor to ceiling. They move to another span after laying all the layers of the previous span.
Laying the first layer begins from the floor. First, the whole canvas is laid. After laying all the canvases of the first layer, the second layer is laid.
Laying the second layer also begins from the bottom. For overlapping joints, the length of the first web of the second layer is taken equal to half the length of the standard web.
At intersections with obstacles, elements of the required shapes and sizes are cut out.
Before covering the bathhouse with clapboard, care should be taken to protect the walls from dampness and rotting. Therefore, after installing thermal insulation, they begin to install the vapor barrier material.
Vapor barrier device
The vapor barrier layer is designed to protect walls from condensation and increase the heat-reflecting properties of the insulation.
The work of laying vapor barriers is the most critical when constructing bathhouses. The efficiency of steam use depends on the quality of vapor barrier work.
Aluminum foil with a thickness of 50-80 microns is used as a vapor barrier. Attaching the foil begins from the corner of the room in the direction from bottom to top.
Vapor barrier sheets are sewn with metal nails or staples to the vertical posts of insulation cells. To attach the foil, use a pneumatic gun or a special construction stapler.
The foil is laid with an overlap of 2-3 cm of vertical seams. All seams are taped with aluminum adhesive tape.
In places of transition from the walls to the floor and ceiling, the foil is laid with an overlap of 5-10 cm in each direction. The free ends are sewn to the ceiling and floor with nails or tacks.
At the junctions of walls and ceilings, gaps often appear in the foil. To eliminate these gaps, use foil corners. To make such a corner, a piece of foil is placed on the corner of a table or chair.
The resulting shape is carefully beaten with a light object to soften the foil. Broken corners are glued with aluminum adhesive tape
The manufactured corner is inserted into the corner and carefully taped.
After completing the work, check the quality of the vapor barrier installation. Any damage found is covered with adhesive tape.
After installing the vapor barrier, the installation of the counter-lattice begins.
Counter-lattice device
The counter-lattice serves as the basis for the main sheathing. Designed to ensure air exchange in the space between the foil layer and the lining.
To construct the counter-lattice, wooden blocks with a cross-section of 20x20 mm are used. The bars are nailed to the vertical posts of the insulation cells. The distance between the slats is taken to be 400-500 mm. Installation of counter-lattice slats is carried out according to level and plumb.
When installing a counter-lattice, a hole with a diameter of 80-100 mm is drilled in the ceiling for the exhaust duct pipe. A sealing cap (valve) is inserted into the hole. During bath procedures, the hole is closed. To ventilate the bath after washing procedures, the hole is opened.
Periodic ventilation prevents the appearance of dampness and rotting of the lining. To ensure air exchange, a gap of at least 2 cm is provided between the lower end of the lining and the floor.
How to install wooden lining
To install wooden lining with your own hands, two types of sheathing are used - wooden and metal. Also, the installation of such panels can occur with preliminary insulation, which is also done in several ways. And finally, the lining itself can be installed either on clamps, or on nails or self-tapping screws.
Types of sheathing
Wooden beam sheathing
- For wooden lining, a horizontal sheathing is most often made from wooden beams, although if the panels are mounted horizontally, then the sheathing will naturally be vertical. If the wall is flat, then the slats are screwed directly onto it and only in some places thin plates of wood or plastic are placed to level the overall plane. In the case where the frame will be supported by an uneven wall, then U-shaped perforated hangers are used for its installation for the consoles, as was done in the photo above.
- The distance between the beams on the sheathing for wooden lining should be 50-60 cm and no more. And with the same step, the beams themselves are fixed on nails, screws or consoles. In order for the plane of the sheathing to be level, first of all the upper and lower profiles are screwed, and all the rest are installed along them using a plumb line, a rule or a long level.
- Exactly the same sheathing can be made from galvanized CD profiles, only they must be mounted on the console. Metal has its advantages over wood - such a profile does not rot or rust, it will never suffer from changes in humidity and, moreover, its service life is immeasurably longer.
Metal lining on the ceiling - do-it-yourself installation. Read here.
The insulation can be installed under the profiles by putting it on the console
- If the wall is cold, then insulation is first installed on it and this can be done in two ways. The first is when mineral wool or polystyrene foam is mounted between the sheathing profiles, if possible slipping the material under the slats, and the second method involves pinning the insulation directly on the console.
- The top of the insulated surface is covered with a vapor-permeable film or a hydrobarrier (depending on the purpose of the room). All this is additionally secured either with self-tapping screws with a homemade press washer, or with dowel mushrooms, and then the profiles are installed. When the insulation is laid between the profiles, the film is attached directly to them with a stapler, nails or screws with a wide head.
Installation of lining panels
To fasten the lining, you can use stainless nails
You can fasten the lining to the sheathing using clamps, self-tapping screws and nails. If you are doing external installation, then it is better for you to use stainless nails or the same self-tapping screws, because when there are changes in temperature and humidity, clamps are ineffective. Keep in mind what nails you use will affect the appearance of the finish, as regular metal will rust and this will cause yellow-brown stains on the wood.
Shtil lining is a stylish solution for any decoration. Read here.
To install the lining, clamps are used
Indoors, wooden lining is installed using clamps, which are also attached either to nails or to self-tapping screws. In fact, the instructions provide for fixing the clamps onto stainless 20 mm nails, since they are supplied in one set, but they are extremely inconvenient to use, and installation with self-tapping screws is more reliable.
You cannot hit the lining lock with a hammer
- The panels often do not fit into the lock when pressed or struck by hand and have to be driven in with a hammer. But if you hit the lock with a hard object, its shelves will break, so in order not to damage the groove, insert a cut piece of lining into it and hit it. You can then easily pull out this scrap (the panel goes in worse than it comes out).
- To hide the gaps in the corners for wooden lining, no finishing or corner profiles are provided, so ordinary strips are used. A carved or planed baguette is nailed or screwed into a corner on one or both sides - the result is a rough, but very beautiful natural composition. A wooden plinth is also quite suitable for such decoration - it is mounted at the top, bottom, and in the corners.
- Wooden lining is installed quite easily, and you will see for yourself by watching a video of its installation. To install it yourself, you just need to be careful and careful - the panel may crack if hit.
What is lining lumber?
“Lining” is a special cladding material belonging to the class of lumber. It consists of specially prepared boards, which are assembled into a single panel structure using a tongue and groove connection.
There are relatively few requirements when finishing a wooden bathhouse with clapboard: if you are doing the exterior finishing, then the weather must be dry (preferably before its final processing - painting, or impregnation with protective compounds, however - if it is an autoclaved board, then all this is not important - it is resistant to dampness, but it is not advisable for it to get behind the “lining” itself to the log house or the insulation laid there - mineral slabs or mats), but if the finishing occurs inside (for example, in winter) - then in cold weather the room itself should already be heated and be well ventilated so that there is no excess moisture during installation
Stage 1. Selecting wood for “lining” (cladding the bathhouse with clapboard)
If in the living quarters of a wooden house the walls and ceiling are often finished with coniferous species (spruce, larch, pine, cedar, etc.), then for the interior decoration of the bathhouse with “lining” only hardwood is used (this is important, since at elevated temperatures in the steam room and the dressing room or furnace room - pine or other coniferous wood begins to “cry resin”, which is unacceptable). Hardwoods are convenient because they do not contain a large amount of resins, and some of them also smell pleasant and have a beautiful texture
Here we will look at them in more detail.
Wood species - oak
Oak is rarely used for interior decoration of baths, as its wood darkens due to humidity. Oak is rightfully the wood of that legendary highest quality, which is used in the manufacture of very strong, durable, very dense and beautiful boards for the interior decoration of bathhouses. It often finds its application in the manufacture of wooden bath furniture of excellent quality, surprisingly strong and at the same time durable.
Wood species - ash
Ash is one of the most valuable species of deciduous tree. It practically does not split, is quite elastic, very dense and in its basic properties is very similar to oak wood. The texture of this wood itself is very expressive (bright), and the wood fibers are a beautiful grayish color, with a slight pink or yellow tint. Rarely used for baths.
Wood species - birch
Being easy to process, birch itself is practically not used when finishing the steam room and other wet rooms of the bathhouse, since it very quickly deteriorates (rots) with constant exposure to the humid and hot air of the steam room.
Wood species - alder
Alder is perfect for decorating a steam room; its pinkish “cognac” color only becomes more beautiful over time. Good alder is not cheap, just like good cognac.
Wood species - linden
Linden is ideal for a steam room, because... It does not heat up to such a temperature that you can get burned. Linden has a pleasant smell. Its disadvantage is that over time it “gets dirty”, traces of drips and stains appear, but the wood itself does not darken and remains yellow. Linden is better suited for a dry steam sauna (“Finnish steam room”).
Wood species - aspen
Aspen is often used in bathhouses because of its affordable price, it has a bitter odor, and over time the wood darkens and “silver.” As wood for a steam room, it can be even better than linden in terms of the fact that aspen is less dense than linden and therefore heats up even less than linden. Aspen behaves well in a traditional Russian bathhouse with wet steam.
Wood species - larch
A bathhouse is sometimes lined with larch based on its natural resistance to decay, but this is not the best choice. Due to its density, it does not have thermal insulation properties, gets very hot and easily splits.
Wood species - pine
Pine is a coniferous tree, has resin pockets, may turn blue over time, but it is cheap and available. Initially light yellow, the color becomes dark yellow over time.
Wood species - spruce
It has smaller knots than pine, is more loose, and has larger resin pockets than pine with more abundant secretions. The color is almost white and does not change for a long time. Spruce has an affordable price and is therefore also used in baths.
Installing eurolining
To the question of how to properly fasten eurolining, you can answer the instructions, for which you will not need any additional knowledge and skills, the main thing is to follow the steps exactly and carry them out without deviations.
If you find it difficult to take advice aurally, but you perceive it better visually, then watch the video, which shows the entire process of installing wood panels in detail.
Preparatory process
If you decide to install and create a wooden structure with your own hands, then you should know some rules that will help you quickly cope with the task.
To start:
- carry out all the electrical wires and wiring that are necessary to provide electricity to the room or room, place them in special corrugations. They are made of material that does not burn, this will ensure the safety of living in such a room;
- Do not forget that any finishing material needs acclimatization, which means that the material must be brought into the room where you will carry out construction work a day before the start of the work process.
If the question arises - how to fasten the eurolining, then in the instructions you will find all the answers, including a list of fasteners that will be needed for such a process. It should also be taken into account that the sequence of arrangement and direction of the panels affects the appearance of the entire structure.
Eurolining can be located:
- horizontally,
- vertically,
- diagonally,
- combined arrangement.
Installing the sheathing
- The sheathing is made of small bars, onto which it will subsequently be attached;
- The material of the beams does not matter, the main thing is that the wood is impregnated with protective compounds for the durability of the entire structure;
- The frequency of fastening the sheathing beams should not exceed 0.8 meters;
- All fasteners must be checked constantly using a building level (photo below).
The sheathing is installed depending on how the eurolining is attached:
- If the eurolining is placed vertically on the wall, then the sheathing should be horizontal;
- If the sheathing material is attached to the wall horizontally or diagonally, then the sheathing must be vertical.
We insulate the walls
To keep the room you decide to cover warm, you can insulate it yourself. Insulation must be installed before you begin installing the eurolining - between the wall and the sheathing.
If the room must be isolated from water and moisture, it is necessary to use, in addition to cotton wool, a special film that will serve as protection against water and moisture. The photo below shows the method of its application.
Hidden fasteners
Eurolining can be fastened with various fasteners: nails, clamps, self-tapping screws. The best option from those listed are clamps, because this type of fastener is considered hidden.
Another advantage of the selected element is that the fasteners for eurolining are completely protected from rust, because the material from which it is made does not lend itself to a process such as corrosion.
If we consider the cost of all fastening materials, then we can say that the highest is the price of clamps, but the result with the use of such elements is better.
Eurolining is gradually beginning to increase its popularity as a modern, high-quality material for finishing walls. Despite its higher price compared to conventional lining, this material is characterized by increased dimensional accuracy, stable humidity characteristics and more convenient fastening to walls. How to install eurolining with optimal labor costs and high quality installation?
Eurolining is a convenient and aesthetic finishing option
Features of finishing a brick bath
A brick bathhouse in terms of the features of wall cladding with clapboard is no different from if the external walls were built from any other material. It is necessary to begin work, moving from the corner farthest from the entrance. In the dampest room, it is better to avoid using nails, as they are prone to corrosion when exposed to vapors.
A brick bathhouse is usually lined from the inside with clamps, which are good because they do not damage the lining. If you have not yet started construction, then it is best to make a dressing room no larger than 150 x 250 cm. This way you will not only eliminate drafts and the creation of a cold space, but also save on lining, which will be used for finishing brick walls.
The premises should be insulated; mineral wool or polystyrene foam are excellent for this. The first is fixed using wooden slats, but for foam plastic special fastenings must be provided. Brick walls should be finished from bottom to top. This also applies to work on the floor, walls, and ceiling. Experts recommend abandoning products in “quarter” and “rabbet”. The most recommended lamellas are those with tongue-and-groove profiles.
Such finishing on brick walls will not move over time, and the density of the joints will not be disrupted, which is especially important for a material that transmits heat so easily
How to make sheathing for lining
Using a screwdriver, we install slats with a cross section of 20×40 mm horizontally in increments of 40-50 cm, regularly checking with a level whether they are installed correctly. Using slats allows you to level the wall (so that the boards fit comfortably), as well as create a gap between the wall and the lining, which is needed to create ventilation.
If the wall is uneven, then you need to put something under the sheathing (or take a thicker sheathing). A mounting wedge, a piece of wooden beam or plywood is usually used as a lining. The sheathing is secured with long-length self-tapping screws and dowel nails. The lower slats are 5 cm from the floor, since the floor plinth will be attached below, and the upper ones are the same amount from the ceiling.
.
Installation of the sheathing should also be done around openings, windows and doors. It is worth noting that the battens are made of plastic and metal. More information about installing the sheathing can be found here:
What are finishing nails?
This is the name for nails with a small cylindrical head, the diameter of which is only slightly larger than the diameter of the rod. They are designed specifically for fixing decorative trim, as they provide a hidden fastening. These nails are thin and, as a result, easily penetrate the wood without causing cracking. It’s easy to drown a small hat in the thickness of the material using a hammer.
Finishing nails
In the photo - the finishing nail next to the finisher
Characteristics
The rods of such hardware are smooth, with notches in the upper part, and range from 20 to 90 mm in length. The cap has an oval shape, and its height corresponds to the diameter of the rod. The diameter of the cap itself varies from 1.6 to 3.4 mm. The fasteners are made from low-carbon steel, and anti-corrosion compounds are used as a protective coating.
Unlike simple construction nails, finishing nails are not designed for high loads, since finishing materials are usually lightweight. They can only be used in structures that are not subject to shrinkage and mechanical bending or tearing loads. It is also undesirable to use them for temporary coverings: not a single tool makes it possible to pick up and pull out a nail due to the small head recessed into the wood. For the same reason, they cannot be reused.
NFL finishing nails
Galvanized finishing nails 1.8x40
Scope of application
Finishing nails are used not only for fastening lining; their scope of application is quite wide:
- furniture manufacturing;
- installation of small decor in interiors;
- decoration of window and door openings with platbands;
- fastening thin slats, glazing beads and skirting boards.
Some craftsmen use them when laying parquet and laminate flooring when they need to fix the planks, but since floor coverings are subject to constant mechanical stress, ordinary nails are more suitable here.
Driving the finishing nail. Using a finisher
Fasteners for walls made of building blocks
Foam blocks are good for everyone: they are easy to build with, warm, do not conduct sound, and are inexpensive. But the attachment to the foam block is specific. This is a fastener similar to the usual dowels, but with an increased surface of the spacer elements.
For fastening in walls made of building blocks, a dowel-nail is used. It consists of two parts: the actual metal nail with a shallow thread and a plastic expansion dowel. To install it, a hole of appropriate diameter is drilled in the wall into which the dowel is inserted. A nail is driven into it. If dismantling is necessary, the nail can be unscrewed like a screw.
The shapes of dowel inserts are different. They largely determine how strong the resulting connection is.
If we talk about the shapes of plastic tabs, those with screw threads are held in the wall much stronger than with spacer elements. But. Only subject to 100% compliance with installation recommendations. Even turning the dowel once in place leads to the destruction of the adjacent foam concrete. As a result, the mount simply pops out of the wall.
Dowel-nails from Sormat
You can also use special Confix concrete nails from Sormat. The front part of these nails has a specific shape, due to which it is firmly held in the wall. To install such a nail, a hole of the required diameter is drilled, then a nail is driven into it.
Another variety of Sormat nails is the PKN quick-fixing nail. This product looks like a tube with a longitudinal hole. These nails are held quite firmly in the wall due to elastic force.
Sormat nail - PKN - used for fastening in lightweight concrete walls
For fastening into gas or foam concrete, it is recommended to use special screws for lightweight concrete Sormat KBRM, which have a special shape and coating that prevents them from rusting. These screws can be used to securely secure the clapboard sheathing.
There is another type of anchors for foam blocks (gas blocks, expanded clay concrete and other cellular concrete) - Fischer chemical anchors.
Chemical anchors - a new product on the market
To install this fastener, a cone-shaped hole is made in the wall using a special drill. A special glue is poured into it, a certain period of time is waited for the mass to partially harden, after which the anchor is inserted. Fasteners can be used only after the composition has completely hardened. The reliability of fixation of this type of fastening for foam blocks depends on how well the two components “grasp”: glue and foam concrete. And this characteristic strongly depends on the quality of the adhesive composition. Therefore, the choice of manufacturer is very important.
A good anchor for traditional foam blocks
There are quite a lot of types of fasteners and new types appear every day, so choosing the right one will not be difficult.
Should I fasten the paneling with a nail or a self-tapping screw?
Oddly enough, people argue, figuring out what is better for fastening the lining in a bathhouse: a nail or a self-tapping screw. Some people think it is more correct to use nails, others self-tapping screws.
Self-tapping screws probably hold better after the wood dries: the thread prevents the boards from dangling. You just need to take ones in which the thread starts not from under the cap, but after about a centimeter. They hold the lining and floorboard better. The work goes slowly: for each you need to drill a hole that is smaller in diameter. This way the wood will definitely not burst.
Shapes of nails and their purpose. Almost everything can be useful when building a bathhouse
When secretly fastening the lining, the angle must be maintained exactly, otherwise the caps will interfere with the installation of the next plank. When attaching the floor board, the top part is still drilled out. This is how the hat is drowned. The holes are then covered with putty.
Everything is installed slowly. But if necessary, all the finishing can be removed without damaging it. The screws come out easily.
Shapes of nails and their purpose. Almost everything can be useful when building a bathhouse
Nails are faster to work with: holes for them are needed only when using very thin materials. There is another argument in favor of nails: they are stronger. Self-tapping screws of low quality often come off when screwed in. And how many remain “torn”, but have not flown off? They will simply break off at the slightest movement of the wood. Another argument in favor of nails is that they are cheaper.
Shapes of nails and their purpose. Almost everything can be useful when building a bathhouse
Fastening the lining to the ceiling
The lining is attached to the ceiling according to the same principles as on the walls: first, a wooden frame is assembled, adjusted to the level. The lining is attached to it - with clamps or nails - it’s your choice. Both methods have a right to exist.
Fastening the lining to the ceiling
It is more convenient to lay the lining with the tenon facing towards you. The principle is the same: you lay the first board of the lining, retreating 1-2 cm from the wall. It can be fixed along the wall with nails - then a corner or plinth will be attached to the top. Then, on the tenon side, at the intersection of the lining with the sheathing, you either install clamps or drive nails in at an angle. Nail one strip after another, knocking, if necessary, with a hammer on a piece of a similar strip to eliminate the gaps between the strips. In general, everything is the same as when installing lining on walls.
Conclusion : You can fix the lining yourself. There is nothing super complicated about this. It takes time, accuracy and patience (except for the lining and fasteners).
Source