None of the most modern building materials can displace natural wood from the market. Houses made of various types of timber are still very popular among developers. They are used to construct both residential buildings and outbuildings, baths, saunas, etc. The technology for constructing log houses requires the mandatory use of inter-crown insulation. Through their use, it is possible to improve the performance characteristics of wooden structures.
Inter-crown insulation for timber
- The heat saving indicators are significantly increased. This is a very important indicator given the high current fuel prices. In some cases, it makes it possible to do without the use of external insulation for the walls of wooden houses, which significantly reduces the estimated cost of construction.
- The service life of wooden buildings increases. Cold and humid air penetrates into the cracks between the crowns, and moisture condenses on the surfaces of the timber. The drying process is lengthy, resulting in accelerated destruction of the wood. It is affected by rot and mold, the strength of the wood is noticeably reduced, and in advanced cases, critical deformations of wooden houses can occur. It is necessary to make complex and expensive repairs, and in some cases they are ineffective.
Inter-crown insulation allows you to extend the life of a wooden house
- Modern inter-crown insulation compensates for annual fluctuations in the linear dimensions of the timber. They have plasticity; if the gaps increase, they expand and eliminate heat loss.
- The premises in the house are better protected from the penetration of street noise. Noise reduction characteristics are directly related to thermal conductivity.
Inter-crown insulation for timber improves the sound absorption properties of walls
The construction industry produces a wide range of inter-crown insulation materials, both in composition and in physical properties and linear parameters. This variety simplifies the choice of a specific type of insulation. But to make the best decision, you should briefly familiarize yourself with the types and characteristics of materials.
Types of inter-crown insulation for timber
Purpose of interventional insulation
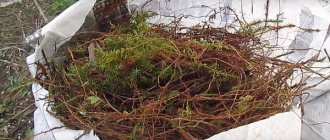
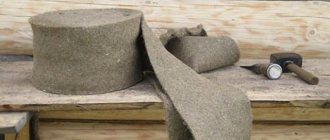
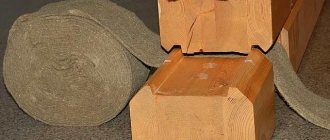
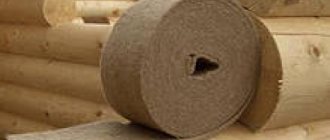
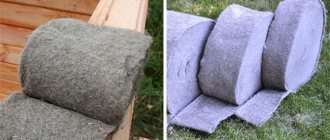
Inter-crown insulation is a special type of heat-insulating materials that are laid between the crowns of a wooden building (house, bathhouse, utility room) to eliminate gaps. They can be loose (tow, moss) or in the form of ribbons (felt, batting).
The main task of such insulation is to create comfortable living conditions inside the house. Interventional insulation creates a favorable microclimate only if it can:
- keep the house warm in winter and prevent it from overheating in summer;
- avoid drafts;
Insulation of a log house with moss.
- compensate for changes in the linear dimensions of wood that appear during drying or swelling during changes in environmental humidity (so that cracks do not appear);
- protect owners from unnecessary noise;
- prevent insects from appearing in the house;
The main functions of interventional insulation.
- prevent the colonization of inter-crown space by microorganisms.
In order to perform its assigned functions, inter-crown insulation for timber (logs) must have a certain set of quality characteristics.
Why is the outer surface of the walls of the house not insulated?
One of the advantages of laminated veneer lumber is that the material itself does not need to be insulated directly. Its thermal conductivity is significantly higher than that of masonry, concrete and solid wood.
Deep cracks do not form in laminated timber, so the material resists heat transfer equally well at every point. The high thermal performance of laminated veneer lumber has been repeatedly proven by special thermographic examinations of such houses.
Covering timber walls with thermal insulation boards is also undesirable from an aesthetic point of view. The smooth, high-quality planed surface of natural wood looks very attractive, this is one of the reasons for the popularity of this building material.
Operational Requirements
High-quality insulation for the crowns of a wooden house must have:
- low level of thermal conductivity to ensure minimal heat loss - the best performance for natural materials;
- high vapor permeability - the walls must breathe, ensuring natural air exchange between the street and the room;
- the ability to absorb moisture well and quickly release it (dry), which allows you to maintain the same moisture content of the timber or log around the entire circumference (the processes of the occurrence of multidirectional stresses inside the timber, leading to its cracking, and the appearance of mold (rot) between the crowns are eliminated). The best in this indicator are flax and jute, but synthetic heat insulators do not absorb liquid - it remains on the fibers. Therefore, artificial insulation materials are not used in bathhouses - the walls will begin to rot;
- uniform density - there will be no cold bridges;
- high elasticity, which allows you to tightly close the gap between the crowns when the house shrinks and the walls swell or dry out;
- resistance to fungus and mold;
- resistance to ultraviolet radiation (sun) and the vagaries of nature (rain, snow, heat, frost);
- long service life comparable to the durability of a house;
- optimal ratio between thickness and density (indicators are given in Table 1);
Table 1. Optimal ratio of thickness and density.
| Thickness, mm | Density, g/m2 |
| 5 | 400 |
| 6-7 | 600 |
| 8-10 | 600-700 |
| 10-15 | 800 |
- environmentally friendly - does not contain components harmful to health;
- sufficient tape width. There are 2 rules here.
- At frost temperatures of -20oC, the width of the thermal insulator should be at least 10 cm, -30oC - 12 cm or more, -40-50oC - 14-18 cm.
- Insulation that is 5 mm smaller in width than the groove will help you get a beautifully designed inter-crown space. If further insulation of the gap is planned with the same material (caulking), the tape should be 10-15 cm larger than the contact area of the crowns.
How to reduce heat loss in a house made of laminated veneer lumber
High-quality laminated timber is characterized by precise geometric parameters. With an initial humidity of 12%, its thermal conductivity is much lower than that of many other materials. We use the highest quality laminated timber for the construction of houses. We strictly adhere to technology when assembling the frame and use highly functional insulation materials. We pay special attention to the assembly of corners and careful placement of heat-insulating tapes in the bowls. This helps reduce heat loss in the house to a minimum, so additional insulation for houses made from laminated veneer lumber from Garden House is not required.
But if defective or low-quality materials are used during construction or assembly technology is violated, problems may arise. For example, multiple cold bridges are formed, as a result of which the house is blown through the walls. In this case, additional insulation of the seams with acrylic-based sealants is required. They are applied externally, treating all inter-crown joints and cracks. In this way, “warm” seams are created, which solves the problem of ventilation in the house.
If you want to build not only a strong and durable, but also a warm house, choose a project made from laminated veneer lumber and order the assembly to professionals. The Garden House company offers you its services and guarantees high quality and fast pace of construction.
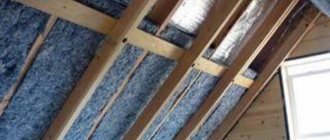
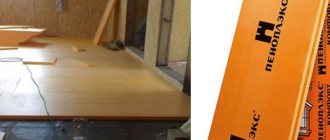
Synthetic insulation
Synthetic thermal insulation for the gaps between the crowns of the wall is represented by polyester fibers. The general advantages of this type of insulation include:
- durability - manufacturers talk about a service life of 100 years;
- low thermal conductivity coefficient;
- vapor permeability;
- elasticity (volume is restored by 90% after prolonged compression);
- frost resistance.
There are two disadvantages:
- high cost of 1 linear meter;
- do not absorb water, as a result of which a greenhouse effect occurs indoors, and the wood becomes moldy. Therefore, good ventilation of the house and careful wood processing are needed.
The result of using low-quality synthetic inter-crown insulation is fungus at the joints of the crowns.
The best representatives in the segment of synthetic insulation are “Holofiber” and “PoliTerm”.
"Holofiber"
Inter-crown insulation “Holofiber” (translated as “hollow thread”) is one of the varieties of padding polyester known to everyone. It is a springy polyester fiber molded into a tape that perfectly adapts to changes in the linear dimensions of wood during deformation due to shrinkage or changes in humidity. This property is especially valuable for a log house made of sawn timber without grooves. The insulation perfectly holds the volume, ensuring complete tightness, so that re-caulking is not done.
Holofiber insulation.
It goes on sale in rolls and sheets of different densities and elasticity, which allows you to make a choice based on the characteristics of the wood.
Among the advantages :
- excellent elasticity;
- good noise and thermal insulation properties;
- long service life;
- simple installation;
- no need for re-caulking;
- environmental cleanliness;
- resistance against negative biological factors (birds do not carry, insects do not appear).
Negative include :
- “biting” price;
- artificial origin;
- there is a risk of mold or a special type of rot, about which people say: “the tree is rotting.”
"PolyTerm"
Insulation of gaps between the crowns of a wooden house "PoliTerm" is the result of the work of Finnish technologists. Let us immediately note two features:
- when developing the heat insulator, “Holofiber” was taken as a basis, as a result, the result was a type of padding polyester insulation;
- short production period (appeared on the market about 10 years ago), and therefore we cannot give an objective assessment of the advantages and disadvantages of the material (manufacturers can say whatever they want).
What is beyond doubt is:
- convenient release form - in the form of an adhesive tape;
- resistance to any vagaries of nature;
- high price (10-12 times more expensive than jute tape);
- lack of vapor permeability.
Insulation "PolyTerm".
Sold in the form of tapes with a width of 30 to 250 mm and a thickness of 80-200 mm.
Criteria for evaluation
When building a log house or log house, insulation (sealant) must be laid between the crowns. Its main task is to insulate a wooden house as much as possible by eliminating any gaps between the crowns . Consequently, the first criterion with which we will approach all materials discussed in the article is the thermal conductivity coefficient.
With an increase or decrease in humidity, wood, as a rule, changes its linear dimensions and volume. Thus, a wooden house is constantly in motion, which is why gaps may appear between the logs. Therefore, the second and third equally important criteria are the density and elasticity of the material , which prevent the formation of cracks during the operation of the building and ensure its reliable protection from blowing.
The fourth criterion is hygroscopicity . The outer side of the walls of a wooden house, as well as the seams between the crowns, are constantly exposed to negative atmospheric influences. But if the walls can be coated with special bio-moisture-proofing compounds, then it is not possible to reliably impregnate the seams with them. That is why it is very important that the material used as an interventional sealant is resistant to rotting and has the ability to absorb and release moisture depending on changes in humidity both outside and inside the room.
The fifth criterion is resistance to insects and microorganisms.
And finally, the last criterion with which we will approach inter-crown insulation is environmental friendliness . The material must not contain inclusions or allergens hazardous to human health.
Popular manufacturers and prices
On sale inter-crown insulation made from natural plant fibers are represented by the following brands: “Thermo-Hanf”, “Val-Flax”, “ThermoLen” (“ThermoJUT”), “Flaxan”, “Ekoteplin”, “Ecoterm”, “Ekolen”, etc. ., both Russian-made and European manufacturers. More detailed information about them is given in the work: “Review of flax insulation.”
Let us separately note the prices. So, for 1 linear m with a thickness of 5 mm, a width of 15 cm and a density of 450 g/m2 must be laid out for products from:
- flax - 11 rubles;
- jute - 13 rubles;
- jute mixed with flax - 12 rubles.
With changes in thickness and width, as well as density, prices also change.
Synthetic insulation is produced by:
- "Holofiber" - enterprise "Thermopol" (Moscow);
- "Polytherm" is a center for inter-crown insulation (Moscow).
For comparison, we present the price per 1 linear meter. the same parameters as natural fibers - 32.7-43.6 rubles.
Which insulation and in what case to choose
Inter-crown insulation is selected for the type of building and type of log (beam), since the requirements for heat insulation, for example, in a bathhouse and a residential building, are different.
House
For log houses made of pine (the logs are not the same size along the entire length), it is recommended to use any type of insulation. If it is linen or jute inter-crown insulation (felt or batting), the tape should be 15-18 mm thick, with a density of about 800 g/m2, or two layers of flax (jute felt) should be laid, each 8-10 mm thick, with a density of 600 g/m2. For poorly dried wood, you need 3-4 layers of tape insulation with a thickness of 8-10 mm and a density of 500-600 g/m2.
You can use tow or moss. In this case, the thickness of the insulating layer should be around 15 mm. Now let’s clarify which inter-crown insulation for timber to choose:
- glued - any type of insulator with a thickness of 4-6 mm and a density of 300-400 g/m2 is used;
- profiled: thickness - 2-3 mm, density - 250-350 g/m2;
- simply sawn: thickness - 8-10 mm, density - 400-500 g/m2.
For rounded logs, you need a tape 10-12 mm thick and a density of 500-600 g/m2 or tapes 5-6 mm thick and a density of 400 g/m2, which are laid in 2 layers.
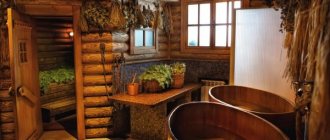
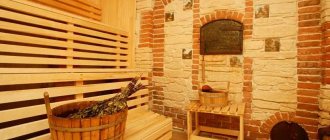
Bath
The bathhouse requires inter-crown insulation made from natural fibers (moss, jute, linen) - it does not accumulate moisture (there will be no rot), provides natural air exchange, is resistant to microorganisms, and does not collapse under conditions of elevated temperature and humidity.
As in a residential building, each type of wall requires its own type of insulation. But there is a nuance here: due to the lower static load on the insulation (the bathhouse is smaller in size), heat insulators with other parameters are required, the values of which are given in the table. 2.
Table 2. Basic parameters of insulation for a bath.
| Wall type | Thickness, mm | Density, g/m2 |
| Hand-cut pine log house | 15 | 400-500 |
| Rounded log for a bathhouse | 5-10 | 450-550 |
| Round log for steam room | 5 | 600 |
| Sawn timber | 4 | Z50-450 |
| Profiled timber | 4 | 250-350 |
Final stages of installation
When the beams of the lower crown in the corners were fastened with dowels or nails, the anchor is usually not installed. In the future, the first anchors will be installed on the inner contour of the foundation strip.
- There should be at least 2 anchor bolts on one piece of wooden beam, but provided that the house has short walls.
- Using a building level, carefully check the diagonals and angles of the lower crown. All existing irregularities are eliminated with an electric planer.
- After the beams are attached to the foundation, they begin to install the vertical posts of the house frame.
The issue is controversial and has both supporters and opponents. Despite this, experts argue that fastening is mandatory, since the foundation tends to be in motion; it is often said that it “walks.” The rigid fixation of the lower frame completely absorbs any movement of the base.
In the most critical situation, the lower crown of the beams can move slightly to the side or tear out the anchor. That is why fastening the timber to the surface of the foundation guarantees the stability of the entire structure.
In some cases, the lower crown of the frame is not attached to the foundation, since this is considered unnecessary. Under the weight of its own weight, a house made of beams will stand quite firmly without anchors. Corner joints are created without the use of special locks, and the beam itself is joined through the ends. This method allows, as necessary, to replace any part of the timber without dismantling the corners.
Materials and tools
To insulate the gaps between the crowns you will need:
- interventional insulation;
- hook for removing old caulk;
- Lebeza (flat spatula) for caulking - needed for sealing cracks;
- flat chisel - seals seams in corners;
- lebeza (narrow thin wedge) to expand the grooves;
- triangular caulk with a groove - it is used to form rollers;
- disk for caulking thin grooves;
Caulking tools. a - hook for removing old caulk; b - swan for caulking; c - winch for expanding the grooves; g - disk for caulking thin grooves.
- wooden mallet - helps to hammer the insulation into the cracks;
- construction stapler.
INSTALLING BEAM ON THE FOUNDATION
After the foundation has been insulated, the installation of the lower piping begins.
The beams installed on the foundation should fit fairly tightly to each other without creating a minimum space between them. This is especially true for the lower part of the frame, where the floor will be created and where significant loads will be placed.
The beams are fastened together with metal dowels, which are achieved using a wooden mallet. In some cases, if necessary, the beams are additionally fastened with staples or nails.
Scheme of fastening the bars to each other
The joining of the lower crown beams to each other occurs by picking at the corners using any of the existing methods:
- “in half a tree” - a variant of laying beams, in which the upper half of the array is removed in corner joints on one beam, and the lower half on the other;
- “into the paw” is the most common way of connecting beams, which is the opposite and does not include the end part of the log protruding beyond the level of the wall.
Nuts and wide washers are used to secure the timber to the surface of the foundation. A wide washer will expand the area of contact of the nut with the surface of the wood. You only need to use a hex nut, and square or round nuts are not suitable for such purposes. If you use narrow nuts to fasten the beams or do not use them at all, then during installation work it will be quite clear that the nut will completely sink into the surface of the beam and the connection of the house frame elements will be unreliable and short-lived.
Technology for insulating inter-crown gaps
Carefully following the instructions for insulating the gaps between the crowns will not help achieve the expected effect if some rules are not followed:
- insulation should be carried out in warm weather;
- the surface of the wood must be dried and cleaned of debris;
- the material is laid in the same layer throughout the entire frame. In this case, you need to look for the “golden mean”, because if the tape is too thick, there will be no normal shrinkage (it will affect it over time), and if it is thin, drafts will appear (you can see the relationship between thickness and density above);
- work is carried out from the bottom up and immediately along the perimeter of the crown. It is forbidden to insulate several cracks between beams on one wall at once, ignoring other walls (there is a risk of distortion during shrinkage);
- the material laid on the log is grabbed in several places with a stapler;
- no rolling of insulating tape into bundles;
- The edges of the tape should not hang from the wall.
The rules are simple. Their implementation is not difficult. Installation of interventional insulation is carried out in several stages.
Stage I. The wood is dried and treated with antiseptics and fire retardants. Materials and tools are being prepared.
Stage II. Thermal insulation is laid between the crowns.
Stage III. The walls are caulked - the gaps between the crowns are tightly filled. It is carried out twice: immediately after insulation and 1-1.5 years after the house shrinks.
Video description
Description of the “stretch” caulking technology in the video:
This technique is practiced both using natural traditional materials and modern insulation materials, and if the material is represented by a tape or roll, caulking is much easier and faster. When caulking, standard tools are used: a wooden spatula and a wooden hammer.
- “To set” method
This method is used if significant gaps larger than 5 mm in size have formed during the shrinkage of the house.
From the selected material, carefully twist the tourniquet and fold it into loops. The space between the logs is filled with rolled loops, filling wide gaps and minor cracks as tightly as possible. A special spatula and a wooden hammer are used.
Method “to set” Source galich-dom.ru
With this technique, it is recommended to use rolled tape materials, since twisting strands of fibrous materials with the subsequent set of loops is a complex matter. But in general, seams can be sealed with any materials.
Methods for insulating gaps
Regardless of the chosen insulation material, the tape is laid using several methods:
- without fold;
- with one-sided fold;
- with double-sided bend (see picture).
Scheme of laying tape insulation.
No bend. This method is only suitable for laminated timber, when when laying the crowns small technological gaps are obtained. The tape is rolled out along the top of the beam (log) on all walls and secured with a construction stapler. After this, the next crown is laid.
With one-sided bend. The method is used for timber with minor deviations in linear dimensions. To do this, take a strip of insulation that is 2 times the width of the log. Laying is carried out by bending into the room. From the outside, a rope made of jute or flax is driven into the gap.
With double-sided bend. For wall materials with different sizes at the ends (hand-chopped or rounded logs), the insulation tape is folded on both sides.
When insulating with moss or tow, they are laid in approximately the same thickness along the entire length of the log, so that the insulation hangs approximately 5 cm on each side.
Caulking gaps
There are several technologies for caulking walls:
- for tape insulation;
- for moss and tow “stretched”;
- moss and tow “set”.
Caulking grooves with moss. a - “stretch”; b - “set”. 1 - finished groove; 2 - driving in moss; 3 — addition of moss; 4 - moss.
Caulk with tape insulation. The work is performed step by step in the following sequence:
- stretch, without cutting, the tape along the wall from one to the second corner, without twisting it or pulling it;
- return to the beginning and, using a caulking tool (you can use a chisel), lightly push one side of the insulation into the crack along the entire length of the wall (do not hammer it in with force, but rather attach it so that it holds). After passing to the second corner, cut the tape to a tolerance of 10-20 cm. If there are narrower gaps, they are widened using a special tool - winches for widening the cracks;
- roll the tape into a roller and caulk the wall. The insulation must be hammered in carefully to prevent waves. The work is considered completed only after the heat insulator completely disappears into the gap;
Technique for caulking panels with tape insulation.
- repeat the entire process starting from the first step. For those who have doubts, we give a certificate: to caulk walls you need 4 times more material than is used for primary insulation.
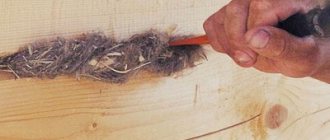
Caulking "stretched". The “stretch” caulking method is used for narrow gaps between the crowns. The work is performed in two steps:
- moss or tow is knocked into the gap with a swan or a chisel (not a sharp one - it will cut the insulation) along the entire length of the wall;
Caulk of tow.
- With the help of a mallet and a wedge, the moss is driven into the gap between the timber (logs).
Caulk “set”. The technology is similar to caulking walls insulated with tape. Take the tape and stretch it along the entire length of the wall. After this, one side is hammered into the gap. After passing along the entire length, the tape is twisted into a roller and driven into the gap.
The house is in the process of being caulked.
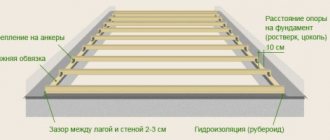
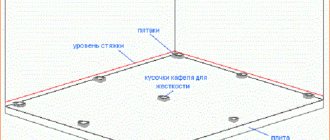
Laying the first crown
The technology for installing the bottom row of a timber house requires a certain sequence of work. Firstly, antiseptic-impregnated slats 10-15mm thick are laid on the foundation on top of the waterproofing layer in increments of 25-30cm. The gap is subsequently filled with polyurethane foam. Next, the first crown of the timber house is mounted on them. At the last stage, the horizontality of the laid beam is checked using a construction or laser level. If necessary, the spatial position of the crown is adjusted until the required results are obtained.
The first row of timber should be laid taking into account the correct design of the corners. One side must be strictly perpendicular to the other, with the exception of projects involving a complex house shape in plan. After installing the lower crown on the foundation, the correspondence of the dimensions of the diagonals between opposite corners is also checked. If the structure is rectangular, then both lengths should match.
An alternative to interventional insulation
Sometimes sealants are used instead of standard insulation. The decision is ambiguous. On the one hand, it’s quick and simple, on the other, it’s expensive and there’s a high risk of mold and mildew in the area of the gaps (the sealant doesn’t allow steam to pass through).
Alternatively, sealant can be used to create beautiful seams inside the house.
Seal the gap with sealant.
In conclusion, properly insulating the gaps between the crowns creates a comfortable living environment in the house. The work is not difficult - the whole process can be done with your own hands.
INSTALLING BEAM ON THE FOUNDATION
After the foundation has been insulated, the installation of the lower piping begins.
The beams installed on the foundation should fit fairly tightly to each other without creating a minimum space between them. This is especially true for the lower part of the frame, where the floor will be created and where significant loads will be placed.
The beams are fastened together with metal dowels, which are achieved using a wooden mallet. In some cases, if necessary, the beams are additionally fastened with staples or nails.
Scheme of fastening the bars to each other
The joining of the lower crown beams to each other occurs by picking at the corners using any of the existing methods:
- “in half a tree” - a variant of laying beams, in which the upper half of the array is removed in corner joints on one beam, and the lower half on the other;
- “into the paw” is the most common way of connecting beams, which is the opposite and does not include the end part of the log protruding beyond the level of the wall.
Nuts and wide washers are used to secure the timber to the surface of the foundation. A wide washer will expand the area of contact of the nut with the surface of the wood. You only need to use a hex nut, and square or round nuts are not suitable for such purposes. If you use narrow nuts to fasten the beams or do not use them at all, then during installation work it will be quite clear that the nut will completely sink into the surface of the beam and the connection of the house frame elements will be unreliable and short-lived.